1
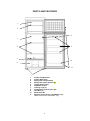
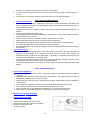
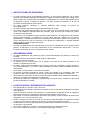
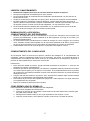
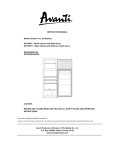
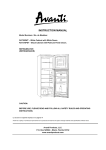
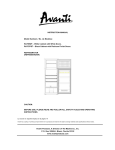
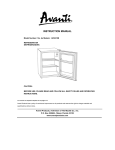
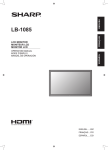
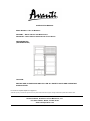
INSTRUCTION MANUAL Model Numbers / No. de Modelos: RA754WT – White Cabinet with White Doors. RA755PST – Black Cabinet with Platinum Finish Doors. REFRIGERATOR (REFRIGERADOR) CAUTION: BEFORE USE, PLEASE READ AND FOLLOW ALL SAFETY RULES AND OPERATING INSTRUCTIONS. La sección en español empieza en la págína 15 Avanti has a policy of continuous improvement on its products and reserves the right to change materials and specifications without notice. Avanti Products, A Division of The Mackle Co., Inc. P.O. Box 520604 - Miami, Florida 33152 www.avantiproducts.com TABLE OF CONTENTS Refrigerator Safety 3 Important Safeguides 4 Help Us Help You 5 Parts and Features 6 Important Safety Instructions 7 Installation Instructions 7 Before Using Your Appliance 7 Installation of Your Appliance 7 Electrical Connection 8 Operating Your Appliance 9 Temperature Control 9 Defrosting Your Appliance 9 Using Your Ice Cube Trays 9 The Freezer Compartment 10 Care and Maintenance 10 Cleaning Your Appliance 10 Maintenance of Your Appliance 10 Changing the Light Bulb 10 Reversing the Door Swing of Your Appliance 11 Moving Your Appliance 11 Energy Saving Tips 11 Troubleshooting Guide 12 Service for Your Appliance 13 Wiring Diagram 13 Your Avanti Products Warranty 14 Instrucciones en Español 15 – 18 Registration Information and Registration Card 19 2 REFRIGERATOR SAFETY Your safety and the safety of others are very important. We have provided many important safety messages in this manual for your appliance. Always read and obey all safety messages. This is the Safety Alert Symbol. This symbol alerts you to potential hazards that can kill or injure you and others. All safety messages will follow the Safety Alert Symbol and either the words” DANGER”, “WARNING” or “CAUTION”. Danger means that failure to heed this safety statement may result in severe personal injury or death. Warning means that failure to heed this safety statement may result in extensive product damage, serious personal injury, or death. Caution means that failure to heed this safety statement may result in minor or moderate personal injury, property or equipment damage. All safety messages will alert you to know what potential hazard is, tell you how to reduce the chance of injury, and let you know what can happen if the instructions are not followed. 3 IMPORTANT SAFEGUIDES Before the refrigerator is used, it must be properly positioned and installed as described in this manual,so read the manual carefully. To reduce the risk of fire, electrical shock or injury when using the refrigerator, follow basic precaution, including the following: • • • • • • • • • • • • • • • • • • • • • Plug into a grounded 3-prong outlet, do not remove grounding prong, do not use an adapter, and do not use an extension cord. It is recommended that a separate circuit, serving only your refrigerator be provided. Use receptacles that cannot be turned off by a switch or pull chain. Never clean refrigerator parts with flammable fluids. These fumes can create a fire hazard or explosion. And do not store or use gasoline or other flammable vapors and liquids in the vicinity of this or any other appliance. The fumes can create a fire hazard or explosion. Before proceeding with cleaning and maintenance operations, make sure the power line of the unit is disconnected. Do not connect or disconnect the electric plug when your hands are wet. Unplug the refrigerator or disconnect power before cleaning or servicing. Failure to do so can result in electrical shock or death. Do not attempt to repair or replace any part of your refrigerator unless it is specifically recommended in this manual. All other servicing should be referred to a qualified technician. FOLLOW WARNING CALL OUTS BELOW ONLY WHEN APPLICABLE TO YOUR MODEL Use two or more people to move and install refrigerator. Failure to do so can result in back or other injury. To ensure proper ventilation for your refrigerator, the front of the unit must be completely ° unobstructed. Choose a well-ventilated area with temperatures above 60°F (16 C) and below 90°F (32°C). This unit must be installed in an area protected from the element, such as wind, rain, water spray or drips. The refrigerator should not be located next to ovens, grills or other sources of high heat. The refrigerator must be installed with all electrical, water and drain connections in accordance with state and local codes. A standard electrical supply (115 V AC only, 60 Hz), properly grounded in accordance with the National Electrical Code and local codes and ordinances is required. Do not kink or pinch the power supply cord of refrigerator. The fuse (or circuit breaker) size should be 15 amperes. It is important for the refrigerator to be leveled in order to work properly. You may need to make several adjustments to level it. All installation must be in accordance with local plumbing code requirements. Make certain that the pipes are not pinched or kinked or damaged during installations. Check for leaks after connection. Never allow children to operate, play with or crawl inside the refrigerator. Although the unit has been tested at the factory, due to long-term transit and storage, the first batch of cubes must be discarded. Do not use solvent-based cleaning agents of abrasives on the interior. These cleaners may damage or discolor the interior. Do not use this apparatus for other than its intended purpose. 4 HELP US HELP YOU... Read this guide carefully. Write down the model and serial numbers. It is intended to help you operate and maintain your new appliance properly. You'll find them on a plate located on the inside left wall the appliance. Keep it handy to answer your questions. If you don't understand something or your need more help, please call: Please write these numbers here: ____________________________________ Date of Purchase Avanti Customer Service 800-220-5570 ____________________________________ Model Number Keep proof of original purchase date (such as your sales slip) with this guide to establish the warranty period. ____________________________________ Serial Number CAUTION: Use these numbers in any correspondence or service calls concerning your appliance. THIS APPLIANCE IS NOT DESIGNED FOR THE STORAGE OF MEDICINE OR OTHER MEDICAL PRODUCTS. If you received a damaged appliance, immediately contact the dealer (or builder) that sold you the appliance. Save time and money. Before you call for service, check the Troubleshooting Guide. It lists causes of minor operating problems that you can correct yourself. IF YOU NEED SERVICE NEXT, if you are still not pleased, write all the details, including your telephone number, and send to: We're proud of our service and want you to be pleased. If for some reason you are not happy with the service you receive, here are some steps to follow for further help. FIRST, contact the people who serviced your appliance. Explain why you are not pleased. In most cases, this will solve the problem. Customer Service Avanti Products 10880 NW 30 Street Miami, FL 33172 5 PARTS AND FEATURES 1 2 8 3 9 4 5 10 6 11 7 1 2 3 4 5 6 7 8 9 10 11 Freezer Compartment Freezer Wire Shelf Refrigerator Compartment Refrigerator Glass Shelves (2) Crisper Glass Cover Vegetable Crisper Leveling Legs (2) Temperature Control and Light Door Bins (3) Bottle Door Bin Platinum Finish Doors ( RA755PST only) White Finish Doors ( RA754WT only) 6 Important Safety Instructions WARNING • • • • • • • To reduce the risk of fire, electrical shock, or injury when using your appliance, follow these basic precautions: Read all instructions before using the appliance. DANGER or WARNING: Risk of child entrapment. Child entrapment and suffocation are not problems of the past. Junked or abandoned appliances are still dangerous. . . even if they will “just sit in the garage a few days.” Before you throw away your old refrigerator or freezer: Take off the doors. Leave the shelves in place so that children may not easily climb inside. Never allow children to operate, play with, or crawl inside the appliance. Never clean appliance parts with flammable fluids. The fumes can create a fire hazard or explosion. Do not store or use gasoline or any other flammable vapors and liquids in the vicinity of this or any other appliance. The fumes can create a fire hazard or explosion. -Save these instructions- INSTALLATION INSTRUCTIONS Before Using Your Appliance • Remove the exterior and interior packing. • Check to be sure you have all of the following parts: • 1 Ice Cube Tray • 1 Plastic Scraper • 4 Door Bins • 2 Glass Refrigerator shelves • 1 Wire Freezer shelf • 1 Crisper • 1 Crisper Cover • Instruction Manual • Before connecting the appliance to the power source, let it stand upright for approximately 2 hours. This will reduce the possibility of a malfunction in the cooling system from handling during transportation. • Clean the interior surface with lukewarm water using a soft cloth. • In case the interior accessories are not correctly placed, rearrange them as described in chapter “Parts and Features” Installation of Your Appliance • Place your appliance on a floor that is strong enough to support the appliance when it is fully loaded. To level your appliance, adjust the legs at the front of the appliance. • Allow 5 inches of space between the back and sides of the appliance, which allows the proper air circulation to cool the compressor. • Locate the appliance away from direct sunlight and sources of heat (stove, heater, radiator, etc.). Direct sunlight may affect the acrylic coating and heat sources may increase electrical consumption. Extreme cold ambient temperatures may also cause the appliance not to perform properly. • Avoid locating the appliance in moist areas. Too much moisture in the air will cause frost to form quickly on the evaporator requiring more frequent defrosting of the appliance. 7 ELECTRICAL CONNECTION Warning Improper use of the grounded plug can result in the risk of electrical shock. If the power cord is damaged, have it replaced by an authorized Avanti Products service center. This appliance should be properly grounded for your safety. The power cord of this appliance is equipped with a three-prong plug which mates with standard three prong wall outlets to minimize the possibility of electrical shock. Do not under any circumstances cut or remove the third ground prong from the power cord supplied. For personal safety, this appliance must be properly grounded. This appliance requires a standard 115/120 Volt AC ~/60Hz electrical ground outlet with three-prong. Have the wall outlet and circuit checked by a qualified electrician to make sure the outlet is properly grounded. When a standard 2-prong wall outlet is encountered, it is your responsibility and obligation to have it replaced with a properly grounded 3-prong wall outlet. The cord should be secured behind the appliance and not left exposed or dangling to prevent accidental injury. The appliance should always be plugged into its own individual electrical outlet which has a voltage rating that matches the rating label on the appliance. This provides the best performance and also prevent overloading house wiring circuits that could cause a fire hazard from overheated. Never unplug the appliance by pulling the power cord. Always grip the plug firmly and pull straight out from the receptacle. Repair or replace immediately all power cords that have become frayed or otherwise damaged. Do not use a cord that shows cracks or abrasion damage along its length or at either end. When moving the appliance, be careful not to damage the power cord. EXTENSION CORD Because of potential safety hazards under certain conditions, it is strongly recommended that you do not use an extension cord with this appliance. However, if you must use an extension cord it is absolutely necessary that it be a UL/CUL-Listed, 3-wire grounding type appliance extension cord having a grounding type plug and outlet and that the electrical rating of the cord be 115 volts and at least 10 amperes. SURGE PROTECTOR Most electrical appliances use a series of electric control boards to operate. These boards are very susceptible to power surges and could be damaged or destroyed. If the appliance is going to be used in an area or if your city / country is prone to power surges / outages; it is suggested that you use a power surge protector for all electrical devices / appliances you use. The surge protector that you select must have a surge block high enough to protect the appliance it is connected to. If you have any questions regarding the type and size of surge protector needed contact a licensed electrician in your area. Damages due to power surges are not considered a manufacturer covered defect and will void your product warranty. 8 OPERATING YOUR APPLIANCE Temperature Control • Your appliance has only one control for regulating the temperature in the fresh food and the freezer compartment. The temperature control is located on the upper right hand side of the fresh food section. • The range of the temperature control is from position"1" the warmest to "7" the coldest. • The first time you turn the unit on set the temperature control to “7” or the max-position. • After 24 to 48 hours, adjust the temperature control to the setting that best suites your needs. The setting of “4” should be correct for home or office appliance use. • Changes of the ambient temperature affect temperature in the interior of the appliance (choose correct setting of the thermostat knob). • To turn the thermostat off, turn the temperature control to "OFF". NOTE: Turning the temperature control to "OFF" position stops the cooling cycle but does not shut off the power to the appliance. If the unit is unplugged, power lost, or turned off; you must wait 3 to 5 minutes before restarting the unit. If you attempt to restart before this time delay, the appliance will not start. Interior Light When you open the door the light will be ON automatically. When you close the door the light will turn OFF automatically. Defrosting Your Appliance • When? For the most efficient operation and minimum energy consumption, defrost the appliance compartment when the frost on the appliance walls is excessive or ¼ inch thick. There is no need to defrost the refrigerator, because ice depositing on the inner back wall is defrosted automatically. Ice is depositing on the inner back wall during the compressor operation; later on, when the compressor is not operating ice is defrosting and water drops collect and drain through the outlet in the inner back wall into the drain pan situated above the compressor, from where it evaporates. How? CAUTION Do not use boiling water because it may damage the plastic parts. In addition, never use a sharp or metallic instrument to remove frost as it may damage the cooling coils and will void the warranty. We recommend using the plastic scraper. • • • • • • A few hours before defrosting set the thermostat to position 7, so foods are well frozen. Reset the thermostat to OFF position and disconnect the power supply. Remove the frozen food from the appliance and place it in a cooler to protect the food. Leave the door open for a while so that you can easy scrape off the frost. Use a plastic scraper but be careful not to damage the inner surfaces of the freezer. Wipe up the scraped frost and ice before it is completely defrosted. Using Your Ice Cube Trays • • Recommended thermostat setting for ice making is position 7. Fill the ice cube tray (two thirds of it) with cold water or with any liquid suitable for freezing and place the tray on the bottom of the freezer to freeze properly. 9 • • • Dry the tray, otherwise it may stick to the bottom of the freezer. The best method to get ice cubes out of the tray is to hold the tray under cold tap water for a second. To eject the ice cubes from the trays, place over the ice bucket and twist slightly THE FREEZER COMPARTMENT. • Freezing Fresh Foods Proper use of the appliance, adequately packed food, correct temperature and taking into account hygienic precautions will substantially influence the quality of freezing the food or string of the frozen foods. • Carefully select food you intend to freeze; it should be of adequate quality and suitable for freezing. • Use correct packaging and wrap it right. • The packaging should be airtight and shouldn’t leak since this could cause substantial vitamin loss and dehydration of foods. • Foils and bags should be soft enough to tightly wrap around the foods. • When preparing foods to be frozen, consider sanitary precautions. • Mark packages with following data: kind and amount of foods and the date of loading. • It is most Important that the food is frozen as quickly as possible. • If the loading amount is too large, the quality of freezing is reduced which affects the quality of frozen foods. Freezing Procedure • 24 hours before loading the freezer with fresh foods to be frozen, set the thermostat to position 7. Put packages on the shelf and let them freeze 24 hours. After loading the packages of fresh foods reset the thermostat, if necessary, to operating temperature and reload the frozen packages to the bottom shelf. • The next time you want to freeze fresh foods, repeat the freezing procedure and be careful that packages with fresh foods do not touch frozen packages. • For freezing smaller amount of foods (up to 2 lbs.) there is no need to change the thermostat setting. CARE AND MAINTENANCE Cleaning Your Appliance • Turn the temperature control to "OFF", unplug the appliance, and remove the food, shelves, and trays. • Wash the inside with warm water and baking soda solution. The solution should be about 2 tablespoons of baking soda to a quart of water. • Wash the shelves and trays with a mild detergent solution. Plastic parts cannot be washed in a dishwasher. • The outside of the appliance should be cleaned with mild detergent and warm water. • The condenser coils should be vacuumed when they are dusty or dirty. • Clean the drain pan on the refrigerator compressor. Do not remove the drain pan. • After cleaning, connect the appliance to power supply and reload the packages. Maintenance of Your Appliance Changing the Light Bulb • • • • Unplug the AC power cord from the wall. Remove the screw with a Phillips screwdriver. Remove the light bulb cover. Unscrew the bulb. 10 • • Replace with a 15 watts bulb that is the same shape and size. Reversing the Door Swing of Your Appliance Replace the light bulb cover and tighten screw. This appliance has the capability of either opening the door from the left or right side. The unit is delivered to you with the door opening from the left side. Should you desire to reverse the opening direction, please call customer service for reversal instructions. Power Failure Most power failures are corrected within a few hours and should not affect the temperature of your appliance if you minimize the number of times the door is opened. If the power is going to be off for a longer period of time, you need to take the proper steps to protect your food. Vacation Time During long absences, remove all the food; unplug your appliance, clean your appliance, and leave the door slightly open to avoid possible formation of condensation, mold, or odors. Moving Your Appliance • Remove all the food. • Securely tape down all loose items inside your appliance. • Turn the leveling screws up to the base to avoid damage. • Tape the doors shut. • Be sure the appliance stays in the upright position during transportation. • Energy Saving Tips The appliance should be located in the coolest area of the room, away from heat producing appliances or heating ducts, and out of the direct sunlight. Let hot foods cool to room temperature before placing in the appliance. Overloading the appliance forces the compressor to run longer. Foods that freeze too slowly may lose quality, or spoil. Be sure to wrap foods properly, and wipe containers dry before placing them in the appliance. This cuts down on frost build-up inside the appliance. Appliance storage bin should not be lined with aluminum foil, wax paper, or paper toweling. Liners interfere with cold air circulation, making the appliance less efficient. Organize and label food to reduce door openings and extended searches. Remove as many items as needed at one time, and close the door as soon as possible. Try not to open the door too often, especially when the weather is wet and hot. Every so often check if the appliance is sufficiently ventilated. Ice and frost layer increase energy consumption, so clean the appliance as soon as the layer is ¼” thick. • • • • • • • 11 PROBLEMS WITH YOUR APPLIANCE? You can solve many common appliance problems easily, saving you the cost of a possible service call. Try the suggestions below to see if you can solve the problem before calling the servicer. TROUBLESHOOTING GUIDE PROBLEM Appliance does not operate. Appliance does not cool. Compressor turns on and off frequently. The light does not work. Vibrations. The appliance seems to make too much noise. The door will not close properly. POSSIBLE CAUSE Not plugged in. The circuit breaker tripped or blown fuse. The appliance temperature control is set at “0” Condenser coil at the back of the unit is dirty. The room temperature is hotter than normal. A large amount of food has been added to the appliance. The door is open too often. The door is not closed completely. The temperature control is not set correctly. The door gasket does not seal properly. The appliance does not have the correct clearances. (5” to both sides and back of unit) The home circuit breaker or fuse has tripped. The appliance is unplugged. The bulb has burned out (see the maintenance section for the replacement procedure). Check to assure that the appliance is level. The rattling noise may come from the flow of the refrigerant, which is normal. As each cycle ends, you may hear gurgling sounds caused by the flow of refrigerant in your appliance. Contraction and expansion of the inside walls may cause popping and crackling noises. The appliance is not level. The appliance is not level. The doors were reversed and not properly installed. The gasket is dirty. The shelves, bins, or baskets are out of position. 12 SERVICE FOR YOUR APPLIANCE We are proud of our customer service organization and the network of professional service technicians that provide service on your Avanti appliances. With the purchase of your Avanti appliance, you can have the confidence that if you ever need additional information or assistance, the Avanti Products Customer Service team will be here for you. Just call us toll-free. AVANTI PRODUCTS CUSTOMER SERVICES Whatever your questions are about our products, Product Information 800-323-5029 help is available. You may order parts and accessories that will be Part Orders delivered directly to your home. 800-220-5570 You may order these items by personal check, money order, Master Card, or Visa. In-Home Repair Service An Avanti Products authorized service center will 800-220-5570 provide expert repair service, scheduled at a time that is convenient for you. Our trained servicers know your appliance inside and out. Wiring Diagram 13 YOUR AVANTI PRODUCTS WARRANTY Staple your sales receipt here. Proof of original purchase date is needed to obtain service under warranty. WHAT IS COVERED – LIMITED ONE-YEAR WARRANTY Avanti Products warrants that the product is free from defects in materials and/or workmanship for a period of twelve (12) months from the date of purchase by the original owner. The foregoing timeline begins to run upon the date of purchase, and shall not be stalled, tolled, extended, or suspended for any reason whatsoever unless described in detail in the warranty document. For one year from the date of purchase by the original owner, Avanti products will, at its option, repair or replace any part of the product which proves to be defective in material or workmanship under normal use. Avanti Products will provide you with a reasonably similar product that is either new or factory refurbished. During this period Avanti Products will provide all parts and labor necessary to correct such defects free of charge, so long as the product has been installed and operated in accordance with the written instructions in this manual. In rental or commercial use, the warranty period is 90 days. All Avanti appliances of 4.2 cubic feet capacity or less must be brought/sent to the appliance service center for repair. LIMITED SECOND THROUGH FIFTH YEAR WARRANTY For the second through the fifth year from the date of original purchase, Avanti Products will provide a replacement compressor free of charge due to a failure. You are responsible for the service labor and freight charges. In rental or commercial use, the limited compressor warranty is one year and nine months. Costs involved to move the product to the service center and back to the user’s home, as maybe required, are the user’s responsibility. WARRANTY EXCLUSIONS / WHAT IS NOT COVERED: The warranty coverage described herein excludes all defects or damage that are not the direct fault of Avanti Products, including without limitation, one or more of the following: • A failure to comply with any applicable state, local, city, or county electrical, plumbing and/or building codes, regulations, or laws, including failure to install the product in strict conformity with local fire and building codes and regulations. • Any external, elemental and/or environmental forces and factors, including without limitation, rain, wind, sand, floods, fires, mud slides, freezing temperatures, excessive moisture or extended exposure to humidity, lightning, power surges, structural failures surrounding the appliance, and acts of God. • Shipping and handling costs associated with the • Content losses of food or other content due to replacement of the unit. spoilage. • Repairs performed by unauthorized servicers. • Incidental or consequential damages • Service calls that are related to external problems, • Parts and labor costs for the following will not be such as abuse, misuse, inadequate electrical considered as warranty: power, accidents, fire, floods, or any other acts of • Evaporator doors, door springs, and/or frames. God. • Inner door panels, door shelves, door rails, • Failure of the product if it is used for other than it and/or door supports. intended purpose. • Chest freezer lid liners. • The warranty does not apply outside the • Vegetable crispers. Continental USA. • Light bulbs and/or plastic housing. • Surcharges including but not limited to, any after • Plastic cabinet liners. hour, weekend, or holiday service calls, tolls, ferry trip charges, or mileage expense for service calls to • Punctured evaporator that voids the warranty on remote areas. the complete sealed system. In no event shall Avanti Products have any liability or responsibility whatsoever for damage to surrounding property, including cabinetry, floors, ceilings, and other structures and/or objects around the product. Also excluded from this warranty are scratches, nicks, minor dents, and other cosmetic damages on external surfaces and exposed parts; Products on which the serial numbers have been altered, defaced or removed; service visits for customer education, or visits where there is nothing wrong with the product; correction of installation problems (you are solely responsible for any structure and setting for the product, including all electrical, plumbing and/or other connecting facilities, for proper foundation/flooring, and for any alterations including without limitation cabinetry, walls, floors, shelving etc., as well as the resetting of breakers or fuses. OUT OF WARRANTY PRODUCT Avanti Products is under no obligation, at law or otherwise, to provide you with any concessions, including repairs, pro-rates, or product replacement, once this warranty has expired. WARRANTY – REFRIGERATION - COMPRESSOR 14 INSTRUCCIONES DE SEGURIDAD • • • • • • El model contiene R134A (el refrigerante isobutano), un gas natural respetuoso con el medio ambiente pero también inflamable. Al transportar o instalar la unidad se debe tener cuidado de no dañar ninguno de los componentes del sistema de refrigeración. En caso de daño se debe evitar la exposición al fuego o fuentes de ignición y se debe ventilar la habitación en la que se encuentra la unidad durante unos minutos. No utilizar aparatos mecánicos o sistemas artificiales para acelerar el proceso de descongelamiento. No utilizar aparatos eléctricos en la parte de almacenaje de comida. Si se utiliza este aparato para sustituir a otro que cuenta con cierre se debe romper o quitar dicho cierre como dedida de seguridad antes de guardarlo, para así evitar que los niños se queden encerrados dentro del lugar. Las neveras y los congeladores viejos contienen gases aislantes y de refrigeración que se deben eliminar adecuadamente. La eliminación de una unidad debe ser realizada por un servicio especializado, y cualquier duda debe ser consultada a las autoridades locales o al proveedor. Es preciso asegurarse de que los conductos de su aparato de refrigeración no resultan dañados antes de que los recoja el equipo encargado. AVISO IMPORTANTE: Por favor, lea atentamente este manual antes de proceder a la instalación y al encendido de este aparato. El fabricante no se hará responsable de las instalaciones defectuosas o del uso incorrecto del aparato, tal como se describe en este manual. RECOMENDACIONES • • • • • • • • • No utilise adaptadores que puedan provocar el sobrecalentamiento del aparato o inclusive un incendio. No utilise cables de suministro de energía viejos o deformados. No retuerza o doble los cables. No permita que los niños jueguen con el aparato. Los niños nunca deben sentarse en los estantes ni colgarse de la puerta. No utilise objetos metálicos afilados para extraer el hielo del congelador: podrían perforar el circuito del refrigerador y, provocar un daño irreparable al aparato. Utilise la espátula de plástico suministrada. No enchufe el tomacorriente con las manos húmedas. No coloque recipientes (botellas de cristal o latas) con líquidos en el congelador, sobre todo líquidos con gas, ya que podrían provovar que el recipiente explote durante le congelación. Las botellas que contengan un alto porcentaje de alcohol, deberán estar debidamente cerradas y deben ser colocadas verticalmente en el refrigerador. No toque las superficies congeladas, especialmente si tiene las manos mojadas ya que podría producir quemaduras o heridas. LA INSTALACION Y ENCENDIDO DEL APARATO • • • • • • • • Este refrigerador se conecta a 120v y 60 ciclos. Podrá disponer de la ayuda necesaria para instalar y poner en marcha su refrigerador sin ningún costo adicional. Antes de realizar la conexión al suministro de corriente eléctrica, asegúrese de que el voltaje que aparece en la etiqueta corresponda al voltaje del sistema eléctrico de su hogar. Si la clavija no sirve para las base de enchufe de que dispone, cambie la clavija del enchufe del refrigerador a una correcta (al menos 10A). Inserte la clavija en la base de enchufe con una toma a tierra apropiada. Si la base de enchufe no tiene una toma a tierra, sugerimos que llame a un electricista para que la ayude. El fabricante no se hace responsable por los posibles fallos al completar la toma a tierra, tal como se describe en este manual. No coloque el aparato en un lugar en el que esté expuesto a la luz directa del sol. No lo use en lugares al aire libre y no permita que se exponga a la lluvia. 15 • • • • • • Coloque el refrigerador lejos de toda fuente de calor y en un lugar ventilado. El refrigerador debe estar colocado a una distancia de por lo menos 50 cm de radiadores, estufas de gas o de carbón, y a una distancia de 5 cm de las estufas eléctricas. No ponga nada encima del refrigerador, y si lo hace que sea a una distancia no menor de a 15 cm. Si se instala el aparato cerca de otro refrigerador o congelador, deberá comprobar que se mantiene a una distancia entre ambos de por lo menos 5 cm con el fin de evitar procesos de condensación. No introduzca en el refrigerador grandes cantidades de productos o que sean muy pesados. El refrigerador deberá estar colocado de manera que mantenga una posición firme y nivelada con respecto al suelo. Utilise las dos patas niveladoras frontales para compensar suelo irregular. Deberá limpiar tanto la parte externa del aparato como los accesorios que encontrará en el interior del mismo con una solución compuesta de agua y jabón líquido; para limpiar la parte interna del aparato utilise bicarbonato de sodio disuelto en agua tibia. Después de secarlos vuelva a colocar los accesorios en su lugar de origen. ANTES DEL ENCENDIDO • • Deberá esperar unas 3 horas antes de enchufar el aparato a la red eléctrica con el fin de asegurar el correcto funcionamiento del mismo. Es posible que se produzca un cierto olor al encender el aparato por primera vez. Este olor desaparece cuando el aparato haya comenzado a enfriarse. LAS DISTINTAS FUNCIONES Y POSIBILIDADES AJUSTE DEL TERMOSTATO • • • • El termostato automáticamente regula la temperature interna en el compartimiento del refrigerador y del congelador. Para obtener temperaturas más frías debe girar el dial del termostato desde la posición 1 a la posición 5. Para la conservación de alimentos en el compartimiento del congelador durante un corto período de tiempo, puede colocar el dial del termostato entre la posición 2 y 3. Para la conservación de alimentos en el compartimiento del congelador durante un período largo de tiempo, puede colocar el dial del termostato en la posición 3-4. Tenga en cuenta; que la temperatura ambiente, la temperatura de la comida almacenada y la frecuencia con que se abra la puerta del aparato, afectan a la temperatura en el compartimiento del refrigerador. Si fuera necesario, modifique la temperatura seleccionada según sea el caso. Accesorios Como hacer cubitos de hielo: (*) • • • Jale de la bandeja hacia usted y extraiga el recipiente para cubitos de hielo. Rellene el recipiente con agua hast alcanzar el nivel adecuado. Sujete el extremo izquierdo de la bandeja y ajuste el recipiente para sacar los cubitos y pasarlos a la caja del hielo. No llene la caja del hielo con agua para hacer hielo en ella directamente. La caja podría romperse. Recipiente para hielo: • • Rellene el recipiente para hielo con agua y colóquelo en el compartimiento del congelador. Cuando el agua se haya transformado en hielo completamente, puede retorcer la bandeja tal como se indica más abajo, para extraer los cubitos de hielo. 16 LIMPIEZA Y MANTENIMIENTO • • • • • • Desenchufe el aparato de la toma de corriente antes de empezar a limpiarlo. No limpie el refrigerador echándole agua a chorro encima. Se recomienda limpiar el compartimiento del refrigerador periodicamente con una solución de bicarbonato de sodio. Limpie los accesorios por separado con agua y jabón. No meta los accesorios en el lavavajillas. No utilise productos, detergentes o jabones abrasivos. Cuando haya terminado de limpiar el aparato, pásele un trapo humedo y séquelo cuidadosamente. Cuando haya terminado el proceso de limpieza vuelva a conectar el enchufe del refrigerador, con las manos bien secas. Se recomienda realizar la limpieza del condensador con un cepillo al menos dos veces al año con el fin de ahorrar energía y de incrementar la productividad. ELIMINACION DE LA ESCARCHA COMPARTIMIENTO DEL REFRIGERADOR • • • Mientras el refrigerador está en funcionamiento el proceso de eliminación de la escarcha se produce automáticamente; el agua resultante de la descongelación se recoge en la cubeta y se evapora automáticamente. Se recomienda limpiar periodicamente la cubeta de drenaje así como el agujero que funciona como vertedero del agua descongelada con el instrumento destinado a tal efecto, para prevenir así que el agua se almacene en la parte inferior del refrigerador en lugar de ser expulsada. Puede además verter medio vaso de agua en el vertedero para limpiar su interior. COMPARTIMIENTO DEL CONGELADOR Se recomienda retirar la escarcha que aparece cubriendo las bandejas en el compartimiento del congelador. (Utilise la espátula de plástico que se suministra). Asi mismo, se recomienda limpiar el compartimiento del congelador del mismo modo que el compartimiento del refrigerador, siguiendo el proceso de descongelamiento al menos dos veces al año. Para hacerlo; • El día antes de realizar el proceso, ponga el dial del termostato en la posición “7” para que los alimentos se congelen completamente. • Durante el proceso de descongelación, los alimentos congelados deberán permanecer envueltos con varias hojas de papel y en un lugar frío. El aumento de la temperatura disminuirá su período de conservación. Recuerde que deberá consumir esos alimentos dentro de un período de tiempo relativamente corto. • Ponga el dial del termostato en la posición “OFF” desenchufe el aparato; deje la puerta abierta hasta que el compartimiento esté totalmente descongelado. • Para acelerar el proceso de descongelamiento ponga uno o más recipientes con agua caliente en el compartimiento del congelador. • Seque con cuidado la parte interior de la unidad. COMO REEMPLAZAR EL BOMBILLO Para reemplazar el bombillo del compartimiento del refrigerador 1. Desenchufe el aparato del tomacorriente. 2. Presione los ganchos que encontrará a ambos lados de la parte superior de la cubierta, para así quitar dicha cubierta o tapa. 3. Reemplace el bombillo usado por otro cuya capacidad no sea superior a 15 W. 4. Vuelva a colocar la tapa y tras esperar 5 minutos, podrá volver a enchufar el aparato. 17 TRANSPORTE Y CAMBIO DE POSICION COMO CAMBIAR LA DIRECCION DE APERTURA DE LA PUERTA En caso de que necesite cambiar el lado de apertura de la puerta, por favor consulte al servicio posventa de su localidad. Transporte y Cambio De Posición • • • El empaque original y la espuma de poliestireno pueden cubrirse si así se desea. Durante el transporte el aparato deberá mantenerse siempre atado con una cinta ancha o con una cuerda resistente. Durante el transporte, deberá seguir las normas que aparecen en la caja de cartón. Antes de transportar el aparato o de cambiar su posición, todos los objetos movibles (como bandejas, cajones para las verduras...) deberían extraerse del aparato o fijarse con cinta adhesiva para evitar su movimiento. ANTES DE LLAMAR AL SERVICIO TECNICO Si su refrigerador no funciona correctamente, puede deberse a un problema de poca importancia, por lo tanto compruebe lo que viene a continuación antes de llamar a un electricista; así podrá ahorrar tiempo y dinero. • • Si no va a usar el refrigerador durante un período de tiempo prolongado (por ejemplo, durante las vacaciones de verano), ponga el dial del termostato del compartimiento que va a desconectar (normalmente el compartimiento del refrigerador) en la posición”OFF”. Descongele y limpie el refrigerador, y deje la puerta abierta para evitar la formacion de moho y la producción de malos olores. Para apagar totalmente el aparato, desconéctelo del tomacorriente (para realizar la limpieza y cuando se dejen las puertas abiertas). 18 Registration Information Thank you for purchasing this fine Avanti product. Please fill out this form and return it to the following address within 100 days from the date of purchase and receive these important benefits: Avanti Products, A Division of The Mackle Co., Inc. P.O.Box 520604 – Miami, Florida 33152 Protect your product: We will keep the model number and date of purchase of your new Avanti product on file to help you refer to this information in the event of an insurance claim such as fire or theft. Promote better products: We value your input. Your responses will help us develop products designed to best meet your future needs. -------------------------------------------------------(detach here)------------------------------------------------------------ Avanti Registration Card Name Model # Serial # Address Date Purchased Store / Dealer Name City State Area Code Phone Number Zip Did You Purchase An Additional Warranty Extended None Reason for Choosing This Avanti Product: Please indicate the most important factors That influenced your decision to purchase this product: Price Product Features Avanti Reputation Product Quality Salesperson Recommendation Other: ___________________ Friend / Relative Recommendation Warranty Other: ___________________ Comments: E-mail Address Occupation As your Primary Residence, Do You: Own Rent Your Age: under 18 18-25 26-30 31-35 36-50 over 50 Marital Status: Married Single Is This Product Used In The: Home Business How Did You Learn About This Product: Advertising In-Store Demo Personal Demo 19 RA754WT/RA755PST – VER1.0 - 03132012 PRINTED IN CHINA 20