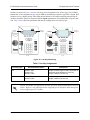
1
IP 700 Series Phone Administrator Guide Firmware Version 2.x.x 6AOSAG0001-31A April 2011 Trademarks ADTRAN IP 700 Series Phone Administrator Guide Trademarks Any brand names and product names included in this manual are trademarks, registered trademarks, or trade names of their respective holders. To the Holder of the Manual The contents of this manual are current as of the date of publication. ADTRAN reserves the right to change the contents without prior notice. In no event will ADTRAN be liable for any special, incidental, or consequential damages or for commercial losses even if ADTRAN has been advised thereof as a result of issue of this publication. Intended Audience This document is intended for ADTRAN IP 700 Series phone administrators. Software Licensing Agreement Each ADTRAN product contains a single license for ADTRAN-supplied software. Pursuant to the Licensing Agreement, you may: (a) use the software on the purchased ADTRAN device only and (b) keep a copy of the software for backup purposes. This Agreement covers all software installed on the system, as well as any software available on the ADTRAN website. In addition, certain ADTRAN systems may contain additional conditions for obtaining software upgrades. Changes or modifications to this unit not expressly approved by the party responsible for compliance could void the user’s authority to operate the equipment. 901 Explorer Boulevard P.O. Box 140000 Huntsville, AL 35814-4000 Phone: (256) 963-8000 Copyright © 2011 ADTRAN, Inc. All Rights Reserved. Printed in U.S.A. 2 Copyright © 2011 ADTRAN, Inc. 6AOSAG0001-31A IP 700 Series Phone Administrator Guide Software Licensing Agreement Conventions Notes provide additional useful information. Cautions signify information that could prevent service interruption or damage to equipment. Warnings provide information that could prevent injury or endangerment to human life. 6AOSAG0001-31A Copyright © 2011 ADTRAN, Inc. 3 Safety Instructions ADTRAN IP 700 Series Phone Administrator Guide Safety Instructions When using your telephone equipment, please follow these basic safety precautions to reduce the risk of fire, electrical shock, or personal injury: 1. Do not use this product near water, such as a bathtub, wash bowl, kitchen sink, laundry tub, in a wet basement, or near a swimming pool. 2. Avoid using a telephone (other than a cordless type) during an electrical storm. There is a remote risk of shock from lightning. 3. Do not use the telephone to report a gas leak in the vicinity of the leak. 4. Use only the power cord, power supply, and batteries indicated in the manual. Do not dispose of batteries in a fire. They may explode. Check with local codes for special disposal instructions. 5. The socket-outlet shall be installed near the equipment and shall be easily accessible. Save These Important Safety Instructions 4 Copyright © 2011 ADTRAN, Inc. 6AOSAG0001-31A IP 700 Series Phone Administrator Guide FCC Radio Frequency Interference Statement FCC Radio Frequency Interference Statement This equipment has been tested and found to comply with the limits for a Class B digital device, pursuant to Part 15 of the FCC rules. These limits are designed to provide reasonable protection against harmful interference when the equipment is operated in a commercial or residential environment. This equipment generates, uses, and can radiate radio frequency energy and, if not installed and used in accordance with the instruction manual, may cause harmful interference to radio frequencies. Product Safety and Electromagnetic Compatibility (EMC) Standards Table P/N and Name 1200769E1#X 1200770E1#X Standards FCC Part 15, Class B ICES-003 EN 55022 Class B EN 55024 EN 61000-3-2 EN 61000-3-3 UL/CUL 60950-1 IEC 60950-1 EN 60950-1 IP 706 Series Phone IP 712 Series Phone Canadian Emissions Requirements This digital apparatus does not exceed the Class B limits for radio noise emissions from digital apparatus as set out in the interference-causing equipment standard entitled “Digital Apparatus,” ICES-003 of the Department of Communications. Cet appareil numérique respecte les limites de bruits radioelectriques applicables aux appareils numériques de Class B prescrites dans la norme sur le materiel brouilleur: “Appareils Numériques,” NMB-003 edictee par le ministre des Communications. 6AOSAG0001-31A Copyright © 2011 ADTRAN, Inc. 5 General Information ADTRAN IP 700 Series Phone Administrator Guide General Information The IP 706 and IP 712 phones are designed to operate in both Key Systems and private branch exchange (PBX) Systems. The IP 706 or IP 712 phone will be aware of its operating mode and respond appropriately. Certain features may or may not be offered in certain modes. This manual notes when certain features are only supported in one system. Refer to the specific feature for more information. Certified IP PBX Systems The IP 700 Series phones have been officially tested and certified with the following IP PBX switches. Phone certification with other systems is ongoing and, therefore, this may not be the most recent list. Refer to ADTRAN’s website at www.adtran.com/phones for the latest information. NetVanta 7000 Series NetVanta Unified Communications Service and Warranty For information on the service and warranty of ADTRAN products, visit the ADTRAN website at http://www.adtran.com/support. Related Documentation For more specific information regarding the IP 706 and IP 712 model phones, refer to ADTRAN’s website at www.adtran.com/phones. 6 Copyright © 2011 ADTRAN, Inc. 6AOSAG0001-31A Table of Contents 1. Introduction . . . . . . . . . . . . . . . . . . . . . . . . . . . . . . . . . . . . . . . . . . . . . . . . . . . . . . . . . . . . . . . . . . . . . 13 2. Assembly and Installation . . . . . . . . . . . . . . . . . . . . . . . . . . . . . . . . . . . . . . . . . . . . . . . . . . . . . . . . . Unpacking the Phone . . . . . . . . . . . . . . . . . . . . . . . . . . . . . . . . . . . . . . . . . . . . . . . . . . . . . . . . . . . . . Assembling the Phone . . . . . . . . . . . . . . . . . . . . . . . . . . . . . . . . . . . . . . . . . . . . . . . . . . . . . . . . . . . . Attaching the Desk Stand . . . . . . . . . . . . . . . . . . . . . . . . . . . . . . . . . . . . . . . . . . . . . . . . . . . . . . . Connecting the Handset and Headset . . . . . . . . . . . . . . . . . . . . . . . . . . . . . . . . . . . . . . . . . . . . . Headset Interface Pinout. . . . . . . . . . . . . . . . . . . . . . . . . . . . . . . . . . . . . . . . . . . . . . . . . . . . . . . . . . . Headset Interface Off-Hook Detection . . . . . . . . . . . . . . . . . . . . . . . . . . . . . . . . . . . . . . . . . . . . . . . . 14 14 15 15 16 16 16 3. Connecting the Power Source . . . . . . . . . . . . . . . . . . . . . . . . . . . . . . . . . . . . . . . . . . . . . . . . . . . . . . Local Power Option. . . . . . . . . . . . . . . . . . . . . . . . . . . . . . . . . . . . . . . . . . . . . . . . . . . . . . . . . . . . . . . Inline Power Option. . . . . . . . . . . . . . . . . . . . . . . . . . . . . . . . . . . . . . . . . . . . . . . . . . . . . . . . . . . . . . . Power Specifications. . . . . . . . . . . . . . . . . . . . . . . . . . . . . . . . . . . . . . . . . . . . . . . . . . . . . . . . . . . . . . 17 17 18 18 4. Managing IP 700 Series Phones. . . . . . . . . . . . . . . . . . . . . . . . . . . . . . . . . . . . . . . . . . . . . . . . . . . . . 19 Precedence of Parameter Sources . . . . . . . . . . . . . . . . . . . . . . . . . . . . . . . . . . . . . . . . . . . . . . . . . . . 19 5. Setting the Minimum Required Parameters . . . . . . . . . . . . . . . . . . . . . . . . . . . . . . . . . . . . . . . . . . . 20 6. Using the Administrator’s Web Interface . . . . . . . . . . . . . . . . . . . . . . . . . . . . . . . . . . . . . . . . . . . . . Locating the IP Address of the Phone. . . . . . . . . . . . . . . . . . . . . . . . . . . . . . . . . . . . . . . . . . . . . . . . . Setting the Phone’s IP Address . . . . . . . . . . . . . . . . . . . . . . . . . . . . . . . . . . . . . . . . . . . . . . . . . . . . . Accessing the Administrator’s Web Interface . . . . . . . . . . . . . . . . . . . . . . . . . . . . . . . . . . . . . . . . . . . Navigating the Phone Manager . . . . . . . . . . . . . . . . . . . . . . . . . . . . . . . . . . . . . . . . . . . . . . . . . . . . . Phone Summary . . . . . . . . . . . . . . . . . . . . . . . . . . . . . . . . . . . . . . . . . . . . . . . . . . . . . . . . . . . . . Network Settings . . . . . . . . . . . . . . . . . . . . . . . . . . . . . . . . . . . . . . . . . . . . . . . . . . . . . . . . . . . . . SIP Settings . . . . . . . . . . . . . . . . . . . . . . . . . . . . . . . . . . . . . . . . . . . . . . . . . . . . . . . . . . . . . . . . . Line Settings . . . . . . . . . . . . . . . . . . . . . . . . . . . . . . . . . . . . . . . . . . . . . . . . . . . . . . . . . . . . . . . . Phone Settings . . . . . . . . . . . . . . . . . . . . . . . . . . . . . . . . . . . . . . . . . . . . . . . . . . . . . . . . . . . . . . Button Settings . . . . . . . . . . . . . . . . . . . . . . . . . . . . . . . . . . . . . . . . . . . . . . . . . . . . . . . . . . . . . . . BLF Settings . . . . . . . . . . . . . . . . . . . . . . . . . . . . . . . . . . . . . . . . . . . . . . . . . . . . . . . . . . . . . . . . Speed Dial Settings . . . . . . . . . . . . . . . . . . . . . . . . . . . . . . . . . . . . . . . . . . . . . . . . . . . . . . . . . . . Time Settings . . . . . . . . . . . . . . . . . . . . . . . . . . . . . . . . . . . . . . . . . . . . . . . . . . . . . . . . . . . . . . . . SPRE Settings . . . . . . . . . . . . . . . . . . . . . . . . . . . . . . . . . . . . . . . . . . . . . . . . . . . . . . . . . . . . . . . Dial Plan Settings . . . . . . . . . . . . . . . . . . . . . . . . . . . . . . . . . . . . . . . . . . . . . . . . . . . . . . . . . . . . Load Certificate . . . . . . . . . . . . . . . . . . . . . . . . . . . . . . . . . . . . . . . . . . . . . . . . . . . . . . . . . . . . . . Reset Phone. . . . . . . . . . . . . . . . . . . . . . . . . . . . . . . . . . . . . . . . . . . . . . . . . . . . . . . . . . . . . . . . . 22 22 22 23 24 25 26 27 28 29 30 31 32 33 34 35 36 36 7. Automating Configuration . . . . . . . . . . . . . . . . . . . . . . . . . . . . . . . . . . . . . . . . . . . . . . . . . . . . . . . . . DHCP Settings . . . . . . . . . . . . . . . . . . . . . . . . . . . . . . . . . . . . . . . . . . . . . . . . . . . . . . . . . . . . . . . . . . Server Settings . . . . . . . . . . . . . . . . . . . . . . . . . . . . . . . . . . . . . . . . . . . . . . . . . . . . . . . . . . . . . . . . . . Configuration Files . . . . . . . . . . . . . . . . . . . . . . . . . . . . . . . . . . . . . . . . . . . . . . . . . . . . . . . . . . . . . . . 37 37 38 38 8. Configuring Common Features . . . . . . . . . . . . . . . . . . . . . . . . . . . . . . . . . . . . . . . . . . . . . . . . . . . . . Setting the Password . . . . . . . . . . . . . . . . . . . . . . . . . . . . . . . . . . . . . . . . . . . . . . . . . . . . . . . . . . . . . Configuring Proxy and Registrar Servers . . . . . . . . . . . . . . . . . . . . . . . . . . . . . . . . . . . . . . . . . . . . . . Defining Line Registrations . . . . . . . . . . . . . . . . . . . . . . . . . . . . . . . . . . . . . . . . . . . . . . . . . . . . . . . . Setting the Realm . . . . . . . . . . . . . . . . . . . . . . . . . . . . . . . . . . . . . . . . . . . . . . . . . . . . . . . . . . . . . Setting the Domain . . . . . . . . . . . . . . . . . . . . . . . . . . . . . . . . . . . . . . . . . . . . . . . . . . . . . . . . . . . . 39 39 39 41 42 42 6AOSAG0001-31A Copyright © 2011 ADTRAN, Inc. 7 Table of Contents ADTRAN IP 700 Series Phone Administrator Guide Assigning Line Key Functions . . . . . . . . . . . . . . . . . . . . . . . . . . . . . . . . . . . . . . . . . . . . . . . . . . . . . . . Configuring Other Server and SIP Options . . . . . . . . . . . . . . . . . . . . . . . . . . . . . . . . . . . . . . . . . . . . Defining Call Handling Options . . . . . . . . . . . . . . . . . . . . . . . . . . . . . . . . . . . . . . . . . . . . . . . . . . . . . . Customizing the Phone . . . . . . . . . . . . . . . . . . . . . . . . . . . . . . . . . . . . . . . . . . . . . . . . . . . . . . . . . . . Modifying the Splash Screen . . . . . . . . . . . . . . . . . . . . . . . . . . . . . . . . . . . . . . . . . . . . . . . . . . . . . . . Bitmap Layout. . . . . . . . . . . . . . . . . . . . . . . . . . . . . . . . . . . . . . . . . . . . . . . . . . . . . . . . . . . . . . . . 42 45 46 47 48 48 9. Troubleshooting . . . . . . . . . . . . . . . . . . . . . . . . . . . . . . . . . . . . . . . . . . . . . . . . . . . . . . . . . . . . . . . . . Basic Troubleshooting. . . . . . . . . . . . . . . . . . . . . . . . . . . . . . . . . . . . . . . . . . . . . . . . . . . . . . . . . . . . . Advanced Troubleshooting . . . . . . . . . . . . . . . . . . . . . . . . . . . . . . . . . . . . . . . . . . . . . . . . . . . . . . . . . Accessing the Phone Status Display Menus. . . . . . . . . . . . . . . . . . . . . . . . . . . . . . . . . . . . . . . . . . . . General Display . . . . . . . . . . . . . . . . . . . . . . . . . . . . . . . . . . . . . . . . . . . . . . . . . . . . . . . . . . . . . . Network Display . . . . . . . . . . . . . . . . . . . . . . . . . . . . . . . . . . . . . . . . . . . . . . . . . . . . . . . . . . . . . . Line Keys . . . . . . . . . . . . . . . . . . . . . . . . . . . . . . . . . . . . . . . . . . . . . . . . . . . . . . . . . . . . . . . . . . . Firmware Version . . . . . . . . . . . . . . . . . . . . . . . . . . . . . . . . . . . . . . . . . . . . . . . . . . . . . . . . . . . . Diagnostics . . . . . . . . . . . . . . . . . . . . . . . . . . . . . . . . . . . . . . . . . . . . . . . . . . . . . . . . . . . . . . . . . . Diagnostic Tests . . . . . . . . . . . . . . . . . . . . . . . . . . . . . . . . . . . . . . . . . . . . . . . . . . . . . . . . . . . . . . . . . Audio Test . . . . . . . . . . . . . . . . . . . . . . . . . . . . . . . . . . . . . . . . . . . . . . . . . . . . . . . . . . . . . . . . . . Keypad Test . . . . . . . . . . . . . . . . . . . . . . . . . . . . . . . . . . . . . . . . . . . . . . . . . . . . . . . . . . . . . . . . . LCD Test . . . . . . . . . . . . . . . . . . . . . . . . . . . . . . . . . . . . . . . . . . . . . . . . . . . . . . . . . . . . . . . . . . . LED Test . . . . . . . . . . . . . . . . . . . . . . . . . . . . . . . . . . . . . . . . . . . . . . . . . . . . . . . . . . . . . . . . . . . Ping Test . . . . . . . . . . . . . . . . . . . . . . . . . . . . . . . . . . . . . . . . . . . . . . . . . . . . . . . . . . . . . . . . . . . Backlight Test . . . . . . . . . . . . . . . . . . . . . . . . . . . . . . . . . . . . . . . . . . . . . . . . . . . . . . . . . . . . . . . . Resetting the Phone . . . . . . . . . . . . . . . . . . . . . . . . . . . . . . . . . . . . . . . . . . . . . . . . . . . . . . . . . . . . . . Restoring Factory Defaults . . . . . . . . . . . . . . . . . . . . . . . . . . . . . . . . . . . . . . . . . . . . . . . . . . . . . . . . . Deleting a Personal Phone Book . . . . . . . . . . . . . . . . . . . . . . . . . . . . . . . . . . . . . . . . . . . . . . . . . . . . 49 49 50 51 51 51 51 52 52 52 52 53 53 54 54 54 55 55 55 Appendix A. Configuration and Line Parameters . . . . . . . . . . . . . . . . . . . . . . . . . . . . . . . . . . . . . . . . 57 Line Parameters . . . . . . . . . . . . . . . . . . . . . . . . . . . . . . . . . . . . . . . . . . . . . . . . . . . . . . . . . . . . . . . . . 78 Appendix B. Dial Plan Configuration . . . . . . . . . . . . . . . . . . . . . . . . . . . . . . . . . . . . . . . . . . . . . . . . . . Dial Plan Examples . . . . . . . . . . . . . . . . . . . . . . . . . . . . . . . . . . . . . . . . . . . . . . . . . . . . . . . . . . . . . . . Default External Dial Plan. . . . . . . . . . . . . . . . . . . . . . . . . . . . . . . . . . . . . . . . . . . . . . . . . . . . . . . Default PBX Dial Plan. . . . . . . . . . . . . . . . . . . . . . . . . . . . . . . . . . . . . . . . . . . . . . . . . . . . . . . . . . 81 81 81 82 Appendix C. Glossary. . . . . . . . . . . . . . . . . . . . . . . . . . . . . . . . . . . . . . . . . . . . . . . . . . . . . . . . . . . . . . . 83 8 Copyright © 2011 ADTRAN, Inc. 6AOSAG0001-31A List of Figures Figure 1. Figure 2. Figure 3. Figure 4. Figure 5. Figure 6. Figure 7. Figure 8. Figure 9. Figure 10. Figure 11. Figure 12. Figure 13. Figure 14. Figure 15. Figure 16. Figure 17. Figure 18. Figure 19. Parts Included with Your IP Phone . . . . . . . . . . . . . . . . . . . . . . . . . . . . . . . . . . . . . . . . . . . . Assembling the Desk Stand . . . . . . . . . . . . . . . . . . . . . . . . . . . . . . . . . . . . . . . . . . . . . . . . . . Connecting the Handset and Headset . . . . . . . . . . . . . . . . . . . . . . . . . . . . . . . . . . . . . . . . . . Connecting to the Local Power Source . . . . . . . . . . . . . . . . . . . . . . . . . . . . . . . . . . . . . . . . . Connecting to the Inline Power Source . . . . . . . . . . . . . . . . . . . . . . . . . . . . . . . . . . . . . . . . . Phone Summary Menu . . . . . . . . . . . . . . . . . . . . . . . . . . . . . . . . . . . . . . . . . . . . . . . . . . . . . Network Settings Menu . . . . . . . . . . . . . . . . . . . . . . . . . . . . . . . . . . . . . . . . . . . . . . . . . . . . . SIP Settings Menu . . . . . . . . . . . . . . . . . . . . . . . . . . . . . . . . . . . . . . . . . . . . . . . . . . . . . . . . . Line Settings Menu . . . . . . . . . . . . . . . . . . . . . . . . . . . . . . . . . . . . . . . . . . . . . . . . . . . . . . . . Phone Settings Menu. . . . . . . . . . . . . . . . . . . . . . . . . . . . . . . . . . . . . . . . . . . . . . . . . . . . . . . Button Settings Menu. . . . . . . . . . . . . . . . . . . . . . . . . . . . . . . . . . . . . . . . . . . . . . . . . . . . . . . BLF Settings Menu. . . . . . . . . . . . . . . . . . . . . . . . . . . . . . . . . . . . . . . . . . . . . . . . . . . . . . . . . Speed Settings Menu. . . . . . . . . . . . . . . . . . . . . . . . . . . . . . . . . . . . . . . . . . . . . . . . . . . . . . . Time Settings Menu . . . . . . . . . . . . . . . . . . . . . . . . . . . . . . . . . . . . . . . . . . . . . . . . . . . . . . . . SPRE Settings Menu . . . . . . . . . . . . . . . . . . . . . . . . . . . . . . . . . . . . . . . . . . . . . . . . . . . . . . . Dial Plan Settings Menu. . . . . . . . . . . . . . . . . . . . . . . . . . . . . . . . . . . . . . . . . . . . . . . . . . . . . Load Certificate File Menu . . . . . . . . . . . . . . . . . . . . . . . . . . . . . . . . . . . . . . . . . . . . . . . . . . . Reset Phone Menu . . . . . . . . . . . . . . . . . . . . . . . . . . . . . . . . . . . . . . . . . . . . . . . . . . . . . . . . Line Key Numbering. . . . . . . . . . . . . . . . . . . . . . . . . . . . . . . . . . . . . . . . . . . . . . . . . . . . . . . . 6AOSAG0001-31A Copyright © 2011 ADTRAN, Inc. 14 15 16 17 18 25 26 27 28 29 30 31 32 33 34 35 36 36 43 9 List of Figures 10 ADTRAN IP 700 Series Phone Administrator Guide Copyright © 2011 ADTRAN, Inc. 6AOSAG0001-31A List of Tables Table 1. Table 2. Table 3. Table 4. Table 5. Table 6. Table 7. Table 8. Table 9. Table 10. Table 11. Table 12. Table 13. Table 14. Table 15. Table 16. Headset Interface Pinout . . . . . . . . . . . . . . . . . . . . . . . . . . . . . . . . . . . . . . . . . . . . . . . . . . Minimum Parameters Required for Operation . . . . . . . . . . . . . . . . . . . . . . . . . . . . . . . . . . Guidelines for Assigning Line Types . . . . . . . . . . . . . . . . . . . . . . . . . . . . . . . . . . . . . . . . . Realm Settings . . . . . . . . . . . . . . . . . . . . . . . . . . . . . . . . . . . . . . . . . . . . . . . . . . . . . . . . . . Line Key Assignments . . . . . . . . . . . . . . . . . . . . . . . . . . . . . . . . . . . . . . . . . . . . . . . . . . . . Server Parameters and SIP Options Overview . . . . . . . . . . . . . . . . . . . . . . . . . . . . . . . . . Call Handling Options Overview . . . . . . . . . . . . . . . . . . . . . . . . . . . . . . . . . . . . . . . . . . . . Phone Customization Overview . . . . . . . . . . . . . . . . . . . . . . . . . . . . . . . . . . . . . . . . . . . . . Basic Troubleshooting . . . . . . . . . . . . . . . . . . . . . . . . . . . . . . . . . . . . . . . . . . . . . . . . . . . . Advanced Troubleshooting Chart . . . . . . . . . . . . . . . . . . . . . . . . . . . . . . . . . . . . . . . . . . . LCD Test Options . . . . . . . . . . . . . . . . . . . . . . . . . . . . . . . . . . . . . . . . . . . . . . . . . . . . . . . Configuration Parameters . . . . . . . . . . . . . . . . . . . . . . . . . . . . . . . . . . . . . . . . . . . . . . . . . Line Parameters . . . . . . . . . . . . . . . . . . . . . . . . . . . . . . . . . . . . . . . . . . . . . . . . . . . . . . . . . Dial Plan Syntax Entries . . . . . . . . . . . . . . . . . . . . . . . . . . . . . . . . . . . . . . . . . . . . . . . . . . External Dial Plan . . . . . . . . . . . . . . . . . . . . . . . . . . . . . . . . . . . . . . . . . . . . . . . . . . . . . . . PBX Dial Plan . . . . . . . . . . . . . . . . . . . . . . . . . . . . . . . . . . . . . . . . . . . . . . . . . . . . . . . . . . 6AOSAG0001-31A Copyright © 2011 ADTRAN, Inc. 16 20 41 42 43 45 46 47 49 50 53 57 78 81 82 82 11 List of Tables 12 ADTRAN IP 700 Series Phone Administrator Guide Copyright © 2011 ADTRAN, Inc. 6AOSAG0001-31A 1. INTRODUCTION This guide explains how to administer the IP 706 and IP 712 phones from ADTRAN. ADTRAN IP phones are full-duplex, handsfree IP phones that offer business-class features, such as multiple call appearance, hold, transfer, and conferencing. The phones are simple to use while offering the latest advances in telephony systems. Updates and new features are downloaded to the phones without intervention or the need for phone replacement. This guide contains the following sections: • Assembly and Installation on page 14 • Connecting the Power Source on page 17 • Managing IP 700 Series Phones on page 19 • Setting the Minimum Required Parameters on page 20 • Using the Administrator’s Web Interface on page 22 • Automating Configuration on page 37 • Configuring Common Features on page 39 • Troubleshooting on page 49 6AOSAG0001-31A Copyright © 2011 ADTRAN, Inc. 13 Assembly and Installation 2. ADTRAN IP 700 Series Phone Administrator Guide ASSEMBLY AND INSTALLATION The following sections list the items included in your phone shipment and provide instructions for assembling the IP 706 and IP 712 phones. For questions dealing with missing parts or difficulty in assembly, contact your ADTRAN reseller. Unpacking the Phone As you carefully unpack your phone, be sure you have received each item in the following list: • • • • • • IP 706 or IP 712 phone console Audio handset 9-foot coiled handset cord Ethernet cable Adjustable desk stand and bracket Quick start guide The following items are available separately: • Wallmount kit, black (P/N 1200808E1#B) • Single port Power over Ethernet (PoE) power supply, North America (P/N 1200809E1) • Single port PoE power supply, International (P/N 1200809E#IN) IP 712 Console Menu OK Cancel ABC DEF Messages Hold Transfer 1 2 3 Conference + GHI 4 JKL 5 MNO 6 Directories PQRS 7 TUV 8 WXYZ Goodbye * 0 # 9 - Network (LAN) Cable Handset and Cord Desk Bracket and Stand Quick Start Guide Optional Wallmount Kit PO WER Optional PoE Power Supply J1 R & PW J2 TA DA TA DA Figure 1. Parts Included with Your IP Phone 14 Copyright © 2011 ADTRAN, Inc. 6AOSAG0001-31A IP 700 Series Phone Administrator Guide Assembly and Installation Assembling the Phone The IP 706 and IP 712 phones require minimal assembly. The parts that must be assembled include the desk stand and handset. Attaching the Desk Stand 1. Insert the stand through the bracket (rotating it so it fits through the opening). 2. Once through the bracket opening, rotate the stand back and pull it toward the bracket until seated. 3. Make sure the stand is properly oriented within the bracket as shown in Figure 2 below. 4. With the desk stand assembled, insert the top two tabs into the corresponding slots on the phone back. 5. Insert the remaining tabs in the order shown in Figure 2 below. Tabs 4 and 5 must be pressed inward to snap into the slots. 6. Once the desk stand is installed, use the sliding latch on the back to adjust the phone to the preferred tilt. To remove the desk stand for wall mounting purposes, simply push in the tabs along the side and lift the desk stand from the back of the phone. Bracket Top Stand Phone Back 1 2 4 5 3 Desk Stand Unit Figure 2. Assembling the Desk Stand The IP 706 and IP 712 phones may be wall mounted using the optional wallmount kit (P/N 1200808E1). For wall mounting instructions, refer to the IP 700 Series Wallmount Kit Quick Start Guide shipped with the kit. 6AOSAG0001-31A Copyright © 2011 ADTRAN, Inc. 15 Assembly and Installation ADTRAN IP 700 Series Phone Administrator Guide Connecting the Handset and Headset 1. Using the provided 9-foot coiled handset cord, insert one end into the jack in the bottom of the handset. Insert the other end into the jack on the back of the phone console labeled with the handset icon as shown in Figure 3 below. Place the handset on the handset cradle once installed. 2. Optional. Connect your headset to the jack in the back of the phone console labeled with the headset icon as shown in Figure 3 below. There are many types of headsets that can be used with the IP 706 or IP 712 phone. For a list of compatible headsets for the IP phones, refer to the ADTRAN website at www.adtran.com/phones. Once the headset is connected, the headset feature is ready to use. Handset Optional Headset Figure 3. Connecting the Handset and Headset Headset Interface Pinout The pinout for the optional headset is available in Table 1 below. Refer to ADTRAN IP 700 Phone Wireless Headset Compatibility (ADTRAN’s Knowledge Base article 3059) for a list of wireless headsets that have been approved for use with ADTRAN IP 700 Series phones. Table 1. Headset Interface Pinout Pin Function 1 TX- 2 RX- 3 RX+ 4 TX+ Headset Interface Off-Hook Detection Off-hook detection is achieved by providing battery across the TX+ and TX- pair and monitoring for loop current. You can simulate off-hook by connecting a 1.5 k resistor across these pins. 16 Copyright © 2011 ADTRAN, Inc. 6AOSAG0001-31A IP 700 Series Phone Administrator Guide 3. Connecting the Power Source CONNECTING THE POWER SOURCE Once the IP 706 and IP 712 phones have been assembled, it is necessary to connect the phones to a power source and the phone system. There are two options available to supply power to your IP phone. Use the Local Power Option if your wall jack is not PoE enabled. This option requires using the optional PoE power supply (P/N 1200809E1 or P/N 1200809E#IN). If your wall jack is PoE enabled, use the Inline Power Option which does not require the optional PoE power supply. Use the following steps to complete these tasks. Local Power Option Use the Local Power Option if your jack is NOT PoE enabled. If your jack is PoE enabled, a PoE power supply is not necessary. 1. Connect one end of the included Ethernet cable to the Ethernet jack on the back of the phone. 2. Connect the remaining end to the J1 DATA AND POWER port on an appropriate PoE-enabled device. 3. Connect one end of a second Ethernet cable (not included) to the J2 DATA port on the PoE device. 4. Connect the remaining end of the second Ethernet cable (not included) to the non-PoE wall jack. 5. Connect the PoE device to the wall outlet. Network connectivity is provided through the wall jack, allowing an optional PC connection through the IP phone. If the IP phone is disconnected from either the network or power source, network connectivity from the phone to the attached PC will be lost. 5 Optional PoE Power Supply PO WE R 3 J1 A& DAT R J2 TA DA PW 2 Non-PoE Wall 4 Jack 1 Optional PC Connection Figure 4. Connecting to the Local Power Source 6AOSAG0001-31A Copyright © 2011 ADTRAN, Inc. 17 Connecting the Power Source ADTRAN IP 700 Series Phone Administrator Guide Inline Power Option 1. Connect one end of the included Ethernet cable to the Ethernet jack on the back of the phone. 2. Connect the remaining end of the Ethernet cable to the PoE wall jack. Network connectivity is provided through the PoE wall jack, allowing an optional PC connection through the IP phone. 1 2 Optional PC Connection PoE Wall Jack Figure 5. Connecting to the Inline Power Source Power Specifications The IP 706 and IP 712 phones support the following powering specifications: • • • • IEEE 802.3af powering on signal or spare pairs independent of polarity Presents a valid IEEE 802.3af detection signature on both the signal and spare pairs Presents a Class 2 signature when a valid signature is required Draws less than 6.49 W of power under normal operating conditions All powering over telecommunication wiring must be via UL-listed power supplies with outputs of 48 VDC 1 percent, 350 mA maximum. 18 Copyright © 2011 ADTRAN, Inc. 6AOSAG0001-31A IP 700 Series Phone Administrator Guide 4. Managing IP 700 Series Phones MANAGING IP 700 SERIES PHONES There are multiple ways to manage ADTRAN IP 700 Series phones, each providing a different management approach. Choose the method that best suits your situation: • Password-protected administrator’s Web interface (Phone Manager) to view and change current settings on a single phone. • Phone’s user interface to view and modify current settings locally. • Configuration files to automatically download parameters upon phone startup and update firmware. • Dynamic Host Configuration Protocol (DHCP) to set a limited number of parameters including the location of configuration files. Administrators can choose to administer phones individually using the Web interface (refer to Using the Administrator’s Web Interface on page 22). Configuring a large number of phones can be accomplished via configuration files that automatically download at startup (refer to Automating Configuration on page 37). In certain situations, it may be necessary to set critical parameters manually using the phone’s user interface (refer to Locating the IP Address of the Phone on page 22). Precedence of Parameter Sources When building the set of phone parameters, it is possible to have multiple sources for the same parameter. Therefore, it is important to understand the order of precedence assigned to each source. The following list indicates this precedence: 1. Parameters manually entered using either the phone’s user interface (Phone Settings) or via the administrator’s Web interface (Phone Manager) have the highest priority and override parameters received from all other sources. Use Restore Factory Defaults on the phone or administrator’s Web interface to clear all values that have been manually set using the Phone Settings menu. 2. Parameters received in a configuration file override those received from DHCP and defaults. 3. Parameters returned by DHCP (if it is enabled) override default settings. 4. Default parameters are used if no other source is available. 6AOSAG0001-31A Copyright © 2011 ADTRAN, Inc. 19 Setting the Minimum Required Parameters 5. ADTRAN IP 700 Series Phone Administrator Guide SETTING THE MINIMUM REQUIRED PARAMETERS At a minimum, the following parameters must be specified for the IP 700 Series phones to operate on a network server. The parameters not included in the table can usually be left at their default values. However, for optimal operation, it is recommended that you review all parameters. For a complete list of parameters and additional information about these settings, refer to Appendix A on page 57. Table 2. Minimum Parameters Required for Operation Parameter Description Source IP Address (IpAddress) Specifies the IP address for the phone. DHCP Phone Interface Web Interface Subnet Mask (SubNetMask) Indicates the network mask for the phone. DHCP Phone Interface Web Interface Gateway (GatewayAddress) Specifies the gateway address for the phone. DHCP Phone Interface Web Interface File Transfer Protocol (FTP), Hypertext Transfer Protocol (HTTP), HTTP Secure (HTTPS), or Trivial File Transfer Protocol (TFTP) Server Address (FtpServers, HttpServers, HttpsServers, or TftpServers) Specifies either FTP, HTTP, HTTPS, or TFTP server. If a server is unavailable, the phone goes through the list until a working server is found. Either FtpServers, HttpServers, HttpsServers, or TftpServers may be specified as the non-null value used to determine the download method for configuration files. DHCP Phone Interface Web Interface DNS Server IP Address (DnsAddress) This must be configured unless numeric IP addresses are supplied for all parameters and fully qualified domain names (FQDNs) are not used. DHCP Config File Phone Interface Web Interface Proxy Server (ProxyServer.z.Address.y) An IP address, FQDN, or domain name for one or more proxy servers. If only a proxy domain name is specified, a Session Initiation Protocol (SIP) SRV record for the proxy must be configured in the DNS server and the ProxyServer.z.Port.y must be set to 0. Config File Web Interface Registrar Server (RegServer.z.Address.y) An IP address, FQDN, or domain name for one or more registrar servers. If only a proxy domain name is specified, a SIP SRV record for the registrar must be configured in the DNS server and the RegServer.z.Port.y must be set to 0. Config File Web Interface Line Key Configuration (Button.z.Type, Button.z.Line, Button.z.Label) At least one key must be configured as a line key to make or receive calls. Config File Web Interface User Name (Reg.x.AuthUserId) User name used to register a phone line with the registrar. Config File Web Interface Password (Reg.x.AuthPassword) Password used to register a phone line with the registrar. Config File Web Interface 20 Copyright © 2011 ADTRAN, Inc. 6AOSAG0001-31A IP 700 Series Phone Administrator Guide Setting the Minimum Required Parameters Table 2. Minimum Parameters Required for Operation (Continued) Parameter Description Source Server (Reg.x.Servers) Defines which pair of proxy and registrar servers should be used for this phone line. Config File Web Interface Enable Line (Reg.x.Enable) Enables or disables registration for a phone line. Config File Web Interface DID (Reg.x.Did) Specifies the direct inward dialing (DID) number. Certain proxies may require a DID number that is different from the user name for authentication. If DID is not set, the Reg.x.AuthUserId is used both for authentication and as the DID number. Config File Web Interface Realm (Reg.x.Realm) Identifies the calling realm of the phone line. This is used to decide which type of dial plan to apply to this phone line. Valid entries are: GE, PE, GP, or GI. General External (GE) - Used for general non-PBX-type outside lines. Lines of this type use the DialPlanExternal dial plan. Private External (PE) - Used for private (few users) non-PBX-type outside lines. Lines of this type use the DialPlanExternal dial plan. General PBX (GP) - Used for PBX call appearances that require an additional digit, such as 9 to be dialed to access outside numbers. Lines of this type use the DialPlanPbx dial plan. General Intercom (GI) - Used for intercom lines configured for key system operation. Lines of this type use the DialPlanIntercom dial plan. Config File Web Interface Dial Plan If a dial plan is not specified, the default dial delay (3 seconds after the last digit is dialed) will be used before dialed digits are sent to the proxy. You should specify DialPlanPbx, DialPlanIntercom, and/or DialPlanExternal as required by your line configuration settings (Reg.x.Realm). GE and PE realms use DialPlanExternal, GI uses DialPlanIntercom, and GP uses DialPlanPbx. Config File Web Interface SNTP Server IP Address (SntpServer) Optional. Identifies the server from which to retrieve the time. DHCP Config File Web Interface 6AOSAG0001-31A Copyright © 2011 ADTRAN, Inc. 21 Using the Administrator’s Web Interface 6. ADTRAN IP 700 Series Phone Administrator Guide USING THE ADMINISTRATOR’S WEB INTERFACE This section explains how to access and use the administrator’s Web interface (Phone Manager) to manage the IP phones. In order to access the Phone Manager via a Web browser, you will first need to identify the IP address of the phone you want to manage. This is explained in Locating the IP Address of the Phone below. If the phone does not already have an IP address assigned to it, you will need to start with Setting the Phone’s IP Address below. Locating the IP Address of the Phone Before you can access the Web interface, you must locate your phone’s IP address. To identify the phone’s IP address, follow these steps: 1. Press Menu. 2. Press 1 for Phone Status. 3. Press 2 for Network. 4. Using the arrow keys, scroll to the IP Address option. 5. Record the IP address for later reference. 6. Press the Exit soft key until the idle screen appears. Setting the Phone’s IP Address If you are unable to locate the phone’s IP address, it must be set manually from the phone. Follow these steps to manually set the phone’s IP address: 1. Press Menu. 2. Press 2 for Phone Settings. 3. Press 6 for Network. 4. Enter the password for the individual phone account and press OK. The default password is 1234. The password can be changed using the SetupPassword parameter in the configuration file. 5. Press 2 for IP Address. Enter the IP address using the keypad and press OK. 6. Continue this process of entering the appropriate values for each of the following: • 3 for Subnet Mask • 4 for Gateway • 5 for DNS 1 • 7 for Server Menu. Only one server type should be set for downloading configuration files. 7. Press the Exit soft key until the idle screen appears. 22 Copyright © 2011 ADTRAN, Inc. 6AOSAG0001-31A IP 700 Series Phone Administrator Guide Using the Administrator’s Web Interface Accessing the Administrator’s Web Interface Follow these steps to access the administrator’s Phone Manager: 1. Enter the following command into the address bar of your browser window: http://<ip address>/admin where <ip address> is the IP address assigned to the phone. 2. Enter the login name and password. The default administrator login user name is admin and the default password is password. The administrator password can be changed using the AdminPassword parameter in the configuration file. Some networks require browsers to use a proxy server to access the Internet. If you have problems accessing the phone’s Web interface, it may be because the browser uses a proxy server. To bypass the proxy server when accessing the phone's Web interface, follow these steps: 1. Open Microsoft® Internet Explorer. 2. From the Tools drop-down menu, select Internet Options. 3. Select the Connections tab and select LAN Settings. 4. If Use a proxy server for your LAN is not selected and you are not using a proxy server, you can quit at this step. If Use a proxy server for your LAN is selected, select Advanced. 5. In the Exceptions box, enter the IP address of your phone. 6. Select OK to close all of the dialog boxes. If you plan to access a large number of phones directly by IP address, you may want to consider turning the proxy off altogether. 6AOSAG0001-31A Copyright © 2011 ADTRAN, Inc. 23 Using the Administrator’s Web Interface ADTRAN IP 700 Series Phone Administrator Guide Navigating the Phone Manager Once the minimum required parameters are set, you can access numerous settings and configurations via the administrator’s Phone Manager. Phone Manager makes administering and configuring the IP phones easy and quick. In many cases, once settings have been changed and saved, you will need to reset the phone before the changes take effect. This can be done either from the phone or the Web interface. Refer to Resetting the Phone on page 55. From the Phone Manager main menu, you can access several menus for managing the IP phone. Each menu is explained in the following sections: • Phone Summary on page 25 • Network Settings on page 26 • SIP Settings on page 27 • Line Settings on page 28 • Phone Settings on page 29 • Button Settings on page 30 • BLF Settings on page 31 • Speed Dial Settings on page 32 • Time Settings on page 33 • SPRE Settings on page 34 • Dial Plan Settings on page 35 • Load Certificate on page 36 • Reset Phone on page 36 24 Copyright © 2011 ADTRAN, Inc. 6AOSAG0001-31A IP 700 Series Phone Administrator Guide Using the Administrator’s Web Interface Phone Summary From the Phone Summary menu, you can view model number, part number, serial number, firmware version, MAC address, hardware version, Ethernet status, and line status. Figure 6. Phone Summary Menu 6AOSAG0001-31A Copyright © 2011 ADTRAN, Inc. 25 Using the Administrator’s Web Interface ADTRAN IP 700 Series Phone Administrator Guide Network Settings From the Network Settings menu, you can change the IP address, gateway, and subnet mask. This menu also allows you to enable and set DHCP, duplex negotiation speeds, server type, virtual local area network (VLAN) IDs, HTTP server, and Internet Control Message Protocol Address Resolution Protocol (ICMP ARP) timeout. Figure 7. Network Settings Menu To remove the configured values (shown in parentheses after the setting name), select Clear Manual Settings. To change the current configured values, follow these steps: 1. Enter a new value in the corresponding field. 2. Select Save Manual Settings. 26 Copyright © 2011 ADTRAN, Inc. 6AOSAG0001-31A IP 700 Series Phone Administrator Guide Using the Administrator’s Web Interface SIP Settings From the SIP Settings menu, you can change the SIP server address, port, connection retries, feature expiration, call timer, message waiting indicator (MWI), hold signal, and other miscellaneous SIP settings. After selecting a server number, the current settings are displayed in parentheses after the setting name. Figure 8. SIP Settings Menu To remove the configured values (shown in parentheses after the setting name), select Clear Manual Settings. To change the current configured values, follow these steps: 1. Enter a new value in the corresponding field. 2. Select Save Manual Settings. 6AOSAG0001-31A Copyright © 2011 ADTRAN, Inc. 27 Using the Administrator’s Web Interface ADTRAN IP 700 Series Phone Administrator Guide Line Settings From the Line Settings menu, you can configure or change the line key settings. This is a convenient method for resetting passwords, changing display names, and assigning locations for voicemail, park zones, and pickup zones. After selecting a line number, the current settings are displayed in parentheses after the setting name. Figure 9. Line Settings Menu To remove the configured values (shown in parentheses after the setting name), select Clear Manual Settings. To change the current configured values, follow these steps: 1. Enter a new value in the corresponding field. 2. Select Save Manual Settings. 28 Copyright © 2011 ADTRAN, Inc. 6AOSAG0001-31A IP 700 Series Phone Administrator Guide Using the Administrator’s Web Interface Phone Settings From the Phone Settings menu, you can review and/or change all settings that pertain to the phone. Some of these features include the display lighting, enabling the headset and handsfree auto answer intercom (HFAAI), automatic connection settings for voicemail, MWI cadence, ring volume, ring type, name of system phone book, DND shortcut, and settings related to coder-decoders (CODECs). Figure 10. Phone Settings Menu 6AOSAG0001-31A Copyright © 2011 ADTRAN, Inc. 29 Using the Administrator’s Web Interface ADTRAN IP 700 Series Phone Administrator Guide To remove the configured values (shown in parentheses after the setting name), select Clear Manual Settings. To change the current configured values, follow these steps: 1. Enter a new value in the corresponding field. 2. Select Save Manual Settings. Button Settings From the Button Settings menu, you can configure the line keys as do not disturb (DND) or as a new line appearance. Select the location of the line key first, then configure the type, label, and line. Figure 11. Button Settings Menu To remove the configured values (shown in parentheses after the setting name), select Clear Manual Settings. To change the current configured values, follow these steps: 1. Enter a new value in the corresponding field. 2. Select Save Manual Settings. 30 Copyright © 2011 ADTRAN, Inc. 6AOSAG0001-31A IP 700 Series Phone Administrator Guide Using the Administrator’s Web Interface BLF Settings From the BLF Settings menu, you can configure the phone to monitor status groups (defined using the SubsGrp.Uri parameter) on the NetVanta 7100 and automatically update the line keys accordingly. When status groups to which the phone is subscribed are updated using the NetVanta 7100, a list of busy lamp field (BLF) members is sent out to the phone. The BLF members are dynamically placed on line keys not occupied by Line or DND line keys. For more information on status groups, refer to the NetVanta 7100 Administrator’s Guide (ADTRAN’s Knowledge Base article 2292). Both BLF and Speed members are dynamically assigned to line keys. BLF members have a higher priority when filling link keys not occupied by Line or DND buttons. Any line keys remaining after all members from the subscribed BLF groups have been placed are assigned to Speed members. When the phone is subscribed to multiple status groups, BLF members are placed on the line keys using the Option Number as a priority setting. For example, if the phone is subscribed to SubsGrp.Uri [email protected] using Option Number 1 and SubsGrp.Uri [email protected] using Option Number 2, the BLF members of the distribution status group will be placed on unused line keys before the BLF members of the sales status group. To configure the BLF settings, select the Option Number first, then select the subscription type and subscription line, and enter the URI of the status group. Figure 12. BLF Settings Menu To remove the configured values (shown in parentheses after the setting name), select Clear Manual Settings. To change the current configured values, follow these steps: 1. Enter a new value in the corresponding field. 2. Select Save Manual Settings. 6AOSAG0001-31A Copyright © 2011 ADTRAN, Inc. 31 Using the Administrator’s Web Interface ADTRAN IP 700 Series Phone Administrator Guide Speed Dial Settings From the Speed Settings menu, you can configure speed dial buttons. Speed members are dynamically placed on line keys not occupied by Line or DND line keys in ascending order of Option Number. Speed members can also be configured by the user using the Set Speed menu on the phone interface. Both BLF and Speed members are dynamically assigned to line keys. BLF members have a higher priority when filling link keys not occupied by Line or DND buttons. Any line keys remaining after all members from the subscribed BLF groups have been placed are assigned to Speed members. Select the option number first, then configure the label, number, and realm. Figure 13. Speed Settings Menu To remove the configured values (shown in parentheses after the setting name), select Clear Manual Settings. To change the current configured values, follow these steps: 1. Enter a new value in the corresponding field. 2. Select Save Manual Settings. 32 Copyright © 2011 ADTRAN, Inc. 6AOSAG0001-31A IP 700 Series Phone Administrator Guide Using the Administrator’s Web Interface Time Settings From the Time Settings menu, you can specify a time server for automatic updates, enable daylight savings time (DST), configure the Greenwich Mean Time (GMT) offset, and select a time and date format. Figure 14. Time Settings Menu To remove the configured values (shown in parentheses after the setting name), select Clear Manual Settings. To change the current configured values, follow these steps: 1. Enter a new value in the corresponding field. 2. Select Save Manual Settings. 6AOSAG0001-31A Copyright © 2011 ADTRAN, Inc. 33 Using the Administrator’s Web Interface ADTRAN IP 700 Series Phone Administrator Guide SPRE Settings From the SPRE Settings menu, you can specify special prefix (SPRE) codes for use with certain features, such as overhead page or HFAAI. Figure 15. SPRE Settings Menu To remove the configured values (shown in parentheses after the setting name), select Clear Manual Settings. To change the current configured values, follow these steps: 1. Enter a new value in the corresponding field. 2. Select Save Manual Settings. 34 Copyright © 2011 ADTRAN, Inc. 6AOSAG0001-31A IP 700 Series Phone Administrator Guide Using the Administrator’s Web Interface Dial Plan Settings From the Dial Plan Settings menu, you can configure dial plans related to intercom, external calls, PBX and set their delays. For more information on dial plans, refer to Appendix B on page 81. Figure 16. Dial Plan Settings Menu To remove the configured values (shown in Active Settings boxes), select Clear Manual Settings. To change the current configured values, follow these steps: 1. Enter a new value in the corresponding field. 2. Select Save Manual Settings. 6AOSAG0001-31A Copyright © 2011 ADTRAN, Inc. 35 Using the Administrator’s Web Interface ADTRAN IP 700 Series Phone Administrator Guide Load Certificate From the Load Certificate menu, you can load a certificate onto the phone for use with HTTPS servers. For more information on configuring server settings, refer to Server Settings on page 38. Figure 17. Load Certificate File Menu To load a certificate onto the phone, follow these steps: 1. Select the Browse button to locate a valid certificate file on your computer. The Choose File to Upload dialog box will appear. 2. Navigate to the certificate file. Select the file, and select the Open button. The path to the certificate file should now appear in the File field. 3. Select the Load button to load the certificate file onto the phone. Reset Phone From the Reset Phone menu, you can reset the phone or return to the factory default settings. For more information related to these two features, refer to Resetting the Phone on page 55 and Restoring Factory Defaults on page 55. Figure 18. Reset Phone Menu To reset the phone or restore it to the factory default settings, select the check box next to appropriate action and select Reset. The phone will reboot. 36 Copyright © 2011 ADTRAN, Inc. 6AOSAG0001-31A IP 700 Series Phone Administrator Guide 7. Automating Configuration AUTOMATING CONFIGURATION Many installations use DHCP and configuration files to automate setting parameters for ADTRAN’s IP phones. This section describes how to use DHCP and configuration files for this purpose. When an IP 700 Series phone boots, it downloads one or more configuration files and begins operation using the parameters received in the files. When more than one source exists for a parameter, it is important to understand the order of precedence assigned to each source. Refer to Precedence of Parameter Sources on page 19 for more information. DHCP Settings DHCP can be used to provide the following settings to the IP phone: • • • • • • • IP address (IpAddress) Subnet mask (SubNetMask) SNTP server IP address (SntpServer) Greenwich Mean Time (GMT) offset (GmtOffset) Router IP address (GatewayAddress) DNS address (DnsAddress) FTP/HTTP/HTTPS/TFTP server address (FtpServers, HttpServers, HttpsServers, TftpServers) If the site-specific DHCP option is set, it provides an FTP/HTTP/HTTPS/TFTP server address from which to retrieve configuration files. Setting these parameters is explained further in Server Settings on page 38. The ADTRAN IP 700 Series phones use the site-specific DHCP option 157 to specify the value of the following parameters: • • • • • • • • • • • • FtpServers FtpLogin FtpPassword HttpServers HttpLogin HttpPassword HttpsServers HttpsLogin HttpsPassword TftpServers Layer2Tagging VlanID Each parameter must contain a <name>=<value> pair. For example: FtpServers=192.168.0.10, FtpLogin=Toledo, FtpPassword=Ohio 6AOSAG0001-31A Copyright © 2011 ADTRAN, Inc. 37 Automating Configuration ADTRAN IP 700 Series Phone Administrator Guide Server Settings A path to the configuration files’ location on the FTP/HTTP/HTTPS/TFTP server is necessary for automatic configuration to take place. The path is indicated using the FtpServers, HttpServers, HttpsServers, and TftpServers parameters. The value of FtpServers, HttpServers, HttpsServers, or TftpServers must be manually set using the administrator’s Web interface, phone’s user interface, or DHCP option 157. The FTP, HTTP, and HTTPS servers may require a login and password to access the configuration files. The FTP/HTTP/HTTPS login and password can be changed from the default values by using the administrator’s Web interface, DHCP option 157, or the phone’s user interface via the Server Menu in the Network Settings menu. The default FTP/HTTP/HTTPS logins are admin, and the default passwords are password. Configuration Files A unique configuration file is required for each phone. The MAC address of the phone is used to identify the appropriate file for downloading. When the phone boots up, it checks the FTP/TFTP server for its specific configuration file. The file must be stored on the FTP/TFTP server in the following format: adtran_<mac address>.txt The <mac address> variable is the MAC address of the phone that will use the configuration file. All file names for configuration files must be titled in lowercase letters. If the phone cannot find its MAC address-based configuration file, it will download the file adtran_000000000000.txt and use it as the main configuration file. Configuration files can be broken into sections to separate the more commonly modified parameters (such as line key definitions) from those that don’t change very often. The Include parameter can be used to call another configuration file that contains parameters (such as the proxy server address) that seldom change. When writing a configuration file, the following restrictions apply: • Each parameter must appear on its own line. A <name> <value> pair is entered for each parameter. The <name> <value> may be separated by an arbitrary number of spaces or tabs. • Any combination of uppercase or lowercase letters can be used within the configuration file because it is not case sensitive. • Spaces are not permitted in any of the configuration values unless quotation marks are used. • Comments may be included in a configuration file by starting the comment line with the # character. A sample configuration file can be found in the Support Center at www.adtran.com. 38 Copyright © 2011 ADTRAN, Inc. 6AOSAG0001-31A IP 700 Series Phone Administrator Guide 8. Configuring Common Features CONFIGURING COMMON FEATURES This section explains how to define many of the parameters required to operate an IP phone. Each example shows either the steps to setting the parameter through the phone’s user interface, or provides the content to add to the configuration files. Setting the Password A password can be configured on the IP phone using the phone’s user interface. The password restricts access to advanced settings not meant for the common user. To change the password, follow these steps: 1. Select Menu. 2. Select 2 for Phone Settings. 3. Select 8 for Password. 4. Enter the old password using the keypad. To toggle between uppercase and lowercase letters or use the numeric keypad, press the Aa1 soft key on the LCD display. This changes the character entry mode and is indicated by a symbol in the upper right corner of the LCD display. A=uppercase letters, a=lowercase letters, and 1=numbers. Add spaces by using the 0 (zero) key, and erase characters by using the soft key. 5. Press the Ok soft key or OK on the Navigation bar. 6. Press the Exit soft key until the idle screen appears. Configuring Proxy and Registrar Servers The IP 706 phone supports up to 6 uniquely defined proxy servers, 6 outbound proxy servers, and 6 registrar servers. Likewise, the IP 712 phone supports up to 12 each of these servers. The servers are defined in the MAC address-based configuration file for each phone. The following configuration file example shows a phone using one set of servers with the index 1. The steps in the example may be repeated for each of the three server types as needed, changing the index number. The secondary server is not required. Additional information about the parameters shown in this example is provided in Appendix A on page 57. #Proxy Server 0 Primary ProxyServer.0.Address.1 192.168.0.33 #Retry attempts before switching proxies ProxyServerMaxRetry 1 #Proxy Server 0 Secondary ProxyServer.0.Address.2 192.168.0.34 6AOSAG0001-31A Copyright © 2011 ADTRAN, Inc. 39 Configuring Common Features ADTRAN IP 700 Series Phone Administrator Guide #Registrar Server 0 Primary RegServer.0.Address.1 192.168.0.33 #Retry Attempts before switching Registrars RegServerMaxRetry 1 #Registrar Server 0 Secondary RegServer.0.Address.2 192.168.0.34 #Outbound Proxy 0 Primary OutboundProxy.0.Address.1 192.168.0.22 #Retry attempts if ICMP destination unavailable is received from the OBP OutboundProxyMaxRetry 1 #Outbound Proxy 0 Secondary OutboundProxy.0.Address.2 192.168.0.23 40 Copyright © 2011 ADTRAN, Inc. 6AOSAG0001-31A IP 700 Series Phone Administrator Guide Configuring Common Features Defining Line Registrations The IP 706 phone supports up to 6 lines and the IP 712 phone supports up to 12 lines each served from a unique proxy/registrar server. This allows a different line for every line key on the phone. The line is called a multiple call appearance (MCA) type if it will be assigned to one or more line keys on the same phone. It is called a shared call appearance (SCA) type if the line is shared across multiple phones. Table 3 below provides a few guidelines to follow when assigning line types to a phone. Table 3. Guidelines for Assigning Line Types Guideline Parameter Setting An MCA should never be an SCA. Reg.0.Multiple True and Reg.0.Shared False An MCA should be assigned to at least 2 line keys for complete call handling flexibility. Button.1.Line 0 and Button.2.Line 0 The parameters Reg.x.Shared and Reg.x.Multiple should both be set to true to allow multiple appearances on the phone to be used for SCA. All calls on shared lines will arrive on appearance 1 and originate on appearance 1 when the line is idle. Appearance 2 is used only for transfer and conference originations. Reg.x.Shared True and Reg.x.Multiple True Consider disabling call logging for SCA-type lines. Many of the calls logged on this type of line may not be useful and could quickly fill the history buffer. Reg.x.Logging False If the number of pop-up windows becomes distracting on SCA-type lines, disable CallerID pop-ups. Reg.x.CallerIdPopup False The line registrations are defined in the MAC address-based configuration file for each phone. Additional information about the parameters shown in the following example is provided in Appendix A on page 57. This example shows how to configure an MCA line of a PBX: #Define Line 1. Used to authenticate with the registrar. Reg.0.AuthUserID 2000 #Enable popup window used for incoming calls. Reg.0.AuthPassword hello #Sets the DID number. Reg.0.Did 2000 #Define domain used to form Invite URIs and Registration request URIs. Reg.0.Domain adtran.com #Label that will appear next to the buttons that use this line. Reg.0.Label x2000 6AOSAG0001-31A Copyright © 2011 ADTRAN, Inc. 41 Configuring Common Features ADTRAN IP 700 Series Phone Administrator Guide #True since we will assign this line to more than 1 line button (MCA). Reg.0.Multiple true #General PBX type line. Reg.0.Realm gp #Link it to the previous Servers we defined where it will Register. Reg.0.Servers 1 #Not a shared line. Reg.0.Shared false #Request-URI for calls forwarded to voicemail. Reg.0.Voicemail *98 Setting the Realm The realm specifies the type of phone system in which the lines are being configured. This setting provides the dial plan to be used. Table 4 below lists the available settings for Reg.1.Realm defined in the MAC address-based configuration file for each phone. Refer to Appendix B on page 81 for more information on setting up the dial plan parameters. Table 4. Realm Settings Value Description General External (GE) Used for general non-PBX-type outside lines. Lines of this type use the DialPlanExternal dial plan. Private External (PE) Used for private (few users) non-PBX-type outside lines. Lines of this type use the DialPlanExternal dial plan. General PBX (GP) Used for PBX call appearances that require an additional digit, such as 9 to be dialed to access outside numbers. Lines of this type use the DialPlanPbx dial plan. General Intercom (GI) Used for intercom lines configured for key system operation. Lines of this type use the DialPlanIntercom dial plan. Setting the Domain Setting the domain in the Reg.x.Domain parameter is optional. It is used to form Invite URIs and registration Request URIs that have a domain after the @ symbol instead of an IP address or FQDN from the proxy or registrar server. Assigning Line Key Functions The line keys are numbered from 1 to 6 on the IP 706 phone and from 1 to 12 on the IP 712 phone. The 42 Copyright © 2011 ADTRAN, Inc. 6AOSAG0001-31A IP 700 Series Phone Administrator Guide Configuring Common Features locations are shown in Figure 19 below. Line keys can be designated as one of two types: Line or DND. Buttons that are not designated as type Line or DND are dynamically assigned as type BLF or Speed. BLF members receive a higher priority when filling unused buttons. Free buttons remaining after placing all members from BLF groups are assigned using the Speed.n parameters in ascending order using the value of n. Table 5 below shows the parameters that must be configured for each line key type. LCD Display LCD Display Line Keys 1 through 3 Line Keys 4 through 6 Menu OK Line Keys 7 through 12 Line Keys 1 through 6 Cancel Menu Messages OK Cancel Messages Hold Hold Transfer 1 ABC 2 DEF GHI 4 JKL 5 MNO PQRS TUV WXYZ Transfer 3 Conference 1 ABC 2 DEF GHI 4 JKL 5 MNO PQRS 7 TUV 8 WXYZ * 0 # 3 Conference + - 7 8 6 + Directories 0 Directories Goodbye 9 - * 6 # IP 706 9 Goodbye IP 712 Figure 19. Line Key Numbering Table 5. Line Key Assignments Line Key Type Associated Parameters Description Line Button.z.Type Button.z.Line Button.z.Label Assigns the button type to button at position z. Associates a line definition to a line key. Assigns a label for the line key. DND Button.z.Type Button.z.Label Assigns the type. Assigns a label for the line key. The line key number is designated by the value of z in the Associated Parameters listed in Table 5. Replace z with 1 through 6 when configuring an IP 706 phone and 1 through 12 when configuring an IP 712 phone. 6AOSAG0001-31A Copyright © 2011 ADTRAN, Inc. 43 Configuring Common Features ADTRAN IP 700 Series Phone Administrator Guide Example 1: This example configuration is for an IP 706 phone on a key system where lines 1 through 3 are SCAs. Line keys 4 and above are assigned to a status group monitored by the phone. #Phone button assignments Button.1.Type line Button.1.Line 0 Button.1.Label 732-758-1000 Button.2.Type line Button.2.Line 1 Button.2.Label 732-758-1001 Button.3.Type line Button.3.Line 2 Button.3.Label 732-758-1002 SubsGrp.1.Uri [email protected] Example 2: This is an example configuration for an IP 706 phone on a PBX system where line 1 is an MCA of type GP, the next available line key is a speed dial, and the last line key is used to toggle DND on and off: #Phone button assignments Button.1.Type line Button.1.Line 0 Button.1.Label x2000 Button.2.Type line Button.2.Line 0 Button.2.Label x2000 Button.3.Type line Button.3.Line 0 Button.3.Label x2000 Button.4.Type line Button.4.Line 0 Button.4.Label x2000 Speed.1.Label Home Speed.1.Number 732-758-9895 Button.6.Type dnd Button.6.Label DND 44 Copyright © 2011 ADTRAN, Inc. 6AOSAG0001-31A IP 700 Series Phone Administrator Guide Configuring Common Features Configuring Other Server and SIP Options A number of server settings can be specified for the IP phone to function correctly on your network. These parameters are listed below with a brief description of their function. This list also includes SIP options that can be specified as well. These parameters are covered in greater detail in Appendix A on page 57. Table 6. Server Parameters and SIP Options Overview Parameter Description FeatureUri Specifies the server (in URI format) to which feature-related state changes are sent. FeatureExpires Defines the subscription interval for FeatureUri notifications. FtpServers Specifies the location of firmware files that the IP phone will download. FtpServers and TftpServers may not both be specified as the non-null value used to determine the download method for configuration files. TftpServers Specifies the location of firmware files that the IP phone will download. FtpServers and TftpServers may not both be specified as the non-null value used to determine the download method for configuration files. AppName BootName Specifies application and boot image file names to be downloaded to the phone. HoldSignal Specifies the hold type for the phone to use. MwiLine Specifies the line on which external MWI server subscribes originate. MwiExpires Specifies the expiration interval of the MWI server subscribes. MwiSubscribeUri Specifies the Request URI sent to the external MWI server. MwiPrimary Specifies the primary voice mailbox association. Setting this to 12 will associate the mailbox to the external messaging server. MwiSecondary Specifies the secondary mailbox association. Setting this to 12 will associate the mailbox to the external messaging server. MwiCadence Selects the operating mode of the illuminated Messages function key. MessagesCallback Defines the URI that is called when the Message function key is pressed. ParkZoneUri Specifies the Request URI that is used for outgoing invites to the park zone server. SipKeepAlive Enables or disables SIP session timers. SntpServers Specifies one or more time servers where the phone can retrieve time and date information. SpreHfaii Specifies the dialing prefix used to initiate HFAAI calls. SprePageOverhead Specifies the dial access code used to access the overhead paging system. If this value is null, then overhead page is not presented on the soft key as an option. StunServer Specifies the FQDN or IP address of the STUN server, which may be required for operating phones behind network address translation (NAT) routers. 6AOSAG0001-31A Copyright © 2011 ADTRAN, Inc. 45 Configuring Common Features ADTRAN IP 700 Series Phone Administrator Guide Defining Call Handling Options Several parameters are available for customizing the call handling behavior on the IP phones. These parameters are listed below with a brief description of their function. These parameters are covered in greater detail in Appendix A on page 57. Table 7. Call Handling Options Overview Parameter Description AlertSelect Sets the policy for handling a preselected line on an idle phone when it rings. CallerIDPopup Enables or disables globally the call pop-up window that appears when an incoming call arrives. Reg.x.CallerIdPopup selectively enables or disables the call pop-up window on individual lines. DndBusyReject Returns a SIP 486 Busy Here signal to incoming calls when the DND mode is enabled. DndRedirected Redirects the call to the URI specified in DndRedirectAddress after the time delay (in seconds) specified in DndDelay. HFAAIbeep Enables or disables HFAAI notification. If enabled, a 600 ms tone is played before an HFAAI call is presented on the phone. HoldReminder Indicates the number of seconds before the hold reminder tone is played. IdleGroupPreference Specifies which line will be preselected when idle and then used for call origination when the phone goes off-hook. The IdleSelectOrder parameter further defines the policy for selecting a specific physical line key should more than one be assigned to that line. IntercomGroupPreference Specifies which line (should be of GI type) represents the intercom lines on the phone. For key system mode, set this to the GI configured line. It appears on the phone as Intercoms. LineSeizeFailure Enables or disables playing a recorded tone if the user attempts to seize an SCA line, but fails (e.g., another user seizes the call first). PopUpHold Defines the number of seconds to leave the caller ID pop-up window open when an HFAAI or page-type call is received. Once the time has elapsed, the caller ID pop-up window is automatically closed. PreselectAnswer Allows the user to answer an incoming call by pressing the line key on a ringing line. If the phone is idle, pressing the line key will activate the speakerphone. PreselectOriginate Allows the user to originate a call when an idle line key is pressed. If the phone is idle, the speakerphone is activated. PostSelectAutoHold Enables placing deselected calls on hold automatically if another line is selected. Otherwise, the deselected call will be dropped. 46 Copyright © 2011 ADTRAN, Inc. 6AOSAG0001-31A IP 700 Series Phone Administrator Guide Configuring Common Features Customizing the Phone There are numerous settings that can be changed on the IP phones, enabling you to customize them for your specific environment. These customizations are listed below, but are covered in greater detail in Appendix A on page 57. Table 8. Phone Customization Overview Parameter Description BackLight Defines the number of minutes the backlight remains on once the phone becomes idle. The backlight illuminates if the phone rings or receives an incoming call, if the user presses a button or lifts the handset, or if the electronic hook switch is activated. If the phone has DND enabled or is forwarded, the backlight does not illuminate as a result of an incoming call. The BLF and SCA status group updates received on the phone do not cause the backlight to illuminate. DateFormat Defines how the date is displayed. DefaultMedia Sets the preferred CODEC, silence suppression algorithm, and packet size for outgoing packets. DscpAudio Sets the differentiated services code points (DSCPs) for outbound audio packets from the phone. This is used to improve quality of service (QoS) handling on the network. DscpSignaling Sets the DSCP for outbound signaling packets from the phone. This is used to improve QoS handling on the network. DSTEnable Enables DST adjustments beginning at the hour, week, day, and month specified in DstStart through the time specified in DstEnd. DtmfLevels Adjusts the level of dual tone multi-frequency (DTMF) tones played into the network from the phone. Ethernet1 Enables/disables the Ethernet interface (local area network (LAN) port) and sets the speed negotiation options. Ethernet2 Enables/disables the Ethernet interface (PC port) and sets the speed negotiation options. ExtensionLabel Customizes the extension label displayed on the second line of an idle phone. GmtOffset Sets the time zone for the phone relative to GMT. GreyLevels Adjusts the light and dark gray levels of the LCD display. HeadsetCtl Enables/disables switchhook control via current detection on the headset interface. HttpServerEnable Disables the built-in HTTP server. HttpServerPort Specifies the port on which the HTTP server receives Transmission Control Protocol (TCP) traffic. Layer2Audio Sets outbound tagging on audio packets. Layer2Signaling Sets outbound tagging on signaling packets. MaxJitter Sets the maximum time interval that the jitter buffer can utilize when dealing with delayed or misordered packets. 6AOSAG0001-31A Copyright © 2011 ADTRAN, Inc. 47 Configuring Common Features ADTRAN IP 700 Series Phone Administrator Guide Table 8. Phone Customization Overview (Continued) Parameter Description PhoneLabel Customizes the label displayed on the top line of the phone (e.g., the user name or company name). RtpBase Sets the base port from which the phone transmits and receives media. SetupPassword Customizes the password for restricted administration settings on the phone. SiteOption Sets the option number that the phone will request during DHCP transactions. If a value other than the default option 157 is set in a configuration file, the phone will re-initiate DHCP procedures using the new option. SystemPhonebook Indicates the file name of the system phone book file. TimeFormat Indicates the clock format as either 12 hour with a.m./p.m., or 24 hour. Modifying the Splash Screen You can customize the IP phone’s splash screen presented during boot up by downloading a 216 x 336 pixel, 16-color gray-scale bitmap file to the parameter IconPixmap. Most graphics programs can be used to modify and save the file. When defining the splash screen, always begin by using the provided default .bmp file. This makes it easier to create accurate files. Use only the four colors (black, white, light gray, and dark gray) in the color palette of the default file. Bitmap Layout The bitmap is built in blocks of 16 x 16 pixels. There are 14 x 21 blocks in the IP phone bitmap. The right most block is only half the width of a normal block or 8 pixels. Each row is one block in height. The bitmap begins the drawing at the top left corner of each block. Both the IP 706 and IP 712 phone models use eight rows for the splash screen. 48 Copyright © 2011 ADTRAN, Inc. 6AOSAG0001-31A IP 700 Series Phone Administrator Guide 9. Troubleshooting TROUBLESHOOTING This section provides tables listing common problems and their resolutions, as well as instructions for performing specific tasks to correct errors with your phone. The following topics are covered in this section: • Basic Troubleshooting on page 49 • Advanced Troubleshooting on page 50 • Accessing the Phone Status Display Menus on page 51 • Diagnostic Tests on page 52 • Resetting the Phone on page 55 • Restoring Factory Defaults on page 55 • Deleting a Personal Phone Book on page 55 Basic Troubleshooting Table 9 below lists basic problems that may occur with your IP phone, along with their suggested solutions. Table 9. Basic Troubleshooting Problem Description Solution Suggestion Phone does not activate when it’s plugged in and nothing appears on the display. The phone may not be receiving power. Make sure the Ethernet cable is plugged into the correct jack and that the power source is plugged into a working outlet. Phone has information on the display, but does not respond to pressed keys. Restart the phone by unplugging the Ethernet cable from the jack and plugging it back in. Display shows an error or informational message. Check the Advanced Troubleshooting Chart on page 50 for the specific error message. Audio quality is poor on both the handset and speaker. You hear clipped, garbled, or severely delayed speech. Various potential network issues may be causing this problem. Contact your network administrator and provide information about the time and duration of the event. No audio from the handset, but the speaker works. Make sure the handset is properly plugged into the phone. Try swapping a handset from a similar phone to see if the handset or cord is defective. The Web interface doesn’t work or only works intermittently. Your company may be using a proxy server. To bypass it when accessing your phone, follow the procedure in Using the Administrator’s Web Interface on page 22. The phone’s IP address may also have changed since the user last accessed their Web interface. Be sure you are using the proper IP address to connect to the phone by reviewing the instructions in Using the Administrator’s Web Interface on page 22. 6AOSAG0001-31A Copyright © 2011 ADTRAN, Inc. 49 Troubleshooting ADTRAN IP 700 Series Phone Administrator Guide Advanced Troubleshooting Table 10 below lists more advanced problems which consist of error messages encountered during the boot up process, and also network connectivity issues. It also provides their suggested solutions. Table 10. Advanced Troubleshooting Chart Problem Description Solution Suggestion Unregistered phone icon displays next to the line key: This indicates the phone is unable to register this line with the Registrar server. Make sure the Reg.x.AuthUserId and Reg.x.AuthPassword are specified for registration. Also, make sure the Reg.x.RegServer address is correct. Phone displays Duplicate IP Address during boot up. The phone has been given an IP address that is already in use. If you are using a manually configured IP address, use the Phone Settings menu on the IP phone to choose an available IP address. Phone displays Network LAN Link is Down. There are several reasons for this error message. The LAN cable could be disconnected, the phone could be unable to negotiate a link to the Ethernet switch because of a speed or duplex incompatibility, or any number of other network failures. Make sure the LAN cable is connected. Contact the network administrator to troubleshoot possible network failures. Problems downloading configuration or other files. Closely observe the error message(s) on the phone display when the phone starts. The problem could be due to an incorrectly named configuration file (refer to Automating Configuration on page 37). It could also be due to an incorrectly specified server address, an unreachable server, an error in configuration of the files on the FTP/TFTP server, or an error in the AppName, BootName, or Include parameter that was specified. Review these items to be sure they are correctly specified. Phone displays TFTP Server Unreachable or FTP Server Unreachable during boot up. Ensure that a valid IP address has been provided via DHCP or manually (from the phone’s user interface) for the TFTP or FTP server. Phone displays Download of information file failed. This error indicates that a TFTP server address was supplied to the phone, but the file adtran_info.txt was not found on the TFTP server. This file is optional, and this message is not a cause for concern unless adtran_info.txt is being used. In that case, load the file adtran_info.txt on the TFTP server. 50 Copyright © 2011 ADTRAN, Inc. 6AOSAG0001-31A IP 700 Series Phone Administrator Guide Troubleshooting Table 10. Advanced Troubleshooting Chart (Continued) Problem Description Solution Suggestion Phone displays Download of main config file failed. This error indicates that the file adtran_<mac address>.txt could not be found on the FTP or TFTP server. One unique configuration file for every phone should be placed in the root directory. The phone may not operate properly if this error message is displayed. The phone does cache and reuse configuration files from the last successful boot sequence if this error happens, which may help bridge a temporary outage. Phone displays The SNTP server could not be contacted. This error indicates that the server specified in DHCP option 4, 42, or the parameter SntpServer could not be contacted. The proper time will not be displayed if this problem is not corrected. Specify a different server. Accessing the Phone Status Display Menus The IP phone status display menus list many of the phone’s settings and configurations beneficial in troubleshooting your phone. This is where you will find the model, part, and serial numbers, as well as the network and firmware settings. Use the following steps to access phone status information: 1. Select Menu. 2. Select 1 for Phone Status. 3. Select 1 through 5 for the corresponding parameter you wish to view. 4. Follow the on-screen prompts as detailed in the following sections. General Display The General option displays information, such as model, part, and serial number. To access the General status information, select 1 from the Phone Status menu. Select Exit from the soft key menu to return to the Phone Status menu. Network Display The Network option displays information regarding the network configuration for the IP phone, such as link, negotiation, speed, duplex, and DHCP status. To access the Network status information, select 2 from the Phone Status menu. Select Exit from the soft key menu to return to the Phone Status menu. Line Keys The Line Keys option displays all the line keys on the IP phone and their assigned type, such as speed, DND, etc. To access the Line Keys status information, select 3 from the Phone Status menu. Select Exit from the soft key menu to return to the Phone Status menu. 6AOSAG0001-31A Copyright © 2011 ADTRAN, Inc. 51 Troubleshooting ADTRAN IP 700 Series Phone Administrator Guide Firmware Version The Firmware Version option displays the version of the current firmware, the date it was installed, the firmware used for booting, the date it was installed, and the configuration file version. To access the Firmware Version status information, select 4 from the Phone Status menu. Select Exit from the soft key menu to return to the Phone Status menu. Diagnostics The Diagnostics option displays six tests that can be executed on the IP phone to assist in diagnosing problems. These tests are explained in greater detail in the next section, Diagnostic Tests below. To access the Diagnostics test menu, select 5 from the Phone Status menu. Select Exit from the soft key menu to return to the Phone Status menu. Diagnostic Tests The following tests can be executed from the phone menus and provide a means for troubleshooting issues with these areas: • Audio Test on page 52 • Keypad Test on page 53 • LCD Test on page 53 • LED Test on page 54 • Ping Test on page 54 • Backlight Test on page 54 Each of the various tests are accessible from the Diagnostics menu. Use the following steps to access the Diagnostics menu: 1. Select Menu. 2. Select 1 for Phone Status. 3. Select 5 for Diagnostics. 4. Select 1 through 5 for the corresponding parameter you want to test. 5. Follow the on-screen prompts as described in the following sections. Audio Test The Audio Test can verify the audio is functioning properly through a chosen input and output device (Handset, Headset, or Speakerphone). Follow these steps to test the audio: 1. Select 1 from the Diagnostics menu. 2. Use the arrow keys to scroll through a list of input devices to test (Handset, Headset, and Speakerphone). 3. Press the Select soft key to choose the input device. 4. Use the arrow keys to scroll through a list of output devices to test (Handset, Headset, and Speakerphone). 52 Copyright © 2011 ADTRAN, Inc. 6AOSAG0001-31A IP 700 Series Phone Administrator Guide Troubleshooting 5. Press the Select soft key to choose the output device. 6. Toggle the Tone On/Tone Off soft key. 7. If the tone is heard through the chosen input/output device, the audio test has passed. 8. Select Exit to return to the idle screen. If no tone is heard, use other combinations of audio tests to determine which device is malfunctioning. Verify the device is connected properly. Keypad Test The Keypad Test can verify if the keys on the phone are functioning properly. Use the following steps to test the keypad: 1. Select 2 from the Diagnostics menu. 2. Press any key and verify that the correct name of the key appears in the top left corner of the LCD display. 3. Press the Exit soft key twice to exit. 4. If a key does not display properly, notify your reseller or contact ADTRAN technical support. LCD Test The LCD Test can verify the LCD screen is functioning normally. Use the following steps to test the LCD screen: 1. Select 3 from the Diagnostics menu. 2. Make a selection from the soft key options shown below: Table 11. LCD Test Options Option Action Function All On Turns on all LCD pixels in the display area for 5 seconds. Used to see if any portion of the LCD is not functioning properly. Pattern Displays a 4-level gray-scale pattern for 5 seconds. Used to view the shading ability of the LCD screen. All Off Turns off all LCD pixels in the display area for 5 seconds. Used to verify that all areas of the LCD respond properly. 3. Select the Exit soft key to return to the idle screen. 6AOSAG0001-31A Copyright © 2011 ADTRAN, Inc. 53 Troubleshooting ADTRAN IP 700 Series Phone Administrator Guide LED Test The LED Test can verify that all light emitting diodes (LEDs) on the phone function properly. Use the following steps to perform an LED test: 1. Select 4 from the Diagnostics menu. 2. Select the All On soft key. 3. Verify the four LED lights on the phone face are working properly. 4. Select the All Off soft key. 5. Press the Exit soft key to return to the idle screen. Ping Test The Ping Test can verify network connectivity by checking the ability to ping a valid IP address. Use the following steps to perform a ping test: 1. Select 5 from the Diagnostics menu. 2. Using the keypad, enter the IP address to ping. (Be sure the IP address you enter is valid and accessible.) When entering one or two digit numbers for portions of the IP address, use the * key to move to the next entry segment. For example, to enter an IP address of 10.10.151.201, you would press the following key sequence from the number pad: 10*10*151*201. 3. Select the Ping soft key. The progress of the ping test will display, indicating the packet number being sent and providing an overall outcome of success or fail. 4. Select the Exit soft key to return to the idle screen. Backlight Test The Backlight diagnostic option verifies the LCD screen backlighting feature is functioning. Use the following steps to test the backlight: 1. Select 6 from the Diagnostics menu. 2. Select the Off soft key. If working properly, the backlight will turn off. 3. Select the On soft key. The backlight should turn back on. 4. Select the Exit soft key to return to the idle screen. 54 Copyright © 2011 ADTRAN, Inc. 6AOSAG0001-31A IP 700 Series Phone Administrator Guide Troubleshooting Resetting the Phone There are times when it is necessary to reset the phone, such as to accept new settings or to attempt to register the phone with the network. Resetting the phone does not erase the user’s personal configurations. It only reloads the firmware and any updates from the network server. If there are no updates available, none of the settings should change from the previous state. It does renegotiate IP address and DHCP settings, so these items may change from the previous state. Use the following steps from the phone’s user interface to reset the phone: 1. Select Menu. 2. Select 2 for Phone Settings. 3. Select 9 for Reset. 4. Press the Reset soft key. You can also reset the phone from the Web interface. Refer to Reset Phone on page 36. Restoring Factory Defaults It is possible to erase configuration settings on a phone and restore it to the state that is was received from the factory. Keep in mind that using the Factory option will erase all settings customized locally at the phone, such as personal speed dial entries, phone book entries, line key settings, and distinctive rings. Any customization that is completed and delivered from the network server will be retained as these are provided when the phone reloads at startup. Follow these steps to restore the factory default settings: 1. Select Menu. 2. Select 2 for Phone Settings. 3. Select 9 for Reset. 4. Press the Factory soft key. 5. Confirm this selection by pressing the Ok soft key. You can also restore the factory default settings from the Web interface. Refer to Reset Phone on page 36. Deleting a Personal Phone Book The personal phone book created on an individual phone can be quickly deleted through the Reset option on the phone’s LCD menus. To delete a phone book from the phone, follow these steps: 1. Select Menu. 2. Select 2 for Phone Settings. 3. Select 9 for Reset. 4. Press the Del Phbk soft key. 5. Confirm this selection by pressing the Ok soft key. 6AOSAG0001-31A Copyright © 2011 ADTRAN, Inc. 55 Troubleshooting 56 ADTRAN IP 700 Series Phone Administrator Guide Copyright © 2011 ADTRAN, Inc. 6AOSAG0001-31A APPENDIX A. CONFIGURATION AND LINE PARAMETERS The following tables list all of the parameters found in the configuration files downloaded to each phone at boot up. Table 12 below spans several pages and covers the Configuration Parameters. Table 13 on page 78 covers only the Line Parameters. The Source column defines the methods that can be used to change or set the parameter including editing the configuration file, manually entering the setting from the phone’s user interface, accessing the settings through the administrator’s Web interface, or using DHCP site-specific option. The default settings are called out in the Description column. If no default is given, there is no default setting present for that command. Table 12. Configuration Parameters Parameter AdminPassword Value Type ASCII String Description Sets the message digest 5 (MD5) hash of the password to access the administrator’s Web page. This password is saved in flash memory after a value has been received in a config file so it can be enforced on subsequent reboots. It is cleared by the restore factory defaults command. Only the password in the hashed string can be changed. The admin:Adtran: part cannot be changed. Sources Config File Default: MD5 hash of “admin:Adtran:password” AlertSelect 0 to 2 Sets the policy for handling a preselected line on an idle phone when it rings. 0=No selection change 1=Select upon audible alert (default) 2=Select away to eligible idle preference Config File Web Interface AppName ASCII String Characters Indicates the name of the application image in the phone. The application file name can contain up to 24 characters. The combination of file name and path can be up to 32 characters long. A new application name is specified in a configuration file and is checked against the version in flash to decide if a new version needs to be downloaded. Config File BackLight 0 to 9999 Indicates the number of minutes the backlight remains lit when the phone is idle. The backlight turns on whenever there is activity on the phone. A setting of 0 will leave the backlight on indefinitely. Config File Web Interface Default: 5 6AOSAG0001-31A Copyright © 2011 ADTRAN, Inc. 57 Appendix A. Configuration and Line Parameters ADTRAN IP 700 Series Phone Administrator Guide Table 12. Configuration Parameters (Continued) Parameter Value Type Description Sources BootName ASCII String Indicates the name of the boot image in the phone. The file name can contain up to 24 characters. The combination of file name and path can contain up to 32 characters. A new name is specified in a configuration file and is checked against the version in flash to decide if a new version needs to be downloaded. Config File Button.z.Label ASCII Assigns the button label to the button at location z. This label has priority over a label defined Reg.x.Label for line-type buttons. The string (or UTF-8) must be 15 characters or less. Config File Web Interface Button.z.Line 0 to 11 Assigns the value of x in Reg.x.* to the line key at location z. Z can be 1 to 6 on the IP 706 phone and 1 to 12 on the IP 712 phone. Config File Web Interface Button.z.Realm Internal, External, PBX, Other Assigns a call appearance type to a DSS or speed dial key. It is used to select the facility type to originate calls. Other may be used for post-call setup dialing strings. Config File Web Interface Button.z.Type DND, Line Assigns the type to the line key at location z. At least one key must be configured as a Line to make or receive calls. Config File Web Interface CallerIdPopup True or False Globally disables the incoming call pop-up window. This may be overridden by a different setting assigned in Reg.x.CallerIdPopup. Config File Phone Interface Web Interface Default: True CIDDisplayWithNumber True or False Enables (true) the display of the number of an incoming call along with the name. Disabling (false) this feature causes only the name of the incoming call to be displayed. Config File Web Interface Default: True Country Up to 3 ASCII Characters 1 to 255 Specifies the country that is used by the Include parameter to identify a particular file. DHCP Config File Phone Interface Default: 1 58 Copyright © 2011 ADTRAN, Inc. 6AOSAG0001-31A IP 700 Series Phone Administrator Guide Appendix A. Configuration and Line Parameters Table 12. Configuration Parameters (Continued) Parameter DateFormat Value Type 0 to 8 Description Defines how the date is displayed. Available formats are: 0=YYYY MM DD 1=DD-MM-YY 2=YYYY-MM-DD 3=DD/MM/YYYY 4=DD/MM/YY 5=DD-MM-YY 6=MM/DD/YY 7=MM DD 8=MM/DD/YYYY DD= Day of Month MM=Numeric Month YY=Last 2 digits of Year YYYY= 4 digit Year Sources Config File Phone Interface Web Interface Default: 8 DefaultMedia ASCII String Sets the preferred CODEC, silence suppression algorithm, and packet size for outgoing packets. Media types are encoded as: Codec/Silence/Packet-Time Config File Web Interface Where: Codec = pcmu, pcma, lwb, g729a, or g722 Silence = on or off Packet-Time = for G.711 it can be 5 to 80 ms in 5 ms steps, for G.729 it can be 10 to 80 ms in 10 ms steps, and for Linear Wideband (256 kbps), it can be -5 to 20 ms in 5 ms steps Example: g729a/off/20, pcma/on/30, pcmu/off/20 DHCP N/A Enables or disables DHCP. Phone Interface Web Interface Default: 1 DialDelayExternal 0 to 99 Indicates the dial delay value for external call appearances. If set to 0, the timer is disabled. Be aware of interactions with the dial plan timer. Config File Web Interface Default: 3 6AOSAG0001-31A Copyright © 2011 ADTRAN, Inc. 59 Appendix A. Configuration and Line Parameters ADTRAN IP 700 Series Phone Administrator Guide Table 12. Configuration Parameters (Continued) Parameter DialDelayIntercom Value Type 0 to 99 Description Indicates the dial delay value for intercom call appearances. If set to 0, the timer is disabled. Be aware of interactions with the dial plan timer. Sources Config File Web Interface Default: 3 DialDelayPBX 0 to 99 Indicates the dial delay value for PBX (i.e., dial 9) call appearances. If set to 0, the timer is disabled. Be aware of interactions with the dial plan timer. Config File Web Interface Default: 3 DialPlanIntercom ASCII String Indicates the dial plan for intercom call appearances. This string of characters specifies one or more dial plans for the phone. Config File Web Interface DialPlanExternal ASCII String Indicates the dial plan for external call appearances. This string of characters specifies one or more dial plans for the phone. Config File Web Interface DialPlanPBX ASCII String Indicates the dial plan for PBX call appearances. This string of characters specifies one or more dial plans for the phone. Config File Web Interface DialplanSendPound True or False Indicates whether to send # to the proxy when it is used to terminate a dial string. Config File Web Interface Default: False DndBusyReject True or False Defines DND busy reject behavior: True=Return SIP 486 response False=Null Config File Web Interface Default: True DndDelay 0 to 30 Specifies the number of seconds before the DND behavior is triggered. Config File Web Interface Default: 0 DndRedirected True or False Enables redirecting the DND call to the URI specified in DndRedirectAddress after the time delay (in seconds) specified in DndDelay. True=Redirect to DndRedirectAddress False=Null Config File Web Interface Default: False 60 Copyright © 2011 ADTRAN, Inc. 6AOSAG0001-31A IP 700 Series Phone Administrator Guide Appendix A. Configuration and Line Parameters Table 12. Configuration Parameters (Continued) Parameter Value Type Description Sources DndRedirectAddress.x URI or E.164 Specifies the address to redirect calls to if the DndRedirect parameter is true. X refers to the line specified in reg.x.*. Config File Web Interface DND Shortcut True or False Specifies the last button on the phone (6th button on IP 706, 12th button on IP 712) to be a DND button. When disabled, the button is returned to its original type. Phone Interface Web Interface DnsAddress Up to 2 Comma Separated IP Addresses List up to two domain naming system (DNS) Servers in dotted decimal format: 192.168.0.1, 192.168.0.2 This must be configured unless numeric IP addresses are supplied for all parameters and FQDN are not used. DHCP Config File Phone Interface Web Interface DscpAudio 0 to 63 Sets the DSCPs for outbound audio packets from the phone. This is used to improve QoS handling on the network. Config File Web Interface Default: 46 DscpSignaling 0 to 63 Sets the DSCP for outbound signaling packets from the phone. This is used to improve QoS handling on the network. Config File Web Interface Default: 26 DstEnable True or False Enables or disables DST adjustments beginning at the hour, week, day, and month specified in DstStart through the time specified in DstEnd. Config File Phone Interface Web Interface Default: True DstEnd ASCII String Indicates the end date of DST in MMWDHH format. Config File Web Interface Where: MM is the month (1-12), W is the week of the month (1-5), D is the day of week (1=Sunday, 2=Monday, 3=Tuesday, 4=Wednesday, 5=Thursday, 6=Friday, 7=Saturday), and HH is the hour in 24-hour format. Default: 111102 6AOSAG0001-31A Copyright © 2011 ADTRAN, Inc. 61 Appendix A. Configuration and Line Parameters ADTRAN IP 700 Series Phone Administrator Guide Table 12. Configuration Parameters (Continued) Parameter DstStart Value Type ASCII String Description Indicates the start date of DST in MMWDHH format. Sources Config File Web Interface Where: MM is the month (1-12), W is the week of the month (1-5), D is the day of week (1=Sunday, 2=Monday, 3=Tuesday, 4=Wednesday, 5=Thursday, 6=Friday, 7=Saturday), and HH is the hour in 24-hour format. Default: 032102 DtmfLevels -1 to -20 Adjusts the level of DTMF tones played into the network from the phone. These are attenuation levels in dB, so -1 is louder than -20. Config File Web Interface Default: -10 Ethernet1 ASCII String Enables/disables the Ethernet interface (LAN port) and sets the speed negotiation options. Config File Phone Interface Web Interface Example: Ethernet1 Status, Speed/Duplex Where: Status is Enable or Disable Speed/Duplex is one of the following: • Auto • 10/FD • 10/HD • 100/FD • 100/HD Default: Enable, Auto 62 Copyright © 2011 ADTRAN, Inc. 6AOSAG0001-31A IP 700 Series Phone Administrator Guide Appendix A. Configuration and Line Parameters Table 12. Configuration Parameters (Continued) Parameter Ethernet2 Value Type ASCII String Description Enables/disables the Ethernet interface (PC port) and sets the speed negotiation options. Sources Config File Phone Interface Web Interface Example: Ethernet2 Status, Speed/Duplex Where: Status is Enable or Disable Speed/Duplex is one of the following: • Auto • 10/FD • 10/HD • 100/FD • 100/HD Default: Enable, Auto ExtensionLabel ASCII String or UTF-8 Encoded Customizes the extension label displayed on the second line of an idle phone. Config File Phone Interface Web Interface FeatureExpires 10 to 65636 Defines the subscription interval in seconds for FeatureUri notifications. Config File Web Interface Default: 3600 FeatureUri.x Request URI Specifies the server (in URI format) to which feature-related state changes are sent. X refers to the line specified in reg.x.*. Config File Web Interface FtpLogin Up to 16 ASCII Characters Specifies the login that is used to access the FTP server. DHCP Web Interface Phone Interface adtran_info.txt Default: admin FtpPassword Up to 16 ASCII Characters Specifies the password used to access the FTP server. Default: password FtpServers 6AOSAG0001-31A FQDN or IP Specifies up to two FTP servers, in comma Address separated format. If a server is unavailable, the phone goes through the list until a working server is found. Either FtpServers, HttpServers, HttpsServers, or TftpServers may be specified as the non-null value used to determine the download method for configuration files. Copyright © 2011 ADTRAN, Inc. DHCP Web Interface Phone Interface adtran_info.txt DHCP Phone Interface Web Interface 63 Appendix A. Configuration and Line Parameters ADTRAN IP 700 Series Phone Administrator Guide Table 12. Configuration Parameters (Continued) Parameter Value Type Description Sources GatewayAddress N/A Specifies the gateway address for the phone. DHCP Phone Interface Web Interface GmtOffset -1200 to 1300 Sets the time zone for the phone relative to GMT in hours and minutes. DHCP Config File Web Interface For example: -500 is EST. The phone learns the time server location through DHCP Option 42 and applies the time zone offset available through DHCP Option 2. If DHCP options are being used to update the date and time on the phone, this parameter should be commented out in the configuration file by placing a # before the parameter. For example, #GmtOffset. Default: -600 GrayLevels ASCII String Adjusts the light and dark gray levels of the LCD display. 0 is white and 63 is black. Low middle gray level may have the values 0 to 63. High middle gray level may have the values 0 to 63. Config File Phone Interface Web Interface Example: 20,40. 64 Copyright © 2011 ADTRAN, Inc. 6AOSAG0001-31A IP 700 Series Phone Administrator Guide Appendix A. Configuration and Line Parameters Table 12. Configuration Parameters (Continued) Parameter HandsetLevels Value Type ASCII String Description Sets the audio levels of the handset using a comma separated list of the following settings. The default values are listed next to the name: TxGain 11544 RxGain1 183 RxGain2 258 RxGain3 365 RxGain4 516 RxGain5 728 RxGain6 1029 RxGain7 1631 RxGain8 2303 RxGain9 3254 RxGain10 4596 Sidetone 579 Handset DTMF Attenuation 13 Sources Config File Caution: Do not change these values unless instructed by ADTRAN Technical Support. Doing so could break TIA-810 compliance. HeadsetCtl True or False Config File Enables/disables switchhook control via current detection on the headset interface. Web Interface Default: False HeadsetLevels ASCII String Sets the headset audio levels using a comma separated list of the following settings. The default values are listed next to the name: TxGain 6144 RxGain1 183 RxGain2 258 RxGain3 365 RxGain4 516 RxGain5 728 RxGain6 1029 RxGain7 1631 RxGain8 2303 RxGain9 3254 RxGain10 4596 Sidetone 917 Headset DTMF Attenuation 13 Config File Caution: Do not change these values unless instructed by ADTRAN Technical Support. Doing so could break TIA-810 compliance. 6AOSAG0001-31A Copyright © 2011 ADTRAN, Inc. 65 Appendix A. Configuration and Line Parameters ADTRAN IP 700 Series Phone Administrator Guide Table 12. Configuration Parameters (Continued) Parameter HfaaiBeep Value Type True or False Description Enables (true) or disables (false) HFAAI notification. If enabled, a 600 ms tone is played before an HFAAI call is presented on the phone. Sources Config File Web Interface Default: True HfaaiEnable True or False Enables (true) or disables (false) HFAAI calls on the phone. Config File Web Interface Phone Interface Default: True HoldReminder 0 to 300 Indicates the number of seconds before the hold reminder tone is played. If set to 0, the hold reminder is disabled. Config File Web Interface Default: 0 HoldSignal 2543 or 3264 Specifies the type of hold to be used. Incoming signaling can be of either type. Config File Web Interface Default: 3264 HttpLogin Up to 16 ASCII Characters Specifies the login that is used to access the HTTP server. Default: admin HttpPassword HttpServerEnable Up to 16 ASCII Characters True or False DHCP Web Interface Phone Interface adtran_info.txt Default: password DHCP Web Interface Phone Interface adtran_info.txt Enables (true) or disables (false) the internal HTTP server. Config File Web Interface Specifies the password used to access the HTTP server. Default: True HttpServerPort 0 to 65536 Specifies the port on which the HTTP server receives TCP traffic. Config File Web Interface Default: 80 HttpServers 66 FQDN or IP Specifies up to two HTTP servers, in Address comma separated format. If a server is unavailable, the phone goes through the list until a working server is found. Either FtpServers, HttpServers, HttpsServers, or TftpServers may be specified as the non-null value used to determine the download method for configuration files. Copyright © 2011 ADTRAN, Inc. DHCP Phone Interface Web Interface 6AOSAG0001-31A IP 700 Series Phone Administrator Guide Appendix A. Configuration and Line Parameters Table 12. Configuration Parameters (Continued) Parameter HttpsLogin Value Type Up to 16 ASCII Characters Description Specifies the login that is used to access the HTTPS server. Default: admin HttpsPassword Up to 16 ASCII Characters Specifies the password used to access the HTTPS server. Default: password Sources DHCP Web Interface Phone Interface adtran_info.txt DHCP Web Interface Phone Interface adtran_info.txt HttpsServers FQDN or IP Specifies up to two HTTPS servers, in Address comma separated format. If a server is unavailable, the phone goes through the list until a working server is found. Either FtpServers, HttpServers, HttpsServers, or TftpServers may be specified as the non-null value used to determine the download method for configuration files. DHCP Phone Interface Web Interface IcmpArpTimeout ASCII String Config File Web Interface Specifies the number of seconds before routing table entries created by ICMP redirects are timed out of the routing table. If 0, then they never time out. Default: 0 IconPixmap Up to 32 ASCII Characters Specifies the path and file name to the server that contains the icon pixmap. This file is downloaded from the FTP/TFTP server upon boot. Format is .bmp, 16 color. Config File Default: iconpixmap.bmp IdleGroupPreference 0 to 11 Specifies which line will be preselected when idle, and then used for call origination when the phone goes off-hook. The IdleSelectOrder parameter further defines the policy for selecting a specific physical line key should more than one be assigned to that line. Config File Web Interface IntercomGroupPreference 0 to 11 Specifies which line (should be of GI type) represents the intercom lines on the phone. For key system mode, set this to the GI configured line. It appears on the phone as Intercoms. Config File Web Interface 6AOSAG0001-31A Copyright © 2011 ADTRAN, Inc. 67 Appendix A. Configuration and Line Parameters ADTRAN IP 700 Series Phone Administrator Guide Table 12. Configuration Parameters (Continued) Parameter IdleSelectOrder Value Type 0 to 4 Description Defines the idle and originate preference selection order: 0=Select previous active and connected 1=Select lowest available index 2=Select highest available index 3=Select circular form, previous active and connected 4=No Select (incoming calls presented on highest available) Sources Config File Web Interface Default: 1 Include Up to 64 ASCII Characters Specifies a file name that is included in the master configuration file. Files may be specified completely, or may include the variable $Hardware. The value of the Hardware Version (programmed into flash at the factory, e.g., K01M01P01L01) is substituted for $Hardware when the file name is created. This will permit parameters to be specified based on a specific hardware release. Config File IPAddress N/A Specifies the IP address for the phone. DHCP Phone Interface Web Interface Default: 0.0.0.0 Layer2Audio 0 to 7 Specifies outbound tagging on audio packets. Config File Default: 5 Layer2Signaling 0 to 7 Specifies outbound tagging on signaling packets. Config File Web Interface Default: 3 Layer2Tagging True or False Enables (true) or disables (false) VLAN tagging. DHCP Phone Interface Web Interface Default: False LineSeizeFaliure True or False Enables tone notification when attempts to seize an SCA line fails (e.g., another user seizes the call first). Config File Web Interface Default: True 68 Copyright © 2011 ADTRAN, Inc. 6AOSAG0001-31A IP 700 Series Phone Administrator Guide Appendix A. Configuration and Line Parameters Table 12. Configuration Parameters (Continued) Parameter MaxJitter Value Type 10 to 300 Description Sets the maximum time interval that the jitter buffer can utilize when dealing with delayed or misordered packets. Valid values are 10 to 300 ms in 1 ms steps. Sources Config File Web Interface Default: 50 MessagesCallback ASCII String Indicates the user part of a SIP URL, such as 6133, or a valid SIP URL, such as [email protected], that is called when the Message button is pressed. Config File Web Interface Default: *98 MissedCallDisplay True or False Enables (true) or disables (false) missed calls displayed on the main screen of the phone’s user interface. Setting the parameter to false disables the missed call display, though missed calls are still recorded in the missed call logs. Config File Web Interface Default: True MwiLine 0 to 11 Specifies the line on which external MWI server subscribes originate. Config File Web Interface MwiExpires 10 to 65536 Specifies the expiration interval of the MWI server subscribes. Config File Web Interface Default: 3600 MwiSubscribeUri Request URI Specifies the Request URI sent to the external MWI server. Config File Web Interface MwiPrimary 0 to 12 Specifies the primary voice mailbox association. If a primary has not been set, it should be assumed that a primary mailbox does not exist. 0 through 11 refer to lines on the NetVanta server, and 12 refers to the external mailbox. Config File Web Interface MwiSecondary 0 to 12 Specifies the secondary mailbox association. If a secondary has not been set, it should be assumed that a secondary mailbox does not exist. 0 through 11 refer to lines on the NetVanta server, and 12 refers to the external mailbox. Config File Web Interface 6AOSAG0001-31A Copyright © 2011 ADTRAN, Inc. 69 Appendix A. Configuration and Line Parameters ADTRAN IP 700 Series Phone Administrator Guide Table 12. Configuration Parameters (Continued) Parameter MwiCadence Value Type 0, 1, or 2 Description Selects the operating mode of the illuminated Messages function key. 0 = On if unread messages, off if none 1 = Flash at a 1 cycle/second rate if there are unread messages and off if none 2 = Flash 500 ms off and 500 ms on for each unread message. Multiple mailbox states are separated by 2 seconds off. If no unread messages, then the LED is off. Sources Config File Web Interface Default: 0 OutboundProxy.z.Address.y FQDN or IP Address of the Outbound proxy server. Z Address may have a value between 0 and 11. Y = the server number and may be 1 or 2. Config File Web Interface OutboundProxy.z.Port.y Config File Web Interface 1 to 65536 Port for the Outbound Proxy Server. Z may have a value between 0 and 11. Y = the server number and may be 1 or 2. Default: 5060 OutboundProxyMaxRetry 1 to 3 Number of attempts to contact a server before the next one is tried. Config File Web Interface Default: 3 ParkZoneUri.x Request URI Specifies the Request URI that is used for outgoing invites to the park zone server. x refers to the line specified in reg.x.*. Config File Web Interface PhoneLabel ASCII String or UTF-8 Encoded Customizes the label displayed on the top line of the phone (e.g., the user name or company name). Config File Phone Interface Web Interface PickupZoneUri.x Request URI Request URI for outgoing invites to the pickup zone server. X refers to the line specified in reg.x.*. Config File Web Interface Play2833Events True or False Enables (true) or disables (false) playing RFC 2833 events. Config File Web Interface Default: False PopUpHold 0 to 5 Defines the number of seconds to leave the caller ID pop-up window open when an HFAAI or page-type call is received. Once the time has elapsed, the caller ID pop-up window is automatically closed. Config File Web Interface Default: 3 70 Copyright © 2011 ADTRAN, Inc. 6AOSAG0001-31A IP 700 Series Phone Administrator Guide Appendix A. Configuration and Line Parameters Table 12. Configuration Parameters (Continued) Parameter PreselectAnswer Value Type True or False Description Allows the user to answer an incoming call by pressing the line key on a ringing line. If the phone is idle, pressing the line key will activate the speakerphone. True = Select and answer/retrieve bridge False = Select only Sources Config File Web Interface Default: True PreselectOriginate True or False Originates a call when an idle line key is pressed. If the phone is idle, the speakerphone is activated. True = Select and originate False = Select only Config File Web Interface Default: True PostselectAutoHold True or False Enables or disables placing deselected calls on hold automatically if another line is selected. Otherwise, the deselected call will be dropped. True = Hold current call False = Disconnect current call Config File Web Interface Default: True ProxyServer.z.Address.y FQDN or IP An IP address, FQDN, or domain name for Address one or more proxy servers. If only a proxy domain name is specified, a SIP SRV record for the proxy must be configured in the DNS server and the ProxyServer.z.Port.y must be set to 0. Nonregistration-related SIP call signaling is sent to this address. Y = the server number. May be 1 or 2. Z may have a value between 0 and 11. Config File Web Interface ProxyServer.z.Port.y 0 to 65535 Config File Web Interface Port of the Registration Server. Y may be 1 or 2. 1 is the primary and 2 is the backup. If set to 0, then the value returned in the DNS_SRV lookup is used. A setting of zero also causes a DNS NAPTR lookup of the value in ProxyServer.z.Address.y. Z may have a value between 0 and 11. Default: 5060 ProxyServerMaxRetry 1 to 3 Number of attempts to contact a server before the next one is tried. Config File Web Interface Default: 3 6AOSAG0001-31A Copyright © 2011 ADTRAN, Inc. 71 Appendix A. Configuration and Line Parameters ADTRAN IP 700 Series Phone Administrator Guide Table 12. Configuration Parameters (Continued) Parameter RegServer.z.Address.y Value Type Description FQDN or IP An IP address, FQDN, or domain name for Address one or more registrar servers. If only a proxy domain name is specified, a SIP SRV record for the registrar must be configured in the DNS server and the RegServer.z.Port.y must be set to 0. Sources Config File Web Interface Y = the server number. May be 1 or 2. 1 is the primary and 2 is the backup. Z may have a value between 0 and 11. RegServer.z.Port.y FQDN or IP Port of the Registration Server. Address Y may be 1 or 2. 1 is the primary and 2 is the backup. If set to 0, then the value returned in the DNS_SRV lookup shall be used. A setting of zero also causes a DNS NAPTR lookup of the value in RegServer.z.Address.y. Z may have a value between 0 and 11. Config File Web Interface Default: 5060 RegServerExpires.z 10 to 65536 Registration interval in seconds. This setting also controls the subscription interval for Call-Info subscriptions. Z may have a value between 0 and 11. Config File Web Interface Default: 3600 RegServerMaxRetry 1 to 3 Number of attempts to contact a server before the next one is tried. Config File Web Interface Default: 3 72 Copyright © 2011 ADTRAN, Inc. 6AOSAG0001-31A IP 700 Series Phone Administrator Guide Appendix A. Configuration and Line Parameters Table 12. Configuration Parameters (Continued) Parameter RingerLevels Value Type ASCII String Description Set the audio levels of the ringer using a comma separated list of the following settings. The following default values (in decimal) are listed next to the name for clarity: RxGain1 205 RxGain2 290 RxGain3 410 RxGain4 579 RxGain5 817 RxGain6 1154 RxGain7 1631 RxGain8 2303 RxGain9 3254 RxGain10 4596 Sources Config File Caution: Do not change these values from their defaults unless instructed by ADTRAN Technical Support. Doing so could break TIA-810 compliance. RtpBase ASCII String Sets the base port from which the phone transmits and receives media. The valid range should be an even number from 3000 to 65408. Config File Web Interface Given an RTP base, the phone should use the next 64 consecutive even numbers for RTP ports. If within that range an existing (reserved) odd or even User Datagram Protocol (UDP) port number is used, the phone should skip over an even/odd pair to the next even number. For example, if the user set rtpBase to 5550, 5552, 5556, 5558, etc. would be used. In this example, 5554 is skipped because 5555 is a reserved port used by the phonectl server. If an odd number is specified, the next lowest even number, if it fits the above limitations, is used. Default: 3000 6AOSAG0001-31A Copyright © 2011 ADTRAN, Inc. 73 Appendix A. Configuration and Line Parameters ADTRAN IP 700 Series Phone Administrator Guide Table 12. Configuration Parameters (Continued) Parameter SetupPassword Value Type ASCII String Description Customizes the MD5 hash of the password that is entered for restricted administration settings on the phone. This password is saved in flash memory after a value has been received in a config file so it can be enforced on subsequent reboots. It is cleared by the restore factory defaults command. Sources Config File Default: 1234 ServerType FTP, HTTP, HTTPS, TFTP Sets the server type to be configured. Web Interface SipKeepAlive True or False Enables (true) or disables (false) session timers. Config File Web Interface Default: True SipTimerBfh Config File Indicates the number of seconds before Web Interface the SIP B, F, and H timers expire. This parameter impacts the server failover time. 3 to 32 Default: 32 SipUdpPort 1 to 65536 Sets the port used to receive SIP UDP traffic. Config File Web Interface Default: 5060 SiteOption Up to 3 ASCII Characters Sets the option number that the phone will Config File Web Interface request during DHCP transactions. If a value other than the default option 157 is set in a configuration file, the phone will reinitiate DHCP procedures using the new option. Valid range is between 128 and 254. Default: 157 74 Copyright © 2011 ADTRAN, Inc. 6AOSAG0001-31A IP 700 Series Phone Administrator Guide Appendix A. Configuration and Line Parameters Table 12. Configuration Parameters (Continued) Parameter SntpServer Value Type Up to 3 Comma Separated FQDNs or IP Addresses Description Specifies a list of up to 3 time servers in FQDN or dotted decimal format, from which to retrieve the time and date information. If from DHCP, only 1 server may be specified. Example: 192.168.0.1, 192.168.0.3, 192.168.0.4 Sources DHCP Config File Web Interface The phone learns the time server location through DHCP Option 42 and applies the time zone offset available through DHCP Option 2. If DHCP options are being used to update the date and time on the phone, this parameter should be commented out in the configuration file by placing a # before the parameter. For example, #SntpServer. SpeakerLevels ASCII String Sets the speakerphone audio levels using a comma separated list of the following settings. The following default values are listed next to the name: TxGain 8192 RxGain1 258 RxGain2 410 RxGain3 649 RxGain4 1029 RxGain5 1631 RxGain6 2584 RxGain7 4096 RxGain8 5785 RxGain9 7283 RxGain10 10288 Speaker DTMF Attenuation 17 Config File Caution: Do not change these values from their defaults unless instructed by ADTRAN Technical Support. Doing so could break TIA-810 compliance. Speed.n.Label ASCII String Assigns the label to a button when an unused button is assigned to be Speed button. Speed members are placed on buttons not occupied by Line or DND buttons in ascending order of n. Config File Phone Interface Web Interface Speed.n.Number Numeric String Assigns the number to be dialed out when an unused button is assigned to be Speed button. Config File Phone Interface Web Interface 6AOSAG0001-31A Copyright © 2011 ADTRAN, Inc. 75 Appendix A. Configuration and Line Parameters ADTRAN IP 700 Series Phone Administrator Guide Table 12. Configuration Parameters (Continued) Parameter Speed.n.Realm Value Type Internal, External, PBX, Other Description Sources Assigns a call appearance type to a Speed dial button. Used to select the facility type to originate calls on. Other value may be used for post-call setup dialing strings. Config File Phone Interface Web Interface Default: Internal SpreHfaai ASCII String Specifies the dialing prefix used to initiate HFAAI calls. Config File Web Interface Default: ** SprePageOverhead ASCII String Specifies the dial access code used to access the overhead paging system. If this value is null, then overhead page is not presented on the soft key as an option. Config File Web Interface Default: *30 StunServer ASCII String Specifies the FQDN or IP address of the STUN server, which may be required for operating phones behind NAT routers. Config File Web Interface SubNetMask N/A Indicates the network mask for the phone. DHCP Phone Interface Web Interface Default: 0.0.0.0 SubsGrp.i.Type BLF Indicates the subscription type. The subscription interval is as specified in the FeatureExpires parameter. Config File Web Interface Default: BLF SubsGrp.i.Uri Request URI Indicates the Request URI to use in the subscribe sent to the server for subscribing to respective status group updates. The subscription interval is as specified in the FeatureExpires parameter. Config File Web Interface SubsGrp.i.Line 0 to 11 Assigns the value of x in reg.x.* to the subscription group i. The value of i can be 1 to 6 on the IP 706 and 1 to 12 on the IP 712 phone. Config File Web Interface Default: 0 76 Copyright © 2011 ADTRAN, Inc. 6AOSAG0001-31A IP 700 Series Phone Administrator Guide Appendix A. Configuration and Line Parameters Table 12. Configuration Parameters (Continued) Parameter SystemPhonebook Value Type ASCII String Description Indicates the name of the system phone book file to download and backup. The format of this file is in comma separated value (CSV) and is compatible with most popular contact software exports. Sources Config File Web Interface Default: adtran_phonebook.csv TftpServers FQDN or IP Specifies a comma separated list of up to 2 Address TFTP servers. If a server is unavailable, the phone goes through the list until a working server is found. Either FtpServers, HttpServers, HttpsServers, or TftpServers may be specified as the non-null value used to determine the download method for configuration files. DHCP Phone Interface Web Interface TimeFormat 12 or 24 Config File Web Interface Indicates the clock format as either 12 hour with a.m./p.m., or 24 hour. Default: 12 UserConfirmTimer Config File Indicates the number of milliseconds Web Interface before a user action confirmation is removed from the caller ID pop-up window. 400 to 1600 Default: 1000 Version ASCII String Specifies the version identifier of the configuration file. This is reported in the menu structure under Phone Status. To use the new configuration parameters, this parameter should be set to 2. Config File VlanId 0 to 4095 Specifies the VLAN ID to be used on tagged packets from the phone. DHCP Phone Interface Web Interface Example: 1234 Default: 0 6AOSAG0001-31A Copyright © 2011 ADTRAN, Inc. 77 Appendix A. Configuration and Line Parameters ADTRAN IP 700 Series Phone Administrator Guide Line Parameters All of the following Line Parameter settings shown in Table 13 below can be set either through the administrator’s Web interface or in the MAC address-based configuration file for each phone. The value of x is 0 through 5 on an IP 706 phone, or 0 through 11 on an IP 712 phone. Table 13. Line Parameters Parameter Value Type Description Reg.x.AuthPassword ASCII String Specifies the password used to register a phone line with the registrar. Reg.x.AuthUserId ASCII String Specifies the user name used to register a phone line with the registrar. Reg.x.CallerIdPopup True or False Enables (true) or disables (false) the incoming call pop-up window. Default: True Reg.x.Did Up to 32 ASCII Characters Specifies the DID number. Certain proxies may require a DID number that is different from the user name for authentication. If DID is not set, the Reg.x.AuthUserId is used both for authentication and as the DID number. Reg.x.DisplayName UTF-8 String Specifies the display name for the SIP signaling. Reg.x.Domain ASCII String Specifies the domain that is combined with the DID or User ID to create an URI. Also, used during registration. Reg.x.Enable True or False Enables or disables registration for a phone line. Default: False Reg.x.Label UTF-8 Encoded String Specifies the label that appears on the phone next to the call appearance. If not specified, of 15 Characters Reg.x.AuthUserId is used. or Less Reg.x.LineSeize 10 to 65536 Indicates the number of seconds before a line seize subscription expires. Only used for shared call appearances. Default: 30 Reg.x.Logging True or False Enables or disables call logging for a phone line. Default: True Reg.x.Multiple True or False Indicates if the line is an MCA line. Default: False Reg.x.Shared True or False Indicates if the line is an SCA line. Default: False 78 Copyright © 2011 ADTRAN, Inc. 6AOSAG0001-31A IP 700 Series Phone Administrator Guide Appendix A. Configuration and Line Parameters Table 13. Line Parameters (Continued) Parameter Reg.x.Realm Value Type GE, PE, GP, GI Description Identifies the calling realm of the phone line. This is used to decide which type of dial plan to apply to this phone line. General External (GE) - Used for general non-PBX-type outside lines. Private External (PE) - Used for private (few users) non-PBX-type outside lines. General PBX (GP) - Used for PBX call appearances that require an additional digit, such as 9 to be dialed to access outside numbers. General Intercom (GI) - Used for intercom lines configured for key system operation. GE and PE realms use DialPlanExternal, GI uses DialPlanIntercom, and GP uses DialPlanPbx. Default: GP Reg.x.Servers 6AOSAG0001-31A 0 to 11 Defines which pair of proxy and registrar servers should be used for this line. Copyright © 2011 ADTRAN, Inc. 79 IP 700 Series Phone Administrator Guide 6AOSAG0001-31A Appendix A. Configuration and Line Parameters Copyright © 2011 ADTRAN, Inc. 80 APPENDIX B. DIAL PLAN CONFIGURATION This appendix describes how to configure the DialPlanPbx, DialPlanIntercom, and DialPlanExternal parameters. The dial plan applied is dependent on the realm that is assigned for the line (Reg.x.Realm). GE and PE realms use the DialPlanExternal parameter, GP uses the DialPlanPbx parameter, and GI uses the DialPlanIntercom parameter. The following table shows the syntax for dial plan entries and explains the results. Table 14. Dial Plan Syntax Entries To Specify Enter Result Digit 01234567890 Identifies a specific digit. Range of Digits [Digit-Digit] OR [Digit-Digit, Digit] Specifies a range that will match a digit. Wildcard x Matches any single digit that is dialed. Matches any arbitrary number of digits or range of digits, including none. Multiple Dial Plans | Specifies more than one dial plan using the | symbol to separate them. For example: 911|9xxxxxxx| Timer Tn Indicates an additional time out period (n = seconds in length) before digits are sent. n is mandatory and can have a value of 0 to 9 seconds. Tn must be the last 2 characters of a dial plan. If Tn is not specified, it is assumed to be T0 by default on all dial plans. Note: The appropriate DialDelay* parameter must be set to 0 (disabled) if these timeout periods are used. Dial Plan Examples This section provides the default dial plan for external calls and PBX environments. An explanation for each portion of the dial plan is provided to assist you in understanding the dial plan. Adjustments can be made to these parameters in the configuration file as needed for your situation. Default External Dial Plan The external dial plan is defined in the DialPlanExternal parameter. Table 15 on page 82 explains the default numeric string by breaking it down into pieces. Each portion of the dial plan is divided by a bar ( | ) in the full string: 0|911|[2-9]xxxxxx+T2|[2-9]xx[2-9]xxxxxx|[0-1][2-9]xx[2-9]xxxxxx|011xxx+T2 6AOSAG0001-31A Copyright © 2011 ADTRAN, Inc. 81 Appendix B. Dial Plan Configuration ADTRAN IP 700 Series Phone Administrator Guide Table 15. External Dial Plan Dial Plan Description 0 Allows for dialing the operator. 911 Allows for dialing emergency number. [2-9]xxxxxx+T2 Allows for dialing 7-digit local numbers. [2-9]xx[2-9]xxxxxx Allows for dialing 10-digit numbers. [0-1][2-9]xx[2-9]xxxxxx Allows for dialing long distance calls. 011xxx+T2 Allows for dialing international numbers. Default PBX Dial Plan The PBX dial plan is defined in the DialPlanPbx parameter. Table 16 below explains the default numeric string by breaking it down into pieces. Each portion of the dial plan is divided by a bar ( | ) in the full string: 0|911|9911|[1-8]xxx|9[2-9]xxxxxx+T2|9[2-9]xx[2-9]xxxxxx|9[0-1][2-9]xx[2-9]xxxxxx|9011xxx+T2| *[29][0-9,*]+T2|*1xx|**xxxx Table 16. PBX Dial Plan Dial Plan Description 0 Allows for dialing the operator. 911 Allows for dialing emergency number. 9911 Allows for dialing emergency number. [1-8]xxx Allows for dialing 4-digit extension numbers. 9[2-9]xxxxxx+T2 Allows for dialing 7-digit local numbers. 9[2-9]xx[2-9]xxxxxx Allows for dialing 10-digit numbers. 9[0-1][2-9]xx[2-9]xxxxxx Allows for dialing long distance calls. [2-9]xxxxxx+T2 Allows for dialing 7-digit local numbers. 9011xxx+T2 Allows for dialing international numbers. *[2-9][0-9,*]+T2 Allows for assigning SPRE numbers. *1xx Reserved for future use. **xxxx Allows HFAAI functionality. 82 Copyright © 2011 ADTRAN, Inc. 6AOSAG0001-31A APPENDIX C. GLOSSARY Active state/Active call: Refers to when the phone is in use and connected to another phone. ARP: Address Resolution Protocol. BLF/DSS: Busy Lamp Field/Direct Station Select. BLF indicates the status of another phone. DSS dials another phone. Caller ID: Service provided by some local telephone companies that supplies the calling party’s phone number and name. CSV file: Comma Separated Values file. The CSV file is a plain text file specially formatted to store spreadsheet or database information. CSV files are used as a method for transferring data between programs. For example, to load a phone book created in Microsoft Excel into your IP phone, save the Excel file as a CSV file and upload it to the phone through the Web GUI. DHCP: Dynamic Host Configuration Protocol. DHCP is a protocol that assigns dynamic IP addresses to devices on a network. Each time the IP 706/IP 712 phone connects to the network, its IP address may change. The DHCP keeps track of the address changes. DID: Direct Inward Dialing number. Essentially a number assigned to an extension within a VoIP PBX. The DID allows calls originating from PSTN to be routed to extensions within a VoIP network. Also, calls originating from the VoIP network use the assigned DID numbers as their originating direct dial number. Distinctive rings: Distinctive Rings are specific ring tones set to specified numbers, allowing the user to recognize who is calling by the ring assigned to their number. Differing from internal/external rings, Distinctive Rings apply only to specified numbers in the Personal Contacts list. DND: Do Not Disturb prevents calls from ringing and paging over a speakerphone. Duplex: Refers to the communication ability of two devices in a system. Half-Duplex means conversation between two devices can only go one direction at a time; Full-Duplex allows for communication in two directions simultaneously. Firmware: The software that is embedded in a hardware device. Function keys: The keys on the phone face that have an assigned function that does not change. Handset: The hand-held part of the phone that contains the audio transmitter and receiver. Headset: A handsfree device worn on the head that contains the audio transmitter and receiver. HFAAI: Handsfree Auto Answer Intercom. The HFAAI feature enables the phone to answer calls automatically (without ringing) when both parties have HFAAI activated on their phones. ICMP: Internet Control Message Protocol. Idle screen: The LCD display when the phone is in an idle state. 6AOSAG0001-31A Copyright © 2011 ADTRAN, Inc. 83 Appendix C. Glossary ADTRAN IP 700 Series Phone Administrator Guide Idle state: Refers to the state when the phone is not in use and is not connected to an active call. In this state, the LCD displays the idle screen. IP Address: Internet Protocol Address. IP addresses are used by devices on a computer network to uniquely identify themselves and communicate with other devices via Internet protocol. Key system: The Key system is the type of phone system most often used by small businesses that do not require the larger number of phone lines supported by a PBX system. Key systems have a line key assigned for each outside line and separate buttons for internal calling, unlike the grouping of the PBX systems. LCD: Liquid Crystal Display. A display device made up of pixels in front of a light source or reflector. The main screen on the IP phones is an LCD. LED: Light Emitting Diode. Semiconductor device that emits narrow-spectrum light. Line appearance: How the phone line appears and/or is labeled on the LCD on the IP phones. Line keys: The keys located down the right and left sides of the LCD, next to each line appearance. Line keys allow the use of different lines on the IP phones. Link: The connection between the IP 706/IP 712 phone and the network or other devices. Message Waiting Indicator (MWI): The LED that illuminates the Message function key that alerts the user there are waiting voicemail messages. MWI cadence: The rate at which the Message Waiting Indicator light blinks to indicate messages. Navigation bar: The directional hard keys in the center of the IP phone face. They include the Menu, Cancel, and Ok keys and the directional arrows. Negotiation: A method of determining the best process for information transport. Park orbit: Allows a parked call to be picked up from any phone in the system. The orbit number allows the tracking of specific calls throughout the system (PBX only). PBX system: Private branch exchange. The PBX system is the type of phone system most often used by larger companies because it supports a larger number of lines than a Key system. The main feature of a PBX system is that is has phone lines pooled into groups. For example, when dialing an outside line, pressing 9 automatically assigns an outside line from the outside line group. Ping: A computer network tool used to test whether various hosts are accessible over IP networks. PoE power supply: Power over Ethernet (PoE) power supply. Supplies power and data over standard twisted-pair cables in an Ethernet network. Proxy: A server in a network that requests information from other servers on behalf of its clients. 84 Copyright © 2011 ADTRAN, Inc. 6AOSAG0001-31A IP 700 Series Phone Administrator Guide Appendix C. Glossary SIP server: Session Internet Protocol server. A SIP server functions as registrar and proxy servers, allowing the SIP communication process between devices. Soft keys: The keys located across the bottom of the LCD screen that are associated with functions displayed on the screen. As menus and screens change, the functions correlated with each soft key also change. Speakerphone: The internal part of the phone that transmits and receives audio signals through a speaker, allowing for phone communication without the use of a handset or headset. Speed: The rate of information transfer between the IP phone and the network. SPRE: Special Prefix codes are numbers dialed to use certain features on the phone. STUN server: Simple Traversal of UDP (User Datagram Protocol) through NATs (Network Address Translators) server. A server providing network information to a client to establish UDP communication between the two, both which reside behind NAT routers. Web GUI: Web Graphical User Interface. A user-friendly method of interacting with the IP phone through a Web interface. 6AOSAG0001-31A Copyright © 2011 ADTRAN, Inc. 85