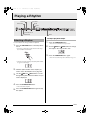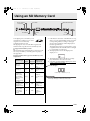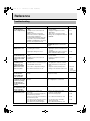
1
ES USER’S GUIDE GUÍA DEL USUARIO Please keep all information for future reference. Guarde toda documentación para futuras consultas. Safety Precautions Before trying to use the piano, be sure to read the separate “Safety Precautions”. Precauciones de seguridad Antes de intentar usar el piano, asegúrese de leer las “Precauciones de seguridad” separadas. PX320ES1A TO REDUCE THE RISK OF FIRE OR ELECTRIC SHOCK, REFER SERVICING TO QUALIFIED SERVICE PERSONNEL. IMPORTANT SAFETY INSTRUCTIONS 1. 2. 3. 4. 5. 6. 7. 8. 9. Read these instructions. Keep these instructions. Heed all warnings. Follow all instructions. Do not use this apparatus near water. Clean only with dry cloth. Do not block any ventilation openings. Install in accordance with the manufacturer’s instructions. Do not install near any heat sources such as radiators, heat registers, stoves, or other apparatus (including amplifiers) that produce heat. Do not defeat the safety purpose of the polarized or grounding-type plug. A polarized plug has two blades with one wider than the other. A grounding type plug has two blades and a third grounding prong. The wide blade or the third prong are provided for your safety. If the provided plug does not fit into your outlet, consult an electrician for replacement of the obsolete outlet. 10. Protect the power cord from being walked on or pinched particularly at plugs, convenience receptacles, and the point where they exit from the apparatus. 11. Only use attachments/accessories specified by the manufacturer. 12. Use only with the cart, stand, tripod, bracket, or table specified by the manufacturer, or sold with the apparatus. When a cart is used, use caution when moving the cart/apparatus combination to avoid injury from tip-over. 13. Unplug this apparatus during lightning storms or when unused for long periods of time. 14. Refer all servicing to qualified service personnel. Servicing is required when the apparatus has been damaged in any way, such as power-supply cord or plug is damaged, liquid has been spilled or objects have fallen into the apparatus, the apparatus has been exposed to rain or moisture, does not operate normally, or has been dropped. The apparatus shall not be exposed to dripping or splashing and that no objects filled with liquids, such as vases, shall be placed on the apparatus. The power indicator being unlit does not mean the apparatus is completely disconnected from the MAINS. When you need to have the apparatus completely disconnected from the MAINS, you must unplug the power cord. For that purpose, locate the apparatus in a way that secures easy access to the power cord. Declaration of Conformity Model Number: PX-320 Trade Name: CASIO COMPUTER CO., LTD. Responsible party: CASIO AMERICA, INC. Address: 570 MT. PLEASANT AVENUE, DOVER, NEW JERSEY 07801 Telephone number: 973-361-5400 This device complies with Part 15 of the FCC Rules, Operation is subject to the following two conditions: (1) This device may not cause harmful interference, and (2) this device must accept any interference received, including interference that may cause undesired operation. NOTICE This equipment has been tested and found to comply with the limits for a Class B digital device, pursuant to Part 15 of the FCC Rules. These limits are designed to provide reasonable protection against harmful interference in a residential installation. This equipment generates, uses and can radiate radio frequency energy and, if not installed and used in accordance with the instructions, may cause harmful interference to radio communications. However, there is no guarantee that interference will not occur in a particular installation. If this equipment does cause harmful interference to radio or television reception, which can be determined by turning the equipment off and on, the user is encouraged to try to correct the interference by one or more of the following measures: • Reorient or relocate the receiving antenna. • Increase the separation between the equipment and receiver. • Connect the equipment into an outlet on a circuit different from that to which the receiver is connected. • Consult the dealer or an experienced radio/TV technician for help. FCC WARNING Changes or modifications not expressly approved by the party responsible for compliance could void the user’s authority to operate the equipment. Important! Please note the following important information before using this product. • Before using the AD-12 Adaptor to power the product, be sure to check the AC Adaptor for any damage first. Carefully check the power cord for breakage, cuts, exposed wire and other serious damage. Never let children use an AC adaptor that is seriously damaged. • The product is not intended for children under 3 years. • Use only CASIO AD-12 adaptor. • The AC adaptor is not a toy. • Be sure to disconnect the AC adaptor before cleaning the product. Manufacturer: CASIO COMPUTER CO.,LTD. 6-2, Hon-machi 1-chome, Shibuya-ku, Tokyo 151-8543, Japan This mark applies in EU countries only. Responsible within the European Union: CASIO EUROPE GmbH Bornbarch 10, 22848 Norderstedt, Germany PX320_e.book 1 ページ 2007年8月1日 水曜日 午前9時28分 Contents General Guide........................... E-2 Other Settings.........................E-32 Installing the Music Stand........................................... E-3 TONE, Area Buttons (1 through 12) ........................... E-4 Using the T/NO and S/YES Buttons......................... E-5 Saving Settings and Using Operation Lock ................ E-5 Returning the Digital Piano to Its Factory Default Settings .......................................................... E-5 To configure other settings........................................ E-32 Secondary Parameter Reference.............................. E-34 Power Outlet ............................. E-6 Connecting to a Computer ....E-38 Connecting to the MIDI Terminal .............................. E-38 Connecting to the USB Port ...................................... E-38 USB Mode and MIDI Mode ....................................... E-39 Expanding the Selections in the Music Library ......... E-40 Using an AC Adaptor .................................................. E-6 Connections.............................. E-7 Connecting Headphones ............................................ E-7 Connecting a Pedal .................................................... E-7 Connecting Audio Equipment or an Amplifier ............. E-8 Selecting and Playing a Tone ........................ E-10 To select a refined tone ............................................ E-10 To select a VARIOUS tone, GM tone, or drum set ... E-11 To adjust the brilliance of a tone............................... E-11 Layering Two Tones ................................................. E-12 Splitting the Keyboard between Two Tones ............. E-12 Using Effects............................................................. E-13 Using the Metronome ............................................... E-14 Playing a Piano Duet ................................................ E-15 Playing a Rhythm ................... E-17 Selecting a Rhythm................................................... E-17 Using Auto Accompaniment ..................................... E-18 Playing Back Built-in Songs ...................................... E-22 Using an SD Memory Card ....E-41 Inserting and Removing an SD Memory Card .......... E-42 Formatting an SD Memory Card ............................... E-43 Saving Recorded/Registration Data to an SD Memory Card ...................................................... E-43 Transferring Data from an SD Memory Card to Digital Piano Memory ................................................ E-45 Playing Back a File Stored on an SD Memory Card ...................................................... E-47 SD Memory Card Errors............................................ E-48 Reference ................................E-49 Troubleshooting ........................................................ E-49 Product Specifications............................................... E-51 Operating Precautions .............................................. E-52 Appendix ...................................A-1 Tone List ..................................................................... A-1 Drum Assignment List ................................................. A-3 Rhythm List ................................................................. A-4 Song List ..................................................................... A-5 Fingered Chord Chart ................................................. A-6 MIDI Implementation Chart Playing Back All of the Built-in Songs....................... E-22 Playing Back a Specific Music Library Song............. E-23 Practicing with a Music Library Song........................ E-24 Saving Digital Piano Setups (Registration Memory) ........... E-25 To store a setup in registration memory ................... E-26 To recall a setup from registration memory .............. E-27 Recording and Play Back ...... E-28 Songs and Tracks..................................................... E-28 Recording Your Keyboard Play ................................ E-29 To play back from digital piano memory ................... E-31 To delete a specific track .......................................... E-31 Company and product names used in this manual may be registered trademarks of others. E-1 PX320_e.book 2 ページ 2007年8月1日 水曜日 午前9時28分 General Guide 1 ∗4 2 3 4 5 6 ∗1-2 7 8 9 bk ∗5 bl ∗2 bm ∗1-1 ∗3 bn bo bp bq *1-1 Back left br bs bt ck dn do *3 Left Side E-2 cm cn co cp cq cr *2 *1-2 Back right dm ds cl dp cs ct dk dl dr dq *4 Bottom dt ek el em PX320_e.book 3 ページ 2007年8月1日 水曜日 午前9時28分 General Guide NOTE • The names shown here are always indicated in bold when they appear within the text of this manual. 1 VOLUME controller cm LAYER BAL button 2 METRONOME button cn EFFECT button 3 INTRO/ENDING, WWREW button co MIDI button 4 SYNCHRO/FILL-IN, FFXX button 5 START/STOP, PLAY/STOP button cp TONE SEL button cq STORE, OTHERS button cr TONE/REGISTRATION button 6 RHYTHM, MUSIC LIBRARY button 7 TRACK/PART button 8 RECORDER button 9 FUNCTION button cs REVERB, REV TYPE button ct CHORUS, CHOR TYPE button dk SPLIT, SPLIT POINT button dl CARD, FORMAT button bk T/NO button dm USB port bl S/YES button dn DAMPER PEDAL jack bm Display do SOFT/SOSTENUTO PEDAL jack bn TONE, Area buttons (1 through 12) dp LINE OUT R, L/MONO jacks bo TEMPO button dq LINE IN R, L/MONO jacks bp BEAT button dr SD memory card slot bq METRO VOL button ds POWER button br SONG/ACCOMP VOL button dt DC 12V terminal bs MODE button ek MIDI OUT/IN terminals bt TOUCH RES button ck TRANSPOSE button el PHONES jack em Pedal connector cl TUNE button *5 Installing the Music Stand Insert the bottom of the music stand into the groove on the top of the digital piano’s console. E-3 PX320_e.book 4 ページ 2007年8月1日 水曜日 午前9時28分 General Guide TONE, Area Buttons (1 through 12) The following three functions are assigned the digital piano’s 12 TONE, Area buttons, depending upon the type of operation you are performing. • Tone selection (TONE buttons) (page E-10) • Registration area selection (Area buttons) (page E-25) • Other functions (Marked below each button.) (page E-34) You can find out which function is currently assigned to the TONE, Area buttons by looking at the display contents and the status of each button’s lamp. Tone Selection Tone names Unlit Lit Unlit Registration Area Selection Unlit Unlit Bank number Area numbers Lit or Flashing Other Settings Unlit Flashing E-4 Setting Setting names Unlit PX320_e.book 5 ページ 2007年8月1日 水曜日 午前9時28分 General Guide Using the T/NO and S/YES Buttons Use the T/NO and S/YES buttons to change the currently displayed setting as you view the results of your changes on the display. Example: Rhythm number 01 Returning the Digital Piano to Its Factory Default Settings Perform the following procedure when you want to return the digital piano’s stored data and settings to their initial factory defaults. 1. While the digital piano is turned off, hold down the RHYTHM, and FUNCTION buttons as you press the POWER button to turn on power. • This will initialize the digital piano and then perform system setup. • The rhythm number (page E-17) appears first whenever you turn on the digital piano. See the applicable pages in this manual for detailed information about each type of setting. • Each press of the T/NO and S/YES button will increase or decrease the displayed value by 1. NOTE • It will take some time for the digital piano initialization procedure complete. During that time, the display contents will be different from those that normally appear when you turn on power (page E-10). NOTE • Holding down either button will scroll continually through the available settings. • To return the displayed setting to its initial default value, press the T/NO and S/YES buttons at the same time. The initial default tempo is the recommended tempo setting for the currently selected rhythm or built-in song. Saving Settings and Using Operation Lock Your digital piano lets you save its current settings, and lock its buttons to protect against operation errors. For details, see “Secondary Parameter Reference” on page E-34. E-5 PX320_e.book 6 ページ 2007年8月1日 水曜日 午前9時28分 Power Outlet Your digital piano runs on standard household power. Be sure to turn off power whenever you are not using the digital piano. Using an AC Adaptor Use only the AC adaptor that is specified for use with this digital piano. Specified AC Adaptor: AD-12 Left Side DC 12V terminal AC adaptor AD-12 Household power Note the following important precautions to avoid damage to the power cord. During Use • Never pull on the cord with excessive force. • Never repeatedly pull on the cord. • Never twist the cord at the base of the plug or connector. • The power cord should not be stretched tight while it is in use. During Movement • Before moving the digital piano, be sure to unplug the AC adaptor from the power outlet. During Storage • Loop and bundle the power cord, but never wind it around the AC adaptor. IMPORTANT! • Make sure the digital piano is turned off before plugging in or unplugging the AC adaptor. • The AC adaptor will become warm to the touch after very long use. This is normal and does not indicate malfunction. E-6 PX320_e.book 7 ページ 2007年8月1日 水曜日 午前9時28分 Connections Connecting Headphones Back PEDAL jacks IMPORTANT! • Before connecting headphones, be sure to use the digital piano’s VOLUME controller to turn the volume down to a low level. After connecting, you can adjust the volume to the level you want. • The digital piano automatically adjusts sound output to optimize for headphones (when headphones are connected) or the built-in speakers (when headphones are not connected). Left Side SP-3 PHONES jack Commercially available headphones Mini plug Connect commercially available headphones to the PHONES jack. Connecting headphones to the PHONES jack cuts off output to the speakers, which means you can practice even late at night without bothering others. To protect your hearing, make sure that you do not set the volume level too high when using headphones. Connecting a Pedal The back of the digital piano has two pedal jacks, one for a damper pedal and one for a soft/sostenuto pedal. To connect to the pedal jack Depending on the type of operation you want the pedal (SP-3) to perform, connect the pedal’s cable either to the digital piano’s DAMPER PEDAL jack or SOFT/SOSTENUTO PEDAL jack. If you want to use both operations (jack) at the same time, you need to purchase another optionally available pedal. NOTE • You can specify the type of operation that should be performed by the pedal connected to the SOFT/ SOSTENUTO PEDAL jack. See “Other Settings” on page E-32 for more information. Pedal Functions z Damper Pedal Pressing the damper pedal while playing will cause the notes you play to reverberate for a very long time. • Whenever a piano tone is selected, pressing this pedal will activate the digital piano’s Acoustic Resonance effect, which causes notes to resonate in the same way as when the damper pedal on an acoustic piano is pressed. z Soft Pedal Pressing this pedal suppresses notes played on the keyboard after the pedal was pressed, and makes them sound softer. z Sostenuto Pedal Only the notes that are played while this pedal are depressed are sustained until the pedal is released. E-7 PX320_e.book 8 ページ 2007年8月1日 水曜日 午前9時28分 Connections Pedal Connector You can connect the optionally available 3-Pedal Unit (SP-30) to the pedal connector on the bottom of the digital piano. You can then use the pedals for expression that is similar to that available on an acoustic piano. Bottom Pedal connector NOTE • The SP-30 Pedal Unit supports half-pedal operation (pressing the pedal part way), and you can adjust the amount of the pedal effect applied when the pedal is pressed part way. See “Other Settings” on page E-32 for more information. • The optional CS-65P or CS-66P stand is required in order to use the SP-30 Pedal Unit. Connecting Audio Equipment or an Amplifier You can connect audio equipment or a music amplifier to the digital piano and then play through external speakers for more powerful volume and better sound quality. IMPORTANT! • The digital piano automatically adjusts sound output to optimize for headphone output (when headphones are connected) or built-in speaker output (when headphones are not connected). This also will cause a change in the output quality from the digital piano’s LINE OUT R and L/MONO jacks. • Whenever connecting something to the digital piano, first use the VOLUME controller to set the volume to a low level. After connecting, you can adjust the volume to the level you want. • Whenever you connect any device to the digital piano, be sure to read the user documentation that comes with the device. Audio amplifier AUX IN jack, etc. Pin plug RIGHT (Red) LEFT (White) Standard jack INPUT 1 INPUT 2 Standard plug Guitar amplifier, keyboard amplifier, etc. E-8 Tape recorder, MIDI sound source, etc. PX320_e.book 9 ページ 2007年8月1日 水曜日 午前9時28分 Connections Playing Output from External Equipment through the Piano’s Speakers 1 LINE IN R jack input sounds through the piano’s right speaker, while LINE IN L/MONO jack input sounds through the left speaker. Connecting to the LINE IN L/MONO jack only causes the same output to be produced from both speakers. It is up to you to purchase connecting cables that are compatible with the equipment you are connecting. Connecting to Audio Equipment 2 Use commercially available cables to connect the external audio equipment to the piano’s LINE OUT jacks as shown in Figure 2. LINE OUT R jack output is right channel sound, while LINE OUT L/MONO jack output is left channel sound. It is up to you to purchase connecting cables like the ones shown in the illustration for connection of audio equipment. Normally in this configuration you must set the audio equipment’s input selector to the setting that specifies the terminal (such as AUX IN) to which the piano is connected. Use the piano’s VOLUME controller to adjust the volume level. Connecting to a Musical Instrument Amplifier 3 Use commercially available cables to connect the amplifier to the piano’s LINE OUT jacks as shown in Figure 3. LINE OUT R jack output is right channel sound, while LINE OUT L/MONO jack output is left channel sound. Connecting to the LINE OUT L/ MONO jack only outputs a mixture of both channels. It is up to you to purchase connecting cable like the one shown in the illustration for connection of the amplifier. Use the piano’s VOLUME controller to adjust the volume level. Bundled and Optional Accessories Use only accessories that are specified for use with this digital piano. Use of unauthorized accessories creates the risk of fire, electric shock, and personal injury. E-9 PX320_e.book 10 ページ 2007年8月1日 水曜日 午前9時28分 Selecting and Playing a Tone START/STOP MUSIC LIBRARY METRO VOL FUNCTION METRONOME Your digital piano has the following types of tones built in. Tone Numbers TONE /YES /NO VOLUME Number of Tones Tone Type — Refined Tone 11 001 to 061 Various 61 062 to 189 GM (General MIDI) 128 190 to 191 Drum Sets 2 sets REVERB CHORUS EFFECT SPLIT VARIOUS/GM TONES TONE/REGISTRATION IMPORTANT! • When you turn on the digital piano, it performs a startup routine, during which the following messages appears on the display. (1) : Please wait! (2) : System startup (Indicated by the “rotary” display pattern shown here.) To select a refined tone 1. Press the POWER button to turn on the digital piano. (3) : Complete! (Keyboard and pedal setup complete.) Left Side (4) : Keyboard and pedal operations are enabled, but button operations are still not enabled yet. (5) POWER button • It takes about six seconds to reach process (4) after you press the POWER button. • The amount of time required to perform process (2) becomes longer and process (4) is skipped if you turn on power while the digital piano’s setup memory is turned on (page E-37). 2. E-10 : System setup complete • All functions are enabled. Use the VOLUME controller to adjust the volume level. PX320_e.book 11 ページ 2007年8月1日 水曜日 午前9時28分 Selecting and Playing a Tone 3. Press one of the TONE buttons (not the VARIOUS/GM TONES button) to select the tone you want. • The names of the refined tones are marked above the TONE buttons. • This will cause the lamp of the selected tone’s button to light. Example: GRAND PIANO (CLASSIC) NOTE • See “Other Settings” on page E-32 for information about another method you can use to assign a tone to the VARIOUS/GM TONES button. • The tone you selected in step 3 will remain assigned to the VARIOUS/GM TONES button until you turn off the digital piano. • If a drum set is assigned to the VARIOUS/GM TONES button, keyboard keys sound drum sounds when you press them while the lamp above the VARIOUS/GM TONES button is lit. See page A-3 for information about the drum sounds that are assigned to each of the keyboard keys. To adjust the brilliance of a tone To select a VARIOUS tone, GM tone, or drum set 1. Use the tone list on page A-1 to find the VARIOUS tone, GM tone, or drum set number you want. 1. Press the FUNCTION button. • This will cause the button’s lamp to flash. 2. Press the EFFECT button. • The EFFECT lamp will flash and the current brilliance setting will appear on the display. Example: 003 MODERN PIANO 2. Press the VARIOUS/GM TONES button. • The button’s lamp will light indicating that the tone currently assigned to the button is lit. The tone’s number will be displayed while the button is depressed. b: Brilliance 3. Use the T/NO and S/YES buttons to set the brilliance level (–3 to 0 to 3). Example: 001 LA PIANO 3. You can change the tone currently assigned to the VARIOUS/GM TONES button by holding down the button as you use the T/NO and S/YES buttons to select the tone you want. 4. To do this: Press this button: Make the tone softer T Make the tone sharper S Press the FUNCTION button again. • This will cause the lamp below the button to go out. E-11 PX320_e.book 12 ページ 2007年8月1日 水曜日 午前9時28分 Selecting and Playing a Tone Layering Two Tones Use the following procedure to layer two tones, so they sound at the same time. The tone you specify first is called the “main tone”, while the tone you specify second is called the “layered tone”. 1. Splitting the Keyboard between Two Tones You can assign different tones to keys on the left side (low range) and the right side (high range) of the keyboard. While holding down the TONE button of the tone that corresponds to the main tone, press the button that corresponds to the layered tone. Example: While holding down the GRAND PIANO (CLASSIC) button, press the SYNTH-VOICE button. Split point 1. Low range High range STRINGS GRAND PIANO (CLASSIC) Press the TONE button of the tone you want to select for the high range. Example: GRAND PIANO (CLASSIC) 2. Press the SPLIT button. • This will cause the SPLIT lamp to light. 3. GRAND PIANO (CLASSIC) Example: STRINGS SYNTH-VOICE NOTE • If you use the VARIOUS/GM TONES button to assign either of the above tones, the tone currently assigned to the VARIOUS/GM TONES button will appear on the display while the button is depressed. Note that a different tone number appears depending on whether you press the VARIOUS/GM TONES button first (to assign it as the main tone) or second (to assign it as the layered tone). • While you are holding down the VARIOUS/GM TONES button and its tone number is displayed, you can change the currently assigned tone using the T/NO and S/YES buttons. 2. To unlayer the keyboard, press any one of the TONE buttons. NOTE • You can adjust the balance between the main tone and layered tone. See “Other Settings” on page E-32 for more information. • You cannot layer the keyboard while in the Duet Mode or when recording to Track 2 on the digital piano. E-12 Press the TONE button of the tone you want to select for the low range. 4. After you are finished using the split keyboard, press the SPLIT button again to unsplit it. • This will cause the SPLIT lamp to go out. NOTE • You can configure the keyboard so it is layered with two tones in the high range. To do this, first perform the layer operation in the left side of this page. After that, split the keyboard as described above. • You cannot split the keyboard while in the Duet Mode or when recording to Track 2 on the digital piano. PX320_e.book 13 ページ 2007年8月1日 水曜日 午前9時28分 Selecting and Playing a Tone To specify the keyboard split point 1. While holding down the SPLIT button, press the keyboard key where you want the left limit of the high range (right) tone to be. Low range Flashing Split point High range To change the effect type 1. 2. Turn on REVERB or CHORUS. While holding down the effect button (REVERB or CHORUS), use the T/NO and S/YES buttons to change the effect type as described below. Reverb High range leftmost key • This will change the split point and display the name of keyboard key that you pressed. NOTE • The split point also is the boundary between the accompaniment keyboard range (pages E-18 to E-21) and the melody keyboard range. Changing the location of the split point also changes the sizes of the keyboards. • See “Other Settings” on page E-32 for information about another method you can use to change the split point. • Reverb Settings 1: Room 2: Small Hall 3: Large Hall 4: Stadium Chorus Using Effects Reverb . . . . . Makes your notes resonate. Chorus . . . . Adds more breadth to your notes. To turn effects on and off 1. Use the REVERB and CHORUS buttons to turn the effects on and off as shown below. • The lamps above the buttons show whether the effects are on or off. • Chorus Settings 1: Light Chorus 2: Medium Chorus 3: Deep Chorus 4: Flanger (Whooshing effect) NOTE • While the keyboard is layered, the chorus on/off setting affects the layered tone only. While the keyboard is split, the chorus on/off setting affects the low range tone only. Lit On On Off Off Unlit NOTE • The chorus effect cannot be turned on while the digital piano is in the Duet Mode. E-13 PX320_e.book 14 ページ 2007年8月1日 水曜日 午前9時28分 Selecting and Playing a Tone Using the Metronome 1. Press the METRONOME button. • This will start the metronome. • The two lamps above the START/STOP button will flash along with the metronome beats. Flashes on the first beat of each measure. To adjust the metronome volume NOTE • You can perform the following procedure at any time, regardless of whether or not the metronome is sounding. 1. • This will cause the lamp above the button to flash. Flashes on subsequent beats. 2. 2. To change the beats per measure, hold down the METRONOME button as you press the T/NO or S/YES button. • You can select a value in the range of 2 through 6. A chime sounds as the first beat of each measure, and the remaining beats sound as clicks. Specifying 0 as the setting plays a straight click, without any chime. This setting lets you practice with a steady beat. 3. Press the FUNCTION button. • This will cause the button’s lamp to flash. 4. Use the T/NO and S/YES buttons to adjust the tempo in a range of 20 to 255 beats per minute. Slower 5. Faster Press the FUNCTION button again. • This will cause the lamp above the button to go out. 6. To stop the metronome, either press the METRONOME button again or press the START/STOP button. NOTE • See “Other Settings” on page E-32 for information about another method you can use to configure the metronome setting. E-14 Press the FUNCTION button. Press the METRO VOL button. • This will cause the lamp above the button to flash. 3. Use the T/NO and S/YES buttons to change the metronome volume in the range of 0 to 42. 4. Press the FUNCTION button again. • This will cause the lamp above the button to go out. PX320_e.book 15 ページ 2007年8月1日 水曜日 午前9時28分 Selecting and Playing a Tone Playing a Piano Duet You can use the Duet Mode to split the piano’s keyboard in the center so two people can play a duet. The left and right side keyboards have virtually the same range. If you have the optionally available SP-30 Pedal Unit installed, the left pedal operates as the left side damper pedal, while the right pedal is the right side damper pedal. The Duet Mode is the perfect way to conduct lessons, with the teacher playing on the left side as the student plays the same song on the right side. NOTE • The SP-3 Pedal Unit does not support half-pedal operation. 1. Press the MUSIC LIBRARY button so the MUSIC LIBRARY lamp (below the button) is lit. Keyboard Split point Left keyboard C3 C4 C5 Right keyboard C6 C3 (middle C) C4 C5 C6 NOTE • In place of step 1 above, you also could press the CARD button so the lamp above the button is lit, and then advance to step 2. (middle C) 2. Pedals While holding down the SPLIT button, press the TONE/REGISTRATION button. • This will enter the Duet Mode, which causes “dUE” (duet) to appear on the display. z Using the Optional SP-30 Pedal Unit Right side damper pedal Left side damper pedal Left and right side damper pedal NOTE • Only the right-side damper pedal supports half-pedal operation. z Using the Optional SP-3 Pedal Unit Either left side or right side damper pedal, depending on configuration* 3. To exit the Duet Mode, press the SPLIT button. IMPORTANT! • The following functions are all disabled in the Duet Mode. • Auto Accompaniment (page E-18) • Registration (page E-25) • Recorder (page E-28) * The following are the possible configurations for the SP-3 Pedal Unit. In this configuration: The SP-3 Pedal Unit performs this operation: SP-3 connected to digital Right side damper pedal piano’s DAMPER PEDAL jack SP-3 connected to digital piano’s SOFT/SOSTENUTO jack, which is configured for SOFT (page E-7) Left side damper pedal SP-3 connected to digital piano’s SOFT/SOSTENUTO jack, which is configured for SOSTENUTO (page E-7) Left and right side damper pedal E-15 PX320_e.book 16 ページ 2007年8月1日 水曜日 午前9時28分 Selecting and Playing a Tone Changing the Octaves of the Keyboards You can change the ranges of the left and right keyboards in octave units from their initial default settings. This comes in handy, for example, if the initial default range is not enough when one person is playing the left hand part and another person is playing the right hand part. 1. While holding down the SPLIT button and the TONE/REGISTRATION button, press the keyboard key of C that you want located at C4 (middle C) of the left keyboard. • This changes the octave of the keyboard and displays the difference between the normal keyboard (when you are not in the Duet Mode) and the current setting. Example: Press the keyboard key of the leftmost C will assign the range shown below. Left keyboard C4 C5 C6 Right keyboard C7 C3 C4 C5 C6 (Pressed key) 1 octave higher than initial setting 2. Unchanged While holding down the SPLIT button and the TONE/REGISTRATION button, press the keyboard key of C that you want located at C4 (middle C) of the right keyboard. NOTE • You can return the keyboards to their initial default ranges by exiting and then re-entering the Duet Mode. E-16 PX320_e.book 17 ページ 2007年8月1日 水曜日 午前9時28分 Playing a Rhythm RHYTHM FUNCTION /NO START/STOP /YES SYNCHRO/FILL-IN INTRO/ENDING Selecting a Rhythm You can select from among 70 built-in rhythms. 1. Press the RHYTHM button so the lamp above it is lit. MODE To adjust playback tempo 1. Press the FUNCTION button. • This will cause the button’s lamp to flash. 2. Use the T/NO and S/YES buttons to change the tempo in the range of 20 to 255. 3. Press the FUNCTION button again. • Each press of the button toggles between the lamps above and below the button. • This will cause the lamp above the button to go out. • This will cause the currently selected rhythm number to appear on the display. 2. Find the rhythm number of the rhythm you want to use in the Rhythm List on page A-4. 3. Use the T/NO and S/YES buttons to scroll through the rhythm numbers until the one you want is displayed. 4. Press the START/STOP button. • This will start the rhythm. 5. Press the START/STOP button again to stop the rhythm. E-17 PX320_e.book 18 ページ 2007年8月1日 水曜日 午前9時28分 Playing a Rhythm Using Auto Accompaniment With Auto Accompaniment, the digital piano automatically plays rhythm, bass, and chord parts in accordance with chords you select using simplified keyboard fingerings, or chords you play. Auto Accompaniment makes it feel like you have your own private backup group with you all the time. To play with Auto Accompaniment PREPARATION • Use the procedures under “Selecting a Rhythm” to select the rhythm you want to use and adjust the tempo. 1. • This will cause the button’s lamp to flash. 2. 3. NOTE • With the rhythms listed below, make sure that CASIO CHORD, FINGERED, or FULL RANGE CHORD is selected as the Auto Accompaniment mode before you try playing chords. The percussion sounds will sound at lower volume while no chord is fingered on the keyboard. 60 PIANO ROCK’N’ROLL 62 ARPEGGIO 1 63 ARPEGGIO 2 64 ARPEGGIO 3 65 MARCH 2 66 MARCH 3 67 STRIDE PIANO 68 WALTZ 2 69 WALTZ 3 70 WALTZ 4 Press the MODE button. Use the T/NO and S/YES buttons to select one of the Auto Accompaniment modes shown below. Display Message Meaning oFF NORMAL C.C. CASIO CHORD FnG FINGERED FUL FULL RANGE CHORD • Here we will select the CASIO CHORD mode. • See “How to Play Chords” on page E-19 for details about Auto Accompaniment modes and their chord fingerings. 4. Press the FUNCTION button again. • This will cause the lamp above the button to go out. 5. Press the SYNCHRO/FILL-IN button. • This configures the digital piano so rhythm and chord accompaniment will start automatically when you press any keys within the accompaniment keyboard range. • This will cause the two lamps above the START/ STOP button to flash. 6. E-18 Press the FUNCTION button. Press the INTRO/ENDING button. PX320_e.book 19 ページ 2007年8月1日 水曜日 午前9時28分 Playing a Rhythm 7. Finger the first chord within the accompaniment keyboard range. • Playing a chord will cause the intro pattern for the selected rhythm to play, followed by the accompaniment rhythm and chord pattern. 8. Finger other chords on the keyboard. • See “How to Play Chords” on page E-19 for information about how to finger chords within the different Auto Accompaniment modes. • The two lamps above the START/STOP button will flash along with the beat. Flashes on the first beat of the measure. Flashes on subsequent beats. NOTE • You can insert a fill-in pattern while a rhythm pattern is playing by pressing the SYNCHRO/FILL-IN button. A fill-in helps to change the mood of the pattern. 9. To stop accompaniment, press the INTRO/ ENDING button. How to Play Chords The way you finger chords depends on the current Auto Accompaniment mode. If you want to play without Auto Accompaniment, use the NORMAL mode. CASIO CHORD Even if you do not know how to play chords normally, this mode lets you play four different types of chords using simplified fingerings in the accompaniment keyboard range of the keyboard. The following shows where the accompaniment keyboard range is located, and explains how to finger chords in the CASIO CHORD mode. CASIO CHORD Mode Keyboard Accompaniment keyboard range Melody keyboard range • This will play an ending pattern for the selected rhythm before stopping Auto Accompaniment play. NOTE • You can stop accompaniment play without an intro and ending pattern by pressing the START/STOP button in place of steps 6 or 9. • See “Other Settings” on page E-32 for information about adjusting accompaniment volume. E-19 PX320_e.book 20 ページ 2007年8月1日 水曜日 午前9時28分 Playing a Rhythm IMPORTANT! • In the CASIO CHORD mode, the keys in the accompaniment keyboard range of the keyboard operate as “chord switches” only. You cannot use the keys in this keyboard range to play notes. • You can use the split point to change the size of the accompaniment keyboard range. See “To specify the keyboard split point” on page E-13 for more information. Chord Types Example: Major Chords Pressing a single accompaniment keyboard range key in the CASIO CHORD mode will play the major chord whose name is marked above the key. All of the accompaniment keyboard range keys that are marked with the same chord name play exactly the same chord. C (C Major) Minor Chords To play a minor chord, press the accompaniment keyboard range key that corresponds to the major chord, while also pressing one other accompaniment keyboard range key to the right. Cm (C Minor) Seventh Chords To play a seventh chord, press the accompaniment keyboard range key that corresponds to the major chord, while also pressing two other accompaniment keyboard range keys to the right. C7 (C Seventh) Minor Seventh Chords To play a minor seventh chord, press the accompaniment keyboard range key that corresponds to the major chord, while also pressing three other accompaniment keyboard range keys to the right. Cm7 (C Minor Seventh) Note names J In the FINGERED mode, you play standard chord fingerings in the accompaniment keyboard range to play chords. To finger a C chord, for example, you would press the C-E-G keys. FINGERED Mode Keyboard Accompaniment keyboard range C C#DE b E F F#GAb A Bb B C C#DE b E F Melody keyboard range IMPORTANT! • In the FINGERED mode, the keys in the accompaniment keyboard range of the keyboard operate as “chord switches” only. You cannot use the keys in this keyboard range to play notes. • You can use the split point to change the size of the accompaniment keyboard range. See “To specify the keyboard split point” on page E-13 for more information. C Cm Cdim Caug *1 Csus4 C7 *2 Cm7 *2 CM7 *2 Cm7b5 C7b5 *1 C7sus4 Cadd9 Cm add9 CmM7 *2 Cdim7 *1 C C#DE b E F F#GAb A Bb B C C#DE b E F C C#DE b E F F#GAb A Bb B C C#DE b E F C C#DE b E F F#GAb A Bb B C C#DE b E F NOTE • When playing a minor, seventh, or minor seventh chord, it makes no different whether the additional keys you press are black or white. E-20 FINGERED NOTE • See the “Fingered Chord Chart” on page A-6 for information about fingering chords with other roots in the accompaniment keyboard range. *1 Inverted fingerings (see “Fingered Chord Notes” on page E-21) are not supported for these chords. The lowest note fingered is used as the root. *2 For these chords, the same chord is specified even if the G fifth is not fingered. PX320_e.book 21 ページ 2007年8月1日 水曜日 午前9時28分 Playing a Rhythm Fingered Chord Notes • Except for the chords whose names have *1 after them in the above examples, you also can use inverted fingerings. This means that fingering either E-G-C or G-C-E will produces a C chord. • Except for the chords whose names have *2 after them in the above examples, you need to press all of the indicated keys in order to finger a chord. Failure to include even a single note may produce a chord that is different from the one you want. FULL RANGE CHORD The FULL RANGE CHORD mode lets you play a total of 38 different types of chords (the same chords available in the FINGERED mode plus 23 more). FULL RANGE CHORD recognizes the pressing of three or more keyboard keys anywhere on the keyboard as a chord fingering. Anything else (pressing one or two keys, or playing any group of notes that does not form a chord fingering that is recognized by the keyboard) is treated as melody notes. FULL RANGE CHORD Mode Keyboard Accompaniment Keyboard/Melody Keyboard z Recognized Chords Type Chord Types FINGERED Mode Chords 15 (See “FINGERED” on page E-20.) 23 For example, the following are chords that have C as the bass note. Other Chords C6, Cm6, C69 Db D E F G Ab Bb C, C, C, C, C, C, C, B Dbm Dm Fm Gm Am Bbm C, C, C, C, C, C, C, Ddim Ab7 F7 Fm7 Gm7 Abadd9 C, C, C, C, C, C Example: C Major or C chord E 1 E E G C G C 2 1 .... 2 .... Chord C Chord C E NOTE • When there are at least six semitones between the lowest note and the next note to the right, the lowest note is assumed to be the bass note. E-21 PX320_e.book 22 ページ 2007年8月1日 水曜日 午前9時28分 Playing Back Built-in Songs FF MUSIC LIBRARY TRACK/PART REW /YES PLAY/STOP /NO IMPORTANT! • After you select a built-in song, it can take a number of seconds for the song data to be loaded. While the data is being loaded, the song number will flash on the display, and the keyboard keys and button operations will be disabled. Selecting a song while playing something on the keyboard will cause sound output of the keyboard notes to stop. 1. • This will start playback of the 71 built-in songs in sequence, from t.01 through L.60. • You can play along with a song on the keyboard during all-song playback. The tone assigned to the keyboard is the one that is preset for the song that is playing. • You can use the T/NO and S/YES buttons to skip sequentially between songs during all-song playback. • If you press a TONE button, playback will jump to the demo song that uses that tone. If you press the MUSIC LIBRARY button during all-song playback, playback will jump to Music Library song L.01. Playing Back All of the Built-in Songs Your digital piano has a total of 71 built-in songs. You can use the procedure below to play back all of the songs, one after the other. Type Refined Tone Demo Tune Music Library Song E-22 Number of Songs Indication 11 The TONE button of the refined tone being used flashes, and the demo song number is displayed. 60 The Music Library lamp flashes and the song number is displayed. While holding down the MUSIC LIBRARY button, press the PLAY/STOP button. 2. Press the PLAY/STOP button to stop all-song playback. PX320_e.book 23 ページ 2007年8月1日 水曜日 午前9時28分 Playing Back Built-in Songs Playing Back a Specific Music Library Song The Music Library includes both built-in songs (01 to 60), plus up to 10 songs (61 to 70) that have been saved to digital piano memory from a computer* or SD memory card (page E-41). You can use the procedure below to select one of these songs and play it back. * You can download music data from the Internet and then transfer it from your computer to digital piano memory. See “Expanding the Selections in the Music Library” on page E-40 for more information. 1. 5. Press the PLAY/STOP button again to stop playback. • Playback will stop automatically when the end of the song is reached. NOTE • You can change tempo, volume, and pre-count settings for playback. See “Other Settings” on page E-32 for more information. To skip back through a song 1. Press the MUSIC LIBRARY button so the lamp below the button is lit. While playback is in progress, hold down the REW button. • This skips back through the song measure-bymeasure. • The measure number appears on the display while you are skipping back. Measure number • Each press of the button toggles between the upper lamp and lower lamp. • This will cause the currently selected song number to appear on the display. 2. When you reach the point you want, release the REW button to resume playback. NOTE • Depending on what is being played when you press the REW button, the skip back operation may not start right away when you press. 2. Find the song number of the song you want to play in the Song Llist on page A-5. 3. Use the T/NO and S/YES buttons to select a song. 4. Press the PLAY/STOP button. • This starts the playback of the song. • The measure number appears on the display during playback. Measure number • To view the song number during playback, hold down the MUSIC LIBRARY button. • While playback is in progress, you can press the T/NO and S/YES button to change to another song. E-23 PX320_e.book 24 ページ 2007年8月1日 水曜日 午前9時28分 Playing Back Built-in Songs To skip forward through a song 1. While playback is in progress, hold down the FF button. • This skips forward through the song measure-bymeasure. • The measure number appears on the display while you are skipping forward. Measure number 2. When you reach the point you want, release the FF button to resume playback. Practicing with a Music Library Song You can turn off the left hand part or right hand part of a Music Library song and play along on the digital piano. NOTE • The Music Library includes duet tunes (song numbers 12, 37, and 45). While a duet is selected, you can turn off the first piano (Primo) or second piano (Secondo) tone and play along with the song. • A number of tunes have tempo changes part way through in order to produce specific musical effects. PREPARATION • Select the Music Library song you want to practice and adjust the tempo. 1. Use the TRACK/PART button to turn off a part. • Each press of the TRACK/PART button cycles through the part settings as shown below. The lamps above the button show which part is turned off. Left hand Right hand Both parts on 2. Right hand part off Left hand part off Press the PLAY/STOP button. • This starts playback, without the part you turned off in step 1. 3. 4. E-24 Play the missing part on the keyboard. Press the PLAY/STOP button again to stop playback. PX320_e.book 25 ページ 2007年8月1日 水曜日 午前9時28分 Saving Digital Piano Setups (Registration Memory) Area buttons (1 through 12) /YES /NO STORE You can save up to 96 digital piano setups in registration memory, including tone, rhythm, and tempo settings, for quick and easy recall whenever you need them. Registration Areas and Banks Each setup is stored in an “area”. There are a total of 96 areas, which are grouped into eight “banks”. Bank number TONE/REGISTRATION Registration Data Contents • Tone (page E-10) • Brilliance (page E-11) • Layer/Split (page E-12) • Reverb/chorus (page E-13) • Rhythm* (page E-17) • Tempo* (page E-17) • Mode* (page E-18) • SYNCHRO button on/off* (page E-18) • Accompaniment volume* (page E-35) • Keyboard key (page E-35) • Pedal settings (page E-36) * These five settings can be recalled only when the RHYTHM lamp (page E-17) is lit and the registration filter is turned off (page E-36). Area buttons (1 through 12) Bank 1 (bn.1) 1-1 1-2 1-3 — 1-11 1-12 Bank 2 (bn.2) 2-1 2-2 2-3 — 2-11 2-12 Bank 3 (bn.3) 3-1 3-2 3-3 — 3-11 3-12 Bank 4 (bn.4) 4-1 4-2 4-3 — 4-11 4-12 Bank 5 (bn.5) 5-1 5-2 5-3 — 5-11 5-12 Bank 6 (bn.6) 6-1 6-2 6-3 — 6-11 6-12 Bank 7 (bn.7) 7-1 7-2 7-3 — 7-11 7-12 Bank 8 (bn.8) 8-1 8-2 8-3 — 8-11 8-12 Example of area data: Area 5-1 Tone: Strings Rhythm number: 32 Tempo: 200 : Area 3-3 Tone: Jazz Organ Rhythm number: 40 Tempo: 110 : E-25 PX320_e.book 26 ページ 2007年8月1日 水曜日 午前9時28分 Saving Digital Piano Setups (Registration Memory) Registration Data Storage Notes • Registration data is stored even when the digital piano is turned off. • Storing new data in an area replaces any data that is currently in the same area. • The digital piano is shipped from the factory with registration data stored in each area. You can restore this original data by performing the procedure under “Returning the Digital Piano to Its Factory Default Settings” on page E-5. • You can save registration data to an SD memory card, if you want. See “Using an SD Memory Card” on page E-41 for more information. IMPORTANT! • CASIO COMPUTER CO., LTD. takes no responsibility for any damages, lost profits, or claims by third parties arising from the loss of deleted recorded data due to malfunction, repair, or for any other reason. To store a setup in registration memory 1. On the digital piano, configure the tone, rhythm, and other settings you want to save as your setup. • See “Registration Data Contents” (page E-25) for more information. NOTE • If you use the FUNCTION button to configure a setting, make sure that the FUNCTION button lamp is unlit before you advance to step 2. If the lamp is lit, press the FUNCTION button so it goes out. 2. While holding down the STORE button, use the T/NO and S/YES buttons to display the number of the bank where you want to store the registration data. • This will display the bank number and then display the screen for specifying the area number. Example: Bank 1 selected 3. While holding down the STORE button, press one of the area buttons (1 through 12), to select the area where you want to save the registration data. • The lamp of the applicable area button will light after registration is complete. Also, the message “CPL” (complete) will appear on the display. Example: After data has been saved to area 1-2 4. Release the STORE button. NOTE • Registration data cannot be stored when any one of the following conditions exists. Eliminate the problem condition and perform the procedure from step 2. • The digital piano is in the Duet Mode. • Song, rhythm, or metronome is playing. • Two RECORDER button lamps are lit or flashing. E-26 PX320_e.book 27 ページ 2007年8月1日 水曜日 午前9時28分 Saving Digital Piano Setups (Registration Memory) To recall a setup from registration memory 1. Press the TONE/REGISTRATION button so the registration lamp is lit. • This will cause the currently selected bank number to appear on the display. • Each press of the button toggles between the upper lamp and lower lamp. 2. Use the T/NO and S/YES buttons to display the number of the bank that contains the area you want to recall. 3. Press the area button (1 through 12) for the area whose registration data you want to recall. • The lamp of the applicable area button will light after recall is complete. Example: After data has been recalled from area 3-1 NOTE • Registration data cannot be recalled when any one of the following conditions exists. Eliminate the problem condition and perform the procedure from step 1. • The digital piano is in the Duet Mode. • RECORDER button PLAY lamp is flashing. • To check the current selected song or rhythm number while a bank number is on the display, press the RHYTHM, MUSIC LIBRARY button or CARD button. E-27 PX320_e.book 28 ページ 2007年8月1日 水曜日 午前9時28分 Recording and Play Back START/STOP TRACK/PART RECORDER /YES /NO INTRO/ENDING You can store the notes you play in digital piano memory for later playback. You can have up to five songs in memory at one time. Songs and Tracks A track is a container of recorded data, and each song consists of two tracks: Track 1 and Track 2. You can record each track separately and then combine them so they play back together as a single song. Track 1 Auto Accompaniment (rhythm, bass, chords), melody Record While playing back. . . Song Track 2 Melody Record Memory Capacity • Digital piano memory can hold about 50,000 notes total, for five songs. Each song can contain up to about 10,000 notes. • When remaining memory capacity is 100 notes or less, the track lamp flashes at high speed to alert you. • Recording will stop automatically and the REC lamp will go out if the number of notes in memory exceeds the maximum. E-28 Recorded Data • Keyboard play • Tone used • Pedal operations • Reverb and chorus settings* • Tempo setting* • Layer and split settings* • Rhythm Patterns* • Chord fingering* • Intro, fill-in, ending operations* * Track 1 only Recorded Data Storage • Starting a new recording deletes any data that was previously recorded in memory. • Should power fail during recording, all of the data in the track you are recording will be deleted. • You can save memory data to external media, if you want. See “Using an SD Memory Card” on page E-41 for more information. IMPORTANT! • CASIO COMPUTER CO., LTD. takes no responsibility for any damages, lost profits, or claims by third parties arising from the deletion of recorded data due to malfunction, repair, or for any other reason. • After you select a song, it can take a number of seconds for the song data to be loaded. While the data is being loaded, the song number will flash on the display, and keyboard key and button operations will be disabled. Selecting a song while playing something on the keyboard will cause sound output of the keyboard notes to stop. PX320_e.book 29 ページ 2007年8月1日 水曜日 午前9時28分 Recording and Play Back 4. Using the RECORDER Button Each press of the RECORDER button cycles through the recording options in the sequence shown below. Playback Standby Record Standby Use the TRACK/PART button to select the track to which you want to record. • Make sure that the lamp for the record track is flashing. Track 1: 1/L lamp Track 2: 2/R lamp Normal NOTE • If you want to record with rhythm or Auto Accompaniment, select Track 1 (1/L lamp flashing). Lit Flashing Off 5. Recording Your Keyboard Play • Tone (page E-10) After recording to either of the tracks of a song, you can record to the other track while listening to playback what you recorded in the first track. To record to a specific track of a specific song 1. Press the RECORDER button so the PLAY lamp is lit. Select the tone and effects you want to use in your recording, and set the tempo you want. If you are recording to Track 1, you also can select a rhythm and accompaniment mode. Track 1 only • Reverb and chorus (page E-13) • Tempo (page E-17) • Rhythm (page E-17) • Mode (page E-18) NOTE • If you want the metronome to sound while you are recording, configure the beats per measure and tempo settings, and then press the METRONOME button. See “Using the Metronome” on page E-14 for more information. 6. Start playing something on the keyboard. • Recording will start automatically. 2. Use the T/NO and S/YES buttons to display a song number (1 to 5). 3. Press the RECORDER button so the REC lamp is flashing. NOTE • When recording to Track 1 with rhythm or Auto Accompaniment: Press the START/STOP button to start recording. You also can start recording by pressing the SYNCHRO/ FILL-IN button and/or the INTRO/ENDING button, and then play a chord. • When recording to Track 1 without rhythm or Auto Accompaniment: Recording will start as soon as you play anything on the keyboard. • At this time the 1/L lamp also will flash to indicate that the digital piano is standing by for recording to Track 1. E-29 PX320_e.book 30 ページ 2007年8月1日 水曜日 午前9時28分 Recording and Play Back 7. When you are finished, press the START/ STOP button to stop recording. • To stop recording with a rhythm/Auto Accompaniment ending pattern, press the INTRO/ ENDING button. • Stopping recording will cause the REC lamp to go out and the PLAY lamp to light. • To play back the track you just recorded, press the START/STOP button again. 8. To record to one track of a song while listening to the playback of the other track 1. Press the RECORDER button so the PLAY lamp is lit. 2. Use the T/NO and S/YES buttons to display a song number (1 to 5). After you are finished recording or playing back, press the RECORDER button so the PLAY lamp and REC lamp are off. This indicator appears when the track contains recorded data already. 3. Press the RECORDER button so the REC lamp is flashing. • This will cause the 1/L lamp to flash. 4. Use the TRACK/PART button to select the track to which you want to record. • Make sure that the lamp for the record track is flashing. Example: To listen to playback of Track 1 as you record to Track 2 Lit: Playback standby Flashing: Record standby 5. Select the tone and effects you want to use for your recording. 6. Press the START/STOP button or play something on the keyboard to start simultaneous playback from Track 1 and recording to Track 2. • This will start both playback of the recorded track and recording to the other track. 7. E-30 When you are finished, press the START/ STOP button again to stop recording. PX320_e.book 31 ページ 2007年8月1日 水曜日 午前9時28分 Recording and Play Back To play back from digital piano memory 1. 2. Press the RECORDER button so the PLAY lamp is lit. Use the T/NO and S/YES buttons to display a song number (1 to 5). NOTE • When a song has something recorded in both tracks, you can turn off one track and play back just the other track, if you want. Whether a track is on or off is indicated by the lamps above the TRACK/PART button. Each press of the TRACK/PART button cycles through the different possible track on/off settings. 3. To delete a specific track IMPORTANT! • The procedure below deletes all of the data of the selected song. Note that the delete operation cannot be undone. Check to make sure you really do not need the data before you perform the following steps. 1. Press the RECORDER button so the PLAY lamp is lit. 2. Use the T/NO and S/YES buttons to display a song number (1 to 5). 3. Press the RECORDER button so the REC lamp is flashing. 4. Use the TRACK/PART button to select the track you want to delete. • This will cause the lamp of the selected track to flash. Press the START/STOP button. • This starts playback of the song and/or track you selected. 5. Hold down the RECORDER button until “dEL” (delete) appears on the display. 6. Press the S/YES button. NOTE • You can change the tempo setting as a track is playing. • You cannot change the tone setting during playback. • Press the START/STOP button again to stop playback. • This will delete the selected track and enter record standby. • To cancel the operation, press the T/NO button in place of the S/YES button. NOTE • All digital piano operations except for the RECORDER button and the T/NO and S/YES buttons are disabled from step 5 until the delete operation is executed in step 6 of the above procedure. E-31 PX320_e.book 32 ページ 2007年8月1日 水曜日 午前9時28分 Other Settings TRANSPOSE FUNCTION EFFECT /YES OTHERS /NO This section explains how to configure key, touch, pedal, MIDI, and other settings. • The basic procedure below is used for configuring all settings. The only difference is the button that you press to select a parameter. • See the “Secondary Parameter Reference” on page E-34 for details about the settings you can configure using this procedure. To configure other settings 1. Use the “Secondary Parameter Reference” on page E-34 to find the parameter whose setting you want to configure, and note the applicable parameter button name. Example: To change key, you would need to use the TRANSPOSE button. 2. Press the FUNCTION button. • This will cause the button’s lamp to flash. 3. Press the button you looked up in step 1. • The button’s lamp will flash and the current setting of the parameter you are configuring will appear on the display. Example: TRANSPOSE button • If the button has multiple parameters assigned to it, keep pressing the button to cycle through the parameters until the parameter you want to configure is displayed. See “Multiple Parameter Buttons” below for more information. E-32 MIDI 4. Use the T/NO and S/YES buttons to change the setting of the displayed parameter. Example: Lower the transpose setting by one semitone by changing the displayed value to –01. 5. Press the FUNCTION button to complete the procedure. • This will cause the button’s lamp to go out. NOTE • Holding down the T/NO and S/YES button will scroll continually through the available settings. • To return the displayed setting to its initial default value, press the T/NO and S/YES buttons at the same time. Multiple Parameter Buttons The EFFECT, MIDI, and OTHERS buttons have more than one parameter assigned to them. Use the procedures below to select the parameter whose setting you want to change. PX320_e.book 33 ページ 2007年8月1日 水曜日 午前9時28分 Other Settings To change the setting of one of the EFFECT button parameters Press the EFFECT button in step 3 of the “To configure other settings” procedure to toggle between the two parameters shown below. To change the setting of one of the OTHERS button parameters Press the OTHERS button in step 3 of the “To configure other settings” procedure to cycle between the parameters shown below. Brilliance parameter (“b” stands for “brilliance”.) Pre-count setting (“P” stands for “pre-count”.) Acoustic Resonance parameter (“A” stands for “acoustic”.) Soft/Sostenuto pedal jack setting (“J” stands for “jack”.) To change the setting of one of the MIDI button parameters Press the MIDI button in step 3 of the “To configure other settings” procedure to cycle between the parameters shown below. Send Channel setting (“C” stands for “channel”.) Accomp MIDI Out setting (“o” stands for “out”.) Damper pedal adjustment (half-damper) setting (“H” stands for “half”.) Registration Filter setting (“F” stands for “filter”.) Setup Memory setting (“S” stands for “setup”.) Operation Lock setting (“L” stands for “lock”.) MIDI In Chord Judge setting (“J” stands for “judge”.) Local Control setting (“L” stands for “local”.) E-33 PX320_e.book 34 ページ 2007年8月1日 水曜日 午前9時28分 Other Settings Secondary Parameter Reference Tones Setting Parameter Name VARIOUS/GM TONES button assignment TONE SEL Settings Description See “Tone List” on page Assigns one of the digital piano’s Various tone, GM A-1. tone, or Drum set to the VARIOUS/GM TONES button. Tone layering volume LAYER BAL balance –24 to 0 to 24 Specifies the volume balance between the main and layered tones. A lower value reduces the volume level of the layered tone. NOTE • The tone layering volume balance can not be changed in the Duet Mode. Split point SPLIT POINT A0 to C8* See page E-12. Reverb type REV TYPE 1 to 4 See page E-13. Chorus type CHOR TYPE 1 to 4 See page E-13. Brilliance level EFFECT b.–3 to b.0 to b.3 See page E-11. Acoustic Resonance EFFECT A.oF: Off A.on: On When the damper pedal is pressed, acoustic resonance reproduces the harmonic resonance similar to that of a grand piano. This parameter turns acoustic resonance on or off. When configuring the setting of this parameter, use the procedure under “To change the setting of one of the EFFECT button parameters” on page E-33. NOTE • Whether or not this effect can be applied depends on the tone. For details, see “Tone List” on page A-1. * Split Point Key Name Display Display Settings E-34 A B C D E F G I F3 i B5 PX320_e.book 35 ページ 2007年8月1日 水曜日 午前9時28分 Other Settings Song, Rhythm, and Metronome Setting Parameter Name Settings Description Tempo TEMPO 20 to 255 Specifies the tempo of Music Library songs, the metronome, Auto Accompaniment playback, recording and playback, etc. Metronome beats per measure BEAT 0, 2 to 6 Specifies the metronome beat. (page E-14) Metronome volume METRO VOL 0 to 42 Specifies the metronome volume. (page E-14) Song, Auto Accompaniment volume SONG/ACCOMP VOL 0 to 42 Specifies the volume of rhythm and chord accompaniment and built-in songs, independent of overall volume control. Pre-count OTHERS P.oF: Off P.on: On Turns the pre-count before playback of a Music Library song on or off. When configuring the setting of this parameter, use the procedure under “To change the setting of one of the OTHERS button parameters” on page E-33. NOTE • When playing a song from the user area or from an SD memory card, the pre-count may not sound, even though the pre-count setting is turned on. Auto Accompaniment MODE mode oFF : NORMAL C.C. : CASIO CHORD FnG : FINGERED FUL : FULL RANGE CHORD Specifies the Auto Accompaniment mode. Keyboard Setting Parameter Name Settings Description Keyboard touch response TOUCH RES oFF : Off Specifies the relative touch of the keyboard keys. 1 : Strong sound is produced even when relatively light pressure is applied. 2 : Normal 3 : Normal sound is produced even when relatively strong pressure is applied. Keyboard Key TRANSPOSE –12 to 0 to 12 Raises or lowers the tuning of the digital piano in semitone steps. NOTE • Using TRANSPOSE to raise the key of the digital piano can cause notes at the highest range of a tone to become distorted. • The transpose setting cannot be configured while Music Library playback is in progress and in the Duet Mode. Keyboard tuning TUNE –99 to 0 to 99 Raises or lowers the overall pitch of the digital piano to match another instrument. The setting range is plus or minus 99 cents (100 cents = 1 semitone) from the standard pitch of A4 = 440.0Hz. E-35 PX320_e.book 36 ページ 2007年8月1日 水曜日 午前9時28分 Other Settings Pedals Setting Parameter Name Settings Description Soft/Sostenuto pedal jack setting OTHERS J.SF: Soft J.SS: Sostenuto Soft pedal is the initial power on default setting for a pedal connected to the digital piano’s SOFT/ SOSTENUTO PEDAL jack. This parameter can be used to change the pedal to a sostenuto pedal. When configuring the setting of this parameter, use the procedure under “To change the setting of one of the OTHERS button parameters” on page E-33. Damper pedal adjustment (half-damper) OTHERS H.00 to H.42 With optional SP-30 only Adjusts the pedal effect applied when the damper pedal is half-pressed as a value from 0 (no effect) to 42 (same a full press). When configuring the setting of this parameter, use the procedure under “To change the setting of one of the OTHERS button parameters” on page E-33. MIDI and Other Settings Setting Parameter Name Settings Description Send channel MIDI C.01 to C.16 Specifies one of the MIDI channels (1 through 16) as the Send Channel, which is used for sending MIDI messages to an external device. When configuring the setting of this parameter, use the procedure under “To change the setting of one of the MIDI button parameters” on page E-33. Accomp MIDI out MIDI o.oF: Off o.on: On Specifies whether or not MIDI messages should be sent in accordance with the digital piano’s Auto Accompaniment and recording function playback. When configuring the setting of this parameter, use the procedure under “To change the setting of one of the MIDI button parameters” on page E-33. MIDI In Chord judge MIDI J.oF: Off J.on: On Specifies whether chord judge should be performed on accompaniment range MIDI Note On messages received from an external device. When configuring the setting of this parameter, use the procedure under “To change the setting of one of the MIDI button parameters” on page E-33. Local control MIDI L.oF: Off L.on: On When Local Control is turned on, pressing the keyboard’s keys plays the notes using the currently selected built-in tone, and also sends the applicable MIDI messages out the MIDI OUT port. Turning off Local Control cuts off the digital piano’s sound source, so no sound is produced by the digital piano when keys are pressed. This capability comes in handy when you want to turn off the digital piano’s keyboard and play on an external sequencer or other device. When configuring the setting of this parameter, use the procedure under “To change the setting of one of the MIDI button parameters” on page E-33. Registration Filter OTHERS F.oF: Off F.on: On When Registration Filter is turned on, the rhythm and Auto Accompaniment related settings are not recalled when recalling registration data. For details about the settings that are not recalled, see “Registration Data Contents” on page E-25. When configuring the setting of this parameter, use the procedure under “To change the setting of one of the OTHERS button parameters” on page E-33. E-36 PX320_e.book 37 ページ 2007年8月1日 水曜日 午前9時28分 Other Settings Setting Setup Memory Parameter Name OTHERS Settings S.oF: Off S.on: On Description When “On” is selected for this setting, the digital piano will remember its current settings*, and restore them when it is turned on again. When “Off” is selected, settings are reset to their initial defaults whenever the digital piano is turned on. When configuring the setting of this parameter, use the procedure under “To change the setting of one of the OTHERS button parameters” on page E-33. NOTE • To clear current setup memory contents, turn the Setup Memory setting off and then back on again. • The setup memory setting cannot be changed while Music Library playback is in progress, while a rhythm or the metronome is sounding, in the Duet Mode, and during recording. Operation Lock OTHERS L.oF: Off L.on: On Selecting “On” for this setting locks the digital piano’s buttons (except for the POWER button and the buttons required for unlock), so no operation can be performed. Turn on operation lock when you want to protect against unintentional button operations. When configuring the setting of this parameter, use the procedure under “To change the setting of one of the OTHERS button parameters” on page E-33. NOTE • The operation lock setting cannot be changed while Music Library playback is in progress, while a rhythm or the metronome is sounding, and during recording. * Setup Memory Data Contents Tone selection, layer/split on/off, reverb/chorus on/off, rhythm number, SD memory card playback selection, settings on pages E-34 through E-37 (except VARIOUS/GM TONES button assignment, Accomp MIDI out, MIDI In Chord judge, Local control, Operation Lock), RHYTHM/MUSIC LIBRARY button setting, TONE/REGISTRATION button setting, CARD button setting. E-37 PX320_e.book 38 ページ 2007年8月1日 水曜日 午前9時28分 Connecting to a Computer Connecting to the MIDI Terminal Connecting to the USB Port What is MIDI? MIDI is a standard for digital signals and connectors that allows musical instruments, computers, and other devices, regardless of manufacturer, to exchange data with each other. NOTE • For details about MIDI implementation, visit: http://world.casio.com/ MIDI Connections Connecting your computer or other external MIDI device to the digital piano’s MIDI OUT/IN terminals makes it possible for them to exchange MIDI messages. You also can playback notes you play on the digital piano on the connected device. The digital piano’s USB port makes it quick and simple to connect to a computer. You can install a USB MIDI driver from the CD-ROM that comes bundled with the digital piano onto a computer equipped with a USB port. After that, you can connect the digital piano to your computer and run commercially available MIDI software on your computer to exchange MIDI data with the digital piano. You also can use the USB connection to transfer files you downloaded from the CASIO MUSIC SITE from your computer to the digital piano. You will need a commercially available USB cable to connect a computer to the digital piano’s USB port. To connect to a computer using the USB port 1. MIDI Cable Left Side MIDI OUT On the computer to which you plan to connect, install the USB MIDI driver from the CD-ROM that comes bundled with the digital piano. MIDI IN NOTE • Before installing the USB MIDI driver, be sure to read the contents of the “readme.txt” file in the “English” folder on the bundled CD-ROM. • For details about how to install the USB MIDI driver, see the “CASIO USB MIDI Driver User’s Guide” (manual_e.pdf) that also is on the bundled CD-ROM. MIDI Settings You can use the procedure in “Other Settings” (page E-32) to configure MIDI settings. See page E-34 for a description of the settings and information about how to configure them. 2. Use a commercially available USB cable (A-B type) to connect the digital piano to the computer. IMPORTANT! • Make sure that the digital piano is turned off before connecting or disconnecting the USB cable. Computer USB port USB cable (A-B type) USB connector Digital piano USB port E-38 PX320_e.book 39 ページ 2007年8月1日 水曜日 午前9時28分 Connecting to a Computer • You need to have Adobe Reader or Acrobat Reader installed on your computer in order to view the contents of the “CASIO USB MIDI Driver User’s Guide” (manual_e.pdf). If your computer does not have Adobe Reader or Acrobat Reader installed already, use the procedure below to install it. To install Adobe Reader (Acrobat Reader) 1. Place the CD-ROM that comes with the digital piano into your computer’s CD-ROM drive. 2. On the CD-ROM, navigate to the “Adobe”/ “English” folder and double-click “ar601enu.exe” (or “ar505enu.exe”). Follow the instructions that appear on your computer screen to install the driver. IMPORTANT! • Adobe Reader cannot be installed using the “ar601enu.exe” file on a computer running Windows 98. If your computer is running Windows 98, click “ar505enu.exe” to install Acrobat Reader. Minimum Computer System Requirements for the USB MIDI Driver z Universal • Operating System Windows VistaTM (32-bit), Windows® XP Professional (32-bit), Windows® XP Home Edition, Windows® 2000 Professional, Windows® Me, Windows® 98SE, Windows® 98 • IBM AT or compatible computer • USB port that provides normal operation under Windows • CD-ROM drive (for installation) • At least 2MB of free hard disk space (not including space required for Acrobat Reader) z Windows Vista, Windows XP • Pentium 300MHz or higher • 128MB minimum memory z Windows 2000 • Pentium 166MHz or higher • 64MB minimum memory Attention Windows Vista users! • If your computer is running Windows Vista, the MIDI device selection screen of the MIDI application software you are using may show a MIDI OUT device name in the menu of MIDI IN items, or a MIDI IN device name in the menu of MIDI OUT items. Note that selecting the wrong type of item for MIDI IN or MIDI OUT will result in a setup error. If a setup error occurs, reconfigure the MIDI device settings, taking care to select the proper items for MIDI IN and MIDI OUT. For details about configuring settings, see the user documentation that comes with your MIDI application software. USB Mode and MIDI Mode Your digital piano has two data communication modes: a USB mode and a MIDI mode. The digital piano will enter the USB mode automatically whenever a connection is established between it and the USB driver running on a connected computer. If there is no computer connected to the USB port, the digital piano will enter the MIDI mode. z USB Mode USB enabled The above message appears for about three seconds after a USB connection is established. For details about using the MIDI device functions in the USB mode, see the “CASIO USB MIDI Driver User’s Guide” (manual_e.pdf) on the bundled CD-ROM. z MIDI Mode USB disabled The above message appears for about three seconds after a USB connection terminated. The MIDI mode is used when sending and receiving data over the digital piano’s MIDI terminals. z Windows Me, Windows 98SE, Windows 98 • Pentium 166MHz or higher • 32MB minimum memory E-39 PX320_e.book 40 ページ 2007年8月1日 水曜日 午前9時28分 Connecting to a Computer Expanding the Selections in the Music Library You can store up to 10 songs you have downloaded with your computer as songs 61 through 70 of the Music Library and practice along with them as they play, just as you do with the built-in songs. You also can use the CASIO SMF conversion software (SMF Converter) to convert SMF data files you have purchased or created, and transfer them to the digital piano’s Music Library. SMF Format Data Files Ð CASIO SMF conversion software Ð Music Library (Songs 61 to 70) NOTE • You will not be able to transfer data from a computer to the digital piano during playback or recording of song data, during a data save or recall operation, etc. Wait until the current operation is complete before transferring data. To install the SMF conversion software (SMF Converter) 1. Place the CD-ROM that comes with the digital piano into the CD-ROM drive of a computer that is equipped with a USB port. 2. Navigate to the CD-ROM and then doubleclick the “SMFConv-e.exe” file. Next, follow the instructions that appear on your computer screen to install the software. • Before installing SMF Converter, be sure to read the contents of the “smfreadme.txt” file. A version of this file is provided in each language folder on the CDROM. For information about using SMF Converter, doubleclick [index.html] in the [help] folder, which was created when you installed SMF Converter. You also can access user documentation from the Windows [Start] menu by clicking [Programs] – [CASIO] – [SMF Converter] – [manual]. A browser that supports frames (like Internet Explorer 4 or Netscape Navigator 4.04 or higher) is required to view the SMF Converter manual. E-40 Minimum Computer System Requirements for SMF Converter z Operating System Windows VistaTM (32-bit), Windows® XP Professional (32-bit), Windows® XP Home Edition, Windows® Me, Windows® 98SE z Storage At least 10 MB of available disk space z USB Interface You also can download the SMF conversion software from the CASIO Website. CASIO MUSIC SITE http://music.casio.com/ In addition to the software itself, the CASIO MUSIC SITE also will provide you with information about its installation and use. You also can find out the latest news about your digital piano and other CASIO musical instruments, and much more. NOTE • Your digital piano supports SMF Format 0 and Format 1. IMPORTANT! • If your computer is running Windows Vista, note the precautions under “Attention Windows Vista users!” on page E-39. If a setup error occurs, perform the following steps to reconfigure settings. (1) Restart SMF Converter. (2) Open any file and display the “Selection” screen. (3) Click “Setup(S)” to display the “MIDI Device” screen. (4) Select the proper items and then exit MIDI device setup. PX320_e.book 41 ページ 2007年8月1日 水曜日 午前9時28分 Using an SD Memory Card MUSIC LIBRARY FUNCTION TONE/REGISTRATION PLAY/STOP /YES RECORDER CARD /NO Your digital piano’s SD memory card slot makes it possible for you to store song data on a commercially available SD memory card. The digital piano also can read SMF song data and CASIO format song data from an SD memory card. z Supported SD Memory Cards The maximum supported SD memory card size is 2 GB. Use of any SD memory card with greater capacity is not supported. SD CARD SLOT *1 If the first two characters of the filename of song data is not a two-digit number from 01 to 99, the corresponding letter (according to data type) shown in the parentheses will be displayed as the data type indicator. The digital piano will no longer be able to access a registration data file if the file name is changed to a format that is not allowed. *2 The display below shows the digital piano display for “v”. z Supported Data File Types and SD Memory Card Operations Display File Name Data File Type Indicator*1 Extension Supported SD Memory Card Operations SMF Data (Format 0) U (v)*2 .MID Playback, transfer to user area SMF Data (Format 1)*3 U (v)*2 .MID Playback, transfer to user area Song data converted to CASIO format using CASIO SMF conversion software (CASIO format) Song data recorded on the digital piano (CASIO format) Registration data recorded on the digital piano (CASIO format) *3 The digital piano will not be able to correctly play a file that has more than 17 tracks. *4 Song data recorded with the digital piano can be saved as SMF Format 0 data. z Data File Display Data File Type C (d) r (q) G .CM2 Playback, transfer to user area .CSR Save to SD memory card,*4 recall to recorder area .CR6 Save to SD memory card, recall to registration area File Number (01 to 99) IMPORTANT! • Use only SD memory cards. Operation is not guaranteed when any other type of memory card is used. E-41 PX320_e.book 42 ページ 2007年8月1日 水曜日 午前9時28分 Using an SD Memory Card SD Memory Card and SD Memory Card Slot Precautions IMPORTANT! • Whenever handling an SD memory card, be sure to observe the instructions and precautions in the user documentation that comes with it. • SD memory cards have a write-protect switch that protects against accidental deletion of data. • Avoid using an SD memory card in the following types of areas. Such conditions can corrupt data stored on the memory card. • Areas subjected to high temperature, high humidity, and corrosive gas • Areas subjected to strong electrostatic charge and digital noise • Never touch the contacts of an SD memory card when loading it or when removing it from the digital piano. • Never remove the SD memory card from the digital piano or turn off the digital piano while it is reading data from or writing data to the memory card. Doing so can corrupt the data on the memory card and damage the SD memory card slot. • Exchange of data between the digital piano and an SD memory card can take anywhere from a few seconds to as long as a few minutes. • Never insert anything besides an SD memory card into the SD memory card slot. Doing so creates the risk of malfunction. • Inserting an SD memory card that carries an electrostatic charge into the SD memory card slot can cause malfunction of the digital piano. If this happens, turn the digital piano off and then back on again. • An SD memory card can become quite warm after very long use in the SD memory card slot. This is normal and does not indicate malfunction. • An SD memory card has a limited service life. After very long use, you may start to experience problems with storing data to, or reading or deleting data from the memory card. When this happens, you need to purchase a new SD memory card. * Note that CASIO COMPUTER CO., LTD. shall not be held liable for any loss of data stored on an SD memory card. Inserting and Removing an SD Memory Card IMPORTANT! • Note that the SD memory card must be oriented correctly when you insert it into the SD memory card slot. Trying to force the memory card into the slot can damage the card and the slot. • Never remove the SD memory card from the card slot or turn off the digital piano while any data access operation (save, recall, format) is being performed. Doing so can corrupt the data on the memory card and damage the SD memory card slot. To insert an SD memory card 1. With the SD memory card facing upwards as shown in the illustration, angle the card downwards as you insert it into the SD memory card slot. • Push the card into the slot until you hear it click into place. Front To remove an SD memory card IMPORTANT! • Before removing the SD memory card, check to make sure that the lamp above the CARD button is not lit. If the lamp is lit or flashing, it means that the card is being accessed, and that you should not remove it. 1. Press the memory card into the slot slightly and then release it. • This will cause the memory card to disengage and eject partially. 2. E-42 Pull the memory card out of the slot. PX320_e.book 43 ページ 2007年8月1日 水曜日 午前9時28分 Using an SD Memory Card Formatting an SD Memory Card Use the procedures in this section to format an SD memory card. IMPORTANT! • When using an SD Memory card, first be sure to format the memory card on the digital piano. • Before performing the procedure below, check to make sure that the SD memory card does not contain any data you might need. • The SD memory card format performed by your digital piano is a “quick format”. If you want to completely delete all of the data on the card, format it on you computer or using some other device. PREPARATION • Insert the SD memory card you want to format into the digital piano’s SD memory card slot. Make sure that the write-protect switch of the SD memory card is not in the write-protect position. To format an SD memory card 1. Saving Recorded/Registration Data to an SD Memory Card You can save song data that you recorded in the digital piano’s recorder area or registration data you saved to the registration area to an SD memory card. Song data also can be converted to SMF format 0 for storage. PREPARATION • Insert an SD memory card that has been formatted on the digital piano into the digital piano’s SD memory card slot. Make sure that the write-protect switch of the SD memory card is not in the write-protect position. IMPORTANT! • Never turn off the digital piano or perform any other operation while data is being saved to an SD memory card. Doing so can cause SD memory card data to be deleted and make impossible to store data to the card. To save recorder area data 1. Press the RECORDER button so the PLAY lamp is lit. 2. Use the T/NO and S/YES buttons to display the song number (1 through 5) of the song you want to save. 3. Hold down the CARD button until its lamp starts to flash slowly and “Ldr” (load recorder area) appears on the display. 4. Press the CARD button again. Press the FUNCTION button. • This will cause the button’s lamp to flash. 2. Press the CARD button. • This will cause “For” (format) to flash on the display. 3. Press the S/YES button to start formatting. • “PLS” (please wait) remains on the display while the formatting operation is performed. Never try to perform any other operation on the digital piano while the memory card is being formatted. The message “CPL” (complete) will appear on the display to let you know when the format operation is complete. z To cancel the format operation, press the T/NO button in place of the S/YES button in step 3. • This will cause the CARD button lamp to flash at a higher speed and “SvC” (save as CSR file) to appear on the display. This setting will save song data in CASIO CSR format. • If you want to save the song data in SMF Format 0, press the CARD button again. This will cause “SvS” (save as SMF0 file) to appear on the display. E-43 PX320_e.book 44 ページ 2007年8月1日 水曜日 午前9時28分 Using an SD Memory Card 5. Use the T/NO and S/YES buttons to display the file number where you want to save the song data. To save registration data 1. Press the TONE/REGISTRATION button so the registration lamp is lit. 2. Hold down the CARD button until its lamp starts to flash slowly and “LdG” (load registration area) appears on the display. 3. Press the CARD button again. This mark indicates that the currently displayed file number on the SD memory card has data stored already. 6. When everything is the way you want, press the FUNCTION button to begin saving data. • The message “CPL” (complete) will appear on the display to let you know when the save operation is complete. After that, the digital piano will return to playback standby. z To cancel the save operation, press the CARD button. z If the SD memory card already contains a data file with the same file number, pressing the FUNCTION button in step 6 will display “rEP” (replace) to confirm that you want to replace the existing file with the file you are saving. Press the S/YES button to overwrite the existing data file or the T/NO button to cancel. • This will cause the CARD button lamp to flash at a higher speed and “SvG” (save as CR6 file) to appear on the display. 4. Use the T/NO and S/YES buttons to display the file number where you want to save the registration memory data. This mark indicates that the currently displayed file number on the SD memory card has data stored already. 5. When everything is the way you want, press the FUNCTION button to begin saving data. • The message “CPL” (complete) will appear on the display to let you know when the save operation is complete. z To cancel the save operation, press the CARD button. z If the SD memory card already contains a data file with the same file number, pressing the FUNCTION button in step 5 will display “rEP” (replace) to confirm that you want to replace the existing file with the file you are saving. Press the S/YES button to overwrite the existing data file or the T/NO button to cancel. E-44 PX320_e.book 45 ページ 2007年8月1日 水曜日 午前9時28分 Using an SD Memory Card Transferring Data from an SD Memory Card to Digital Piano Memory To transfer song data from an SD memory card to the digital piano user area 1. Press the MUSIC LIBRARY button so the lamp below the button is lit. 2. Use the T/NO and S/YES buttons to display the number of the user area song (Music Library song number 61 through 70) to which you want to transfer the song data. You can use the procedures in this section to transfer data from an SD memory card to the digital piano user area,*1 recorder area,*2 or registration area.*3 *1 Music Library Songs 61 to 70 *2 Memory area where songs recorded on the digital piano are stored. *3 Memory area where registration data on the piano is stored. z Supported Data User Area .............SMF format data and song data converted using SMF conversion software (CASIO CM2 format) Recorder Area.......Song data recorded on the digital piano (CASIO CSR format) Registration Area ...Registration data saved with the digital piano (CASIO CR6 format) PREPARATION • Insert the SD memory card, which contains the data you want to transfer, into the piano’s SD memory card slot. IMPORTANT! • Never turn off the digital piano or perform any other operation while data is being recalled from an SD memory card. Doing so can cause SD memory card data to be deleted or damaged, making transfer of the data impossible. It also can cause deletion of data stored in the area to which you are saving the data. This mark indicates that the currently displayed user area song number has data stored already. 3. Hold down the CARD button until its lamp starts to flash slowly and “LdU” (load user area) appears on the display. 4. Use the T/NO and S/YES buttons to display the file number of the song data you want to transfer to digital piano memory. 5. When everything is the way you want, press the FUNCTION button to begin data transfer. • The message “CPL” (complete) will appear on the display to let you know when data transfer is complete. After that, the display will change to show the number of the user area song to which the data was transferred. z To interrupt an ongoing data transfer operation, press the CARD button. z If the user area song number you select contains data already, pressing the FUNCTION button in step 5 will display “rEP” (replace) to confirm that you want to replace the existing data with the data you are transferring. Press the S/YES button to overwrite the data or the T/NO button to cancel. E-45 PX320_e.book 46 ページ 2007年8月1日 水曜日 午前9時28分 Using an SD Memory Card To transfer song data from an SD memory card to the recorder area 1. Press the RECORDER button so the PLAY lamp is lit. 2. Use the T/NO and S/YES buttons to display the number of the recorder area song (1 through 5) to which you want to transfer the song data. To transfer registration data from an SD memory card to the registration area 1. Press the TONE/REGISTRATION button so the registration lamp is lit. 2. Hold down the CARD button until its lamp starts to flash slowly and “LdG” (load registration area) appears on the display. 3. Use the T/NO and S/YES buttons to display the file number of the registration data you want to transfer to digital piano memory. 4. When everything is the way you want, press the FUNCTION button to begin data transfer. This mark indicates that the currently displayed song number has data stored already. 3. Hold down the CARD button until its lamp starts to flash slowly and “Ldr” (load recorder area) appears on the display. 4. Use the T/NO and S/YES buttons to display the file number of the song data you want to transfer to digital piano memory. 5. When everything is the way you want, press the FUNCTION button to begin data transfer. • The message “CPL” (complete) will appear on the display to let you know when data transfer is complete. The number of the recorder area song to which the data was transferred will be shown on the display. z To interrupt an ongoing data transfer operation, press the CARD button. z If the recorder area song number you select contains data already, pressing the FUNCTION button in step 5 will display “rEP” (replace) to confirm that you want to replace the existing data with the data you are transferring. Press the S/YES button to overwrite the data or the T/NO button to cancel. E-46 • The message “rEP” (replace) will appear to confirm that you wish to overwrite existing data. Press the S/YES button to recall the data. The message “CPL” (complete) will appear when data transfer is complete. To cancel the transfer operation, press the T/NO button. z You can cancel the above operation any time before you press the FUNCTION button by pressing the CARD button twice. PX320_e.book 47 ページ 2007年8月1日 水曜日 午前9時28分 Using an SD Memory Card Playing Back a File Stored on an SD Memory Card Playback of SMF format data and song data converted using SMF conversion software to CASIO CM2 format. NOTE • You can change tempo, volume, and pre-count settings for playback. See “Other Settings” on page E-32 for more information. IMPORTANT! • Note the following important precautions whenever playing back a data file you copied to a memory card with a computer. To perform the procedure below, you must have an SD memory card to which an SMF data file has been copied from a computer. Insert an SD memory card that has been formatted on the digital piano into the memory card slot of your computer, and copy the data file you want to play back from your computer into the memory card folder named “MUSICDAT”. Note that you will not be able to play back the data on the digital piano if it is not located inside the “MUSICDAT” folder. If you create a sub-folder inside of the “MUSICDAT” folder, the digital piano will not be able to load any data file inside the subfolder. • After you select song data, it can take a number of seconds for it to be loaded. While the data is being loaded, the song number will flash on the display, and the keyboard keys and button operations will be disabled. Selecting a song while playing something on the keyboard will cause sound output of the keyboard notes to stop. 1. Press the CARD button. • The CARD button lamp will light and a file number will appear on the display. CASIO format song 2. Use the T/NO and S/YES buttons to display the song number of the song you want to play. 3. Press the PLAY/STOP button. • This starts the playback of the song. • The measure number appears on the display during playback. • To view the song number during playback, hold down the CARD button. 4. Press the PLAY/STOP button again to stop playback. 5. After you are finished playing back files from the SD memory card, stop playback and then press the CARD button. • This will cause the lamp above the button to go out. E-47 PX320_e.book 48 ページ 2007年8月1日 水曜日 午前9時28分 Using an SD Memory Card SD Memory Card Errors Display Message Cause Action No SD memory card loaded in the SD memory card slot or the card is not loaded correctly. Correctly insert the SD memory card into the SD memory card slot. (Page E-42) You are trying to load data from an SD memory card that does not contain any data that is supported by this digital piano. 1. Change to an SD memory card that contains data saved by or supported by this digital piano. 2. When copying data to an SD memory card from a computer, copy it to the “MUSICDAT” folder. (Page E-47) The SD memory card is damaged or the card was removed while it was being accessed. 1. Use an SD memory card that was formatted on the digital piano. (Page E-43) 2. Use a different SD memory card. The SD memory card is full. Use a different SD memory card. An SD memory card was removed while some operation was in progress. Never remove a card from the card slot while a card access operation is in progress. Attempt to overwrite the song data file that is read-only. Save the file to a different SD memory card or under a different number. The data file you are trying to transfer to the digital piano is too large. When playing back a file stored on an SD memory card or loading data to the user area, select a data file that is no larger than about 318 KB. When loading song data to the recorder area, you can select only song data that was recorded on this model of digital piano. You are trying to load SMF (Standard MIDI File) Use only Format 0 or Format 1 SMF data. data that is not Format 0 or Format 1. E-48 You are trying to store data to an SD memory card that is write-protected. 1. Use a different SD memory card. 2. If you want to write to the SD memory card, change the write-protect switch position to enable writing. (Page E-42) There is a problem with the SD memory card data format or the data is corrupted. Use different data or a different SD memory card. PX320_e.book 49 ページ 2007年8月1日 水曜日 午前9時28分 Reference Troubleshooting Problem Cause Action See Page No sound is 1. The VOLUME controller is set to produced when I “MIN”. press a keyboard key. 2. Headphones are connected to the digital piano. 3. MIDI Local Control is turned off. 4. Check the current accompaniment mode setting. Normally, the accompaniment keyboard range will not produce any note while CASIO CHORD or FINGERED is selected as the Auto Accompaniment mode. 1. Rotate the VOLUME controller more towards “MAX”. 2. Unplug the headphones from the digital piano. 3. Turn on the Local Control setting. 4. Change the accompaniment mode to NORMAL. ) E-10 No rhythm Accompaniment volume is set to 0. Use the FUNCTION button and SONG/ ACCOMP VOL button to increase the volume. ) E-35 The pitch of the digital piano is off. 1. The digital piano’s key setting is something other than “0”. 1. Change the key setting to “0”, or turn digital piano power off and then back on again. 2. Adjust digital piano tuning, or turn the piano off and then back on again. ) E-35 No sound is 1. The VOLUME controller is set to produced when I try “MIN”. to play back a built-in 2. Headphones are connected to the song or a recorded digital piano. song. 1. Rotate the VOLUME controller more towards “MAX”. 2. Unplug the headphones from the digital piano. ) E-10 When I play something on the digital piano, my connected external MIDI sound source does not sound. 1. The digital piano’s send channel is different from the send channel of the external MIDI sound source. ) E-36 2. The volume or expression setting of the external sound source is “0”. 1. Change the send channel settings of the digital piano and/or the external MIDI sound source so they are the same. 2. Adjust the volume and expression settings of the external sound source. No sound is produced when playing MIDI data from a computer. The USB cable is not connected correctly. Check to make sure that the USB cable is ) E-38 connected correctly. 2. Digital piano tuning is incorrect. ) E-7 ) E-36 ) E-18 ) E-35 ) E-7 ) External sound source user’s guide When connected to a The computer’s MIDI THRU function is computer over a USB turned on. connection, playing on the keyboard produces unnatural sounds. Turn off MIDI THRU on the computer, or turn off digital piano Local Control. ) E-36 I can’t record chord accompaniment data on my computer. Accomp MIDI out is turned off. Turn on Accomp MIDI out. ) E-36 I can’t store data to an SD memory card. 1. The SD memory card is writeprotected. 2. The card is not inserted properly into the SD memory card slot. 3. There is not enough room available on the SD memory card. 4. The capacity of the SD memory card is not supported by the digital piano. 5. The SD memory card is damaged. 1. Change the write-protect switch position to enable writing. 2. Insert the card properly. ) E-42 3. Use a different SD memory card. ) E-42 4. Use an SD memory card with a supported capacity. 5. Use a different SD memory card. ) E-42 ) E-42 E-49 PX320_e.book 50 ページ 2007年8月1日 水曜日 午前9時28分 Reference Problem Cause Action See Page I can’t load data from 1. The card is not inserted properly into an SD memory card. the SD memory card slot. 2. The capacity of the SD memory card is not supported by the digital piano. 3. The SD memory card is damaged. 4. When the data was copied to the SD memory card from a computer, it was copied to a folder other than “MUSICDAT”. 1. Insert the card properly. ) E-42 2. Use an SD memory card with a supported capacity. 3. Use a different SD memory card. 4. Move the data to the “MUSICDAT” folder. ) E-42 Playback stops part way through while transferring song data from my computer. Stop song playback, disconnect the USB ) E-38 cable from the digital piano, and then reconnect it. Next, try playing back the song again. If this does not solve the problem, quit the MIDI software you are using, disconnect the USB cable from the digital piano, and then reconnect it. Next, restart the MIDI software and then try playing back the song again. Digital noise from the USB cable or power cord caused data communication your computer and digital piano to be interrupted. “E-A” appears on the Built-in flash memory is corrupted. display immediately after power is turned on. Contact your nearest CASIO Service Center. ) E-47 — A tone’s quality and This is an unavoidable result of the digital sampling process,* and does not indicate malfunction. volume sounds * Multiple digital samples are taken for the low range, middle range, and high range of the original slightly different musical instrument. Because of this, there may be a very slight difference in tonal quality and volume depending where it is between sample ranges. played on the keyboard. When I press a button, the note that is sounding cuts out momentarily or there is a slight change in how effects are applied. Selecting some tones or functions automatically changes internal effect settings that are unique the tone being used, which can cause such phenomena. This is due to the limitations of the digital piano’s system, and does not indicate malfunction. Even though I play on different ranges of the keyboard, the notes do not change octaves. The ranges of certain tones are limited, which means that octaves change normally up to a certain low note or high note. With such a tone, the notes of the lowest octave will be repeated to the left of the lowest possible note, and the highest octave will be repeated to the right of the highest possible note. This is due do limitations in the range of the original musical instrument for each tone, and does not indicate malfunction of the digital piano. E-50 PX320_e.book 51 ページ 2007年8月1日 水曜日 午前9時28分 Reference Product Specifications Model PX-320 Keyboard 88-key piano keyboard, with Touch Response Maximum Polyphony 128 notes Tones 202 (with Layer and Split) Effects Reverb (4 types), Chorus (4 types), Brilliance (–3 to 0 to 3), Acoustic Resonance Metronome • Beats per measure: 0, 2, 3, 4, 5, 6 • Tempo Range: 20 to 255 Duet Adjustable tone range: 0 to 3 octaves for the left keyboard; –4 to –1 octaves for the right keyboard Auto Accompaniment • • • • • Demo Songs 71 (11 tone demo songs; 60 Music Library songs) Music Library • Built-in Songs: 60 User Songs: Up to 10 (3.1 MB total memory capacity; up to approximately 318 KB per song)* * Based on 1 KB = 1024 bytes, 1 MB = 10242 bytes. • Song volume: Adjustable • Part On/Off: L, R Registration Number of Areas: 96 (12 sets × 8 banks) Recorder • • • • • Pedals Damper, Soft/Sostenuto (switchable) Other Functions • • • • MIDI 16-channel multi-timbre receive SD Memory Card • SD memory card slot • Supported SD Memory Cards: Up to 2 GB • Functions: SMF playback, file storage, file recall, card format Inputs/Outputs • • • • • Speakers (12cm × 6cm oval) × 2 + φ 5cm × 2 (Output: 8.0W + 8.0W) Power Requirements AD-12 AC adaptor Number of Rhythms: 70 Tempo Range: 20 to 255 Controllers: START/STOP, INTRO/ENDING, SYNCHRO/FILL-IN Auto Accompaniment modes: NORMAL, CASIO CHORD, FINGERED, FULL RANGE CHORD Accompaniment Volume Level: Adjustable Functions: Real-time recording, playback Number of Songs: 5 Number of Tracks: 2 Capacity: Approximately 50,000 notes total (Up to approximately 10,000 notes per song) Recording Media: Built-in flash memory Touch Select: 3 types, Off Transpose: ±1 octave (–12 to 0 to 12) Tuning: A4 = 440.0 Hz ±99 cents (variable) Operation Lock PHONES jack: Stereo mini jacks × 2 Pedal Jacks: Standard jacks × 2 AC adaptor terminal: 12V DC MIDI OUT/IN terminals LINE OUT R, L/MONO jacks: Standard jacks × 2 Output impedance: 2.3KΩ Output voltage: 1.8V (RMS) MAX • LINE IN R, L/MONO jacks: Standard jacks × 2 Input impedance: 9.0KΩ Input voltage: 200mV • USB port: Type B • Pedal connector (for optional SP-30 only) Power Consumption 12V Dimensions 132.2 (W) × 27.8 (D) × 13.4 (H) cm (52 1/16 × 10 15/16 × 5 1/4 inch) 18W Weight Approximately 12.0kg (26.4 lbs) • Specifications and designs are subject to change without notice. E-51 PX320_03_e.fm 52 ページ 2007年8月2日 木曜日 午後12時17分 Reference Operating Precautions Be sure to read and observe the following operating precautions. Location Avoid the following locations for this product. • Areas exposed to direct sunlight and high humidity • Areas subjected to temperature extremes • Near a radio, TV, video deck, or tuner The above devices will not cause malfunction of the product, but the product can cause interference in the audio or video of a nearby device. User Maintenance • Never use benzene, alcohol, thinner, or other chemical agents to clean the product. • To clean the product or its keyboard, wipe with a soft cloth moistened in a weak solution of water and a mild neutral detergent. Wring all excess moisture from the cloth before wiping. Included and Optional Accessories Use only accessories that are specified for use with this product. Use of unauthorized accessories creates the risk of fire, electric shock, and personal injury. Weld Lines Lines may be visible on the exterior of the product. These are “weld lines” that result from the plastic molding process. They are not cracks or scratches. Musical Instrument Etiquette Always be aware of others around you whenever using this product. Be especially careful when playing late at night to keep the volume at levels that do not disturb others. Other steps you can take when playing late at night are closing windows and using headphones. E-52 • Any reproduction of the contents of this manual, either in part or its entirety, is prohibited. Except for your own, personal use, any other use of the contents of this manual without the consent of CASIO is prohibited under copyright laws. • IN NO EVENT SHALL CASIO BE LIABLE FOR ANY DAMAGES WHATSOEVER (INCLUDING, WITHOUT LIMITATION, DAMAGES FOR LOSS OF PROFITS, BUSINESS INTERRUPTION, LOSS OF INFORMATION) ARISING OUT OF THE USE OF OR INABILITY TO USE THIS MANUAL OR PRODUCT, EVEN IF CASIO HAS BEEN ADVISED OF THE POSSIBILITY OF SUCH DAMAGES. • The contents of this manual are subject to change without notice. PX320_s.book 1 ページ 2007年8月8日 水曜日 午後8時8分 Appendix/Apéndice Tone List/Lista de tonos No./ Nº Tone Name/ Nombre de tonos Program Change/ Cambio de programa Bank Select Maximum Acoustic MSB/ Polyphony/ Resonance/ MSB de Polifonía Resonancia selección máxima acústica de banco Bank Select Maximum Acoustic MSB/ Polyphony/ Resonance/ MSB de Polifonía Resonancia selección máxima acústica de banco No./ Nº Tone Name/ Nombre de tonos Program Change/ Cambio de programa 048 BREATHY TENOR SAX 66 49 64 049 ALTO SAX 65 48 128 050 TENOR SAX 66 48 128 051 CLARINET 71 48 128 128 GRAND PIANO MODERN 0 02 GRAND PIANO CLASSIC 0 03 GRAND PIANO VARIATION 0 50 128 052 FLUTE 73 48 04 ROCK PIANO 1 48 64 053 SAWTOOTH LEAD 81 48 64 05 ELEC PIANO 1 4 48 128 054 MELLOW SAW LEAD 81 49 64 01 48 49 64 64 06 ELEC PIANO 2 5 48 64 055 SQUARE LEAD 80 48 64 07 60’S E.PIANO 4 51 128 056 SYNTH-PAD 90 48 64 08 ROCK ORGAN 16 49 128 057 FANTASY 88 48 64 09 JAZZ ORGAN 17 48 64 058 NEW AGE 88 49 64 10 STRINGS 49 48 128 059 WARM PAD 89 48 128 11 SYNTH-VOICE 54 48 128 060 WARM VOX 89 49 64 061 POLYSYNTH PAD 90 49 64 Various GM 001 LA PIANO 1 49 128 002 MELLOW PIANO 0 51 64 062 GM PIANO 1 0 0 128 003 MODERN PIANO 1 50 64 063 GM PIANO 2 1 0 128 128 004 DANCE PIANO 1 51 128 064 GM PIANO 3 2 0 005 STRINGS PIANO 0 52 64 065 GM HONKY-TONK 3 0 64 006 PIANO PAD 0 53 64 066 GM E.PIANO 1 4 0 128 007 HONKY-TONK 3 48 64 067 GM E.PIANO 2 5 0 128 008 OCTAVE PIANO 3 49 64 068 GM HARPSICHORD 6 0 128 009 E.GRAND 80 2 48 128 069 GM CLAVI 7 0 128 010 DYNO ELEC.PIANO 4 49 128 070 GM CELESTA 8 0 128 011 FM ELEC.PIANO 5 49 128 071 GM GLOCKENSPIEL 9 0 128 012 MELLOW E.PIANO 4 50 64 072 GM MUSIC BOX 10 0 64 013 POP ELEC.PIANO 5 50 64 073 GM VIBRAPHONE 11 0 128 014 SYNTH-STR E.PIANO 4 52 64 074 GM MARIMBA 12 0 128 015 CLAVI 7 48 128 075 GM XYLOPHONE 13 0 128 016 HARPSICHORD 6 48 128 076 GM TUBULAR BELL 14 0 128 017 COUPLED HARPSICHORD 6 077 GM DULCIMER 15 0 64 078 GM ORGAN 1 16 0 128 018 VIBRAPHONE 64 019 MARIMBA 020 49 64 11 48 128 079 GM ORGAN 2 17 0 12 48 128 080 GM ORGAN 3 18 0 64 DRAWBAR ORGAN 16 48 128 081 GM PIPE ORGAN 19 0 64 021 ROTARY DRAWBAR 16 50 128 082 GM REED ORGAN 20 0 128 022 ROTARY ORGAN 16 51 128 083 GM ACCORDION 21 0 64 023 PERC.ORGAN 17 49 128 084 GM HARMONICA 22 0 128 024 70’S ORGAN 17 50 128 085 GM BANDONEON 23 0 64 025 OVERDRIVE ORGAN 16 52 128 128 086 GM NYLON STR.GUITAR 24 0 128 128 026 TREMOLO ORGAN 16 53 027 CHURCH ORGAN 19 48 64 087 GM STEEL STR.GUITAR 25 0 028 CHAPEL ORGAN 19 49 128 088 GM JAZZ GUITAR 26 0 128 029 NYLON STR.GUITAR 24 48 128 089 GM CLEAN GUITAR 27 0 128 030 STEEL STR.GUITAR 25 48 128 090 GM MUTE GUITAR 28 0 128 031 JAZZ GUITAR 26 48 128 091 GM OVERDRIVE GT 29 0 64 032 CHORUS CLEAN GUITAR 27 48 092 GM DISTORTION GT 30 0 64 093 GM GT HARMONICS 31 0 128 033 OVERDRIVE GUITAR 29 48 64 094 GM ACOUSTIC BASS 32 0 128 034 ACOUSTIC BASS 32 48 128 095 GM FINGERED BASS 33 0 128 035 RIDE BASS 32 49 64 096 GM PICKED BASS 34 0 128 036 FINGERED BASS 33 48 128 097 GM FRETLESS BASS 35 0 128 037 STRING ENSEMBLE 48 48 128 098 GM SLAP BASS 1 36 0 128 038 SYNTH-STRINGS 50 48 128 099 GM SLAP BASS 2 37 0 128 039 70’S SYNTH-STR 50 49 128 100 GM SYNTH-BASS 1 38 0 64 040 80’S SYNTH-STR 50 50 128 101 GM SYNTH-BASS 2 39 0 128 041 CHOIR 52 48 64 102 GM VIOLIN 40 0 128 042 TRUMPET 56 48 128 103 GM VIOLA 41 0 128 043 TROMBONE 57 48 128 104 GM CELLO 42 0 128 044 STEREO BRASS 61 48 128 105 GM CONTRABASS 43 0 128 045 SYNTH-BRASS 62 48 64 046 80’S SYNTH-BRASS 62 49 64 106 GM TREMOLO STRINGS 44 0 128 047 BREATHY ALTO SAX 65 49 64 107 GM PIZZICATO 45 0 128 128 A-1 PX320_s.book 2 ページ 2007年8月8日 水曜日 午後8時8分 Appendix/Apéndice No./ Nº Tone Name/ Nombre de tonos Program Change/ Cambio de programa Bank Select Maximum Acoustic MSB/ Polyphony/ Resonance/ MSB de Polifonía Resonancia selección máxima acústica de banco No./ Nº Tone Name/ Nombre de tonos Program Change/ Cambio de programa Bank Select Maximum Acoustic MSB/ Polyphony/ Resonance/ MSB de Polifonía Resonancia selección máxima acústica de banco 108 GM HARP 46 0 128 177 GM WOOD BLOCK 115 0 109 GM TIMPANI 47 0 128 178 GM TAIKO 116 0 128 110 GM STRINGS 1 48 0 128 179 GM MELODIC TOM 117 0 128 111 GM STRINGS 2 49 0 128 180 GM SYNTH-DRUM 118 0 128 112 GM SYNTH-STRINGS 1 50 0 128 181 GM REVERSE CYMBAL 119 0 128 113 GM SYNTH-STRINGS 2 51 0 128 182 GM GT FRET NOISE 120 0 128 114 GM CHOIR AAHS 52 0 128 183 GM BREATH NOISE 121 0 128 115 GM VOICE DOO 53 0 128 184 GM SEASHORE 122 0 64 116 GM SYNTH-VOICE 54 0 128 185 GM BIRD 123 0 64 117 GM ORCHESTRA HIT 55 0 64 186 GM TELEPHONE 124 0 128 118 GM TRUMPET 56 0 128 187 GM HELICOPTER 125 0 128 119 GM TROMBONE 57 0 128 188 GM APPLAUSE 126 0 64 120 GM TUBA 58 0 128 189 GM GUNSHOT 127 0 128 121 GM MUTE TRUMPET 59 0 128 122 GM FRENCH HORN 60 0 64 190 STANDARD SET 0 120 128 — 123 GM BRASS 61 0 128 191 BRUSH SET 40 120 128 — 124 GM SYNTH-BRASS 1 62 0 64 125 GM SYNTH-BRASS 2 63 0 64 126 GM SOPRANO SAX 64 0 128 127 GM ALTO SAX 65 0 128 128 GM TENOR SAX 66 0 128 129 GM BARITONE SAX 67 0 128 130 GM OBOE 68 0 128 131 GM ENGLISH HORN 69 0 128 132 GM BASSOON 70 0 128 133 GM CLARINET 71 0 128 134 GM PICCOLO 72 0 128 135 GM FLUTE 73 0 128 136 GM RECORDER 74 0 128 137 GM PAN FLUTE 75 0 128 138 GM BOTTLE BLOW 76 0 128 139 GM SHAKUHACHI 77 0 64 140 GM WHISTLE 78 0 128 141 GM OCARINA 79 0 128 142 GM SQUARE LEAD 80 0 64 143 GM SAWTOOTH LEAD 81 0 64 144 GM CALLIOPE 82 0 64 145 GM CHIFF LEAD 83 0 64 146 GM CHARANG 84 0 64 147 GM VOICE LEAD 85 0 64 148 GM FIFTH LEAD 86 0 64 149 GM BASS+LEAD 87 0 64 150 GM FANTASY 88 0 64 151 GM WARM PAD 89 0 128 152 GM POLYSYNTH 90 0 64 153 GM SPACE CHOIR 91 0 64 154 GM BOWED GLASS 92 0 64 155 GM METAL PAD 93 0 64 156 GM HALO PAD 94 0 64 157 GM SWEEP PAD 95 0 128 158 GM RAIN DROP 96 0 64 159 GM SOUND TRACK 97 0 64 160 GM CRYSTAL 98 0 64 161 GM ATMOSPHERE 99 0 64 162 GM BRIGHTNESS 100 0 64 163 GM GOBLINS 101 0 64 164 GM ECHOES 102 0 128 165 GM SF 103 0 64 166 GM SITAR 104 0 128 167 GM BANJO 105 0 128 168 GM SHAMISEN 106 0 128 169 GM KOTO 107 0 128 128 170 GM THUMB PIANO 108 0 171 GM BAGPIPE 109 0 64 172 GM FIDDLE 110 0 128 173 GM SHANAI 111 0 128 174 GM TINKLE BELL 112 0 128 175 GM AGOGO 113 0 128 176 GM STEEL DRUMS 114 0 64 A-2 128 Drum Sets NOTE • Acoustic resonance (page E-34) is applied only to tones indicated by “ ”. NOTA • La resonancia acústica (página S-34) se aplica solamente a los tonos indicados mediante “ ”. PX320_s.book 3 ページ 2007年8月8日 水曜日 午後8時8分 Appendix/Apéndice Drum Assignment List/ Lista de sonidos de batería Key/Note Number Número de clave/nota E1 28 E b 1 27 F1 29 F # 1 30 G1 31 A b 1 32 A1 33 B b 1 34 B1 35 C2 36 C # 2 37 D2 38 E b 2 39 E2 40 F2 41 F # 2 42 G2 43 A b 2 44 A2 45 B b 2 46 B2 47 C3 48 C # 3 49 D3 50 E b 3 51 E3 52 F3 53 F # 3 54 G3 55 A b 3 56 A3 57 B b 3 58 B3 59 C4 60 C # 4 61 D4 62 E b 4 63 E4 64 F4 65 F # 4 66 G4 67 A b 4 68 A4 69 B b 4 70 B4 71 C5 72 C # 5 73 D5 74 E b 5 75 E5 76 F5 77 F # 5 78 G5 79 A b 5 80 A5 81 B b 5 82 B5 83 C6 84 C # 6 85 D6 86 E b 6 87 E6 88 F6 89 STANDARD SET HIGH Q SLAP SCRATCH PUSH SCRATCH PULL STICKS SQUARE CLICK METRONOME CLICK METRONOME BELL STANDARD 1 KICK 2 STANDARD 1 KICK 1 SIDE STICK STANDARD 1 SNARE 1 HAND CLAP 1 STANDARD 1 SNARE 2 LOW TOM 2 CLOSED HI-HAT LOW TOM 1 PEDAL HI-HAT MID TOM 2 OPEN HI-HAT MID TOM 1 HIGH TOM 2 CRASH CYMBAL 1 HIGH TOM 1 RIDE CYMBAL 1 CHINESE CYMBAL RIDE BELL TAMBOURINE 1 SPLASH CYMBAL COWBELL CRASH CYMBAL 2 VIBRA-SLAP RIDE CYMBAL 2 HIGH BONGO LOW BONGO MUTE HIGH CONGA OPEN HIGH CONGA LOW CONGA HIGH TIMBALE LOW TIMBALE HIGH AGOGO LOW AGOGO CABASA MARACAS SHORT HI WHISTLE LONG LOW WHISTLE SHORT GUIRO LONG GUIRO CLAVES HIGH WOOD BLOCK LOW WOOD BLOCK MUTE CUICA OPEN CUICA MUTE TRIANGLE OPEN TRIANGLE SHAKER JINGLE BELL BELL TREE CASTANETS MUTE SURDO OPEN SURDO APPLAUSE APPLAUSE 2 BRUSH SET BRUSH KICK 2 BRUSH KICK 1 BRUSH SIDE STICK BRUSH TAP BRUSH SLAP BRUSH SWIRL BRUSH CRASH CYMBAL 1 BRUSH RIDE CYMBAL 1 BRUSH RIDE BELL TAMBOURINE 2 BRUSH SPLASH CYMBAL BRUSH CRASH CYMBAL 2 BRUSH RIDE CYMBAL 2 NOTE • “” : indicates the same sound as STANDARD SET. NOTA • “” : indica el mismo sonido que STANDARD SET. A-3 PX320_s.book 4 ページ 2007年8月8日 水曜日 午後8時8分 Appendix/Apéndice Rhythm List/Lista de ritmos Category/Categoría 8BEAT/16BEAT BALLAD POPS ROCK JAZZ EUROPEAN LATIN VARIOUS A-4 Rhythm Name/ Nombre de ritmo No./Nº 01 02 STRAIGHT 8 BEAT MELLOW 8 BEAT 03 04 Category/Categoría FOR PIANO No./Nº Rhythm Name/ Nombre de ritmo 51 52 PIANO 8 BEAT PIANO BALLAD 1 GUITAR 8 BEAT 8 BEAT POP 53 54 PIANO BALLAD 2 EP BALLAD 1 05 16 BEAT 55 EP BALLAD 2 06 16 BEAT SHUFFLE 56 BLUES BALLAD 07 SLOW BALLAD 57 JAZZ COMBO 2 08 POP BALLAD 58 JAZZ COMBO 3 09 6/8 BALLAD 59 RAGTIME 10 ROCK BALLAD 60 PIANO ROCK’N’ROLL 11 POP 61 BOOGIE-WOOGIE 12 POP ROCK 62 ARPEGGIO 1 13 FAST SOUL 63 ARPEGGIO 2 14 60’S SOUL 64 ARPEGGIO 3 15 DISCO SOUL 65 MARCH 2 MARCH 3 16 SHUFFLE ROCK 66 17 BLUES 67 STRIDE PIANO 18 SOFT ROCK 68 WALTZ 2 19 SLOW ROCK 69 WALTZ 3 20 NEW ORLNS R&R 70 WALTZ 4 21 ROCK WALTZ 22 SLOW BIG BAND 23 FAST BIG BAND 24 SWING 25 SLOW SWING 26 JAZZ WALTZ 27 FOX TROT 28 QUICKSTEP 29 JAZZ COMBO 1 30 POLKA 31 WALTZ 1 32 VIENNESE WALTZ 33 FRENCH WALTZ 34 TANGO 35 MARCH 1 36 BOSSA NOVA 37 BEGUINE 38 SAMBA 39 MAMBO 40 RHUMBA 41 CHA-CHA-CHA 42 BOLERO 43 SALSA 44 REGGAE 45 COUNTRY 8 BEAT 46 COUNTRY BALLAD 47 COUNTRY SHUFFLE 48 FAST GOSPEL 49 SLOW GOSPEL 50 STR QUARTET PX320_s.book 5 ページ 2007年8月8日 水曜日 午後8時8分 Appendix/Apéndice Song List/Lista de canciones Tone Demo/Demostración de tonos No./Nº Tone Name/ Nombre de tonos Song Name/ Nombre de canciones 02 03 Fantaisie-Impromptu Op.66 Étude Op.10-3 “Chanson de l’adieu” Ungarischer Tanz 5 04 05 Étude Op.10-5 “Black Keys” Étude Op.10-12 “Revolutionary” Original 06 07 Étude Op.25-9 “Butterflies” Prélude Op.28-7 08 09 Valse Op.64-1 “Petit Chien” Valse Op.64-2 10 11 Moments Musicaux 3 Impromptu Op.90-2 12 13 Marche Militaire 1 (Duet) Frühlingslied [Lieder Ohne Worte Heft 5] 14 15 Fröhlicher Landmann [Album für die Jugend] Von fremden Ländern und Menschen [Kinderszenen] 16 17 Träumerei [Kinderszenen] Tambourin 3 Romances Sans Paroles 3 04 GRAND PIANO (CLASSIC) GRAND PIANO (VARIATION) ROCK PIANO 05 ELEC PIANO 1 Original 06 ELEC PIANO 2 Original 07 60’s E.PIANO Original 08 ROCK ORGAN Original 09 JAZZ ORGAN Original 10 STRINGS Nessun Dorma [Turandot] 11 SYNTH-VOICE Original 03 Song Name/Nombre de canciones Nocturne Op.9-2 Pr_lude [Suite bergamasque] 02 No./Nº 01 GRAND PIANO (MODERN) 01 Music Library/Biblioteca musical 19 Menuet BWV Anh.114 [Clavierbüchlein der Anna Magdalena Bach] Inventio 1 BWV 772 20 21 Inventio 8 BWV 779 Inventio 13 BWV 784 22 23 Praeludium 1 BWV 846 [Das Wohltemperierte Klavier 1] Le Coucou 24 25 Gavotte Sonatina Op.36-1 1st Mov. 26 27 Sonatine Op.20-1 1st Mov. Sonate K.545 1st Mov. 28 29 Sonate K.331 3rd Mov. “Turkish March” Rondo K.485 30 31 Für Elise Marcia alla Turca 32 33 Sonate Op.13 “Pathétique” 1st Mov. Sonate Op.13 “Pathétique” 2nd Mov. 34 35 Sonate Op.13 “Pathétique” 3rd Mov. Sonate Op.27-2 “Moonlight” 1st Mov. 36 37 Rhapsodie 2 Waltz Op.39-15 (Duet) 38 39 Liebesträume 3 Blumenlied 40 41 La Prière d’une Vierge Csikos Post 42 43 Humoresque Op.101-7 Melodie [Lyrische Stücke Heft 2] 44 45 Sicilienne Op.78 Berceuse [Dolly] (Duet) 46 47 Arabesque 1 La Fille aux Cheveux de Lin [Préludes] 48 49 Passepied [Suite bergamasque] Gymnopédie 1 50 Je Te Veux 18 51 Salut d’Amour 52 53 The Entertainer Maple Leaf Rag 54 55 L’arabesque [25 Etüden Op.100] La Styrienne [25 Etüden Op.100] 56 57 Ave Maria [25 Etüden Op.100] Le retour [25 Etüden Op.100] 58 59 La chevaleresque [25 Etüden Op.100] No.13 [Études de Mécanisme Op.849] 60 61-70 No.26 [Études de Mécanisme Op.849] User area songs/Canciones del área de usuario A-5 A-6 F # F /(Gb ) G # (G )/Ab A # (A )/B b B # F /(Gb ) G # (G )/Ab A # (A )/B b B Chord Type F Root E m7 b 5 E dim # (D )/E b M7 # (D )/E b dim7 D m7 D 7 # C /(D b) m # C /(D b) M C Chord Type aug sus4 7sus4 m add9 mM7 7b5 add9 6 ページ C Root PX320_s.book 2007年8月8日 水曜日 午後8時8分 Appendix/Apéndice Fingered Chord Chart/Cuadro de acordes digitados (Fingered) MIDI Implementation Chart Model PX-320 Function Transmitted Recognized Basic Channel Default Changed 1 - 16 1 - 16 1 - 16 1 - 16 Mode Default Messages Altered Mode 3 X Mode 3 X 21 - 108 0 - 127 0 - 127*1 O 9nH v = 1 - 127 X 8nH v = 64 O 9nH v = 1 - 127 X 9nH v = 0.8nH V =** X X X O X O O X X O X X X X X X O O O X X X X X X X O O X O O O O O O O O O O O O O O O O O O O O O O O O O O O O 0 - 127 O 0 - 127 System Exclusive O O System Common : Song Pos : Song Sel : Tune X X X X X X System Real Time : Clock : Commands O O X X Aux : Local ON/OFF : All notes OFF : Active Sense : Reset X O X X X O O X Note Number True voice Velocity Note ON Note OFF After Touch Key’s Ch’s Pitch Bender 0,32 1 6, 38 7 10 11 16 17 18 19 64 66 67 76 77 78 80 81 82 83 91 93 100, 101 120 121 Control Change Program Change Messages Version : 1.0 Remarks *1: Depends on tone *1: Depende del tono. **: no relation **: sin relación Bank select Modulation Data entry Volume Pan Expression DSP Parameter0*2 DSP Parameter1*2 DSP Parameter2*2 DSP Parameter3*2 Damper Sostenuto Soft pedal Vibrato rate Vibrato depth Vibrato delay DSP Parameter4*2 DSP Parameter5*2 DSP Parameter6*2 DSP Parameter7*2 Reverb send Chorus send RPN LSB, MSB*3 All sound off Reset all controller :True # Remarks Mode 1 : OMNI ON, POLY Mode 3 : OMNI OFF, POLY *2 *2 *3 *3 *4 *4, *5 : : : : : For details, see MIDI Implementation at http://world.casio.com/. Si desea más información, vea Implementación MIDI en http://world.casio.com/. Pitch Bend Sensitivity, Fine Tune, Coarse Tune, Modulation Depth, Null Sensibilidad de inflexión de tono, afinación precisa, afinación poco precisa, profundidad de modulación, nulo Universal Real-time Exclusive Messages: Master Volume, Master Balance, Master Fine Tuning, Master Coarse Tuning, Reverb Parameter, Chorus Parameter, GM System Message *4 : Mensajes exclusivos de sistemas universales en tiempo real: Volumen maestro, balance maestro, afinación precisa maestra, afinación poco precisa maestra, parámetro de reverberación, parámetro de coro, mensaje de sistema GM *5 : This model’s System Exclusive Message • For details about footnotes 3 through 5, see MIDI Implementation at http://world.casio.com/. *5 : Mensaje exclusivo del sistema de este modelo • Si desea más información sobre los pies de página 3 a 5, vea Implementación MIDI en http://world.casio.com/. Mode 2 : OMNI ON, MONO Mode 4 : OMNI OFF, MONO O : Yes X : No E-1 This recycle mark indicates that the packaging conforms to the environmental protection legislation in Germany. Esta marca de reciclaje indica que el empaquetado se ajusta a la legislación de protección ambiental en Alemania. C MA0708-A Printed in China PX320ES1A