1
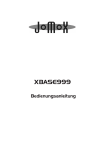
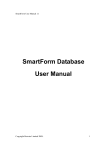
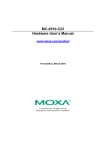
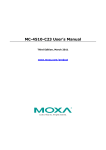
E-MU PN FI10993 Rev. B Sound Authoring Overview Sound Authoring is the process of creating sound sets for the Proteus 2000 sound modules, Proteus 1000 sound modules, Proteus Command Stations or Proteus Keyboards. (In this document, we will refer to all these synthesizers as simply “Proteus”.) Flash sound modules have advantages of convenience, reliability and compact size, as opposed to a hard disk or CD-ROM. In addition, independent sound developers can now offer their own custom sound sets at a reasonable cost. In order to create a Proteus Sound ROM you will need an EOS Ultra sampler, a Proteus, and an E-MU 16MB Flash SIMM (E-MU Model No. 6876) or an E-MU 32MB Flash SIMM (E-MU Model No. 6877). These instructions are intended for E-MU dealers & E-MU service centers. DISCONNECT POWER BEFORE OPENING THE BOX! Dangerous voltages are present inside Proteus when power is connected. The Sound Authoring process involves several steps: 1. 2. 3. 4. The samples and basic presets are created on an EOS Ultra sampler. The EOS presets will become Proteus Instruments. The EOS bank is copied to Flash. The Flash SIMM is inserted into the Proteus module and Presets are created in Proteus User RAM. When a bank of 128 presets is finished, the presets are copied into the Flash SIMM using a special utility. Up to four banks of presets can be stored on a Flash SIMM. Sound Authoring Guide 2 Sound Authoring Big Flash-Baby Flash An E-MU Flash SIMM actually contains two separate Flash memories which we call “Big Flash” and “Baby Flash”. When a bank is saved to Flash on an EOS Ultra, ALL the preset data is saved into Big Flash and can be read by another EOS Ultra. All the preset data will be preserved. (EOS Ultra does not use Baby Flash.) Proteus reads its preset information from a special memory that we call “Baby Flash”. The EOS Sound Authoring process copies a few basic parameters into Baby Flash, which enables the SIMM to be read by Proteus. EOS Data Proteus uses: • EOS sound data • Proteus Preset & Instr data • Sound data • EOS Preset data Proteus Data Used By EOS Ultra • Basic Preset data • Proteus Instrument Big Flash Fig. 1 Baby Flash Big Flash contains: • All the Sample data (this data is used by EOS and Proteus) • All EOS preset data contained in the bank (not used by Proteus) Baby Flash contains: Preset and Instrument data used by Proteus • Sample Headers - - - - pointers to the sample memory locations • Instruments - - - - - - - sample original key, sample keyboard range, sample velocity scaling, sample fine tuning, sample volume, sample pan position • Default Preset info - - preset name, voice amplifier envelope • Proteus Preset info - - after the Flash SIMM is installed in Proteus, complete presets are created, then uploaded from User RAM into Baby Flash on the SIMM. Sound Authoring Guide 3 Sound Authoring Creating EOS Sound Banks General Restrictions • EOS Ultra must be running EOS version 4.10 or higher. • The EOS data, (samples, sample headers, EOS presets and ROM ID) must be saved in a single bank. • The combined size of all data in the bank must be 15.9 MB or less. (If the file size is larger than 15.9 MB, an “End of File Error” will occur.) • A maximum of 999 samples, numbered 001 to 999 can be saved in the EOS bank. • A maximum of 1000 presets can be saved in the EOS bank. In creating Proteus Instruments, only the following EOS preset parameters are used. All other EOS preset parameters are ignored. • Preset Name (becomes the Instrument name in Proteus) • Voice/sample key and velocity windows • Voice/sample fine tuning, volume and pan • Voice amplifier envelope settings • Sample original key DRA MB DRA MA ROM 0 ROM 1 ROM 2 The Flash SIMM and EOS RAM must be installed in a specific way when writing to Flash. The Flash SIMM MUST be installed in the ROM 0 SIMM slot and the DRAM A slot MUST be empty. ROM 3 SIMM Installation RAM Here Flash Here 4 E-MU Systems MUST be Empty Fig. 2 Sound Authoring Installing Memory SIMMs NOTE: These instructions are intended for E-MU dealers or E-MU authorized service centers. Before you begin, find a clean, well lit work place. UNPLUG THE AC POWER CORD BEFORE WORKING ON ULTRA Ground Work Installing memory requires that you periodically “Ground” yourself, by touching a grounded object such as a water pipe or a grounded piece of equipment. Grounding yourself prevents the static charge in your body from damaging the sensitive memory chips. When you are asked to “Ground” yourself, simply reach over and touch the metal on the water faucet. Do not walk across the room or across a rug, as this will defeat the purpose of grounding. Remove the Cover 1. To gain access to the interior of Ultra, the top panel must first be removed. The top panel is attached to the main chassis by means of (7) Phillips head screws There are three screws along the top back of the unit and two in the recesses on both sides. 2. When the screws are removed, lift the metal top FROM THE REAR and lift off. Set the top cover aside in a safe place and put the screws into a cup so they will not get lost. The switching power supply is covered by a metal box. Do not remove this metal cover! Remove the SIMM With the front of Ultra facing you, the memory SIMMs are located near the left front of the main board. To remove a SIMM: 3. Ground yourself by touching a grounded object. 4. On each end of the SIMM socket there is a silver or plastic tab. Use a screwdriver or a ball point pen to squeeze the tabs toward the outside of the socket while gently pushing the SIMM toward the right side of the unit. The old SIMM should “hinge” to the right and can now be removed. Install the SIMM 5. Ground yourself by touching a grounded object, then remove the memory SIMM modules from the static protected packaging. Install the SIMM closest to the LEFT side first. 6. Gently set the SIMM deep into the SIMM socket at a 45º angle with the notch toward the back of the unit as shown in figure 3. Without forcing the insertion, let the board rest in the socket as deep as it will go. The chips mounted on the board should face the rear of the unit. See the following diagrams. Sound Authoring Guide 5 Sound Authoring M RO 3 RO M 2 RO M 1 RO M A RA D M RA 0 D M B Fig. 3 INSERTING SIMMs Pres s Step 1: Unhook Latches Pres s Step 2: Tilt Module Fig. 4 REMOVING SIMMs 6 E-MU Systems Sound Authoring 7. While applying a slight downward pressure on the top of the SIMM to keep it from popping out of the socket, tilt the SIMM board into a vertical position. You should hear an audible click. Make sure both sides of the silver tabs have latched. Reassemble the Unit 8. Tilt the rear of the top cover up a little and slide the front of the top panel under the front panel lip. Lower the rear of the top panel into place. 9. Replace the seven screws. The screws are all identical. Problems? Disconnect power, open the unit, and try re-seating the SIMMs. Check for proper placement of the RAM and Flash SIMMs. If all else fails, return the Ultra to its original configuration and call EMU/ENSONIQ Customer Service at (831) 438-1921. Telephone support hours are 8:00-5:00 PST, Monday through Friday. Writing to a Flash SIMM This procedure creates a Flash SIMM for Proteus. (Proteus Flash SIMMs can also be used in EOS.) When the EOS bank is finished and the memory has been installed as described on the preceding page, you are ready to write the Flash SIMM. EOS version 4.10 or higher is required to author SIMMs for Proteus. 1. 2. 3. 4. 5. To Write the Flash SIMM on EOS Ultra Install the Flash SIMM as described on page 4. Load the bank you wish to write to Flash (must be 15.9 MB or less). Press the Master button. Press the Bank soft key. Press the Author soft key. The following screen appears: Name the SIMM 6. Press the Name soft key. A pop-up window allows you to name the Bank. This bank name is only used if the SIMM is installed in an EOS machine. In any case, it’s always a good idea to label everything. Sound Authoring Guide 7 Sound Authoring 7. Name the bank and press OK. The following screen appears: 8. The SIMM name appears in the upper right corner of Proteus’ main screen. Select a name and press OK. ID numbers The next step is to give the SIMM an ID number. This step is only necessary if you have more than one Flash SIMM in your Proteus. The important point to remember is: Each Flash SIMM must have its own unique SoundSet ID number. The SoundSet ID is the MSB of the MIDI Bank Select command used to select the bank. If you will be using multiple Flash SIMMs in your Proteus, it’s important to keep track of the ID numbers. If you install two SIMMs with the same ID number, only the lowest SIMM slot will be recognized. The ID numbers 106-119 have been reserved for Proteus Flash SIMMs. 9. 10. To change the SIMM ID number, press ID. Change the SoundSet ID number and press OK. Write the Flash SIMM 8 E-MU Systems 11. Press the Create button. If the Flash SIMM is blank, EOS begins writing immediately. If the Flash SIMM is not blank, the warning dialog box shown below appears. 12. Press OK to write the bank to Flash. This operation takes about five minutes. Time to take a break. EOS first erases the Flash memory, then writes sample data into Big Flash. Next, EOS converts the minimal parameter set to Proteus format and writes this data into Baby Flash. Last of all, the checksums are compared to verify that all data was correctly written to Flash. Sound Authoring Making a Proteus Flash ROM After EOS has finished writing the SIMM, turn off power to the Ultra and remove the SIMM as described on page 5. Insert the SIMM into your Proteus to verify that it works correctly and to begin preset development. WARNING: dangerous voltages are exposed inside Proteus! Make sure power is completely disconnected from Proteus before removing the top panel. Replace the top panel before restoring power to the unit. 1. 2. 3. 4. 5. To create a Proteus Flash SIMM Select the Flash ROM you just created. C01A Vol127 Pan00 0000 fls: default preset FLASH Play through the Instruments in the Flash SIMM and verify that they are correct. If not, you can correct the problem in your EOS bank and re-write the Flash SIMM. The EOS sound authoring process creates a default Proteus preset for each instrument and stores them in the Flash banks. Each default preset is named after the instrument it contains. Before beginning preset development you may want to copy these Flash presets into User RAM using the “Copy Bank” utility in the Save/Copy menu. Create presets in a Proteus User bank. The Flash SIMM can hold up to four banks of 128 presets. When you’ve got the bank of presets exactly the way you like, they can be transferred back into Flash using the “Copy User bank to Flash” utility described on page 10. Sound Authoring Guide 9 Sound Authoring Copy User Bank to Flash Presets are edited in a User bank. When the bank of presets is finished, it can be copied, using this function, to the FLASH ROM bank. A Flash SIMM can hold four banks of 128 presets. WARNING: dangerous voltages are exposed inside Proteus! Make sure power is completely disconnected from Proteus before removing the top panel. Replace the top panel before restoring power to the unit. The sound SIMM sockets in Proteus, are marked 0, 1, 2 & 3 (0 & 1 on Proteus 1000). The SIMM sockets are located behind the controller knobs on the circuit board. COPY USER BANK TO FLASH From: User0 To: Flash2 _ If there is no Flash SIMM in the unit, the error message, “Requires Flash SIMM” will be displayed. 1. 2. 3. 4. 5. 6. To Copy a User Bank to Flash Make sure a Flash SIMM is inserted into a Proteus SIMM socket. Press the Save/Copy menu button. Rotate the Data Entry Control to select the “Copy User Bank” function shown above. Move the cursor to the “From” field and select the User bank that you want to copy to the Flash SIMM. Move the cursor to the “To” field and select the Flash bank that you want to contain the User bank. Press Enter. The Enter LED will flash and the screen below appears. Press ENTER to Overwrite Flash SIMM Presets 7. Press Enter again to confirm. The following screen appears: COPYING USER BANK TO FLASH Done. Please Reboot Now. 8. 10 E-MU Systems The Flash presets cannot be used until Proteus is rebooted (power off then on). Reboot the Proteus and verify that the new Flash bank has been properly copied. Sound Authoring Rename Flash SIMM This utility allows you to rename the Flash SIMM and change its ROM ID number. Flash SIMMs can have any five letter name you choose. Each Flash SIMM in a Proteus unit must have a unique ROM ID number (106-119). The field in the upper right corner selects between multiple Flash SIMMs. If only one Flash SIMM is installed, the field cannot be modified. The ROM ID is the MSB of the MIDI Bank Select command used to select the ROM bank. _ If there is no Flash SIMM in the unit, the error message, “Requires Flash SIMM” will be displayed. RENAME FLASH SIMM New Name: Drums 1. 2. 3. 4. 5. _ If you have two Flash SIMMs installed in Proteus and only one is being recognized, try changing the ID number of the SIMM, then re-boot. 6. Flash ID: 110 Make sure a Flash SIMM is inserted in a Proteus SIMM socket. Press the Save/Copy menu button. Rotate the Data Entry Control to select the “Rename Flash SIMM” function shown above. Move the cursor to the “New Name” field and rename the SIMM using the Data Entry Control to select the letter and the cursor keys to select the position. Set the ROM ID number for the SIMM. It doesn’t matter which number you choose as long as the same number isn’t used in another SIMM. Press Enter. The following screen appears and the Enter LED will be flashing. Press ENTER to Update Flash SIMM data 7. Press Enter again to confirm or any other button to abort. The following screen appears: CHANGING SIMM NAME & ID (takes about 2 minutes) 8. The Flash presets cannot be used until Proteus is rebooted (power off then on). Reboot the Proteus and verify that the new Flash bank has been properly renamed. Sound Authoring Guide 11 Sound Authoring Duplicate Flash This utility allows you to duplicate Flash SIMMs using Proteus. Both Sound and Preset data is copied when a Flash SIMM is duplicated. A factory sound SIMM cannot be copied using this utility. WARNING: dangerous voltages are exposed inside Proteus! Make sure power is completely disconnected from Proteus before removing the top panel. Replace the top panel before restoring power to the unit. The four sound SIMM sockets in Proteus are marked 0, 1, 2 and 3. These are located behind the controller knobs on the circuit board. The Flash SIMM you want to copy MUST be placed into SIMM Socket 0. The Destination Flash SIMM MUST be placed in SIMM socket 1. DUPLICATE SLOT 0 FLASH Start 1. _ If there are no Flash SIMMs in the unit, or if the SIMMs are in the wrong slots, an error message will be displayed. 2. 3. 4. Make sure the two Flash SIMM are located in the required Proteus SIMM sockets. Press the Save/Copy menu button. Rotate the Data Entry Control to select the “Duplicate Flash SIMM” screen shown above. Move the cursor to the bottom line and press Enter. The following screen appears and the Enter LED will be flashing. Press ENTER to overwrite the Flash SIMM in Slot 1 5. Press Enter again to confirm or any other button to abort. The following screen appears and the SIMM is copied. DUPLICATING SLOT 0 -> SLOT 1 (Takes about 5 minutes) 6. 12 E-MU Systems When Proteus has finished duplicating the SIMM, turn power off, remove the copied SIMM, then reboot. That’s it! Sound Authoring Clearing a Used Flash SIMM You can clear the sample and preset data from a Flash SIMM by doing these steps: 1. 2. Caveats Erase the RAM bank (Master / Bank / Erase). Author the newly erased RAM bank (Master / Bank /Author / Create). General Do not play a sequence or transfer samples via SMDI while sound authoring. Doing so may result in flash program errors. X and Y Samples Sound authoring cannot be done on E4R banks. These are banks that use 'X' or 'Y' samples; i.e., banks that use samples that are located on a ROM or Flash SIMM. Be aware that you may inadvertently be using X or Y samples -- if you merge a bank or load a preset that uses samples that are identical to the installed ROM or Flash samples, then the RROM or Flash samples will be used instead of the RAM samples. If you later save the bank, it will be saved as an E4R bank and will permanently point to the 'X' or 'Y' samples. The following guidelines should help to avoid confusion: • Start with a blank SIMM. If it’s a used SIMM, you can clear it by erasing the bank in RAM and then authoring the newly erased RAM bank. • Remove the Flash or ROM SIMM before you begin creating the bank to be authored. This will avoid the inadvertent use of X or Y samples. (or disable sound ROM in the Master/Misc screen). • Remove the SIMM as soon as you’ve authored -- don’t leave the SIMM in the unit if you want to continue working on the bank. Sound Authoring Guide 13 E-MU/ENSONIQ U.S.A. 1600 Green Hills Road Scotts Valley, CA USA 95067-0015 Telephone: 831-438-1921 Fax: 831-438-8612 Internet: www.emu.com Europe, Africa, Middle East E-MU/ENSONIQ Suite 6, Adam Ferguson House Eskmills Industrial Park Musselburgh, East Lothian Scotland, EH21 7PQ Tel: +44 (0) 131-653-6556 Fax: +44 (0) 131-665-0473