1
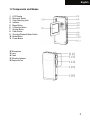
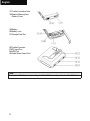
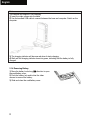
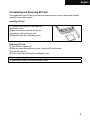
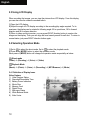
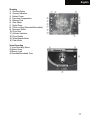
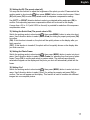
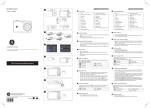
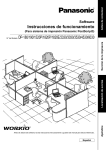
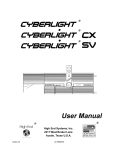
English
1
English
Preface
Many thanks for your selection of our products. Before use, please thoroughly read this
manual to ensure you can enjoy every function of this machine and keep it long under
normal service. Please also keep this manual properly for future reference during use.
Copyright
Without prior written permission by the Company, the contents in this publication shall not be
reproduced, distributed or reprinted in electronic, mechanical, magnetic, optical, chemical,
manual or any other form, nor can they be stored into any search system or translated into
any language or computer language. Brand name and product name are the trademarks or
registered trademarks of respective company.
Statement
We reserve the final right to interpret relevant contents in this manual. The contents in this
manual are subject to change without prior notice. We do not provide any warranty to the
information herein contained or assume any liability for any possible errors in this document.
This manual is provided to the users for reference only during use. Our products are under
continuous improvement and upgrading. We appreciate and thank you for your opinions and
suggestions on a better product.
2
English
Contents
1 Introduction .......................................................................................................................... 4
1.1 Accessories ................................................................................................................ 4
1.2 Components and Names ............................................................................................. 5
2 Get Video Camera Ready .................................................................................................... 7
2.1 How to Turn ON/OFF the Power of Video Camera ..................................................... 7
2.1.1 Installing Battery ................................................................................................ 7
2.1.2 Turning ON/OFF Video Camera......................................................................... 7
2.1.3 Charging Battery................................................................................................. 7
2.1.4 Removing Battery ............................................................................................... 8
2.2 Installing and Removing SD Card................................................................................ 9
2.3 Using LCD Display ..................................................................................................... 10
2.4 Selecting Operation Mode.......................................................................................... 10
2.4.1 Definition of Display Icons ................................................................................ 10
3 Use the Video Camera ....................................................................................................... 12
3.1 Working Modes .......................................................................................................... 12
3.1.1 Video Capture................................................................................................... 12
3.1.2 Shooting............................................................................................................ 14
3.1.3 Voice Recording ............................................................................................... 18
3.1.4 Playback Mode ................................................................................................. 18
3.1.5 Setting Mode..................................................................................................... 21
3.1.6 MP3 Play .......................................................................................................... 25
3.1.7 Browser Mode................................................................................................... 26
4 Functions Related to Computer ....................................................................................... 27
4.1 Installing Video Camera Software.............................................................................. 27
4.2 Connecting to Computer ............................................................................................ 27
5 Precautions on Use ............................................................................................................28
5.1 About Safety...............................................................................................................28
5.2 Care and Storage ...................................................................................................... 28
5.3 About Battery and Charging...................................................................................... 29
5.4 About Memory Card ................................................................................................... 29
6 Troubleshooting................................................................................................................. 30
7 Product Specifications ...................................................................................................... 32
8 Security and disposal advise ........................................................................................... 33
3
English
1 Introduction
The video camera you select and purchase is a digital video device integrating high-quality
digital video camera, digital camera, super MP3, digital pen recorder and PC-Cam. It will
bring you endless new experiences in digital video.
1.1 Accessories
AC Adaptor
A/V Cable
Headphones
Pouch
Strap
USB Cable
4
Cradle
English
1.2 Components and Names
1
2
3
4
5
6
7
8
9
10
11
LCD Display
Microspur Switch
Strap Attaching Hole
Indicator
Menu Button
5-Direction Button
Shutter Button
Flash Button
Shooting/Playback Mode Switch
Mode Button
Power Button
12 Microphone
13 Lens
14 Flash
15 Shooting Indicator
16 Earphone Port
5
English
17 Cradle Connection Hole
18 External MemoryCard
/Battery Cover
19 Battery
20 Battery Lock
21 Storage Card Slot
22 Cradle Connector
23 DC Input Port
24 USB Port
25 Audio/Video Output Port
Note:
The bundled AC Adaptor output voltage is 5V, 1.0A. Please only use the bundled AC Adaptor.
6
English
2 Get Video Camera Ready
2.1 How to Turn ON/OFF the Power of Video Camera
2.1.1 Installing Battery
This video camera uses rechargeable lithium ion battery.
Please refer to following procedures for correct
installation of the battery:
1) Move the battery lock along
direction to open the
card/battery cover.
2) Install the battery into the battery cell as directed and
ensure the battery lock is fastened after the battery is
inserted. Before installation, confirm the polarity is correct.
3) Slide and close the card/battery cover.
2.1.2 Turning ON/OFF Video Camera
1) Turning ON: Press down the power button for 1~2 seconds and release it to start up the
system. If the system is not started normally, please check the battery power and polarity.
2) Turning OFF: Press down the power button for 1 second or longer to turn off the system
normally.
Note:
From LCD display, you can see the battery status as shown below:
Battery power is full and you can use the video camera normally.
Battery power is sufficient and you can use the video camera normally.
Battery power is half consumed. Please prepare for charging.
Battery is low power. Please charge it.
Battery power is completely consumed. The video camera will be turned off
automatically.
2.1.3 Charging Battery
1) Place the battery contained video camera onto the USB cradle.
2) Connect the DC input line to (DC IN 5.0V) port on the USB cradle.
3) Connect the power line to the charging adaptor and power socket. The charging
indicator will become red and the charging is started.
4) Wait until the charging indicator turns into green, indicating that the battery is fully
charged. Usually, this process will take 3 hours around.
Note:
The bundled battery is 850 mAh, 3.7V. Please only use the bundled battery.
7
English
Note:
This camera also supports USB charging.
1) Insert the video camera into the base
2) Use the bundled USB cable to connect between the base and computer. Switch on the
computer.
3) The charging indicator will become red when it starts charging.
4) Wait until the charging indicator turns into green, indicating that the battery is fully
charged.
2.1.4 Removing Battery
1) Move the battery lock along
direction to open
the card/battery cover.
2) Push the battery lock and incline the video
camera to remove the battery.
3) Slide and close the card/battery cover.
8
English
2.2 Installing and Removing SD Card
It is suggested to use SD card if you need an external memory card to expand the storage
capacity of your video camera.
Installing SD Card
1) Turn the video camera off and open the
card/battery cover.
2) Insert the memory card into the slot as
shown below, until you hear a click.
3) Slide and close the card/battery cover.
Removing SD Card
1) Turn the video camera off.
2) Slide and open the card/battery cover. Press the SD card inward.
The card will eject out.
3) Pull out the card and close the card/battery cover.
Note:
To use a new SD card, you have to format it firstly.
9
English
2.3 Using LCD Display
When recording the images, you can view the pictures from LCD display. From this display,
you can also view the contents recorded before.
1) Open the LCD display.
2) Adjust the angle of LCD display according to the recording/play angle required. To its
maximum, the display can be rotated to following angle: 90 in open/close, 180 in forward
direction and 90 in reverse direction.
3) When in video and shot preview, you can press RIGHT direction button to overturn the
images on the display. Then you can align the lens toward yourself for self shot. To return to
normal status, just press RIGHT direction button again.
2.4 Selecting Operation Mode
1) Set to
to select the shoot mode. Set to
to select the playback mode.
2) Press down (MODE) button to select the operation mode.
Each press of (MODE) button will change the operation mode sequentially as below.
Shoot mode
(Video) B (Shooting) B (Voice) B (Video)
Playback Mode
(Movie) B (Photo) B (Voice) B (Recording) B (MP3 Browser) B (Movie)
2.4.1 Definition of Display Icons
Video Capture
1) Video Capture Status
2) Recorded/Recordable Time
3) Battery Power Indication
4) Movie Size
5) Memory Card
6) Digital Zoom
7) Microspur Status
8) White Balance Mode
9) Video Voice
10
English
Shooting
1) Shooting Status
2) Scenery Indication
3) Battery Power
4) Exposure Compensation
5) Memory Card
6) Date Stamp
7) Digital Zoom
8) Photo counting [Recorded/Recordable]
9) Microspur Status
10) Photo Size
11) Self-shot Indication
12) Photo Quality
13) White Balance Mode
14) Flash Mode
Voice Recording
1) Voice Recording Status
2) Battery Power
3) Memory Card
4) Recorded/Recordable Time
11
English
3 Use the Video Camera
The main functions of this digital video camera include six modes, i.e. video capture, photo
taking, voice recording, playback, MP3 play and browser. In this chapter, we will introduce
the functions and use of video camera based on these modes.
3.1 Working Modes
3.1.1 Video Capture
The system will automatically enter into video capture mode after the video camera is
started. If under other modes, you can press (MODE) button to have the video capture mode
selected when the icon is indicated on upper left of the display. The upper left of the display
will show the expected time length of movie recordable in the memory card. Press shutter
button to start video capture, in which case the capture indicator in the front of video camera
will be bright and the lower right of the screen will turn into display of the time recorded.
Press the shutter button again to stop video capture. The maximum length of movie depends
on the capacity of your memory card. This mode dose not supports flash function.
1) Setting Digital Zoom (The preset status is No Digital Zoom)
This video camera is provided with digital zoom function. To activate the digital zoom, please
will be displayed.
press UP button under video preview mode, in which case the icon
You can adjust the digital zoom status by using UP/DOWN button. To cancel the digital
zoom function, please adjust until this icon disappears.
Note:
(T): Zoom in the view (W) : Zoom out the view.
2) Setting Video Resolution (Preset at 640 x 480)
Set the working mode to video mode , then press (MENU) button to enter into video
menu. Use 5-direction button to select (Resolution) for setting its property and press (OK) to
confirm.
The new setting will be shown on the display. If there is no display of new setting, please
repeat the procedures above.
This camera provides two resolutions for your selection:
640 x 480
320 x 240
3) Setting Frame Rate (Preset at 30 frames/second)
Set the working mode to video mode , then press (MENU) button to enter into video
menu. Use 5-direction button to select (Frame Rate) for setting its property and press (OK)
to confirm.
This camera provides two frame rates, i.e. 30 frames/s and 15 frames/s, for your selection.
12
English
4) Setting Audio (Default setting is ON)
Set the working mode to video mode , then press (MENU) button to enter into video
menu. Use 5-direction button to select (Audio) for setting its property and press (OK) to
confirm. The icon will appear on the display when the voice is turned off.
Note:
There will be no voice output from your file if the voice is turned off.
5) White Balance (Preset as auto white balance)
Set the working mode to video mode , then press (MENU) button to enter into video
menu.
Use 5-direction button to select White Balance for setting its property and press (OK) to
confirm.
Five white balance modes are provided for your selection:
(AUTO):
(Daylight):
(Tungsten):
(Fluoresce):
(Cloudy):
The video camera will adjust the white balance automatically. The
users are recommended to adopt this mode, except that the
lighting is of great difference from the normal conditions.
Suitable for outdoor environment where the sunshine is very
strong.
Suitable for indoor environment where tungsten lamp illuminates.
Suitable for indoor environment where fluorescence lamp
illuminates.
Suitable for cloudy environment.
6) Setting Stabilizer
Set the working mode to video mode , then press (MENU) button to enter into video
menu. Use 5-direction button to select (Stabilizer) for setting its property and press (OK) to
confirm.
will appear on the display. This
(On): When anti-shake function is activated, the icon
function is used to reduce the shiver caused to the picture due to shaking of your hands
during shooting. It is suggested to activate this function when shooting a quick-moving
object
(Off): To deactivate the anti-shake function.
13
English
3.1.2 Shooting
The photo you shot will be saved in JPEG format. Turn on the video camera and press
(MODE) button. Shoot mode is selected when the
icon appears on upper left of the
display.
Find the view from LCD display under shooting preview status. Hold your camera and fully
press down the shutter button to complete the shooting. The green indicator starts to blink
after the shutter button is released. You can proceed to next shot after the green indicator
stops blinking.
Under shoot mode, you can press (MENU) button to set the menu. Select (Shoot mode) and
press direction button to enter the submenu. Press (OK) to set its property according to your
needs.
1) Setting the Digital Zoom (Preset as No Digital Zoom)
This video camera is provided with digital zoom function. To activate the digital zoom, please
icon will be displayed.
press UP button under video preview mode, in which case the
You can adjust the digital zoom status by using UP/DOWN button. To cancel the digital
zoom function, please adjust until this icon disappears.
Note:
(T): Zoom in the view (W): Zoom out the view
2) Instant Playback Function
To view the photo immediately after shooting, please press OK button. In this case, you can
press FLASH button to delete this photo. Press (OK) to return to preview status.
3) Setting the Microspur Shooting
Near the lens there is a shooting distance selection switch. To shoot an object within
30~40cm, please dial this switch to ( ) position. To shoot in normal
distance, please dial this switch back to( ) position.
4) Setting the Resolution (The preset value is 5,000,000 pixel)
then press (MENU) button to enter into shoot
Set the working mode to shoot mode
menu. Use 5-direction button to select (Resolution) for setting its property and press (OK) to
confirm.
Exit the menu and return to preview mode. The new setting will be shown on the display. If
there is no display of new setting, please repeat the procedures above.
Five resolutions are provided for your selection:
(10 mega Pixels)
3648×2736 / (8 mega Pixels)
3264×2448
(5 mega Pixels)
2560×1920
(3 mega Pixels)
2048×1536
(2 mega Pixels)
1600×1200
(0.3 mega Pixels)
640×480
5) Setting the Photo Quality (Preset as FINE)
14
English
Set the working mode to shoot mode
then press (MENU) button to enter into shoot
menu. Use 5-direction button to select (Quality) for setting its property and press (OK) to
confirm.
Exit the menu and return to preview mode. The new setting will be shown on the display.
Three quality modes are provided for your selection:
(Super)
(Fine)
(Normal)
The image quality is best but the image file is largest.
The image quality is good but the image file is comparatively large.
The image quality is average but the image file is small.
6) Setting the White Balance
Set the working mode to shoot mode
then press (MENU) button to enter into shoot
menu. Use 5-direction button to select (White Balance) for setting its property and press
(OK) to confirm. Exit the menu and return to preview mode. The new settings will be shown
on the display.
Five white balance modes are provided for your selection:
(AUTO):
(Daylight):
(Tungsten):
(Fluoresce):
(Cloudy):
The video camera will adjust the white balance automatically. The
users are recommended to adopt this mode, except that the
lighting is of great difference from the normal conditions.
Suitable for outdoor environment where the sunshine is very
strong.
Suitable for indoor environment where tungsten lamp illuminates.
Suitable for indoor environment where fluorescence lamp
illuminates.
Suitable for cloudy environment.
7) Setting the Capture Mode (Preset as Single Shot)
Switch the working mode to shoot mode
, then press (MENU) button to enter into shoot
menu. Use 5-direction button to select (Capture Mode) for setting its property and press
(OK) to confirm. Exit the menu and return to preview mode. The new setting will be shown
on the display.
Four modes are provided for your selection:
(Single): Each full press of shutter button will shoot one photo.
(Sequence): Each full press of shutter button will shoot three Photos.
(10S Timer): After full press of shutter button, the system will shot automatically after 10second delay and the self-shot indicator in front will prompt you that the system is waiting.
(20S Timer): After full press of shutter button, the system will shot automatically after 20second delay and the self-shot indicator in front will prompt you that the system is waiting.
15
English
8) Setting the Date Stamp (The preset value is OFF)
Switch the working mode to shoot mode
, then press (MENU) button to enter into shoot
menu. Use 5-direction button to select (Date Stamp) for setting its property and press (OK)
to confirm.
(ON): If this function is turned on, the date will be stamped on the lower right of the photo
after each shot.
(OFF): If this function is turned off, there will be no date stamp on the photo you shot.
Note:
Before using this function, please set the time of the video camera from the menu.
9) Quick Setting the Flash Mode (The preset mode is auto flash)
. Press FLASH button for quick selection of
Switch the working mode to shoot mode
flash mode. There are three flash modes available:
a.) Auto
The camera will judge if it is necessary to use the flash. If the environmental
light is too dark, the camera will use the flash automatically.
b.) Red-Eye Reduction
This mode is mainly used for taking a portrait picture. The
camera will judge if it is necessary to use the flash. If the environmental light is too dark, the
camera will use the flash automatically.
There will be no flash under any lighting conditions.
c.) OFF
Note:
The flash unit will be recharged after each flash. When the flash unit is being charged, the
green indicator will blink. Please wait until the green indicator stops blinking before you can
shoot the next photo; otherwise, the brightness of the flash might be insufficient.
10) Setting the Color Mode (Preset as Standard)
, then press (MENU) button to enter into shoot
Switch the working mode to shoot mode
menu. Use 5-direction button to select (Color Mode) for setting its property and press (OK)
to confirm. Exit the menu and return to preview mode. The current selected effect will be
shown on the display.
Three modes are provided for your selection:
(Standard): Normal shoot effect.
(Sepia): Special effect of brown mode, i.e. old photo.
(B & W): The photo you shot is black and white.
11) Setting the Scenery (Preset as Auto)
, then press (MENU) button to enter into shoot
Switch the working mode to shoot mode
menu. Use 5-direction button to select (Scenery) for setting its property and press (OK) to
confirm. Exit the menu and return to preview mode. The new setting will be shown on the
display.
This video camera provides four modes for your selection, i.e. Auto, landscape, Flower and
Night Scene.
16
English
12) Setting the EV (The preset value is 0)
You may use this function to adjust the brightness of the photo you shot. Please switch the
working mode to shoot mode
, then press (MENU) button to enter into the menu. Select
(EV) and press (OK) to enter into preview mode for exposure compensation setting.
Use (LEFT) or (RIGHT) direction button to select your desired setting and press (OK) to
confirm. Corresponding exposure compensation effect will be shown on the display.
A range from +2.0 to -2.0 (with 0.5EV as the unit) is provided for selection of the exposure
compensation value.
13) Setting the Quick View (The preset value is ON)
, then press(MENU) button to enter into shoot
Switch the working mode to shoot mode
menu. Use 5-direction button to select (Quick View) for setting its property and press (OK)
to confirm.
(ON): If this function is turned on, the photo will be quickly shown on the display after you
finish one shot.
(OFF): If this function is turned off, the photo will not be quickly shown on the display after
you finish one shot.
14) Setting the Photo Frame
, then press (MENU) button to enter into shoot
Switch the working mode to shoot mode
menu. Use 5-direction button to select (Photo Frame) for selecting from five types of photo
frame. Press (OK) to confirm and return to preview mode. The picture frame currently
selected will appear on the display and the photo you shot will automatically inlaid into the
frame.
15) Setting 2 in 1
, then press (MENU) button to enter into shoot
Switch the working mode to shoot mode
menu. Use 5-direction button to select (2 in 1) for setting its property and press (OK) to
confirm. The icon will appear on the display. This function is used to combine two different
images into one complete picture.
17
English
3.1.3 Voice Recording
Please set the shoot/playback mode switch to shoot mode .
Twice pressing (MODE)
button, the camera will enter into preparing status for voice recording. Press the shutter
button to start voice recording. The voice-recording indicator in the front of the camera will be
bright and the time recorded will be shown on the display. Press the shutter again to stop
voice recording. The length of voice recording depends on the storage of memory card.
3.1.4 Playback Mode
Set the shoot/playback mode switch to playback mode , and then press (MODE) button.
The LCD display will show respectively e latest movie, photo or voice. Use 5-direction button
to select the movie, photo or voice you have recorded. The serial number of the file will be
shown on the upper left of the display. The mode is switched in a sequence as below:
(Video, Photo, Voice) (MP3) (Browse)
1) Set the shoot/playback mode switch to playback mode , and then keep pressing down
(MODE) button until the playback file is movie or voice. Select the movie or voice you want to
play and then press (OK) to switch to large-screen display.
a.) Under large-screen display, press shutter button to play movie or voice.
b.) During play, use UP/DOWN button to adjust the voice, press (OK) to pause the play and
press shutter button to exit the play.
c.) During playing of movie, press LEFT/RIGHT button to fast backward or fast forward.
During fast forward, you can press LEFT button to stop fast forward. During fast backward,
you can press RIGHT button to stop fast backward.
d.) During playing of movie, you can also press flash button to switch the prompts on screen
ON or OFF.
2) Deleting the File
Method 1:
Set the shoot/playback mode switch to playback mode , and use 5-direction button to
select the photo, movie or voice you want to delete. Then press (MENU) to enter into
playback menu. Use 5-direction to select (Delete) menu.
a.) Delete One: From (Delete) menu, select (Delete one) and press (OK) to confirm. Select
YES or NO to execute the deletion.
b.) Delete All: This is used to delete all files. The operating method is the same as that for
deletion of a single photo. The protected file will not be deleted.
Method 2:
and use 5-direction button to
Set the shoot/playback mode switch to playback mode
select the photo, movie or voice you want to delete. Press FLASH button. CONFIRM TO
DELETE window will appear. Press 5-direction button to confirm if to delete the selected
photo, movie or voice.
18
English
3) Setting the Lock
To prevent the user from deleting the file by error, the video camera provides file lock
function.
a.) Set the shoot/playback mode switch to playback mode , then press 5-direction button
to select the photo, movie or voice you want to lock. Press (MENU) to enter into playback
menu and then use 5-direction button to select (LOCK) menu.
b.) In the property list, it is provided with four operations, i.e. (Lock one), (Unlock one),
(Lock All) and (Unlock All). The User may execute relevant function according to needs.
c.) Lock (Activate Protection): The file on display is protected and the LOCK icon will appear
on the upper right of the file. Unlock (Cancel Protection): The LOCK icon on upper right of
The file disappears.
Note:
The locked file cannot be deleted but can be formatted.
4) Viewing the Thumbnail Image (Each page can display 9 thumbnail images)
Set the shoot/playback mode switch to playback mode ,
a.) Press (OK) to enter thumbnail display.
b.) Use 5-direction button to select the photo, movie and voice you want to edit.
c.) Press (OK) to display the selected photo, movie or voice in full screen.
d.) To return to the file list of thumbnail images, please press (OK) again.
5) Viewing the Enlarged Image
Set the shoot/playback mode switch to playback mode , then press (MODE) to switch to
photo playback mode. Use 5-direction button to select a photo you want to view in
enlargement. Only the photo can be viewed in enlargement.
a.) To display a picture in large screen, you can press UP button to enlarge the image, in
which case the icon will appear. To adjust the picture zoom status, please use UP and
DOWN button.
b.) After pressing (OK) under enlargement status, you can use 5-direction button to move
the icon for viewing the picture by part.
c.) To return to normal view status, please press OK again.
6) Setting Logo
This video camera allows you to set any picture you shot into personalized welcome banner.
a.) Set the shoot/playback mode switch to playback mode, then press 5-direction button to
select the photo you want to set as welcome banner. Press (OK) to switch to enlarged
playback and then press (MENU) to enter into playback menu.
b.) From playback mode menu, use 5-direction button to select Set Logo. Select “YES” and
press (OK) to complete the setting of your welcome banner. The system will convert your
selected photo into welcome banner mode for saving.
c.) To cancel the personalized welcome banner you have set, you may follow above
procedures and select “NO” to cancel.
19
English
7) Setting the Rotation
Set the shoot/playback mode switch to playback mode , then press 5-direction button to
select the photo you want to rotate. Press OK to switch to enlarged playback and then press
MENU to enter into playback menu. Only the photo can be set for rotation.
a.) Select Rotate from playback menu and press (OK). The system will automatically jump to
will appear on lower left of the display.
enlarged playback mode and the icon
b.) Press LEFT/RIGHT button to rotate the picture counter clockwise and clockwise.
c.) Press OK again to confirm the rotation angle of your picture.
Note:
a.) After executing Default Setting, the welcome banner will be changed back to factory
default image.
b.) The welcome banner will remain even though the system has been subjected to
relevant storage processing and the preset photo has been deleted or formatted.
8) Setting the Print
Set the shoot/playback mode switch to playback mode , then press 5-direction button to
select the photo you want to print. Press (OK) to switch to enlarged playback. Only the photo
can be set for print.
Note:
The printing function only works when the USB Mode is set to Mass storage.
a.) First, set the USB mode to Mass storage in SETUP menu, then connect USB to the
printer until the icon appears on the upper of the display. Then, press (MENU) to enter
into playback menu.
b.) From playback mode menu, use 5-direction button to select (Print). The video camera
will enter into print setting menu.
c.) Press UP/DOWN button to set the print. Press RIGHT button to print immediately and
press LEFT button to cancel the print.
d.) After completing the print, press LEFT button to exit the print. To continue the print,
repeat the procedures above.
Note:
This video camera supports PicBridge print. When the camera displays the image in full
mode, it won’t work as Mass-storage or PC-camera by connecting the camera to the
computer with USB cable.
9) Setting the Crop
Set the shoot/playback mode switch to playback mode , then press (MODE) to switch to
photo playback mode. Use 5-direction button to select a photo you want to cut and copy.
Only the photo can be set for cut.
a.) From thumbnail images, select a photo you want to cut. Press (OK) to confirm and return
to large-screen display mode.
b.) Under large-screen display mode, press (MENU) to enter into playback menu and press
5-direction button to select (Crop). The system will automatically switch to the selected
20
English
photo. An icon will appear on upper left of the display, in which there is a blue-colored
rectangular frame prompting the cut area. Press 5-direction button to select an area and
press (OK). The area in rectangular frame will be cut to form a separate photo and show on
the display.
10) Setting Slide Show
Set the shoot/playback mode switch to playback mode , then press (MODE) to switch to
photo playback mode. Only the photo and movie are allowed for continuous play.
a.) Press (OK) to switch to enlarged playback of any photo and press (MENU) to enter into
playback menu. Use 5-direction button to select Slide Show. An icon will appear on upper
right of the display, in which case you enter into continuous playback.
b.) Press SHUTTER button to start slide show of photo. Press (OK) to pause and press
SHUTTER again to exit the continuous playback mode.
3.1.5 Setting Mode
Set the shoot/playback mode switch to shoot mode , then press (MENU) button to enter
into the menu. Press RIGHT button to enter into (SETUP) menu list. Use 5-direction button
to select the function you want to set. Press (OK) to confirm the setting and exit the menu.
1) Set Time
a.) Select (Time Setting) and press (OK) to enter into SET CLOCK window.
b.) Use (UP/DOWN) button to change the time.
c.) Use (LEFT/RIGHT) button to confirm and move to next digit.
d.) Press (OK) to confirm the setting.
2) Formatting Memory Card
A new SD card shall be firstly formatted before use.
a.) Select (Format) to enter into property list.
b.) Select “NO” to cancel the formatting. Select “YES” and press (OK) to execute the
formatting.
c.) All the contents in the memory will be cleared after formatting.
3) Setting Auto Power Off (The preset value is 3 minutes)
Setting Auto Power Off function can save unnecessary consumption of battery power.
a.) Select (Auto Power Off) to enter into property list.
b.) To cancel Auto Power Off function, select Auto Power Off time after stop of all operations,
i.e. 1-minute, 3-minute, 5-minute or OFF.
c.) Press (OK) to confirm the setting.
21
English
4) Setting Beep (The preset value is ON)
a.) Select (Beep) to enter into property list.
b.) Select “ON” to turn on the beep sound upon each press. Select “OFF” to cancel the beep
sound.
c.) Press (OK) to confirm the setting.
5) Setting USB Mode (The preset value is memory)
a.) Select (USB MODE) to enter into property list.
(Mass Storage): The video camera is connected to the computer via USB. You can operate
the memory as on the hard disc, for example, copy, cut, delete or download photo, movie or
voice from the video camera.
(PC-Camera): The video camera is connected to the computer via USB. You can use it as a
PC-Cam in video instant communication tools like NETMEETING or OICQ.
b.) Press (OK) to confirm the setting.
6) Setting Logo Display (The preset value is ON)
a.) Select (Logo Display) to enter into property list.
b.) Selecting “ON”, the welcome banner will be firstly displayed upon each start of the video
camera. Selecting “OFF”, the video camera will be directly started without displaying the
welcome banner.
c.) Press (OK) to confirm the setting.
7) Setting Language
a.) Select (Language) to enter into property list.
b.) Select your desired language and press (OK) to confirm the setting.
8) Setting Video Out
a.) Select (Video Out) to enter into property list.
b.) Select your desired video output system. The system available for your selection includes
PAL and NTSC.
c.) Press (OK) to confirm the setting.
9) Default Setting
a.) Select (Default Setting) and press (OK). Then, select “YES” to resume all settings to
factory default value, or select “NO” to cancel the operation.
b.) Press (OK) to confirm the setting.
10) Media Selection
a.) Select (Media Select) to enter into property list.
(Internal Flash): The current memory is internal.
(External Card): The current memory is an external memory. This video camera supports
SD card.
b.) Press (OK) to confirm the setting.
22
English
11) Setting LCD Brightness
a.) Select (LCD Brightness) and press (OK). An indication bar for brightness adjustment will
be shown on the menu interface.
b.) Use (LEFT/RIGHT) button to adjust the screen to your desired brightness.
c.) Press (OK) to confirm the setting.
23
English
12) Setting Flicker Frequency
This video camera provides two light frequencies for your selection.
There are two different light frequencies 50Hz and 60Hz for different area. This function is
designed for avoiding camera LCD display flicker. Please set the option according your area.
60HZ
Tahiti
Japan
North Korea
Taiwan
Guatemala
South Korea
Philippines
Trinidad & Tobago
Ecuador
Brazil
Bahamas
Canada
Cuba
Nicaragua
Guatemala
Dominican Rep
Bermuda
Honduras
Belize
Venezuela
Puerto Rico
Colombia
Costa Rica
Haiti
Peru
Virgin Islands
Monteserrat
Mexico
El Salvador
Guam
Surinam
Cayman Island
Liberia
24
50HZ
China
Papua New Guinea
Qatar
Saba
Abu Dhabi
Brunei
Bangladesh
Solomon Islands
Oman
Afghanistan
Cambodia
Kuwait
Egypt
Malaysia
Fiji Islands
Sri Lanka
Vietnam
Cyprus
Mauritius
Burma
Lebanon
Barbados
Paraguay
Jamaica
Antigua
Anguilla
French Guiana
Argentina
Bolivia
Guadeloupe
Grenada
Uruguay
Martinique
Neth. Antilles
Chile
Denmark
Belgium
Ireland Northern
Iceland
Hungary
Spain
Greece
Poland
France
Gibraltar
Finland
Bulgaria
Yugoslavia
United Kingdom
Norway
Malta
Czech Republic
Netherlands
Slovakia
Austria
Ireland of Rep
Italy
Portugal
Sri Lanka
Germany
Monaco
Luxembourg
Romania
Australia
New Zealand
Swaziland
Niger
Togo
Angola
Ethiopia
South Africa
Chad
Tunisia
Ghana
Uganda
Mali
Malagassy Rep
Malawi
Cameroon
Ivory Coast
Senegal
Seychelles
Sierra Leone
Dahomey
Morocco
Rwanda
Lesotho
Zaire
Rhodesia
Sudan
Libya
Tanzania
Nigeria
Zambia
Botswana
Kenya
Algeria
St. Vincent
St. Lucia
Falkland Islands
Guyana
Saba
Bolivia
Russia
English
3.1.6 MP3 Play
This video camera is provided with MP3 play function. You can listen to music by earphone
(recommended to use earphone) or directly by the loudspeaker output from the camera.
Note:
The MP3 files must be put under MP3 directory of the memory; otherwise they cannot be
played.
a.) Turn on your video camera after copying MP3 files. Set the shoot/playback mode switch
to playback mode and then press (MODE) to switch to MP3 list.
b.) Press UP/DOWN button to select the music you want to listen and then press SHUTTER
button to play. The camera will automatically play the next piece after completing the play of
current one. You can also press (MENU) select among repeat play mode.
Four repeat modes are provided for your selection:
Single Repeat; All Repeat; Random Play; Normal Play
c.) During play, you may use LEFT/RIGHT button to switch between next and previous
piece, and press UP/DOWN button to adjust the volume. You can press (OK) to pause the
play and press SHUTTER to exit the play.
d.) To delete an MP3 file, you may press FLASH button for quick deletion from MP3 list, or
switch to browser mode to execute the deletion from menu.
e.) This video camera supports synchronization of MP3 text. The MP3 text file must be put
under the same directory and given the same name as MP3 file. The extended name is
.LRC.
For example, the MP3 file is “mylove.mp3”, its lyric file must named as “mylove.lrc”. The LRC
file can be edited by Notepad or other text edit tools. When you open a LRC file, it will be like
this:
[ti:YESTERDAY ONCE MORE]
[ar:Carpenter]
[al:YESTERDAY ONCE MORE]
[by:qk1o_xue]
[offset:500]
[00:00.00]YESTERDAY ONCE MORE
[00:02.68]When I was young I'd listen to the radio
[00:08.64]Waiting for my favorite songs
[00:14.31]When they played I'd sing along
[00:19.24]It made me smile
[00:25.82]Those were such happy times
Etc.
The row 1 to row 5 are some information about the music like music name, singer, etc, The
content from row6 divided into two parts, the content between [ and ] is time stamp, it
indicates the text display time from the beginning. The second half is the text will be
displayed on the screen. The max length of each line is 50 characters.
25
English
3.1.7 Browser Mode
Set the shoot/playback mode switch to playback mode, then press (MODE) to switch to
browser mode, where you can quickly browse the photo, movie, voice and MP3 files you
have recorded.
a.) Use 5-direction button to select the file folder or a single file.
b.) To edit a file, you can select this file and then press RIGHT button. An icon “√ ” will be
shown on the display to prompt that the file is selected.
c.) You can press (MENU) button and 5-direction button to execute following operations
toward this file.
(DELETE): To delete the file.
(LOCK): To lock or unlock the file.
(COPY): To copy and edit the file.
26
English
4 Functions Related to Computer
Preparations
To use the functions related to computer, you need to install video camera software and
connect the video camera to the computer.
Minimum Requirements for computer:
• Computer with MMX Pentium 233MHz or faster CPU
• Operating System: Windows 98/98SE/2000/ME/XP
• Available disk space: at least 100MB.
• USB Port
• CD-ROM Drive
• 800x600 pixel or higher, compatible display with 16-bit colors
(24-bit color display is recommended)
4.1 Installing Video Camera Software
If your operating system is Windows 98, please install the driver first.
If you use Windows ME/2000/XP operating system and do not use PC-Cam function, it is not
necessary to install driver first. If you are to use PC CAM function, you have to install driver.
• Please refer to the following instructions for installation of general plug-and-play
equipment.
• Precaution: Please do not connect the video camera to the computer before you
complete the installation of driver. Generally, a software installation menu will
automatically appear after the installation CD is inserted into CD-ROM drive.
4.2 Connecting to Computer
1.) Insert the video camera into the base.
2.) Use the bundled USB cable to connect between the base and computer. The video
camera screen will be shut off. Pressing POWER ON/OFF button, you will hear a sound
prompting you to turn on the camera.
3.) After completing the software installation and connecting the video camera to the
computer, a removable disc will appear on the computer. It could be found in “100 MEDIA”
file folder which is routed “\ DCIM \ 100 MEDIA”.
4.) If you want to use MP3 function, please copy the MP3 files under MP3 directory before
you can play normally. If you want to use movie player function, please copy the converted
movie file to “\ DCIM \ 100 MEDIA”.
5.) If you want to use PC-Cam function, please firstly set the USB mode of video camera into
PC Cam and then connect USB cable to the video camera. Pressing POWER ON/OFF
button, you will hear a sound prompting you to turn on the camera. By setting appropriate
video input equipment in other computer program (e.g. NetMeeting) supporting PC Cam, you
can use the PC Cam function of the video camera.
6.) After plugging off the USB cable, the video camera will be shut off automatically. To
continue to use the video camera, please restart it.
27
English
English
5 Precautions on Use
5.1 About Safety
Full consideration has been made to the safety of this product. But to ensure correct use,
you are still requested to read the following warnings and precautions thoroughly.
Warning:
• Please do not tear down, modify or repair the video camera by yourself.
• Please contact your dealer for repair and internal inspection.
• Please do not shock or knock the video camera fiercely. Accidental falling might cause
damage to the components of the video camera and thus result in trouble.
• Please do not spray water onto video camera or let it subject to humidity. Water inside
the camera might cause short-circuit or electric leakage, thus resulting in trouble or
even accident.
Note:
When using flashlight, please do not look against the light at a short distance; otherwise the
light will hurt your eye and cause injury.
5.2 Care and Storage
Do not use the video camera beyond following environmental conditions:
Temperature: 0-40°C, Relative humidity: 10%-80%.
•
Please clean the camera frame, lens and LCD display according to following
procedures.
•
Frame: Use soft cloth or lens cloth to gently wipe off the dirt from the frame.
•
Lens: Firstly, clean off the dust and dirt with lens brush. Then, wipe off the remaining
dirt with soft cloth.
•
It is prohibited to clean the video camera with thinner, benzene contained or artificially
synthesized detergent. These substances might cause deformation or damage to the
video camera.
•
It is prohibited to use artificially synthesized detergent on the frame or lens.
It is prohibited to rub or squeeze the LCD display with force, as this will cause damage
•
or other problems.
•
To avoid loss of important image data, please transfer the data to the computer as
soon as possible.
28
English
5.3 About Battery and Charging
•
•
•
•
•
Long storage of batteries in the video camera, even not in use, will cause the battery
power to decrease. And long connection of the batteries to the video camera will
cause excessive discharge, in which case the battery cannot be used even it is
recharged. Therefore, if you do not use your video camera, please remove the
batteries and put them in a cool and dry place with relatively stable temperature.
Do not use the batteries not bundled with the video camera. Cooled under low
temperature (10 or lower), the bundled lithium battery may have shortened operating
time according to its characteristics and possibly cannot work normally. Under this
occasion, please warm up the battery appropriately before using the video camera.
Extreme temperature will shorten the service life of the battery.
Please confirm the polarity before correct installation of the battery.
Do not strip off or damage the battery packaging or housing.
5.4 About Memory Card
The external card supported by this camera is SD card.
•
To use a new SD card, you have to format it firstly.
•
Maloperation may cause damage to or deletion of the data recorded.
The loss arising from deletion of recorded data will not be the manufacturer's
responsibility.
•
Electrical interference, static electricity and failure of video camera or memory card
might damage the data in the card. Therefore, it is suggested to transfer the data to
your computer timely.
•
Never take out the memory card or turn off the video camera when reading or writing
the data.
• Never put the card under high temperature or high humidity.
• Never modify or tear down it.
29
English
English
6 Troubleshooting
Problem
The camera cannot be
turned on.
Cause
- If the power is correctly
connected.
- If the power is fully
charged.
The power is OFF during
use
- If setting Auto Power Off.
- If Auto Power Off is set,
the Video camera will be
OFF automatically in case
of no operation after a
period of preset time.
- Ambient temperature is
too low.
- If the battery is charged
full.
- If the battery is beyond its
service life.
The batter power is
consumed too fast
The camera does not shoot
after the shutter is pressed
down
The image is blurred
The flashlight cannot flash
Display of incorrect
date/time
The color of the shot image
is abnormal.
The playback photo is
abnormal.
Problem
Image is too bright or too
30
The camera is not set to
recording mode.
- The lens is dirty.
- If the shooting distance is
set at normal position.
- If the compression ratio is
set too high.
The flash of the camera is
under OFF status.
- Date/time is not set yet, or
the camera still records its
default time.
Setting of white balance is
incorrect.
The photo might be
damaged.
Cause
Exposure compensation
How to Correct
- Install the battery into the
camera in a correct
direction.
- Use DC adaptor to charge
the battery full.
- Set Auto Power Off
according to your needs
- Do not use the video
camera under extreme
temperature.
- Charge with DC adaptor.
If the battery works for a
very short time even after it
is charged full, it is
necessary to replace with a
new one.
Set the mode to recording
mode.
- Clean with dry and soft
cloth.
- Put the shooting distance
selection switch beside the
lens to normal position.
- Set the compression ratio
to Super.
Set the flash mode to
“AUTO FLASH”.
Reset the date/time.
Reset the white balance
Backup with personal
computer.
How to Correct
Reset the exposure
dark.
LCD display is not clear
value is incorrect.
LCD display is dirty.
The image cannot be
downloaded to the
computer.
- Cable connection is
incorrect.
- The operating system is
not Windows
98/98SE/2000/ME/XP or
the computer has no USB
port.
- Window 98 is installed
with USB driver.
compensation.
Clean it with dry and soft
cloth.
- Check the cable
connection.
- Install Windows
98/98SE/ 2000 /ME /XP
and USB port.
- Install Window 98USB
driver
General Notice:
This product complies with assessment criterion C of EN 55024:1998 + A1 dated 2001 +
A2 dated 2003. In the event of static electricity adversely affecting the quality of playback,
the appliance is to be restarted manually by the user (see page 5).
31
English
En lish
7 Product Specifications
Image Sensor
Lens
Image Size
1/1.8-inch CMOS, 5,000,000 pixel
f=8.22mm F=2.8
3648 x 2736 10 mega pixels / 3264 x 2448 8 mega pixels
2560 x 1920 5 mega pixels
2048 x 1536 3 mega pixels
1600 x 1200 2 mega pixels
0.3 mega pixels
640 x 480
Digital Zoom
LCD Display
Focus
Focus Range
Shutter
Shutter Speed
Exposure
Max. 8x
2.0-inch LTPS color LCD (640X240)
Fixed focus
1.5m infinite far, micro distance 30 40cm
Mechanical shutter
1/15~ 1/2000 second
Program AE/Exposure Compensation ±2EV
(with 0. 5EV as one step)
JPEG
Auto/Sunny/Cloudy/Flour/Tungsten
GN 5.0 (in-built)
Mp3
MPEG4
320x240 AVI approx. 30 frames/s
640x480 AVI approx. 30 frames/s
64MB Flash Memory, 32MB available
SD card
Still Image: JPEG
USB 2.0
850mAh rechargeable lithium ion battery
(Height x Width x Length) 102 x 52 x 22 mm
Approx. 110g (excluding battery and card)
Approx. 135g (including battery and card)
0 - 40 °C
10% - 80%
Image Compression
White Balance
Flash
Music
Movie Format
Internal Memory
External Memory
File Format
Interface
Battery
Dimension
Weight
Working Temperature
Working Humidity
32
8 Security and disposal advise
Caution:
Danger of explosion at improper exchange of battery/accumulator. Disposal of used
batteries/accumulators according to instructions.
Attention:
Remark regarding separation from mains.
To separate the device completely from mains plug has to be pulled from the mains socket.
Therefore the device has to be set up in a way that an unobstructed access to the mains
socket is ensured, so that the mains plug can be pulled immediately in case of an
emergency. To eliminate the danger of fire the mains plug should principally be
disconnected from mains before a longer absence as for example during the vacation.
The device should not be subjected to splashing and/or dripping water; also no items filled
with liquids such as vases or open drinks should be placed on or next to the device.
Before a storm and/or thunder storm with the danger of lightning strike please separate the
device from mains.
Disposal of old appliances
1. When this symbol of a crossed out waste bin is placed on the product, this
product is subjected to the European guideline 2002/96/EC.
2. All old electric and electronical appliances have to be exposed of separate
from the domestic waste over locations provided for this by the state.
3. With the proper disposal of the old appliance you prevent damages to the
environment and a danger of the personal health.
4. Further information regarding the disposal of the old appliance you receive
at the municipal administration, at the disposal office or in the shop, where
you acquired the product.
Batteries
Used batteries do not belong in the domestic waste! They have to be handled in a collection
location for old batteries.
33