1
FULLY AUTOMATIC COFFEE CENTER 5500
IMPORTANT INSTRUCTIONS - SAVE THESE INSTRUCTIONS
Register this product on-line and receive a free trial issue of Cook's Illustrated. Visit
http://registration.delonghi-csservice.com. Visit www.delonghi.com for a list of service centers near you.
(U.S. and Canada only).
MACHINE À CAFÈ AUTOMATIQUE ESAM5500
MODE D’EMPLOI IMPORTANT - CONSERVEZ LES PRESENTES INSTRUCTIONS
Enregistrez ce produit en ligne et recevez un numéro gratuit de Cook's Illustrated. Visitez
http://registration.delonghi-csservice.com.
Visitez www.delonghi.com pour y voir une liste des centres de réparation proches de chez vous.
(É.-U. et Canada seulement).
CAFETERA SUPERAUTOMATICA ESAM5500
INSTRUCIONES IMPORTANTES- REPASE Y GUARDE ESTAS INSTRUCCIONESLEA ESTE INSTRUCTIVO ANTES DE UTILIZAR EL APARATO
Registre este producto en línea y reciba un ejemplar gratis de Cook's Illustrated.
Visite http://registration.delonghi-csservice.com.
Visite www.delonghi.com para ver la lista de centros de servicios cercanos a usted.
(Sólo Estados Unidos y Canada
MACCHINA PER CAFFÈ SUPERAUTOMATICA ESAM5500
ISTRUZIONI IMPORTANTI- CONSERVARE LE ISTRUZIONI
Registra questo prodotto "on-line" per ricevere una copia omaggio della rivista “Cook’s Illustrated”.
Visita http://registration.delonghi-csservice.com.
Visita www.delonghi.com per una lista dei centri di servizio a te piu vicini.
(Solo Stati Uniti e Canada)
ELECTRONIC CHARACTERISTICS:
CARACTÉRISTIQUES ÉLECTRIQUES:
CARACTERISTICAS ELECTRICAS:
CARATTERISTICHE ELETTRICHE:
120V˜60HZ 1350W
EN
FR
ES
IT
2
A
A1
A5
A3
B
B1
B6
A4
A6
A2
B3
B5
B4
A14 A15
B2
A13
B7
A12
A16
A11
A10
A9
A8
B8
A7
C
C1
C11
Ready
espresso
C2
C10
C3
C9
C4
C8
C5
C7
C6
3
1
2
3
4
5
6
7
8
9
10
11
1 normal coffee
M
A
X
12
13
14
4
15
16
17
18
19
20
21
22
23
24
25
26
27
28
29
30
31
CLEAN
5
INDEX
IMPORTANT SAFEGUARDS................7
Programming the quantity of
cappuccino...............................................16
Cleaning the milk container after use .....16
INTRODUCTION..................................8
HEATING WATER ..............................16
Symbols used in these instructions ...........8
Letters in brackets......................................8
Troubleshooting and repairs ......................8
CLEANING AND MAINTENANCE .......17
Preparation...............................................16
Changing the quantity ..............................16
Emptying the drip tray..............................17
Cleaning the coffee maker........................17
Cleaning the water tank............................17
Cleaning the drip tray...............................17
Cleaning the coffee grounds container.....17
Cleaning the spouts ................................18
Cleaning the coffee feed funnel ................18
Cleaning the inside of the machine ..........18
Cleaning the infuser .................................18
Cleaning the milk container......................18
DESCRIPTION.....................................9
Description of the appliance.......................9
Description of milk container .....................9
Description of control panel.......................9
Explanation of indicator lights....................9
PRELIMINARY CHECKS....................10
Controls after transport............................10
Installing the appliance ............................10
Connecting the appliance .........................10
Using the appliance for the first time.......10
DESCALING .....................................19
TURNING THE APPLIANCE ON/OFF 11
SETTING WATER HARDNESS...........19
Setting the clock ......................................11
Setting the language ...............................11
Setting automatic start up time................11
Descaling ................................................12
Setting the temperature ...........................12
Auto-Off ...................................................12
Setting water hardness ............................12
Resetting factory default values (reset) ...12
Installing the filter ....................................12
Replacing the filter ("Reset water filter") ..12
Removing the filter...................................13
Statistics function ....................................13
Measuring water hardness.......................19
Setting water hardness ............................20
TECHNICAL SPECIFICATION ............20
DISPLAYED MESSAGES ...................21
TROUBLESHOOTING ........................23
LIMITED WARRANTY .......................25
MAKING COFFEE ..............................13
Selecting the coffee taste .........................13
Selecting the quantity of coffee in the cup 13
Customizing the "MY COFFEE" quantity ...13
Preparing coffee using coffee beans ........14
Making coffee using pre-ground coffee ...14
Regulating the coffee mill ........................14
MAKING MILK-BASED DRINKS........15
Filling and attaching the milk container....15
Making cappuccino ................................15
Making frothed milk ...............................15
Making caffelatte
...............................15
Making hot milk
..............................15
6
IMPORTANT SAFEGUARDS
When using electrical appliances, basic safety precautions should always be followed, including the following.
• Read all instructions carefully.
• Make sure the voltage of your electrical system corresponds to the voltage shown on the bottom of the machine.
• Do not touch hot surfaces. Use handles or knobs.
• To protect against fire, electrical shock and personal injury, do not immerse cord, plug or
appliance in water or other liquid.
• Keep the appliance out of the reach of children and do not leave appliance unattended while
in operation.
• Unplug from the outlet when not in use and before cleaning.
• Do not operate with a damaged cord or plug, or after the appliance malfunctions, or has been
damaged in any manner. Return the appliance to the nearest authorized service facility for
examination, repair or adjustment.
• The use of accessory attachments not recommended by the manufacturer may result in fire,
electrical shock, or personal injury.
• Do not use outdoors.
• Make sure the power cord does not hang over the edge of the table or counter-top to avoid
getting accidentally caught or entangled.
• Do not place the appliance or its electrical parts on or near electric stoves, cooking surfaces,
or gas burners.
• Plug cord into the wall outlet. To disconnect, turn any control to “off”, then remove plug from
wall outlet.
• Do not use the appliance for other than the intended use. This appliance is to be utilized for
domestic use only. The manufacturer declines all responsibility for any damage caused by
improper, incorrect, or irresponsible use.
WARNING: To reduce the risk of fire or electric shock, do not remove the cover. No user serviceable parts inside. Repair should be done by authorized service personnel only!
SAVE THESE INSTRUCTIONS
THIS APPLIANCE IS FOR HOUSEHOLD USE ONLY
SHORT CORD INSTRUCTIONS
-
-
A short power cord is provided to reduce risks resulting from becoming entangled in or tripping over a
longer cord.
Longer, detachable power supply cords or extension cords are available and may be used if care is exercised in their use.
If an extension cord is used, the marked electrical rating should be at least as great as the electrical rating of the appliance. If the appliance is provided with 3- wire, grounding type cord, the extension should
be a GROUNDING TYPE 3 - WIRE CORD. The longer cord should be arranged so that it will not drape
over the counter-top or table top where it can be pulled on by children or tripped over.
Your product is equipped with a polarized alternating current line plug (a plug having one blade wider
than the other). This plug will fit into the power outlet only one way. This is a safety feature. If you are
unable to insert the plug fully into the outlet, try reversing the plug. If the plug should still fail to fit, contact your electrician to replace your obsolete outlet. Do not defeat the safety purpose of the polarized
plug.
7
EN
INTRODUCTION
Troubleshooting and repairs
In the event of problems, first try and resolve
them following the information given in the section "Displayed messages" on page 21 and
"Troubleshooting" on page 23.
If this does not resolve the problem or you require
further information, you should consult the customer service center by calling the number given
on the "Customer Service" sheet.
If your country is not among those listed on the
sheet, call the number given in the guarantee.
If repairs are required, contact the customer service center only.
The addresses are given in the guarantee certificate provided with the machine.
Thank you for choosing the ESAM 5500 automatic coffee maker.
We hope you enjoy using your new appliance.
Take a few minutes to read these instructions.
This will avoid all risks and damage to the
machine.
Symbols used in these instructions
Important warnings are identified by these symbols.
These warnings must absolutely be respected.
Failure to observe the instructions could result in
electric shock, serious injury, burns, fire or damage to the appliance.
Danger!
Failure to observe the warning could result in possibly life threatening injury from electric shock.
Important!
Failure to observe the warning could result in
injury or damage to the appliance.
Danger of burns!
Failure to observe the warning could result in
scalds or burns.
NB:
This symbol identifies important advice or information for the user.
Letters in brackets
The letters in brackets correspond to the legend in
the Description of the appliance on page 3.
8
DESCRIPTION
C7.
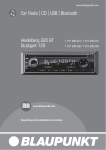
Description of the appliance
(pag. 3 A1.
A2.
A3.
A4.
A5.
A6.
A7.
A8.
A9.
A10.
A11.
A12.
A13.
A14.
A15.
A16.
A )
Grinding coarseness regulator knob
Bean container lid
Container for coffee beans
Ground coffee feed funnel
Compartment for measuring scoop
Cup warmer shelf
Water tank
Infuser
Coffee grounds container
Cup tray
Drip tray
Service door
Coffee guide
Coffee spout (adjustable height)
Hot water and steam nozzle
Main switch (some models only)
Selection knob: turn clockwise or
counterclockwise until the light
corresponding to the quantity of coffee
comes on
customized "my coffee"
espresso coffee
normal coffee
long coffee
extra long coffee
C8.
(When you access the MENU: turn to
select).
Aroma selection button
: press
until the light corresponding to the
strength of coffee you want to make
comes on.
pre-ground coffee
Description of milk container
extra-mild taste
(pag. 3 B1.
B2.
B3.
B4.
B5.
B6.
B7.
B8.
mild taste
B )
Milk frother slide
Milk container handle
CLEAN button
Milk intake tube
Frothed milk spout
Milk frother
Hot water spout
Measuring scoop
standard taste
strong taste
extra-strong taste
C9.
Rinse button
: performs a brief rinse
to heat the infuser.
(Button is also used as "ESC" for MENU
selections)
C10. P button to access the menu:
C11.
button: turns the appliance on and
off
Description of control panel
(pag. 3 - C )
A number of buttons on the panel have a dual
function. This is indicated in brackets in the
description.
C1. Display: guides the user in operating
the appliance.
C2.
button: to prepare 1 cup of coffee
with the settings displayed
C3.
button: to prepare 2 cups of coffee
with the settings displayed.
C4.
button: Delivers hot water
(Button is also used as "OK" for MENU
selections)
C5. Indicator lights: indicate the current
settings, alarm messages or need for
maintenance.
C6. CAPPUCCINO button to prepare
cappuccino or frothed milk for Latte.
Explanation of indicator lights
Indicates the need to descale the
appliance.
The grounds container is full and must
be emptied.
The water tank is empty and must be
filled with fresh water.
The Auto-Start function is active.
The filter is exhausted and must be
replaced.
An alarm is displayed.
Indicates the button to press to confirm
the choice in the menu.
Indicates the button to press to exit the
menu or selected function.
9
EN
PRELIMINARY CHECKS
Using the appliance for the first
time
Controls after transport
After removing the packaging, make sure the
product is complete and undamaged and that all
accessories are present.
Do not use the appliance if it is visibly damaged.
Contact the Customer Service Center if product
seems damaged in any way.
•
•
Installing the appliance
Important!
When you install the appliance, you should
respect the following safety warnings:
• The appliance gives off heat. Leave a free
space of at least 1 inch around the sides and
back of the appliance and at least 6 inches at
the top, otherwise the heat could be trapped
and damage the machine.
• Water penetrating the appliance could cause
damage. Do not place the appliance near taps
or sinks.
• The appliance could be damaged if the water
it contains freezes. Do not install the appliance in a room where the temperature could
drop below freezing point.
• Arrange the power cable in such a way that it
cannot be damaged by sharp edges or contact
with hot surfaces (e.g. electric hot plates).
•
NB!
Coffee has been used to factory test the appliance and it is therefore completely normal for
there to be traces of coffee in the mill. The
machine is, however, guaranteed to be new.
You should customize water hardness as
soon as possible following the instructions in
the section "Setting water hardness" on page
19.
Some models are fitted with a water softener
filter which reduces the build up of limescale
in the appliance. To install, see the instructions in the section "Installing the filter" on
page 12.
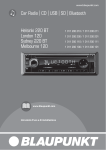
1. Plug appliance into electrical outlet.
You must first select the language (the languages
scroll through at intervals of about two seconds):
2. When English appears, press the
button for three seconds (fig. 1). Once the language has been saved, the message "English
Installed" is displayed.
Follow the instructions indicated by the appliance:
3. "FILL TANK!": remove the water tank, fill to the
MAX line with fresh water then replace in the
appliance (fig. 2).
4. "INSERT WATER SPOUT AND PRESS OK":
Check that the hot water spout is inserted on
the nozzle and place a container underneath
(fig. 3).
Press the
button (fig. 1). "Please Wait..."
is displayed and the appliance begins to run
off hot water.
The appliance ends the first start up procedure,
then the message "Turning Off, Please Wait..." is
displayed and the appliance goes off.
The coffee maker is now ready for normal use.
Connecting the appliance
Important! Check that the mains power
supply voltage corresponds to the value indicated
on the rating plate on the bottom of the appliance.
Connect the appliance to an properly grounded
and correctly installed socket with a minimum
current rating of 10A only. If the power socket
does not match the plug on the appliance, have
the socket replaced with a suitable type by a qualified professional.
NB! When using the appliance for the first
time, you need to make 4 to 5 cups of coffee and
4 to 5 cappuccinos before the appliance starts to
give satisfactory results.
10
TURNING THE APPLIANCE
ON
3. Press the
button;
4. Turn the selection knob to change the hours;
5. Press the
button to confirm (or the
button to cancel the operation);
6. Turn the selection knob to change the minutes;
7. Press the
button to confirm (or the
button to cancel the operation);
8. Press the
button to exit the menu.
N.B.! Before turning the appliance on, make
sure the main switch is in the I position (fig. 30).
Each time the appliance is turned on, it performs
an automatic preheat and rinse cycle which cannot be interrupted.
The appliance is ready for use only after completion of this cycle.
Setting the language
1. Press the P button to enter the menu;
2. Turn the selection knob until "Set Language" is
displayed;
3. Press the
button;
4. Turn the selection knob until the required language is displayed;
5. Press the
button to confirm (or the
button to cancel the operation);
6. Press the
button to exit the menu.
Danger of burns! During rinsing, a little
hot water is run off from the coffee spouts.
Avoid contact with splashes of water.
•
To turn the appliance on, press the
button
(fig. 4). The message "Heating Up... Please
Wait" is displayed.
After heating, the message "RINSING" is displayed. While the boiler is heating, the appliance
also heats the internal circuits by circulating hot
water.
The appliance is at temperature when the message "READY Standard Taste" is displayed.
Setting automatic start up time
You can set the auto-start time in order to have
the appliance automatically turn on (for example
in the morning) so you can make coffee immediately.
1. Press the P button to enter the menu;
2. Turn the selection knob until "Auto-Start" is
displayed;
3. Press the
button;
4. Turn the selection knob to change the hours;
5. Press the
button to confirm (or the
button to cancel the operation);
6. Turn the selection knob to change the minutes;
7. Press the
button to confirm (or the
button to cancel the operation);
8. Press the
button to exit the menu.
After confirming the time, the red AUTO light on
the display comes on indicating that the function
is active.
To deactivate the function, select auto-start from
the menu and press OK. Then exit by pressing the
button.
The AUTO icon on the display goes off.
TURNING THE APPLIANCE
OFF
Each time the appliance is turned off, it performs
an automatic rinse cycle which cannot be interrupted.
Danger of burns! During rinsing, a little
hot water is run off from the coffee spouts. Avoid
contact with splashes of water.
To turn the appliance off, press the
button (fig.
4). The appliance performs the rinse cycle then
goes off.
N.B.! If the appliance is not used for an
extended period, place the main switch in the 0
position (fig. 31).
CHANGING THE MENU
SETTINGS
NB! To activate this function, the time must
be set.
Setting the clock
1. Press the P button to enter the menu;
2. Turn the selection knob until "Adjust Time" is
displayed;
11
EN
Descaling
Resetting factory default values
(reset)
1. Press the P button to enter the menu;
2. Turn the selection knob until "Descaling" is
displayed;
3. Press the
button;
4. The message "Confirm?" is displayed.
5. Press the
button to confirm (or the
button to cancel the operation);
6. Carry out descaling as described in the section "Descaling" on page 19.
This function resets the entire menu with the
default values (except the language, which
remains as set).
1. Press the P button to enter the menu;
2. Turn the selection knob until "Default Values"
is displayed;
3. Press the
button;
4. The message "Confirm?" is displayed.
5. Press the
button to confirm and exit
(or the
button to cancel the operation);
Setting the temperature
1. Press the P button to enter the menu;
2. Turn the selection knob until "Set
Temperature" is displayed;
3. Press the
button;
4. Turn the selection knob until the required temperature (high, medium, low) is displayed;
5. Press the
button to confirm (or the
button to cancel the operation);
6. Press the
button to exit the menu.
Installing the filter
Certain models are provided with a water
softener filter (alternatively it can be purchased separately from an authorized
Customer Service Center).
To install the filter, proceed as follows:
1. Insert the filter in the water tank as
far as it will go (see figure
alongside).
When you install the filter, you
must notify the appliance of its
presence.
2. Press the P button to enter
the menu;
3. Turn the selection knob until "Install Filter" is
displayed;
4. Press the
button;
5. The message "Confirm?" is displayed.
6. Press the
button to confirm (an asterisk appears at the top right of the display);
7. Press the
button to exit the menu.
Auto-Off
1. Press the P button to enter the menu;
2. Turn the selection knob until "Auto-Off" is displayed;
3. Press the
button;
4. Turn the selection knob until the required
number of hours of operation (1, 2 or 3) is
displayed;
5. Press the
button to confirm (or the
button to cancel the operation);
6. Press the
button to exit the menu.
Setting water hardness
Replacing the filter ("Reset water
filter")
1. Press the P button to enter the menu;
2. Turn the selection knob until "Water Hardness"
is displayed;
3. Press the
button;
4. Turn the selection knob until the water hardness measured using the indicator strip is displayed (see paragraph "Measuring water hardness" - page 19);
5. Press the
button to confirm (or the
button to cancel the operation);
6. Press the
button to exit the menu.
When the red light
comes on, the filter must
be replaced:
1. Extract the exhausted filter and replace with a
new one;
2. Press the P button to enter the menu;
3. Turn the selection knob until "Reset Water
Filter" is displayed;
4. Press the
button;
5. The message "Confirm?" is now displayed.
6. Press the
button to confirm (or the
button to cancel the operation);
7. Press the
button to exit the menu.
12
MAKING COFFEE
Removing the filter
If you want to use the appliance without a filter,
you must remove it and notify the appliance of its
removal as follows:
1. Press the P button to enter the menu;
2. Turn the selection knob until "Install Filter" is
displayed;
3. Press the
button;
4. The message "Confirm?" is displayed.
5. Press the
button;
6. When the asterisk has disappeared from the
top right of the display, press
to exit
the menu.
EN
Selecting the coffee taste
The appliance is preset to make coffee with a standard taste.
You an also choose one of these tastes:
Extra-mild taste
Mild taste
Standard taste
Strong taste
Extra-strong taste
To change the flavor, press the
button (fig.
5) repeatedly until the required taste is displayed.
Important! If this is not done, the
appliance could become clogged with limescale.
Selecting the quantity of coffee in
the cup
Statistics function
To select the quantity of coffee, turn the selection
knob until the light corresponding to the required
quantity of coffee comes on:
1. Press the P button to enter the menu;
2. Turn the selection knob until "Statistics" is displayed;
3. Press the
button;
4. Turn the selection knob to verify:
- how many coffees have been made;
- how many cappuccinos have been made;
- how many times the machine has been
descaled;
- the total number of litres of water run off;
- how many times the water filter has been
replaced.
5. Press the
button twice to exit the
menu.
NORMAL
2oz
ESPRESSO
1.4oz
MY
COFFEE
1oz
LONG
3oz
EXTRA
LONG
4oz
Customizing the "MY COFFEE" quantity
The appliance is factory preset to automatically
deliver 1oz.
1. Place a cup under the coffee spouts (fig. 9).
2. Turn the selection knob (C7) until the
light comes on.
3. Press and hold the 1 cup button for at least
eight seconds (fig. 6). When the message "1
MY COFFEE Program Quantity" is displayed
the button can be released and coffee will be
delivered into the cup;
4. As soon as the coffee in the cup reaches the
required level, press the 1 cup button
again.
The quantity set has now been programmed.
The "my coffee" button is only programmable
using the 1 coffee button. When "my coffee" setting is being used and the 2 coffee button is
pressed, a double shot of the programmed quantity will be delivered.
13
Preparing coffee using coffee
beans
2. Put one level measure of pre-ground coffee
into the funnel (fig. 14).
3. Place a cup under the coffee spouts.
4. Press the 1 cup
coffee button (fig. 6).
Important! Do not use caramelized or
candied coffee beans as they could stick to the
coffee mill and make it unusable.
Regulating the coffee mill
The coffee mill is preset in the factory to prepare
coffee correctly and should not require regulating
initially.
However, if after making the first few coffees you
find that run-off is either too fast or too slow
(drips), this can be corrected by adjusting the
grinding coarseness regulator knob (fig. 7).
1. Fill the container (A3) with coffee beans (fig.
8).
2. Place under the coffee spouts:
- 1 cup, if you want to make 1 coffee (fig. 9);
- 2 cups, if you want 2 coffees.
3. Lower the spouts as near as possible to the
cup. This makes a creamier coffee (fig. 10).
4. Press the corresponding coffee button (1 cup
or 2 cups
) (fig. 6 and 11).
5. Preparation begins. A progress bar appears
on the display and gradually advances as the
procedure progresses (fig. 12).
Once the coffee has been made, the appliance is
ready to use again.
•
•
•
For slower run-off and
creamier coffee, turn
one click towards the "1"
(finer ground coffee).
For faster run-off (without dripping, turn one
click towards the "7"
(coarser ground coffee).
NB!
While the machine is making coffee, run-off
can be interrupted at any moment by pressing
one of the coffee buttons (
or
).
As soon as run-off is finished, to increase the
quantity of coffee in the cup, just hold down
one of the coffee buttons (
or
) until
the required amount is reached (this must be
done within three seconds after completion of
run-off).
If the coffee drips out, or runs out too fast
with little crema or too cold, read the tips in
the "Troubleshooting" section on page 23.
These adjustments will only be evident after at
least 2 cups of coffee have been run off.
NB! The grinding coarseness regulator
must only be turned when the coffee mill is in
operation (After coffee button has been pressed
and you hear the grinder working.) Only adjust
grinder one setting at a time.
Making coffee using pre-ground
coffee
NB! If you use pre-ground coffee, you can
only make one cup of coffee at a time.
1. Press the
button repeatedly (fig. 13)
until "READY PRE-GROUND" is displayed.
•
•
Important!
Never add pre-ground coffee when the
machine is off or it could spread through the
inside of the machine and dirty it.
This could damage the appliance.
Never use more than one level
measure or it could dirty the
inside of the machine or block
the funnel.
14
MAKING MILK-BASED
DRINKS
3. Press the cappuccino button (fig. 22). The
message "Cappuccino" is displayed. (After a
few seconds, frothed milk runs out of the milk
spout into the cup below. Run off of milk
stops automatically and run off of coffee
begins.)
Filling and attaching the milk
container
1. Turn the lid of the milk container clockwise
until it becomes noticeably difficult to turn,
then remove the lid.
2. Fill the milk container with a sufficient quantity of milk, not exceeding the MAX level
marked on the handle (fig. 15).
N.B.! If you want to stop preparation, press
the CAPPUCCINO button twice. Pressing it once
stops frothed milk run-off, pressing it twice stops
coffee run-off.
Making frothed milk
NB! You should ideally use skimmed or
2% milk at refrigerator temperature (about 41°F).
1. Fill the container (B) with milk and attach it as
described in the section "Filling and attaching
the milk container".
2. Set the frothed milk regulator (B1) to the
quantity of froth required.
3. Press the CAPPUCCINO button (fig. 22) twice.
The message "Milk Frothing" is displayed.
3. Make sure the milk intake tube (B4) is correctly inserted in the bottom of the milk container lid (fig. 16).
4. Replace the milk container lid and turn counterclockwise as far as it will go.
5. Remove the hot water spout from the nozzle
(fig. 17).
6. Attach the container to the nozzle, pushing as
far as it will go (fig. 18).
7. Place a sufficiently large cup under the coffee
spouts (A14) and the frothed milk spout (fig.
19). If necessary, move the frothed milk spout
slightly outwards (B5 - fig. 19).
NB! If you want to stop preparation of
frothed milk, press the CAPPUCCINO button once.
Making caffelatte
1. Fill the container (B) with milk and attach it as
described in the section "Filling and attaching
the milk container".
2. Set the frothed milk slide (B1) to CAFFELATTE.
3. Press the CAPPUCCINO button (fig. 22). The
message "Cappuccino" is displayed.
Making cappuccino
1. Fill the milk container (B) with milk and attach
it as described in the section "Filling and
attaching the milk container".
2. Position the milk frother slide (B1) between
the words CAPPUCCINO and CAFFELATTE
printed on the milk container lid cover. The
quantity of froth can be adjusted by moving
the slide towards the word CAFFELATTE for a
denser froth. Moving it towards the word
CAPPUCCINO obtains a less dense froth.
NB! If you want to stop preparation of caffelatte, press the CAPPUCCINO button twice.
Making hot milk
1. Fill the container (B) with milk and attach it as
described in the section "Filling and attaching
the milk container".
2. Set the frothed milk slide(B1) to CAFFELATTE
3. Press the CAPPUCCINO button (fig. 22) twice.
The message "Milk Frothing" is displayed.
NO froth
"Denser" froth
regulator
NB! If you want to stop preparation of hot
milk , press the CAPPUCCINO button once.
"Less dense"
froth
15
EN
HEATING WATER
Programming the quantity of coffee
and milk in the cup for cappuccino
or frothed milk
Preparation
The appliance is factory preset to automatically
deliver 2.4oz of frothed milk and 2.7oz of coffee.
To modify these quantities, proceed as follows:
1. Place a cup under the coffee spouts and the
frothed milk spout (fig. 19).
2. Press and hold the CAPPUCCINO button for at
least eight seconds (fig. 22). The message
"Milk for Cappuccino Program Quantity" is
displayed.
3. Release the button. The appliance starts running off milk.
4. Once the required quantity of milk has been
run off into the cup, press the CAPPUCCINO
button again.
5. After a few seconds, the appliance starts running off coffee into the cup and the message
"Coffee for Cappuccino Program Quantity" is
displayed.
6. Once the required quantity of coffee has been
run off into the cup, press the CAPPUCCINO
button again. Coffee run-off stops and "READY"
is displayed.
The machine is now reprogrammed with the new
quantities.
Important! Danger of burns. Never leave
the machine unsupervised while running off hot
water. As shown below, stop run-off of hot water
when the cup is full. The hot water spout becomes
hot while water is running off and must be handled by the handle only.
1. Make sure the hot water spout (B7) is
attached correctly (fig. 3).
2. Place a container under the spout (as close as
possible to avoid splashes).
3 Press the
button (fig. 1). The message
"Hot Water..." is displayed. Water runs out of
the spout.
the
NB! Stop the flow of hot water by pressing
button.
Important: You should not run off hot
water for more than two minutes at a time.
Changing the quantity
The appliance is factory preset to automatically
deliver 8.5oz. To modify these quantities, proceed
as follows:
1. Position a container under the spouts.
2. Press and hold the button down for 8 seconds. The message "Hot Water Program
Quantity" is displayed.
• When the hot water in the cup reaches the
required level, press the
button again.
The machine is now reprogrammed with the new
quantity.
Cleaning the milk container after
use
Clean the internal tubes of the milk container each
time you use it to avoid the build-up of milk
residues or blockages.
Important! Danger of burns When cleaning
the internal tubes of the milk container, a little hot
water leaks out of the frothed milk tube (B5).
Avoid contact with splashes of water.
1
Place a cup or other container under the
frothed milk spout (B5 - fig. 19);
2. Press the "CLEAN" button (B3 - fig. 20) and hold
it down for at least eight seconds. The message
"Cleaning" is displayed.
3. Remove the milk container and clean the nozzle with a sponge (fig. 21).
16
CLEANING AND
MAINTENANCE
Cleaning the coffee maker
The following parts of the machine must be
cleaned regularly:
- water tank (A7),
- drip tray (A11),
- coffee grounds container (A9),
- coffee spouts (A14) and hot water nozzle
(A15),
- pre-ground coffee feed funnel (A4),
- inside the machine, accessible after opening
the service door (A12),
- infuser (A8),
- milk container (B)
Danger of electric shock! Before performing any cleaning operations, the machine must be
turned off and disconnected from the mains
power supply.
Never immerse the coffee maker in water.
Important! Danger of burns. Allow the
machine to cool down before cleaning.
•
•
•
Important!
Do not use solvents, abrasive detergents or
alcohol to clean the coffee maker.
None of the components can be washed in a
dishwasher.
Do not use metal objects to remove encrustations or coffee deposits as they could scratch
metal or plastic surfaces.
Cleaning the water tank
1. Clean the water tank (A7) regularly (about
once a month) with a damp cloth and a little
mild dish detergent.
2. Clean to remove all soap residues, then rinse
the water tank thoroughly.
Cleaning the drip tray
Emptying the drip tray
•
Important! If the drip tray (A11) is not emptied regularly, the water could overflow from the
edge and seep inside or around the machine. This
could damage the machine, the surface it rests on
or the surrounding area.
The drip tray has a water level indicator in the
form of a red float which rises up as the level of
water in the drip tray rises.
Clean the drip tray (A11) each time you empty
it using a damp cloth and a little mild dish
detergent.
Cleaning the coffee grounds
container
1. Clean the grounds container (A9) each time
you empty it using a damp cloth and a little
mild dish detergent.
2. Try removing the toughest coffee encrustations with a toothpick.
If this is not sufficient, soften the encrustations by soaking the grounds container in
water for a few minutes.
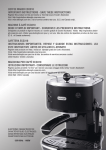
Empty the drip tray before the red float protrudes
from the tray (fig. 23).
To remove the tray:
1. Open the service door (fig. 24);
2. Remove the drip tray and the grounds container (Fig. 25);
3. Empty the drip tray and grounds container
(A9);
4. Insert the drip tray complete with grounds
container (A9);
5. Close the service door.
Important! Grounds container MUST be
emptied every time the service door is open, even
if container is not full as the counter will reset. If
this is not done, the grounds container may fill up
past capacity and damage the machine. Grounds
container will display light every 14 single shots
or 7 double shots. (This cleaning task can be
done without powering the machine off.)
17
EN
Cleaning the spouts
6. After cleaning, replace the infuser (A8) by
sliding it onto the internal support and pin at
the bottom, then push the PUSH symbol fully
in until it clicks into place.
1. Clean the nozzle (A15), ideally each time the
frother is used, with a sponge or cloth (fig.
21).
2. Check regularly (about once a month) that the
holes in the coffee spout (A14) are not
blocked. If necessary, remove coffee deposits
with a toothpick (fig. 26), sponge or stiff bristled kitchen brush.
Support
Cleaning the coffee feed funnel
•
Check regularly (about once a month) that the
pre-ground coffee feed funnel is not blocked.
If necessary, remove coffee deposits with a
wooden skewer.
Pin
Cleaning the inside of the machine
NB! If you encounter difficulty inserting the
infuser, before inserting
it you must adapt it to
the right dimension by
pressing it forcefully
from the bottom and top
as shown in the figure.
1. Check regularly (about once a week) that the
inside of the machine is not blocked.
If necessary, remove coffee deposits with a
toothpick, sponge or stiff bristled kitchen
brush.
2. Remove the residues with a vacuum cleaner
(fig. 27).
7. Once inserted, make
sure the two red buttons have snapped
out.
8. Replace the drip tray
(A11) and grounds
container (A9).
9. Close the service door (A12).
Cleaning the infuser
The infuser must be cleaned at least once a
month.
Important! The infuser (A8) may not be
removed when the appliance is on. Do not attempt
to use force to remove the infuser as this could
damage the machine.
Cleaning the milk container
1. Turn the machine off.
2. Open the service door (fig. 24);
3. Remove the drip tray and grounds container
(fig. 25);
4. Press the two red release buttons inwards and
at the same time extract the infuser (fig. 28).
Important! Always
clean the tubes inside the
milk container (B) when
you prepare milk. If there
is still milk in the container, do not leave it out of
the refrigerator for longer
than necessary. Clean the
container each time you
prepare milk as described
in the section "Cleaning
the milk container after
use".
Important! Do not use dish detergent to
clean the infuser (A8). The detergent would
remove the lubricant applied to the inside of the
piston, causing the infuser to seize up and
become unusable.
5. Soak the infuser in water for about 15 minutes, then rinse.
1. Turn the lid of the
milk container clock18
spout
milk intake
tube
Groove
Pointer
wise then remove it.
2. Remove the milk spout and intake tube.
3. Remove the pointer by pulling it outwards.
4. Wash all the components thoroughly with hot
water and mild dish detergent. Make sure
there are no milk residues left inside the holes
and the groove on the fine end of the pointer.
5. Check that the
intake tube and
spout are not
Hole
clogged
with
milk residues.
Hole
6. Replace
the
pointer,
milk
spout and intake tube.
7. Replace the milk container lid.
Important! Danger of burns Hot water containing acid runs out of the hot water spout. Avoid
contact with splashes of water.
9. Press the
button to confirm that you
have added the solution and begin the descaling procedure.
10. The message "Descaling Underway" is displayed.
After about 30 minutes, the message "Rinsing
FILL TANK!" is displayed.
11. Remove the water tank, empty, rinse with running water, fill with clean water and replace.
12. Empty the container used to collect the
descaler solution and replace it under the hot
water spout.
13. Press the
button to start rinsing. Hot
water runs out of the spout and the message
"Rinsing..." is displayed.
14. When the water tank is completely empty, the
message "Rinsing Complete... Confirm?" is
displayed.
15. Press the
button, fill the water tank
and the appliance is ready for use.
DESCALING
Descale the machine when the red light and the
message "DESCALE" flash on the display.
Important! Descaler contains acids which
may irritate the skin and eyes. It is vital to respect
the manufacturer's safety warnings given on the
descaler pack and the warnings relating to the procedure to follow in the event of contact with the skin
and eyes.
SETTING WATER HARDNESS
The DESCALE message is displayed after a period
of time established according to water hardness.
The machine is factory set for a hardness value of
1.
The machine can also be programmed according
to the hardness of your tap water. By programming the water hardness, the machine will adjust
the frequency of the descaling message displayed.
NB! Failure to descale the appliance as
described above voids the guarantee.
1. Press the P button to enter the menu;
2. Turn the selection knob until "Descaling" is
displayed;
3. Select by pressing the
button. The
message "Descaling Confirm?" is displayed.
Press
to activate the function.
4. If the message "INSERT WATER SPOUT" is
displayed, insert it (fig. 3).
5. The message "Insert Descaler. Confirm?" is
displayed.
6. Empty the water tank (A7).
7. Pour the descaler diluted with water (respecting the proportions indicated on the descaler
bottle) into the water tank. Always use
descaler recommended by De’Longhi (contact
an authorized customer service center).
8. Place an empty container with a minimum
capacity of 50 oz under the hot water spout
(B7) (fig. 3).
Measuring water hardness
1. Remove the "TOTAL HARDNESS TEST" indicator paper from its pack.
2. Immerse the paper completely in a glass of
water for one second.
3. Remove the paper from the water and shake
lightly.
Level 1
Level 2
Level 3
Level 4
19
EN
TECHNICAL SPECIFICATION
After about a minute, 1, 2, 3, or 4 red squares
form, depending on the hardness of the water.
Each square corresponds to one level.
Voltage: 120 V~ 50/60 Hz max. 10A
Absorbed power: 1350W
Pressure: 15 bar
Water tank capacity: 60 ounces
Size: LxHxP: 10.7 x14.7x17.3 in
Weight: 25 lbs
Setting water hardness
1. Press the P button to enter the menu.
2. Turn the selection knob to select "Water
Hardness".
3. Confirm the selection by pressing the
button.
4. Turn the selection knob and set the level
shown by the indicator paper (see previous
paragraph).
5. Press the
button to confirm the setting.
6. Press the
button to exit the menu.
The machine is now reprogrammed with the new
water hardness setting.
20
DISPLAYED MESSAGES
DISPLAYED MESSAGE
EN
POSSIBLE CAUSE
REMEDY
FILL TANK!
•
The water tank is empty or
positioned incorrectly.
•
Fill the tank with water
and/or insert it correctly,
pushing it as far as it will go
until it clicks into place.
GROUND TOO FINE ADJUST
MILL!
Insert water spout and press
ok
•
The grinding is too fine and
the coffee runs off too
slowly.
•
Turn the grinding adjustment knob one click
towards the 7.
•
The machine is not able to
make coffee.
•
Insert the hot water spout,
press the
button and
run off water from the
spout for a few seconds
INSERT WATER SPOUT!
•
The water spout is not
inserted or is inserted
incorrectly.
•
Insert the hot water spout.
EMPTY GROUNDS CONTAINER
•
The grounds container (A9)
is full.
•
Empty the grounds container and clean, then replace.
Important: when removing
the drip tray, the grounds
container MUST be emptied, even if it is not completely full. If this is not
done, when you make the
next coffees, the grounds
container may fill up more
than expected and clog the
machine.
INSERT GROUNDS CONTAINER
•
After cleaning, the grounds
container has not been
replaced.
•
Open the service door and
insert the grounds container.
INSERT MILK CONTAINER!
•
The milk container is not
inserted.
•
Insert milk container.
ADD PRE-GROUND COFFEE!
•
The "pre-ground coffee"
function has been selected
without placing any preground coffee in the funnel.
•
Add the pre-ground coffee
to the funnel or select the
"coffee beans" function.
21
DISPLAYED MESSAGE
POSSIBLE CAUSE
REMEDY
DESCALE!
•
This indicates the presence
of limescale in the machine.
•
The descaling procedure
described in the "Descaling"
section needs to be performed as soon as possible.
LESS COFFEE!
•
The ground coffee funnel is
clogged.
•
•
Too many coffee beans or
too much ground coffee
has been added.
•
Empty the funnel as described in the section "Cleaning
the funnel to add coffee"..
Select a milder taste or
reduce the quantity of
ground coffee, then run-off
the coffee again.
FILL BEANS CONTAINER!
•
The coffee beans have run
out.
•
Fill bean container
INSERT INFUSER ASSEMBLY!
•
The infuser has not been
replaced after cleaning.
•
Insert the infuser as described in the paragraph
"Cleaning the infuser".
CLOSE DOOR!
•
The service door is open
•
Close the service door.
GENERAL ALARM!
•
The inside of the appliance
is very dirty.
•
Clean the inside of the
appliance thoroughly, as
described in the section
"Cleaning and maintenance". If the message is still
displayed after cleaning,
contact a service center.
22
TROUBLESHOOTING
EN
Below is a list of some of the possible malfunctions.
If the problem cannot be resolved as described, contact a Customer Service Center.
PROBLEM
The coffee is not hot
POSSIBLE CAUSE
REMEDY
•
The cups have not been
preheated.
•
•
The infuser has cooled
down because 2 to 3 minutes have elapsed since the
last coffee was made.
•
•
The coffee is ground too
coarsely.
•
•
Coffee type is not suitable.
•
The coffee runs out too slowly
or in drips.
•
The coffee is ground too
finely.
•
Turn the grinding adjustment knob one click clockwise towards the 7 while
the coffee mill is in operation (fig. 7). Continue one
click at a time until coffee
run-off is satisfactory.
The coffee runs out too
quickly.
•
The coffee is ground too
coarsely.
•
Turn the grinding adjustment knob one click anticlockwise towards the 1
while the coffee mill is in
operation (fig. 7). Avoid turning the grinding coarseness regulator excessively
otherwise when you select
2 cups, the coffee may run
out in drips.
The coffee is not creamy
enough
23
Heat the cups by rinsing
them in hot water or leaving
them to rest for at least 20
minutes on the cup warmer
tray.
Before making coffee, heat
the infuser by pressing the
button (fig. 29).
Turn the grinding adjustment
knob one click anticlockwise
towards the 1 while the coffee mill is in operation (fig.
7).
Use a type of coffee for
espresso coffee makers.
PROBLEM
POSSIBLE CAUSE
REMEDY
The coffee does not come out
of one of the spouts.
•
The spouts are blocked.
•
If necessary, remove coffee
deposits with a toothpick
(fig. 26), sponge or stiff
bristled kitchen brush.
The coffee does not come out
of the spouts, but around the
service door (A12).
•
The holes in the spouts are
clogged with dry coffee
dust.
•
•
The coffee guide (A13) inside the service door is blocked and cannot swing.
•
If necessary, remove coffee
deposits with a toothpick,
sponge or stiff bristled kitchen brush (fig. 26).
Thoroughly clean the coffee
guide (A13), particularly
near the hinges.
Water comes out of the spouts
instead of coffee.
•
The ground coffee may be
blocked in the funnel (A4).
•
Clean the funnel (A4) with a
wooden or plastic fork,
clean the inside of the
machine.
The milk does not come out of
the milk spout (B5).
•
The intake tube is not inserted or is inserted incorrectly.
•
Insert the intake tube (B4)
in the rubber washer in the
milk container lid (fig. 16).
The milk is not well frothed.
•
The milk container lid is
dirty.
•
Clean the milk container lid
as described in the section
"Cleaning the milk container".
The milk contains bubbles or
squirts out of the milk spout.
•
The milk is not cold enough
or is not skimmed.
•
•
The milk frother slide is
incorrectly adjusted.
•
You should ideally use
skimmed milk at refrigerator temperature (about
41°F). If the result is not as
you wished, try changing
brand of milk.
Move the slide slightly
towards the word "CAFFELATTE"
(see
section
"Making cappuccino".
24
This warranty applies to Super Automatic Espresso Machines with the De'Longhi brand name.
LIMITED WARRANTY
What does the warranty cover?
We warrant each appliance to be free from defects in material and workmanship. Our obligation under this
warranty is limited to repair at our factory or authorized service center of any defective parts or part thereof, other than parts damaged in transit. The repaired or new model will be returned at the company expense.
This warranty shall apply only if the appliance is used in accordance with the factory directions, which
accompany it, and on an alternating current ( AC ) circuit.
How long does the coverage last?
This warranty runs for two years ( 2 ) from the purchase date found on your receipt and applies only to the
original purchaser for use.
What is not covered by the warranty?
The warranty does not cover defects or damage of the appliance, which result from repairs or alterations to
the appliance outside our factory or authorized service centers, nor shall it apply to any appliance, which has
been subject to abuse, misuse, negligence or accidents. Also, consequential and incidental damage resulting from the use of this product or arising out of any breach of contract or breach of this warranty are not
recoverable under this warranty. Some states do not allow the exclusion or limitation of incidental or consequential damage, so the above limitation may not apply to you.
How do you get service?
If repairs become necessary, see contact information below:
U.S. Residents:
Please contact our toll free hotline at #1-866-Latte-Best (Hours of Operation: Monday - Friday 8:30am - 8pm,
Saturday 9:30am - 5:30pm) or log onto our website at www.delonghi.com.
For all accessories, spare parts or replacement parts, please contact our parts division at 1-866-528-8323.
Residents of Canada:
Please contact our toll free hotline at #1-866-Latte-Best or 1-866-528-8323 or log onto our website at
www.delonghi.com.
Residents of Mexico:
Please refer to the Limited Warranty statement for Mexico (see page 66 ).
Please refer to the back page of the manual for De’Longhi addresses.
The above warranty is in lieu of all other express warranties and representations. All implied warranties are
limited to the applicable warranty period set forth above. This limitation does not apply if you enter into an
extended warranty with De’Longhi. Some states do not allow limitations on how long an implied warranty
lasts, so the above exclusions may not apply to you. De’Longhi does not authorize any other person or company to assume for it any liability in connection with the sale or use of its appliance.
How does state law apply?
This warranty gives you specific legal rights, and you may also have other rights, which vary from state to
state.
25
EN
De’Longhi America, Inc.
Park 80 West, Plaza One
Saddle Brook, NJ 07663
#1-866-Latte-Best
1-866-528-8323
De’Longhi Canada, Inc.
6150 McLaughlin Road
Mississauga, Ontario
L5R 4E1 Canada
#1-866-Latte-Best
1-866-528-8323
Fiducia Italiana S.A de C.V.
Pestalozzi 814
Col. Del Valle
Del. Benito Juarez
México D.F. 03100
tels: 5543 1447 y 5543 6492
Lada sin costo: 01800 711 8805
www.delonghi.com
5713210861/07.08