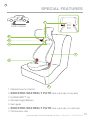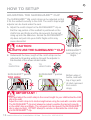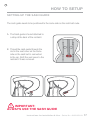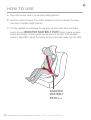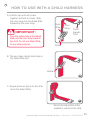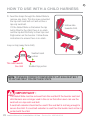
1
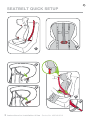
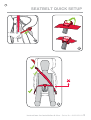
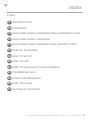
TOURER™ Scan for video instructions BOOSTER CAR SEAT Instructions for Installation & Use Series No. 4000/A/2013 FORWARD FACING 4 years to 6-8 years (approx). IMPORTANT: KEEP THIS BOOKLET IN THE PLACE PROVIDED ON THE CHILD RESTRAINT Instructions for Installation & Use - Series No. 4000/A/2013 SEATBELT QUICK SETUP 1 2 3 4 5 6 2 Instructions for Installation & Use - Series No. 4000/A/2013 SEATBELT QUICK SETUP 7 8 9 Instructions for Installation & Use - Series No. 4000/A/2013 3 INTRODUCTION To be used with a lap-sash seatbelt by a child whose shoulders are above the lower shoulder height marker (approximately 4 years of age) until the child’s shoulders reach the upper shoulder height marker (approximately 6 to 8 years of age). Can also be used with child harness that is approved for use with this booster seat. Continue to use this booster seat until the child reaches this limit. Children are safest in a booster seat until their shoulders reach the upper shoulder height marker of the booster seat. Do not use this booster seat until child’s shoulders are above the lower shoulder height marker. If the knees do not bend in front of the vehicle seat cushion continue to use a booster seat. Just using a seatbelt is not recommended for children that have outgrown this seat. Use a larger booster seat. ةيلفسلا فاتكألا عافترا ةمالع هيفتك زواجت يذلا لفطلل رصخلا و فتكلا نامأ مازح عم همادختسا متي ( رمع يف اًبيرقت4 يف اًبيرقت( ةيولعلا فاتكألا عافترا ةمالع ىلإ لفطلا يفتك لصي ىتح )تاونس رمع6 ىلإ8 )تاونس. اذه عفترملا نامألا دعقم عم مادختسالل ةنسحتسملا لافطألا تيبثت ةمزحأ عم اًضيأ همادختسا نكمي. ّدحلا اذه ىلإ لفطلا لوصو نيحل اذه عفترملا نامألا دعقم مادختسا يف رمتسا. يف اًنامأ رثكأ لافطألا نوكي عفترملا نامألا دعقمل ةيولعلا فاتكألا عافترا ةمالع ىلإ مهفاتكأ لصت ىتح عفترم نامأ دعقم. فاتكألا عافترا ةمالع نم ىلعأ لفطلا يفتك نوكي امدنع الإ اذه عفترملا نامألا دعقم مدختست ال ةيلفسلا. ةرايسلا يسرك ةداسو مامأ ناينثنت ال نيتبكرلا تناك اذإ، عفترم نامأ دعقم مادختسا يف رمتسا. دعقملا اذه نع مهمجح رُبك نيذلا لافطألل نامألا مازح مادختسا درجمب يصون ال. عفترم نامأ دعقم مدختسا ربكأ ساقم وذ. 用于肩膀超过靠下的肩高标记的儿童(大约4岁的儿童),配安全腰带一起 使用,直到儿童的肩膀达到靠上的肩高标记(约6-8岁的儿童)。 也可以和该垫高椅匹配的儿童安全带一起使用。 在儿童达到垫高椅上限之前必须使用垫高椅。在儿童肩膀达到垫高椅靠上的 肩高标记之前最安全的做法是使用垫高椅。 在儿童肩膀未超过靠下的肩高标记时不得使用此垫高椅。 如果儿童在车辆弹性座垫前无法自然屈膝则需要继续使用垫高椅。 不建议个子比该座椅大的儿童只使用安全带,要使用较大的垫高椅。 4 Instructions for Installation & Use - Series No. 4000/A/2013 INTRODUCTION Da usare con una cintura di sicurezza fasciante da un bambino le cui spalle superano il marcatore di altezza inferiore (circa 4 anni di età) fino a quando le spalle del bambino raggiungono il marcatore di altezza della spalla superiore (circa 6 a 8 anni di età). Con questo seggiolino, può essere utilizzato anche con un'imbracatura per bambini approvata per l'uso. Continuare a utilizzare questo seggiolino fino a quando il bambino raggiunge questo limite. I bambini sono più sicuri su un seggiolino finchè le loro spalle raggiungono il marcatore di altezza superiore del seggiolino. Non utilizzare il seggiolino fino a quando le spalle del bambino sono al di sopra del marcatore altezza inferiore. Se le ginocchia non si piegano al limite del sedile del veicolo continuare ad utilizzare un seggiolino. Usare soltanto la cintura di sicurezza non è raccomandato per i bambini che sono troppo grandi per questo sedile. Utilizzare un seggiolino più grande. केवल उस शिशु द्वारा लेप-सेश सीटबेल्ट के साथ प्रयोग किया जाना चाहिए जिसके कन्धे कन्धे के निचले भाग से ऊपर आ गए हों (लगभग 4 वर्ष की आयु पर) और तब तक जब तक कि शिशु के कन्धे कन्धे के ऊपरी भाग के चिन्ह तक न पहुँच जाएँ (लगभग 6 से 8 वर्ष की आयु पर)। शिशु हार्नस के साथ प्रयोग भी किया जा सकता है जो बूस्टर सीट के साथ प्रयोग के लिए अनुमोदित हो। बूस्टर सीट को तब तक प्रयोग करते रहें जब तक कि शिशु सीमा तक न पहुँचे। शिशु बूस्टर सीट में तब तक सबसे अधिक सुरक्षित होते हैं जब तक कि उनके कन्धे बूस्टर सीट के कन्धों के उपरी चिन्ह तक न पहुँचे। बूस्टर सीट का प्रयोग तब तक न करें जब तक कि शिशु के कन्धे बूस्टर सीट पर कन्धों के निचले चिन्ह को पार न करें। अगर घुटने गाडी के सीट के गद्दे पर आगे न मुडें तो बूस्टर सीट का प्रयोग जारी रखें। जिन शिशुओं की आयु इस सीट के लिए उचित आयु से अधिक हो गई हो उनके लिए मात्र सीटबेल्ट के प्रयोग का सुझाव नहीं दिया जाता है। बड़ी बूस्टर सीट का प्रयोग करें। Instructions for Installation & Use - Series No. 4000/A/2013 5 INTRODUCTION Được sử dụng với dây nịt an toàn quàng qua vai của em có vai ở trên vạch ghi độ cao của vai ở dưới cùng (khoảng 4 tuổi) cho đến khi vai em cao tới vạch ghi độ cao của vai ở trên cùng (khoảng 6-8 tuổi). Cũng có thể được sử dụng với đai nịt trẻ em được chấp thuận sử dụng với ghế trẻ em (booster) này. Hãy tiếp tục sử dụng ghế trẻ em (booster) này cho đến khi em cao tới giới hạn này. Trẻ em được an toàn nhất trong ghế trẻ em (booster) cho đến khi vai của em đạt tới vạch ghi độ cao của vai ở trên cùng của ghế trẻ em. Không sử dụng ghế trẻ em (booster) này cho đến khi vai của em ở trên vạch ghi độ cao của vai ở dưới cùng. Nếu đầu gối không co lại đằng trước đệm ghế của xe, hãy tiếp tục sử dụng ghế trẻ em (booster). Chỉ sử dụng dây nịt an toàn nào không được đề nghị cho các em lớn hơn ghế này. Hãy sử dụng ghế trẻ em rộng hơn. 應與安全腰帶一同使用,適用於肩膀超過靠下的肩高標記的孩子(大約4歲 大),直至其肩膀達到靠上的肩高標記(大約6至8歲大)。 也可同與此墊高椅匹配的兒童安全背帶一並使用。 讓您的孩子一直乘坐墊高椅,直至其達到墊高椅的上限。在孩子肩膀達到墊高 椅靠上的肩高度標記之前,使用墊高椅是最安全的做法。 在孩子肩膀超過靠下的肩高標記前,切勿使用此墊高椅。 若孩子在汽車座椅邊無法自然曲膝,請繼續使用墊高椅。 孩子因長大超出墊高椅的上限時,不推薦僅僅使用安全帶。請使用更大尺寸 的墊高椅。 6 Debe utilizarse con un cinturón de seguridad de tres puntos para un niño cuyos hombros sobrepasen el marcador de altura inferior (aproximadamente a los 4 años de edad) hasta que los hombros del niño alcancen el marcador de altura superior (aproximadamente de 6 a 8 años de edad). También se puede utilizar con un arnés para niños cuyo uso con este asiento elevador esté aprobado. Siga utilizando este asiento elevador hasta que el niño alcance dicho límite. El niño estará más seguro en un asiento elevador hasta que sus hombros alcancen el marcador de altura superior del asiento elevador. No utilice este asiento elevador hasta que los hombros del niño sobrepasen el marcador inferior. Si las rodillas del niño no se doblan en la parte delantera del cojín del asiento del vehículo siga utilizando un asiento elevador. No se recomienda utilizar sólo un cinturón de seguridad para el niño que ya no quepa en este asiento. Utilice un asiento elevador más grande. Instructions for Installation & Use - Series No. 4000/A/2013 INTRODUCTION Να χρησιμοποιείται με ζώνη ασφαλείας τριών σημείων από ένα παιδί του οποίου οι ώμοι είναι πάνω από τον χαμηλότερο δείκτη ύψους ώμου (περίπου 4 ετών) μέχρι οι ώμοι του παιδιού να φτάνουν στον ανώτερο δείκτη ύψους ώμου (περίπου 6 έως 8 ετών). Μπορεί επίσης να χρησιμοποιηθεί με τον παιδικό ιμάντα που έχει εγκριθεί για χρήση με αυτό το βοηθητικό κάθισμα. Συνεχίστε να χρησιμοποιείτε αυτό το βοηθητικό κάθισμα μέχρι το παιδί να φτάσει σε αυτό το όριο. Τα παιδιά είναι ασφαλέστερα σε ένα βοηθητικό κάθισμα μέχρι οι ώμοι τους να φθάνουν στον ανώτερο δείκτη ύψους ώμου του βοηθητικού καθίσματος. Μην χρησιμοποιείτε αυτό το βοηθητικό κάθισμα μέχρι οι ώμοι του παιδιού να είναι πάνω από τον χαμηλότερο δείκτη ύψους ώμων. Αν τα γόνατα δεν λυγίζουν μπροστά από το μαξιλάρι καθίσματος του οχήματος, συνεχίστε να χρησιμοποιείτε ένα βοηθητικό κάθισμα. Η χρήση μόνον μιας ζώνης ασφαλείας δεν συνιστάται για παιδιά που έχουν ξεπεράσει σε ύψος αυτό το κάθισμα. Χρησιμοποιήστε ένα μεγαλύτερο βοηθητικό κάθισμα. Gamitin kasama ang isang lap-sash na seatbelt ng isang bata na ang mga balikat ay lampas na sa ibabang marka ng taas ng balikat (humigitkumulang 4 na taong gulang) hanggang sa maabot ngmga balikat ng bata ang itaas na marka ng taas sa balikat (humigit-kumulang 6-8 taong gulang). Maaari ring gamitan ng guwarnisyon ng bata na naaprubahang gamitin kasama ang upuang booster na ito. Patuloy na gamitin ang upuang booster na ito hanggang sa maabot ng bata ang limitasyong ito. Ang mga bata ay pinakaligtas sa isang upuang booster hanggang sa maabot ng kanilang mga balikat ang itaas na marka ng taas ng balikat ng upuang booster. Huwag gamitin ang upuan booster na ito hanggang sa ang mga balikat ng bata ay lumampas sa ibabang marka ng taas ng balikat. Kung ang mga tuhod ay hindi makaliko sa harap ng kutson ng upuan ng sasakyan ay patuloy na gamitin ang upuang booster. Ang paggamit lamang ng seatbelt ay hindi inirerekomenda para sa mga bata na nakalakhan na ang upuang ito. Gumamit ng mas malaking upuang booster. Instructions for Installation & Use - Series No. 4000/A/2013 7 INTRODUCTION Carefully read all the instructions for installation. If in doubt about the method of installation, consult Britax Childcare or agent or a child restraint fitter or, in New Zealand, consult the agent for the vehicle. There is no requirement to attach this booster seat to the car's child restraint upper anchorage fitting. THIS RESTRAINT MUST BE USED IN CARS WITH FORWARD FACING SEATS WITH A LAP-SASH SEATBELT OR WITH A SEATBELT AND CHILD HARNESS. When used with a Child Harness either lap only seatbelt or lapsash seatbelt may be used. This booster seat should be use in the rear seating position wherever possible as this is a safer position. Suitable for use with the following child harnesses: Safe-n-Sound Protecta PLUS™ harness Series 220/2010 and 220/2013. Babylove EzyGo Harness™ Series BL220/2010 and BL220/2013. No child restraint can guarantee absolute protection from injury in every crash. However, to ensure that your child gets all the protection designed into the restraint PLEASE READ AND FOLLOW THESE INSTRUCTIONS EXACTLY. This child restraint is not suitable for use on an aircraft. Always store the instruction book in the pocket provided on the side of the headrest. 8 Instructions for Installation & Use - Series No. 4000/A/2013 INDEX PAGE 8 INTRODUCTION 10 WARNINGS 12 SHOULDER HEIGHT MARKERS AND A GROWING CHILD 13 SHOULDER HEIGHT MARKERS 14 SHOULDER HEIGHT MARKERS AND THE NEXT STEP 15 SPECIAL FEATURES 16 HOW TO SETUP 18 HOW TO USE 24 HOW TO USE WITH A CHILD HARNESS 34 TO REMOVE CHILD 35 CARE & MAINTENANCE 36 HOW TO CLEAN 37 IN CASE OF ACCIDENT Instructions for Installation & Use - Series No. 4000/A/2013 9 • Use the restraint exactly as shown in the instructions. • Supervision of children is needed because they may be able to undo the buckles and/or special features. • DO NOT LEAVE CHILDREN UNATTENDED IN THE CAR. • Do not alter or modify this restraint. Use only recommended parts and accessories. • Repairs must only be done by the manufacturers or agent. • Do not allow the restraint to come into contact with polishes, oils, bleach and other chemicals. • Destroy the restraint if it has been in a severe crash, even if no damage is visible. • DO NOT USE THIS RESTRAINT WITHOUT THE COVER. • DO NOT USE WITH JUST A LAP BELT. You must use with lap-sash seat belt, or with a seat belt and child harness. • The lap part of the seat belt must be firmly across the thighs and the sash straps fitted diagonally across the chest and on the shoulder. • If used with a child harness, the lap belt must be adjusted firmly first, and then the harness, so that the lap-belt is not lifted off the child’s lap when the harness is adjusted. • Regularly check the restraint components, straps and other fitments for correct function, cracking & condition. Seek immediate repair. • IF AN AIRBAG IS FITTED IN THE SEATING POSITION WHERE THE CHILD RESTRAINT IS TO BE FITTED, FOLLOW THE VEHICLE MANUFACTURER’S WARNINGS AND INSTRUCTIONS. • The lap belt on the abdomen is dangerous. The lap belt positioning device SLIDEGUARD™ clip must always be used. 10 Instructions for Installation & Use - Series No. 4000/A/2013 IMPORTANT : • Seatbelt extenders are not recommended to be used if the seatbelt is not long enough to secure the child restraint. If seatbelts are too short then seek advice from a child restraint fitter and consider their recommendations before using a seatbelt extender. If you use a seatbelt extender then ensure that the seatbelt buckle does not contact the child. • Do not use in a front seat, unless your child is over 4 years of age or in accordance with the applicable Road Rules in your region. Research shows that children under 12 years old are at a greater risk of serious injury when travelling in the front seat. • Do not use on any vehicle seat which faces sideways or rearwards. • Use of aftermarket accessories (i.e. items not provided in the box with the child restraint), can reduce the safety provided by the child restraint and may cause injury or death. • Use a towel or seat protector (messy mat) to protect the vehicle seat. Protection of both underneath and behind the booster seat may be required. • Do not store in hot places or underneath heavy objects. The plastic may distort. • This child restraint is not approved for use with any connectors that connect to the car's ISOFIX low anchorages. • The restraint should not be purchased or sold as a second hand item. It is recommended not to use child restraints older than 10 years as the protection in an accident may be reduced. Instructions for Installation & Use - Series No. 4000/A/2013 11 SHOULDER HEIGHT MARKERS AND A GROWING CHILD Marker B Marker A Front of Vehicle Height label will be behind the child’s neck. SMALLER CHILD Shoulders must not be below the Lower Shoulder Height Marker. From approximately 4 years of age. Marker A TALLER CHILD Shoulders must not be above the Upper Shoulder Height Marker. Marker B To approximately 6 to 8 years of age. NOTE: These heights also apply if you are using a Child Harness with the booster seat. 12 Instructions for Installation & Use - Series No. 4000/A/2013 SHOULDER HEIGHT MARKERS IMPORTANT: Follow this advice. MARKER A: LOWER SHOULDER HEIGHT MARKER The child’s shoulders must be in-line or above this marker. Approximately 4 years of age. If the child’s shoulders are below then the child should remain in their previous child restraint. MARKER B: UPPER SHOULDER HEIGHT MARKER When the child’s shoulders reach this upper marker, or the child no longer fits in the child restraint, approximately 6 to 8 years of age, then the child must be moved to the next form of child restraint, see next page. The child restraint is unsuitable for the occupant when the shoulders are below the lower marker or above the upper height marker. Instructions for Installation & Use - Series No. 4000/A/2013 13 SHOULDER HEIGHT MARKERS AND AND THE NEXT STEP Next type of restraint that can be used in the car for your child. When your child has outgrown the this booster seat, you can then use either restraint methods as follows: A larger booster seat suitable for children up to 8-10 years of age. Safe-n-Sound recommends the Encore 10 for children who have outgrown this booster seat. Or the car's lap-sash seatbelt if the lower leg is able to hang over the edge of the seat cushion. Safe-n-Sound recommend to keep your child in the appropriate restraint suitable for their age and size, only moving to the car's lap-sash seatbelt setup when they no longer fits a dedicated child restraint. 14 Instructions for Installation & Use - Series No. 4000/A/2013 SPECIAL FEATURES 7 Front of Vehicle 6 5 4 1 3 1. Padded Cover for Comfort 2 2. BOOSTER SEATBELT PATH label (each side, for lap belt) 3. SLIDEGUARD™ clip 4. Shoulder Height Markers 5. Sash guide 6. BOOSTER SEATBELT PATH label (each side, for sash belt) 7. Child harness slots Instructions for Installation & Use - Series No. 4000/A/2013 15 HOW TO SETUP ADJUSTING THE SLIDEGUARD™ CLIP The SLIDEGUARD™clip crotch strap can be adjusted so that it fits the seatbelt correctly to the child. The crotch strap length adjuster can be found under the seat. A. Adjust the crotch straps for the SLIDEGUARD™ clip so that the Lap portion of the seatbelt is positioned on the child's hips and thighs and the clip prevents the lap belt rising up onto the abdomen. Ensure the SLIDEGUARD™ clip does not push into your child's thighs as this may cause discomfort. CAUTION: ALWAYS USE THE SLIDEGUARD™ CLIP B. Underneath the base, length of the crotch strap can be adjusted by threading webbing through the adjuster in the direction of the arrows shown below. TO SHORTEN SLIDEGUARD™ position TOO HIGH Lower edge of SLIDEGUARD™, level with top of thighs. TO LENGTHEN SLIDEGUARD™ position OK Bottom edge of buckle, level with top of legs (with all slack removed from crotch strap). IMPORTANT : You must adjust the crotch strap to the correct length for your child before the child sits in the seat. Adjust the crotch strap to its shorter length when using the seat with a smaller child. The SLIDEGUARD™ clip must always be setup to position the lap belt correctly on the child's hips and thighs. The occupant may be injured if the SLIDEGUARD™ clip is setup too high. DO NOT attempt to remove or dismantle the crotch strap and SLIDEGUARD™ clip. 16 Instructions for Installation & Use - Series No. 4000/A/2013 HOW TO SETUP SETTING UP THE SASH GUIDE The sash guide needs to be positioned to the same side as the sash belt route. A. The Sash guide is found attached to a strap at the back of the restraint. B. Thread the sash guide through the slot in the seat cover on the same side as the sash belt is connected to the car. Refit the seat cover to the restraint if it was removed. IMPORTANT: ALWAYS USE THE SASH GUIDE Instructions for Installation & Use - Series No. 4000/A/2013 17 HOW TO USE A. Place the booster seat in the desired seating position. B. Seat the child in the seat. The child's shoulders must be between the lower and upper shoulder height markers. C. Pull the seatbelt out and place the lap belt over the child's hips and thighs, across the red BOOSTER SEATBELT PATH label, engage seatbelt buckle and tongue, ensuring there are no twists in the belt. If the seatbelt buckle is adjustable, adjust the buckle as low as possible away from the child. BOOSTER SEATBELT PATH label 18 Instructions for Installation & Use - Series No. 4000/A/2013 HOW TO USE D. Feed the sash-belt across the child's chest and through the sash guide. The sash guide should be used to correctly position the sash portion of the seatbelt over the child’s shoulder and across the chest. IMPORTANT: ALWAYS USE THE SASH GUIDE Sash guide Instructions for Installation & Use - Series No. 4000/A/2013 19 HOW TO USE E. Hook the SLIDEGUARD™ clip over the lap part of the seatbelt with the lap belt positioning logo facing forward. The SLIDEGUARD™ clip must be used at all times to prevent the child slumping (sliding forward at base of seat) as the lap belt on the abdomen is dangerous in the event of a crash. F. Tighten the lap belt and the sash belt if using an Inertia Sash belt reel retractor seatbelt, adjust across the lap portion of the seatbelt chest and firmly around the child and through the child booster seat, place the sash guide sash belt through sash guide where the red BOOSTER SEATBELT PATH label is. Allow the slack sash portion to retract into the seatbelt. Engage buckle CAUTION: ALWAYS USE THE SLIDEGUARD™ CLIP. 20 Instructions for Installation & Use - Series No. 4000/A/2013 HOW TO USE G. The seatbelt must fit firmly but comfortably across the lap and chest. If needed, adjust the vehicle seat to improve the position of the sash on the child’s chest. It should pull to the rear of the child. H. Always ensure the lap belt is on the child's hips and thighs at all times. The lap belt must not be on the child's abdomen. The sash belt must be across the child's chest. IMPORTANT : Always ensure the seatbelt is firmly fitted to the hips and thighs and the sash belt is diagonally across the chest. The SLIDEGUARD™clip correctly adjusted must always be used when the child is using the booster seat as it ensures the lap belt is correctly positioned on the child's thighs and hips. A loose or poorly positioned lap belt can allow the lap belt to ride up into the abdomen and can cause serious injuries in a crash. : DO NOT LEAVE CHILDREN UNATTENDED IN THE CAR Instructions for Installation & Use - Series No. 4000/A/2013 21 HOW TO USE WARNING: A SASH BELT UNDER THE ARM OR BEHIND THE BACK IS DANGEROUS. SEAT BELT UNDER THE ARM IS DANGEROUS SEAT BELT BEHIND THE BACK IS DANGEROUS Seat belt fitting closely across the chest and through the sash guide. Lap belt must always be firm on the thighs. The child should not slump or slouch. NOTE: Seatbelt extenders should not be used if the seatbelt is not long enough to fit around the child. If a seatbelt extender is used then the seatbelt buckle must not be in contact with the child. 22 Instructions for Installation & Use - Series No. 4000/A/2013 HOW TO USE TO REMOVE CHILD Disengage seat belt tongue and buckle. Remove the belt from the child. When Booster is not being used, secure in position, by engaging seat belt over the booster seat or store in a safe place. Instructions for Installation & Use - Series No. 4000/A/2013 23 HOW TO USE WITH A CHILD HARNESS USING THE BOOSTER SEAT WITH A CHILD HARNESS A child harness MUST be used with this Booster seat if the seating position chosen has a Lap only seat belt. A child harness can also be used in a position with a lap-sash seatbelt and is useful if the occupant does not always wear the seat belt correctly. When using this Booster Seat with a child harness the Sash guide is not needed and can be left in the slot in the cover or hanging at the back of the seat. Before using the Child Harness with a Lap-Sash Seat Belt, you need to convert the seat belt to a Lap Seat Belt by using a Gated Slide. The Booster Seat can be used with a child harness in a seating position where a upper anchorage fitting is fitted in the vehicle. Refer to the car owners manual for the location of the child restraint upper anchorage fitting and for any precaution related to airbags in selected seating position. If there is no anchor fitting you will need to refer to the instruction book for the child harness which will provide information about fitting an anchor fitting into the car. This booster seat is suitable for use with either of the following child harnesses: Safe-n-Sound Protecta PLUS™ harness Series 220/2010 and 220/2013 or Babylove EzyGo Harness™ Series BL220/2010 and BL220/2013. CAUTION: ALWAYS FOLLOW THE CHILD HARNESS INSTRUCTIONS. If the seating position has a lap only seat belt then no other preparation is required. If the seating position has a lap-sash seatbelt then it MUST be converted into a lap belt by fitting a Gated 3 bar slide. Only use Gated Slides recommended for this Harness. When using a curved Gated Slide, the belt route through this can only go one way as shown. 24 Instructions for Installation & Use - Series No. 4000/A/2013 Curved Gated 3-bar Slide HOW TO USE WITH A CHILD HARNESS A. Hold the lap and sash straps together and fold as shown. Slide the inner strap into the Gated Slide followed by the outer strap. Outer Strap IMPORTANT : Face the hollow side of the Gated Slide and the inner strap towards the child. Do not use Gated Slide for any other purpose. Inner Strap Faces towards Child A Hollow B. The two straps should slide freely in the Gated Slide slot. Hollow B C. Repeat previous step A for the other slot in the Gated Slide. C Ensure the lap portion of the seatbelt is nearest to the child Instructions for Installation & Use - Series No. 4000/A/2013 25 HOW TO USE WITH A CHILD HARNESS D. Feed the straps through the Gated Slide to remove any slack. This has now converted the lap-sash seat belt so it will act like a lap only seat belt. Fit the Gated Slide so that when the lap belt is fitted to the child, there is no slack and the lap belt fits firmly to their hips and thighs when on the booster. Follow these instructions to ensure there is no slack. Hollow side towards child. Loop on top (away from child) Seatbelt sash portion This side towards the child D Seatbelt lap portion NOTE: TO ENSURE CORRECT CONVERSION OF LAP-SASH SEAT BELT TO LAP SEAT BELT FOLLOW THESE STEPS. IMPORTANT : The Gated Slide must be removed from the seat belt if the booster seat and child harness are no longer used in the car so that other users can use the seat belt as a lap-sash seat belt. A seat belt extender should not be used if the seat belt is not long enough to secure the child. If a seat belt extender is used then the buckle must not be in contact with the child. 26 Instructions for Installation & Use - Series No. 4000/A/2013 HOW TO USE WITH A CHILD HARNESS USING THE BOOSTER SEAT WITH A CHILD HARNESS WITH A FRONT ADJUSTER The Safe-n-Sound Protecta PLUS™ harness Series 220/2010, 220/2013 and Babylove EzyGo harness Series BL220/2010 and BL220/2013 Child Harnesses include an adjuster in the front of the harness. The harness may be used with either a lap only seat belt or a lap-sash seat belt (with gated 3 bar slide). 2 Pull to remove slack 3 1 5 4 6 7 8 1. Attachment Clip 2. Car's Upper Anchorage Fitting 3. Right Hand Harness Straps 4. Storage strap 5. Adjuster (under cover) 6. Right Hand Harness Strap Loop 7. Cross Strap Loop 8. Cross Strap Instructions for Installation & Use - Series No. 4000/A/2013 27 HOW TO USE WITH A CHILD HARNESS CHOOSING METHOD OF INSTALLATION A Child Harness can be installed using either of the following methods. METHOD 1 : Using a lap sash seatbelt in conjunction with Gated 3-bar Slide (provided with the Child Harness) to convert to lap belt plus upper anchorage strap. METHOD 2 : Using lap seatbelt plus upper anchorage strap. Before installing the Child Harness determine which method of installation is required and follow instructions carefully. Refer to the child harness instructions. IMPORTANT : The SLIDEGUARD™clip MUST ALWAYS be used when the child is using the booster seat with the child harness as it ensures the lap belt is correctly positioned on the child's hips and thighs. A loose or poorly positioned lap belt can allow the lap belt to ride up into the abdomen and can cause serious injures in a crash. 28 Instructions for Installation & Use - Series No. 4000/A/2013 HOW TO USE WITH A CHILD HARNESS INSTALLING CHILD HARNESS INTO SEAT If the seat is fitted to the car, remove it as it will be easier to fit the child's harness. Left hand Strap Cross Strap Attachment Clip Adjuster under cover 2 A. Prepare the child harness by lengthening the right side harness strap. Press the adjuster button (1) and pull the shoulder strap (2). 1 B. Feed the left hand harness strap and attachment clip through the right hand slot of the booster seat. Instructions for Installation & Use - Series No. 4000/A/2013 29 HOW TO USE WITH A CHILD HARNESS C. Feed the left hand Harness Strap & Cross Strap through the other shoulder slot. Make sure that the Attachment Clip is at the back of the restraint. Attachment Clip NOTE: The straps must be in the slots provided in the back rest. The shoulder straps must be in the slots which are nearest to the child’s shoulders, but not lower than the child’s shoulders D. Attach the attachment clip to the car's upper anchorage fitting (see illustration). An adjustable extension strap supplied with the child harness may be required for hatchbacks or wagons. Ensure that the harness strap loops line up to an equal length. Attachment Clip Anchor Fitting E E. With the child seated, place each of the harness straps through the slots in the top of the seat and then over each shoulder. 30 Instructions for Installation & Use - Series No. 4000/A/2013 HOW TO USE WITH A CHILD HARNESS F. Feed the right hand strap loop into the cross strap loop to connect the two sides. G. Feed the adult belt (lap belt or converted lap/ sash) through the harness strap loops, ensuring that the cross strap loop does not disconnect. Ensure there are no twists in the harness, cross strap and seat belt. Lap belt Thread the converted lap-sash seat belt or lap seat belt through the harness strap loops as shown below. Harness strap loops. Converted lap-sash seat belt Lap belt WARNING: The lap portion of the belt must be adjusted firmly first, and then the harness, so that the belt is not lifted off the child’s lap when the harness is adjusted. The shoulder strap does not need to be tight. Instructions for Installation & Use - Series No. 4000/A/2013 31 HOW TO USE WITH A CHILD HARNESS H. Engage the seatbelt tongue into the buckle and adjust the seatbelt to fit firmly around the child’s hips and thighs. I. The seatbelt buckle should be located as low as possible below the child’s hip. If using a lap-sash seatbelt and gated slide you will need to adjust it so that the seatbelt is firm on the child’s hips and thighs and the gated slide is close to the child but not touching the child. J. Hook the SLIDEGUARD™ clip over the lap part of the seatbelt with the lap belt positioning logo facing forward. The SLIDEGUARD™ clip must be used at all times to prevent the child slumping (sliding forward at base of seat) as the lap belt on the abdomen is dangerous in the event of a crash. K. Adjust the Protecta PLUS™ Harness by removing the slack from the left side harness strap and pulling it through the attachment clip. Next pull the adjuster strap (3) to remove all slack in the right shoulder strap. Do not over tighten so as to cause the seatbelt to lift off the child’s hips and thighs. As the child grows this front adjuster will need to be adjusted. Converted lap-sash seat belt. The Gated Slide needs to be close to the child but not touching the child. If armrests are included the Gated Slide needs to be under the armrest. SLIDEGUARD™clip Check that both left and right harness straps have a close even fit to the child. 32 L. Finally, roll up the excess adjuster strap, secure using the storage strap, then close the adjuster cover. Instructions for Installation & Use - Series No. 4000/A/2013 Adjuster Cover Storage Strap Cross Strap HOW TO USE WITH A CHILD HARNESS USING LAP SASH SEATBELT Harness strap loops. Thread the converted lap-sash seat belt through the harness strap loops as shown. Engage buckle Tighten the converted Lap belt over the child's hips and thighs. Remove the slack from the Child Harness so that the Lap belt is not lifted off the thighs. Converted lap-sash seat belt. Slide the Gated Slide so that it is close to the child but not touching the child. Connect the SLIDEGUARD™ clip. Adjust length if necessary so that the lap belt is kept on thighs and hips, see page 16. USING LAP ONLY SEATBELT Thread the lap seat belt through the harness strap loops. Harness Tighten the Lap belt over the strap loops. child's hips and thighs. Remove the slack from the Child Harness so that the Lap belt is not lifted off the thighs. Engage buckle Lap belt or converted lapsash seatbelt. Connect the SLIDEGUARD™ clip Connect the SLIDEGUARD™ clip. Adjust length if necessary so that the lap belt is kept on thighs and hips, see page 16. : DO NOT LEAVE CHILDREN UNATTENDED IN THE CAR. Instructions for Installation & Use - Series No. 4000/A/2013 33 HOW TO REMOVE CHILD TO REMOVE CHILD FROM HARNESS AND SEAT Disengage seatbelt tongue and buckle, remove the lap portion of seatbelt from the SLIDEGUARD™ clip and remove child harness and seatbelt from child. NOTE: It may be easier to unthread the car seatbelt out of the loops before lifting the child harness over the child’s head. Lift child harness strap over child’s head. When the booster seat is not being used, secure in position, by engaging seatbelt around the booster seat or store in a safe place to prevent it becoming a projectile in a crash. IMPORTANT : The gated slide must be removed from the seatbelt if the booster seat and child harness are no longer used in the car to allow other users to use the seatbelt as a lap-sash seatbelt. 34 Instructions for Installation & Use - Series No. 4000/A/2013 CARE & MAINTENANCE REGULAR CARE OF THIS RESTRAINT: Please check the following items regularly to ensure the safety of your child: A. Check the webbing straps for fraying. B. Check there are no cracks in plastic mouldings. C. If any part of the restraint is cracked or broken, seek repair immediately contact Britax Customer Service 1300 303 330 or replace the child restraint. D. Clean the cover and the seat regularly. HOW TO CLEAN Use only mild soap and water with a moist cloth to clean all metal and plastic parts of the booster seat. Do not use harsh cleaners, polishes, oils, bleach or other chemicals. COVER The booster seat has a cover made from flame retardant fabric and is removable for cleaning. Washing and care instructions are on the care label attached to the cover. Refer to the following pages for instructions on how to remove and replace the cover. VERY IMPORTANT: Only replace the cover with BRITAX Safen-Sound supplied replacement cover with identical shoulder height markers or a replacement cover meeting AS/NZS 8005. ONLY USE BRITAX SAFE-N-SOUND SEAT COVERS AND ACCESSORIES THAT ARE DESIGNED AND TESTED FOR USE WITH THIS PRODUCT. MAINTENANCE Other than cleaning, there are no parts on this booster seat that require user maintenance. Instructions for Installation & Use - Series No. 4000/A/2013 35 HOW TO CLEAN TO REMOVE COVER To remove the cover peel away from headrest and then from body, feeding through the SLIDEGUARD™ clip. TO REPLACE COVER To replace the main cover stretch the cover over the top of the restraint first, then the sides, then stretch the cover around the rim of the restraint. Feed the SLIDEGUARD™ clip through the cover. ACCESSORIES Use of aftermarket accessories, (ie; items not provided in the box with the child restraint), can reduce the safety provided by the child restraint and may cause injury or death. Always follow the instructions covering the use of accessories in this booklet or the instructions provided with an accessory. If an aftermarket accessory is used that is not recommended by Britax Safe-n-Sound, ensure that the accessory is compliant with AS/NZS 8005 and is stated as suitable for use with this child restraint. The following instructions apply to accessories that may be supplied with this restraint at point of purchase. A variety of Britax Safe-nSound accessories are available from various retailers of Britax Safe-n-Sound products. MESSY MAT™ (IF SUPPLIED) Place ribbed or pocket end of the Messy Mat seat protector on edge of car seat, smooth back toward seat join (’A’) and fit in any excess Messy Mat into the join of the car seat (’A’). For seat protectors please read their instructions. Short Messy Mat 'A' 36 Instructions for Installation & Use - Series No. 4000/A/2013 IN CASE OF ACCIDENT If your restraint has been involved in a severe crash, you should destroy the restraint even if no damage is obvious. Some insurance companies offer vehicle insurance which covers or partially covers the replacement of your child restraint. Contact your insurance company for further details. Your insurance company may require you to keep the child restraint for assessment, but do not use the child restraint after a severe crash. To assist you in making an accident insurance claim cut the following statement and include it with your claim. NOTICE TO INSURANCE COMPANY CHILD RESTRAINT INVOLVED IN AN ACCIDENT This Britax Safe-n-Sound child restraint is manufactured to Australian/New Zealand Standard AS/NZS1754-2013 which requires us to advise users of child restraints to "Destroy the entire restraint if it has been in use in a severe crash, even if no damage is obvious". The joint Australian/New Zealand Standards committee CS/085 advise that this statement applies whether a child was in the child restraint or not. A severe crash, we consider as being one where the main body structure of the vehicle is distorted. There is no method of determining if the restraint has been damaged and we concur with the Australian/New Zealand Standards in recommending destruction of the child restraint. This notice is to advise you of the requirements of the Australian/New Zealand Standards and our obligation in complying with the standards. Please assist the owner of this restraint in their claim. AUSTRALIA Britax Childcare Pty. Ltd. A.B.N 55 006 773 600 Head office and registered address 99 Derby Road, Sunshine, Victoria 3020. PO Box 147 Sunshine, Victoria 3020. Customer Service 1300 303 330 Email [email protected] www.britax.com.au NEW ZEALAND Britax Childcare (NZ) Ltd. Customer Service 0508 688 822 Email [email protected] www.britax.co.nz Instructions for Installation & Use - Series No. 4000/A/2013 37 IN CASE OF ACCIDENT CRASH EXCHANGE We would never want you to experience an accident, but unfortunately accidents do happen. If you experience an accident you may be eligible for a free replacement. The Safe-n-Sound Crash Exchange Program is a voluntary program designed to ensure that our children are safe and that any seat that may have experienced a severe crash is taken out of the market. There is no method of determining if the restraint has been damaged in a severe crash, so the restraint should be destroyed as the crash may reduce the child restraints ability to perform. Since its inception in 2006, the Crash Exchange program has helped 100’s of families ensure that their children have new restraints and that the restraints are not sold second hand placing others at risk. Our Crash Exchange Terms and Application form are accessible on our website. Please visit www.britax.com.au for further information. 38 Instructions for Installation & Use - Series No. 4000/A/2013 NOTES VERY IMPORTANT: Only use this child restraint with the cover supplied or a manufacturerauthorised replacement cover with identical shoulder height markers. Instructions for Installation & Use - Series No. 4000/A/2013 39 28 The Safe-n-Sound and Protecta PLUS trademarks are the property of Britax Childcare Pty. Ltd. (Australia). The BRITAX trademark is the property of Britax Childcare Holdings Ltd, UK. The Babylove & EzyGo Harness trademarks are the property of Nursery Elegance Pty. Ltd. (Australia). We reserve the right to alter this product without notice. © 2014 Britax Childcare Pty. Ltd. This product is covered by Australian and overseas patent applications. Patents pending. Instructions P/No. 2201808/Afor Installation & Use - Series No. 4000/A/2013