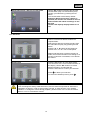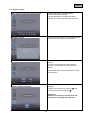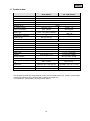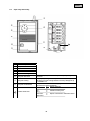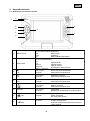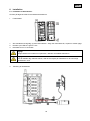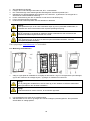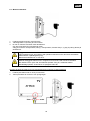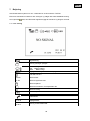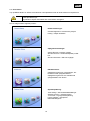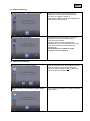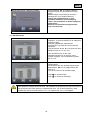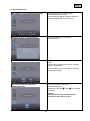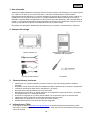
1
TVAC80020B User guide Instrukcja obsługi Betjeningsvejledning Manual de instrucciones You can find important information and FAQs about this and other products on the website www.abus.com/plug-and-play Version 10/2014 English This user guide contains important information on starting operation and using the device. Make sure that this user guide is handed over when the product is given to other persons. Keep this user guide to consult later! For a list of contents with the corresponding page numbers, see page 5. Polski Niniejsza instrukcja obsługi zawiera ważne wskazówki dotyczące uruchamiania i obsługi. Pamiętaj o tym, także przekazując produkt osobie trzeciej. Zachowaj instrukcję do wykorzystania w przyszłości! Wykaz treści znajdziesz w spisie treści z podaniem odpowiednich liczb stron na stronie 26. Dansk Denne betjeningsvejledning indeholder vigtige henvisninger til idriftsættelse og håndtering. Vær også opmærksom på dette, hvis produktet gives videre til en tredje person. Opbevar derfor denne betjeningsvejledning til senere brug! I indholdsfortegnelsen på side 47 findes der en liste over indholdet med angivelse af de pågældende sidetal. Español Este manual de instrucciones contiene indicaciones importantes para la puesta en funcionamiento y para la utilización. Tenga esto en cuenta, también cuando transfiera este aparato a terceras personas. Por este motivo, guarde este manual para poder consultarlo cuando lo necesite. El listado de los contenidos figura en el índice junto a las páginas correspondientes en la página 68. TVAC80020B User guide Version 10/2014 Original user guide in English. Retain for future reference! English Introduction Dear customer, Thank you for purchasing this product. This device complies with the requirements of the applicable EU directives. The declaration of conformity can be ordered from: ABUS Security-Center GmbH & Co. KG Linker Kreuthweg 5 86444 Affing GERMANY To ensure this condition is maintained and that safe operation is guaranteed, it is your obligation to observe these operating instructions! Read the entire user guide carefully before starting operation of the product, and pay attention to all operating instructions and safety information! All company names and product descriptions are trademarks of the corresponding owner. All rights reserved. In the event of questions, please contact your local maintenance specialist or dealer. Warning as required by §201 StGB (German Criminal Code): Whosoever unlawfully makes an audio recording of the privately spoken words of another; or uses, or makes a recording thus produced accessible to a third party, shall be liable to imprisonment or a fine. Whosoever unlawfully overhears with an eavesdropping device the privately spoken words of another not intended for his attention; or publicly communicates, verbatim or the essential content of, the privately spoken words of another, recorded or overheard, shall incur the same penalty. Disclaimer This user guide has been produced with the greatest of care. Should you discover any missing information or inaccuracies, please contact us under the address shown on the back of the manual. ABUS Security-Center GmbH does not accept any liability for technical and typographical errors, and reserves the right to make changes to the product and user guide at any time and without prior warning. ABUS Security-Center GmbH is not liable or responsible for direct or indirect damage resulting from the equipment, performance and use of this product. No forms of guarantee are accepted for the contents of this document. 2 English Explanation of symbols The triangular high voltage symbol is used to warn of the risk of injury or health hazards (e.g. caused by electric shock). The triangular warning symbol indicates important notes in these operating instructions which must be observed. This symbol indicates special tips and notes on the operation of the unit. Important safety information All guarantee claims are invalid in the event of damage caused by non-compliance with this user guide. We cannot be held liable for resulting damages. In the event of material or personal damage caused by improper operation or noncompliance with the safety information, we cannot be held liable. All guarantee claims are voided in such cases. This device has been manufactured in accordance with international safety standards. Please read the following safety instructions carefully. Safety information 1. Power supply 100 - 240 V AC voltage, 50 - 60 Hz (using a power supply unit for 5 V DC) Only operate this device using a power source which supplies the grid voltage specified on the type plate. If you are unsure which voltage is supplied at the installation location, contact your power supply company. Disconnect the device from the power supply before carrying out maintenance or installation work. 2. Overloading Avoid overloading electrical sockets, extension cables and adapters, as this can result in fires or electric shocks. 3. Liquids Make sure that no liquids of any type are able to enter the device. 4. Cleaning Only use a damp cloth to clean the device. Do not use corrosive cleaning materials. Disconnect the device from the power supply while doing so. 5. Accessories Only connect devices that are suitable for the intended purpose. Otherwise, hazardous situations or damage to the device can occur. 6. Installation position This device is suitable both for operation in protected outdoor areas as well as indoors. The product may be damaged if it is dropped, even from a low height. Install the device so that no direct sunlight can shine on the image sensor. Pay attention to the installation instructions in the corresponding section of this user guide. Never place the device close to heaters, stoves, other sources of heat, or in direct sunlight. Only operate the device at locations where temperatures within the permitted ambient temperature range of -10 °C to 50 °C prevail. 3 English 7. Wireless transmission The wireless range depends on a variety of environmental factors. The local conditions at the installation site may have a negative impact on the range. When there are no obstructions between the receiver and transmitter, a range of up to 150m is possible, but this range will be considerably less within buildings. The following environmental conditions compromise both the range as well as the frame rate: Mobile communication masts, high-tension pylons, electrical wires, ceilings and walls, devices with the same or an adjacent wireless frequency. Warnings Observe all safety and operating instructions before putting the device into operation for the first time. 1. Observe the following information to avoid damage to the mains cable and plug: Do not modify or manipulate the power cable or plug. Do not pull the cable when disconnecting the device from the mains power – always hold of the plug. Ensure that the mains cable is positioned as far away as possible from any heating equipment, as this could otherwise melt the plastic coating. The power supply unit for the door station must be protected from damp and moisture. 2. Follow these instructions. Non-compliance with these instructions could lead to an electric shock. 1. Never open the housing or power supply unit. 2. Do not insert any metallic or flammable objects into the device. 3. Use overvoltage protection to prevent damage caused by overvoltage (e.g. electrical storms). 3. Disconnect defective devices from the power immediately and contact your specialist dealer. When installing the device in an existing video surveillance system, ensure that all devices have been disconnected from the power supply and low-voltage circuit. If in doubt, have a specialist technician carry out assembly, installation, and connection of the device. Improper or unprofessional work on the power supply or domestic installation puts both you and other persons at risk. Connect the installations so that the power supply circuit and low-voltage circuit always run separately from each other. They should not be connected at any point or be able to become connected as a result of a malfunction. Avoid the following adverse conditions during operation: Moisture or excess humidity Extreme heat or cold Direct sunlight Dust or flammable gases, vapors, or solvents Strong vibrations Strong magnetic fields (e.g. next to machines or loudspeakers) The camera for the door station must not be directed toward the sun, as otherwise the sensor may be destroyed. The door station must not be installed on unstable surfaces Unpacking the device Handle the device with extreme care when unpacking it. If the original packaging has been damaged, inspect the device. If the device shows signs of damage, return it in the original packaging and inform the delivery service. 4 English Contents 1. Intended use ............................................................................................................................................... 6 2. Scope of delivery ....................................................................................................................................... 6 3. Features and functions .............................................................................................................................. 6 4. Information and FAQs ............................................................................................................................... 6 5. Device description ..................................................................................................................................... 7 6. 7. 8. 9. 5.1 Guide to the front of the monitor .......................................................................................................... 7 5.2 Guide to the rear of the monitor ........................................................................................................... 8 5.3 Guide to the connections on the monitor ............................................................................................. 8 5.4 Guide to the door station ...................................................................................................................... 9 5.5 Guide to the cable connections .......................................................................................................... 10 Installation ................................................................................................................................................ 11 6.1 Installation the door station ................................................................................................................ 11 6.2 Assembling the door station ............................................................................................................... 12 6.3 Installing the monitor .......................................................................................................................... 13 Operation .................................................................................................................................................. 14 6.1 Live cast ............................................................................................................................................. 14 6.2 Main menu.......................................................................................................................................... 15 6.3 Camera settings ................................................................................................................................. 16 6.4 Recording settings ............................................................................................................................. 16 6.5 Event list ............................................................................................................................................. 17 6.6 System settings .................................................................................................................................. 18 Maintenance and cleaning ...................................................................................................................... 19 8.1 Maintenance ....................................................................................................................................... 19 8.2 Cleaning ............................................................................................................................................. 19 Disposal .................................................................................................................................................... 19 10. Tips for troubleshooting .......................................................................................................................... 20 11. Technical data .......................................................................................................................................... 21 5 English 1. Intended use Digital wireless video intercom system, comprised of a weatherproof housing and a 3.5" LCD monitor, each with a hands-free speaker and power supply unit. You can install the system next to your door bell and connect it to your door opener. The compact 3.5" LCD color monitor is portable, meaning you do not have to walk to the intercom. The integrated microphone makes speaking to the visitor outside more convenient, and the door opener can be operated from the monitor. The digital transmission technology ensures interference-free reception. After the door bell has been pressed, images are recorded on an SD card (not included). For a detailed description of functions, refer to Section 3, “Features and functions” 2. Scope of delivery 3.5" LCD monitor Digital door station in weatherproof housing Accessories Power supply components 3. Features and functions Intercom with an integrated camera and a portable 3.5" LCD color monitor thanks to its integrated battery An existing bell - buzzer wire is easy to connect to the door station Encrypted signal transmission between the door station and monitor The door can be opened by pressing a button on the monitor After pressing the door bell, images are recorded on an SD card in the monitor and can be watched conveniently on the PC Integrated microphone on the monitor allows speaking to the person outside Door station for a sheltered outdoor area (protection class IP55) Door station with batteries for use in the event of a power failure Day/night camera with integrated IR LEDs 4. Information and FAQs You can find important information and FAQs about this and other products on the website www.abus.com/plug-and-play. You will find information for troubleshooting under item 10 of these instructions. 6 English 5. Device description 5.1 Guide to the front of the monitor Display of the current charge level: Battery status display Red: Green: Off: Battery low Charging Battery fully charged Device status display PWR / REC II ◄ ► ▲ Vol- Vol+ OK-Taste / Del Blue: Off: Flashes 3x per sec.: Flashes 1x per sec.: Switch device on Switch device off Device recording New recording in memory Live cast: In the menu: Click to access event list directly Navigate between menu items Live cast: In the menu: Reduce volume Navigate between menu items Live cast: In the menu: Increase volume Navigate between menu items Standby: Live cast: In the menu: Switch on monitor Switch off monitor Navigate between menu items Live cast: In the menu Speech function Confirm the settings and changes Live cast: In the menu: Start/stop the recording Delete the recording Only possible with an SD card! Live cast: In the menu: Door opener Quit the sub-menu The system will quit the menu automatically after one minute of inactivity / ESC 7 English 5.2 Guide to the rear of the monitor Antenna Stand 5.3 Guide to the connections on the monitor Power supply AV output SD card slot Power button and menu button 5 VDC / 1 A (DC, 14.5 x 4.8 mm) Output for displaying the screen image on a different device using an RCA cable (not included) Slot for using an SD card with a max. capacity of 32 GB Switch monitor on or off Live cast: Open / exit the menu 8 English 5.4 Guide to the door station 11 Antenna Infrared LED Photo sensor Loudspeaker Microphone Lens Housing for attachment Bell button Pairing button Reset button 11 Terminal block When the bell button is pressed, the monitor is activated. To connect the door station to the monitor, the pairing button must be pressed. More information can be found under point 5.3. Reset button to restart the door station Connection for bell DCPower supply DC+ UNLOCKConnection for door opener UNLOCK+ 9 English 5.5 Guide to the cable connections Cable lug with connecting cable for the door opener Cable lug contacts For connection to a door opener already installed Stripped cable ends For connection to the terminal block in the door station Round socket with connecting cable for power supply unit Round socket Stripped cable ends Red Stripped cable end, black Connected to the connecting cable for the power supply unit For connection to the terminal block in the door station (“DC+”) For connection to the terminal block in the door station (“DC-”) Power supply unit for the monitor Wall adapter Connection for power supply Round plug For connection to the monitor Power supply unit for the door station Wall adapter Connection for power supply Round plug For connection to round sockets 10 English 6. Installation 6.1 Installation the door station To install the door station, please proceed as described in the following: I. Preparation 1. 2. 3. Please remove the rear cover of the door station and insert 6 AA batteries. Make sure the polarity is correct. The LEDs will then light up in green for 5 seconds. The door station is now functional. Important: Weak batteries can cause the device to function incorrectly; please replace any depleted batteries. Important: If you are in battery mode, please press the call button first to start operation of the door station. II. Connecting the door station 11 English 1. 2. 3. 4. 5. 6. 7. Remove the rear cover of the door station. Attach the red cable for the round socket next to “DC+” in the terminal block. The black connecting cable for the round socket must be attached to the terminal point “DC-”. The two connecting cables for the cable lug must be inserted next to “UNLOCK”, with the terminals being provided for an existing 2-cable door opener connection. A round plug with a power supply unit can now be connected to the round socket. Turn on the power to the power supply unit. A door bell can be connected to the two uppermost connector points. Important: Please note that this contact is a potential-free relay contact, and a bell which lacks a power supply of its own can therefore not be connected. Important: You also have the option of connecting your door opener directly to the door station, or to connect an existing door opening transformer using a relay. Important: Please note that only DC door openers can be actuated, with AC door openers not being able to be actuated. More Information: www.abus.com TVAC80020 6.2 Assembling the door station 1. Use the door bracket to help you find a suitable place for installation. Use the drill holes to mark the surface, and drill the holes. Insert the wall plugs provided before attaching the bracket using the screws. Important: Before starting the installation, make sure than the wireless transmission range at the site of the required installation is sufficient. Important: Before replacing the cover of the device, connect the door station to the monitor. 2. 3. Close the housing for the door station using the four screws provided. Place the door station into its housing and attach it using the anti-theft screws provided. The matching screwdriver has been enclosed with the package. 12 English 6.3 Installing the monitor 1. 2. 3. Connect the power supply unit to the monitor. Switch the device on. To do so, press the power button. You can now connect the monitor to the door station. To do so, please proceed as follows: When the menu item “Camera set up” appears on the monitor, select the sub-item “Pairing” and press the pairing button on the door station. Important: Please note that if the monitor does NOT have an external power supply, it must be charged for at least 8 hours prior to being used for the first time. The batteries will provide power for approx. 3.5 hours. Important: The integrated battery allows you to use the LCD monitor flexibly. If the battery LED lights up in red, then the batteries must be charged. Please note that the battery is always charged to a level which guarantees loss-free recording. To display the monitor images on another display unit, please proceed as follows: 1. Connect the jack plug to the AV OUT connector on the monitor. 2. Then connect the RCA cable as shown in the drawing. 13 English 7. Operation To switch the monitor ON / OFF, press and hold the power button for at least 2 seconds. After each start, the monitor will switch to the live cast, selecting the last viewing settings. If the symbol is displayed, then the SD card was identified correctly by the monitor and is functioning properly. 6.1 Live cast Signal display Display “Visitor is being recorded” Battery status display for door station Yellow: Battery charged Red: Battery low Recording display: Flashes during recording No SD card inserted Full SD SD card full Err SD SD card is not detected SD card blocked SD card will be overwritten when memory is full SD card display SD card memory capacity NO SIGNAL No connection between the door station and monitor Speech function 01:12:45 Recording time 2011 05 01 14:30:11 Date / time display 14 English 6.2 Main menu Press the MENU button to enter the main menu. You can navigate between the individual menu items using the arrow buttons. Important: Please note: The symbols will be hidden automatically after being displayed for 10 seconds You can choose between the following: Camera settings: Camera brightness Pairing = add door stations Recording settings: Visiting record = visitor is being recorded SD Card format = memory capacity on SD card SD Card overwrite = SD card circular buffer Event list: The recordings are saved to sub-folders which are named with the date on which the recording was made. The recordings are saved as individual files with the duration of the recording being used as the file name. System settings: Time setting = settings for date and time Software version TV format = TV output resolution Factory default = restore factory settings 15 English 6.3 Camera settings Camera brightness To change the camera brightness level, press the OK button which appears under the menu item “Camera brightness”. A selection bar with settings from 0 to 9 appears. Settings can be changed using the ◄► buttons, and be confirmed by pressing the OK button. Pairing = add door stations The connection between the door station and the monitor is set up under the menu item “Pairing”. To do so, press the OK button. The system will now search for the connection to the door station, with a round arrow appearing for 60 seconds. Press the pairing button on the door station during this time. When a connection is established, the monitor will switch to a live cast. 6.4 Recording settings Visiting Record = visitor is being recorded Press the OK button to switch between ON and OFF. If you switch it to OFF, the visitor will not be recorded on the SD card when the bell is pressed. SD Card Format = memory capacity on SD card This indicates the memory capacity which is available, and the free memory capacity, on the SD card. 16 English Use the ◄► buttons to activate the SD card circular buffer (ON) or to deactivate it (OFF). Confirm your selection by pressing the OK button. The circular buffer is activated by default. Important: When the memory capacity is reached, the monitor will continue to record, and will delete the oldest recordings on the SD card. The SD card capacity display flashes 0.0 in red. SD Card Overwrite = SD card circular buffer 6.5 Event list Event List Use the arrow buttons to navigate between folders. Press the OK button to select the required folder. Select the file with the required recording from the sub-folder and play it by pressing the OK button. Press the ▲ or ▼ buttons to fast forward or reverse at 2x / 4x / 8x / 16x normal speed. Please note that when a manual recording is made, the maximum duration of recording is 10 minutes. If this time is exceeded, a new file will be created. Deleting files Press the DEL button to enter delete mode. The current file or the current folder will flash on the display. Use the ◄► buttons to choose between all files or an individual file. Press the OK button to confirm your selection. Press to delete your selection. To cancel the deletion process, press . Important: Your recordings are always made with sound, and it is therefore important to observe the stipulation on page 2 in order to avoid putting yourself, or other persons, in an unlawful situation. To change the volume during playback, please use the “Vol-” to turn the volume down or “Vol+” to increase the volume. 17 English 6.6 System settings Time setting = settings for date and time Press the ► button to toggle between year/month/day/hour/minute. Use the ▲▼ buttons to adjust the values. Confirm your input by pressing the OK button. Software version This indicates the version of the software being used by the door station and the monitor. TV-format = TV output resolution Use the ◄► buttons to select the preferred TV format. You can choose between NTSC and PAL. Confirm your selection by pressing the OK button. Please note that the format selected can affect the resolution. Set to factory default = Restore default parameters Press the OK button to launch the factory settings. Confirm your selection by pressing , and cancel the process by pressing . Important: Please note that this procedure does not change the formatting of the SD card. 18 English 8. Maintenance and cleaning 8.1 Maintenance Examine the technical safety of the product regularly, e.g. check the housing for damage. If it seems that it may no longer be possible to operate the device safety, stop using the product and protect it from unintentional use. It is likely that safe operation is no longer possible in the event that: The device shows signs of visible damage. The device no longer works correctly Please note: You do not need to perform any maintenance on this product. There are no components to service or anything inside the product to check. Never open it. 8.2 Cleaning Clean the device with a clean, dry cloth. The cloth can be dampened with lukewarm water if the dirt on the monitor is hard to remove. Do not allow any liquids to enter the device. Do not use any chemical cleaning agent, as they could damage the surface of the housing (discoloration). 9. Disposal Important: The EU Directive 2002/96/EG regulates the proper return, treatment and recycling of used electronic devices. This symbol means that in the interest of environmental protection the device must be disposed of separately from household or industrial waste at the end of its service life in accordance with applicable local legal guidelines. Disposing of used devices can be done at official recycling centers in your country. Obey local regulations when disposing of material. Further details on returns (also for non-European countries) can be obtained at your local authority. Separate collection and recycling saves natural resources and ensures that all the provisions for protecting health and environment are observed when recycling the product. 19 English 10. Tips for troubleshooting No. Question Answer 1 What does pairing the door station and monitor mean and how does this work? 2 What could be the reasons why the monitor displays “NO SIGNAL” instead of a picture? Pairing creates the exclusive, encrypted wireless connection between the door station and monitor. To pair the door station and monitor, please proceed as follows: On the monitor in the menu item “Camera set up”, select the sub-item “Pairing”. The system now counts down 60 seconds. Press the pairing button on the door station during this time. If you do not have a signal, please check the following: 1. Is the door station connected to the power supply? 2. Are the door station and monitor paired with each other (see question 1)? 3. Is the door station within range of the monitor? This is a maximum of 30 m. 4. Is the signal between the door station and monitor disrupted? 3 What could be the reasons why the device does not record? If your device does not record, please check the following: 1. Have you inserted an SD card? 2. Is the SD card locked? (Lock/Unlock?) 3. Have you formatted the SD card? It must be formatted before it is first used. 4. The recording function for motion detection was switched off in the menu. Go into the menu “Record settings / Motion Detection” and select between “OFF, 5 Sec, 10 Sec, 15 Sec”. 4 Can the device record continuously? 5 Is it possible to integrate the door station into an existing doorbell system? Is it possible to combine other wireless cameras with the system? Can more than one monitor be used at the same time? Is continuous operation possible with batteries? Generally the device records for 60 seconds after the doorbell is pressed. If you would like a longer recording period, you must press the REC button manually. Yes, the door station can be connected to the doorbell wires. Circuit diagrams for wiring the doorbell can be downloaded at www.abus.com. No, this is not possible for technical reasons. 6 7 8 NNo, because a door station can only be paired directly with one monitor. Continuous battery operation is not possible/recommended because the batteries only last about 6 hours. They are intended solely as the backup power supply. 20 English 11. Technical data Model number Frequency Modulation Transmission power Sensitivity Wireless range DC voltage supply Power consumption Battery type Transmission channels Viewing angle Lens Resolution Number of IR LEDs Image sensor Range of night vision function Video signal Audio signal Outputs Storage medium IP protection class Rechargeable battery running time Dimensions Net weight Max. operating temperature Door station 3.5" LCD monitor 2.4 GHz GFSK 13dBm -75dBm 150 m* 15V DC / 1.5 A Max. 180mA 6 x AA 1.5 V lithium batteries 5V DC / 1 A Max. 650mA Li-Ion polymer battery, 3.7 V / 1,800 mA 1 -- 1 85° (H) / 65° (V) 1.8 mm 640 x 480 pixels (VGA) 9 x IR LED -1/4" CMOS -0.8 m --1.0 V p-p, 75 Ohm -1.0 V p-p, 600 Ohm Door opener: 12 V 3.5 mm jack (video) -SD card, max. 32 GB IP 55 -Max. 6 hours Max. 4 hours (WxHxD): 85 x 169 x 36 mm 0.205 kg -10 °C - 40 °C (WxHxD): 133 x 87 x 27 mm 0.2 kg -10 °C - 40 °C * The wireless transmission range depends on the environmental factors (e.g. mobile communication masts, high-tension pylons, electrical wires, ceilings and walls, etc.). If conditions are not favorable, the range will be limited. 21 TVAC80020B Instrukcja obsługi Wersja 10/2014 Traduction française du manuel utilisateur (original en allemand). À conserver pour utilisation ultérieure. Polski Wprowadzenie Szanowna Klientko, Szanowny Kliencie! Dziękujemy za zakup naszego produktu. To urządzenie spełnia wymogi obowiązujących dyrektyw UE. Deklarację zgodności można otrzymać pod adresem: ABUS Security-Center GmbH & Co. KG Linker Kreuthweg 5 86444 Affing GERMANY Aby zachować ten stan i zapewnić bezpieczną eksploatację, użytkownik musi przestrzegać niniejszej instrukcji obsługi! Przed uruchomieniem produktu przeczytaj całą instrukcję obsługi i przestrzegaj wszystkich zasad bezpieczeństwa! Wszystkie zawarte w niej nazwy firm i oznaczenia produktów są zarejestrowanymi znakami towarowymi odnośnych właścicieli. Wszystkie prawa zastrzeżone. W razie wątpliwości zwracaj się do instalatora lub sprzedawcy! Ostrzeżenie w rozumieniu § 201 Kodeksu Karnego (niemieckiego): Kto bez upoważnienia nagrywa teksty wypowiedziane niepublicznie przez inną osobę na nośniku audio, używa wykonanych w ten sposób nagrań lub udostępnia je osobom trzecim, podlega karze pozbawienia wolności lub grzywny! Sankcjom karnym podlega także ten, kto bez upoważnienia podsłuchuje za pomocą aparatu podsłuchowego nie przeznaczone do jego wiadomości teksty, wypowiedziane niepublicznie przez inną osobę lub udostępnia osobom trzecim taką nagraną lub upublicznia podsłuchaną odpowiedź, w pełnym brzmieniu lub istotną treść tej niepublicznej wypowiedzi. Wyłączenie odpowiedzialności cywilnej Niniejsza instrukcja obsługi została opracowana z najwyższą starannością. Jeżeli mimo to zauważysz w niej braki lub niedokładności, prosimy o ich zgłaszanie na adres podany na odwrocie niniejszego podręcznika. ABUS Security-Center GmbH nie odpowiada za błędy techniczne i typograficzne oraz zastrzega sobie prawo do wprowadzania w każdej chwili bez wcześniejszej zapowiedzi zmian w produkcie i w instrukcjach obsługi. ABUS Security-Center nie odpowiada za bezpośrednie i pośrednie szkody następcze, powstałe w związku z wyposażeniem, wydajnością i zastosowaniem produktu. Zawartość niniejszego dokumentu nie jest objęta gwarancją. 23 Polski Objaśnienie symboli Symbol błyskawicy w trójkącie jest stosowany w celu wskazania na zagrożenie dla zdrowia, np. porażeniem elektrycznym. Wykrzyknik w trójkącie oznacza w niniejszej instrukcji obsługi ważne wskazówki, które muszą być bezwzględnie przestrzegane. Tym symbolem oznaczane są specjalne rady i wskazówki dotyczące obsługi. Ważne zasady bezpieczeństwa Szkody spowodowane nieprzestrzeganiem niniejszej instrukcji obsługi powodują wygaśnięcie roszczeń gwarancyjnych. Nie odpowiadamy za szkody następcze! Nie odpowiadamy za szkody materialne lub osobowe, spowodowane nieprawidłową obsługą lub nieprzestrzeganiem zasad bezpieczeństwa. W takich przypadkach wygasają wszelkie roszczenia gwarancyjne! Urządzenie zostało wyprodukowane zgodnie z międzynarodowymi standardami bezpieczeństwa. Przeczytaj uważnie poniższe informacje dotyczące zasad bezpieczeństwa. Zasady bezpieczeństwa 1. Zasilanie elektryczne 100-240 VAC, napięcie przemienne, 50 – 60 Hz (zasilacz wtyczkowy do 5 V DC) Zasilaj urządzenie tylko ze źródła napięcia sieciowego zgodnego z podanym na tabliczce znamionowej. W razie wątpliwości co do parametrów lokalnego zasilania elektrycznego zwróć się do właściwego zakładu energetycznego. Przed przystąpieniem do konserwacji lub instalacji odłącz urządzenie od zasilania sieciowego. 2. Przeciążenie Unikaj przeciążania gniazd sieciowych, przedłużaczy i adapterów, ponieważ może to spowodować pożar lub porażenie elektryczne. 3. Ciecze Chroń urządzenie przed kontaktem z wszelkimi płynami. 4. Czyszczenie Czyść urządzenie tylko wilgotną ściereczką bez ostro działających środków czyszczących. Przed czyszczeniem odłącz urządzenie od sieci. 5. Akcesoria Podłączaj tylko dedykowane do tego celu urządzenia. W przeciwnym razie może dojść do sytuacji niebezpiecznych lub uszkodzeń urządzenia. 6. Miejsce ustawienia Urządzenie jest przewidziane do eksploatacji na zabezpieczonym terenie zewnętrznym oraz we wnętrzach. Upadek nawet z niewielkiej wysokości może spowodować uszkodzenie produktu. Zamontuj produkt tak, aby światło słoneczne nie mogło padać bezpośrednio na czujnik obrazowy urządzenia. Przestrzegaj wskazówek montażowych zawartych w odpowiednim rozdziale niniejszej instrukcji obsługi. Nie umieszczaj urządzenia w bezpośrednim sąsiedztwie ogrzewania, pieca i innych źródeł ciepła bądź w miejscu bezpośredniego oddziaływania promieni słonecznych. Używaj urządzenia tylko w miejscach, w których temperatura otoczenia mieści się w dozwolonym zakresie -10° - 50°C. 24 Polski 7. Transmission radio La portée de la transmission radio dépend de différents paramètres environnementaux. Les données du lieu de montage peuvent avoir une influence négative sur la portée. Il est ainsi possible d'atteindre une portée de jusqu'à 150 m, si rien n'interfère entre le récepteur et l'émetteur ; cette portée est donc nettement moins élevée à l'intérieur des bâtiments. Les facteurs environnementaux cités ci-après réduisent la portée et la fréquence d’images : antennes-relais, piliers de ligne haute-tension, lignes électriques, murs et plafonds, appareils ayant une fréquence radio identique ou voisine. Ostrzeżenia Przed pierwszym uruchomieniem należy spełnić wszystkie wymagania określone w zasadach bezpieczeństwa i instrukcji obsługi! 1. Przestrzegaj poniższych wskazówek, aby uniknąć uszkodzenia kabla sieciowego i wtyczki sieciowej. Nie zmieniaj ani nie manipuluj kablem sieciowym i wtyczką sieciową. Odłączając urządzenie od sieci, nie ciągnij za kabel sieciowy, lecz za wtyczkę. Dopilnuj, aby kabel sieciowy był maksymalnie oddalony od urządzeń grzejnych, aby zapobiec stopieniu powłoki kabla wykonanej z tworzywa sztucznego. Zasilacz sieciowy stacji drzwiowej musi być zabezpieczony przed wilgocią i wodą. 2. Przestrzegaj tych wskazówek. Ich nieprzestrzeganie może doprowadzić do porażenia elektrycznego. Nigdy nie otwieraj obudowy ani zasilacza. Nie wkładaj do wnętrza urządzenia przedmiotów metalowych lub łatwopalnych. Aby uniknąć uszkodzeń w wyniku przepięć (np. w czasie burzy), zastosuj zabezpieczenia przepięciowe. 3. Uszkodzone urządzenia odłącz niezwłocznie od sieci elektrycznej i poinformuj sprzedawcę. Instalując urządzenie w istniejącej instalacji monitoringu wideo upewnij się, czy wszystkie urządzenia są odłączone od obwodu sieciowego i obwodu niskiego napięcia. W razie wątpliwości nie wykonuj montażu, instalacji i okablowania samodzielnie, lecz zleć ich wykonanie specjaliście. Nieprawidłowe i niefachowo wykonywane prace na sieci elektrycznej i instalacjach wewnętrznych stwarzają niebezpieczeństwo dla użytkownika a także dla innych osób. Okabluj instalację tak, aby obwód sieciowy i obwód niskiego napięcia były ułożone osobno i nie stykały się w żadnym miejscu ani nie mogły zostać połączone w wyniku uszkodzenia. Unikaj wymienionych niżej niekorzystnych warunków otoczenia w czasie eksploatacji urządzenia. Wilgoć lub za wysoka wilgotność powietrza. Skrajne zimno lub gorąco. Bezpośrednie nasłonecznienie. Zapylenie, palne gazy, opary lub rozpuszczalniki. Silne wibracje. Silne pola magnetyczne, występujące np. w pobliżu maszyn lub głośników. Kamery stacji drzwiowej nie wolno ustawiać w kierunku słońca. Takie ustawienie może spowodować zniszczenie czujnika. Stacja drzwiowa nie może być instalowana na niestabilnych powierzchniach. Rozpakowanie Rozpakowując urządzenie, należy zachować szczególną ostrożność. W razie stwierdzenia uszkodzenia oryginalnego opakowania, sprawdź najpierw urządzenie. W razie stwierdzenia uszkodzeń urządzenia, odeślij je wraz z opakowaniem, informując jednocześnie przewoźnika. 25 Polski Spis treści 1. Użycie zgodne z przeznaczeniem ........................................................................................................... 27 2. Zakres dostawy ........................................................................................................................................ 27 3. Cechy i funkcje ......................................................................................................................................... 27 4. Wskazówki i często zadawane ................................................................................................................ 27 5. Opis urządzenia ........................................................................................................................................ 28 6. 7. 8. 9. 5.1 Opis przodu monitora ......................................................................................................................... 28 5.2 Opis tyłu monitora .............................................................................................................................. 29 5.3 Opis złączy monitora .......................................................................................................................... 29 5.4 Opis stacji drzwiowej .......................................................................................................................... 30 5.5 Opis złączy kablowych ....................................................................................................................... 31 Instalacja ................................................................................................................................................... 32 6.1 Instalacja stacji drzwiowej .................................................................................................................. 32 6.2 Montaż stacji drzwiowej ..................................................................................................................... 33 6.3 Instalacja monitora ............................................................................................................................. 34 Obsługa ..................................................................................................................................................... 35 7.1 Widok na żywo ................................................................................................................................... 35 7.2 Menu główne ...................................................................................................................................... 36 7.3 Ustawienia kamery ............................................................................................................................. 37 7.4 Ustawienia zapisu .............................................................................................................................. 37 7.5 Lista zdarzeń ...................................................................................................................................... 38 7.6 Ustawienia systemowe ....................................................................................................................... 39 Konserwacja i czyszczenie ..................................................................................................................... 40 8.1 Konserwacja ....................................................................................................................................... 40 8.2 Czyszczenie ....................................................................................................................................... 40 Utylizacja ................................................................................................................................................... 40 10. Wskazówki dotyczące usuwania błędów ............................................................................................... 41 11. Dane techniczne ....................................................................................................................................... 42 26 Polski 1. Użycie zgodne z przeznaczeniem Cyfrowy wideofon radiowy wyposażony w obudowę zewnętrzną odporną na działanie warunków atmosferycznych, monitor LCD 3,5'', zestaw głośnomówiący oraz urządzenie sieciowe. Urządzenie można dodatkowo zainstalować obok dzwonka i połączyć z automatem do otwierania drzwi. Mały 3,5 calowy kolorowy monitor LCD jest urządzeniem przenośnym. Nie trzeba więc za każdym razem podchodzić do domofonu. Dzięki zintegrowanemu mikrofonowi można rozmawiać wygodnie z osobą znajdującą się na zewnątrz, a za pomocą monitora obsługiwać automat do otwierania drzwi. Zastosowana technika transferu cyfrowego zapewnia bezzakłóceniowy odbiór. Po naciśnięciu dzwonka drzwiowego obrazy rejestrowane są na karcie SD (nieobjętej zakresem dostawy). Szczegółowy opis działania znajduje się w rozdziale „3. Cechy i funkcje“. 2. Zakres dostawy Cyfrowa stacja drzwiowa w obudowie odpornej na działanie warunków atmosferycznych Monitor LCD 3,5" Akcesoria Zasilacze 3. Cechy i funkcje Domofon ze zintegrowaną kamerą i przenośnym monitorem LCD 3,5'' dzięki wbudowanemu akumulatorowi Kable dzwonka - gongu można połączyć ze stacją drzwiową Szyfrowana transmisja sygnału pomiędzy stacją drzwiową a monitorem Drzwi można otworzyć za pomocą przycisku znajdującego się na monitorze Po naciśnięciu przycisku dzwonka drzwiowego na znajdującej się w monitorze karcie SD są zapisywane obrazy, które można następnie przeglądać na komputerze Mikrofon zintegrowany z monitorem umożliwia emisję głosu na zewnątrz. Stacja drzwiowa do zastosowania na zewnątrz z zabezpieczeniem (klasa ochrony IP55) Stacja drzwiowa z bateriami do zasilania awaryjnego Kamera dzienna/nocna z wbudowanymi diodami IR LED 4. Wskazówki i często zadawane Ważne wskazówki i często zadawane pytania dotyczące tego produktu, jak również innych produktów znaleźć można na stronie internetowej www.abus.com/plug-and-play. Informacje dotyczące usuwania błędów znajdują się w punkcie 10 niniejszej instrukcji. 27 Polski 5. Opis urządzenia 5.1 Opis przodu monitora Wskaźnik bieżącego stanu naładowania Wskazanie akumulatora Słaby akumulator Proces ładowania Akumulator w pełni naładowany Czerwony: Zielony: Wył.: Wskaźnik stanu urządzenia Urządzenie włączone Urządzenie wyłączone Urządzenie rejestruje Nowy zapis w pamięci Bezpośrednie kliknięcie w celu wyświetlenia listy zdarzeń Przełączanie pomiędzy opcjami menu Niebieski: Wył.: Miga 3 razy/sek.: Miga raz/sek.: PWR / REC II ▲ Widok na żywo: W menu: ◄ Vol- Widok na żywo: W menu: Zmniejszanie głośności Przełączanie pomiędzy opcjami menu ► Vol+ Widok na żywo: W menu: Zwiększanie głośności Przełączanie pomiędzy opcjami menu StandBy: Widok na żywo: W menu: Włączanie monitora Wyłączanie monitora Przełączanie pomiędzy opcjami menu Widok na żywo: W menu: Funkcja mówienia Potwierdzanie ustawień i zmian Widok na żywo: W menu: Uruchamianie/zatrzymywanie zapisu Kasowanie zapisu możliwe tylko z kartą SD! Widok na żywo: W menu: Automat do otwierania drzwi Wyjście z podmenu Opuszczenie menu następuje automatycznie po minucie. Touche OK / LED / ESC 28 Polski 5.2 Opis tyłu monitora Antena Podstawka 5.3 Opis złączy monitora Zasilanie napięciowe Wyjście AV Gniazdo karty SD Przycisk zasilania i przycisk menu 5 VDC / 1A (DC, 14,5 x 4,8 mm) Wyjście umożliwiające prezentację informacji wyświetlanych na ekranie na innym urządzeniu za pomocą kabla Cinch (nieobjętego zakresem dostawy). Gniazdo umożliwiające użycie karty SD do 32 GB Włączanie i wyłączanie monitora Widok na żywo: Wywoływanie/opuszczanie menu 29 Polski 5.4 Opis stacji drzwiowej 11 Antena Dioda LED podczerwieni Czujnik światła Głośnik Mikrofon Soczewka Obudowa mocująca Przycisk dzwonka Przycisk Pairing Przycisk resetowania 11 Listwa zaciskowa Naciśnięcie przycisku dzwonka powoduje aktywację monitora. Aby połączyć stację drzwiową z monitorem, należy nacisnąć przycisk Paring Dalsze informacje dostępne są w rozdziale 5.3. Przycisk resetowania umożliwiający ponowne uruchomienie stacji drzwiowej Złącze dzwonka DCZasilanie elektryczne DC+ UNLOCKZłącze automatu do otwierania drzwi UNLOCK+ 30 Polski 5.5 Opis złączy kablowych Końcówka kablowa z kablem przyłączeniowym do automatu do otwierania drzwi Zaciski końcówek kablowych Końcówka kablowa bez izolacji Do podłączenia do automatu do otwierania drzwi Do podłączenia do listwy zaciskowej w stacji drzwiowej Gniazdko okrągłe z kablem przyłączeniowym do zasilacza Gniazdko okrągłe Końcówka kablowa bez izolacji Czerwona Końcówka kablowa bez izolacji, czarna Jest łączone z kablem przyłączeniowym zasilacza Do podłączenia do listy zaciskowej w stacji drzwiowej („DC+“) Do podłączenia do listy zaciskowej w stacji drzwiowej („DC-“) Zasilacz do monitora Złącze prądowe Do podłączenia do monitora Zasilacz wtyczkowy Wtyczka okrągła Zasilacz do stacji drzwiowej Zasilacz wtyczkowy Wtyczka okrągła Złącze prądowe Do podłączenia do gniazdka okrągłego 31 Polski 6. Instalacja 6.1 Instalacja stacji drzwiowej Aby zainstalować stację drzwiową, postępuj w następujący sposób: I. Przygotowanie 1. Otwórz tylną ściankę stacji drzwiowej i włóż 6 baterii AA, pamiętając przy tym o prawidłowym położeniu biegunów. Diody LED zaświecą się na zielono i będą świeciły się przez 5 sekund. Teraz możesz już korzystać ze stacji drzwiowej. 2. 3. Uwaga: Słabe baterie mogą spowodować nieprawidłowe funkcjonowanie urządzenia. Należy je więc wymienić. Uwaga: W przypadku pracy w trybie bateryjnym, aby móc uruchomić stację drzwiową, naciśnij najpierw przycisk dzwonienia. II. Podłączanie stacji drzwiowej 32 Polski 1. 2. 3. 4. 5. 6. 7. Otwórz tylną ściankę stacji drzwiowej. Zamocuj czerwonych kabel gniazdka okrągłego w listwie zaciskowej przy punkcie „DC+“. Czarny kabel przyłączeniowy gniazdka okrągłego należy zamocować przy punkcie zaciskowym „DC-“. Oba kable przyłączeniowe końcówki kablowej muszą być przymocowane przy „UNLOCK". Natomiast zaciski są przeznaczone do podłączenia automatu do otwierania drzwi za pomocą dwóch kabli. Teraz do gniazdka okrągłego można podłączyć wtyczkę okrągłą z zasilaczem. Do zasilacza należy doprowadzić prąd. W powyższych punktach zaciskowych można podłączyć gong drzwiowy. Uwaga: Zestyk przekaźnika jest zestykiem bezpotencjałowym i dlatego dzwonka nie można podłączyć bez odrębnego zasilania. Uwaga: Istnieje możliwość podłączenia automatu do otwierania drzwi bezpośrednio do stacji drzwiowej lub włączenia posiadanego transformatora mechanizmu otwierania drzwi za pomocą przekaźnika. Uwaga: Można użyć jedynie automatu do otwierania drzwi zasilanego prądem stałym. Zastosowanie automatu zasilanego prądem naprzemiennym jest wykluczone. Więcej informacji: www.abus.com TVAC80020 6.2 Montaż stacji drzwiowej 1. Za pomocą wspornika drzwiowego wybierz odpowiednie miejsce instalacji. Zaznacz miejsca do wywiercenia otworów na podłożu i nawierć je. Włóż najpierw dostarczone w komplecie kołki rozporowe i zamocuj uchwyt śrubami. Uwaga: Przed przystąpieniem do instalacji upewnij się, czy zasięg transmisji radiowej w miejscu przeznaczonym do instalacji jest zapewniony. Uwaga: Zanim zamkniesz urządzenie, połącz stację drzwiową z monitorem. 2. 3. Zamknij obudowę stacji drzwiowej czterema dołączonymi śrubami. Wstaw stację drzwiową w obudowę i zamocuj ją za pomocą dołączonych śrub antykradzieżowych. Pasujący śrubokręt jest dołączony do pakietu. 33 Polski 6.3 Instalacja monitora 1. 2. 3. Połącz zasilacz z monitorem. Włącz urządzenie. W tym celu naciśnij przycisk zasilania. Teraz monitor można połączyć ze stacją drzwiową. Aby tego dokonać, postępuj w następujący sposób: Wybierz na monitorze w ramach opcji menu „Camera Setup“, podopcję „Pairing“, a następnie naciśnij przycisk Pairing znajdujący się przy stacji drzwiowej. Uwaga: Przed pierwszym użyciem monitor należy ładować BEZ zewnętrznego źródła zasilania przez co najmniej 8 godzin. Trwałość akumulatora wynosi ok. 3,5 godziny. Uwaga: Wbudowany akumulator pozwala na elastyczne zastosowanie monitora LCD. Jeśli świeci się czerwona dioda LED, akumulator należy załadować. Zawsze należy pamiętać o dostatecznym naładowaniu akumulatora. Pozwoli to uniknąć luk w zapisie. Aby wskazania wyświetlane na monitorze zaprezentować na innym monitorze ekranowym, postępuj w następujący sposób: 1. 2. Połącz wtyczkę typu jack z AV OUT monitora. Podłącz wtyczki Chinch zgodnie z rysunkiem na monitorze. 34 Polski 7. Obsługa Aby włączyć/wyłączyć monitor, wciśnij przycisk zasilania i przytrzymaj go wciśniętym przez co najmniej 2 sekundy. Każdorazowo po uruchomieniu na monitorze pojawia się widok na żywo, a następnie ostatnio ustawiony widok. Wyświetlenie symbolu zwykłym trybie. oznacza prawidłowe rozpoznanie karty SD przez monitor. Monitor pracuje w 7.1 Widok na żywo Wskazanie sygnału Wskazanie „Trwa zapis gości“ Wskazanie akumulatora Stacja drzwiowa Żółty: Naładowany akumulator Czerwony: Słaby akumulator Wskazanie zapisu: miganie podczas zapisu Niewłożona karta SD Full SD Pełna karta SD Err SD Nierozpoznana karta SD Zablokowana karta SD Po wyczerpaniu pojemności karta SD zostaje nadpisana Wskazanie karty SD Pojemność kart SD NO SIGNAL Brak połączenia pomiędzy stacją drzwiową a monitorem Funkcja mówienia 01:12:45 Czas zapisu 2011 05 01 14:30:11 Wskazanie daty/godziny 35 Polski 7.2 Menu główne Naciśnij przycisk MENU, aby wyświetlić menu główne. Za pomocą przycisków strzałki można przełączać pomiędzy opcjami menu. Uwaga: Pamiętaj: Symbole znikają automatycznie po dziesięciu sekundach. Istnieje możliwość wyboru następujących opcji: Ustawienia kamery: Camera Brightness = jasność obrazu kamery Pairing = dodawanie stacji drzwiowej Ustawienia zapisu: Visiting Record = rejestracja gości SD Card Format = miejsce w pamięci karty SD SD Card Overwrite = pamięć cykliczna karty SD Lista zdarzeń: Zapisane obrazy są zapamiętywane w podkatalogach o nazwach nadawanych zgodnie z datą zapisu. Zapisane obrazy są zapamiętywane w postaci pojedynczego pliku z datą zapisu, która występuje jako nazwa pliku. Ustawienia systemowe: Time setting = ustawienia daty/godziny Software Version = wersja oprogramowania TV-Format = rozdzielczość w formacie TV Factory Default = przywracanie ustawień fabrycznych 36 Polski 7.3 7.4 Ustawienia kamery Camera Brightness = jasność obrazu kamery Aby zmienić jasność obrazu kamery, naciśnij w ramach opcji menu „Camera Brightness“ przycisk OK. Wyświetlany jest pasek wyboru 0-9. Ustawienia można zmienić za pomocą przycisków ◄► i potwierdzić przyciskiem OK. Pairing = dodawanie stacji drzwiowej Połączenie pomiędzy stacją drzwiową a monitorem jest tworzone za pomocą opcji menu „Pairing“. Po jej wybraniu należy nacisnąć przycisk OK. System będzie szukał połączenia ze stacją drzwiową i po 60 sekundach wyświetli okrągłą strzałkę. W tym czasie naciśnij przycisk PAIRING znajdujący się na stacji drzwiowej. Po nawiązaniu połączenia na monitorze wyświetlony zostanie widok na żywo. Ustawienia zapisu Visiting Record = rejestracja gości Naciśnij przycisk OK, aby przełączać pomiędzy ON (wł.) a OFF (wył.). W przypadku wyboru opcji OFF gość po naciśnięciu przycisku dzwonka nie zostanie zarejestrowany na karcie SD. SD Card Format = miejsce w pamięci na karcie SD Wskazuje dostępne i wolne miejsce w pamięci karty SD. 37 Polski SD Card Overwrite = pamięć cykliczna karty SD 7.5 Aby aktywować (ON) lub dezaktywować (OFF) pamięć cykliczną pamięci SD, należy użyć przycisków ◄►. Dokonany wybór należy potwierdzić przyciskiem OK. Standardowo pamięć cykliczna jest aktywna. Uwaga: W przypadku wyczerpania pojemności pamięci monitor nadal rejestruje obrazy, usuwając jednocześnie z karty SD najstarsze zapisy. Wskazanie pojemności karty SD "0.0 G" miga w kolorze czerwonym. Lista zdarzeń Event List = lista zdarzeń Aby nawigować pomiędzy folderami używaj przycisków strzałek. Aby wybrać określony folder, naciśnij przycisk OK. Wybierz w podfolderze plik z zapisanym obrazem, a następnie odtwórz go, naciskając przycisk OK. Naciśnij przycisk ▲ lub ▼, aby przewijać kroki 2x / 4x / 8x / 16x. Pamiętaj o tym, że maksymalny czas ręcznego zapisu wynosi 10 minut. Po przekroczeniu tego czasu tworzony jest nowy plik. Naciśnij przycisk DEL, aby przejść do trybu usuwania. Na ekranie zacznie migać bieżący plik lub bieżący folder. Za pomocą przycisków ◄► można wybrać wszystkie pliki lub tylko jeden plik. Naciśnij przycisk OK, aby potwierdzić wybór. Kasowanie plików Aby usunąć wybór, wybierz . Aby przerwać operację usuwania, wybierz . Uwaga: Obrazy zapisywane są w wersji dźwiękowej. Dlatego więc, aby nie stanąć w sprzeczności z prawem lub nie postawić w takiej sytuacji inne osoby, należy pamiętać o klauzuli opisanej na stronie 22. Aby zmienić głośność podczas odtwarzania, użyj przycisków „Vol -“ (zmniejszenie) lub „Vol +“ (zwiększenie). 38 Polski 7.6 Ustawienia systemowe Time setting = ustawienia daty/godziny Naciśnij przycisk ►, aby przełączać pomiędzy rokiem/miesiące,/dniem,/godzinami/minutami. Użyj przycisków ▲▼, aby zmodyfikować wartości. Potwierdź wprowadzone dane przyciskiem OK. Software Version = wersja oprogramowania Wskazanie wersji oprogramowania stacji drzwiowej i monitora. TV Format = rozdzielczość w formacie TV Wybierz za pomocą przycisków ◄► określony format TV. Można wybrać format NTSC lub PAL. Potwierdź dokonany wybór przyciskiem OK. Pamiętaj o tym, że wybrany format może mieć wpływ na rozdzielczość. Set to factory Default = Przywracanie ustawień warsztatowych Naciśnij przycisk OK, aby uruchomić ustawienia warsztatowe. Potwierdź wybór za pomocą . Aby przerwać operację, wybierz . Uwaga: Pamiętaj, że podczas tej operacji formatowanie karty SD nie ma miejsca 39 Polski 8. Konserwacja i czyszczenie 8.1 Konserwacja Sprawdzaj regularnie bezpieczeństwo techniczne produktu, np. czy obudowa nie jest uszkodzona. Jeżeli są powody do przypuszczenia, że bezpieczna eksploatacja jest niemożliwa, należy wycofać produkt z eksploatacji i zabezpieczyć przed przypadkowym uruchomieniem. Należy przyjąć, że bezpieczna eksploatacja nie jest możliwa, jeżeli: urządzenie ma widoczne uszkodzenia, urządzenie nie działa. Pamiętaj: Produkt nie wymaga konserwacji. Nie posiada on części, które powinno się sprawdzać lub konserwować, dlatego nie należy go nigdy otwierać. 8.2 Czyszczenie Czyść produkt czystą, suchą ściereczką. W razie większych zabrudzeń ściereczkę można zwilżyć letnią wodą. Uważaj, aby do wnętrza urządzenia nie dostała się jakakolwiek ciecz. Nie używaj chemicznych środków czyszczących, ponieważ mogą one uszkodzić powierzchnię obudowy (spowodować odbarwienia). 9. Utylizacja Uwaga: Dyrektywa UE 2002/96/WE reguluje kwestię prawidłowego wycofania z użycia i utylizacji urządzeń elektronicznych oraz obchodzenia się z nimi. Ten symbol oznacza, że w związku ochroną środowiska urządzenie należy zutylizować po okresie jego żywotności zgodnie z obowiązującymi przepisami prawnymi, w separacji od odpadów z gospodarstw domowych oraz odpadów przemysłowych. Utylizacja może być przeprowadzona przez autoryzowane punkty zbiorcze w kraju użytkownika. Przestrzegaj lokalnych przepisów w zakresie utylizacji materiałów. Dalsze informacje dotyczące wycofania z użytku (obejmujące również kraje spoza UE) można uzyskać od organów administracji lokalnej. Selektywna zbiórka i recykling umożliwiają oszczędność zasobów naturalnych, a sam recykling, o ile jest realizowany zgodnie z przepisami, zapewnia ochronę zdrowia i środowiska. 40 Polski 10. Wskazówki dotyczące usuwania błędów Nr Pytania Odpowiedź 1 Co oznacza sparowanie stacji drzwiowej z monitorem i jak to działa? 2 Co może być przyczyną tego, że na monitorze nie pojawia się żaden obraz, a jedynie komunikat "NO SIGNAL"? W wyniku sparowania tworzone jest wyłączne, zaszyfrowane połączenie radiowe pomiędzy stacją drzwiową i monitorem. Aby sparować stację drzwiową i monitor, należy postępować w następujący sposób: Wybierz na monitorze w opcji menu „Camera Setup“ podopcję „Pairing“ . System zacznie odliczać teraz od 60 sekund do 0 sekundy. W tym czasie naciśnij przycisk Pairing znajdujący się na stacji drzwiowej. W przypadku braku sygnału należy sprawdzić co następuje: 1. Czy stacja drzwiowa jest podłączona do sieci elektrycznej? 2. Czy stacja drzwiowa i monitor są ze sobą sparowane (zob. pytanie 1)? 3. Czy stacja drzwiowa znajduje się w zasięgu radiowym monitora? Wynosi on maksymalnie 30 m. 4. Czy sygnał pomiędzy stacją drzwiową i monitorem jest zakłócony? 3 Co może być przyczyną niezapisywania danych przez urządzenie? Jeśli urządzenie nie dokonuje zapisu, należy sprawdzić poniższe punkty: 1. Czy włożono kartę SD? 2. Czy karta SD jest odblokowana? (Lock/Unlock?) 3. Czy sformatowano kartę SD? Kartę należy sformatować przed użyciem po raz pierwszy. 4. Czy funkcja zapisu przy wykrywaniu ruchu (Motion Detection) została w menu wyłączona. Należy przejść do menu "Record settings / Motion Detection" i wybrać jedną z opcji OFF 5 Sec, 10 Sec, 15 Sec. 4 Czy możliwa jest rejestracja obrazu w trybie ciągłym? 5 Czy możliwe jest zintegrowanie stacji drzwiowej z istniejącą instalacją dzwonka? Czy możliwe jest łączenie z urządzeniem innych kamer radiowych? Czy równocześnie można używać kilku monitorów? Czy możliwa jest praca stała na bateriach? Generalnie urządzenie rejestruje pierwsze 60 sekund po naciśnięciu przycisku dzwonka. Aby urządzenie rejestrowało obraz przez dłuższy czas, należy ręcznie nacisnąć przycisk REC. Tak. Można podłączyć stację drzwiową do istniejących przewodów dzwonka. Schemat połączeń dla okablowania dzwonka można pobrać ze strony www.abus.com. Nie. Jest to niemożliwe z przyczyn technicznych. 6 7 8 Nie. Jedną stację drzwiową można sparować bezpośrednio tylko z jednym monitorem. Ciągła praca na zasilamiu bateryjnym nie jest możliwy ani wskazany, gdyż baterie wytrzymują ok. 6 godzin ciągłej pracy. Są one przewidziane wyłącznie jako zasilanie awaryjne. 41 Polski 11. Dane techniczne Numer typu Częstotliwość Modulacja Moc nadawcza Czułość Zasięg radiowy Zasilanie napięciowe DC Pobór prądu Typ akumulatora Kanały transmisji Kąt widzenia Obiektyw Rozdzielczość Liczba diod IR LED Czujnik obrazowy Zasięg w funkcji noktowizora Sygnał wideo Sygnał audio Wyjścia Nośnik pamięci Stopień ochrony IP Trwałość akumulatora Wymiary Waga netto Maks. temperatura pracy Stacja drzwiowa Monitor LCD 3,5" 2,4 GHz GFSK 13dBm -75dBm 150 m* 15V DC / 1,5 A Maks. 180 mA Bateria litowa 6 AA 1,5 V 5V DC / 1 A Maks. 650 mA Akumulator litowo-jonowy polimerowy 3,7 V / 1800 mA 1 -- 1 85° (H) / 65° (V) 1.8 mm 640 x 480 pikseli (VGA) 9 diod IR LED -1/4"CMOS -0,8 m --1.0 V p-p, 75 Ohm -1.0 V p-p, 600 Ohm Automat do otwierania drzwi: Gniazdko 3,5 mm (wideo) 12 V -Karta SD, maks. 32 GB IP 55 -Maks. 6 godzin Maks. 4 godziny (szer. x wys. x gł.): 85 x 169 x (szer. x wys. x gł.): 133 x 87 x 36 mm 27 mm 0,205 kg 0,2 kg -10°C - 40°C -10°C - 40°C * Zasięg zależy od warunków środowiskowych (np. sąsiedztwo anten telefonii komórkowej, słupów sieci elektroenergetycznej, przewodów elektrycznych, stropów i ścian, itd.). W niekorzystnych warunkach faktyczny zasięg może być mniejszy. 42 TVAC80020B Betjeningsvejledning Versie 10/2014 Original betjeningsvejledning på tysk. Opbevares til fremtidig anvendelse! Dansk Indledning Kære kunde. Tak, fordi du har valgt at købe dette produkt. Dette apparat opfylder kravene i gældende EU-direktiver. Overensstemmelseserklæringen kan rekvireres hos: ABUS Security-Center GmbH & Co. KG Linker Kreuthweg 5 86444 Affing GERMANY Som bruger er du forpligtet til at følge denne betjeningsvejledning for at bevare denne tilstand og sikre en farefri brug! Læs hele betjeningsvejledningen igennem før idrifttagning af produktet og overhold alle betjenings- og sikkerhedshenvisninger! Alle nævnte firmanavne og produktbetegnelser er de pågældende ejeres varemærker. Alle rettigheder forbeholdt. I tilfælde af spørgsmål bedes du henvende dig til din installatør eller forhandler! Advarselshenvisning iht. § 201 StGB: Den, der uden tilladelse optager en anden persons ikke-offentligt udtalte udtalelse på et lydmedium eller anvender en optagelse, der er fremstillet på denne måde, eller lader tredjeperson få adgang til den, kan straffes med frihedsstraf eller bøde! Den, der uden tilladelse aflytter en anden persons ikke-offentligt udtalte udtalelse, der ikke er tiltænkt vedkommende, med et lytteapparat eller offentligt gengiver en anden persons optagede eller aflyttede ikkeoffentligt udtalte udtalelse ordret eller det væsentlige indhold, kan også straffes. Ansvarsfritagelse Denne betjeningsvejledning er udarbejdet meget omhyggeligt. Hvis du alligevel finder udeladelser eller unøjagtigheder, bedes du meddele os dette på adressen, der er anført på bagsiden af håndbogen. ABUS Security-Center GmbH påtager sig intet ansvar for tekniske og typografiske fejl og forbeholder sig retten til på ethvert tidspunkt uden forudgående varsel at ændre produktet og betjeningsvejledningerne. ABUS Security-Center er ikke ansvarlig for direkte og indirekte følgeskader, der opstår i forbindelse med dette produkts udstyr, funktion og anvendelse. Der gælder ingen garanti for indholdet i dette dokument. 44 Dansk Symbolforklaring Symbolet med lynet i trekanten anvendes, når der er fare for helbredet, f.eks. på grund af elektrisk stød. Et udråbstegn, der befinder sig i trekanten, gør opmærksom på vigtige henvisninger i betjeningsvejledningen, som ubetinget skal overholdes. Dette symbol vises, når du skal have særlige tips og henvisninger vedr. betjeningen. Vigtige sikkerhedshenvisninger Ved skader, der skyldes manglende overholdelse af denne betjeningsvejledning, bortfalder garantien. Vi påtager os intet ansvar for følgeskader! Vi påtager os intet ansvar i forbindelse med materielle skader og/eller personskader, der skyldes ukorrekt håndtering eller manglende overholdelse af sikkerhedshenvisningerne. I sådanne tilfælde bortfalder enhver form for garanti! Dette apparat blev produceret under overholdelse af internationale sikkerhedsstandarder. Læs de efterfølgende sikkerhedshenvisninger omhyggeligt igennem. Sikkerhedshenvisninger 1. Strømforsyning 100-240 V AC vekselspænding, 50 – 60 Hz (via strømforsyning til 5 V DC) Tilslut kun dette apparat til en strømkilde, der leverer den netspænding, der er anført på typeskiltet. Hvis du ikke er sikker på, hvilken netspænding, der findes hos dig, skal du kontakte el-forsyningsselskabet. Afbryd apparatet fra netstrømforsyningen, før der udføres vedligeholdelses- eller installationsarbejder. 2. Overbelastning Undgå at overbelaste stikdåser, forlængerledninger og adaptere, da dette kan medføre brand eller elektrisk stød. 3. Væsker Beskyt apparatet mod enhver form for væskeindtrængen. 4. Rengøring Rengør kun apparatet med en fugtig klud uden skarpe rengøringsmidler. Apparatet skal i den forbindelse afbrydes fra nettet. 5. Tilbehør Tilslut kun apparater, der udtrykkeligt er beregnet hertil. I modsat fald kan der forekomme faresituationer eller skader på apparatet. 6. Placering Dette apparat er beregnet både til beskyttet udendørs brug og til indendørs brug (beskyttelsesklasse IP66). Produktet kan også blive beskadiget, hvis det falder ned fra lav højde. Montér produktet, så apparatets billedoptager ikke udsættes for direkte sollys. Vær opmærksom på monteringshenvisningerne i det pågældende kapitel i denne betjeningsvejledning. Undlad at placere apparatet i nærheden af radiatorer, komfurer, andre varmekilder eller i direkte sollys. Apparatet må kun anvendes på steder med en omgivelsestemperatur inden for det tilladte område på -10 - 50 °C. 45 Dansk 7. Draadloze transmissie Het bereik van de draadloze transmissie is afhankelijk van verschillende omgevingsfactoren. De lokale omstandigheden op de montageplaats kunnen een negatief effect hebben op het bereik. Daarom kan bij vrij zicht tussen de ontvanger en zender een afstand van maximaal 150m overbrugd worden, in gebouwen echter aanzienlijk korter. De volgende omgevingsfactoren beperken zowel het bereik als de beeldfrequentie: antennes voor mobiele telefonie, hoogspanningsmasten, elektrische leidingen, plafonds en wanden, apparaten met dezelfde of nabijgelegen radiofrequentie. Advarsler Forud for første idrifttagning skal alle sikkerheds- og betjeningshenvisninger læses! 1. Overhold følgende henvisninger for at undgå skader på netkabler og netstik: Netkabler og netstik må ikke ændres eller manipuleres. Træk ikke i netkablet, når apparatet afbrydes fra nettet, men tag fat i stikket. Sørg for, at netkablet er så langt som muligt fra varmeapparater for at forhindre, at kunststofbeklædningen smelter. Dørstationens strømforsyning skal beskyttes mod fugt og væde. 2. Følg disse anvisninger. Hvis de ikke overholdes, kan det medføre elektrisk stød: Undlad at åbne huset og strømforsyningsenheden. Stik ikke metalliske eller brandfarlige genstande ind i apparatets indre. Anvend en overspændingsbeskyttelse for at undgå beskadigelser på grund af overspænding (f.eks. tordenvejr). 3. Afbryd defekte apparater fra strømnettet med det samme og informér faghandleren. Sørg ved installation i et eksisterende videoovervågningsanlæg for, at alle apparater er afbrudt fra net- og lavspændingsstrømkredsen. Foretag ikke selv montering, installation og kabelføring, hvis du er i tvivl, men overlad det til en fagmand. Ukorrekte og uprofessionelle arbejder på strømnettet eller på husets installationer er ikke kun en fare for dig selv, men også for andre personer. Træk installationernes kabler, så net- og lavspændingskredse altid forløber adskilt og ikke er forbundet med hinanden på noget sted eller kan forbindes på grund af en defekt. Undgå følgende ugunstige omgivelsesbetingelser ved drift: Væde eller for høj luftfugtighed Ekstrem kulde eller varme Direkte sollys Støv eller brændbare gasser, dampe eller opløsningsmidler Kraftige vibrationer Kraftige magnetfelter f.eks. i nærheden af maskiner eller højttalere Dørstationen må ikke rettes mod solen. Det kan medføre ødelæggelse af sensoren. Dørstationen må ikke installeres på ustabile overflader. Udpakning Håndtér apparatet meget forsigtigt, når du pakker det ud. Kontrollér apparatet, hvis den originale emballage er beskadiget. Hvis apparatet er beskadiget, skal du sende det tilbage sammen med emballagen og informere leveringsfirmaet. 46 Dansk Indholdsfortegnelse 1. Korrekt anvendelse .................................................................................................................................. 48 2. Leveringsomfang ..................................................................................................................................... 48 3. Særlige kendetegn og funktioner ........................................................................................................... 48 4. Henvisninger og FAQs ............................................................................................................................ 48 5. Apparatbeskrivelse .................................................................................................................................. 49 6. 7. 8. 9. 5.1 Beskrivelse af monitorens forside ...................................................................................................... 49 5.2 Beskrivelse af monitorens bagside .................................................................................................... 50 5.3 Beskrivelse af monitorens tilslutninger ............................................................................................... 50 5.4 Beskrivelse af dørstationen ................................................................................................................ 51 5.5 Beskrivelse af kabeltilslutningerne ..................................................................................................... 52 Installation ................................................................................................................................................ 53 6.1 Installation af dørstationen ................................................................................................................. 53 6.2 Montering af dørstationen .................................................................................................................. 54 6.3 Monitorinstallation .............................................................................................................................. 55 Betjening ................................................................................................................................................... 56 7.1 Live- visning ....................................................................................................................................... 56 7.2 Hovedmenu ........................................................................................................................................ 57 7.3 Kameraindstillinger ............................................................................................................................. 58 7.4 Optagelsesindstillinger ....................................................................................................................... 58 7.5 Hændelsesliste ................................................................................................................................... 59 7.6 Systemopsætning .............................................................................................................................. 60 Vedligeholdelse og rengøring................................................................................................................. 61 8.1 Vedligeholdelse .................................................................................................................................. 61 8.2 Rengøring........................................................................................................................................... 61 Bortskaffelse ............................................................................................................................................ 61 10. Tips vedrørende fejlafhjælpning ............................................................................................................ 62 11. Tekniske data ........................................................................................................................................... 63 47 Dansk 1. Korrekt anvendelse Digitalt trådløst video-dørsamtaleanlæg, der består af vejrbestandigt udendørshus og en 3,5" LCDmonitor, hver med frihåndsanordning og strømforsyning. Du kan også montere anlægget ved sin af dørklokken og forbinde den med din døråbner. Den lille 3,5 tommers LCD-farvemonitor er bærbar, så du ikke skal gå hen til samtaleanlægget. Med den integrerede mikrofon kan du nemt tale med den besøgende udenfor og betjene døråbneren fra monitoren. Den digitale overførselsteknik sørger for fejlfri modtagelse. Når der er trykket på dørklokken, optages der billeder på et SD-kort (ikke indeholdt i leveringsomfanget). Der findes en udførlig funktionsbeskrivelse i kapitel "3. Særlige kendetegn og funktioner". 2. Leveringsomfang 3,5" LCD-monitor Digital dørstation i vejrbestandigt hus Strømforsyninger Tilbehør 3. Særlige kendetegn og funktioner Dørsamtaleanlæg med integreret kamera og bærbar 3,5‘‘ LCD-farvemonitor takket være indbygget batteri Eksisterende dørklokkeledningsføring kan forbindes praktisk med dørstationen Kodet signaloverførsel mellem dørstation og monitor Dør kan åbnes med tryk på en tast på monitoren. Når der er trykket på dørklokken, optages der billeder på et SD-kort i monitoren, og de kan nemt vises på pc'en Integreret mikrofon på monitoren gør det muligt at tale med personer udenfor Dørstation til det beskyttede udendørs område (kapslingsklasse IP55) Dørstation med batterier til nødstrømsanvendelse Dag-/natkamera med integrerede IR LED'er 4. Henvisninger og FAQs Vigtige henvisninger og FAQs vedrørende dette produkt og andre produkter findes på internetsiden www.abus.com/plug-and-play. Informationer om fejlafhjælpningen findes under punkt 10 i denne vejledning. 48 Dansk 5. Apparatbeskrivelse 5.1 Beskrivelse af monitorens forside Visning af den aktuelle ladetilstand Batterivisning Rød: Grøn: Fra: Batteri svagt Opladning Batteri fuldstændigt opladet Visning af apparatstatus Blå: Fra: Blinker 3 gange/sek.: Blinker 1 gang/sek.: Apparat tændt Apparat slukket Apparat optager Ny optagelse i hukommelsen PWR / REC II ▲ Live-visning: I menuen: Direkte klik til hændelseslisten Skift mellem menupunkterne ◄ Vol- Live-visning: I menuen: Reducerer lydstyrken Skift mellem menupunkterne ► Vol+ Live-visning: I menuen: Forøger lydstyrken Skift mellem menupunkterne StandBy: Live-visning: I menuen: Tænder monitoren Slukker monitoren Skift mellem menupunkterne Live-visning: I menuen: Talefunktion Bekræftelse af indstillingerne og ændringerne Live-visning: I menuen: Starter/standser optagelsen Sletter optagelsen Kun mulig med SD-kort Live-visning: I menuen: Døråbner Forlader undermenuen Systemet forlader automatisk menuen efter et minuts ventetid. OK-toets / Del / ESC 49 Dansk 5.2 Beskrivelse af monitorens bagside Antenne Fod 5.3 Beskrivelse af monitorens tilslutninger Spændingsforsyning AV-udgang SD-kort-slot Power-tast Menu-tast 5 V DC / 1 A (DC, 14,5 x 4,8 mm) Udgang til visning af skærmbilledet på et andet appparat ved hjælp af et cinch-kabel (ikke indeholdt i leveringsomfanget) Slot til anvendelse af et SD-kort indtil 32 GB Tænder og slukker monitoren Live-visning: Henter/forlader menuen 50 Dansk 5.4 Beskrivelse af dørstationen 11 Antenne Infrarød LED Lyssensor Højttaler Mikrofon Linse Fastgørelseshus Ringeklokke Pairing-tast Reset-tast Klemmeliste 11 Når der trykkes på ringeklokken, aktiveres monitoren For at forbinde dørstationen med monitoren skal der trykkes på pairing-tasten. Yderligere informationer findes under 5.3. Reset-tast til genstart af dørstationen Dørklokketilslutning DCStrømforsyning DC+ UNLOCKDøråbnertilslutning UNLOCK+ 51 Dansk 5.5 Beskrivelse af kabeltilslutningerne Kabelsko med tilslutningskabel til døråbner Kabelsko-klemmer Afisolerede kabelender Til tilslutning af den eksisterende døråbner Til tilslutning til klemmelisten i dørstationen Rund bøsning med tilslutningskabel til strømforsyning Rund bøsning Afisoleret kabelende Rød Afisoleret kabelende, sort Forbindes med strømforsyningens tilslutningskabel Til tilslutning til klemmelisten i dørstationen („DC+“) Til tilslutning til klemmelisten i dørstationen („DC-“) Strømforsyning til monitor Strømforsyning Rundt stik Strømtilslutning Til tilslutning til monitoren Strømforsyning til dørstation Strømforsyning Rundt stik Strømtilslutning Til tilslutning til rund bøsning 52 Dansk 6. Installation 6.1 Installation af dørstationen Gå frem på følgende måde for at installere dørstationen: I. Forberedelse 1. 2. 3. Åbn dørstationens bagvæg, og sæt 6 AA-batterier i. Sørg i den forbindelse for, at polerne vender rigtigt Derefter lyser LED'erne grønt i 5 sek. Dørstationen kan nu anvendes. Vigtigt: Svage batterier kan medføre en fejlfunktion, udskifter i det tilfælde batterierne. Vigtigt: Hvis du befinder dig i batterimodusen, skal du først trykke på kaldetasten for at kunne tage dørstationen i drift. II. Tilslutning af dørstationen 53 Dansk 1. 2. 3. 4. 5. 6. 7. Åbn dørstationens bagvæg Fastgør den runde bøsnings røde kabel ved „DC+“ i klemmelisten Den runde bøsnings sorte tilslutningskabel skal fastgøres ved klemmepunktet „DC-“ Kabelskoens to tilslutningskabler skal fastgøres ved „UNLOCK“, og klemmerne er beregnet til en eksisterende 2-kabel-døråbner-tilslutning På den runde bøsning kan der nu tilsluttes et rund stik med strømforsyning Forsyn strømforsyningen med strøm På de øverste to klemmepunkter kan der tilsluttes en dørklokke Vigtigt: Vær opmærksom på, at det i den forbindelse drejer sig om en potentialfri relækontakt, en dørklokke kan derfor ikke tilsluttes uden separat spændingsforsyning. Vigtigt: Du har mulighed for at tilslutte din døråbner direkte til dørstationen eller at forbinde den eksisterende døråbningstransformator via et relæ. Vigtigt: Vær opmærksom på, at der kun kan aktiveres jævnstrømsåbnerkontakter, men ikke vekelspændingsåbnerkontakter. Flere oplysninger: www.abus.com TVAC80020 6.2 Montering af dørstationen 1. Vælg en egnet plads til installationen ved hjælp af dørholderen. Tegn nu boringshullerne på underlaget, og bor dem. Sæt først de vedlagte dyvler i, og fastgør nu holderen med skruerne. Vigtigt: Før du påbegynder installationen, skal du sikre dig, at den trådløse overførsels rækkevidde findes på stedet for den ønskede installation. Vigtigt: Forbind dørstationen med monitoren, før du tilslutter apparatet 2. 3. Luk dørstationens hus med de fire vedlagte skruer Sæt dørstationen ind i huset, og fastgør den med de vedlagte tyverisikringsskruer. Den passende skruetrækker er vedlagt pakken. 54 Dansk 6.3 Monitorinstallation 1. 2. 3. Forbind strømforsyningen med monitoren Tænd apparatet. Tryk hertil på Power-tasten. Du kan nu forbinde monitoren med dørstationen. Gå i den forbindelse frem på følgende måde: Vælg på monitoren underpunktet „Pairing“ i menupunktet „Camera Setup“, og tryk på pairing-tasten på dørstationen. Vigtigt: Vær opmærksom på, at monitoren skal oplades mindst 8 timer før den første anvendelse UDEN ekstern spændingsforsyning! Batteriets funktionstid er ca. 3,5 timer. Vigtigt: Med det indbyggede batteri har du mulighed for at anvende LCD-monitoren fleksibelt. Når batteri-LED'en lyser rødt, skal batteriet oplades. Sørg for, at batteriet altid er tilstrækkeligt opladet, så der sikres en optagelse uden tab. Gå frem på følgende måde for at vise monitorvisningen på endnu et visningsapparat: 1. 2. Forbind jack-stikket med AV OUT på monitoren. Tilslut jack-stikket til monitoren som på tegningen. 55 Dansk 7. Betjening Hold Power-tasten trykket ind i min. 2 sekunder for at slå monitoren TIL/FRA. Efter hver start skifter monitoren til live-visningen og vælger den sidste indstillede visning. Hvis symbolet vises, blev SD-kortet registreret rigtigt af monitoren og fungerer normalt. 7.1 Live- visning Signalvisning Visning „Besøger optages“ Batterivisning dørstation Gul: Batteri opladet Rød: Batteri svagt Optagelsesvisning: Blinker under optagelsen Intet SD-kort sat i Full SD SD-kort fuldt Err SD SD-kort registreres ikke SD-kort spærret SD-kort overskrives, når kapaciteten nås SD-kort-visning NO SIGNAL SD-kort kapacitet Ingen forbindelse mellem dørstation og monitor Talefunktion 01:12:45 Optagelsestid 2011 05 01 14:30:11 Visning af dato/klokkeslæt 56 Dansk 7.2 Hovedmenu Tryk på MENU-tasten for at åbne hovedmenuen. Med piletasterne kan du skifte mellem menupunkterne. Vigtigt: Vær opmærksom på: Symbolerne skjules automatisk efter ti sekunders visningstid. Du kan vælge mellem følgende punkter: Kameraindstillinger: Camera Brightness = kameraets lysstyrke Pairing = tilføjer dørstation Optagelsesindstillinger: Visiting Record = besøger optages SD Card Format = hukommelsesplads på SDkort SD Card Overwrite = SD-kort-ringlager Hændelsesliste: Optagelserne gemmes i undermapper, der benævnes efter optagelsesdatoen. Optagelserne gemmes som enkeltfil med optagelsestiden som filnavn. Systemopsætning: Time setting = dato-/klokkeslætindstillinger Software Version = softwareversion TV-Format = tv-gengivelsesopløsning Factory Default = genopretter fabriksindstillingerne 57 Dansk 7.3 Kameraindstillinger Camera brightness = kameraets lysstyrke Tryk på OK-tasten i menupunktt „Camera Brightness“ for at ændre kameralysstyrken. Der vises en valgmenu fra 0 til 9. Med tasterne ◄► kan du ændre indstillingerne og bekræfte med OK-tasten. Pairing = tilføjer dørstation Forbindelsen mellem dørstation og monitor etableres under menupunktet „Pairing“. Tryk hertil på OK-tasten. Systemet søger nu efter forbindelsen til dørstationen og viser 60 sekunder en rund pil. Tryk i dette tidsrum på Pairing-tasten på dørstationen. Når forbindelsen er etableret, skifter monitoren til live-visningen. 7.4 Optagelsesindstillinger Visiting Record = besøger optages Tryk på OK-tasten for at skifte mellem ON (TIL) eller OFF (FRA). Hvis du indstiller på OFF (FRA), optages besøgeren ikke på SD-kortet, når der trykkes på dørklokken. SD Card Format = hukommelsesplads på SDkort Viser hukommelsespladsen, der står til rådighed på SD-kortet. 58 Dansk Anvend tasterne ◄► til at aktivere SD-kortringlageret (ON) (TIL) eller deaktivere (OFF) (FRA). Bekræft valget ved at trykke på OK-tasten. Ringlageret er som standard aktiveret. Vigtigt: Når lagerkapaciteten er nået, fortsætter monitoren med at optage og sletter i den forbindelse de ældste optagelser på SD-kortet. SD-kortenes kapacitetsvisningen blinker med 0.0 G med rødt. SD Card Overwrite = SD-kort-ringlager 7.5 Hændelsesliste Event List = hændelsesliste Anvend piletasterne til at navigere mellem mapperne. Tryk på OK-tasterne for at vælge den ønskede mappe. Vælg den pågældende optagelsesfil i undermappen, og afspil den ved at trykke på OK-tasten. Tryk på tasterne ▲ eller ▼ for at spole frem eller tilbage i trin på 2x / 4x / 8x / 16x. Vær opmærksom på, at den maks. optagelsesvarighed er 10 minutter ved en manuel optagelse. Ved overskridelse oprettes der en ny fil. Sletning af filer Tryk på DEL-tasten for at komme til slettemodusen. De aktuelle fil eller den aktuelle mappe blinker. Med tasterne ◄► kan du vælge mellem alle eller en fil. Tryk på OK-tasten for at bekræfte valget. Vælg Vælg for at slette valget. for at afbryde sletningen. Vigtigt: Dine optagelser optages altid med audio, vær opmærksom på klausulen på side 42 for ikke at bringe dig selv eller andre personer i modstrid med loven. For at ændre lydstyrken under afspilningen skal du anvende tasterne „Vol -“ for svagere eller „Vol +“ for kraftigere. 59 Dansk 7.6 Systemopsætning Time Setting = dato-/klokkeslætindstillinger Tryk på tasten ► for at skifte mellem år/måned/dag/timer/minutter. Anvend tasterne ▲▼ til at tilpasse værdierne. Bekræft indtastningen med OK-tasten. Software Version = softwareverstion Viser dørstationens og monitorens softwareversion. TV-Format = tv-gengivelsesopløsning Vælg den ønskede TV-format med tasterne ◄►. Du kan vælge mellem NTSC og PAL. Bekræft valget med OK-tasten. Vær opmærksom på, at det valgte format kan påvirke opløsningen. Set to Factory Default = Genopret fabriksindstillinger Tryk på OK-tasten for at starte fabriksindstillingerne. Bekræft dit valg med , vælg processen. for at afbryde Vigtigt: Vær opmærksom på, at SD-kortet ikke formateres under denne proces. 60 Dansk 8. Vedligeholdelse og rengøring 8.1 Vedligeholdelse Kontrollér regelmæssigt produktets tekniske sikkerhed, f.eks. beskadigelse af huset. Hvis det antages, at drift ikke længere er mulig uden farer, skal produktet tages ud af drift og sikres mod utilsigtet drift. Det antages, at drift ikke længere er mulig uden fare, hvis apparatet har synlige beskadigelser apparatet ikke længere fungerer Vær opmærksom på: Produktet er vedligeholdelsesfrit for dig. Der er ingen bestanddele inde i produktet, som du skal kontrollere eller vedligeholde: åbn det aldrig. 8.2 Rengøring Rengør produktet med en ren, tør klud. Ved kraftigere tilsmudsninger kan kluden fugtes let med lunkent vand. Sørg for, at der ikke kommer væsker ind i apparatet. Anvend ikke kemiske rengøringsmidler. Derved kan husets overflade blive beskadiget (misfarvninger). 9. Bortskaffelse Vigtigt: EU-direktiv 2002/96/EF regulerer den korrekte tilbagetagning, behandling og anvendelse af brugte elektronikapparater. Dette symbol betyder, at med henblik på miljøbeskyttelse skal apparatet efter sin levetid bortskaffes i overensstemmelse med de gældende lovmæssige forskrifter og adskilt fra husholdningsaffald og erhvervsaffald. Bortskaffelsen af det brugte apparat kan foretages på de respektive officielle tilbagetagningssteder. Følg de lokale forskrifter, når materialerne bortskaffes. Yderligere enkeltheder om tilbagetagningen (også for lande uden for EU) får du hos dine lokale myndigheder. Ved hjælp af den separate indsamling og recycling skånes de naturlige ressourcer, og det sikres, at alle bestemmelser vedrørende beskyttelse af sundhed og miljø overholdes ved recycling af produktet. 61 Dansk 10. Tips vedrørende fejlafhjælpning Nr Spørgsmål Svar 1 Hvad betyder det at forbinde dørstation og monitor, og hvordan fungerer det? 2 Hvad kan være årsagerne til, at monitoren ikke viser et billede, men "NO SIGNAL"? Med forbindelsen etableres den eksklusive, kodede trådløse forbindelse mellem dørstation og monitor. Gå frem på følgende måde for at forbinde dørstation og monitor: Vælg på monitoren underpunktet „Pairing“ i menupunktet „Camera Setup“. Systemet tæller nu 60 sekunder nedad. Tryk i dette tidsrum på Pairing-tasten på dørstationen. Kontrollér følgende, hvis du ikke har et signal: 1. Er dørstationen tilsluttet til strømnettet? 2. Er dørstationen og monitoren forbundet med hinanden (se spørgsmål 1)? 3. Er dørstationen inden for monitorens rækkevidde? Den er maks. 30 m. 4. Er der fejl ved signalet mellem dørstation og monitor? 3 Hvad kan være årsagerne til, at apparatet ikke optager? Kontrollér følgende punkter, hvis dit apparatet ikke optager: 1. Har du sat et SD-kort i? 2. Er SD-kortet spærret? (Lock/Unlock?) 3. Har du formateret SD-kortet? Det skal formateres før det tages i brug. 4. Optagelsesfunktionen ved bevægelsesregistrering (Motion Detection) blev frakoblet i menuen. Gå til menuen "Record settings / Motion Detection", og vælg mellem OFF, 5 Sec, 10 Sec, 15 Sec". 4 Kan en konstant optagelse realiseres? 5 Er det muligt at integrere dørstationen i et eksisterende dørklokkeanlæg? Er det muligt at kombinere andre trådløse kameraer med anlægget? Kan flere monitorer anvendes samtidigt? Er en konstant drift med batterier mulig? Generelt optager apparatet i 60 sekunder, når der trykkes på dørklokken. Hvis du ønsker at optage i et længere tidsrum, skal du trykke manuelt på knappen REC. Ja, det er muligt at tilslutte dørstationen til eksisterende dørklokketråde. Strømskemaer for dørklokkeforbindelsen kan downloades på www.abus.com. Nej, det er af tekniske årsager ikke muligt. 6 7 8 Nej, fordi en dørstation kun kan forbindes direkte med en monitor. Konstant batteridrift er ikke mulig/kan ikke anbefales, da batterierne holder ca. 6 timer. De er udelukkende beregnet til nødstrømsforsyning. 62 Dansk 11. Tekniske data Typenummer Frekvens Modulation Sendeeffekt Følsomhed Trådløs rækkevidde Spændingsforsyning DC Strømforbrug Batteritype Overførselskanaler Synsvinkel Objektiv Opløsning Antal IR LED'er Billedoptager Rækkevidde natsigtfunktion Videosignal Audiosignal Udgange Lagermedium Beskyttelsesklasse IP Batteriets funktionstid Mål Nettovægt Maks. driftstemperatur Dørstation 3,5" LCD-monitor 2,4 GHz GFSK 13 dBm -75 dBm 150 m* 15 V DC/1,5 A Maks. 180 mA 6 AA 1,5 V lithium-batteri 5 V DC/1 A Maks. 650 mA Li-ion polymer batteri, 3,7 V/1800 mA 1 -- 1 85° (H) / 65° (V) 1,8 mm 640 x 480 pixel (VGA) 9 IR LED -1/4" CMOS -0,8 m --1,0 V p-p, 75 ohm -1,0 V p-p, 600 ohm Døråbner: 12 V 3,5 mm jack (video) -SD-kort, maks. 32 GB IP 55 -Maks. 6 timer Maks. 4 timer (BxHxD): 85 x 169 x 36 mm (BxHxD): 133 x 87 x 27 mm 0,205 kg 0,2 kg -10 °C - 40 °C -10 °C - 40 °C * Rækkevidden afhænger af betingelserne i omgivelserne (f.eks. mobiltelefonantenner, stærkstrømsmaster, elektriske ledninger, lofter og vægge, osv.). Under ugunstige betingelser kan der også kun opnås mindre rækkevidder 63 TVAC80020B Manual de instrucciones Versión 10/2014 Manual de instrucciones original en alemán. Guardar para futuras consultas. Español Introducción Estimado cliente: Le agradecemos la compra de este artículo. Este aparato cumple los requisitos establecidos en las directivas vigentes de la UE. Si desea solicitar la declaración de conformidad, diríjase a: ABUS Security-Center GmbH & Co. KG Linker Kreuthweg 5 86444 Affing GERMANY Para conservar este estado y garantizar un funcionamiento exento de peligros, debe tener en cuenta lo expuesto en este manual de instrucciones. Antes de poner en funcionamiento el producto, lea todo el manual y respete todas las indicaciones de utilización y seguridad. Todos los nombres de empresas y denominaciones de producto son marcas registradas del correspondiente propietario. Todos los derechos reservados. Si tiene alguna pregunta, diríjase a su instalador o a su distribuidor especializado. Advertencia conforme al artículo 201 del Código Penal Alemán: La grabación no autorizada de conversaciones privadas o el uso no autorizado de tales grabaciones o su entrega a terceras personas se puede sancionar con la privación de libertad o con una multa. Igualmente se puede sancionar a quien escuche de forma no autorizada conversaciones privadas no destinadas a sus oídos con un aparato de escuchas o a quien divulgue públicamente grabaciones no autorizadas o el contenido de conversaciones interceptadas. Exención de responsabilidad Este manual de instrucciones ha sido elaborado muy detalladamente. Si a pesar de ello usted advirtiera omisiones o imprecisiones, comuníquenoslo a la dirección indicada al dorso de este manual. ABUS Security-Center GmbH no asume ningún tipo de responsabilidad por los fallos técnicos ni tipográficos y se reserva el derecho a realizar modificaciones en el producto y en los manuales de instrucciones sin previo aviso. ABUS Security-Center no se hace responsable de los daños que deriven directa o indirectamente del equipamiento, las prestaciones y el empleo de este producto. No se otorga ninguna garantía por el contenido de esta documentación. 65 Español Explicación de los símbolos El símbolo con un rayo dentro de un triángulo se utiliza para advertir de un peligro para la integridad física debido, por ejemplo, a una descarga eléctrica. Un signo de admiración dentro de un triángulo señaliza una indicación importante que es imprescindible tener en cuenta. Este símbolo señaliza consejos e indicaciones útiles para la utilización. Indicaciones importantes de seguridad En el caso de daños provocados por no haber respetado las indicaciones expuestas en el manual, se extingue el derecho de garantía. No nos hacemos responsables de los daños resultantes. No nos hacemos responsables de los daños personales o materiales provocados por una utilización incorrecta o por no haber respetado las indicaciones de seguridad. En tales casos se extingue el derecho de garantía. Este aparato ha sido fabricado en cumplimiento de los estándares internacionales de seguridad. Lea detenidamente las siguientes indicaciones de seguridad. Indicaciones de seguridad 1. Alimentación de corriente 100-240 V CA de tensión alterna, 50 – 60 Hz (con la fuente de alimentación: 5 / 12 V CC) Conecte este aparato solo a fuentes de alimentación que suministren la tensión de red indicada en la placa de características. Si no está seguro de cuál es la tensión de red, pregunte a la empresa distribuidora de electricidad. Desenchufe el aparato de la red de alimentación antes de llevar a cabo trabajos de mantenimiento o instalación. 2. Sobrecarga Evite la sobrecarga en cajas de enchufe, cables alargadores y adaptadores, ya que esto puede provocar un incendio o una descarga eléctrica. 3. Líquidos Proteja el aparato para que no pueda penetrar ningún líquido. 4. Limpieza Limpie el aparato únicamente con un paño húmedo y no utilice agentes de limpieza abrasivos. Para ello se ha de desenchufar el aparato. 5. Accesorios Conecte únicamente los aparatos expresamente previstos para ello. De otro modo se podrían producir situaciones de peligro y daños en el aparato. 6. Lugar de instalación Este aparato está previsto tanto para zonas exteriores protegidas como para interiores. Al caer, aunque sea desde poca altura, el aparato puede resultar dañado. Monte el producto de forma que el sol no incida directamente sobre el sensor de imagen del aparato. Siga las instrucciones de montaje contenidas en el capítulo correspondiente de este manual de instrucciones. No coloque el aparato muy cerca de calefacciones, hornos u otras fuentes de calor ni bajo la incidencia directa del sol. Utilice el aparato solo en lugares con una temperatura ambiente que esté dentro del margen permitido de -10° - 50°C. 66 Español 7. Transmisión inalámbrica La cobertura de la transmisión inalámbrica depende de las condiciones del entorno. Las condiciones concretas del lugar de montaje pueden influir negativamente en la cobertura. Por ello, si no hay obstáculos entre el receptor y el emisor puede alcanzarse una cobertura de 150m, aunque dentro de edificios será bastante menor. Las siguientes condiciones del entorno pueden reducir la cobertura, así como la frecuencia de imágenes por segundo: antenas de telefonía móvil, postes de líneas de alta tensión, líneas eléctricas, techos y paredes, aparatos con frecuencia de transmisión igual o similar Advertencias Tenga en cuenta las indicaciones de seguridad y de utilización antes de la primera puesta en funcionamiento. 1. 2. 3. Respete las siguientes indicaciones a fin de evitar que se produzcan daños en el cable de red y en el enchufe de red. No modifique ni manipule el cable de red ni el enchufe de red. Para desenchufar el aparato de la red, no tire del cable de red, sino directamente del enchufe. Preste atención a que el cable de red esté lo más alejado posible de fuentes de calor para así evitar que se derrita el recubrimiento de plástico. La fuente de alimentación del videoportero se tiene que proteger de la humedad y el agua. Respete las siguientes instrucciones, pues de lo contrario se podría producir una descarga eléctrica: No abra nunca la carcasa o la fuente de alimentación. No introduzca ningún objeto metálico ni inflamable en el interior del aparato. A fin de evitar que se produzcan daños por sobretensión (por ejemplo, a causa de una tormenta), utilice una protección contra sobretensión. Desenchufe inmediatamente de la red los aparatos defectuosos e informe a su distribuidor. Al instalar el aparato en un sistema de videovigilancia ya existente, asegúrese de que todos los aparatos estén desenchufados del circuito de red y del circuito de baja tensión. En caso de no estar seguro de cómo realizar el montaje, la instalación y el cableado, encárgueselo a un especialista. Los trabajos no profesionales o indebidamente realizados en la red eléctrica o en las instalaciones de viviendas suponen un peligro no solo para usted, sino también para otras personas. Tienda los cables de las instalaciones de tal forma que los circuitos de red y de baja tensión discurran siempre separados y que no se unan en ningún punto ni se puedan unir por algún defecto. Evite las siguientes condiciones ambientales perjudiciales durante el funcionamiento: Agua o humedad excesiva del aire Frío o calor excesivo Radiación directa del sol Polvo o gases, vapores o disolventes inflamables Fuertes vibraciones Campos magnéticos de gran intensidad, como cerca de máquinas o altavoces Orientación de la cámara del videoportero en dirección al sol, pudiendo resultar destruido el sensor Instalación del videoportero sobre superficies inestables Desembalaje Manipule el aparato con extremo cuidado al desembalarlo. Si el embalaje original presenta algún desperfecto, compruebe el aparato. En caso de que este presente algún daño, devuélvalo en el embalaje e informe al servicio de reparto. 67 Español Índice 1. Uso adecuado ........................................................................................................................................... 69 2. Volumen de entrega ................................................................................................................................. 69 3. Características y funciones .................................................................................................................... 69 4. Indicaciones y FAQs ................................................................................................................................ 69 5. Descripción del aparato .......................................................................................................................... 70 6. 7. 8. 9. 5.1 Descripción de la parte delantera del monitor ................................................................................... 70 5.2 Descripción de la parte trasera del monitor ....................................................................................... 71 5.3 Descripción de las conexiones del monitor ........................................................................................ 71 5.4 Descripción del videoportero.............................................................................................................. 72 5.5 Descripción de las conexiones de cable ............................................................................................ 73 Instalación................................................................................................................................................. 74 6.1 Instalación del videoportero ............................................................................................................... 74 6.2 Montaje del videoportero .................................................................................................................... 75 6.3 Instalación del monitor ....................................................................................................................... 76 Utilización ................................................................................................................................................. 77 7.1 Imagen en directo .............................................................................................................................. 77 7.2 Menú principal .................................................................................................................................... 78 7.3 Configuración de la cámara ............................................................................................................... 79 7.4 Configuración de grabación ............................................................................................................... 79 7.5 Lista de eventos ................................................................................................................................. 80 7.6 Configuración del sistema .................................................................................................................. 81 Mantenimiento y limpieza........................................................................................................................ 82 8.1 Mantenimiento .................................................................................................................................... 82 8.2 Limpieza ............................................................................................................................................. 82 Gestión de residuo ................................................................................................................................... 82 10. Consejos para la solución de averías .................................................................................................... 83 11. Datos técnicos .......................................................................................................................................... 84 68 Español 1. Uso adecuado Videoportero digital inalámbrico compuesto de una carcasa resistente a la intemperie y un monitor LCD de 3,5", cada uno de ellos con un intercomunicador y una fuente de alimentación. Puede instalarlo adicionalmente al lado del timbre y conectarlo al aparato de apertura de la puerta. El monitor LCD de 3,5 pulgadas de color es portátil, de forma que no necesita desplazarse hasta el telefonillo. El micrófono integrado le permite hablar cómodamente con las personas que están llamando y abrir la puerta desde el monitor. La tecnología de transmisión digital garantiza una recepción sin interferencias. Después de tocar el timbre, se graban las imágenes en la tarjeta de memoria (no está incluida). Encontrará una descripción detallada del funcionamiento en el capítulo 3 “Características y funciones”. 2. Volumen de entrega Monitor LCD de 3,5 Videoportero digital con carcasa resistente a la intemperie Fuentes de alimentación Accesorios 3. Características y funciones Videoportero con cámara integrada y monitor LCD de 3,5" de color portátil gracias a la batería integrada Se puede conectar de forma práctica el cableado del altavoz del timbre de la vivienda a videoportero Trasmisión cifrada de la señal entre el videoportero y el monitor Se puede abrir la puerta pulsando una tecla del monitor Después de tocar el timbre, se graban imágenes en la tarjeta de memoria del monitor y se pueden ver cómodamente en un ordenador personal El micrófono integrado en el monitor permite hablar con las personas que se encuentran fuera Videoportero para el área externa protegida (clase de protección IP55) Videoportero con pilas para su uso en caso de corte de corriente Cámara diurna/nocturna con LEDs de infrarrojos integrados 4. Indicaciones y FAQs En la página de Internet www.abus.com/plug-and-play encontrará indicaciones importantes y FAQs sobre éste y muchos otros productos. En el punto 10 de estas instrucciones encontrará información para solucionar averías. 69 Español 5. Descripción del aparato 5.1 Descripción de la parte delantera del monitor Indicación de la carga de la batería Indicación de batería Rojo: Verde: Apagado: batería con poca carga cargando batería completamente cargada Indicación del estado del aparato Azul: Apagado: Parpadea 3 veces por segundo: Parpadea 1 vez por segundo: aparato encendido aparato apagado aparato grabando nueva grabación en la memoria II ▲ Imagen en directo: En el menú: clic directo a la lista de eventos cambiar entre puntos de menú ◄ Vol- Imagen en directo: En el menú: bajar el volumen cambiar entre puntos de menú ► Vol+ Imagen en directo: En el menú: subir el volumen cambiar entre puntos de menú Stand-by: Imagen en directo: En el menú: encender el monitor apagar el monitor cambiar entre puntos de menú función para hablar confirmar la configuración y los cambios iniciar y parar la grabación borrar la grabación ¡solo es posible con tarjeta de memoria! abrir la puerta salir del submenú El sistema cierra el menú automáticamente después de un minuto de espera. PWR / REC Tasto OK Imagen en directo: En el menú: Imagen en directo: En el menú: / Del Imagen en directo: En el menú: / ESC 70 Español 5.2 Descripción de la parte trasera del monitor Antena Base 5.3 Descripción de las conexiones del monitor Tensión de alimentación Salida AV Ranura para tarjetas de memoria Tecla de encendido/apagado y tecla de menú 5 V CC / 1A (CC, 14,5 x 4,8 mm) salida para visualizar la imagen del monitor en otro dispositivo mediante un cable RCA (no incluido) ranura para utilizar una tarjeta de memoria de hasta 32 GB encender y apagar el monitor imagen en directo: abrir y cerrar menús 71 Español 5.4 Descripción del videoportero 11 Antena LED de infrarrojos Fotocelda Altavoz Micrófono Lente Carcasa de sujeción Timbre Botón de emparejamiento Tecla reset Barra de conectores 11 al tocar el timbre, se activa el monitor para conectar el monitor con el videoportero, se debe pulsar la tecla de emparejamiento. En el apartado 5.3 figuran más detalles. tecla reset para reiniciar el videoportero conexión del timbre DCalimentación de corriente DC+ UNLOCKconexión para abrir la puerta UNLOCK+ 72 Español 5.5 Descripción de las conexiones de cable Terminal con cable de conexión para abrir la puerta eléctricos Terminales Extremos de los cables aislados para conectar la puerta eléctricos para conectar a la barra de conectores del videoportero Conector redondo con cable de conexión para la fuente de alimentación Conector redondo Extremo del cable aislado rojo Extremo del cable aislado negro se conecta con el cable de conexión de la fuente de alimentación para conectar a la barra de conectores del videoportero (“DC+”) para conectar a la barra de conectores del videoportero (“DC-”) Fuente de alimentación del monitor Conector de fuente de red Clavija redonda conector a la corriente para conectar al monitor Fuente de alimentación del videoportero Conector de fuente de red Clavija redonda conector a la corriente para conectar al conector redondo 73 Español 6. Instalación 6.1 Instalación del videoportero Proceda de la siguiente manera para instalar el videoportero: I. Preparación 1. Abra la tapa trasera del videoportero y coloque las pilas 6 AA. Asegúrese de colocar los polos en el lado correcto. A continuación, los LED se iluminan durante 5 segundos. El videoportero ya se puede usar. 2. 3. Atención: Las pilas con poca carga pueden ser causa de un funcionamiento incorrecto, cambie las pilas. Atención: Si se encuentra en modo con pilas, pulse primero la tecla de llamada para poder poner en funcionamiento el videoportero. II. Conectar el videoportero 74 Español 1. 2. 3. 4. 5. 6. 7. Abra la tapa trasera del videoportero. Introduzca el cable rojo del conector redondo en el terminal “DC+” de la barra de conectores. El cable de conexión negro del conector redondo debe estar introducido en el terminal “DC-”. Ambos cables de conexión del terminal deben estar conectados a “UNLOCK” y a los conectores que están diseñados para los dos cables de la apertura de la puerta de su vivienda. El conector redondo solo admite la conexión de una clavija redonda con fuente de alimentación. Conecte la fuente de alimentación a la corriente. Los dos terminales superiores son para conectar el altavoz del timbre. Atención: Tenga en cuenta que se trata de un contacto de relé sin tensión, por lo que no se puede conectar un timbre sin tensión de alimentación separada. Atención: Tiene la posibilidad de conectar el dispositivo de apertura de la puerta directamente al videoportero o conectar el transformador de apertura de la puerta ya instalado a través de un relé. Atención: Tenga en cuenta que solo se pueden controlar dispositivos de apertura de corriente continua y nunca de corriente alterna. Más información: www.abus.com TVAC80020 6.2 Montaje del videoportero 1. Seleccione un lugar adecuado de instalación con el soporte del videoportero. Marque los orificios para taladrar en la superficie de apoyo y taládrelos. A continuación, introduzca en ellos los tacos adjuntos y fije el soporte con los tornillos. Atención: Antes de comenzar la instalación, asegúrese de que la distancia de transmisión sea suficiente para llegar al lugar elegido. Atención: Antes de conectar el aparato, conecte el videoportero al monitor. 2. 3. Sujete la carcasa del videoportero con los cuatro tornillos adjuntos. Coloque el videoportero en la carcasa y sujételo con los tornillos antirrobo adjuntos. El destornillador necesario está también incluido. 75 Español 6.3 Instalación del monitor 1. 2. 3. Conecte la fuente de red al monitor. Encienda el aparato. Para ello, pulse de tecla de encendido y apagado. El monitor solo se puede conectar al videoportero. Para ello, proceda como sigue: Seleccione en el punto del menú “Camera Setup” del monitor el submenú “Pairing” y pulse la tecla de emparejamiento en el videoportero. Atención: Tenga en cuenta que el monitor debe cargarse al menos durante 8 horas cuando se va a usar SIN tensión de alimentación. La autonomía funcionando con la batería es de aprox. 3,5 horas. Atención: La batería adjunta le permite usar el monitor LCD de forma flexible. Cuando el LED de la batería se ilumina de color rojo, se debe cargar la batería. Asegúrese de que la batería está siempre lo suficientemente cargada para garantizar una grabación sin pérdidas. Modo de proceder para visualizar la imagen del monitor en otro dispositivo 4. 5. Conecte la clavija al conector AV OUT del monitor. Conecte el conector RCA en el monitor como muestra la imagen. 76 Español 7. Utilización Para encender y apagar el monitor, pulse la tecla de encendido y apagado durante 2 segundos. Cada vez que se enciende, el monitor cambia a la imagen en directo y selecciona la vista configurada por última vez. Si aparece el icono normalidad. , el monitor ha detectado correctamente la tarjeta de memoria y funciona con 7.1 Imagen en directo Indicación de señal Indicación de estar grabando a las personas en la puerta Indicación de batería del videoportero Amarillo: batería cargada Rojo: batería con poca carga Indicación de grabación: parpadea durante la grabación No hay tarjeta de memoria Full SD Tarjeta de memoria llena Err SD No se detecta la tarjeta de memoria Tarjeta de memoria bloqueada El contenido de la tarjeta de memoria se sobrescribe cuando está llena Indicación de tarjetas de memoria NO SIGNAL Capacidad de tarjetas de memoria No hay conexión entre el videoportero y el monitor Función para hablar 01:12:45 Hora de grabación 2011 05 01 14:30:11 Indicación de fecha y hora 77 Español 7.2 Menú principal Pulse la tecla MENU para abrir el menú principal. Puede moverse entre puntos del menú con las teclas de flecha. Atención: Tenga en cuenta lo siguiente: Los iconos dejan de aparecer tras diez segundos en el monitor. Puede seleccionar entre los siguientes puntos: Configuración de la cámara: Camera Brightness = brillo de la cámara Pairing = añadir videoportero Configuración de grabación Visiting Record = se graban las personas que se encuentran fuera SD Card Format = espacio de memoria en la tarjeta de memoria SD Card Overwrite = búfer circular de la tarjeta de memoria Lista de eventos: Las grabaciones se guardan en subcarpetas que tienen como nombre la fecha de grabación. Las grabaciones se guardan como archivos separados y tienen como nombre la hora de grabación. Configuración del sistema: Time Setting = configuración de fecha y hora Software Version = versión de software TV-Format = resolución de la imagen Factory Default = restaurar la configuración de fábrica 78 Español 7.3 Configuración de la cámara Camera Brightness = brillo de la cámara Para modificar el brillo de la cámara, pulse la tecla OK en el punto de menú “Camera Brightness”. Aparece una barra de selección del 0 al 9. Con las teclas ◄►puede modificar la configuración y confirmarla con la tecla OK. Pairing = añadir videoportero La conexión entre el videoportero y el monitor se establece en el punto de menú “Pairing”. Para ello, pulse la tecla OK. El sistema busca una conexión con el videoportero y muestra durante 60 segundos una flecha circular. Pulse durante este intervalo de tiempo la tecla PAIRING del videoportero. Una vez establecida la conexión, el monitor cambia a la imagen en directo. 7.4 Configuración de grabación Visiting Record = se graban las personas que se encuentran fuera Pulse la tecla OK para cambiar entre ON (encendido) y OFF (apagado). Cuando lo pone en OFF, no se graba a las personas en la tarjeta de memoria cuando tocan el timbre. SD Card Format = espacio de memoria en la tarjeta de memoria Indica el espacio de memoria disponible y libre en la tarjeta de memoria. 79 Español Utilice las teclas ◄► para activar el búfer circular (ON) o desactivarlo (OFF). Confirme la selección pulsando la tecla OK. El búfer circular está activado por defecto. Atención: al alcanzar la capacidad de memoria, el monitor sigue grabando y borra las grabaciones más antiguas de la tarjeta de memoria. La indicación de capacidad de la tarjeta de memoria parpadea con 0.0 G en rojo. SD Card Overwrite = búfer circular de la tarjeta de memoria 7.5 Lista de eventos Event List = lista de eventos Utilice las teclas de flecha para moverse entre las carpetas. Pulse la tecla OK para seleccionar la carpeta deseada. Seleccione en la subcarpeta el archivo de grabación y reprodúzcalo pulsando la tecla OK. Pulse las teclas ▲ o ▼ para avanzar o retroceder en pasos de 2x, 4x, 8x o 16x. Tenga en cuenta que la grabación manual tiene una duración máxima de 10 minutos. Si se supera, se crea un archivo nuevo. Borrar archivos Pulse la tecla DEL para acceder al modo de borrado. El archivo o la carpeta actual parpadean. Con las teclas ◄► puede seleccionar uno o todos los archivos. Pulse la tecla OK para confirmar su selección. Seleccione para borrar la selección. Para cancelar el borrado, seleccione . Atención: Sus grabaciones se graban siempre con sonido, tenga en cuenta la cláusula de la página 62 para no incurrir en situaciones ilegales. Para modificar el volumen al reproducir, utilice las teclas “Vol-” para bajar el volumen y “Vol+” para subirlo. 80 Español 7.6 Configuración del sistema Time setting = configuración de fecha y hora Pulse la tecla ► para cambiar entre año, mes, día, horas y minutos. Utilice las teclas ▲▼ para adaptar los valores. Confirme la entrada pulsando la tecla OK. Software Version = versión de software Indica la versión de software del videoportero y del monitor. TV-Format = resolución de la imagen Seleccione con las teclas ◄► el formato de imagen deseado. Puede elegir entre NTSC y PAL. Confirme la selección pulsando la tecla OK. Tenga en cuenta que el formato puede influir en la resolución. Set to Factory Default = restaurar la configuración de fábrica Pulse la tecla OK para restaurar la configuración de fábrica. Confirme la selección con . Para cancelar el proceso, pulse . Atención: Tenga en cuenta que la tarjeta de memoria no se formatea durante el proceso. 81 Español 8. Mantenimiento y limpieza 8.1 Mantenimiento Compruebe regularmente la seguridad técnica del producto, por ejemplo, si está dañada la carcasa. Cuando no esté garantizado un funcionamiento seguro, ponga fuera de funcionamiento el aparato y evite que pueda ponerse en marcha de nuevo involuntariamente. El funcionamiento seguro no está garantizado si: El aparato presenta daños visibles. El aparato no funciona. Tenga en cuenta lo siguiente: El producto no requiere ningún mantenimiento por su parte. No hay ningún componente que deba controlar o mantener en el interior del aparato; no lo abra nunca. 8.2 Limpieza Limpie el producto con un paño limpio y húmedo. En caso de estar muy sucio, el paño se puede humedecer con agua templada. Evite que entren líquidos en el aparato. No utilice limpiadores químicos; estos pueden dañar (desteñir) la superficie de la carcasa. 9. Gestión de residuo Atención: La directiva UE 2002/96/CE regula la recogida, tratamiento y reciclaje de los aparatos electrónicos al finalizar su vida útil. Este símbolo significa que, para proteger el medio ambiente, al final de su vida útil el aparato debe eliminarse conforme a las normas establecidas en la ley, separado de la basura doméstica y de la basura industrial. La eliminación del aparato usado se puede realizar a través de distintos puntos de recogida oficiales disponibles en su país. Siga las normas locales relativas a la gestión de materiales. El ayuntamiento de su localidad le podrá ofrecer otros detalles relativos a la recogida (también en los países no miembros de la UE). La separación y reciclaje de materiales protegen los recursos naturales y garantizan que durante el reciclaje del producto se respeten todas las disposiciones relativas a la protección de la salud y el medio ambiente. 82 Español 10. Consejos para la solución de averías N.° Pregunta Respuesta 1 ¿Qué significa “emparejar” el videoportero y el monitor y cómo funciona? 2 ¿Cuál podría ser la causa cuando el monitor muestra “NO SIGNAL” en vez de la imagen? 3 ¿Cuáles pueden ser los motivos por los que el aparato no graba? Compruebe los siguientes puntos si su aparato no graba: 1. ¿Ha introducido una tarjeta SD? 2. ¿La tarjeta SD está bloqueada? (Lock/Unlock?) 3. ¿Ha formateado la tarjeta SD? Ésta debe formatearse antes de usarla por primera vez. 4. La función de grabación cuando se detecta movimiento (Motion Detection) ha sido desconectada en el menú. Vaya al menú “Record settings / Motion Detection” y seleccione entre “OFF, 5 Sec, 10 Sec, 15 Sec”. 4 ¿Es posible la grabación continua? 5 ¿Es posible integrar el videoportero en un timbre existente? ¿Es posible combinar otras cámaras inalámbricas con la instalación? ¿Pueden utilizarse varios monitores al mismo tiempo? ¿Es posible un funcionamiento continuo con pilas? Normalmente, el aparato graba durante 60 segundos una vez accionado el timbre. Si desea grabar durante más tiempo, deberá pulsar la tecla REC. Sí. Es posible conectar el videoportero al cableado del timbre existente. Puede descargar los esquemas eléctricos del cableado del timbre en www.abus.com. No. No es posible por motivos técnicos. 6 7 8 A través del emparejamiento se establece una comunicación por radio cifrada y exclusiva entre el videoportero y el monitor. Proceda de la siguiente manera para emparejar el videoportero y el monitor: En el monitor, seleccione en el punto de menú “Camera Setup” el subpunto “Pairing”. El sistema comienza una cuenta atrás de 60 segundos. Pulse durante este intervalo de tiempo la tecla Pairing del videoportero. Compruebe lo siguiente si no hay ninguna señal: 1. ¿El videoportero está conectado a la red? 2. ¿Están emparejados entre sí el videoportero y el monitor (véase la pregunta 1)? 3. ¿El videoportero está dentro del alcance del monitor? Éste es de máx. 30 m. 4. ¿La señal entre el videoportero y el monitor está averiada? No. Un videoportero solo puede emparejarse directamente con un monitor. No es posible ni recomendable el funcionamiento continuo con pilas porque éstas tienen unas 6 horas de duración. Éstas están indicadas únicamente para la alimentación de emergencia. 83 Español 11. Datos técnicos Código de referencia Frecuencia Modulación Potencia de emisión Sensibilidad Cobertura Alimentación de corriente continua Consumo de corriente Videoportero Monitor LCD de 3,5" 2,4 GHz GFSK 13 dBm -75 dBm 150 m* 15V CC / 1,5 A 5V CC / 1 A máx. 180mA máx. 650 mA batería de polímero de iones de litio, 3,7 V / 1800 mA 1 -- Tipo de batería pila de litio 6 AA 1,5 V Canales de transmisión Ángulo de visión Objetivo Resolución Número de LEDs de infrarrojos Sensor de imagen Alcance función de visión nocturna Señal de vídeo Señal de audio 1 85° (H) / 65° (V) 1,8 mm 640 x 480 píxeles (VGA) 9 LEDs de infrarrojos 1/4‘‘ CMOS Salidas Soporte de memoria Clase de protección IP Duración de la batería Dimensiones Peso neto Temperatura máx. de servicio * --- 0,8 m -- --dispositivo para abrir la puerta: 12 V 1,0 V p-p, 75 ohmios 1,0 V p-p, 600 ohmios -IP 55 máx. 6 horas (A x H x P): 85 x 169 x 36 mm 0,205 kg -10°C - 40°C conector de 3,5 mm (vídeo) tarjeta de memoria, máx. 32 GB -máx. 4 horas (A x H x P): 133 x 87 x 27 mm 0,2 kg -10°C - 40°C La cobertura depende de las condiciones del entorno (por ejemplo, antenas de telefonía móvil, postes de líneas de alta tensión, líneas eléctricas, techos y paredes, etc.). En condiciones adversas solo se obtiene una cobertura menor. 84 Imprint These operating instructions are published by ABUS Security-Center GmbH & Co.KG, Linker Kreuthweg 5, 86444 Affing, Germany. No reproduction (including translation) is permitted in whole or part e.g. photocopy, microfilming or storage in electronic data processing equipment, without the express written consent of the publisher. The operating instructions reflect the current technical specifications at the time of print. We reserve the right to change the technical or physical specifications. Nota redakcyjna Niniejsza instrukcja obsługi jest publikacją ABUS Security-Center GmbH & Co. KG, Linker Kreuthweg 5, 86444 Affing. Wszystkie prawa, także do tłumaczenia, zastrzeżone. Reprodukcje wszelkiego rodzaju, np. fotokopia mikrofilm oraz zapis w elektronicznych systemach przetwarzania danych wymagają pisemnej zgody wydawcy. Przedruk, także we fragmentach, zabroniony. Niniejsza instrukcja obsługi odzwierciedla stan faktyczny w dacie złożenia do druku. Zmiany techniczne i zmiany wyposażenia zastrzeżone Redaktionel note Denne betjeningsvejledning er publiceret af ABUS Security-Center GmbH & Co. KG, Linker Kreuthweg 5, 86444 Affing, Germany. Der må ikke foretages kopiering, inklusive oversættelser, fotokopierng, mikrofilms optagelse af proces udstyr uden forudgående tilladelse fra udgiveren. Denne brugervejledning reflekterer de kendte til dato tekniske specifikationer. Vi forbeholder os retten til at ændre frit og uden forudgående advisering. Pie de imprenta Este manual es una publicación de la Seguridad ABUS-Center GmbH & Co. KG, enlazador Kreuthweg 5, 86444 Affing. Todos los derechos reservados, incluyendo traducciones. Queda prohibida la reproducción, por ejemplo, Fotocopia, microfilm, o en los datos de los equipos electrónicos de procesamiento, sin la autorización por escrito de la editorial. No puede ser reproducido en cualquier forma. Este derecho para cambiar el estado de la técnica de la impresión. Los cambios en la tecnología y el equipo. © Copyright 10/2014 by ABUS Security-Center