1
www.delonghi.com
57132XXXXX/10.10
Instructions for use. Keep these instructions
Mode d’emploi. Conservez cette notice
Instrucciones para el uso. Repase y guarde
estas instrucciones. Lea cuidadosamente este
instructivo antes de usar su aparato
FULLY AUTOMATIC COFFEE CENTER
MACHINE À CAFÈ AUTOMATIQUE
CAFETERA SUPERAUTOMATICA
DE
ECAM23210B/SB
GB
Register this product on-line and receive a free trial
issue of Cook’s Illustrated.
Visit www.delonghiregistration.com.
Visit www.delonghiusa.com for a list of service centers
near you. (U.S. and Canada Only)
Registre este producto en línea y reciba un ejemplar
gratis de Cook’s Illustrated. Visite www.delonghiregistration.com. Visite www.delonghiusa.com para ver la
lista de centros de servicios cercanos a usted. (Solamente
en los Estados Unidos y Canada)
Enregistrez ce produit en ligne et recevez un
numéro gratuit de Cook’s Illustrated. Visitez www.
delonghiregistration.com. Visitez www.delonghiusa.com
pour y voir une liste des centres de réparation proches de
chez vous. (É.-U. et Canada uniquement)
Electronic Characteristics: Caractéristiques électriques: Caracteristicas electricas: Caratteristiche elettriche:
120 V ~60Hz 1 350W
B
C
C1
B1
B2
B7
B3
B8
C2
C3
B4
B9
B5
C4
B6
2
A
A4
4
A5
A2
A6
A3
A7
A8
A19
A1
A9
A10
A18
PU
SH
C4
A12
A11
A14
A13
A16
A15
A17
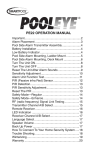
3
1A
2
3
4
5
6
7
8
9
10
11
1B
1
13
14
15
4
4
12
7
16
17
18
21
19
20
23
24
27
28
22
26A
PU
SH
25
A
PU
SH
26A
30
B
31
B
32A
32B
A
29
5
CONTENTS
DESCALE .........................................16
IMPORTANT SAFEGUARDS ..................... 7
SETTING WATER HARDNESS ..................17
Measuring water hardness ............................... 17
Set water hardness .......................................... 17
SAVE THESE INSTRUCTIONS ........................... 7
SHORT CORD INSTRUCTIONS ................. 7
WATER SOFTENER FILTER .....................17
INTRODUCTION .................................. 8
Installing the filter ............................................ 17
Replacing the filter ........................................... 18
Removing the filter .......................................... 18
Letters in brackets ............................................. 8
Troubleshooting and repairs .............................. 8
Description of the appliance .............................. 8
Description of the control panel ......................... 8
Description of the accessories ........................... 9
Description of lights ........................................... 9
TECHNICAL SPECIFICATION ...................18
EXPLANATION OF LIGHTS .....................19
TROUBLESHOOTING ............................21
PRELIMINARY CHECKS ......................... 9
Checking the appliance ...................................... 9
Connecting the appliance ................................... 9
Using the appliance for the first time ................. 9
LIMITED WARRANTY ........................... 22
TURNING THE APPLIANCE ON ................10
TURNING THE APPLIANCE OFF ..............10
MENU SETTINGS ................................10
Descale ............................................................ 10
Auto-off ............................................................ 11
Setting the temperature ................................... 11
Energy Saving .................................................. 11
Setting water hardness .................................... 11
Install filter ....................................................... 11
Replacing the filter ........................................... 11
Default values (reset) ....................................... 11
Statistics function ............................................ 11
MAKING COFFEE ................................12
Selecting the coffee taste ................................. 12
Selecting the quantity of coffee in the cup ...... 12
Customizing the “my coffee” quantity ............. 12
Adjusting the coffee mill .................................. 12
Tips for a hotter coffee ..................................... 13
Making coffee using coffee beans .................... 13
Making coffee using pre-ground coffee ........... 13
MAKING CAPUCCINO ..........................13
Cleaning the cappuccino maker after use. ........ 14
HEATING WATER ................................14
CLEANING ........................................14
Cleaning the coffee maker ................................ 14
Cleaning the coffee grounds container ............. 15
Cleaning the drip tray and condensate tray ...... 15
Cleaning the inside of the coffee maker ........... 15
Cleaning the water tank .................................... 15
Cleaning the coffee spouts ............................... 15
Cleaning the pre-ground coffee funnel ............. 15
Cleaning the infuser ......................................... 15
6
IMPORTANT SAFEGUARDS
When using electrical appliances, basic safety precautions should always be followed, including the following.
UÊ ,i>`Ê>ÊÃÌÀÕVÌÃÊV>ÀivÕÞ°
UÊ >iÊÃÕÀiÊÌ
iÊÛÌ>}iÊvÊÞÕÀÊiiVÌÀV>ÊÃÞÃÌiÊVÀÀië`ÃÊÌÊÌ
iÊÛÌ>}iÊÃ
ÜÊÊÌ
iÊ
bottom of the machine.
UÊ ÊÌÊÌÕV
Ê
ÌÊÃÕÀv>ViðÊ1ÃiÊ
>`iÃÊÀÊLð
UÊ /Ê«ÀÌiVÌÊ>}>ÃÌÊwÀi]ÊiiVÌÀV>ÊÃ
VÊ>`Ê«iÀÃ>ÊÕÀÞ]Ê`ÊÌÊiÀÃiÊVÀ`]Ê«Õ}ÊÀÊ
appliance in water or other liquid.
UÊ ii«ÊÌ
iÊ>««>ViÊÕÌÊvÊÌ
iÊÀi>V
ÊvÊV
`ÀiÊ>`Ê`ÊÌÊi>ÛiÊ>««>ViÊÕ>ÌÌi`i`Ê
while in operation.
UÊ 1«Õ}ÊvÀÊÌ
iÊÕÌiÌÊÜ
iÊÌÊÊÕÃiÊ>`ÊLivÀiÊVi>}°
UÊ ÊÌÊ«iÀ>ÌiÊÜÌ
Ê>Ê`>>}i`ÊVÀ`ÊÀÊ«Õ}]ÊÀÊ>vÌiÀÊÌ
iÊ>««>ViÊ>vÕVÌÃ]ÊÀÊ
>ÃÊ
been damaged in any manner. Return the appliance to the nearest authorized service
facility for examination, repair or adjustment.
UÊ /
iÊÕÃiÊvÊ>VViÃÃÀÞÊ>ÌÌ>V
iÌÃÊÌÊÀiVi`i`ÊLÞÊÌ
iÊ>Õv>VÌÕÀiÀÊ>ÞÊÀiÃÕÌÊÊ
fire, electrical shock, or personal injury.
UÊ ÊÌÊÕÃiÊÕÌ`Àð
UÊ >iÊÃÕÀiÊÌ
iÊ«ÜiÀÊVÀ`Ê`iÃÊÌÊ
>}ÊÛiÀÊÌ
iÊi`}iÊvÊÌ
iÊÌ>LiÊÀÊVÕÌiÀÌ«ÊÌÊ>Û`Ê
getting accidentally caught or entangled.
UÊ ÊÌÊ«>ViÊÌ
iÊ>««>ViÊÀÊÌÃÊiiVÌÀV>Ê«>ÀÌÃÊÊÀÊi>ÀÊiiVÌÀVÊÃÌÛiÃ]ÊV}ÊÃÕÀv>ces, or gas burners.
UÊ *Õ}ÊVÀ`ÊÌÊÌ
iÊÜ>ÊÕÌiÌ°Ê/Ê`ÃViVÌ]ÊwÀÃÌÊÌÕÀÊ>V
iʺvv»]ÊÌ
iÊÀiÛiÊ«Õ}Ê
from wall outlet.
UÊ ÊÌÊÕÃiÊÌ
iÊ>««>ViÊvÀÊÌ
iÀÊÌ
>ÊÌ
iÊÌi`i`ÊÕÃi°Ê/
ÃÊ>««>ViÊÃÊÌÊLiÊÕÌâi`Ê
for domestic use only. The manufacturer declines all responsibility for any damage caused
by improper, incorrect, or irresponsible use.
WARNING: To reduce the risk of fire or electric shock, do not remove the cover or the exterior of the
unit. Don’t attempt to repair or modify the machine, doing so will void the warranty. Repair should
be done by authorized service personnel only!
SAVE THESE INSTRUCTIONS
/-Ê** Ê-Ê",Ê"1-"Ê1-Ê" 9
SHORT CORD INSTRUCTIONS
A short power cord is provided to reduce risks resulting from becoming entangled in or tripping
over a longer cord.
- Longer, detachable power supply cords or extension cords are available and may be used if care is
exercised in their use.
- If an extension cord is used, the marked electrical rating should be at least as great as the electrical
rating of the appliance. If the appliance is provided with 3- wire, grounding type cord, the extension
Ã
Õ`ÊLiÊ>Ê,"1 Ê/9*ÊÎÊÊ7,Ê
",°Ê/
iÊ}iÀÊVÀ`ÊÃ
Õ`ÊLiÊ>ÀÀ>}i`ÊÃÊÌ
>ÌÊÌÊÜÊ
not drape over the counter-top or table top where it can be pulled on by children or tripped over.
Ê 9ÕÀÊ«À`ÕVÌÊÃÊiµÕ««i`ÊÜÌ
Ê>Ê«>Àâi`Ê>ÌiÀ>Ì}ÊVÕÀÀiÌÊiÊ«Õ}Ê>Ê«Õ}Ê
>Û}ÊiÊL>`iÊ
wider than the other). This plug will fit into the power outlet only one way. This is a safety feature.
If you are unable to insert the plug fully into the outlet, try reversing the plug. If the plug should still
fail to fit, contact your electrician to replace your obsolete outlet. Do not defeat the safety purpose
of the polarized plug.
7
INTRODUCTION
DESCRIPTION
Thank you for choosing the ECAM 23.210 automatic coffee and cappuccino maker.
We hope you enjoy using your new appliance.
Take a few minutes to read these instructions.
This will avoid all risks and damage to the machine.
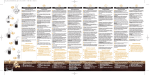
Description of the appliance
(page 3 - A )
A1. Control panel
A2. Grinding adjustment knob
A3. Cup shelf
A4. Beans container lid
x°ÊÊ *Ài}ÀÕ`ÊVvviiÊvÕiÊ`
È°ÊÊ *Ài}ÀÕ`ÊVvviiÊvÕi
A7. Beans container
A8. Main switch
A9. Water tank
A10. Infuser door
A11. Infuser
A12. Coffee spout (adjustable height)
A13. Coffee grounds container
A14. Condensate tray
A15. Cup tray
A16. Drip tray water level indicator
A17. Drip tray
A18. Cappuccino maker
A19. Steam/hot water knob
Symbols used in these instructions
Important warnings are identified by these
symbols. These warnings must absolutely be
respected.
Danger!
>ÕÀiÊ ÌÊ LÃiÀÛiÊ Ì
iÊ Ü>À}Ê VÕ`Ê ÀiÃÕÌÊ Ê
possibly life threatening injury from electric
shock.
Important!
>ÕÀiÊÌÊLÃiÀÛiÊÌ
iÊÜ>À}ÊVÕ`ÊÀiÃÕÌÊÊjury or damage to the appliance.
Danger of burns!
>ÕÀiÊ ÌÊ LÃiÀÛiÊ Ì
iÊ Ü>À}Ê VÕ`Ê ÀiÃÕÌÊ Ê
scalds or burns.
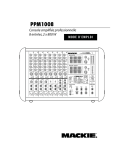
Description of the control panel
(page 2 - B )
A number of buttons on the panel have a double
function. This is indicated in brackets in the description.
B1. Lights
B2.
: button: turns the appliance on and off.
B3. P button to access the menu
B4.
button: to perform a rinse cycle.
(When in the settings MENU, it acts as the
“ESC” button to exit from the selected function and go back to the main menu).
B5. Selection knob: turn to select the required
quantity of coffee. (When in the settings
MENU, turn to select the required function).
B6.
coffee strength button: to select the
coffee taste
B7.
button: to make 1 cup of coffee with the
settings displayed
B8.
button: to make 2 cups of coffee with
the settings displayed
B9.
button: to deliver steam to make hot
drinks with milk.
(When you access the MENU: Press“OK”
button to confirm the selection made)
Please note:
This symbol identifies important advice or information for the user.
Letters in brackets
The letters in brackets refer to the legend in the
Description of the Appliance on page 3.
Troubleshooting and repairs
In the event of problems, first try and resolve them following the information given in the
section “Explanation of lights” on page 19 and
“Troubleshooting” on page 21.
If this does not resolve the problem or you require further information, you should consult
Customer Services by calling the number given
on the annexed “Customer Service” sheet.
If your country is not among those listed on the
sheet, call the number given in the guarantee.
If repairs are required, contact De’Longhi Customer Services only.
The addresses are given in the guarantee certificate provided with the appliance.
8
PRELIMINARY CHECKS
Description of the accessories
(page 2 - C )
C1. Measure
C2. Cleaning brush
C3. Descaler bottle
C4. Water softener filter (certain models only)
Checking the appliance
After removing the packaging, make sure the
product is complete and undamaged and that all
accessories are present.
Do not use the appliance if it is visibly damaged.
Contact De’Longhi Customer Services.
Description of lights
Light flashing: the machine is heating up
or a rinse cycle is underway.
E
E
E
E
E
E
Installing the appliance
The appliance is delivering two cups of
coffee.
Important!
When installing the appliance, respect the following safety warnings:
UÊÊ /
iÊ>««>ViÊ}ÛiÃÊvvÊ
i>Ì°ÊÊ
After positioning the appliance on the
worktop, leave a space of at least 1,18 in/
3 cm between the surfaces of the appliance
and the side and rear walls and at least 5,9
in/ 15 cm above the coffee maker.
UÊÊ 7>ÌiÀÊ «iiÌÀ>Ì}Ê Ì
iÊ VvviiÊ >iÀÊ VÕ`Ê
cause damage.
Do not place the appliance near taps or sinks.
UÊÊ /
iÊ>««>ViÊVÕ`ÊLiÊ`>>}i`ÊvÊÌ
iÊÜ>ÌiÀÊ
it contains freezes.
Do not install the appliance in a room where
the temperature could drop below freezing
point.
UÊÊ ÀÀ>}iÊÌ
iÊ«ÜiÀÊV>LiÊÊÃÕV
Ê>ÊÜ>ÞÊÌ
>ÌÊÌÊ
cannot be damaged by sharp edges or contact with hot surfaces (e.g. electric hot plates).
“Energy Saving” mode is active.
Light on steadily: the “steam” function
has been selected;
Light flashing: you must turn the steam
knob.
An alarm is displayed on the control
panel (see the section: “Explanation of
lights”).
Light flashing: the water softener filter
must be replaced.
Light on steadily: the grounds container
is missing and must be inserted in the
appliance;
Light flashing: the grounds container is
full and must be emptied.
Light on steadily: the water tank is missing;
Connecting the appliance
Light flashing: there is not enough water
in the tank.
Important!
Check that the mains power supply voltage corresponds to the value indicated on the rating plate on the bottom of the appliance.
If the power socket does not match the plug on
the appliance, have the socket replaced with a
suitable type by a qualified professional.
Light flashing: the appliance must be descaled (see the section “Descaling”).
Indicates the button to press to exit the
programming menu or selected function.
Indicates the button to press to confirm
the function selected in the programming menu.
Using the appliance for the first time
Please note!
UÊ vviiÊ
>ÃÊLiiÊÕÃi`ÊÌÊv>VÌÀÞÊÌiÃÌÊÌ
iÊ>«pliance and it is therefore completely normal
for there to be traces of coffee in the mill.
The machine is, however, guaranteed to be
new.
9
UÊÊ 9ÕÊ Ã
Õ`Ê VÕÃÌâiÊ Ü>ÌiÀÊ
>À`iÃÃÊ >ÃÊ
soon as possible following the instructions
in the section “Setting water hardness” on
page 17.
Danger of burns!
During rinsing, a little hot water comes out of
the coffee spouts and is collected in the drip tray
underneath.
Avoid contact with splashes of water.
UÊ /Ê ÌÕÀÊ Ì
iÊ >««>ViÊ ]Ê «ÀiÃÃÊ Ì
iÊ
button (fig. 7). The
light flashes while
the appliance is heating up and performing
an automatic rinse cycle. By circulating hot
water, the appliance heats both the boiler and
the internal circuits.
The appliance is at temperature when the
light goes off and the lights corresponding to the
selected coffee taste and quantity come on.
ÜÊÌ
iÊÃÌÀÕVÌÃ\
1. Remove the water tank, fill to the MAX line
with fresh water (fig. 1A) then put back in the
appliance (fig. 1B).
Ó°ÊÊ *>ViÊ >Ê VÌ>iÀÊ ÜÌ
Ê >Ê ÕÊ V>«>VÌÞÊ
of 3.4oz (100ml) under the cappuccino maker (fig. 2).
ΰÊÊ *Õ}ÊÌ
iÊ>««>ViÊÌÊÌ
iÊ>ÃÊÃViÌÊ>`Ê
place the main switch on the back of the appliance in the I position (fig. 3).
4. The
light flashes on the control panel
(fig. 4).
5. Turn the steam knob to the “I” position (fig.
5) and press the
button to confirm (fig.
6). The appliance delivers water from the
cappuccino maker then goes off.
6. Turn the steam knob to the “0” position.
The coffee maker is now ready for normal use.
TURNING THE APPLIANCE OFF
Each time the appliance is turned off, it performs
an automatic rinse cycle which cannot be interrupted.
Danger of burns!
During rinsing, a little hot water flows from the
coffee spouts. Avoid contact with splashes of
water.
Please note!
UÊ 7
iÊÕÃ}ÊÌ
iÊ>««>ViÊvÀÊÌ
iÊwÀÃÌÊÌi]Ê
you need to make 4-5 cups of coffee or 4-5
cappuccinos before the appliance starts to
give satisfactory results.
UÊ To enjoy your coffee even more and improve
the performance of your appliance, we recommend installing a water softener filter as
`iÃVÀLi`ÊÊÌ
iÊÃiVÌʺ7/,Ê-"/ ,Ê
/,»°ÊÊ
If your model is not provided with a filter, you
can request one from De’Longhi Customer
Services.
To turn the appliance off, press the
button
(fig. 7). The appliance performs a rinse cycle,
then goes off.
Please note!
If the appliance is not used for an extended period,
place the main switch in the 0 position (fig. 3).
Important!
To avoid damaging the appliance, never place the
main switch (fig. 3) in the 0 position while the
appliance is on.
TURNING THE APPLIANCE ON
MENU SETTINGS
When you access the programming menu by pressing
the P button, the following menu settings are available:
Descale, Auto-off, Set temperature, Energy Saving, Water hardness, Install filter, Replace filter, Default values,
Statistics.
Please note!
Before turning the appliance on, make sure the
main switch on the back of the appliance is in the
I position (fig. 3).
Each time the appliance is turned on, it performs
an automatic preheat and rinse cycle which cannot be interrupted.
The appliance is ready for use only after completion of this cycle.
Descale
ÀÊÃÌÀÕVÌÃÊÊ`iÃV>}]ÊÃiiÊ«>}iʣȰÊ
10
Auto-off
Î°Ê *ÀiÃÃÊÌ
iÊ
button. The OK light flashes.
{°Ê *ÀiÃÃÊÌ
iÊ
button to activate, or
to
deactivate, the energy saving mode;
x°Ê *ÀiÃÃÊÌ
iÊ
button to exit the menu.
When the function is active, the E light remains
on.
Please note
The appliance is set to turn off automatically if
not used for 2 hours.
The time can be changed so that the appliance
switches off after 15 or 30 minutes, or after 1,
2 or 3 hours.
£°ÊÊ *ÀiÃÃÊÌ
iÊP button to enter the menu;
2. Turn the selection knob (fig. 8) until the
light comes on;
ΰÊÊ *ÀiÃÃÊÌ
iÊ
button to select the function;
4. Turn the selection knob until the lights corresponding to the number of hours before the
appliance goes off automatically come on:
15 minutes
30 minutes
1 hour
2 hours
3 hours
x°Ê *ÀiÃÃÊÌ
iÊÊ
button to confirm;
È°Ê *ÀiÃÃÊÌ
iÊ
button to exit the menu.
Auto-off is programmed.
Please note!
A few seconds may elapse between energy saving mode and delivery of the first coffee as the
appliance must heat up again.
Setting water hardness
ÀÊÃÌÀÕVÌÃÊÊÃiÌÌ}ÊÜ>ÌiÀÊ
>À`iÃÃ]ÊÃiiÊ
page 17.
Install filter
ÀÊ ÃÌÀÕVÌÃÊ Ê
ÜÊ ÌÊ ÃÌ>Ê Ì
iÊ wÌiÀ]Ê ÃiiÊ
the section “Installing the filter” on page 17.
Replacing the filter
ÀÊÃÌÀÕVÌÃÊÊ
ÜÊÌÊÀi«>ViÊÌ
iÊwÌiÀ]ÊÃiiÊ
the section “Water softener filter” on page 17.
Setting the temperature
To modify the temperature (low, medium, high)
of the water used to make the coffee, proceed
as follows:
£°ÊÊ *ÀiÃÃÊÌ
i P button to enter the menu;
2. Turn the selection knob until the
light
comes on;
Î°Ê *ÀiÃÃÊÌ
i
button;
4. Turn the selection knob until the lights corresponding to the required temperature come
on:
LOW
MEDIUM
HIGH
x°ÊÊ *ÀiÃÃÊÌ
iÊ
È°ÊÊ *ÀiÃÃÊÌ
iÊ
Default values (reset)
This resets all menu settings and programmed
quantities back to the default values.
£°ÊÊ *ÀiÃÃÊÌ
iÊP button to enter the menu;
2. Turn the selection knob until the
lights come on;
ΰÊÊ *ÀiÃÃÊÌ
iÊ
button. The OK light flashes;
x°ÊÊ *ÀiÃÃÊÌ
iÊ
button to confirm and exit.
Statistics function
This displays statistics relating to the machine.
To display, proceed as follows:
£°ÊÊ *ÀiÃÃÊÌ
iÊP button to enter the menu;
2. Turn the selection knob until the
light
comes on;
Î°Ê *ÀiÃÃÊÌ
iÊ
button;
4. When the selection knob is turned and the
corresponding light flashes, the following
information is displayed:
how many coffees have been made;
how many times the machine has been
descaled;
the total number of litres of water delivered;
button to confirm;
button to exit the menu.
Energy Saving
Use this function to enable or disable energy
saving mode. When activated, it reduces energy
consumption while the machine is on in compliance with current European regulations.
£°ÊÊ *ÀiÃÃÊÌ
iÊP button to enter the menu;
2. Turn the selection knob until the light E comes on.
11
0.6-6oz
20-180ml
-
how many times the water softener filter
has been replaced.
5. The quantities are indicated by the flashing
beans as follows:
TENS OF
THOUSANDS THOUSANDS HUNDREDS
TENS
È°Ê *ÀiÃÃÊÌ
i
x3
4oz
120ml
Customizing the “my coffee” quantity
The appliance is set by default to automatically
deliver 1oz/ 30ml of “my coffee”.
To modify the quantity, proceed as follows:
£°Ê *>ViÊ >Ê VÕ«Ê Õ`iÀÊ Ì
iÊ VvviiÊ Ã«ÕÌÃÊ w}°Ê
10).
2. Turn the selection knob (fig. 8) until the
light comes on.
Î°Ê *ÀiÃÃÊÌ
iÊ£ÊVÕ«ÊLÕÌÌÊ
(fig. 11) until the
light starts flashing and the appliance
starts delivering coffee, then release the button.
4. As soon as the coffee in the cup reaches the
required level, press the 1 cup button
(fig. 11) again.
The quantity of coffee in the cup has now been
programmed.
x7
Adjusting the coffee mill
The coffee mill is preset in the factory to make
coffee correctly and should not require adjusting
initially. However, if after making the first few
coffees you find that the coffee is too thin and
not creamy enough or that delivery is too slow
(a drop at a time), this can be corrected by adjusting the grinding adjustment knob (fig. 12).
button twice to exit the menu.
Selecting the coffee taste
The appliance is set by default to make coffee
with a standard taste.
9ÕÊV>Ê>ÃÊV
ÃiÊiÊvÊÌ
iÃiÊÌ>ÃÌiÃ\
Mild Standard Strong
3oz
90ml
UNITS
MAKING COFFEE
Extra
mild
2oz
60ml
MY COFFEE
Example: you want to know how many coffees have been made. Enter the menu and
select the
light.
Count the flashes of the beans - 137 coffees
have been made.
x1
1.35oz
40ml
Please note!
The grinding adjustment knob must only be turned when the coffee mill is in operation.
If the coffee is delivered too slowly or not at all,
turn one click clockwise towards “7”.
ÀÊvÕiÀÊL`i`ÊVÀi>iÀÊVvvii]ÊÌÕÀÊiÊVVÊ
counter-clockwise towards
“1” (do not turn more than
one click at a time otherwise
the coffee could be delivered a drop at a time). These
adjustments will only be evident after at least 2 cups of
coffee have been delivered.
If this adjustment does not obtain the desired
result, turn the knob another click.
Extra
strong
Selecting the quantity of coffee in the cup
The appliance is set by default to make a standard quantity of coffee.
To select the quantity of coffee, turn the selection
knob (fig. 8) until the light corresponding to the
required quantity of coffee comes on:
4
To change the taste, press the
button
(fig. 9) repeatedly until the required taste appears.
12
Tips for a hotter coffee
ÀÊ >Ê
ÌÌiÀÊ Vvvii]Ê LivÀiÊ `iÛiÀÞÊ ÞÕÊ >ÀiÊ Àicommended to:
UÊ ÀÃiÊÌ
iÊ>««>ViÊÌ
ÀÕ}
ÊLÞÊ«ÀiÃÃ}ÊÌ
iÊ
button. Hot water flows out of the coffee
spouts and heats the internal circuit of the
machine so that the coffee delivered will be
hotter.
UÊÊ Ü>ÀÊÌ
iÊVÕ«ÃÊÜÌ
Ê
ÌÊÜ>ÌiÀÊÕÃ}ÊÌ
iÊ
ÌÊ
water function);
UÊÊ ÃiiVÌÊ Ì
iÊ º
}
»Ê VvviiÊ Ìi«iÀ>ÌÕÀiÊ Ê Ì
iÊ
menu.
Important!
UÊ vÊÌ
iÊVvviiÊÃÊ`iÛiÀi`Ê>Ê`À«Ê>ÌÊ>ÊÌi]ÊÌÊ
thin and not creamy enough or too cold, read
the tips in the “Troubleshooting” section on
page 21.
UÊ Lights may be displayed on the control panel during use. Their meaning is given in the
section “Explanation of the lights” on page
19.
Making coffee using coffee beans
UÊ
Making coffee using pre-ground coffee
Important!
iÛiÀÊ >``Ê «Ài}ÀÕ`Ê
coffee when the machine
is off or it could spread
through the inside of the
machine and dirty it. This
could damage the appliance.
UÊÊ iÛiÀÊ ÕÃiÊ ÀiÊ Ì
>Ê £Ê iÛiÊ i>ÃÕÀiÊ ÀÊ ÌÊ
could dirty the inside of the coffee maker or
block the funnel.
Important!
Do not use caramelized or candied coffee beans
as they could stick to the coffee mill and make it
unusable.
£°ÊÊ ÊÌ
iÊVÌ>iÀÊÜÌ
ÊVvviiÊLi>ÃÊw}°Ê£Î®°
Ó°ÊÊ *>ViÊÕ`iÀÊÌ
iÊVvviiÊëÕÌÃ\
- 1 cup if you want one coffee (fig. 10);
- 2 cups if you want 2 coffees.
3. Lower the spouts as near as possible to the
cup. This makes a creamier coffee (fig. 14).
{°Ê *ÀiÃÃÊÌ
iÊLÕÌÌÊVÀÀië`}ÊÌÊÌ
iÊÕber of coffees required (1 cup
or 2
cups
, figs. 11 and 15).
x°Ê *Ài«>À>ÌÊLi}ÃÊ>`ÊÌ
iÊ}
ÌÃÊVÀÀiëding to the taste and quantity of coffee selected are displayed.
Once the coffee has been made, the appliance
prepares for use again.
Please note:
If you use pre-ground coffee, you can only make
one cup of coffee at a time.
£°Ê *ÀiÃÃÊ Ì
iÊ
button repeatedly (fig. 9)
until the
symbol appears.
Ó°ÊÊ *ÕÌÊiÊiÛiÊi>ÃÕÀiÊvÊ«Ài}ÀÕ`ÊVvviiÊ
into the funnel (fig. 16).
ΰÊÊ *>ViÊ>ÊVÕ«ÊÕ`iÀÊÌ
iÊVvviiÊëÕÌð
{°Ê *ÀiÃÃÊÌ
iÊ£ÊVÕ«ÊVvviiÊLÕÌÌÊ
(fig. 11).
x°Ê *Ài«>À>ÌÊLi}ðÊÊ
Please note:
UÊ 7
iÊÌ
iÊVvviiÊ>iÀÊÃÊ>}ÊVvvii]Ê`ilivery can be interrupted at any moment by
pressing one of the two coffee buttons (
or
).
UÊ At the end of delivery, to increase the quantity of coffee in the cup, just press (within 3
seconds) one of the coffee buttons (
or
).
MAKING CAPUCCINO
Important! Danger of burns
During preparation, steam is given off. Take care
to avoid scalds.
1. When making cappuccino, prepare the coffee in a large cup;
Ó°ÊÊ Ê>ÊVÌ>iÀÊÜÌ
Ê>LÕÌÊΰ{âÉÊ£ääÊ}À>ÃÊvÊ
milk for each cappuccino to be made. In choosing the size of the container, bear in mind
that the milk doubles or triples in volume.
Please note:
ÀÊ
ÌÌiÀÊVvvii]ÊÃiiÊÌ
iÊÃiVÌʺTips for a hotter coffee”.
Ê
13
Please note!
ÀÊ >Ê ÀV
iÀÊ `iÃiÀÊ vÀÌ
]Ê ÕÃiÊ Ãi`Ê ÀÊ
partially skimmed milk at refrigerator tempe-
ΰÊ
4.
5.
6.
Ê
À>ÌÕÀiÊ>LÕÌÊ{£cÉxc
®°ÊÊ
To avoid milk with poor froth or large bubbles, always clean the cappuccino maker as
described in the section “Cleaning the cappuccino maker after use”.
*ÀiÃÃÊÌ
iÊ
button. The
light flashes.
After a few seconds, the
light flashes
telling you to turn the steam knob.
Immerse the cappuccino maker in the milk
container (fig. 17). Take care not to immerse the raised line on the cappuccino maker
(shown by the arrow in fig. 18).
Turn the steam knob to the I position (fig.
4) . Steam is delivered from the cappuccino
maker, giving the milk a creamy frothy appearance and making it more voluminous.
To obtain a creamier froth, rotate the container with slow upward movements.
9ÕÊÃ
Õ`ÊÌÊ`iÛiÀÊÃÌi>ÊvÀÊÀiÊÌ
>ÊÎÊ
minutes at a time.
4. Make sure the two holes shown by the arrow
in fig. 21 are not blocked.
If necessary, clean with a pin.
5. Wash all parts of the cappuccino maker thoroughly with a sponge and warm water.
6. Replace the nozzle and put the cappuccino
maker back on the nozzle (fig. 22), turning it
and pushing it upwards until it is attached.
HEATING WATER
Important! Danger of burns.
Never leave the machine unsupervised while delivering hot water. Stop delivery of hot water as
described below when the cup is full.
The cappuccino maker becomes hot while water
is being delivered and must be held by the handle only. The hot water spout becomes hot while
water is being delivered and must be handled by
the handle only.
£°ÊÊ *>ViÊ>ÊVÌ>iÀÊÕ`iÀÊÌ
iÊV>««ÕVVÊ>ker as close as possible to avoid splashes.
2. Turn the steam knob to the I position. Delivery begins.
3. Stop by turning the steam knob to the 0 position.
Important! Danger of burns
Stop steam delivery before removing the
container with the frothed milk to avoid
burns caused by splashes of boiling milk.
7. Add the milk froth to the coffee prepared previously.
The cappuccino is ready. Sweeten to taste
and, if desired, sprinkle the froth with a little
cocoa powder.
Please note!
If “Energy Saving” mode is active, you may have
to wait a few seconds before the hot water is delivered.
Cleaning the cappuccino maker after use.
Clean the cappuccino maker each time you use it
to avoid the build-up of milk residues or blockages.
CLEANING
Cleaning the coffee maker
The following parts of the machine must be cleaned regularly:
- coffee grounds container (A13),
- drip tray (A17) and condensate tray (A14),
- water tank (A9),
- coffee spouts (A12),
- pre-ground coffee funnel (A6),
- inside of the machine, accessible after opening the infuser door (A10),
- infuser (A11).
Important! Danger of burns
When cleaning the cappuccino maker, a little hot
water comes out.
Avoid contact with splashes of water.
1. Discharge a little water for a few seconds by
rotating the steam knob to the I position.
Then turn the steam knob to the 0 position to
stop the flow of hot water.
2. Wait a few minute for the cappuccino maker
to cool down. Turn the cappuccino maker
outwards and remove it by pulling it downwards (fig. 19).
3. Remove the nozzle downwards (fig. 20).
Important!
UÊ ÊÌÊÕÃiÊÃÛiÌÃ]Ê>LÀ>ÃÛiÊ`iÌiÀ}iÌÃÊÀÊ
alcohol to clean the coffee maker.
With De’Longhi superautomatic coffee makers, you need not use chemical products to
14
clean the machine.
The descaler recommended by De’Longhi is
made from natural and completely biodegradable substances.
UÊ
iÊvÊÌ
iÊV«iÌÃÊV>ÊLiÊÜ>Ã
i`ÊÊ>Ê
dishwasher.
UÊ ÊÌÊ ÕÃiÊ iÌ>ÊLiVÌÃÊÌÊ ÀiÛiÊiVÀÕstations or coffee deposits as they could
scratch metal or plastic surfaces.
3. Check the condensate tray and empty if necessary.
4. Replace the drip tray and grounds container.
Cleaning the inside of the coffee maker
Danger of electric shock!
Before cleaning internal parts, the machine must
be turned off (see “Turning off”) and unplugged
from the mains power supply.
Never immerse the coffee maker in water.
Cleaning the coffee grounds container
When the
light flashes, the coffee grounds
container must be emptied and cleaned.
Unless you clean the grounds container, the light
will continue to flash and the appliance cannot be
used to make coffee.
To clean (with the machine on):
UÊ ,iÛiÊ Ì
iÊ `À«Ê ÌÀ>ÞÊ w}°Ê Óή]Ê i«ÌÞÊ >`Ê
clean.
UÊÊ «ÌÞÊÌ
iÊ}ÀÕ`ÃÊVÌ>iÀÊ>`ÊVi>ÊÌ
roughly to remove all residues left on the
bottom.
UÊÊ
iVÊÌ
iÊV`iÃ>ÌiÊÌÀ>ÞÊÀi`®Ê>`Êi«ÌÞÊvÊ
necessary.
1. Check regularly (about once a week) that the
inside of the appliance (accessible after removing the drip tray) is not dirty.
If necessary, remove coffee deposits with the
brush and a sponge.
2. Remove the residues with a vacuum cleaner
(fig. 25).
Cleaning the water tank
1. Clean the water tank (A9) regularly (about
once a month and whenever you replace the
water softener filter (if provided) with a damp
cloth and a little mild washing up liquid.
2. Remove the filter (if present) and rinse with
running water.
3. Replace the filter (if provided), fill the tank
with fresh water and replace the tank.
Important!
When removing the drip tray, the grounds container must be emptied, even if it contains few
grounds.
Cleaning the coffee spouts
1. Clean the coffee spouts with a sponge or
cloth (fig. 26A).
2. Check the holes in the coffee spout are not
blocked.
If necessary, remove coffee deposits with a
toothpick (fig. 26B).
If this is not done, when you make the next coffees, the grounds container may fill up more than
expected and clog the machine.
Cleaning the drip tray and condensate tray
Important!
If the drip tray is not emptied regularly, the water
could overflow from the edge and seep inside or
around the coffee maker.
This could damage the machine, the surface it
rests on or the surrounding area.
The drip tray is fitted with a level indicator (red)
showing the level of water it contains (fig. 24).
Before the indicator protrudes from the cup tray,
the drip tray must be emptied and cleaned.
To remove the drip tray:
1. Remove the drip tray and the grounds container (fig. 23);
2. Empty the drip tray and grounds container
and wash them;
Cleaning the pre-ground coffee funnel
Check regularly (about once a month ) that the
pre-ground coffee funnel is not blocked.
If necessary, remove coffee deposits with the
brush supplied.
Cleaning the infuser
The infuser (A11) must be cleaned at least once
a month.
15
9. Replace the water tank.
PU
SH
Important!
The infuser may not be extracted when the machine is on.
1. Make sure the machine is correctly turned
off (see “Turning the appliance off” on page
10).
2. Remove the water tank.
3. Open the infuser door (fig. 27) on the right
side.
{°ÊÊ *ÀiÃÃÊ Ì
iÊ ÌÜÊ Ài`Ê Àii>ÃiÊ LÕÌÌÃÊ Ü>À`ÃÊ
and at the same time pull the infuser outwards (fig. 28).
DESCALE
Descale the appliance when the
control panel flashes.
Important!
RINSE WITH WATER ONLY
NO DISHWASHING LIQUID - NO DISHWASHER
Clean the infuser without using dishwashing
up liquid as it could be damaged.
5. Soak the infuser in water for about 5 minutes, then rinse under the tap.
6. Use the brush to remove any coffee residues
left in the infuser housing, visible through
the infuser door.
7. After cleaning, replace the infuser by sliding
it onto the internal support, then push the
*1-ÊÃÞLÊvÕÞÊÊÕÌÊÌÊVVÃÊÌÊ«>ce.
light on the
Important!
Descaler contains acids which may irritate the
skin and eyes.
It is vital to respect the manufacturer’s safety
warnings given on the descaler pack and the
warnings relating to the procedure to follow in
the event of contact with the skin and eyes.
Please note!
Use De’Longhi descaler only.
Under no circumstances should you use sulphamic or acetic based descalers. Their use invalidates the guarantee.
>ÕÀiÊÌÊ`iÃV>iÊÌ
iÊ>««>ViÊ>ÃÊ`iÃVÀLi`Ê>ÃÊ
invalidates the guarantee.
1. Turn the machine on.
Ó°ÊÊ *ÀiÃÃÊÌ
iÊP button to enter the menu.
3. Turn the selection knob until the
light is
displayed.
4. Select by pressing the
ÊLÕÌÌ°Ê/
iÊ"Ê
}
ÌÊy>Ã
iðÊ*ÀiÃÃÊÌ
iÊ
button again to
confirm.
5. Completely empty the water tank (A9) and
remove the water softener filter (if present).
È°ÊÊ *ÕÀÊÌ
iÊ`iÃV>iÀÊÌÊÌ
iÊÌ>ÊÕ«ÊÌÊÌ
iÊiÛiÊ
A (corresponding to a 3.4oz/ 100ml pack)
marked on the back of the tank (fig. 29A),
then add water (3.4oz./ 100ml) up to level B
(fig. 29B).
Ç°ÊÊ *>ViÊ >Ê i«ÌÞÊ VÌ>iÀÊ ÜÌ
Ê >Ê ÕÊ
capacity of 50oz/ 1,5l under the cappuccino
maker (A19) (fig. 5).
Infuser
support
Please note!
If the infuser is difficult to insert, before insertion, adapt it to the right size by pressing the two
levers shown in the figure.
7. Once inserted, make sure the two red buttons have snapped out.
8. Close the infuser door.
Important! Danger of burns
Hot water containing acid flows from the cappuccino maker.
16
Avoid contact with splashes of water.
°Ê *ÀiÃÃÊ Ì
iÊ
button to confirm introduction of the solution. The
light flashes
telling you to turn the steam knob.
10. Turn the steam knob to the I position
The descaling program starts and the descaler liquid comes out of the cappuccino maker.
The descale program automatically performs
a series of rinses and pauses to remove limescale deposits from inside the machine.
After about 30 minutes, the water tank is empty.
/
iÊ "Ê >`Ê
lights come on and the
light flashes.
11. Empty the container used to collect the descaler solution and replace it under the cappuccino maker.
12. Remove the water tank, empty, rinse under
running water, fill with clean water and replace. The
light goes off.
13. Hot water comes out of the cappuccino maker.
14. When the water tank is completely empty,
is displayed.
15. Turn the knob to the 0 position, insert the
filter (if present), fill the water tank and the
appliance is ready for use.
Level 1
Set water hardness
£°Ê *ÀiÃÃÊÌ
iÊP button to enter the menu.
2. Turn the selector knob until the
light is
selected.
3. Confirm the selection by pressing the
button.
4. Turn the selection knob and set the level
shown by the indicator paper (see previous
paragraph).
LEVEL 1
LEVEL 2
LEVEL 3
LEVEL 4
x°Ê *ÀiÃÃÊÌ
iÊ
button to confirm the setting.
È°Ê *ÀiÃÃÊÌ
iÊ
button to exit the menu.
The machine is now reprogrammed with the new
water hardness setting.
SETTING WATER HARDNESS
WATER SOFTENER FILTER
Level 2
Level 3
Level 4
Certain models are fitted with a water softener
filter. If this is not the case with your model, you
are recommended to purchase one from De’Longhi Customer Services.
To use the filter correctly, follow the instructions
below.
The
light is displayed after a period of time
established according to the water hardness set.
The machine is factory set for a hardness value
of 4. The machine can also be programmed according to the hardness of the mains water in the
various regions so that the machine needs to be
descaled less often.
Installing the filter
1. Remove the filter from the packaging.
2. Turn the date indicator disk (see fig. 30) until
the next 2 months of use are displayed.
Measuring water hardness
1. Remove the “TOTAL HARDNESS TEST” indicator paper attached to this manual from its
pack.
2. Immerse the paper completely in a glass of
water for one second.
3. Remove the paper from the water and shake
lightly.
After about a minute, 1, 2, 3, or 4 red squares
form, depending on the hardness of the water. Each square corresponds to one level.
Please note:
The filter lasts about two months if the appliance
is used normally. If the coffee maker is left unused with the filter installed, it will last a maximum
of three weeks.
3. Remove the tank from the appliance and fill
with water.
4. Insert the filter in the water tank and immerse it completely, sloping it to enable the air
17
bubbles to escape (fig. 31).
5. Insert the filter in the filter housing (fig. 32A)
and press as far as it will go.
6. Close the tank with the lid (fig. 32B), then
replace the tank in the machine.
12. Turn the steam knob and press the
button.
13. At the end of delivery, the
light flashes.
Close the knob and the appliance returns automatically to the “ready for coffee” state.
The new filter is now active and you can use the
coffee maker.
When you install the filter, you must notify the
appliance of its presence.
Ç°ÊÊ *ÀiÃÃÊÌ
iÊP button to enter the menu;
8. Turn the selection knob until the
and
lights come on.
°ÊÊ *ÀiÃÃÊÌ
i
OK button.
£ä°Ê*ÀiÃÃÊÌ
iÊ
button to confirm the selection.
££°Ê*>ViÊ>ÊVÌ>iÀÊ°ÊV>«>VÌÞ\Ê£ääÊ®ÊÕder the cappuccino maker.
12. Turn the steam knob and press the
button.
13. At the end of delivery, the
light flashes.
Close the knob and the appliance returns automatically to the “ready for coffee” state.
The new filter is active and you can now use the
coffee maker.
Removing the filter
If you want to continue using the appliance without a filter, you must remove it and notify the
appliance of its removal as follows:
1. Extract the tank and exhausted filter;
Ó°ÊÊ *ÀiÃÃÊÌ
i P button to enter the menu;
3. Turn the selection knob (fig. 8) until the
and
lights come on;
{°Ê *ÀiÃÃÊÌ
iÊ
button. The OK light flashes;
x°Ê *ÀiÃÃÊÌ
iÊ
button to confirm use of the
appliance without the filter;
È°Ê *ÀiÃÃÊÌ
iÊ
button to exit the menu.
TECHNICAL SPECIFICATION
Voltage:
120V~ 60Hz
Absorbed power:
1350W
*ÀiÃÃÕÀi\ÊÊ
£xÊL>ÀÃ
Water tank capacity:
50.7 fl. oz. max.
Size LxHxD:
2,38x3,4x4,3 in.
Cable length:
11 ft.
Weight:
20,22 lb.
Coffee beans container capacity: 5,3 oz. max.
Replacing the filter
When the
light flashes, after two months
(see date indicator) or when the appliance has
not been used for 3 weeks, you should replace
the filter:
1. Remove the old filter;
2. Remove the new filter from the packaging.
3. Turn the date indicator disk (see fig. 30) until
the next 2 months of use are displayed (the
filter lasts about two months);
4. Refill the tank;
5. Insert the filter in the water tank and immerse it completely, sloping it to enable the air
bubbles to escape (fig. 31);
È°ÊÊ *>ViÊÌ
iÊwÌiÀÊÊÌ
iÊwÌiÀÊ
ÕÃ}Êw}°ÊÎÓ®Ê
and press as far as it will go. Close the tank
with the lid (fig. 32B), then replace the tank
in the machine;
Ç°ÊÊ *>ViÊ>ÊVÌ>iÀÊ°ÊV>«>VÌÞ\Ê£ääÊ®ÊÕder the cappuccino maker.
n°ÊÊ *ÀiÃÃÊÌ
iÊP button to enter the menu;
9. Turn the selection knob until the
and
lights come on.
£ä°ÊÊ*ÀiÃÃÊÌ
iÊ
button. The OK light flashes.
££°Ê*ÀiÃÃÊÌ
iÊ
button to confirm the selection.
18
EXPLANATION OF LIGHTS
LIGHT
POSSIBLE CAUSE
REMEDY
Insufficient water in the tank.
ÊÌ
iÊÌ>ÊÜÌ
ÊÜ>ÌiÀÊ>`ÊÃiÀÌÊÌÊVÀÀiVÌÞ]Ê
pushing it as far as it will go until it clicks
into place.
The tank is not correctly in place.
Insert the tank correctly and press as far as
it will go.
The grounds container (A13)
is full.
Empty the grounds container and drip tray,
clean and replace.
Important: when removing the drip tray, the
grounds container MUST be emptied, even if
it contains few grounds.
If this is not done, when you make the next
coffee, the grounds container may fill up more
coffee than expected and clog the machine.
After cleaning, the grounds
container has not been replaced.
Remove the drip tray and insert the grounds
container.
The grinding is too fine and the
coffee is delivered too slowly or
not at all.
Repeat coffee delivery and turn the grinding
adjustment knob (fig. 10) one click clockwise
towards “7” while the coffee mill is in
operation.
If after making at least 2 coffees delivery is
still too slow, repeat the correction procedure,
turning the grinding adjustment knob another
click until delivery is correct (see the section:
Adjusting the coffee mill on page 29).
If the problem persists, turn the steam knob
to the I position and deliver water from the
cappuccino maker.
19
LIGHT
POSSIBLE CAUSE
REMEDY
The “pre-ground coffee” function
has been selected without placing
any pre-ground coffee in the
funnel.
*>ViÊ«Ài}ÀÕ`ÊVvviiÊÊÌ
iÊvÕiÊÀÊ
deselect the “pre-ground” function.
The machine must be descaled.
The descaling procedure described in the
section “Descaling” needs to be performed as
soon as possible.
Too much coffee has been used.
Select a milder taste or reduce the quantity of
pre-ground coffee then make the coffee again.
The coffee beans have run out.
ÊÌ
iÊLi>ÃÊVÌ>iÀ
The pre-ground coffee funnel is
clogged.
Empty the funnel with the help of a brush as
described in the section “Cleaning the preground coffee funnel”.
The infuser has not been replaced
after cleaning.
Insert the infuser as described in the section
"Cleaning the infuser".
The inside of the appliance is
very dirty.
Clean the inside of the appliance thoroughly,
as described in the section "Cleaning and
maintenance". If the message is still displayed
after cleaning, contact customer service.
The filter needs to be replaced.
Replace the filter (see the section "Replacing
the water softener filter").
20
TROUBLESHOOTING
Below is a list of some of the possible malfunctions.
If the problem cannot be resolved as described, contact Customer Service.
PROBLEM
POSSIBLE CAUSE
REMEDY
The coffee is not hot
The cups were not preheated.
Warm the cups by rinsing them with hot
Ü>ÌiÀÊ*i>ÃiÊÌiÊÞÕÊV>ÊÕÃiÊÌ
iÊ
ÌÊÜ>ÌiÀÊ
function).
The infuser has cooled down because 2-3
minutes have elapsed since the last coffee
was made.
Before making the coffee, warm the infuser by
pressing the
button.
Low coffee temperature is set.
In the menu, set a high coffee temperature.
The coffee is ground too coarsely.
Turn the grinding adjustment knob one click
counter-clockwise towards “1” while the
coffee mill is in operation (fig. 10). Continue
one click at a time until coffee delivery is
satisfactory. The effect is only visible after
delivering two coffees (see “Adjusting coffee
mill”, page 12).
The coffee is unsuitable.
Use pre-ground or coffee beans for espresso
coffee makers
The coffee is delivered
too slowly or a drop at
a time.
The coffee is ground too finely.
Turn the grinding adjustment knob one click
clockwise towards “7” while the coffee mill is
in operation (fig. 10).
Continue one click at a time until coffee
delivery is satisfactory.
The effect is only visible after delivering 2
coffees (see the section: “Adjusting the coffee
mill” on page 12).
Coffee does not come
out of one of the
spouts.
The spouts are blocked.
Clean the spouts with a toothpick.
The frothed milk has
large bubbles
The milk is not cold enough or is not semiskimmed.
9ÕÊÃ
Õ`Ê`i>ÞÊÕÃiÊÃi`ÊÀÊÃi
skimmed milk at refrigerator temperature
>LÕÌÊ{£cÉÊxc
®°ÊvÊÌ
iÊÀiÃÕÌÊÃÊÃÌÊ
disappointing, try another brand of milk.
The milk is not frothed
Cappuccino maker is dirty
Clean as described in the section “Cleaning
the cappuccino maker after use” on page 31.
Steam delivery stops
A safety device stops steam delivery after 3
minutes.
Wait, then activate the steam function again.
The appliance does not
come on.
It is not plugged into the mains socket.
*Õ}ÊÌÊÌ
iÊ>ÃÊÃViÌ°Ê
The main switch is in O position.
*>ViÊÌ
iÊ>ÊÃÜÌV
ÊÊÌ
iÊÊ«ÃÌÊw}°Ê£®°
The coffee is thin or
not creamy enough.
21
LIMITED WARRANTY
/
ÃÊÜ>ÀÀ>ÌÞÊ>««iÃÊÌÊ>Ê«À`ÕVÌÃÊÜÌ
Êi½}
ÊÀÊiÜ`ÊLÀ>`Ê>ið
What does the warranty cover?
We warrant each appliance to be free from defects in material and workmanship. Our obligation under
this warranty is limited to repair at our factory or authorized service center of any defective parts or part
thereof, other than parts damaged in transit. In the event of a products replacement or return, the unit
must be returned transportation prepaid. The repaired or new model will be returned at the company
expense.
This warranty shall apply only if the appliance is used in accordance with the factory directions, which
accompany it, and on an Alternating current ( AC ) circuit.
How long does the coverage last?
This warranty runs for two years (2) from the purchase date found on your receipt and applies only to
the original purchaser for use.
What is not covered by the warranty?
The warranty does not cover defects or damage of the appliance, which result from repairs or alterations
to the appliance outside our factory or authorized service centers, nor shall it apply to any appliance,
which has been subject to abuse, misuse, negligence or accidents. Also, consequential and incidental
damage resulting from the use of this product or arising out of any breach of contract or breach of this
warranty are not recoverable under this warranty. Some states do not allow the exclusion or limitation
of incidental or consequential damage, so the above limitation may not apply to you.
How do you get service?
If repairs become necessary, see contact information below:
U.S. Residents: *i>ÃiÊVÌ>VÌÊÕÀÊÌÊvÀiiÊ
ÌiÊ>ÌÊÊä£nÈÈxÓnnÎÓÎÊä£nÈÈ>ÌÌiiÃÌ®ÊÊÀÊ}Ê
onto our website at www.delonghi.com.
Residents of Canada: *i>ÃiÊVÌ>VÌÊÕÀÊÌÊvÀiiÊ
ÌiÊ>ÌÊä£nnnÎÎxÈÈ{{ÊÀÊ}ÊÌÊÕÀÊÜiLÃÌiÊ
at www.delonghi.com.
Residents of Mexico: *i>ÃiÊVÌ>VÌÊÕÀÊÌÊvÀiiÊÕLiÀÊä£nääÇ££nnäxÊvÀÊ>ÃÃÃÌ>ViÊÀÊ}ÊÌÊ
our website at www.delonghi.com.
The above warranty is in lieu of all other express warranties and representations. All implied warranties
are limited to the applicable warranty period set forth above. This limitation does not apply if you enter
into an extended warranty with De’Longhi. Some states/countries do not allow limitations on how long
an implied warranty lasts, so the above exclusions may not apply to you. De’Longhi does not authorize
any other person or company to assume for it any liability in connection with the sale or use of its
appliance.
How does country law apply?
This warranty gives you specific legal rights, and you may also have other rights, which vary from state
to state/country to country.
22
ÍNDICE
LIMPIEZA .........................................50
Limpieza de la cafetera ..................................... 50
Limpieza del cajón de los posos de café .......... 50
Limpieza de la bandeja recogegotas y de la
bandeja recogedora del líquido de condensación
......................................................................... 50
Limpieza del interior de la cafetera ................... 51
Limpieza del depósito del agua ........................ 51
Limpieza de las boquillas de salida de café ...... 51
Limpieza del embudo para echar el café
premolido ........................................................ 51
Limpieza del grupo de infusión ........................ 51
ADVERTENCIAS IMPORTANTES ...............42
INSTRUCCIONES PARA EL CABLE CORTO ...... 42
INTRODUCCIÓN .................................43
Símbolos utilizados en las instrucciones ......... 43
Problemas y reparaciones ................................ 43
DESCRIPCIÓN ...................................43
Descripción del aparato .................................. 43
Descripción del panel de control ...................... 43
Descripción de los accesorios ......................... 44
Significado de los pilotos ................................. 44
DESCALCIFICACIÓN ............................52
OPERACIONES PRELIMINARES ...............44
PROGRAMAR LA DUREZA DEL AGUA ........52
Control del aparato .......................................... 44
Instalación del aparato ..................................... 44
Conexión del aparato ....................................... 44
Primera puesta en marcha del aparato ............. 45
Medir la dureza del agua .................................. 52
Programar la dureza del agua .......................... 53
FILTRO ABLANDADOR ..........................53
APAGADO DEL APARATO .......................45
Instalación del filtro ......................................... 53
Cambio del filtro .............................................. 53
Extracción del filtro .......................................... 54
PROGRAMACIONES DEL MENÚ ...............46
DATOS TÉCNICOS ...............................54
ENCENDIDO DEL APARATO ....................45
Descalcificación ............................................... 46
Autoapagado .................................................... 46
Programar la temperatura ................................ 46
Ahorro energético ............................................ 46
Programar la dureza del agua .......................... 46
Instalar filtro .................................................... 46
Cambio del filtro .............................................. 46
Valores de fábrica (reset) ................................. 46
Función de estadística ...................................... 47
SIGNIFICADO DE LOS PILOTOS ...............55
SOLUCIÓN DE LOS PROBLEMAS .............57
GARANTÍA LIMITADA (PARA LOS ESTADOS
UNIDOS SOLAMENTE) ..........................58
PREPARACIÓN DEL CAFÉ ......................47
Seleccionar el sabor del café ............................ 47
Seleccionar la cantidad de café por taza .......... 47
Personalizar la cantidad de “mi café” ............... 47
Regular el molinillo del café ............................. 48
Consejos para un café más caliente ................. 48
Preparación del café con café en granos .......... 48
Preparación del café con café premolido ......... 48
PREPARACIÓN DEL CAPUCHINO .............49
Limpieza del espumador después del uso ....... 49
PREPARACIÓN DEL AGUA CALIENTE .........50
41
ADVERTENCIAS IMPORTANTES
El uso de cualquier aparato eléctrico implica la observación de algunas reglas fundamentales. En particular:
UÊ i>Ê>ÌiÌ>iÌiÊ>ÃÊÃÌÀÕVViÃ
UÊ Ãi}ÖÀiÃiʵÕiÊ>ÊÌiÃÊÛÌ>i®Ê`iÊÃÕÊ>«>À>ÌÊijVÌÀVÊVÀÀië`>ÊVÊiÊ`V>`Ê>Êv`Ê`iÊ
la máquina.
UÊ
Ê̵ÕiÊ>ÃÊÃÕ«iÀwViÃÊV>iÌi]ÊÕÃ>`Ê>ÃÊi«Õ>`ÕÀ>ÃÊ>«À«>`>ð
UÊ *>À>Ê«ÀÌi}iÀÃiÊ`iÊiÛiÌÕ>iÃÊÀiÃ}ÃÊijVÌÀVÃÊÊÃÕiÀ>ÊiÊV>Li]Ê>ÊL>ÃiʵÕiÊVÌiiÊ>ÊV>Û>Ê
Ê>ÊV>viÌiÀ>ÊiÊ>}Õ>ÊÊiÊ}ÖÊÌÀʵÕ`°Ê Ê`iiÊiÊ>«>À>ÌÊ>Ê>ÃÊ`iÊÃÊÃ]ÊÊÊ`iiÊ
funcionando sin vigilancia.
UÊ ,iÌÀiÊ>ÊV>Û>Ê`iÊÌ>VÀÀiÌiÊVÕ>`ÊiÊ>«>À>ÌÊÊiÃÌjÊiÊÕÃÊÊ>ÌiÃÊ`iÊÀi>â>ÀÊÃÕÊ«iâ>°
UÊ
Ê«}>ÊiÊvÕV>iÌÊiÊ>«>À>ÌÊVÊiÊV>LiÊÊiÊiV
ÕviÊ`>>`Ã]Ê`iëÕjÃÊ`iÊÕÊvÕV>iÌÊ>>Ê`iÊ>«>À>ÌÊÊVÕ>`ÊiÊ>«>À>ÌÊÃiÊ
>Þ>Ê`>>`Ê`iÊVÕ>µÕiÀÊ`°ÊÀ>ÃiÊ>Ê
centro de servicio más cercano para la atención de problemas y reparaciones.
UÊ ÊÕÃÊ`iÊ>VViÃÀÃÊÊ`V>`ÃÊ«ÀÊiÊv>LÀV>ÌiÊ«Õi`iÊÃiÀÊ>ÊV>ÕÃ>Ê`iÊVi`Ã]Ê`iÃV>À}>ÃÊ
eléctricas o lesiones.
UÊ
ÊÕÌViÊiÊ>«>À>ÌÊiÊiÝÌiÀÀið
UÊ
Ê`iiʵÕiÊiÊV>LiÊ`iÊ>iÌ>VÊÃiÊ`LiÊiÊ>ÊÌ>L>ÊÊÃÕ«iÀwViÊ`iÊÌÀ>L>Ê«>À>ÊiÛÌ>ÀÊ>Ì>ÃV>ÀÃiÊ
o tropezar accidentalmente.
UÊ
Ê>ViÀµÕiÊiÊ>«>À>ÌÊÞÊ>ÃÊ«>ÀÌiÃÊijVÌÀV>ÃÊÊ>Ê
ÀÃÊijVÌÀVÃ]ÊiÃÌÕv>ÃÊÕÊ
ÀÃÊ>Ê}>ðÊ
UÊ iVÌiÊiÊiV
ÕviÊ>ÊÌ>VÀÀiÌi°Ê*>À>ÊÀiÌÀ>À>]Ê>«>}ÕiÊiÊ>«>À>ÌÊÞÊÕi}Ê`iÃViVÌiÊiÊiV
Õfe.
UÊ
ÊÕÌViÊiÊ>«>À>ÌÊ«>À>ÊÕÃÃÊ`viÀiÌiÃÊ>ÊÃÊ`V>`ðÊÊ>«>À>ÌÊÃiÊ`iLiÊÕÌâ>ÀÊÃÊ«>À>Ê>«V>ViÃÊ`jÃÌV>ðÊÊv>LÀV>ÌiÊÀiV
>â>ÊVÕ>µÕiÀÊÀiëÃ>L`>`Ê«ÀÊiÛiÌÕ>iÃÊ`>ÃÊ`iÀÛ>`ÃÊ
`iÊÃÕÊÕÃÊ>`iVÕ>`]ÊVÀÀiVÌÊÊÀÀiëÃ>Li°
ATENCIÓN: Para evitar el peligro de incendio o quemaduras, no retire la parte superior del aparato.
Al interior no debe encontrarse ningún elemento del usuario. ¡Las eventuales reparaciones deben
ser realizadas por los Centros de Servicio Autorizados !
CONSERVE ESTAS INSTRUCCIONES
ESTE APARATO ESTÁ DESTINADO AL USO DOMÉSTICO
INSTRUCCIONES PARA EL CABLE CORTO
(sólo para Estados Unidos)
Se suministra un cable de alimentación corto para reducir los riesgos consecuentes de un enganche o tropezadura con un cable largo.
Ê -iÊiVÕiÌÀ>Ê`ëLiÃÊV>LiÃÊ`iÊ>iÌ>VÊÃi«>À>LiÃÊ?ÃÊ>À}ÃÊÊV>LiÃÊ`iÊ«À}>V]Ê
los cuales se podrán utilizar con tal de que se preste la máxima atención.
Ê -ÊÃiÊÕÌâ>ÊÕÊV>LiÊ`iÊ«À}>V]ÊÃÊÛ>ÀiÃÊijVÌÀVÃÊVÌÀ>Ãi>`ÃÊÌiiʵÕiÊÃiÀÊ«ÀÊÊ
menos equivalentes a los del aparato. Si el aparato se suministra con cable de 3 hilos de tipo con
«ÕiÃÌ>Ê>ÊÌiÀÀ>]ÊiÊV>LiÊ`iÊ«À}>VÊÌiiʵÕiÊÃiÀÊÕÊ
ÊÊÎÊ"-ÊÊ/*"Ê
" Ê*1STA A TIERRA. El cable más largo tiene que estar predispuesto de modo que no se apoye sobre la
ÃÕ«iÀwViÊ`iÊL>VÊÊ`iÊ>ÊiÃ>]ÊÞ>ʵÕiÊ«`À>ÊÃiÀÊ
>>`Ê«ÀÊÃÊÃÊÞÊ>ÃÊ«iÀÃ>ÃÊ«`À>Ê
tropezarse.
- Su aparato está provisto de un enchufe polarizado para línea de corriente alterna (un enchufe que tiene
Õ>Êië}>Ê?ÃÊ>À}>ʵÕiÊ>ÊÌÀ>®°ÊÃÌiÊiV
ÕviÊÃiÊ>`>«Ì>À?ÊiÊiÊÌ>VÀÀiÌiÊ`iÊÕ>ÊÃ>Ê>iÀ>]Ê
la cual es una característica de seguridad. Si no logra introducir completamente el enchufe en el toma
VÀÀiÌi]ÊÛjÀÌ>°Ê-ÊiÊiV
ÕviÊÊiÌÀ>Ê>Ö]Ê>iÊ>ÊiiVÌÀVÃÌ>Ê`iÊ>iÀ>Ê`iʵÕiÊÃÕÃÌÌÕÞ>ÊiÊ
tomacorriente anómalo. No eludir el objetivo de seguridad del enchufe polarizado.
-
42
INTRODUCCIÓN
DESCRIPCIÓN
Le damos las gracias por haber elegido la cafetera automática para café y capuchino “ECAM
23.210”. Esperamos que su nuevo aparato le
satisfaga. Dedique unos minutos para leer estas
instrucciones para el uso. De esta forma evitará
correr riesgos o causar desperfectos a la cafetera.
Descripción del aparato
(pág. 3 - A )
A1. Panel de control
A2. Regulador del grado de molienda
A3. Superficie para tazas
A4. Tapadera del recipiente para granos de café
A5. Tapadera del embudo del café premolido
A6. Embudo para echar el café premolido
A7. Recipiente para granos de café
A8. Interruptor general
A9. Depósito del agua
A10. Portezuela del grupo de infusión
A11. Grupo de infusión
A12. Dispositivo de erogación café (regulable en
altura)
A13. Cajón para posos de café
A14. Bandeja recogedora del líquido de condensación
A15. Bandeja apoyatazas
A16. Indicador del nivel del agua de la bandeja
recogegotas
A17. Bandeja recogegotas
A18. Espumador
A19. Mando de vapor/agua caliente
Símbolos utilizados en las instrucciones
Las advertencias importantes se indican con los
siguientes símbolos. Respete rigurosamente
estas advertencias.
¡Peligro!
El incumplimiento puede ser o es causa de lesiones provocadas por descargas eléctricas con
peligro para la vida.
¡Atención!
El incumplimiento puede ser o es causa de lesiones o de desperfectos al aparato.
¡Peligro de quemaduras!
El incumplimiento puede ser o es causa de escaldaduras o quemaduras.
Descripción del panel de control
(pág. 2 - B )
Algunos botones del panel tienen una función
doble: ésta se indica entre paréntesis, dentro de
la descripción.
B1. Pilotos
B2. Botón
: para encender o apagar la cafetera
B3. Botón PÊ«>À>Ê>VVi`iÀÊ>ÊiÖ
B4. Botón
: realiza un enjuague.
(Cuando se accede al MENÚ de programación, funciona como botón “ESC”: se pulsa
para salir de la función seleccionada y regresar al menú principal)
B5. Mando selector: gírelo para seleccionar la
cantidad de café deseada. (Cuando se accede
al MENÚ de programación: gírelo para seleccionar la función deseada).
B6. Cuando se accede al MENÚ de programación: gírelo para seleccionar la función deseada).
Ê\«ÖÃiÊ«>À>ÊÃiiVV>ÀÊiÊ
sabor del café.
B7. Botón
: para preparar 1 taza de café con
las configuraciones visualizadas.
B8. Botón
: para preparar 2 tazas de café
Importante:
Este símbolo indica consejos e informaciones
importantes para el usuario.
Letras entre paréntesis
Las letras entre paréntesis corresponden a la
leyenda contenida en la Descripción del aparato
(pág. 3).
Problemas y reparaciones
-ÊÃiÊ«>Ìi>Ê«ÀLi>Ã]ÊÌiÌiÊiÊ«ÀiÀÊÕ}>ÀÊ
solucionarlos siguiendo las advertencias contenidas en los párrafos “Significado de los pilotos”
en la pág. 37 y “Solución de los problemas” en la
pág. 39. Si éstas no fuesen eficaces o para obteiÀÊ>V>À>ViÃÊ?ÃÊ`iÌ>>`>Ã]ÊiÊ>VÃi>ÃÊ
ponerse en contacto con la asistencia clientes
>>`Ê >Ê ÖiÀÊ v>VÌ>`Ê iÊ >Ê
>Ê ºÃstencia clientes” adjunta. Si su país no aparece
iÌÀiÊÃÊiÕiÀ>`ÃÊiÊ>Ê
>]Ê>iÊ>ÊÖiÀÊ
indicado en la garantía. Para eventuales reparaViÃ]Ê«}>ÃiÊiÊVÌ>VÌÊiÝVÕÃÛ>iÌiÊVÊ
la Asistencia Técnica De’Longhi. Las direcciones
están en el certificado de garantía entregado con
la cafetera.
43
OPERACIONES PRELIMINARES
con las configuraciones visualizadas.
B9. Botón
para suministrar vapor para la
preparación de bebidas a base de leche
(Cuando se accede al MENÚ: botón “OK”,
púlselo para confirmar la opción elegida)
Control del aparato
/À>ÃÊ
>LiÀÊ `iÃiL>>`Ê >Ê V>viÌiÀ>]Ê >Ãi}ÖÀiÃiÊ
de su integridad y de que no falten accesorios.
No utilice el aparato si presenta desperfectos evidentes. Póngase en contacto con la Asistencia
Técnica De’Longhi.
Descripción de los accesorios
(pág. 2 - C )
C1. Medidor dosificador
C2. Pincel de limpieza
C3. Frasco de descalcificante
C4. Filtro ablandador (en algunos modelos)
Instalación del aparato
¡Atención!
Cuando instale el aparato considere las siguientes advertencias de seguridad:
UÊ Ê>«>À>ÌÊLiÀ>ÊV>ÀÊiÊiÊ>LiÌiÊVÀVÕdante. Después de colocar el aparato sobre
>Ê ÃÕ«iÀwViÊ `iÊ ÌÀ>L>]Ê >Ãi}ÖÀiÃiÊ `iÊ `i>ÀÊ
ÕÊië>VÊLÀiÊ`iÊ«ÀÊÊiÃÊ£]nÊÉÊÎÊVÊ
iÌÀiÊ >ÃÊ ÃÕ«iÀwViÃÊ `iÊ >«>À>Ì]Ê >ÃÊ «>ÀÌiÃÊ
>ÌiÀ>iÃÊÞÊ>Ê«>ÀÌiÊÌÀ>ÃiÀ>]ÊÞÊÕÊië>VÊLÀiÊ
`iÊ«ÀÊÊiÃÊx]ÊÊÉ£xÊVÊiV>Ê`iÊ>Ê
cafetera.
UÊÊ -Ê iÊ >}Õ>Ê «iiÌÀ>À>Ê iÊ iÊ >«>À>ÌÊ «`À>Ê
estropearlo.
No coloque el aparato cerca de grifos de
agua o de pilas.
UÊÊ Ê >«>À>ÌÊ «`À>Ê iÃÌÀ«i>ÀÃiÊ ÃÊ iÊ >}Õ>Ê ÃiÊ
congela en su interior.
No instale el aparato en un ambiente donde
la temperatura pueda descender por debajo
del punto de congelación.
UÊ µÕiÊiÊV>LiÊ`iÊ>iÌ>VÊ«>À>ʵÕiÊÊ
se estropee con cantos cortantes o en contacto con superficies calientes (por ej. placas
eléctricas).
Significado de los pilotos
Piloto parpadeante: indica que la cafetera
se está calentando o está enjuagando.
Indica que el aparato está suministrando
dos tazas de café.
Indica que la modalidad “Ahorro Energético” está activa.
Piloto fijo: indica que se seleccionó la
función “vapor”;
Piloto parpadeante: indica que es necesario girar el mando de vapor.
Indica que en el panel de control aparece
una alarma (véase el pár. “Significado de
los pilotos”).
Piloto parpadeante: indica que es necesario sustituir el filtro ablandador.
Piloto fijo: indica la falta del cajón de los
posos: es necesario introducirlo; Piloto
parpadeante: indica que el cajón de los
posos está lleno y es necesario vaciarlo.
Piloto fijo: Indica la falta del depósito del
agua;
Piloto parpadeante: indica que el agua en
el depósito no es suficiente.
Piloto parpadeante: indica la necesidad
de descalsificar el aparato (véase pár.
“Descalcificación”).
Indica el botón que debe pulsarse para
Ã>ÀÊ`iÊiÖÊ`iÊ«À}À>>VÊÊ`iÊ>Ê
función seleccionada.
Indica el botón que debe pulsarse para
confirmar la función seleccionada dentro
`iÊiÖÊ«À}À>>V°
E
EE
E
EE
E
Conexión del aparato
¡Atención!
Ãi}ÖÀiÃiÊ `iÊ µÕiÊ >Ê ÌiÃÊ `iÊ >Ê Ài`Ê ijVÌÀV>Ê
corresponda al valor indicado en la placa de datos situada en el fondo del aparato.
Conecte el aparato sólo a un enchufe instalado
en conformidad con las normativas con una capacidad mínima de 10 A y con una puesta a tierra
eficiente.
En caso de incompatibilidad entre el enchufe y la
V>Û>Ê`iÊ>«>À>Ì]Ê
>}>ÊÃÕÃÌÌÕÀÊiÊiV
ÕviÊ«ÀÊ
otro adecuado por personal cualificado.
44
Primera puesta en marcha del aparato
ENCENDIDO DEL APARATO
¡Importante!
UÊ >ÊV>viÌiÀ>ÊÃiÊ
>ÊVÌÀ>`ÊiÊ>Êv?LÀV>Êi«i>`ÊV>vj]ÊiÃÊÀ>Ê«ÀÊÊÌ>ÌʵÕiÊÃiÊ
iVÕiÌÀiÊ>}ÖÊÀiÃÌÊ`iÊV>vjÊiÊiÊ°Ê
Se garantiza sin embargo que esta cafetera
es nueva.
UÊ iÊ >VÃi>ÃÊ «iÀÃ>â>ÀÊ VÕ>ÌÊ >ÌiÃÊ
>Ê`ÕÀiâ>Ê`iÊ>}Õ>]Ê«>À>ÊiÊÃ}>ÊiÊ«ÀVi`miento descrito en el párrafo “Programar la
dureza del agua” (pág. 28).
ÌÖiÊÃ}Õi`Ê>ÃÊÃÌÀÕVViÃÊv>VÌ>`>Ã\
£°Ê ÝÌÀ>}>ÊiÊ`i«ÃÌÊ`iÊ>}Õ>]ÊjiÊ
>ÃÌ>Ê>Ê
línea MAX con agua fresca (fig. 1A) y vuelva
a colocar el depósito (fig. 1B).
2. Ponga bajo el espumador un recipiente con
capacidad mínima de 100 ml (fig. 2).
3. Conecte el aparato a la red eléctrica y ponga
iÊÌiÀÀÕ«ÌÀÊ}iiÀ>]ʵÕiÊÃiÊiVÕiÌÀ>ÊiÊ>Ê
«>ÀÌiÊ`iÊ>ÌÀ?ÃÊ`iÊ>«>À>Ì]ÊiÊ>ʫð I (fig.
3).
4. En el panel de control parpadea el piloto
(fig. 4).
5. Gire el mando del vapor a la posición “I” (fig.
5) y pulse el botón
para confirmar (fig.
6): el aparato suministra agua por el espumador y se apaga entonces.
6. Vuelva a girar el mando del vapor a la posición “O”.
La cafetera está lista para ser utilizada normalmente.
¡Importante!
ÌiÃÊ`iÊiVi`iÀÊiÊ>«>À>Ì]Ê>Ãi}ÖÀiÃiÊ`iʵÕiÊ
iÊÌiÀÀÕ«ÌÀÊ}iiÀ>]ʵÕiÊÃiÊiVÕiÌÀ>ÊiÊ>Ê«>ÀÌiÊ`iÊ>ÌÀ?ÃÊ`iÊ>«>À>Ì]ÊiÃÌjÊiÊ>ʫðÊI (fig. 3).
>`>ÊÛiâʵÕiÊÃiÊiVi`iÊiÊ>«>À>Ì]ÊÃiÊÀi>â>Ê
automáticamente un ciclo de precalentamiento y
de enjuague que no se puede interrumpir. ÚniV>iÌiÊ `iëÕjÃÊ `iÊ iÃÌiÊ VV]Ê iÊ >«>À>ÌÊ iÃÌ?Ê
listo.
¡Importante!
UÊ Õ>`Ê ÕÌViÊ «ÀÊ «ÀiÀ>Ê ÛiâÊ >Ê V>viÌiÀ>]Ê
deben prepararse 4-5 cafés o 4-5 capuchinos antes de obtener buenos resultados.
UÊ *>À>Ê VÃi}ÕÀÊ >ÖÊ iÀiÃÊ ÀiÃÕÌ>`ÃÊ ÞÊ
LÌiiÀÊiÀiÃÊ«ÀiÃÌ>ViÃÊ`iÊ>Ê?µÕ>]Ê
se recomienda instalar el filtro ablandador
siguiendo las instrucciones del párrafo “FILTRO ABLANDADOR”. Si su modelo no está
«ÀÛÃÌÊ`iÊwÌÀ]ÊiÃÊ«ÃLiÊÃVÌ>ÀÊ>ÊÃÊ
Centros de Asistencia Autorizados De’Longhi.
¡Peligro de quemaduras!
ÕÀ>ÌiÊiÊiÕ>}Õi]ÊÃ>iÊÕÊ«VÊ`iÊ>}Õ>ÊV>ite por las boquillas del dispositivo de erogación
de café. Tenga cuidado de no entrar en contacto
con salpicaduras de agua.
*>À>Ê >«>}>ÀÊ iÊ >«>À>Ì]Ê «ÀiÃiÊ iÊ LÌÊ
(fig. 7). El aparato realiza el enjuague y luego se
apaga.
¡Peligro de quemaduras!
ÕÀ>ÌiÊiÊiÕ>}Õi]ÊÃ>iÊÕÊ«VÊ`iÊ>}Õ>ÊV>ite por las boquillas del dispositivo de erogación
`iÊV>vj]ÊÞÊÃiÊÀiV}iÊiÊ>ÊL>`i>ÊÀiV}i}Ì>ÃÊ
que se encuentra debajo. Tenga cuidado de no
entrar en contacto con salpicaduras de agua.
UÊ *>À>ÊiVi`iÀÊiÊ>«>À>Ì]Ê«ÀiÃiÊiÊLÌÊÊ
(fig. 7): el piloto
parpadea hasta
que el aparato lleva a cabo el calentamienÌÊÞÊiÊiÕ>}ÕiÊ>ÕÌ?ÌV\ÊiÊiÃÌiÊ`]Ê
>`i?ÃÊ`iÊV>iÌ>ÀÊ>ÊV>`iÀ>]ÊiÊ>«>À>ÌÊ`i>Ê
fluir el agua caliente por los conductos internos para que se calienten también.
El aparato se ha calentado cuando el piloto
se apaga y se encienden los pilotos correspondientes a la selección del gusto y de la cantidad
de café.
APAGADO DEL APARATO
>`>ÊÛiâʵÕiÊÃiÊ>«>}>ÊiÊ>«>À>Ì]ÊÃiÊÀi>â>ÊÕÊijuague automático que no se puede interrumpir.
¡Importante!
Si no va a utilizar el aparato por un período pro}>`]Ê«}>ÊiÊÌiÀÀÕ«ÌÀÊ}iiÀ>ÊiÊ>Ê«Ãción 0 (fig. 3).
¡Atención!
*>À>ÊiÛÌ>ÀÊ`>ÃÊ>Ê>«>À>Ì]ÊÊ«}>ÊiÊÌiÀ45
ruptor general de la fig. 3 en la pos. O mientras el
aparato está encendido.
`iÌiÃÊ>Ê>ÊÌi«iÀ>ÌÕÀ>Ê`iÃi>`>]ÊÊÃi>\
BAJA
MEDIA
ALTA
5. Pulse el botón
para confirmar;
6. Pulse entonces el botón
para salir del
iÖ°
PROGRAMACIONES DEL MENÚ
Presione el botón PÊ«>À>ÊiÌÀ>ÀÊiÊiÊiÖÊ`iÊ«À}À>mación; las opciones que se pueden seleccionar en el
iÖÊÃ\ÊiÃV>VwV>V]ÊÕÌ>«>}>`]Ê*À}À>>ÀÊ
Ìi«iÀ>ÌÕÀ>]Ê
ÀÀÊiÀ}jÌV]ÊÕÀiâ>Ê`iÊ>}Õ>]ÊÃÌ>>ÀÊwÌÀ]Ê
>L>ÀÊwÌÀ]Ê6>ÀiÃÊv?LÀV>]ÊÃÌ>`ÃÌV>°
Ahorro energético
Esta función permite activar o desactivar la modalidad de ahorro energético. La máquina se ha
preconfigurado en la fábrica en modalidad actiÛ>`>]Ê «>À>Ê }>À>Ìâ>ÀÊ ÕÊ iÀÊ VÃÕÊ iiÀ}jÌVÊ VÊ >Ê ?µÕ>Ê iVi``>]Ê `iÊ >VÕiÀ`Ê
con las normativas europeas vigentes.
1. Presione el botón PÊ«>À>ÊiÌÀ>ÀÊiÊiÊiÖ°
2. Gire el mando selector hasta que se encienda
el piloto E.
3. Presione el botón
: el piloto OK parpadea
4. Presione el botón
para activar la modalidad de ahorro energético o
para desactivarla;
5. Pulse entonces el botón
para salir del
iÖ°
Õ>`Ê>ÊvÕVÊiÃÌ?Ê>VÌÛ>`>]ÊiÊ«ÌÊÊ«iÀmanece encendido.
Descalcificación
Para las instrucciones correspondientes a la deÃV>VwV>V]ÊVÃÕÌiÊ>Ê«?}°ÊÎ{°
Autoapagado
¡Importante!
La máquina ha sido programada para efectuar
el autoapagado tras 2 horas de inactividad. Se
puede modificar este intervalo de tiempo para
µÕiÊiÊ>«>À>ÌÊÃiÊ>«>}ÕiÊÌÀ>ÃÊ£xÊÊÎäÊÕÌÃ]ÊÊ
LiÊÌÀ>ÃÊ£]ÊÓÊÊÎÊ
À>ð
1. Presione el botón PÊ«>À>ÊiÌÀ>ÀÊiÊiÊiÖÆ
2. Gire el mando selector (fig. 8) hasta que se
encienda el piloto
;
3. Pulse el botón
para seleccionar la función;
4. Gire el mando selector hasta que se enciendan
completamente los pilotos correspondientes
>ÊÖiÀÊ`iÊ
À>ÃÊ`iëÕjÃÊ`iÊ>ÃÊVÕ>iÃÊiÊ
aparato se debe apagar automáticamente:
15 minutos
30 minutos
1 hora
2 horas
3 horas
5. Pulse el botón
para confirmar;
6. Pulse entonces el botón
para salir del
iÖ°
El autoapagado ha quedado programado.
¡Importante!
En modalidad de ahorro energético la máquina
podría requerir algunos segundos de espera anÌiÃÊ`iÊÃÕÃÌÀ>ÀÊiÊ«ÀiÀÊV>vj]Ê«ÀµÕiÊÃiÊ`iLiÊ
precalentar.
Programar la dureza del agua
Para las instrucciones correspondientes a la confi}ÕÀ>VÊ`iÊ>Ê`ÕÀiâ>Ê`iÊ>}Õ>]ÊVÃÕÌiÊ>Ê«?}°ÊÓn°
Instalar filtro
Para las instrucciones correspondientes a la
ÃÌ>>VÊ `iÊ wÌÀ]Ê VÃÕÌiÊ iÊ «?ÀÀ>vÊ ºÌÀÊ
ablandador”.
Programar la temperatura
-Ê`iÃi>Ê`wV>ÀÊ>ÊÌi«iÀ>ÌÕÀ>Ê`iÊ>}Õ>ÊL>>]Ê
ÌiÀi`>]Ê>Ì>®ÊVÊ>ÊVÕ>ÊÃiÊ«Ài«>À>ÊiÊV>vj]Ê
lleve a cabo el siguiente procedimiento:
1. Presione el botón PÊ«>À>ÊiÌÀ>ÀÊiÊiÊiÖÆ
2. Gire el mando selector hasta que se encienda
el piloto
;
3. Presione el botón
;
4. Gire el mando selector hasta que se enciendan completamente los pilotos correspon-
Cambio del filtro
Para las instrucciones correspondientes a la
ÃÕÃÌÌÕVÊ `iÊ wÌÀ]Ê VÃÕÌiÊ iÊ «?ÀÀ>vÊ ºÌÀÊ
ablandador”.
Valores de fábrica (reset)
Con esta función se restablecen todas las configuraViÃÊ`iÊiÖÊÞÊÌ`>ÃÊ>ÃÊ«À}À>>ViÃÊ`iÊ>ÃÊ
cantidades regresan a los valores de la fábrica.
46
PREPARACIÓN DEL CAFÉ
1. Presione el botón PÊ«>À>ÊiÌÀ>ÀÊiÊiÊiÖ°
2. Gire el mando selector hasta que se encienda
el piloto
;
3. Presione el botón
:parpadea el piloto
OK;
5. Presione el botón
para confirmar y salir.
Seleccionar el sabor del café
En la fábrica la cafetera se ha programado para
producir cafés con sabor normal.
Se puede elegir entre los siguientes sabores:
Función de estadística
Con esta función aparecen las estadísticas de
>ÊV>viÌiÀ>°Ê*>À>ÊÛiÀ>Ã]ÊiÛiÊ>ÊV>LÊiÊÃ}ÕiÌiÊ
procedimiento:
1. Presione el botón PÊ«>À>ÊiÌÀ>ÀÊiÊiÊiÖ°
2. Gire el mando selector hasta que se encienda
el piloto
;
3. Presione el botón
:
{°Ê À>`Ê iÊ >`Ê `iÊ ÃiiVVÊ iÊ >«>À>Ì]Ê
haciendo parpadear el piloto correspondienÌi]ÊÛÃÕ>â>À?Ê>ÃÊÃ}ÕiÌiÃÊvÀ>ViÃ\
cuántos cafés se han preparado;
iÊÖiÀÊ`iÊ`iÃV>VwV>ViÃÊÀi>â>das;
iÊÖiÀÊ`iÊÌÀÃÊ`iÊ>}Õ>Ê«À`ÕV`ÃÊ
en total;
Extra
suave
0.6-6oz
20-180ml
Extra
fuerte
1.35oz
40ml
2oz
60ml
3oz
90ml
4oz
120ml
MI CAFÉ
Personalizar la cantidad de “mi café”
En la fábrica la cafetera se ha programado para
producir unos 1 oz/ 30 ml de “mi café”. Si desea
`wV>ÀÊiÃÌ>ÊV>Ì`>`]ÊiÛiÊ>ÊV>LÊiÊÃ}ÕiÌiÊ
procedimiento:
1. Coloque una taza bajo las boquillas del dispositivo de erogación del café (fig. 10).
2. Gire el mando selector (fig. 8) hasta que se
encienda el piloto
;
3. Mantenga presionado el botón de salida de 1
taza
(fig. 11) hasta cuando el piloto
comience a parpadear y la máquina comience
a producir el café: entonces suelte el botón;
4. En cuanto el café llegue al nivel deseado en
>ÊÌ>â>]ÊÛÕiÛ>Ê>Ê«ÀiÃ>ÀÊiÊLÌÊ£ÊÌ>â>Ê
(fig. 11).
En este momento la cantidad del café por taza
iÃÌ?Ê«À}À>>`>ÊÃi}ÖÊ>ÊÕiÛ>ÊVw}ÕÀ>V°
UNIDAD
Ejemplo: se quiere saber cuántos cafés se
>Ê
iV
°Ê-iÊiÌÀ>ÊiÊiÊiÖÊÞÊÃiÊÃiiVciona el piloto
.
x3
Fuerte
Seleccionar la cantidad de café por taza
En la fábrica la cafetera se ha programado para
producir café normal. Para seleccionar la canti`>`Ê`iÊV>vj]Ê}ÀiÊiÊ>`ÊÃiiVÌÀÊw}°Ên®Ê
>ÃÌ>Ê
que se encienda el piloto que corresponde a la
cantidad de café deseada:
iÊÖiÀÊ`iÊÛiViÃʵÕiÊÃiÊ
>ÊÃÕÃÌÌÕ`Ê
el filtro ablandador
x°ÊÊ Ê«>À«>`iÊ`iÊÃÊ}À>ÃÊÃi>>Ê>ÃÊV>Ì`>`iÃ]ÊiÊiÃÌiÊÀ`i\
x1
Normal
*>À>Ê V>L>ÀÊ `iÊ Ã>LÀ]Ê «ÀiÃiÊ Ài«iÌ`>iÌiÊ
el botón
(fig. 9) hasta que vea en el display el sabor elegido.
-
DECENAS DE
MILLARES MILLAR CENTENAR DECENA
Suave
x7
Se cuentan los parpadeos de los granos: se
han realizado 137 cafés.
6. Presione entonces 2 veces el botón
«>À>ÊÃ>ÀÊ`iÊiÖ°
47
Regular el molinillo del café
ÊÊ`iÊV>vjÊÊ`iLiÊÀi}Õ>ÀÃi]Ê>ÊiÃÊ
>Ê«ÀV«]Ê«ÀµÕiÊÃiÊ
>Ê«À}À>>`ÊiÊ>Êv?brica para obtener una salida correcta del café.
-ÊiL>À}]ÊÃÊ`iëÕjÃÊ`iÊ
>LiÀÊ«Ài«>À>`ÊÃÊ
«ÀiÀÃÊ V>vjÃ]Ê iÊ V>vjÊ Ã>iÊ VÊ «VÊ VÕiÀ«Ê ÞÊ
«V>ÊVÀi>ÊÊ`i>Ã>`ÊiÌ>iÌiÊ}Ìi>®]ÊÃiÊ
debe realizar una corrección con el regulador del
grado de molienda (fig. 12).
1. Eche el café en granos en el recipiente
específico (fig. 13).
2. Coloque bajo las boquillas del dispositivo de
erogación de café:
Ê Ê£ÊÌ>â>]Ê«>À>Ê£ÊV>vjÊw}°Ê£ä®Æ
Ê ÊÓÊÌ>â>Ã]Ê«>À>ÊÓÊV>vjð
3. Baje el dispositivo de erogación para acercarlo lo más posible a las tazas: de esta for>]ÊÃiÊLÌiiÊÕ>ÊVÀi>ÊiÀÊw}°Ê£{®°
4. Pulse el botón correspondiente a la salida deseada (1 taza o 2 tazas
o 2 tazas
)
(fig. 11 y 15).
5. La preparación empieza y en el panel de
control permanecen visualizados los pilotos
correspondientes al sabor y a la cantidad del
café seleccionados.
Õ>`Ê>V>L>Ê>Ê«Ài«>À>V]ÊiÊ>«>À>ÌÊÃiÊ«Àipara para ser utilizado de nuevo.
¡Importante!
El regulador debe girarse solamente cuando el
molinillo de café está funcionando.
4
Si el café sale demasiado
iÌ>iÌiÊÊÊÃ>i]Ê}ÀiÊ
el regulador en sentido
horario una posición haV>ÊiÊÖiÀÊÇ°
Para que el café salga con
más cuerpo y mejore el
>ëiVÌÊ`iÊ>ÊVÀi>]Ê}ÀiÊiÊÀi}Õ>`ÀÊiÊÃiÌ`Ê
>Ì
À>ÀÊÕ>Ê«ÃVÊ
>V>ÊiÊÖiÀÊ£ÊÊ
?ÃÊ`iÊÕ>Ê«ÃVÊ>Ê>ÊÛiâ]Ê«>À>ÊiÛÌ>ÀʵÕiÊiÊ
café salga luego goteando).
El efecto de esta corrección se nota solamente
después de haber preparado por lo menos 2
cafés seguidos. Si tras esta regulación no se obÌiiÊiÊÀiÃÕÌ>`Ê`iÃi>`]Ê
>LÀ?ʵÕiÊÀi«iÌÀÊ>Ê
corrección girando el mando otra posición.
¡Importante!
UÊ iÌÀ>ÃÊ>ÊV>viÌiÀ>ÊiÃÌ?Ê«Ài«>À>`ÊiÊV>vj]Ê
se puede interrumpir su salida en cualquier
momento presionando cualquiera de los dos
botones de salida (
o
).
UÊ ÊVÕ>ÌÊÌiÀ>Ê>ÊÃ>`>]ÊÃÊÃiʵÕiÀiÊ>ÕiÌ>ÀÊ>ÊV>Ì`>`Ê`iÊV>vjÊiÊ>ÊÌ>â>]ÊiÃÊÃÕficiente tener presionado (en no más de 3
segundos) uno de los botones de salida del
café (
o
).
¡Importante!
*>À>Ê LÌiiÀÊ ÕÊ V>vjÊ ?ÃÊ V>iÌi]Ê VÃÕÌiÊ iÊ
párrafo “Consejos para un café más caliente”.
Consejos para un café más caliente
*>À>ÊLÌiiÀÊÕÊV>vjÊ?ÃÊV>iÌi]ÊiÊ>VÃi>mos:
UÊ iviVÌÕ>ÀÊ ÕÊ iÕ>}Õi]Ê >ÌiÃÊ `iÊ >Ê «Ài«>À>V]Ê «ÀiÃ>`Ê iÊ LÌÊ
: por el
dispositivo de erogación sale agua caliente
que calienta el circuito interno de la cafetera
y aumenta la temperatura del café.
UÊ V>iÌ>ÀÊ>ÃÊÌ>â>ÃÊVÊ>}Õ>ÊV>iÌiÊÕÌâ>ÀÊ
la función agua caliente).
UÊ ÃiiVV>ÀÊ>ÊÌi«iÀ>ÌÕÀ>Ê`iÊV>vjʺ>Ì>»ÊiÊ
iÊiÖ°
¡Atención!
UÊ -ÊiÊV>vjÊÃ>iÊ}Ìi>`ÊÊVÊ«VÊVÕiÀ«Ê
ÞÊ«V>ÊVÀi>]ÊÊiÃÌ?Ê`i>Ã>`ÊvÀ]Êi>ÊÃÊ
consejos recogidos en el capítulo “Solución
de los problemas” (pág. 57).
UÊ ÕÀ>ÌiÊ iÊ ÕÃ]Ê iÊ iÊ «>iÊ `iÊ VÌÀÊ «drían encenderse los pilotos cuyo significado
se muestra en el párrafo “Significado de los
pilotos” (pág. 55).
Preparación del café con café premolido
Preparación del café con café en granos
UÊ
¡Atención!
No utilice café en granos con caramelo o confitado porque puede pegarse en el molinillo del café
e inutilizarlo.
48
¡Atención!
ÊiV
iÊÕV>ÊV>vjÊ«Ài`ÊiÊ>ÊV>viÌiÀ>Ê
>«>}>`>]Ê«>À>ÊiÛÌ>ÀʵÕiÊÃiÊ`ëiÀÃiÊiÊiÊterior de la misma y la ensucie. En este caso
la cafetera podría estropearse.
UÊÊ
ÊiV
iÊ?ÃÊ`iÊ£Êi``ÀÊÀ>ÃÊ`iÊV>vj]Ê«Àque se puede ensuciar la cafetera o se puede
obstruir el embudo.
5. Gire el mando del vapor a la pos. I (fig. 4).
El vapor sale por el espumador dándole un
aspecto cremoso a la leche y aumenta su volumen;
È°Ê *>À>Ê LÌiiÀÊ Õ>Ê iëÕ>Ê ?ÃÊ VÀiÃ>]Ê
haga girar el recipiente con movimientos
lentos de abajo hacia arriba. (Se recomienda
no dejar que el vapor salga durante más de 3
minutos seguidos);
Ç°Ê 1>ÊÛiâÊLÌi`>Ê>ÊiëÕ>Ê`iÃi>`>]ÊÌiÀrumpa la salida del vapor llevando el mando
del vapor a la posición 0.
¡Importante!
-Ê ÃiÊ ÕÌâ>Ê V>vjÊ «Ài`]Ê
se puede preparar solamente
una taza de café a la vez.
1. Presione repetidamente el botón
(fig. 9) hasta que aparezca el símbolo
.
2. Eche un medidor raso de café premolido en
el embudo (fig. 16).
3. Coloque una taza bajo las boquillas del dispositivo de erogación.
4. Presione el botón de salida 1 taza
(fig.
11).
5. La preparación empieza.
¡Atención! Peligro de quemaduras
Apague el vapor antes de extraer el recipienÌiÊVÊ>ÊiV
iÊÌ>`>]Ê«>ÀiÊiÛÌ>ÀʵÕi>duras causadas por salpicaduras de leche
hirviendo.
8. Vierta la leche montada en el café que se ha
preparado previamente. El capuchino está
ÃÌ\Êi`ÕViÊ>ÊÃÕÊ}ÕÃÌÊÞ]ÊÃÊÊ`iÃi>]Êiëvoree la espuma con un poco de chocolate
en polvo.
PREPARACIÓN DEL CAPUCHINO
¡Atención! Peligro de quemaduras
Durante estas preparaciones sale vapor: preste
atención a no quemarse.
£°Ê *>À>Ê ÕÊ V>«ÕV
]Ê «Ài«>ÀiÊ iÊ V>vjÊ iÊ Õ>Ê
taza grande.
2. Llene un recipiente con unos 3.5 oz / 100
gramos de leche para cada capuchino que
se desea preparar. Al elegir las dimensiones
`iÊÀiV«iÌi]ÊÌi}>ÊiÊVÕiÌ>ʵÕiÊ>ÊiV
iÊ
crecerá el doble o el triple de su volumen.
Limpieza del espumador después del uso
«iÊiÊiëÕ>`ÀÊ`iëÕjÃÊ`iÊV>`>ÊÕÃ]Ê«>À>Ê
evitar que se acumulen restos de leche o que se
obstruya.
¡Atención! Peligro de quemaduras
ÕÀ>ÌiÊ>Ê«iâ>]ÊÃ>iÊÕÊ«VÊ`iÊ>}Õ>ÊV>ite por el espumador. Tenga cuidado de no entrar
en contacto con salpicaduras de agua.
¡Importante!
*>À>ÊLÌiiÀÊÕ>ÊiëÕ>Ê?ÃÊ`iÃ>ÊÞÊÀV>]Ê
utilice leche desnatada o semidesnatada y
a temperatura del frigorífico (alrededor de
41°F / 5°C). Para evitar que la leche tenga
«V>Ê iëÕ>]Ê Ê LÕÀLÕ>ÃÊ }À>`iÃ]Ê «iÊ
siempre el espumador como se describe en
el párrafo “Limpieza del espumador después
del uso”.
3. Presione el botón
: parpadea el piloto
.
{°Ê iëÕjÃÊ`iÊÕÃÊÃi}Õ`Ã]Ê«>À«>`i>ÊiÊ«loto
indicado que se debe girar el mando
de vapor. Sumerja el espumador en el recipiente de leche (fig. 17) prestando atención
a no sumergir la línea en relieve del mismo
(que muestra la flecha de la fig. 18).
Ê
1. Deje salir un poco de agua durante algunos
Ãi}Õ`Ã]Ê }À>`Ê iÊ >`Ê `iÊ Û>«ÀÊ >Ê >Ê
posición I. Vuelva a poner entonces el mando en la posición 0 para interrumpir la salida
del agua caliente.
2. Espere unos minutos a que el espumador se
enfríe: gire el espumador hacia afuera y extráigalo tirando de él hacia abajo (fig. 19).
3. Tire de la boquilla hacia abajo (fig. 20).
4. Controle que los agujeros indicados por la
flecha en la fig. 21 no estén obstruidos. De
ÃiÀÊiViÃ>À]Ê«iÃÊÕÃ>`ÊÕÊ>wiÀ°
5. Lave meticulosamente los elementos del
espumador con una esponja y agua tibia.
È°Ê 6ÕiÛ>Ê>ÊÌ>ÀÊ>ÊLµÕ>]ÊÞÊ>ÊÌÀ`ÕVÀÊiÊ
espumador en la misma (fig. 22) girándolo
49
y empujándolo hacia arriba hasta que quede
enganchado.
UÊ
}ÖÊV«iÌiÊ`iÊ>«>À>ÌÊ`iLiÊ>Û>ÀÃiÊ
en lavavajillas.
UÊ
ÊÕÌViÊLiÌÃÊiÌ?VÃÊ«>À>Êi>ÀÊ>ÃÊ
incrustaciones o los depósitos de café porque podrían rayar las superficies metálicas o
plásticas.
PREPARACIÓN DEL AGUA CALIENTE
¡Atención! ¡Peligro de quemaduras!
No deje la cafetera sin vigilancia cuando sale
agua caliente. Interrumpa la salida del agua caiÌi]ÊVÊÃiÊ`iÃVÀLiÊ>ÊVÌÕ>V]ÊVÕ>`Ê
la taza está llena. El tubo de salida del agua caliente se calienta durante la salida por lo que se
`iLiÊÌV>ÀÊÃ>iÌiÊ>Êi«Õ>`ÕÀ>Ê`iÊ`ësitivo de erogación.
Limpieza del cajón de los posos de café
Cuando el piloto
Ê«>À«>`i>]ÊiÃÊiViÃ>ÀÊÛ>ciar y limpiar el cajón de posos. Mientras no se
Ài>ViÊ>Ê«iâ>Ê`iÊV>Ê`iÊ«ÃÃ]ÊiÊ«ÌÊÃiÊ
mantendrá parpadeando y la cafetera no podrá
preparar el café.
UÊ ÝÌÀ>}>Ê >Ê L>`i>Ê ÀiV}i}Ì>ÃÊ w}°Ê Óή]Ê
vacíela y límpiela.
UÊ 6>ViÊ ÞÊ «iÊ iÌVÕÃ>iÌiÊ iÊ V>Ê `iÊ
los posos teniendo cuidado de eliminar todos los restos que puedan haberse acumulado en el fondo.
UÊ ÌÀiÊ>ÊL>`i>ÊÀiV}i`À>Ê`iʵÕ`Ê`iÊ
V`iÃ>VÊ `iÊ VÀÊ ÀÊ Þ]Ê ÃÊ iÃÌ?Ê i>]Ê
vacíela.
£°Ê-ÌÖiÊÕÊÀiV«iÌiÊL>ÊiÊiëÕ>`ÀÊÊ?ÃÊ
cerca posible para evitar salpicaduras).
2. Gire el mando de vapor a la posición I: inicia
la salida.
3. Interrumpa la salida poniendo el mando de
vapor en la posición 0.
¡Importante!
Si la modalidad “Ahorro energético” está actiÛ>`>]Ê>ÊÃ>`>Ê`iÊ>}Õ>ÊV>iÌiÊ«`À>ÊÀiµÕiÀÀÊ
unos segundos de espera.
¡Atención!
Al extraer la bandeja recogegotas es obligatorio
vaciar el cajón de los posos de café aunque no
esté muy lleno.
LIMPIEZA
Limpieza de la cafetera
Las siguientes partes de la cafetera deben limpiarse periódicamente:
Ê V>Ê`iÊÃÊ«ÃÃÊ`iÊV>vjʣή]
- bandeja recogegotas (A17) y bandeja reco}i`À>Ê`iʵÕ`Ê`iÊV`iÃ>VÊ£{®]
ÊÊ `i«ÃÌÊ`iÊ>}Õ>Ê®]
- boquillas del dispositivo de erogación café
£Ó®]
ÊÊ iLÕ`Ê«>À>ÊiV
>ÀÊiÊV>vjÊ«Ài`ÊÈ®]
Ê iÊÌiÀÀÊ`iÊ>Ê?µÕ>]Ê>VViÃLiÊ`iëÕjÃÊ`iÊ
>LÀÀÊ>Ê«ÀÌiâÕi>Ê`iÊ}ÀÕ«Ê`iÊvÕÃÊ£ä®]
Ê iÊ}ÀÕ«Ê`iÊvÕÃÊ££®]
iÊÊ
>ViÀ]Ê>Ê«Ài«>À>ÀÊÌÀÃÊV>vjÃÊÃÕViÃÛ>iÌi]ÊiÊV>Ê`iÊÃÊ«ÃÃÊ«`À>Êi>ÀÃiÊ?ÃÊ
de lo previsto y obstruir la cafetera.
Limpieza de la bandeja recogegotas y de la
bandeja recogedora del líquido de condensación
¡Atención!
Si la bandeja recogegotas no se vacía periódicaiÌi]Ê iÊ >}Õ>Ê «Õi`iÊ `iÀÀ>>ÀÃiÊ «ÀÊ iÊ LÀ`iÊ
y penetrar en el interior de la cafetera o en los
>`ðÊÃÌÊ«Õi`iÊiÃÌÀ«i>ÀÊ>ÊV>viÌiÀ>]Ê>ÊÃÕ«iÀficie de apoyo o la zona circundante.
¡Atención!
UÊ *>À>Ê «>ÀÊ >Ê V>viÌiÀ>Ê Ê ÕÃiÊ `ÃÛiÌiÃ]Ê
detergentes abrasivos o alcohol. Con las
ÃÖ«iÀÊ>ÕÌ?ÌV>ÃÊi½}
ÊÊiÃÊiViÃ>rio utilizar aditivos químicos para la limpieza
de la cafetera. El descalcificador aconsejado
por De’Longhi es a base de componentes naturales y completamente biodegradable.
La bandeja recogegotas tiene un indicador de
ÛiÊ`iÊ>}Õ>]ÊVÃÌÌÕ`Ê«ÀÊÕÊyÌ>`ÀÊ`iÊVlor rojo (fig. 24). Antes de que dicho indicador
i«iViÊ >Ê ÃLÀiÃ>ÀÊ `iÊ >Ê L>`i>Ê >«Þ>Ì>â>Ã]Ê
es necesario vaciar la bandeja recogegotas y limpiarla.
Para extraer la bandeja recogegotas:
50
Limpieza del grupo de infusión
El grupo de infusión (A11) debe limpiarse por lo
menos una vez al mes.
1. Extraiga la bandeja recogegotas y el cajón de
los posos de café (fig. 23);
2. Extraiga la bandeja recogegotas y el cajón de
los posos de café (fig. 23);
3. Controle la bandeja recogedora de líquido de
V`iÃ>VÊÞ]ÊÃÊiÃÌ?Êi>]ÊÛ>Vi>°
4. Vuelva a colocar la bandeja recogegotas con
el cajón de los posos de café.
¡Atención!
El grupo de infusión no puede extraerse cuando
la cafetera está encendida.
£°Ê Ãi}ÖÀiÃiÊ`iʵÕiÊ>ÊV>viÌiÀ>ÊÃiÊ
>Þ>Ê>«>}>do correctamente (véase “Apagado del apaÀ>Ì»®]Ê«?}°ÊÓÇ®°
2. Extraiga el depósito del agua.
3. Abra la portezuela del grupo de infusión (fig.
27) ubicada en el costado derecho.
4. Presione hacia adentro los dos botones de
desenganche de color rojo y al mismo tiempo extraiga el grupo de infusión (fig. 28).
Limpieza del interior de la cafetera
¡Peligro de descargas eléctricas!
Antes de llevar a cabo las operaciones de lim«iâ>Ê `iÊ >ÃÊ «>ÀÌiÃÊ ÌiÀ>Ã]Ê >Ê ?µÕ>Ê `iLiÊ
apagarse (véase “Apagado”) y desenchufarse de
la red eléctrica. No sumerja nunca la cafetera en
el agua.
1. Controle periódicamente (una vez a la semana aproximadamente) que el interior de la cafetera (al cual se accede al retirar la bandeja
ÀiV}i}Ì>îÊÊiÃÌjÊÃÕV°Ê-ÊiÃÊiViÃ>À]Ê
elimine los restos de café con el pincel y una
esponja.
2. Aspire todos los restos con un aspirador (fig.
25).
¡Atención!
ENJUAGUE SÓLO CON AGUA
NO USE DETERGENTES - NO LAVE EN LAVAVAJILLAS
Limpie el grupo de infusión sin usar detergentes ya que podría estropearse.
5. Sumerja durante 5 minutos aproximadamente el grupo de infusión en el agua y enjuáguelo bajo el grifo.
È°Ê 1Ìâ>`Ê iÊ «ViÊ
Ó®]Ê «iÊ ÃÊ ÀiÃÌÃÊ
de café que hayan quedado en el puesto del
}ÀÕ«Ê`iÊvÕÃ]ʵÕiÊ«Õi`iÊÛiÀÃiÊ`iÃ`iÊ
la portezuela de dicho grupo.
Ç°Ê iëÕjÃÊ `iÊ >Ê «iâ>]Ê ÛÕiÛ>Ê >Ê VV>ÀÊ iÊ
grupo de infusión en el soporte; a continuaVÊ«ÀiÃiÊÃLÀiÊiÊÌjÀÊ*1-Ê
>ÃÌ>Ê
oír el clic de enganche.
Limpieza del depósito del agua
1. Limpie periódicamente (una vez al mes aproximadamente y cada vez que cambie el filtro
>L>`>`À]ÊÃÊiÃÌ?Ê«ÀiÃiÌi®ÊiÊ`i«ÃÌÊ`iÊ
>}Õ>Ê®ÊVÊÕÊ«>Ê
Öi`ÊÞÊÕÊ«VÊ`iÊ
detergente delicado.
2. Extraiga el filtro (si está presente) y enjuáguelo bajo el grifo.
Î°Ê 6ÕiÛ>Ê >Ê Ì>ÀÊ iÊ wÌÀÊ ÃÊ iÃÌ?Ê «ÀiÃiÌi®]Ê
llene el depósito con agua fresca y móntelo
de nuevo.
soporte
del grupo
de infusión
Limpieza de las boquillas de salida de café
1. Limpie las boquillas de salida del café usan`ÊÕ>Êië>ÊÊÕÊ«>Êw}°ÊÓÈ®°
2. Controle que los agujeros del dispositivo de
erogación del café no estén obstruidos. Si es
iViÃ>À]ÊiiÊÃÊÀiÃÌÃÊ`iÊV>vjÊVÊÕÊ
palillo de dientes (fig. 26B).
¡Importante!
-ÊÀiÃÕÌ>Ê`vVÊVV>ÀÊiÊ}ÀÕ«Ê`iÊvÕÃ]Ê>ÌiÃÊ
de colocarlo) se debe llevar a la dimensión correcta
presionando las dos palancas como se muestra en
la figura.
Limpieza del embudo para echar el café
premolido
Controle periódicamente (una vez al mes aproximadamente) que el embudo para echar el café pre`ÊÊiÃÌjÊLÃÌÀÕ`°Ê-ÊiÃÊiViÃ>À]ÊiiÊ
los restos de café con el pincel suministrado.
51
Ç°ÊÊ /À>ÃÊ
>LiÀÊVV>`]Ê>Ãi}ÖÀiÃiÊ`iʵÕiÊÃÊ
dos botones rojos sobresalgan.
¡Atención! Peligro de quemaduras
Por el espumador sale agua caliente con ácidos.
Tenga cuidado de no entrar en contacto con salpicaduras de agua.
PU
SH
9. Presione el botón
para confirmar que
se ha echado la solución: el piloto
parpadea indicando girar el mando del vapor.
10. Gire el mando de vapor a la posición I. El
programa de descalcificación se activa y el
líquido descalcificante sale por el espumador. El programa de descalcificación realiza
automáticamente toda una serie de enjuagues e intervalos para eliminar los restos de
cal en el interior de la cafetera.
iëÕjÃÊ `iÊ ÎäÊ ÕÌÃÊ >«ÀÝ>`>iÌi]Ê ÃiÊ
vacía el depósito del agua: se encienden los pilotos
OK y parpadea el piloto
.
11. Vacíe el recipiente utilizado para recoger la
solución descalcificante y colóquelo de nuevo bajo el espumador.
£Ó°ÊÝÌÀ>}>ÊiÊ`i«ÃÌÊ`iÊ>}Õ>]ÊÛ>Vi]ÊiÕ?}ÕiÊL>ÊiÊ}Àv]ÊjiÊ`iÊ>}Õ>Ê«>ÊÞÊ
vuelva a colocarlo: parpadea el piloto
.
13. El agua caliente sale por el espumador.
14. Cuando el depósito del agua se haya vacia`ÊV«iÌ>iÌi]ÊÃiÊiVi`iÊÃÊ«ÌÃÊÊ
OK.
£x°Ê*}>ÊiÊ>`ÊiÊ>Ê«ÃVÊä]ÊVµÕiÊiÊ
wÌÀÊÃÊiÃÌ?Ê«ÀiÃiÌi®]ÊiiÊiÊ`i«ÃÌÊ`iÊ
agua y la cafetera quedará lista para el uso.
8. Cierre la portezuela del grupo de infusión.
9. Extraiga el depósito del agua.
DESCALCIFICACIÓN
Descalcifique la cafetera cuando se enciende en
el panel de control
el piloto.
¡Atención!
El desalcificante contiene ácidos que pueden
irritar la piel y los ojos. Respete rigurosamente
>ÃÊ>`ÛiÀÌiV>ÃÊ`iÊÃi}ÕÀ`>`Ê`iÊv>LÀV>Ìi]Ê`V>`>ÃÊiÊiÊÀiV«iÌiÊ`iÊ`iÃV>VwV>Ìi]ÊÞÊ>ÃÊ
advertencias relativas al comportamiento que se
debe adoptar en caso de contacto con la piel o
con los ojos.
¡Importante!
1ÌViÊÖV>iÌiÊ`iÃV>VwV>ÌiÊi½}
°Ê Ê
ÕÌViÊ «ÀÊ }ÖÊ ÌÛÊ `iÃV>VwV>ÌiÃÊ VÊ
L>ÃiÊÃÕvV>ÊÊ>VjÌV>]ÊÞ>ʵÕiÊiÊiÃiÊV>ÃÊ>Ê
garantía pierde toda validez. La garantía pierde
validez además si la descalcificación no se realiza
regularmente.
1. Encienda la cafetera.
Ó°Ê VVi`>Ê>ÊiÖÊ«ÀiÃ>`ÊiÊLÌÊP.
3. Gire el mando selector hasta que se encienda
el piloto
.
4. Seleccione Presionando el botón
: parpadea el piloto OK; presione nuevamente el
botón
para confirmar.
5. Vacíe completamente el depósito del agua (A9) y
quite el filtro ablandador (si está presente).
6. Eche en el depósito del agua el descalcificante hasta alcanzar el nivel A (que corresponde
a un envase de 3.4 oz / 100 ml) indicado en
el revés del depósito (fig. 29A); y eche entonces agua hasta legar al nivel B (fig. 29B).
7. Ponga bajo el espumador (A19) un recipienÌiÊÛ>VÊVÊV>«>V`>`Ê>Ê`iÊxäÊâÊÉÊ£]xÊ
l (fig. 3).
PROGRAMAR LA DUREZA DEL AGUA
El piloto
se ve después de un período de
funcionamiento predeterminado que depende de
la dureza del agua configurada.
La cafetera se ha programado en la fábrica para
iÊÛiÊ{Ê`iÊ`ÕÀiâ>°Ê-ÊÃiÊ`iÃi>]ÊÃiÊ«Õi`iÊ«Àgramar la cafetera en base a la dureza efectiva
`iÊ>}Õ>ÊÕÃ>`>ÊiÊ>ÃÊ`viÀiÌiÃÊÀi}iÃ]Ê«>À>Ê
reducir la frecuencia de la operación de descalcificación.
Medir la dureza del agua
1. Saque del paquete la tira reactiva “TOTAL
, --Ê/-/»ÊµÕiÊÃiÊ
>ÊiÌÀi}>`ÊÕÌÊ
a este manual.
2. Sumerja completamente la tira en un vaso de
agua durante un segundo aproximadamente.
52
3. Saque la tira del agua y agítela ligeramente.
Después de un minuto aproximadamente se
vÀ>Ê£]ÊÓ]ÊÎÊÊ{ÊVÕ>`À>`ÃÊ`iÊVÀÊÀ]Ê
en función de la dureza del agua; cada cuadrado corresponde a 1 nivel.
Importante:
el filtro dura dos meses si el aparato se ha usado
en condiciones normales; si en cambio la máqui>Ê«iÀ>iViÊ>VÌÛ>ÊVÊiÊwÌÀÊÃÌ>>`]ÊiÃÌiÊ
durará un máximo de tres semanas.
Nivel 1
3. Extraiga el depósito de la cafetera y llénelo de
agua.
4. Introduzca el filtro en el depósito del agua
ÞÊÃÕjÀ>Ê«ÀÊV«iÌ]ÊV?`Ê«>À>Ê
que las burbujas de aire salgan (fig. 31).
5. Introduzca el filtro en el respectivo soporte
(fig. 32A) y presiónelo hasta el fondo.
6. Vuelva a cerrar el depósito con la tapadera
w}°ÊÎÓ®]ÊÞÊ«}>ÊiÌViÃÊÕiÛ>iÌiÊiÊ
depósito en la cafetera.
ÊÃÌ>>ÀÊiÊwÌÀ]ÊiÃÊiViÃ>ÀÊ`V>ÀÊÃÕÊ«Àisencia al aparato.
7. Presione el botón PÊ«>À>ÊiÌÀ>ÀÊiÊiÊiÖ°
8. Gire el mando selector hasta que se enciendan los pilotos
y
.
9. Presione el botón
: parpadea el piloto
OK.
10. Presione el botón
para confirmar la selección.
11. Coloque un recipiente bajo el espumador (capacidad: mín. 100 ml).
12. Gire el mando de vapor y presione el botón
.
£Î°Ê
Õ>`ÊiÊ>}Õ>Ê`i>Ê`iÊÃ>À]Ê«>À«>`i>ÊiÊ«loto
ÆÊ
Õ>`ÊiÊ>}Õ>Ê`i>Ê`iÊÃ>À]Ê«>Àpadea el piloto
El filtro ha quedado activado y la máquina está
ahora lista para el uso.
Nivel 2
Nivel 3
Nivel 4
Programar la dureza del agua
1. Presione el botón PÊ«>À>ÊiÌÀ>ÀÊiÊiÊiÖ°
2. Gire el mando selector hasta que se encienda
el piloto
.
3. Confirme la selección presionando el botón
.
4. Gire el mando selector y programe el nivel
detectado por la tira reactiva (ver fig. del párrafo anterior).
NIVEL 1
NIVEL 2
NIVEL 3
NIVEL 4
5. Presione el botón
para confirmar la programación.
6. Presione el botón
Ê«>À>ÊÃ>ÀÊ`iÊiÖ°
>ÊV>viÌiÀ>ÊÃiÊ
>ÊÀi«À}À>>`ÊÃi}ÖÊ>ÊÕiÛ>Ê
configuración de la dureza del agua.
FILTRO ABLANDADOR
Cambio del filtro
Cuando el piloto
Ê«>À«>`i>]ÊÊÕ>ÊÛiâÊ«>Ã>dos los dos meses de duración (véase indicador
`iÊviV
>®]ÊÊLiÊÃÊÊÃiÊ
>ÊÕÌâ>`ÊiÊ>«>À>ÌÊ
`ÕÀ>ÌiÊÎÊÃi>>Ã]ÊiÃÊiViÃ>ÀÊV>L>ÀÊiÊwtro:
1. Extraiga el depósito y el filtro agotado;
2. Saque el nuevo filtro del empaque.
3. Gire el disco del indicador de fecha (ver fig.
30) para que se vean los próximos 2 meses
de uso (el filtro dura dos meses).
4. Llene el depósito;
5. Introduzca el filtro en el depósito del agua
ÞÊÃÕjÀ>Ê«ÀÊV«iÌ]ÊV?`Ê«>À>Ê
que las burbujas de aire salgan (fig. 31);
Algunos modelos cuentan con el filtro ablanda`À\ÊÃÊÃÕÊ`iÊÊVÕiÌ>ÊVÊ`V
ÊwÌÀ]ÊiÊ
recomendamos comprarlo en un centro de asistencia autorizado De’Longhi.
*>À>ÊiÊÕÃÊVÀÀiVÌÊ`iÊwÌÀ]ÊÃ}>Ê>ÃÊÃÌÀÕVVnes que encontrará a continuación.
Instalación del filtro
1. Saque el filtro del empaque.
2. Gire el disco del indicador de fecha (véase
la fig. 30) para que se vean los próximos 2
meses de uso.
53
DATOS TÉCNICOS
6. Introduzca el filtro en el respectivo soporte
w}°ÊÎÓ®ÊÞÊ«ÀiÃiÊ
>ÃÌ>ÊiÊv`]ÊÛÕiÛ>Ê
a poner la tapadera en el depósito (fig. 32B)
e introduzca de nuevo el depósito en la cafetera;
7. Coloque un recipiente bajo el espumador
(capacidad: mín. 100 ml).
8. Presione el botón PÊ«>À>ÊiÌÀ>ÀÊiÊiÊiÖ°
9. Gire el mando selector hasta que se enciendan los pilotos
y
.
10. Presione el botón
: parpadea el piloto
OK.
11. Presione el botón
para confirmar la selección.
12. Gire el mando de vapor y presione el botón
.
£Î°Ê
Õ>`Ê iÊ >}Õ>Ê `i>Ê `iÊ Ã>À]Ê «>À«>`i>Ê iÊ
piloto
ÆÊ >Ê ViÀÀ>ÀÊ iÊ >`]Ê iÊ >«>À>ÌÊ
regresa automáticamente a “Listo café”.
El nuevo filtro ha quedado activado y la máquina
está ahora lista para el uso.
/iÃ\ÊÊ ÓÓäÓ{äÊ6HÊxäÉÈäÊâÊ?Ý°Ê£äÊ
Potencia absorbida:
1450 W
Presión:
15 bar
Capacidad máx. del depósito
de agua:
50.7 fl. oz. / £]nÊÌÀÃ
iÃiÃÊÝÝ*\ÊÊ
Ó]ÎnÝÎ]{Ý{]ÎÊ°
238x340x430 mm
Longitud del cable:
11 ft. / £]£xÊ
Peso:
Óä]ÓÓÊL°ÊÉÊ]£Ê}
Capacidad máx. del recipiente
del café en granos:
x]ÎÊâ°ÊÉÊ150 g máx.
Extracción del filtro
Si se desea seguir utilizando el aparato sin el filÌÀ]Ê
>LÀ?Ê µÕiÊ iÝÌÀ>iÀÊ iÊ `V>ÀÊ >Ê iÝÌÀ>VV°Ê
Lleve a cabo el siguiente procedimiento:
1. Extraiga el depósito y el filtro agotado;
2. Presione el botón P «>À>ÊiÌÀ>ÀÊiÊiÊiÖ°
3. Gire el mando selector (fig. 8) hasta que se
enciendan los pilotos
y
;
4. Presione el botón
: parpadea el piloto
OK;
5. Presione el botón
para confirmar el
uso del aparato sin filtro;
6. Presione entonces el botón
para salir
`iÊiÖ°
54
SIGNIFICADO DE LOS PILOTOS
PILOTO VISUALIZADO
POSSIBILE CAUSA
SOLUCIÓN
El agua en el depósito no es
suficiente.
Llene el depósito del agua y colóquelo
VÀÀiVÌ>iÌi]Ê«ÀiÃ?`ÊLiÊ
>ÃÌ>ÊÀÊ
el clic del enganche.
El depósito no está puesto
correctamente.
Coloque correctamente el depósito
presionándolo hasta el fondo.
El cajón de los posos (A13) de
café está lleno.
6>ViÊiÊV>Ê`iÊÃÊ«ÃÃ]Ê>ÊL>`i>Ê
ÀiV}i}Ì>Ã]Ê«iÃÊÞÊÛÕiÛ>Ê>ÊVV>ÀðÊ
Importante: al extraer la bandeja recogegotas
es obligatorio vaciar el cajón de los posos de
V>vjÊ>ÕµÕiÊÊiÃÌjÊÕÞÊi°ÊiÊÊ
>ViÀ]Ê
>Ê«Ài«>À>ÀÊÌÀÃÊV>vjÃÊÃÕViÃÛ>iÌi]ÊiÊ
cajón de los posos podría llenarse más de lo
previsto y obstruir la cafetera.
Después de la limpieza no se ha
colocado el cajón de los posos.
Extraiga la bandeja recogegotas y coloque el
cajón de los posos.
La molienda es demasiado fina y
por tanto el café sale demasiado
lentamente o no sale.
Repita la salida de café y gire el regulador
de molienda (fig. 10) una posición hacia el
ÖiÀÊÇ]ÊiÊÃiÌ`Ê
À>À]ÊiÌÀ>ÃÊiÊ
molinillo de café está funcionando. Si después
`iÊ«Ài«>À>ÀÊ«ÀÊÊiÃÊÓÊV>vjÃ]ÊiÊV>vjÊ
Ã}ÕiÊÃ>i`Ê`i>Ã>`ÊiÌ>iÌi]ÊÀi«Ì>Ê
la corrección girando el mando regulador a
la posición sucesiva (véase regulación del
Ê«?}°Ê{n®°Ê-ÊiÊ«ÀLi>Ê«iÀÃÃÌi]Ê
gire el mando de vapor a la posición I y deje
salir un poco de agua por el espumador.
Se ha seleccionado la función
ºV>vjÊ«Ài`»]Ê«iÀÊÊÃiÊ
>Ê
echado el café premolido en el
embudo.
Eche el café premolido en el embudo o
desactive la función del café premolido.
55
PILOTO VISUALIZADO
POSSIBILE CAUSA
SOLUCIÓN
Indica que es necesario
descalcificar la cafetera.
Es necesario realizar lo más rápido posible el
programa de descalcificación descrito en el
cap. “Descalcificación”.
Se ha echado demasiado café.
Seleccione un sabor más ligero o disminuya
la cantidad de café premolido y luego haga
salir nuevamente el café
Se ha acabado el café en granos.
Llene el recipiente del café en granos.
El embudo para echar el café
premolido está obstruido.
6>ViÊiÊiLÕ`ÊÕÌâ>`ÊiÊ«Vi]ÊVÊÃiÊ
describe en el pár. “Limpieza del embudo para
echar el café”.
Después de la limpieza no se ha
colocado el grupo de infusión.
Coloque el grupo de infusión como se
describe en el párrafo “Limpieza del grupo de
infusión”.
La cafetera está muy sucia.
Limpie cuidadosamente la cafetera
como se describe en el pár. “limpieza y
>ÌiiÌ»°Ê-Ê`iëÕjÃÊ`iÊ>Ê«iâ>]ÊÃiÊ
ÕiÃÌÀ>Ê>ÖÊiÊiÃ>i]Ê`À>ÃiÊ>ÊÕÊViÌÀÊ
de asistencia.
Se ha agotado el filtro.
Sustituya el filtro (véase pár. "cambio del filtro
ablandador").
56
SOLUCIÓN DE LOS PROBLEMAS
A continuación se enumeran algunos posibles funcionamientos incorrectos. Si no puede resolverse el
«ÀLi>ÊiÊiÊ`Ê`iÃVÀÌ]Ê«}>ÃiÊiÊVÌ>VÌÊVÊ>ÊÃÃÌiV>Ê/jVV>°
PROBLEMA
POSIBLE CAUSA
SOLUCIÓN
El café no está caliente.
Las tazas no se han precalentado.
Caliente las tazas enjuagándolas con agua
caliente. (IMPORTANTE: se puede utilizar la
función agua caliente).
El grupo de infusión se ha enfriado porque
>Ê«>Ã>`ÊÓÉÎÊÕÌÃÊ`iÃ`iÊiÊÖÌÊV>vj°
ÌiÃÊ`iÊ«Ài«>À>ÀÊiÊV>vj]ÊV>iÌiÊiÊ}ÀÕ«Ê`iÊ
infusión presionando el botón
.
La temperatura programada del café es baja.
Seleccione la temperatura del café “alta” en
iÊiÖ°
El café se ha molido demasiado grueso.
Gire el regulador de molienda una posición
>V>ÊiÊÖiÀÊ£]ÊiÊiÊÃiÌ`Ê>Ì
À>À]Ê
mientras el molinillo de café está funcionando
(fig. 10). Gire el regulador gradualmente hasta
que el café salga correctamente. El efecto se
nota solamente después de haber preparado
2 cafés (véase párrafo “regular el molinillo de
V>vj»]Ê«?}°Ê{n®°
El café no es adecuado.
Use café para cafeteras de café espresso.
El café sale muy
lentamente o goteando.
El café se ha molido demasiado fino.
Gire el regulador de molienda una posición
>V>ÊiÊÖiÀÊÇ]ÊiÊiÊÃiÌ`Ê`iÊ>ÃÊ>}Õ>ÃÊ
`iÊÀi]ÊiÌÀ>ÃÊiÊÊ`iÊV>vjÊiÃÌ?Ê
funcionando (fig. 10). Gire el regulador
gradualmente hasta que el café salga
correctamente. El efecto se nota solamente
después de haber preparado 2 cafés (véase
«?ÀÀ>vʺÀi}Õ>ÀÊiÊÊ`iÊV>vj»]Ê«?}°Ê{n®°
El café no sale por una
o por ninguna de las
boquillas del dispositivo de erogación.
Las boquillas están obstruidas.
Limpie las boquillas con un palillo de dientes.
La leche montada
presenta burbujas
grandes
La leche no está suficientemente fría o no es
semidesnatada.
Utilice preferentemente leche desnatada o
Ãi`iÃ>Ì>`>]ÊÞÊ>ÊÌi«iÀ>ÌÕÀ>Ê`iÊvÀ}ÀwVÊ
(aproximadamente 41°f / 5 °C). Si no se
LÌiiÊÕÊLÕiÊÀiÃÕÌ>`]ÊV>LiÊ>Ê>ÀV>Ê
de la leche.
La leche no está
montada
El espumador está sucio.
Realice la limpieza como se indica en el
párrafo “Limpieza del espumador después del
uso” (pág. 49).
La salida de vapor se
interrumpe
Un dispositivo de seguridad interrumpe la
salida de vapor después de 3 minutos.
Espere y sucesivamente reactive la función
de vapor.
El aparato no se
enciende
La clavija no está conectada al enchufe.
Conecte la clavija al enchufe.
El interruptor general (A8) no está encendido.
Presione el interruptor general en la posición
I (fig. 1).
El café tiene poco
cuerpo o poca crema.
57
GARANTÍA LIMITADA
Esta garantía cubre todos los productos con las marcas De’Longhi o Kenwood.
Alcance de la garantía
Cada artefacto tiene garantía por defectos de materiales y de fabricación. Bajo los términos de esta
}>À>Ì>ÊÌ>`>]ÊÕiÃÌÀ>ÊL}>VÊÃiÊÌ>Ê>Ê>ÊÀi«>À>VÊ`iÊ«>ÀÌiÃÊÊV«iÌiÃÊ>ÊiÝVi«VÊ
`iÊ«>ÀÌiÃÊ`>>`>ÃÊ`ÕÀ>ÌiÊiÊÌÀ>ëÀÌi®ÊiÊÕiÃÌÀ>Êv?LÀV>ÊÊiÊÕÊViÌÀÊ>ÕÌÀâ>`Ê`iÊÃiÀÛV°ÊÊ
`iÛÛiÀÊÕÊ«À`ÕVÌÊ«>À>ÊV>LÊÊÀi«>À>V]ÊÌ`ÃÊÃÊVÃÌÃÊ`iÊiÛÊ`iLiÊÃiÀÊ«>}>`ÃÊ«ÀÊiÊ
propietario del mismo. El producto nuevo o reparado será devuelto con los gastos de envío pagados
«ÀÊ>ÊV«>>°
ÃÌ>Ê}>À>Ì>ÊiÃÊÛ?`>ÊÖV>iÌiÊÃÊiÊ>ÀÌiv>VÌÊÃiÊÕÌâ>Ê`iÊ>VÕiÀ`ÊVÊ>ÃÊÃÌÀÕVViÃÊ`iÊv>LÀV>te (incluidas con el artefacto) y alimentada eléctricamente con corriente alterna (CA).
Duración de la garantía
ÃÌ>Ê}>À>Ì>ÊiÃÊÛ?`>Ê«ÀÊ`ÃÊÓ®Ê>ÃÊ>Ê«>ÀÌÀÊ`iÊ>ÊviV
>Ê`iÊV«À>ʵÕiÊw}ÕÀ>ÊiÊiÊÀiVLÊÊv>VÌÕÀ>Ê
`iÊÛiÌ>Ê`iÊ>ÊÕ`>`]ÊÞÊÃÊiÊV«À>`ÀÊÀ}>ÊÌiiÊ`iÀiV
Ê>Ê
>ViÀÊÕÃÊ`iÊ>Ê}>À>Ì>°
Exclusiones de la garantía
L>Ê }>À>Ì>Ê Ê VÕLÀiÊ `iviVÌÃÊ Ê `>ÃÊ µÕiÊ vÕiÀ>Ê VÃiVÕiV>Ê `iÊ Ài«>À>ViÃÊ Ê `wV>ViÃÊ
iviVÌÕ>`>ÃÊ>Ê>ÀÌiv>VÌÊ«ÀÊ«iÀÃ>Ê>iÊ>ÊÕiÃÌÀ>Êv?LÀV>ÊÊ>ÊViÌÀÃÊ>ÕÌÀâ>`ÃÊ`iÊÃiÀÛV]ÊÊVÕLÀiÊ
v>>ÃÊÊ`>ÃÊV>ÕÃ>`ÃÊ«ÀÊ>ÌÀ>Ì]ÊÕÃÊ`iL`]Êi}}iV>ÊÊ>VV`iÌiðÊÃÌ>Ê}>À>Ì>ÊÌ>«VÊ
ÀiVViÀ?ÊÀiV>ÃÊiviVÌÕ>`ÃÊ«ÀÊ«iÀÕVÃÊ`ÀiVÌÃÊÊ`ÀiVÌÃÊiiÀ}iÌiÃÊ`iÊÕÃÊ`iÊ«À`ÕVÌ]Ê
Ê«iÀÕVÃÊÊ`>ÃÊÀiÃÕÌ>ÌiÃÊ`iÊÕÃÊ`iÊ«À`ÕVÌÊiÊVÕ«iÌÊ`iÊÃÊÌjÀÃÊÞÊV`ViÃÊ
que hacen válida la garantía. En algunos estados no se permiten exclusiones ni limitaciones de los
«iÀÕVÃÊÀiVV`ÃÊ«ÀÊÕ>Ê}>À>Ì>]Ê«ÀÊÊVÕ>Ê>ÃÊÌ>ViÃÊiV>`>ÃÊ«`À>ÊÃiÀÊÊÛ?`>ÃÊ
en su caso particular.
Obtención de servicios de garantía
-Ê>ÃÊÀi«>À>ViÃÊÃÊiViÃ>À>Ã]ÊÛi>Ê>ÊvÀ>VÊ`iÊVÌ>VÌʵÕiÊ>«>ÀiViÊ>ÊVÌÕ>V\
Residentes de los Estados Unidos:Ê*ÀÊv>ÛÀÊVÌ>VÌ>ÀÊ>ÊÕiÃÌÀ>Êi>ÊÌiivV>Ê}À>ÌÕÌ>]Ê>Êä£nÈÈ
528-8323 (01-866-Latte-Best) o ingrese a nuestro sitio en el Internet www.delonghi.com.
Residentes de Canadá: *ÀÊv>ÛÀÊVÌ>VÌ>ÀÊ>ÊÕiÃÌÀ>Êi>ÊÌiivV>Ê}À>ÌÕÌ>]Ê>Êä£nnnÎÎxÈÈ{{ÊÊ
ingrese a nuestro sitio en el Internet www.delonghi.com.
Residentes de México: Por favor contactar 01-800-711-88-05 o ingrese a nuestro sitio en el Internet
www.delonghi.com.
La g>À>Ì>ÊiÝ«V>`>Ê>ÌiÀÀiÌiÊÃiÊvÀiViÊiÊÀii«>âÊ`iÊVÕ>µÕiÀÊÌÀ>Ê}>À>Ì>]ÊÃi>ÊiÝ«ÀiÃ>ÊÕÊ
vÀiV`>Ê`iÊVÕ>µÕiÀÊÌÀ>Ê>iÀ>]ÊÞÊÌ`>Ê}>À>Ì>Ê«VÌ>Ê`iÊ«À`ÕVÌÊiÃÌ>À?ÊÌ>`>Ê>Ê«iÀ`Ê`iÊ
duración mencionado anteriormente. Esta limitación queda anulada y es reemplazada por otros términos si el usuario decide obtener una garantía prolongada de De’Longhi. En algunos estados/paises no
ÃiÊ«iÀÌiÊÌ>ViÃÊ`iÊ«iÀ`Ê`iÊ}>À>Ì>Ê«VÌ>]Ê«ÀÊÊVÕ>Ê>ÃÊÌ>ViÃÊiV>`>ÃÊ>teriormente podrían no ser válidas en su caso particular. De’Longhi no autoriza a ninguna otra persona
ÊV«>>Ê>ÊvÀiViÀÊ}ÖÊÌ«Ê`iÊ}>À>Ì>ÊÊÀiëÃ>L`>`ÊVÊÀiëiVÌÊ>ÊÕÃÊÊ>ÊÃÊÌjÀÃÊ
de venta de sus artefactos.
Leyes del país
ÃÌ>Ê}>À>Ì>ÊiÊVwiÀiÊ`iÀiV
ÃÊiÃÌ>LiV`ÃÊ«ÀÊiÞ]Ê«iÀÊÕÃÌi`ÊÌ>LjÊ«`À>ÊÌiiÀÊÌÀÃÊ`iÀiV
ÃÊ
que varían de un estado/país a otro.
58
SOMMAIRE
Nettoyage de l’égouttoir et du récipient de
récupération de la condensation ...................... 33
Comment nettoyer l’intérieur de la machine ..... 33
Nettoyage du réservoir à eau ........................... 33
Nettoyage de l’entonnoir pour l’introduction du
café pré-moulu ................................................. 33
Comment nettoyer l’infuseur ............................ 33
MISES EN GARDE IMPORTANTES ............24
CONSERVEZ CES DIRECTIVES ........................ 24
CORDON SPECIAL ..............................24
INTRODUCTION .................................25
Symboles utilisés dans ce mode d’emploi ....... 25
Lettres entre parenthèses ................................ 25
Problèmes et réparations ................................. 25
DETARTRAGE ....................................34
REGLAGE DE LA DURETE DE L’EAU ..........35
Mesure de la dureté de l’eau ............................ 35
Réglage de la dureté de l’eau ........................... 35
DESCRIPTION ....................................25
Description de la machine ............................... 25
Description du panneau de contrôle ................ 25
Description des accessoires ............................ 26
Description des voyants ................................... 26
Contrôle de la machine .................................... 26
Installation de la machine ................................ 26
Branchement de la machine ............................. 26
Première mise en marche de la machine ......... 27
FILTRE ADOUCISSEUR .........................35
Installation du filtre .......................................... 35
Comment remplacer le filtre ............................. 36
Comment enlever le filtre ................................ 36
SIGNIFICATION DES VOYANTS ................37
SOLUTIONS AUX PROBLEMES ................39
MISE EN MARCHE DE LA MACHINE ..........27
GARANTIE LIMITÉE .............................40
ARRET DE LA MACHINE ........................27
CONFIGURATIONS DU MENU .................28
Détartrage ........................................................ 28
Arrêt automatique ............................................ 28
Réglage de la température ............................... 28
Economie d’énergie ......................................... 28
Réglage de la dureté de l’eau ........................... 28
Comment installer le filtre ................................ 28
Comment remplacer le filtre ............................. 28
Programmation Usine (reset) .......................... 29
Fonction de statistiques ................................... 29
PREPARATION DU CAFE .......................29
Sélection du goût du café ................................ 29
Sélection de la quantité de café dans la tasse .. 29
Personnalisation de la quantité de mon café .... 29
Réglage du moulin à café ................................. 30
Conseils pour obtenir un café plus chaud ........ 30
Préparation du café en utilisant le café en
grains ............................................................... 30
Préparation du café en utilisant le café en grains
déjà moulu ....................................................... 31
PREPARATION DU CAPPUCCINO .............31
Nettoyage de la buse à cappuccino après
l’utilisation ....................................................... 31
PREPARATION DE L’EAU CHAUDE ............32
NETTOYAGE ......................................32
Nettoyage de la machine .................................. 32
Nettoyage du récipient de récupération des
marcs à café ..................................................... 32
23
M I S E S E N G A R D E I M P O RTA N T E S
Quelques précautions sont nécessaires lors de l’utilisation d’appareils électriques. En particulier:
UÊ 6iÕiâÊÀiÊ>ÌÌiÌÛiiÌÊiÃÊ`ÀiVÌÛið
UÊ ÃÃÕÀiâÛÕÃʵÕiÊiÊÛÌ>}iÊ`iÊÛÌÀiÊÃÞÃÌmiÊjiVÌÀµÕiÊVÀÀië`iÊDÊViÕÊ`µÕjÊÃÕÀÊiÊ
dessous de l’appareil.
UÊ iÊÌÕV
iÀÊ«>ÃÊ>ÕÝÊÃÕÀv>ViÃÊV
>Õ`iÃ]ÊÕÌÃiÀÊiÃÊ«}jið
UÊ *ÕÀÊ`iÃÊÀ>ÃÃÊ`iÊÃjVÕÀÌjÊVÌÀiÊiÃÊV
VÃÊjiVÌÀµÕiÃ]ÊiÊ«>ÃÊiÀ}iÀÊiÊVÀ`]Ê>Ê
base contenant la fiche ou la bouilloire dans l’eau ou tout autre liquide.
UÊ >À`iÀÊ
ÀÃÊ`iÊ>Ê«ÀÌjiÊ`iÃÊiv>ÌÃ]ÊiÌÊiÊ>ÃÃiÀÊ>>Ãʽ>««>ÀiÊiÊ>ÀV
iÊÃ>ÃÊÃÕ«iÀÛsion.
UÊ ,iÌÀiÀÊ>ÊwV
iÊ`iÊ>Ê«ÀÃiÊjiVÌÀµÕiÊÀõÕiʽ>««>ÀiʽiÃÌÊ«>ÃÊiÊ>ÀV
iÊiÌÊ>Û>ÌÊ`iÊiÊ
nettoyer.
UÊ iÊ>>ÃÊiÌÌÀiʽ>««>ÀiÊiÊ>ÀV
iÊÃÊiÊVÀ`ÊÕÊ>ÊwV
iÊÃÌÊ>LjÃ]Ê>«ÀmÃÊÕiÊ`jviVtuosité de l’appareil ou après que l’appareil ait été endommagé de quelque manière que ce
ÃÌ°Ê,jvjÀiâÛÕÃÊ>ÕÊViÌÀiÊ`½>ÃÃÃÌ>ViÊiÊ«ÕÃÊ«ÀmÃÊ`iÊV
iâÊÛÕÃÊ«ÕÀÊÌÕÃÊ«ÀLmiÃÊiÌÊ
réparations.
UÊ ½ÕÌÃ>ÌÊ`½>VViÃÃÀiÃÊÊ>ÕÌÀÃjÃÊ«>ÀÊiÊv>LÀV>ÌÊ«ÕÀÀ>ÌÊV>ÕÃiÀÊÕÊVi`i]ÊV
VÊ
électrique ou une blessure.
UÊ iÊ«>ÃÊÕÌÃiÀʽ>««>ÀiÊDʽiÝÌjÀiÕÀ°
UÊ iÊ«>ÃÊ>ÃÃiÀÊiÊVÀ`Ê`½>iÌ>ÌÊ«i`ÀiÊ`iÊ>ÊÌ>LiÊÕÊ`iÊ>ÊÃÕÀv>ViÊ`iÊÌÀ>Û>Ê«ÕÀÊ
éviter l’enchevêtrement ou des chutes accidentelles.
UÊ iÊ«>ÃÊ}>À`iÀʽ>««>ÀiÊiÌÊiÃÊ«>ÀÌiÃÊjiVÌÀµÕiÃÊ«ÀmÃÊ`iÊLÀ×iÕÀÃÊjiVÌÀµÕiÃ]ÊvÕÀÃÊV
>Õ`ÃÊ
ÕÊDÊ}>â°
UÊ À>V
iÀÊ>ÊwV
iÊDÊ>Ê«ÀÃi°Ê*ÕÀÊ>ÊÀiÌÀiÀ]ÊjÌi`Àiʽ>««>ÀiÊiÌÊ`jLÀ>V
iÀÊ>ÊwV
i°
UÊ iÊ «>ÃÊ ÕÌÃiÀÊ ½>««>ÀiÊ «ÕÀÊ `½>ÕÌÀiÃÊ vVÌÃÊ µÕiÊ ViiÃÊ `µÕjiÃ°Ê ½>««>ÀiÊ `ÌÊ kÌÀiÊ
destiné à l’usage domestique seulement. Le fabricant ne sera pas tenu responsable pour
`>}iÃÊV>ÕÃjÃÊ«>ÀÊÕÊ>ÕÛ>ÃÊÕÃ>}i]Ê>ÕÛ>ÃÊÌÀ>ÌiiÌÊÕÊj}}iVi°Ê
ATTENTION : Pour éviter tout risque d’incendie ou de choc électrique, ne pas retirer la partie
supérieure ou extérieur. Aucune partie interne ne doit être manipulée par l’utilisateur. Les réparations doivent être faites par un centre d’assistance autorisé!
CONSERVEZ CES DIRECTIVES
/Ê**,Ê-/Ê-/ Êʽ1-Ê"-/+1Ê-1 /Ê
CORDON SPECIAL
(soulement pour Etats Unis)
UÊ ½>««>ÀiÊiÃÌÊÕÊ`½ÕÊVÀ`Ê`½>iÌ>ÌÊVÕÀÌÊÕÊLiÊÕÊVÀ`Ê`½>iÌ>ÌÊ`jÌ>V
>Li®Ê
pour réduire les risques d’enchevêtrement et la possibilité de trébucher sur un cordon plus long.
UÊ iÃÊVÀ`ÃÊ`½>iÌ>ÌÊ`jÌ>V
>LiÃÊ«ÕÃÊ}ÃÊÕÊ`iÃÊwÃÊ`iÊÀ>}iÊÃÌÊj}>iiÌÊ`ëbles; il faut cependant les utiliser avec précaution.
UÊ -ʽÊÕÌÃiÊÕÊVÀ`Ê}Ê`jÌ>V
>LiÊÕÊÕiÊÀ>}i]ÊiÃÊëjVwV>ÌÃÊjiVÌÀµÕiÃÊ`ÕÊVÀ`Ê
ou de la rallonge doivent être au moins de la même valeur que celles de l’appareil. Si l’appareil est
jµÕ«jÊ`½ÕiÊÃiÊDÊÌiÀÀi]Ê>ÊÀ>}iÊ`ÌÊkÌÀiÊ`iÊkiÊÕÊVÀ`Ê>ÊÌÀÃÊwÃÊ>ÛiVÊÌiÀÀi]ÊiÌÊiÊVÀ`Ê
}Ê`ÌÊkÌÀiÊÀ>}jÊ`iÊÌiiÊv>XʵսÊiÊÃÌÊ«>ÃÊjÌ>jÊÃÕÀÊiÊV«ÌÀÊÕÊÃÕÀÊ>ÊÌ>Li]ÊÙÊÊ«ÕÀÀ>ÌÊ
kÌÀiÊÌÀjÊ«>ÀÊiÃÊiv>ÌÃ]ÊÕÊÃÕÀÊiµÕiÊÊ«ÕÀÀ>ÌÊÌÀjLÕV
iÀ°
UÊ 6ÌÀiÊ«À`ÕÌÊiÃÌÊÕÊ`½ÕiÊwV
iÊ«>ÀÃjiÊ`iÊVÕÀ>ÌÊ>ÌiÀ>ÌvÊDÊÃ>ÛÀÊÕiÊwV
iÊ>Þ>ÌÊÕiÊ`iÌÊ
plus large que l’autre). Cette fiche ne peut être enfoncée dans la prise que dans une seule position.
Êý>}ÌÊ`½ÕiÊiÃÕÀiÊ`iÊÃjVÕÀÌj°Ê-ÊÛÕÃÊiÊ«ÕÛiâÊ«>ÃÊivViÀÊV«mÌiiÌÊ>ÊwV
iÊ`>ÃÊ>Ê
«ÀÃiÊiÃÃ>ÞiâÊ`iÊ>ÊÌÕÀiÀ°Ê-Ê>}ÀjÊÌÕÌÊÛÕÃÊiÊ«ÕÛiâÊ«>ÃÊiVÀiÊ>ÊLÀ>V
iÀ]Ê`i>`iâÊDÊÕÊ
électricien de remplacer la prise obsolète. Ne pas annuler la sécurité de la fiche polarisée.
24
INTRODUCTION
DESCRIPTION
Nous vous remercions pour avoir choisi la machine à café et cappuccino automatique „ECAM
23.210“.
Nous vous souhaitons de bien profiter de votre
ÕÛiÊ >««>Ài°Ê Ã>VÀiâÊ µÕiµÕiÃÊ ÕÌiÃÊ
pour lire ce mode d’emploi.
6ÕÃÊjÛÌiÀiâÊ>ÃÊ`iÊVÕÀÀÊ`iÃÊÀõÕiÃÊÕÊ`iÊ
détériorer la machine
Description de la machine
(page 3 - A )
A1. Tableau de contrôle
A2. Poignée de réglage du degré de mouture
A3. Plateau d’appui pour les tasses
A4. Couvercle du réservoir à grains
A5. Couvercle de l’entonnoir pour le café prémoulu
A6. Entonnoir pour l’introduction du café prémoulu
A7. Réservoir à grains
A8. Interrupteur général
A9. Réservoir à eau
A10. Volet infuseur
A11. Infuseur
A12. Bec verseur café (hauteur réglable)
A13. Récipient pour les marcs de café
A14. Récipient de récupération de la condensation
A15. Plateau d’appui pour tasses
A16. Indicateur de niveau de l’eau de l’égouttoir
A17. Égouttoir
A18. Buse à cappuccino
A19. Manette vapeur/eau chaude
Symboles utilisés dans ce mode d’emploi
Les avertissements importants portent les
symboles suivants. Il faut impérativement respecter ces avertissements.
Danger!
L’inobservation peut être ou est la cause de lésions dues à une décharge électrique dangereuÃi]ÊÛÀiÊÀÌii°
Attention!
L’inobservation peut être ou est la cause de lésions ou de dégâts matériels.
Danger Brûlures!
L’inobservation peut être ou est la cause de
brûlures même graves.
Description du panneau de contrôle
(page 2 - B )
Certaines touches du tableau ont une double
fonction: elle est signalée entre parenthèses, à
l’intérieur de la description.
B1. Voyants
B2. Touche
: pour allumer ou éteindre la
machine
B3. Touche P pour accéder au menu
B4. Touche
pour effectuer un rinçage.
(Lorsque l’on accède au MENU de programmation, il prend la fonction de la touche
“ESC”: appuyez pour sortir de la fonction
sélectionnée et revenir au menu principal)
x°Ê>iÌÌiÊ`iÊÃjiVÌ\ÊÌÕÀiâÊ«ÕÀÊÃjiVÌner la quantité de café souhaité. (Lorsque l’on
accède au MENU de programmation: tournez
pour sélectionner la fonction souhaitée).
B6. Touche de sélection de l’arôme
ap«ÕÞiâÊ«ÕÀÊÃjiVÌiÀÊiÊ}×ÌÊ`ÕÊV>vj
B7. Touche
pour préparer 1 tasse de café
avec les programmations affichées
B8. Touche
pour préparer 2 tasses de café
avec les programmations affichées.
B9. Touche
pour obtenir de la vapeur pour
Nota Bene :
Symbole d’informations et de conseils importants pour l’utilisateur.
Lettres entre parenthèses
Les lettres entre parenthèses correspondent à la
légende reportée dans la Description de l’appareil (page 3).
Problèmes et réparations
ÊV>ÃÊ`iÊ«ÀLmiÃ]ÊiÃÃ>ÞiâÊ>Û>ÌÊÌÕÌÊ`iÊiÃÊ
résoudre en suivant les instructions des paragraphes “Signification des voyants” de la page 37 et
º-ÕÌÃÊ>ÕÝÊ«ÀLmiûÊÊ`iÊ>Ê«>}iÊΰÊ
-ÊVi>ÊiÊÃÕvwÌÊ«>ÃÊÕÊÃÊÛÕÃÊ>ÛiâÊLiÃÊ`½>ÕÌÀiÃÊiÝ«V>ÌÃ]ÊÕÃÊÛÕÃÊVÃiÃÊ`iÊVtacter l’Assistance Clients au numéro indiqué sur
iÊÛÀiÌʺÃÃÃÌ>ViÊViÌûÊiÊ>iÝi°Ê-ÊÛÌÀiÊ
«>ÞÃʽiÃÌÊ«>ÃÊiÌj]ÊÌjj«
iâÊ>ÕÊÕjÀÊ
indiqué dans la garantie. Pour les éventuelles
Àj«>À>ÌÃ]Ê >`ÀiÃÃiâÛÕÃÊ DÊ ½ÃÃÃÌ>ViÊ /iV
nique De’Longhi. Les adresses sont reportées
`>ÃÊiÊViÀÌwV>ÌÊ`iÊ}>À>ÌiÊ>iÝjÊDÊ>Ê>V
ne.
25
préparer des boissons à base de lait
(Lorsque l’on accède au MENU: touche “OK”,
appuyez pour confirmer l’option choisie)
Il indique quelle touche appuyer pour
confirmer la fonction sélectionnée à l’intérieur du menu programmation.
Description des accessoires
(page 2 - C )
C1. Doseur
C2. Pinceau pour le nettoyage
C3. Flacon de détartrant
C4. Filtre adoucisseur (présents sur certains modèles)
OPERATIONS PRELIMINAIRES
Contrôle de la machine
«ÀmÃÊ >ÛÀÊ `jL>jÊ >Ê >V
i]Ê >ÃÃÕÀiâÛÕÃÊ
qu’elle soit est intacte et dotée de tous ses acViÃÃÀiÃ°Ê ½ÕÌÃiâÊ«>ÃÊ>Ê>V
iÊýʫÀjÃiÌiÊ
`iÃÊ`>}iÃÊjÛ`iÌðÊ`ÀiÃÃiâÛÕÃÊDʽÃÃstance Technique De’Longhi.
Description des voyants
Voyant clignotant: il indique que la machine est en train de chauffer ou qu’elle
est en train d’effectuer un rinçage.
E
E
E
E
E
E
E
Installation de la machine
Attention!
ÕÊ iÌÊ `½ÃÌ>iÀÊ ½>««>Ài]Ê LÃiÀÛiâÊ iÃÊ
consignes de sécurité suivantes:
UÊ >Ê>V
iÊjiÌÊ`iÊ>ÊV
>iÕÀÊ`>ÃÊÃiÃÊ>itours. Après avoir positionné l’appareil sur le
«>Ê `iÊ ÌÀ>Û>]Ê ÛjÀwiâÊ µÕ½Ê ÀiÃÌiÊ >ÕÊ ÃÊ
£]nÊÉÊÎÊVÊiÌÀiÊiÃÊÃÕ«iÀwViÃÊ`iʽ>««>Ài]ÊiÃÊ«>ÀÌiÃÊ>ÌjÀ>iÃÊiÌÊ>Ê«>ÀÌiÊÃÕ«jÀiÕÀiÊ iÌÊ ÕÊ ië>ViÊ LÀiÊ `½>ÕÊ ÃÊ x]Ê ÉÊ £xÊ
cm au-dessus de la machine.
UÊ ½jÛiÌÕiiÊ«jjÌÀ>ÌÊ`½i>ÕÊ`>Ãʽ>««>ÀiÊ
pourrait l’endommager.
Ê ÛÌiâÊ`iÊ«>ViÀÊ>Ê>V
iÊDÊ«ÀÝÌjÊ`½ÕÊ
robinet d’eau ou d’un évier.
UÊ >Ê >V
iÊ «iÕÌÊ ÃiÊ `jÌjÀÀiÀÊ ÃÊ ½i>ÕÊ µÕ½Ê
contient gèle.
Ê ÛÌiâÊ`½ÃÌ>iÀÊ>Ê>V
iÊ`>ÃÊÕÊi`ÀÌÊ
ÙÊ >Ê Ìi«jÀ>ÌÕÀiÊ «iÕÌÊ `iÃVi`ÀiÊ >Õ`iÃsous du point de congélation.
UÊ ,>}iâÊiÊVÀ`Ê`½>iÌ>ÌÊ`iÊ>mÀiÊ
à ce qu’il ne soit pas touché par des arêtes
tranchantes ni par des surfaces chaudes
(plaques électriques).
Il indique que la machine est en train de
v>ÀiÊ`iÕÝÊV>vjð
Il indique que la modalité “Economie
d’énergie” est activée.
6Þ>ÌÊ wÝi\Ê Ê `µÕiÊ µÕiÊ >Ê vVÌÊ
“vapeur” a été sélectionnée;
Voyant clignotant: il indique qu’il
faut tourner la manette à vapeur.
Il indique que le panneau de contrôle
affiche une alarme (voir par. “Significato delle spie”) (“Signification des voyants”).
Voyant clignotant: il indique qu’il faut
substituer le filtre adoucisseur.
6Þ>ÌÊwÝi\ÊViÊÛÞ>ÌÊ`µÕiʵսÊ>que le récipient des marcs à café: il faut
l’insérer;
Voyant clignotant: il indique que le récipient des marcs à café est plein et qu’il
faut le vider.
Branchement de la machine
6Þ>ÌÊ wÝi\Ê Ê Ê `µÕiÊ µÕ½Ê >µÕiÊ iÊ
réservoir à eau;
6Þ>ÌÊ V}Ì>Ì\Ê Ê ½ÞÊ >Ê «>ÃÊ >ÃÃiâÊ
d’eau dans le réservoir.
Attention!
6jÀwiâÊÃÊ>ÊÌiÃÊ`ÕÊÃiVÌiÕÀÊVÀÀië`ÊDÊVile indiquée sur la plaque signalétique sur le fond
de la machine.
En cas d’incompatibilité entre la prise de courant
iÌÊ >Ê wV
iÊ `iÊ ½>««>Ài]Ê >««iiâÊ ÕÊ jiVÌÀViÊ
qualifié pour qu’il remplace la prise.
Voyant clignotant: il indique que la machine a besoin d’être détartrée (voir par.
“Détartrage”).
Il indique quelle touche appuyer pour
sortir du menu programmation ou bien
pour sortir de la fonction sélectionnée.
26
Première mise en marche de la machine
MISE EN MARCHE DE LA MACHINE
Nota Bene!
UÊ >Ê>V
iÊ>ÊjÌjÊVÌÀjiÊiÊÕÃiÊiÊÕÌÃ>ÌÊ`ÕÊV>vj]ÊÊiÃÌÊ«>ÀÊVÃjµÕiÌÊ>LÃÕiÌÊÀ>ʵÕiÊÛÕÃÊ«ÕÃÃiâÊÌÀÕÛiÀÊ`iÃÊ
traces de café à l’intérieur du moulin à café.
Nous vous garantissons tout de même que la
machine est neuve.
UÊÊ ÕÃÊ ÛÕÃÊ VÃiÃÊ `iÊ «iÀÃ>ÃiÀÊ iÊ
plus rapidement possible la dureté de l’eau
en suivant la procédure décrite au paragraphe “Réglage de la dureté de l’eau” (page
28).
*ÀVj`iâÊiÊÃÕÛ>ÌÊiÃÊÃÌÀÕVÌÃÊ`µÕjiÃ\
£°Ê iÛiâÊ iÊ ÀjÃiÀÛÀÊ DÊ ½i>Õ]Ê Ê Ài«ÃÃiâiÊ
jusqu’à la ligne MAX avec de l’eau courante
w}°Ê£®Ê«ÕÃÊÀjÃjÀiâÊiÊÀjÃiÀÛÀÊw}°Ê£®°
Ó°Ê *>ViâÊi`iÃÃÕÃÊ`iÊ>ÊLÕÃiÊDÊV>««ÕVV]Ê
un récipient de 100 ml minimum (fig. 2).
Î°Ê À>V
iâÊ >Ê >V
iÊ >ÕÊ ÀjÃi>ÕÊ jiVÌÀµÕiÊ
iÌÊ >««ÕÞiâÊ ÃÕÀÊ ½ÌiÀÀÕ«ÌiÕÀÊ }jjÀ>Ê µÕÊ ÃiÊ
ÌÀÕÛiÊ>ÕÊ`ÃÊ`iÊViÌÌiÊ`iÀmÀi]ÊiÌÌiâiÊiÊ
position I (fig. 3).
4. Sur le tableau de contrôle le voyant
(fig.
4) clignote.
x°Ê /ÕÀiâÊ>Ê>iÌÌiÊDÊÛ>«iÕÀÊiÊ«ÃÌʺ»Ê
w}°Ê x®Ê iÌÊ >««ÕÞiâÊ ÃÕÀÊ >Ê ÌÕV
iÊ
pour
confirmer (fig. 6): la machine débite de l’eau
par la buse à cappuccino puis elle s’éteint.
È°ÊÊ ,iiÌÌiâÊ >Ê >iÌÌiÊ DÊ Û>«iÕÀÊ iÊ «ÃÌÊÊ
“O”.
Maintenant la machine à café est prête pour
être utilisée normalement.
Nota Bene!
Û>ÌÊ`iÊiÌÌÀiÊiÊ>ÀV
iÊÛÌÀiÊ>V
i]Ê>ÃÃÕÀiâÛÕÃʵÕiʽÌiÀÀÕ«ÌiÕÀÊ}jjÀ>Ê«>VjÊ`iÀÀmre) en pos. I (fig. 3).
½>««>ÀiÊ ivviVÌÕiÊ >ÕÌ>̵ÕiiÌ]Ê DÊ V
>µÕiÊ
ÃiÊiÊ>ÀV
i]ÊÕÊVÞViÊ`iÊ«ÀjV
>Õvv>}iÊiÌÊ`iÊ
rinçage qui ne peut pas être interrompu. La machine est prête seulement après avoir effectué ce
cycle.
Danger brûlures!
urant le rinçage un peu d’eau chaude sortira des
buses et coulera dans l’égouttoir. Faites attenÌÊ>ÕÝÊjV>LÕÃÃÕÀiÃÊ`½i>Õ°
UÊ *ÕÀÊ>ÕiÀʽ>««>Ài]Ê>««ÕÞiâÊÃÕÀÊ>ÊÌÕche
(fig. 7): le voyant
clignote jusqu’à ce que la machine effectue le chauffage
iÌÊiÊÀX>}iÊ>ÕÌ>̵Õi\Ê`iÊViÌÌiÊv>X]Ê>Ê
machine chauffe la chaudière et fait couler
½i>ÕÊ V
>Õ`iÊ `>ÃÊ iÃÊ ÌÕÞ>ÕÝÊ ÌiÀiÃÊ «ÕÀÊ
qu’ils se réchauffent.
La machine est en température lorsque le voyant
s’éteint et que les voyants de sélection du
goût et de quantité de café correspondant s’allument
ARRET DE LA MACHINE
ÊV
>µÕiÊ>ÀÀkÌ]ʽ>««>ÀiÊivviVÌÕiÊÕÊÀX>}iÊ>Õtomatique qui ne doit pas être interrompu.
Danger brûlures!
ÕÀ>ÌÊiÊÀX>}i]ÊÕÊ«iÕÊ`½i>ÕÊV
>Õ`iÊÃÀÌÊ`iÃÊ
becs à café.
>ÌiÃÊ>ÌÌiÌÊ>ÕÝÊjV>LÕÃÃÕÀiÃÊ`½i>Õ°
Nota Bene!
UÊ >Ê«ÀimÀiÊvÃʵÕiÊÛÕÃÊÕÌÃiâÊ>Ê>V
i]Ê
ÛÕÃÊ`iÛÀiâÊv>ÀiÊ{xÊV>vjÃÊÕÊ{xÊV>««ÕVVnos avant d’obtenir un résultat satisfaisant.
UÊ *ÕÀÊ Ã>ÛÕÀiÀÊ ÕÊ V>vjÊ iVÀiÊ iiÕÀÊ iÌÊ
obtenir des performances optimales de
ÛÌÀiÊ >V
i]Ê ÕÃÊ ÛÕÃÊ VÃiÃÊ `½staller un filtre adoucisseur en suivant les
indications du paragraphe “FILTRE ADOU
--1,»°Ê-ÊiÊ`miʵÕiÊÛÕÃÊ«ÃÃj`iâÊ
½iÃÌÊ «>ÃÊ vÕÀÊ >ÛiVÊ iÊ wÌÀi]Ê ÛÕÃÊ «ÕÛiâÊ
iÊv>ÀiÊ>Ê`i>`iÊ>ÕÝÊ
iÌÀiÃÊÃÃÃÌ>ViÊ
Autorisés De’Longhi.
*ÕÀÊ>ÕiÀÊ>Ê>V
i]Ê>««ÕÞiâÊÃÕÀÊ>ÊÌÕV
iÊ
Êw}°ÊÇ®°Ê>Ê>V
iÊivviVÌÕiÊiÊÀX>}i]Ê«ÕÃÊ
s’éteint.
Nota Bene!
Si la machine ne doit pas être utilisée pendant
µÕiµÕiÃÊÌi«Ã]Ê«>ViâʽÌiÀÀÕ«ÌiÕÀÊ}jjÀ>ÊiÊ
position 0 (fig. 3).
Attention!
wÊ `½jÛÌiÀÊ ÌÕÌÊ `>}iÊ DÊ >Ê >V
i]Ê Ê iÊ
faut pas appuyer sur l’interrupteur général représenté en fig. 3 en pos. O quand la machine est
allumée.
27
CONFIGURATIONS DU MENU
que les voyants qui correspondent à la tem«jÀ>ÌÕÀiÊÃÕ
>ÌjiÊý>ÕiÌ]ÊV½iÃÌD`Ài\
BASSE
MOYENNE
ELEVEE
x°ÊÊ ««ÕÞiâÊÃÕÀÊ>ÊÌÕV
i
pour confirmer;
È°ÊÊ ««ÕÞiâÊ ÃÕÀÊ >Ê ÌÕV
i
pour sortir du
menu.
6ÕÃÊ«ÕÛiâÊ>VVj`iÀÊ>ÕÊiÕÊ`iÊ«À}À>>ÌÊiÊ
appuyant sur la touche P; les configurations sélection>LiÃÊDÊ«>ÀÌÀÊ`ÕÊiÕÊÃÌÊiÃÊÃÕÛ>ÌiÃ\ÊjÌ>ÀÌÀ>}i]Ê
ÀÀkÌÊ >ÕÌ>̵Õi]Ê ,j}>}iÊ Ìi«jÀ>ÌÕÀi]Ê ViÊ
`½jiÀ}i]ÊÕÀiÌjÊ`iʽi>Õ]ÊÃÌ>iÀÊiÊwÌÀi]Ê,i«>ViÀÊ
wÌÀi]Ê*À}À>>ÌÊÕÃi]Ê-Ì>ÌÃ̵Õið
Détartrage
En ce qui concerne les instructions pour effecÌÕiÀÊiÊ`jÌ>ÀÌÀ>}i]ÊVÃÕÌiâÊ>Ê«>}iÊÎ{°
Economie d’énergie
À@ViÊ DÊ ViÌÌiÊ vVÌÊ ÛÕÃÊ «ÕÛiâÊ >VÌÛiÀÊ ÕÊ
désactiver la modalité d’économie d’énergie. La
>V
iÊ>Ê`jDÊjÌjÊÀj}ji]ÊiÊÕÃi]ÊiÊ`>ÌjÊ
>VÌÛji]ÊVi>Ê«iÀiÌÊ`iÊ}>À>ÌÀÊÕiÊVÃ>ÌÊ jiÀ}j̵ÕiÊ vjÀiÕÀiÊ VvÀjiÌÊ >ÕÝÊ
normes européennes en vigueur.
£°Ê ««ÕÞiâÊ ÃÕÀÊ >Ê ÌÕV
iÊ P pour accéder au
menu;
Ó°Ê /ÕÀiâÊ >Ê >iÌÌiÊ `iÊ ÃjiVÌÊ ÕõսDÊ ViÊ
que le voyant E. s’allume;
Î°Ê ««ÕÞiâÊÃÕÀÊ>ÊÌÕV
iÊ
: le voyant OK clignote.
{°Ê ««ÕÞiâÊ ÃÕÀÊ >Ê ÌÕV
iÊ
pour activer la
modalité d’économie d’énergie ou
bien
pour la désactiver;
x°Ê ««ÕÞiâÊ ÃÕÀÊ >Ê ÌÕV
i
pour sortir du
menu.
ÀõÕiÊ>ÊvVÌÊiÃÌÊ>VÌÛji]ÊiÊÛÞ>ÌÊE reste
allumé.
Arrêt automatique
Nota Bene!
La machine est déjà programmée pour s’étein`ÀiÊ>«ÀmÃÊÓÊ
iÕÀiÃÊ`½ÕÌÃ>Ì°ÊÊ6ÕÃÊ«ÕÛiâÊ
modifier cet intervalle pour faire en sorte que la
machine s’éteigne après 15 ou 30 minutes ou
LiÊ>«ÀmÃÊ£]ÊÓÊÕÊÎÊ
iÕÀið
£°ÊÊ ««ÕÞiâÊ ÃÕÀÊ >Ê ÌÕV
iÊ P pour accéder au
menu;
Ó°Ê /ÕÀiâÊ >Ê >iÌÌiÊ `iÊ ÃjiVÌÊ w}°Ê n®Ê Õsqu’à ce que le voyant
s’allume;
ΰÊÊ ««ÕÞiâÊÃÕÀÊ>ÊÌÕV
iÊ
pour sélectionner
la fonction;
{°Ê /ÕÀiâÊ >Ê >iÌÌiÊ `iÊ ÃjiVÌÊ ÕõսDÊ ViÊ
µÕiÊiÃÊÛÞ>ÌÃ]ʵÕÊVÀÀië`iÌÊ>ÕÊbre d’heures après lesquelles la machine doit
ýjÌi`ÀiÊ>ÕÌ>̵ÕiiÌ]Êý>ÕiÌ\Ê
15 minutes
30 minutes
1 heure
2 heures
3 heures
x°Ê ««ÕÞiâÊÃÕÀÊ>ÊÌÕV
i
pour confirmer;
È°Ê ««ÕÞiâÊÃÕÀÊ>ÊÌÕV
i
pour sortir du
menu.
L’arrêt automatique est ainsi reprogrammé.
Nota Bene!
Ê `>ÌjÊ `½jViÊ `½jiÀ}i]Ê >Ê >V
iÊ
pourrait nécessiter quelques secondes d’attente
>Û>ÌÊ`iÊ`jLÌiÀÊiÊ«ÀiiÀÊV>vj]ÊV>ÀÊiiÊ>ÊLiÃÊ
de chauffer.
Réglage de la dureté de l’eau
Pour les instructions concernant la programmaÌÊ`iÊ>Ê`ÕÀiÌjÊ`iʽi>Õ]ÊVÃÕÌiâÊ>Ê«>}iÊÓn°
Réglage de la température
-Ê ÛÕÃÊ ÃÕ
>ÌiâÊ `wiÀÊ >Ê Ìi«jÀ>ÌÕÀiÊ `iÊ
½i>ÕÊL>ÃÃi]ÊÞii]ÊjiÛji®Ê>ÛiVÊ>µÕiiÊv>ÀiÊ
iÊV>vjÊ«ÀVj`iâÊ`iÊ>Êv>XÊÃÕÛ>Ìi\
£°Ê ««ÕÞiâÊ ÃÕÀÊ >Ê ÌÕV
iÊ P pour accéder au
menu;
Ó°Ê /ÕÀiâÊ >Ê >iÌÌiÊ `iÊ ÃjiVÌÊ ÕõսDÊ ViÊ
que le voyant
s’allume;
Î°Ê ««ÕÞiâÊÃÕÀÊ>ÊÌÕV
i
;
{°ÊÊ /ÕÀiâÊ >Ê >iÌÌiÊ `iÊ ÃjiVÌÊ ÕõսDÊ ViÊ
Comment installer le filtre
En ce qui concerne les instructions relatives à
½ÃÌ>>ÌÊ `ÕÊ wÌÀi]Ê VÃÕÌiâÊ iÊ «>À>}À>«
iÊ
“Filtre adoucisseur”.
Comment remplacer le filtre
En ce qui concerne les instructions relatives à
>ÊÃÕLÃÌÌÕÌÊ`ÕÊwÌÀi]ÊVÃÕÌiâÊiÊ«>À>}À>«
iÊ
“Filtre adoucisseur”.
28
Programmation Usine (reset)
À@ViÊDÊViÌÌiÊvVÌ]ÊÌÕÌiÃÊiÃÊVw}ÕÀ>ÌÃÊ
du menu et toutes les programmations des quanÌÌjÃÊÀiÛiiÌÊ>ÕÝÊÀj}>}iÃÊ`½ÕÃi°
£°ÊÊ ««ÕÞiâÊ ÃÕÀÊ >Ê ÌÕV
iÊ P pour accéder au
menu;
Ó°ÊÊ /ÕÀiâÊ >Ê >iÌÌiÊ `iÊ ÃjiVÌÊ ÕõսDÊ ViÊ
que les voyants
s’allument;
ΰÊÊ ««ÕÞiâÊÃÕÀÊ>ÊÌÕV
i
]ÊiÊÛÞ>ÌÊOK clignote;
{°ÊÊ ««ÕÞiâÊÃÕÀÊ>ÊÌÕV
i
pour confirmer et
sortir;
Ê
«ÌiâÊ iÊ LÀiÊ `iÊ vÃÊ µÕiÊ iÃÊ }À>ÃÊ
clignotent: la machine a fait 137 cafés.
6. *ÕÃÊ>««ÕÞiâÊÓÊvÃÊÃÕÀÊ>ÊÌÕV
iÊ
pour
sortir du menu.
PREPARATION DU CAFE
Sélection du goût du café
La machine est réglée en usine pour donner du
café au goût normal.
6ÕÃÊ«ÕÛiâÊV
ÃÀÊ«>ÀÊiÃÊ}×ÌÃÊÃÕÛ>ÌÃ\
Fonction de statistiques
À@ViÊDÊViÌÌiÊvVÌÊÛÕÃÊ«ÕÛiâÊÛÃÕ>ÃiÀÊiÃÊ
données statistiques de la machine. Pour les viÃÕ>ÃiÀ]Ê«ÀVj`iâÊViÊÃÕÌ\
£°ÊÊ ««ÕÞiâÊ ÃÕÀÊ >Ê ÌÕV
iÊ P pour accéder au
menu;
Ó°Ê /ÕÀiâÊ >Ê >iÌÌiÊ `iÊ ÃjiVÌÊ ÕõսDÊ ViÊ
que le voyant
s’allume;
Î°Ê ««ÕÞiâÊÃÕÀÊ>ÊÌÕV
i
:
4. En tournant la manette de sélection la maV
iÊ>vwV
iÀ>]ÊiÊv>Ã>ÌÊV}ÌiÀÊiÊÛÞ>ÌÊ
VÀÀië`>Ì]ÊiÃÊvÀ>ÌÃÊÃÕÛ>ÌiÃ\
le nombre de cafés déjà débités;
le nombre de détartrages déjà effectués;
la quantité d’eau totale déjà débitée;
Extra
léger
Fort
Extra
fort
Sélection de la quantité de café dans la tasse
La machine est réglée en usine pour donner une
quantité normale de café. Pour sélectionner la
µÕ>ÌÌjÊ`iÊV>vj]ÊÌÕÀiâÊ>Ê>iÌÌiÊ`iÊÃjiVÌÊ
(fig.8) jusqu’à ce que le voyant correspondant à
la quantité de café souhaitée s’allume:
ÊiÊLÀiÊ`iÊvÃʵÕiÊÛÕÃÊ>ÛiâÊÃÕLÃÌtuer le filtre adoucisseur.
5. Les quantités sont signalées par le clignoteiÌÊ`ÕÊÛÞ>Ìʺ}À>ÃÊ`iÊV>vj»]Ê`>ÃʽÀ`ÀiÊ
suivant:
Ê
Normal
*ÕÀÊV
>}iÀÊ`iÊ}×Ì]Ê>««ÕÞiâÊ«ÕÃiÕÀÃÊvÃÊÃÕÀÊ
la touche
(fig. 9) tant que l’écran n’affiche pas le goût souhaité.
-
DIZAINES DE
MILLIERS MILLIER
Léger
ä°ÈÈâ
£°Îxâ
20-180ml 40ml
Óâ
60ml
Îâ
90ml
{â
120ml
MON CAFE
CENTAINE DIZAINES UNITES
Personnalisation de la quantité de mon café
La machine est réglée en usine pour débiter enÛÀÊ£âÉÊÎäÊÊ`iʺÊV>vj»°Ê-ÊÛÕÃÊÃÕ
>ÌiâÊ`wiÀÊViÌÌiʵÕ>ÌÌj]Ê«ÀVj`iâÊ`iÊ>Êv>XÊ
suivante:
£°Ê *>ViâÊÕiÊÌ>ÃÃiÊÃÕÃÊiÃÊLiVÃÊÛiÀÃiÕÀÃÊw}°Ê£ä®°
Ó°ÊÊ /ÕÀiâÊ >Ê >iÌÌiÊ `iÊ ÃjiVÌÊ w}°Ê n®Ê Õsqu’à ce que le voyant
s’allume;
Î°Ê >ÌiiâÊ>ÊÌÕV
iʺ£ÊÌ>ÃÃi»Ê
appuyée
(fig. 11) jusqu’à ce que le voyant
commence à clignoter et que la machine commence à débiter le café: relâcher donc la
touche;
4. Dès que le café dans la tasse atteint le niveau
Ýi«i\ÊÛÕÃÊÃÕ
>ÌiâÊÃ>ÛÀÊVLiÊ`iÊ
V>vjÃÊ ÌÊ jÌjÊ v>ÌÃ°Ê ÌÀiâÊ `>ÃÊ iÊ iÕÊ iÌÊ
ÃjiVÌiâÊiÊÛÞ>ÌÊ
.
x1
x3
x7
29
ÃÕ
>Ìj]Ê>««ÕÞiâÊDÊÕÛi>ÕÊÃÕÀÊ>ÊÌÕV
iʺ£Ê
tasse”
(fig. 11).
La quantité de café est maintenant configurée
selon la nouvelle programmation.
VwÌÃ]ÊV>ÀÊViÕÝVÊÀõÕiÌÊ`iÊViÀÊÃÕÀÊiÊÕlin à café et de l’endommager.
£°Ê ÌÀ`ÕÃiâÊiÊV>vjÊiÊ}À>ÃÊ`>ÃÊiÊÀjV«iÌÊ
prévu à cet effet (fig. 13).
Ó°ÊÊ *ÃÌiâÊÃÕÃÊiÃÊLiVÃÊÛiÀÃiÕÀÃ\
Ê Ê £Ê Ì>ÃÃi]Ê ÃÊ ÛÕÃÊ `jÃÀiâÊ £Ê ÃiÕÊ V>vjÊ w}°Ê
10);
Ê ÊÓÊÌ>ÃÃiÃ]ÊÃÊÛÕÃÊiÊÃÕ
>ÌiâÊÓ°
Î°Ê L>ÃÃiâÊ iÊ LiVÊ ÛiÀÃiÕÀÊ `iÊ v>XÊ DÊ iÊ À>«procher le plus possible à la tasse: de cette
v>XÊÛÕÃÊLÌiiâÊÕiÊiiÕÀiÊVÀmiÊw}°Ê
14).
{°ÊÊ ««ÕÞiâÊ ÃÕÀÊ >Ê ÌÕV
iÊ Ài>ÌÛiÊ DÊ >Ê ÃÀÌiÊ
de café souhaitée (1 tasse
ou 2 tasses
) (fig. 11 et 15).
5. La préparation commence et les voyants
relatifs au goût et à la quantité de café sélectionnés restent affichés sur le panneau de
contrôle.
1iÊvÃÊ>Ê«Àj«>À>ÌÊÌiÀji]Ê>Ê>V
iÊiÃÌÊ
prête pour une nouvelle utilisation.
Réglage du moulin à café
iÊÕÊDÊV>vjÊiÊ`ÌÊ«>ÃÊkÌÀiÊÀj}j]ÊÌÕÌÊ>ÕÊ
ÃÊ>ÕÊ`jLÕÌ]ÊV>ÀÊÊiÃÌÊ«ÀjÀj}jÊiÊÕÃiÊ«ÕÀÊ
que le café coule correctement.
/ÕÌivÃ]ÊÃÊ>«ÀmÃÊiÃÊ«ÀiiÀÃÊV>vjÃ]ÊiÊV>vjÊiÃÌÊ
ÌÀ«Ê µÕ`iÊ ÕÊ «>ÃÊ >ÃÃiâÊ VÀjiÕÝÊ ÕÊ LiÊ Ã½Ê
coule trop lentement (goutte à goutte) vous deÛÀiâÊVÀÀ}iÀÊiÊ`i}ÀjÊ`iÊÕÌÕÀiÊDʽ>`iÊ`iÊ>Ê
manette de réglage (fig. 12).
4
Nota Bene!
La manette de réglage doit être tournée uniquement quand le moulin à café est en marche.
Si le café sort trop lentement ou ne sort pas du
ÌÕÌ]ÊÌÕÀiâÊ`½ÕÊVÀ>ÊiÊ
sens horaire en direction
du numéro 7. Plus obtenir un café plus dense et
VÀjiÕÝ]ÊÌÕÀiÀÊiÊÃiÃÊ
anti-horaire d’un cran en direction du numéro 1
(pas plus d’un cran à la fois autrement le café
risque de sortir par gouttes). L’effet de cette correction s’obtient seulement après avoir fait au
ÃÊÓÊV>vjðÊ-Ê>«ÀmÃÊViÊÀj}>}iÊÛÕÃʽ>ÛiâÊ
«>ÃÊLÌiÕÊiÊÀjÃÕÌ>ÌÊÃÕ
>Ìj]ÊÀj«jÌiâÊ>ÊVÀÀiVtion en tournant la manette d’un autre cran.
Nota Bene:
UÊ *i`>ÌʵÕiÊ>Ê>V
iÊiÃÌÊiÊÌÀ>Ê`iÊv>ÀiÊ
iÊV>vj]ÊiÊ`jLÌÊ«iÕÌÊkÌÀiÊ>ÀÀkÌjÊDʽ«ÀÌiÊ
µÕiÊiÌÊiÊ>««ÕÞ>ÌÊÃÕÀÊÕiÊ`iÃÊ`iÕÝÊ
touches de sortie café
ou
.
UÊ mÃÊ µÕiÊ iÊ `jLÌÊ `ÕÊ V>vjÊ iÃÌÊ V«jÌj]Ê ÃÊ
ÛÕÃÊÃÕ
>ÌiâÊ>Õ}iÌiÀÊ>ʵÕ>ÌÌjÊ`iÊV>vjÊ
`>ÃÊ>ÊÌ>ÃÃi]ÊÊÃÕvwÌÊ`iÊ>ÌiÀÊ`>ÃÊiÃÊ
3 secondes qui suivent) une des touches de
production du café
ou
appuyée.
Conseils pour obtenir un café plus chaud
*ÕÀÊLÌiÀÊÕÊV>vjÊ«ÕÃÊV
>Õ`]ÊÕÃÊÛÕÃÊVseillons de:
UÊ ivviVÌÕiâÊÕÊÀX>}i]Ê>Û>ÌʵÕiÊiÊV>vjÊVÕi]Ê iÊ >««ÕÞ>ÌÊ ÃÕÀÊ >Ê ÌÕV
iÊ
: de l’eau
V
>Õ`i]ʵÕÊÀjV
>ÕvviÊiÊVÀVÕÌÊÌiÀiÊ`iÊ>Ê
>V
i]ÊÃÀÌÊ`ÕÊLiVÊÛiÀÃiÕÀÊiÌÊv>ÌÊiÊÃÀÌiÊ
que le café en sortie soit plus chaud;
UÊÊÊÊV
>ÕvviâÊiÃÊÌ>ÃÃiÃÊ>ÛiVÊ`iʽi>ÕÊV
>Õ`iÊÕÌÃiâÊ>ÊvVÌÊi>ÕÊV
>Õ`i®Æ
UÊ ÃjiVÌiâ]ÊDÊ«>ÀÌÀÊ`ÕÊiÕ]Ê>ÊÌi«jÀ>ÌÕre du café “élevée”.
Nota Bene!
*ÕÀÊ LÌiÀÊ ÕÊ V>vjÊ «ÕÃÊ V
>Õ`]Ê VÃÕÌiâÊ iÊ
paragraphe “Conseils pour obtenir un café plus
chaud”.
Attention!
UÊ -Ê iÊ V>vjÊ ÃÀÌÊ }ÕÌÌiÊ DÊ }ÕÌÌiÊ ÕÊ LiÊ Ã½Ê
iÃÌÊÌÀ«ÊµÕ`i]Ê«>ÃÊ>ÃÃiâÊVÀjiÕÝÊÕÊÌÀ«Ê
vÀ`]Ê VÃÕÌiâÊ iÃÊ VÃiÃÊ iÌjÃÊ
`>ÃÊiÊV
>«ÌÀiʺ-ÕÌÃÊ>ÕÝÊ«ÀLmiûÊ
(page 39).
UÊ Ê Ê Ê ÕÀ>ÌÊ ½ÕÌÃ>Ì]Ê iÊ «>i>ÕÊ `iÊ VÌÀiÊ
pourra afficher des voyants dont la signification est reportée dans le paragraphe “Signification des voyants” (page 37).
Préparation du café en utilisant le café en
grains
Attention!
½ÕÌÃiâÊ «>ÃÊ `iÊ }À>ÃÊ `iÊ V>vjÊ V>À>jÃjÃÊ ÕÊ
30
Préparation du café en utilisant le café en
grains déjà moulu
ΰÊÊ
Attention!
UÊ
½ÌÀ`ÕÃiâÊ>>ÃÊiÊV>vjÊ«ÀjÕÕʵÕ>`Ê
>Ê>V
iÊiÃÌÊjÌiÌi]Ê`iÊv>XÊDÊjÛÌiÀʵÕiÊ
celui-ci ne s’éparpille à l’intérieur de la machine en la salissant. De cette façon la machine risque de s’endommager.
UÊÊ ½ÃjÀiâÊ >>ÃÊ «ÕÃÊ `½ÕiÊ `ÃiÊ À>ÃiÊ V>ÀÊ
l’intérieur de la machine pourrait se salir ou
bien l’entonnoir risquerait de s’obturer.
{°Ê
Ê
x°Ê
Nota Bene!
-Ê ÛÕÃÊ ÕÌÃiâÊ `ÕÊ V>vjÊ «Àj
ÕÕ]Ê ÛÕÃÊ iÊ «ÕÛiâÊ
préparer qu’une seule tasse
de café à la fois.
Ç°ÊÊ
1. ««ÕÞiâÊ«ÕÃiÕÀÃÊvÃÊÃÕÀÊ>ÊÌÕV
i
(fig. 9) tant que l’écran n’affiche pas le
symbole
.
Ó°ÊÊ ÃjÀiâÊ ÕiÊ `ÃiÊ À>ÃiÊ `iÊ V>vjÊ «ÀjÕÕÊ
dans l’entonnoir (fig. 16).
ΰÊÊ *>ViâÊÕiÊÌ>ÃÃiÊÃÕÃÊiÃÊLiVÃÊÛiÀÃiÕÀð
{°Ê ««ÕÞiâÊÃÕÀÊ>ÊÌÕV
iÊ`iÊÃÀÌiÊV>vjÊ£ÊÌ>ÃÃiÊ
(fig. 11).
5. La préparation commence.
n°ÊÊ
Ê
PREPARATION DU CAPPUCCINO
décrit dans le paragraphe “Nettoyage buse à
cappuccino après l’utilisation”.
««ÕÞiâÊ ÃÕÀÊ >Ê ÌÕV
i
: le voyant
clignote.
«ÀmÃÊ µÕiµÕiÃÊ ÃiV`iÃ]Ê iÊ ÛÞ>Ì
clignote pour indiquer qu’il faut tourner la manette vapeur.
*}iâÊ >Ê LÕÃiÊ DÊ V>««ÕVVÊ `>ÃÊ iÊ >ÌÊ
(fig. 17) en veillant à ne pas plonger la ligne
en relief sur la buse (indiquée par la flèche de
la fig. 18).
/ÕÀiâÊ >Ê >iÌÌiÊ DÊ Û>«iÕÀÊ iÊ «Ã°Ê Ê w}°Ê
4). De la vapeur sort de la buse à cappuccino
iÌÊ`iÊÕÊ>ëiVÌÊVÀjiÕÝÊ>ÕÊ>ÌʵÕÊ>Õgmente de volume;
*ÕÀÊ LÌiÀÊ ÕiÊ ÕÃÃiÊ «ÕÃÊ VÀjiÕÃi]Ê
faites tourner le récipient avec des mouvements lents du bas vers le haut. (Nous vous
conseillons de ne pas débiter la vapeur pendant plus de 3 minutes de suite).
«ÀmÃÊ>ÛÀÊLÌiÕÊ>ÊÕÃÃiÊÃÕ
>Ìji]ÊÌiÀÀ«iâÊ>ÊÃÀÌiÊ`iÊÛ>«iÕÀÊiÊÀiiÌÌ>ÌÊ>Ê
manette de vapeur en position 0.
Attention! Danger de brûlures
Ìi}iâÊ >Ê Û>«iÕÀÊ >Û>ÌÊ `½iÝÌÀ>ÀiÊ iÊ ÀjV«iÌÊ>ÛiVÊiÊ>ÌÊÕÃÃiÕÝ]Ê>wÊ`½jÛÌiÀÊ`iÊ
vous brûler à cause des éclaboussures de
lait bouillant.
Attention! Danger de brûlures
Durant ce type de préparation une sortie de vapeur se produit: faites attention à ne pas vous
brûler.
°Ê 6iÀÃiâÊiÊ>ÌÊÕÃÃiÕÝÊ`>ÃÊ>ÊÌ>ÃÃiÊ`iÊV>vjÊ
`jDÊ«Àj«>Àj°ÊiÊV>««ÕVVÊiÃÌÊ«ÀkÌÊ\ÊÃÕVÀiâÊ
DÊÛÌj]ÊiÌÊ>ÕÊLiÃ]ÊÃ>Õ«Õ`ÀiâÊ>ÊÕÃse avec un peu de chocolat en poudre.
£°Ê *ÕÀÊ ÕÊ V>««ÕVV]Ê «Àj«>ÀiâÊ iÊ V>vjÊ `>ÃÊ
une grande tasse;
Ó°ÊÊ ÌÀiÌi«Ã]Ê Ài«ÃÃiâÊ ÕÊ ÀjV«iÌÊ >ÛiVÊ
iÛÀÊ Î°xÊ âÉÊ £ääÊ }À>iÃÊ `iÊ >ÌÊ «ÕÀÊ
V
>µÕiÊ V>««ÕVVÊ µÕiÊ ÛÕÃÊ `iÛiâÊ «Àj«>rer. Pour choisir un récipient de dimensions
>`jµÕ>ÌiÃ]Ê ½ÕLiâÊ «>ÃÊ µÕiÊ iÊ ÛÕiÊ `iÊ
lait augmentera de 2 ou 3 fois.
Nettoyage de la buse à cappuccino après
l’utilisation
iÌÌÞiâÊ>ÊLÕÃiÊDÊV>««ÕVVÊDÊV
>µÕiÊvÃʵÕiÊ
ÛÕÃʽÕÌÃiâÊ>wÊ`½jÛÌiÀʵÕiÊ`iÃÊÀjÃ`ÕÃÊ`iÊ>ÌÊ
ne se déposent ou qu’elle ne s’obture.
Attention! Danger de brûlures
ÕÀ>ÌÊiÊiÌÌÞ>}i]ÊÕÊ«iÕÊ`½i>ÕÊV
>Õ`iÊÃÀÌÊ`iÊ
>ÊLÕÃiÊDÊV>««ÕVV°ÊÊ>ÌiÃÊ>ÌÌiÌÊ>ÕÝÊjV>boussures d’eau.
Nota Bene!
Pour obtenir une mousse plus dense et
VÌÕiÕÃi]Ê ÕÌÃiâÊ `ÕÊ >ÌÊ jVÀjjÊ ÕÊ `i
écrémé sorti du réfrigérateur (environ 41°F /
5º C). Pour éviter d’obtenir un lait peu mousÃiÕÝ]Ê ÕÊ LiÊ >ÛiVÊ `iÊ }ÀÃÃiÃÊ LÕiÃ]Ê iÌÌÞiâÊÌÕÕÀÃÊ>ÊLÕÃiÊDÊV>««ÕVVÊViÊ
£°Ê >ÌiÃÊ VÕiÀ]Ê «i`>ÌÊ µÕiµÕiÃÊ ÃiV`iÃ]Ê
un peu d’eau en tournant la manette à vapeur
iÊ«ÃÌÊ°Ê*ÕÃÊÀiiÌÌiâÊ>Ê>iÌÌiÊDÊÛ>peur en position 0 pour interrompre la sortie
d’eau chaude.
31
Ó°Ê ÌÌi`iâÊ µÕiµÕiÃÊ ÕÌiÃÊ «ÕÀÊ >Ê LÕÃiÊ DÊ
V>««ÕVVÊÃiÊÀivÀ`ÃÃi\ÊÌÕÀiâÊ>ÊLÕÃiÊDÊ
V>««ÕVVÊÛiÀÃʽiÝÌjÀiÕÀÊiÌÊiiÛiâ>ÊiÊ>Ê
tirant vers le bas (fig. 19).
Î°Ê iÛiâÊiÊ}ViÕÀÊiÊiÊÌÀ>ÌÊÛiÀÃÊiÊL>ÃÊw}°Ê
20).
{°ÊÊ ÌÀiâÊ µÕiÊ iÃÊ ÀwViÃÊ `µÕjÃÊ «>ÀÊ iÃÊ
flèches en fig. 21 ne soient pas bouchés. Si
jViÃÃ>Ài]ÊiÃÊiÌÌÞiÀÊDʽ>`iÊ`½ÕiÊj«gle.
x°Ê iÌÌÞiâÊ Ã}iÕÃiiÌÊ iÃÊ jjiÌÃÊ `iÊ >Ê
buse à cappuccino avec une éponge et de
l’eau tiède.
È°Ê ÃjÀiâÊ DÊ ÕÛi>ÕÊ iÊ }ViÕÀÊ iÌÊ ÀjÃjÀiâÊ >Ê
buse à cappuccino sur le gicleur (fig. 22) en
>Ê ÌÕÀ>ÌÊ iÌÊ >Ê «ÕÃÃ>ÌÊ ÛiÀÃÊ iÊ
>ÕÌ]Ê Õsqu’à ce qu’elle s’accroche.
ÊÊ iÊÀjÃiÀÛÀÊDÊi>ÕÊ®]
ÊÊ iÃÊLiVÃÊÛiÀÃiÕÀÃÊ`iÊÃÀÌiÊV>vjÊ£Ó®]
- l’entonnoir pour l’introduction du café préÕÕÊÊÈ®]
ÊÊ ½ÌjÀiÕÀÊ `iÊ >Ê >V
i]Ê >VViÃÃLiÊ >«ÀmÃÊ
>ÛÀÊÕÛiÀÌÊiÊÛiÌÊ`iʽvÕÃiÕÀÊ£ä®]
- l’infuseur (A11).
Attention!
½ÕÌÃiâÊ «>ÃÊ `iÊ ÃÛ>ÌÃ]Ê `½>VÊ ÕÊ `iÊ
détergents abrasifs pour nettoyer la machine. Avec les machines “superautomatiques”
i½}
]Ê ÛÕÃÊ ½>ÛiâÊ «>ÃÊ LiÃÊ `½ÕÌser des additifs chimiques pour nettoyer la
machine. Le détartrant que De’Longhi vous
recommande d’utiliser est à base de composants naturels et complètement biodégradable.
UÊ ÕVÕiÊ«>ÀÌiÊ`iÊ>Ê>V
iÊiÊ«iÕÌÊkÌÀiÊ>vée en lave-vaisselle.
UÊÊ ½ÕÌÃiâÊ «>ÃÊ `½LiÌÃÊ jÌ>µÕiÃÊ «ÕÀÊ ilever les incrustations ou les dépôts de café
pour ne pas risquer de rayer les surfaces en
métal ou en plastique.
UÊ
PREPARATION DE L’EAU CHAUDE
Attention! Danger de brûlures.
iÊ >ÃÃiâÊ >>ÃÊ >Ê >V
iÊ Ã>ÃÊ ÃÕÀÛi>ViÊ
ÀõսiiÊ `jLÌiÊ `iÊ ½i>ÕÊ V
>Õ`i°Ê ÌiÀÀ«iâÊ
>Ê ÃÀÌiÊ `½i>ÕÊ V
>Õ`i]Ê ViÊ `jVÀÌÊ «ÕÃÊ L>Ã]Ê
quand la tasse est pleine. Le tube de la buse à
i>ÕÊV
>Õ`iÊV
>ÕvviÊ`ÕÀ>ÌÊ>Ê«À`ÕVÌ]ÊÃ>ÃÃÃiâÊ `VÊ Ã>ÃÀÊ >Ê LÕÃiÊ ÕµÕiiÌÊ «>ÀÊ >Ê «gnée.
Nettoyage du récipient de récupération des
marcs à café
Lorsque le voyant
V}Ìi]ÊÛÕÃÊ`iÛiâÊÛ`iÀÊ
et nettoyer le récipient des marcs à cafés. Le voyant continu à clignoter et la machine ne peut
pas faire de café tant que le récipient n’est pas
nettoyé. Pour effectuer le nettoyage (avec la machine allumée):
UÊ iÛiâʽj}ÕÌÌÀÊw}°ÊÓή]ÊÛ`iâiÊiÌÊiÌÌÞiâi°
UÊÊ 6`iâÊiÌÊiÌÌÞiâÊÃ}iÕÃiiÌÊiÊÀjV«iÌÊ
des marcs à café en ayant soin d’enlever tous
les résidus qui se déposent sur le fond:
UÊ ÌÀiâÊ iÊ ÀjV«iÌÊ `iÊ ÀjVÕ«jÀ>ÌÊ `iÊ >Ê
V`iÃ>ÌÊ ÀÕ}i®]Ê iÌÊ jÛiÌÕiiiÌÊ
Û`iâi°
£°Ê *>ViâÊ ÕÊ ÀjV«iÌÊ ÃÕÃÊ >Ê LÕÃiÊ DÊ V>««ÕVcino (le plus près possible afin d’éviter les
éclaboussures):
Ó°Ê /ÕÀiâÊ>Ê>iÌÌiÊDÊÛ>«iÕÀÊiÊ«ÃÌÊ\ÊiÊ
débit commence.
Î°Ê ÌiÀÀ«iâÊ iÊ ÀiiÌÌ>ÌÊ >Ê >iÌÌiÊ DÊ Û>peur en position 0.
Nota Bene!
-Ê>Ê`>ÌjʺViÊ`½jiÀ}i»ÊiÃÌÊ>VÌÛji]Ê
la sortie d’eau chaude nécessite quelques secondes d’attente.
Attention!
ÀõÕiÊ ÛÕÃÊ iiÛiâÊ ½j}ÕÌÌÀ]Ê ÛÕÃÊ `iÛiâÊ
obligatoirement toujours vider le récipient des
marcs même s’il est à moitié vide.
NETTOYAGE
Nettoyage de la machine
Il faut nettoyer périodiquement les parties de la
machine suivantes:
Ê iÊÀjV«iÌÊ«ÕÀÊiÃÊ>ÀVÃÊ`iÊV>vjʣή]
- l’égouttoir (A17) et le récipient de récupéraÌÊ`iÊ>ÊV`iÃ>ÌÊ£{®]
-ÊViÌÌiÊ«jÀ>ÌʽiÃÌÊ«>ÃÊivviVÌÕji]ÊÊÃiÊ«iÕÌÊ
µÕ½Ê iÊ v>Ã>ÌÊ `½>ÕÌÀiÃÊ V>vjÃ]Ê iÊ ÀjV«iÌÊ `iÃÊ
marcs à café se remplisse plus que prévu et que
la machine s’obstrue.
32
Nettoyage de l’égouttoir et du récipient de
récupération de la condensation
Nettoyage des becs verseurs de sortie café
£°Ê iÌÌÞiâÊiÃÊLiVÃÊÛiÀÃiÕÀÃÊ>ÕÊÞiÊ`½ÕiÊ
éponge ou d’un chiffon (fig. 26A).
Ó°ÊÊ ÌÀiâÊ µÕiÊ iÃÊ ÀwViÃÊ `ÕÊ LiVÊ ÛiÀÃiÕÀÊ DÊ
V>vjÊ iÊ ÃiÌÊ «>ÃÊ LÃÌÀÕjÃ°Ê -Ê jViÃÃ>Ài]Ê
iiÛiâÊiÃÊ`j«ÌÃÊ`iÊV>vjÊDʽ>`iÊ`½ÕÊVÕÀi
dents (fig. 26B).
Attention!
Si le récipient de récupération de la condensation
½iÃÌÊ«>ÃÊÛ`jÊÀj}ÕmÀiiÌ]ʽi>ÕÊ«iÕÌÊ`jLÀ`iÀÊ
et pénétrer à l’intérieur ou sur le côté de la maV
i°Ê
iVÊ«iÕÌÊi`>}iÀÊ>Ê>V
i]ÊiÊ«>Ê
`½>««ÕÊÕÊ>ÊâiÊiÛÀ>Ìi°
Nettoyage de l’entonnoir pour l’introduction
du café pré-moulu
ÌÀiâÊ«jÀ`µÕiiÌÊiÛÀÊÕiÊvÃÊ«>ÀÊ
mois) que l’entonnoir pour l’introduction du café
pré-moulu ne soit pas obstrué. Dans le cas conÌÀ>Ài]ÊiiÛiâÊiÃÊ`j«ÌÃÊ`iÊV>vjÊ>ÛiVÊiÊ«Vi>ÕÊ
fourni en dotation.
L’égouttoir est doté d’un flotteur (rouge) qui indique le niveau de l’eau contenue (fig. 24). Il faut
>LÃÕiÌÊÛ`iÀʽj}ÕÌÌÀÊiÌÊiÊiÌÌÞiÀ]Ê>Û>ÌÊ
que cet indicateur commence à sortir du plateau
d’appui pour les tasses. Pour enlever l’égouttoir:
£°Ê ,iÌÀiâʽj}ÕÌÌÀÊiÌÊiÊÀjV«iÌÊ`iÊ>ÀVÃÊDÊ
café (fig. 23);
Ó°Ê 6`iâÊ ½j}ÕÌÌÀÊ iÌÊ iÊ ÀjV«iÌÊ `iÊ >ÀVÃÊ DÊ
V>vjÊ«ÕÃÊ>ÛiâiÃÆ
Î°Ê ÌÀiâÊ iÊ ÀjV«iÌÊ `iÊ ÀjVÕ«jÀ>ÌÊ `iÊ >Ê
V`iÃ>Ì]ÊiÌÊjÛiÌÕiiiÌÊÛ`iâi°Ê
{°Ê ,jÃjÀiâÊ ½j}ÕÌÌÀÊ >ÛiVÊ iÊ ÀjV«iÌÊ `iÊ
marcs à café.
Comment nettoyer l’infuseur
L’infuseur (A11) doit être nettoyé au moins une
fois par mois.
Attention!
½vÕÃiÕÀÊiÊ«iÕÌÊ«>ÃÊkÌÀiÊiÝÌÀ>ÌʵÕ>`Ê>Ê>chine est allumée.
£°Ê ÃÃÕÀiâÛÕÃÊ µÕiÊ >Ê >V
iÊ >ÌÊ ivviVÌÕjÊ
correctement l’arrêt (voir “Arrêt de la machii»]Ê«>}iÊÓÇ®°
Ó°Ê iÛiâÊiÊÀjÃiÀÛÀÊDÊi>Õ°
Î°Ê "ÕÛÀiâÊiÊÛiÌÊvÕÃiÕÀÊw}°ÊÓǮʫ>VjÊÃÕÀÊiÊ
côté droit.
{°ÊÊ ««ÕÞiâÊ ÛiÀÃÊ ½ÌjÀiÕÀÊ iÃÊ `iÕÝÊ ÌÕV
iÃÊ
ÀÕ}iÃÊ `iÊ `jVÀV
>}iÊ iÌÊ ÀiÌÀiâÊ ÃÕÌ>jiÌÊ ½vÕÃiÕÀÊ iÊ iÊ ÌÀ>ÌÊ ÛiÀÃÊ ½iÝÌjÀiÕÀÊ
(fig. 28).
Comment nettoyer l’intérieur de la machine
Danger de secousses électriques!
Avant de nettoyer les parties internes de la maV
i]ÊViiVÊ`ÌÊkÌÀiÊjÌiÌiÊVÃÕÌiÀʺÀÀḵ®Ê
iÌÊ`jLÀ>V
jiÊ`ÕÊÀjÃi>ÕÊjiVÌÀµÕi°Ê iÊ«}iâÊ
jamais la machine dans l’eau.
£°Ê ÌÀiâÊ «jÀ`µÕiiÌÊ iÛÀÊ ÕiÊ vÃÊ
par semaine) que l’intérieur de la machine
>VViÃÃLiÊ>«ÀmÃÊ>ÛÀÊiÝÌÀ>Ìʽj}ÕÌÌÀ®ÊiÊ
ÃÌÊ«>ÃÊÃ>i°Ê>ÃÊiÊV>ÃÊVÌÀ>Ài]ÊiiÛiâÊ
les dépôts de café avec le pinceau fourni en
dotation et une éponge.
Ó°Ê Ã«ÀiâÊÌÕÃÊiÃÊÀjÃ`ÕÃÊDʽ>`iÊ`½ÕÊ>ëÀ>teur (fig. 25).
Nettoyage du réservoir à eau
£°Ê iÌÌÞiâÊ «jÀ`µÕiiÌÊ iÛÀÊ ÕiÊ vÃÊ
par mois) et à chaque substitution du filtre
adoucisseur (si prévu) le réservoir à eau (A9)
avec un chiffon humide et un peu de détergent délicat.
Ó°Ê iÛiâÊiÊwÌÀiÊÃÊ«ÀjÃiÌ®ÊiÌÊÀViâiÊÃÕÃÊ
l’eau courante.
Î°Ê ,jÃjÀiâÊ iÊ wÌÀiÊ ÃÊ «ÀjÛÕ®]Ê Ài«ÃÃiâÊ iÊ
ÀjÃiÀÛÀÊ>ÛiVÊ`iʽi>ÕÊvÀ>V
iÊiÌÊÀjÃjÀiâÊiÊ
réservoir.
Attention!
RINCEZ UNIQUEMENT AVEC DE L’EAU
N’UTILISEZ PAS DE DETERGENTS NI DE
LAVE-VAISSELLE
Nettoyez l’infuseur sans utiliser de détergents
car ceux-ci risqueraient de l’endommager.
x°Ê >ÃÃiâʽvÕÃiÕÀÊ`>Ãʽi>ÕÊ«i`>ÌÊiÛÀÊ
xÊÕÌiÃ]Ê«ÕÃÊÀViâiÊÃÕÃÊiÊÀLiÌ°
È°Ê Ê ÕÌÃ>ÌÊ iÊ «Vi>ÕÊ
Ó®]Ê iÌÌÞiâÊ jÛituellement les résidus de café présents dans
le logement de l’infuseur que vous remarµÕiâÊiÊÕÛÀ>ÌÊiÊÛiÌÊvÕÃiÕÀ°°
Ç°Ê «ÀmÃÊ iÊ iÌÌÞ>}i]Ê ÀjÃjÀiâÊ ½vÕÃiÕÀÊ iÊ
½iw>ÌÊ `>ÃÊ iÊ ÃÕ««ÀÌÆÊ «ÕÃÊ >««ÕÞiâÊ ÃÕÀÊ
l’inscription PUSH jusqu’à entendre le clic
d’accrochage.
33
>Ê}>À>ÌiʽiÃÌÊ«>ÃÊÛ>>Li°ÊiÊ«ÕÃ]Ê>Ê}>À>ÌiÊ
n’est pas valable si le détartrage n’est pas régulièrement effectué.
£°ÊÊ ÕiâÊ>Ê>V
i°
Ó°ÊÊ VVj`iâÊ>ÕÊiÕÊiÊ>««ÕÞ>ÌÊÃÕÀÊ>ÊÌÕV
iÊ
P.
ΰÊÊ /ÕÀiâÊ >Ê >iÌÌiÊ `iÊ ÃjiVÌÊ ÕõսDÊ ViÊ
que le voyant
s’allume.
{°ÊÊ ««ÕÞiâÊ ÃÕÀÊ >Ê ÌÕV
iÊ
: le voyant OK
V}ÌiÆÊ >««ÕÞiâÊ DÊ ÕÛi>ÕÊ ÃÕÀÊ >Ê ÌÕV
iÊ
pour confirmer.
x°Ê 6`iâÊV«mÌiiÌÊiÊÀjÃiÀÛÀÊDÊi>ÕÊ®Ê
iÌÊiiÛiâÊiÊwÌÀiÊ>`ÕVÃÃiÕÀÊÃÊ«ÀjÃiÌ®°
Ç°Ê 6iÀÃiâÊ iÊ `jÌ>ÀÌÀ>ÌÊ `>ÃÊ iÊ ÀjÃiÀÛÀÊ DÊ i>ÕÊ
jusqu’au niveau A (qui correspond à un saV
iÌÊ`iÊΰ{ÊâÊÉÊ£ää®Ê«ÀjÊ>ÕÊ`ÃÊ`ÕÊ
ÀjÃiÀÛÀÊ w}°Ê Ó®ÆÊ «ÕÃÊ >ÕÌiâÊ `iÊ ½i>ÕÊ
(11) jusqu’à atteindre le niveau B (fig. 29B).
n°ÊÊ *>ViâÊi`iÃÃÕÃÊ`iÊ>ÊLÕÃiÊDÊV>««ÕVVÊ
£®ÊÕÊÀjV«iÌÊÛ`iÊ`iÊxäÊâÊÉÊ£]xÊmum (fig. 3).
support
infuseur
Nota Bene!
-Ê ½vÕÃiÕÀÊ iÃÌÊ `vwViÊ DÊ ÃjÀiÀ]Ê Ê iÃÌÊ jViÃsaire (avant de l’insérer) de le placer à la bonne
`iÃÊiÊ>««ÕÞ>ÌÊiÃÊ`iÕÝÊiÛiÀÃÊViÊ
indiqué en figure.
grand levier
Petit levier
Ç°ÊÊ «ÀmÃÊ ½>ÛÀÊ ÃjÀj]Ê >ÃÃÕÀiâÛÕÃÊ µÕiÊ iÃÊ
`iÕÝÊÌÕV
iÃÊÀÕ}iÃÊÃiÌÊiLÌjð
PU
SH
Attention! Danger de brûlures
De l’eau chaude contenant des acides sort de la
LÕÃiÊ DÊ V>««ÕVV°Ê Ê >ÌiÃÊ >ÌÌiÌÊ >ÕÝÊ jV>boussures d’eau.
°Ê ««ÕÞiâÊ ÃÕÀÊ >Ê ÌÕV
i
pour confirmer
l’introduction de la solution: le voyant
clignote pour indiquer qu’il faut tourner la
manette à vapeur.
£ä°Ê/ÕÀiâÊ >Ê >iÌÌiÊ DÊ Û>«iÕÀÊ iÊ «ÃÌÊ °Ê
Le programme de détartrage démarre et le
liquide détartrant sort de la buse à eau. Le
programme de détartrage effectue automatiquement toute une série de rinçages et d’inÌiÀÛ>iÃ]Ê«ÕÀÊiiÛiÀÊiÃÊÀjÃ`ÕÃÊ`iÊV>V>ÀiÊ
qui se trouvent à l’intérieur de la machine à
café.
«ÀmÃÊiÛÀÊÎäÊÕÌiÃ]ÊiÊÀjÃiÀÛÀÊDÊi>ÕÊiÃÌÊ
vide: les voyants
OK s’allument et le voyant
clignote.
££°Ê6`iâÊ iÊ ÀjV«iÌÊ ÕÌÃjÊ «ÕÀÊ ÀiVÕiÀÊ >Ê
ÃÕÌÊ `jÌ>ÀÌÀ>ÌiÊ iÌÊ iÊ ÀiiÌÌÀi]Ê ÕiÊ vÃÊ
Û`j]ÊÃÕÃÊ>ÊLÕÃiÊDÊV>««ÕVV°
£Ó°ÊiÛiâÊiÊÀjÃiÀÛÀÊDÊi>Õ]ÊÛ`iâi]ÊÀViâiÊ
>ÛiVÊ`iʽi>ÕÊVÕÀ>Ìi]ÊÀi«ÃÃiâiÊ>ÛiVÊ`iÊ
½i>ÕÊ«À«ÀiÊ«ÕÃÊÀjÃjÀiâi\ÊiÊÛÞ>ÌÊ
s’éteint.
13. L’eau chaude sort de la buse à cappuccino.
n°Ê ,iviÀiâÊiÊÛiÌÊvÕÃiÕÀ°
°Ê ,jÃjÀiâÊiÊÀjÃiÀÛÀÊDÊi>Õ°
DETARTRAGE
jÌ>ÀÌÀiâÊ >Ê >V
iÊ ÀõÕiÊ iÊ ÛÞ>Ì
gnote sur le panneau de contrôle.
cli-
Attention!
Le détartrant contient des acides qui peuvent
ÀÀÌiÀÊ>Ê«i>ÕÊiÌÊiÃÊÞiÕÝ°ÊÊiÃÌÊ>LÃÕiÌÊjcessaire de respecter les mesures de sécurité
vÕÀiÃÊ«>ÀÊiÊv>LÀV>Ì]ÊViiÃÊiÌjiÃÊÃÕÀÊ
le récipient du détartrant ainsi que les instructions concernant les mesures à adopter en cas
`iÊVÌ>VÌÊ>ÛiVÊ>Ê«i>ÕÊÕÊiÃÊÞiÕÝ°
Nota Bene!
1ÌÃiâÊ iÝVÕÃÛiiÌÊ iÊ `jÌ>ÀÌÀ>ÌÊ i½}
°Ê
Il ne faut absolument pas utiliser du détartrant
DÊ L>ÃiÊ `iÊ ÃÕv>µÕiÊ ÕÊ >Vj̵Õi]Ê `>ÃÊ ViÊ V>ÃÊ
34
14. Lorsque le récipient à eau est complètement
Û`i]ÊiÃÊÛÞ>ÌÃÊ
OK s’allument.
£x°Ê *>ViâÊ >Ê >iÌÌiÊ iÊ «ÃÌÊ ä]Ê ÃjÀiâÊ iÊ
wÌÀiÊÃÊViÕVÊjÌ>ÌÊ«ÀjÃiÌ®]ÊÀi«ÃÃiâÊiÊ
ÀjÃiÀÛÀÊ DÊ i>Õ]Ê >Ê >V
iÊ iÃÌÊ >Ìi>ÌÊ
prête pour l’utilisation.
NIVEAU 3
NIVEAU 4
x°Ê ««ÕÞiâÊÃÕÀÊ>ÊÌÕV
iÊ
pour confirmer la
configuration.
È°Ê ««ÕÞiâÊ ÃÕÀÊ >Ê ÌÕV
i
pour sortir du
menu.
La machine est maintenant programmée selon la
nouvelle configuration de la dureté de l’eau.
REGLAGE DE LA DURETE DE L’EAU
Le voyant
s’affiche après une période de fonctionnement pré-établie qui dépend de la dureté de l’eau. La machine est réglée en usine sur
Ûi>ÕÊ `iÊ `ÕÀiÌjÊ {°Ê -Ê ÛÕÃÊ iÊ ÃÕ
>Ìiâ]Ê ÛÕÃÊ
«ÕÛiâÊ «À}À>iÀÊ >Ê >V
iÊ iÊ vVÌÊ `iÊ
la dureté effective de l’eau fournie dans les difféÀiÌiÃÊÀj}Ã]ÊViʵÕÊ«iÀiÌÊ`½ivviVÌÕiÀÊÃÊ
fréquemment le détartrage.
FILTRE ADOUCISSEUR
Certains modèles ont un filtre adoucisseur fournit
iÊ `Ì>Ì\Ê ÃÊ ÛÌÀiÊ `miÊ ½iÊ iÃÌÊ «>ÃÊ `Ìj]Ê
nous vous conseillons de l’acheter dans une des
centres assistance autorisés De’Longhi.
*ÕÀÊ ÕiÊ LiÊ ÕÌÃ>ÌÊ `ÕÊ wÌÀi]Ê ÃÕÛiâÊ iÃÊ
instructions sousmentionnées.
Mesure de la dureté de l’eau
1. -ÀÌiâÊ `iÊ ÃÊ iL>>}iÊ >Ê Ì}iÊ vÕÀiÊ iÊ
`Ì>Ìʺ/"/Ê, --Ê/-/»Ê>iÝjiÊ
à ce livret.
Ó°ÊÊ *}iâÊV«mÌiiÌÊ>ÊÌ}iÊ`>ÃÊÕÊÛiÀÀiÊ
d’eau pendant environ une seconde.
Î°Ê iÛiâÊ>ÊÌ}iÊ`iʽi>ÕÊiÌÊÃiVÕiâ>Êj}mÀiiÌ°Ê«ÀmÃÊiÛÀÊÕiÊÕÌiÊÃiÊvÀiÌ]Ê
ÃiÊ >Ê `ÕÀiÌjÊ `iÊ ½i>Õ]Ê £]Ê Ó]Ê ÎÊ ÕÊ {Ê «iÌÌÃÊ
carrés rouge; chaque carré correspond à 1
niveau.
Installation du filtre
£°ÊÊ ,iÌÀiâÊiÊwÌÀiÊ`iÊÃÊiL>>}i°
Ó°ÊÊ /ÕÀiâÊiÊ`õÕiÊ`ÕÊ`>ÌiÕÀÊÛÀÊw}°ÊÎä®ÊÕsqu’à visualiser les 2 prochains mois d’utilisation.
Nota Bene
iÊ wÌÀiÊ >Ê ÕiÊ `ÕÀjiÊ `iÊ `iÕÝÊ ÃÊ ÃÊ >Ê >V
iÊ iÃÌÊ ÕÌÃjiÊ À>iiÌ]Ê iÊ ÀiÛ>V
i]Ê ÃÊ >Ê
machine n’est pas utilisée tout en ayant le filtre
ÃÌ>j]ÊViÕVÊ>ÊÕiÊ`ÕÀjiÊ`iÊÎÊÃi>iÃÊ>ÝÕ°
Niveau 1
3. iÛiâÊiÊÀjÃiÀÛÀÊ`iÊ>Ê>V
iÊiÌÊÀi«ÃÃiâiÊ`½i>Õ°
{°ÊÊ ÃjÀiâÊiÊwÌÀiÊDʽÌjÀiÕÀÊ`ÕÊÀjÃiÀÛÀÊDÊi>ÕÊ
iÌÊ «}iâiÊ V«mÌiiÌÊ iÊ ½V>ÌÊ
>wÊ `iÊ «iÀiÌÌÀiÊ >ÕÝÊ LÕiÃÊ `½>ÀÊ `iÊ ÃÀÌÀÊ
(fig. 31);
x°ÊÊ ÃjÀiâÊiÊwÌÀiÊ`>ÃÊÃÊ}iiÌÊw}°ÊÎÓ®Ê
iÌÊ>««ÕÞiâiÊDÊv`°
È°ÊÊ ,iviÀiâÊiÊÀjÃiÀÛÀÊ>ÛiVÊiÊVÕÛiÀViÊw}°Ê
ÎÓ®]Ê«ÕÃÊÀjÃjÀiâiÊ`>ÃÊ>Ê>V
i°
Ê «>ÀÌÀÊ `ÕÊ iÌÊ ÙÊ ÛÕÃÊ ÃÌ>iâÊ iÊ wÌÀi]Ê
ÛÕÃÊ`iÛiâÊiÊÃ}>iÀÊ>Ê«ÀjÃiViÊDÊ>Ê>V
i°
Ç°ÊÊ ««ÕÞiâÊ ÃÕÀÊ >Ê ÌÕV
iÊ P pour accéder au
menu;
n°ÊÊ /ÕÀiâÊ >Ê >iÌÌiÊ `iÊ ÃjiVÌÊ ÕõսDÊ ViÊ
que les voyants
et
s’allument.
°ÊÊ ««ÕÞiâÊÃÕÀÊ>ÊÌÕV
i
: le voyant OK clignote.
10. ««ÕÞiâÊÃÕÀÊ>ÊÌÕV
iÊ
pour confirmer la
sélection.
Niveau 2
Niveau 3
Niveau 4
Réglage de la dureté de l’eau
£°Ê ««ÕÞiâÊ ÃÕÀÊ >Ê ÌÕV
iÊ P pour accéder au
menu.
Ó°Ê /ÕÀiâÊ >Ê >iÌÌiÊ `iÊ ÃjiVÌÊ ÕõսDÊ ViÊ
que le voyant
s’allume.
Î°Ê wÀiâÊ >Ê ÃjiVÌÊ iÊ >««ÕÞ>ÌÊ ÃÕÀÊ >Ê
touche
.
{°Ê /ÕÀiâÊ>Ê>iÌÌiÊ`iÊÃjiVÌÊiÌÊVw}ÕÀiâÊ
le niveau relevé par la tige réactive (voir fig.
du paragraphe précédent).
NIVEAU 1
NIVEAU 2
35
££°Ê *>ViâÊ ÕÊ ÀjV«iÌÊ i`iÃÃÕÃÊ `iÊ >Ê LÕÃiÊ
à cappuccino (ayant une capacité: min.
100ml).
££°Ê/ÕÀiâÊ>Ê>iÌÌiÊDÊÛ>«iÕÀÊiÌÊ>««ÕÞiâÊÃÕÀÊ
la touche
.
£Ó°Ê«ÀmÃÊ>ÛÀÊV«jÌjÊiÊ`jLÌ]ÊiÊÛÞ>Ì
V}ÌiÆÊiÊviÀ>ÌÊ>Ê>iÌÌi]Ê>Ê>V
iÊ
se remet automatiquement en mode “Pronto
caffè” (“Café prêt”).
Maintenant le nouveau filtre est activé et vous
«ÕÛiâÊÕÌÃiÀÊ>Ê>V
i°
«ÕÛiâÊÕÌÃiÀÊ>Ê>V
i°
Comment enlever le filtre
-ÊÛÕÃÊÃÕ
>ÌiâÊVÌÕiÀÊDÊÕÌÃiÀÊ>Ê>V
iÊ
Ã>ÃÊiÊwÌÀi]ÊÛÕÃÊ`iÛiâʽiiÛiÀÊiÌÊiÊÃ}>iÀÊ
½j>Ì°Ê*ÀVj`iâÊ`iÊ>Êv>XÊÃÕÛ>Ìi\
£°Ê iÛiâÊiÊÀjÃiÀÛÀÊiÌÊiÊwÌÀiÊÕÃjÆ
Ó°ÊÊ ««ÕÞiâÊ ÃÕÀÊ >Ê ÌÕV
iÊ P pour accéder au
menu;
Î°Ê /ÕÀiâÊ >Ê >iÌÌiÊ `iÊ ÃjiVÌÊ w}°Ê n®Ê Õsqu’à ce que les voyants
et
s’allument.
4. ««ÕÞiâÊÃÕÀÊ>ÊÌÕV
i
: le voyant OK clignote.
x°Ê ««ÕÞiâÊ ÃÕÀÊ >Ê ÌÕV
i
pour confirmer
l’utilisation de la machine sans le filtre;
È°Ê ««ÕÞiâÊ ÃÕÀÊ >Ê ÌÕV
iÊ
pour sortir du
menu.
Comment remplacer le filtre
Lorsque le voyant
clignote ou bien lorsque
«ÕÃÊ`iÊ`iÕÝÊÃÊÃiÊÃÌÊjVÕjÃÊÛÀÊ`>ÌiÕÀ®Ê
ou bien si la machine n’est pas utilisée pendant
«ÕÃÊ`iÊÎÊÃi>iÃ]ÊÊv>ÕÌÊ>LÃÕiÌÊÀi«>ViÀÊ
le filtre:
£°ÊÊ iÛiâÊiÊÀjÃiÀÛÀÊiÌÊiÊwÌÀiÊÕÃjÆ
Ó°ÊÊÊ,iÌÀiâÊiÊÕÛi>ÕÊwÌÀiÊ`iÊÃÊiL>>}i°
ΰÊÊ /ÕÀiâÊiÊ`õÕiÊ`ÕÊ`>ÌiÕÀÊÛÀÊw}°ÊÎä®ÊÕsqu’à visualiser les 2 mois successifs d’utiliÃ>ÌÊiÊwÌÀiÊDÊÕiÊ`ÕÀjiÊ`iÊ`iÕÝÊîÆ
{°ÊÊ ,i«ÃÃiâÊiÊÀjÃiÀÛÀÆ
x°ÊÊ ÃjÀiâÊiÊwÌÀiÊDʽÌjÀiÕÀÊ`ÕÊÀjÃiÀÛÀÊDÊi>ÕÊ
iÌÊ «}iâiÊ V«mÌiiÌÊ iÊ ½V>ÌÊ
>wÊ `iÊ «iÀiÌÌÀiÊ >ÕÝÊ LÕiÃÊ `½>ÀÊ `iÊ ÃÀÌÀÊ
(fig. 31);
È°ÊÊ ÃjÀiâÊiÊwÌÀiÊ`>ÃÊÃÊ}iiÌÊw}°ÊÎÓ®Ê
iÌÊ>««ÕÞiâÊDÊv`]ÊÀiviÀiâÊiÊÀjÃiÀÛÀÊ>ÛiVÊ
iÊVÕÛiÀViÊw}°ÊÎӮʫÕÃÊÀjÃjÀiâiÊ`>ÃÊ
la machine;
Ç°ÊÊ *>ViâÊ ÕÊ ÀjV«iÌÊ i`iÃÃÕÃÊ `iÊ >Ê LÕÃiÊ
à cappuccino (ayant une capacité: min.
100ml).
n°ÊÊ ««ÕÞiâÊ ÃÕÀÊ >Ê ÌÕV
iÊ P pour accéder au
menu;
°ÊÊ /ÕÀiâÊ >Ê >iÌÌiÊ `iÊ ÃjiVÌÊ ÕõսDÊ ViÊ
que les voyants
et
s’allument.
£ä°ÊÊ««ÕÞiâÊÃÕÀÊ>ÊÌÕV
iÊ
: le voyant OK clignote.
11. ««ÕÞiâÊÃÕÀÊ>ÊÌÕV
iÊ
pour confirmer la
sélection.
12. /ÕÀiâÊ>Ê>iÌÌiÊDÊÛ>«iÕÀÊiÌÊ>««ÕÞiâÊÃÕÀÊ
la touche
.
13. «ÀmÃÊ>ÛÀÊV«jÌjÊiÊ`jLÌ]ÊiÊÛÞ>ÌÊ
V}ÌiÆÊiÊviÀ>ÌÊ>Ê>iÌÌi]Ê>Ê>V
iÊ
se remet automatiquement en mode “Pronto
caffè” (“Café prêt”).
Maintenant le nouveau filtre est activé et vous
CARACTERISTIQUES TECHNIQUES
/iÃ\ÊÊÊ
£Óä6HÊÈäÊâÊ
Puissance absorbée:
1350 W
Pression:
15 bar
>«>VÌjÊ>Ý°ÊÀjÃiÀÛÀÊDÊi>Õ\ÊÊÊxä°ÇÊyÊâÊÉ£]nÊ
iÃÃÊÝÝ*\ÊÊ
Ó°ÎnÊÝÊΰ{ÊÝÊ{°ÎÊÊÉÊ
ÓÎnÝÎ{äÝ{ÎäÊ
}ÕiÕÀÊVÀ`\Ê
££ÊÊÉÊ£]£xÊ
*`Ã\ÊÊÊ
Óä°ÓÓÊLÊÉÊ]£Ê}
>«>VÌjÊ>Ý°ÊÀjV«iÌÊDÊ}À>Ã\Ê x°ÎÊâÊÉÊ£xäÊ}
36
SIGNIFICATION DES VOYANTS
VOYANT AFFICHE
CAUSE POSSIBLE
SOLUTION
Ê¿ÞÊ>Ê«>ÃÊ>ÃÃiâÊ`¿i>ÕÊ`>ÃÊiÊ
réservoir.
,i«ÃÃiâÊiÊÀjÃiÀÛÀÊDÊi>ÕÊiÌÉÕÊÃjÀiâiÊ
correctement en l’appuyant à fond jusqu’à
l’enclenchement.
Le réservoir n’est pas inséré
correctement.
ÃjÀiâÊVÀÀiVÌiiÌÊiÊÀjÃiÀÛÀÊiÊ
l'appuyant à fond.
Le récipient de marcs à café (A13)
est plein.
6`iâÊiÊÀjV«iÌÊ`iÊ>ÀVÃÊiÌʽj}ÕÌÌÀ]Ê
iÌÌÞiâiÃÊ«ÕÃÊÀjÃjÀiâiðʫÀÌ>Ì\Ê
ÀõÕiÊÛÕÃÊiiÛiâʽj}ÕÌÌÀ]ÊÛÕÃÊ`iÛiâÊ
obligatoirement toujours vider le récipient des
marcs à café même s’il est à moitié vide. Si
ViÌÌiÊ«jÀ>ÌʽiÃÌÊ«>ÃÊivviVÌÕji]ÊÊÃiÊ«iÕÌÊ
µÕ½ÊiÊv>Ã>ÌÊ`½>ÕÌÀiÃÊV>vjÃ]ÊiÊÀjV«iÌÊ`iÃÊ
marcs à café se remplisse plus que prévu et
que la machine s’obstrue.
Le récipient à marcs n’a pas été
inséré après le nettoyage.
iÛiâʽj}ÕÌÌÀÊiÌÊÃjÀiâÊiÊÀjV«iÌÊ`iÊ
marcs à café.
>ÊÕÌÕÀiÊ`ÕÊV>vjÊiÃÌÊÌÀ«Êwi]Ê
par conséquent le café sort trop
lentement ou ne sort pas du tout.
,j«jÌiâÊ>ÊÃÀÌiÊ`ÕÊV>vjÊiÌÊÌÕÀiâÊ>Ê>iÌÌiÊ
de réglage de la mouture (fig. 10) en sens
À>Ài]Ê`½ÕÊVÀ>ÊÛiÀÃÊiÊÕjÀÊÇÊ«i`>ÌÊ
µÕiÊiÊÕÊDÊV>vjÊiÃÌÊiÊ>ÀV
i°Ê-]Ê>«ÀmÃÊ
>ÛÀÊv>ÌÊ>ÕÊÃÊÓÊV>vjÃ]iÊ`jLÌÊ`iÛÀ>ÌÊ
kÌÀiÊiVÀiÊÌÀ«ÊiÌ]ÊÀj«jÌiâÊ>ÊVÀÀiVÌÊ
en tournant la manette de réglage d’un autre
VÀ>ÊÛÀÊÀj}>}iÊ`ÕÊÕÊDÊV>vj]Ê«>}iÊÎä®°Ê
-ÊiÊ«ÀLmiÊ«iÀÃÃÌi]ÊÌÕÀiâÊ>Ê>iÌÌiÊ
à vapeur en position I et faites couler un peu
d’eau par la buse à cappuccino.
La fonction “café pré-moulu” a été
sélectionnée mais il n’y a pas de
café pré-moulu dans l’entonnoir.
ÌÀ`ÕÃiâÊiÊV>vjÊ«ÀjÕÕÊ`>ÃÊ¿iÌÀÊ
ÕÊ`jÃjiVÌiâÊ>ÊvVÌÊ«ÀjÕÕ°
37
VOYANT AFFICHE
CAUSE POSSIBLE
SOLUTION
Il indique qu’un détartrage de la
machine est nécessaire.
Il faut effectuer le plus rapidement possible
le programme de détartrage décrit au chap.
“Détartrage”.
6ÕÃÊ>ÛiâÊÕÌÃjÊÌÀ«Ê`iÊV>vj°
-jiVÌiâÊÕÊ}×ÌÊ«ÕÃÊj}iÀÊÕÊLiÊ
Àj`ÕÃiâÊ>ʵÕ>ÌÌjÊ`iÊV>vjÊ«ÀjÕÕÊ«ÕÃÊ
demander un autre café.
Le café en grains est terminé.
,i«ÃÃiâÊiÊÀjV«iÌÊDÊ}À>ð
L’entonnoir pour le café prémoulu est obstrué.
6`iâʽiÌÀÊDʽ>`iÊ`ÕÊ«Vi>ÕÊViÊ
décrit au par. “Nettoyage de l’entonnoir pour
l’introduction du café”
L’infuseur n’a pas été réinséré
après le nettoyage.
ÃjÀiâʽvÕÃiÕÀÊViÊ`jVÀÌÊ>ÕÊ
paragraphe “Nettoyage de l’infuseur”.
L’intérieur de la machine est très
sale.
Nettoyer soigneusement la machine comme
décrit dans le par. "nettoyage et maintenance".
Si après le nettoyage la machine affiche
iVÀiÊiÊiÃÃ>}i]Ê>`ÀiÃÃiâÛÕÃÊDÊÕÊViÌÀiÊ
d'assistance.
Le filtre est usé.
Substituer le filtre (voir par. “comment
remplacer le filtre adoucisseur”).
38
SOLUTIONS AUX PROBLEMES
Plus bas sont énumérés certains dysfonctionnements qui peuvent se produire.
-ÊiÊ«ÀLmiÊiÊ«iÕÌÊ«>ÃÊkÌÀiÊÀjÃÕÊ`iÊ>Êv>XÊ`jVÀÌi]ÊVÌ>VÌiâʽÃÃÃÌ>ViÊ/iV
µÕi°
PROBLEME
CAUSE POSSIBLE
SOLUTION
Le café n'est pas
chaud.
Les tasses n’ont pas été préchauffées.
,jV
>ÕvviâÊiÃÊÌ>ÃÃiÃÊiÊiÃÊÀX>ÌÊ>ÛiVÊ`iÊ
¿i>ÕÊV
>Õ`iÊ °\ÊÛÕÃÊ«ÕÛiâÊÕÌÃiÀÊ>Ê
fonction eau chaude).
L'infuseur s'est refroidi parce que 2/3
minutes se sont écoulées depuis la sortie du
dernier café.
Û>ÌÊ`iÊv>ÀiÊiÊV>vj]ÊÀjV
>ÕvviâʽvÕÃiÕÀÊiÊ
appuyant sur la touche
.
La température du café configurée est trop
basse.
w}ÕÀiâÊDÊ«>ÀÌÀÊ`ÕÊiÕ]Ê>ÊÌi«jÀ>ÌÕÀiÊ
du café «élevée».
La mouture du café est trop grosse
/ÕÀiâÊ>Ê>iÌÌiÊ`iÊÀj}>}iÊ`iÊ>Ê
mouture d’un cran vers le numéro 1 en sens
antihoraire quand le moulin à café est en
>ÀV
iÊw}°Ê£ä®°Ê/ÕÀiâÊ`½ÕÊVÀ>ÊDÊ>ÊvÃÊ
jusqu’à obtenir un débit satisfaisant. L’effet
est visible seulement après avoir fait 2 cafés
ÛÃÊ«>À>}À>«
iʺÀj}>}iÊ`ÕÊÕÊDÊV>vj»]Ê
page 30).
Le café n'est pas approprié.
1ÌÃiâÊ`ÕÊV>vjÊ«ÕÀÊiÃÊ>V
iÃÊDÊV>vjÊ
iÝ«ÀiÃð
Le café sort trop
lentement ou bien
goutte à goutte.
La mouture du café est trop fine.
/ÕÀiâÊ>Ê>iÌÌiÊ`iÊÀj}>}iÊ`iÊ>ÊÕÌÕÀiÊ
d’un cran vers le numéro 7 en sens horaire
quand le moulin à café est en marche (fig.
£ä®°Ê/ÕÀiâÊ`½ÕÊVÀ>ÊDÊ>ÊvÃÊÕõսDÊ
obtenir un débit satisfaisant. L’effet est
visible seulement après avoir fait 2 cafés
(voir paragraphe “réglage du moulin à café”
page 30).
Le café ne sort pas
`½ÕÊ`iÃÊ`iÕÝÊLiVÃÊ
verseurs.
Les becs verseurs sont obstrués.
iÌÌÞiâÊiÃÊLiVÃÊÛiÀÃiÕÀÃÊDʽ>`iÊ`½ÕÊ
cure-dents.
iÊ>ÌÊÕÃÃiÕÝÊ>Ê`iÊ
grandes bulles
Le lait n'est pas suffisamment froid ou n'est
pas demi-écrémé.
1ÌÃiâÊ`iÊ«ÀjvjÀiViÊ`ÕÊ>ÌÊjVÀjjÊÕÊLiÊ
`ijVÀjj]ÊÃÀÌÌÊ`ÕÊÀjvÀ}jÀ>ÌiÕÀÊiÛÀÊ
41°F / 5ºC). Si le résultat n'est pas celui
ÃÕ
>Ìj]ÊiÃÃ>ÞiâÊÕÊ>ÌÊ`¿ÕiÊ>ÕÌÀiÊ>ÀµÕi°
Le lait n'est pas
émulsionné
La buse à cappuccino est sale.
iÌÌÞiâÊiÊÀiëiVÌ>ÌÊiÃÊ`V>ÌÃÊ
du paragraphe “Nettoyage de la buse à
cappuccino après l’utilisation” ( page 31).
La sortie de vapeur
s’est interrompue
Un dispositif de sécurité interrompt la sortie
de la vapeur après 3 minutes.
ÌÌi`iâÊ«ÕÃÊÀj>VÌÛiâÊ>ÊvVÌÊÛ>«iÕÀ°
La machine ne s'allume
pas
La fiche n'est pas branchée à la prise.
À>V
iâÊ>ÊwV
iÊDÊ>Ê«ÀÃi°
L’interrupteur général (A8) n’est pas allumé.
iÌÌiâʽÌiÀÀÕ«ÌiÕÀÊ}jjÀ>ÊiÊ«ÃÌÊÊ
(fig. 1).
Le café est trop liquide
Õʽ>Ê«>ÃÊ>ÃÃiâÊ`iÊ
crème.
39
GARANTIE LIMITÈE
Cette garantie s’applique à tous les appareils ménagers de marques De’Longhi ou Kenwood.
Qu’est-ce qui est couvert par la garantie?
ÕÃÊ}>À>ÌÃÃÃʵÕiÊV
>µÕiÊ>««>ÀiÊiÃÌÊiÝi«ÌÊ`iÊÛViÃÊ`iÊ>ÌjÀ>ÕÝÊiÌÊ`iÊv>LÀV>Ì°Ê ÌÀiÊL}>Ì]Ê`>ÃÊiÊV>`ÀiÊ`iÊViÌÌiÊ}>À>Ìi]ÊiÃÌÊÌjiÊDÊ>ÊÀj«>À>Ì]ÊDÊÌÀiÊÕÃiÊÕÊ`>ÃÊÕÊViÌÀiÊ`iÊ
Àj«>À>ÌÊ>}Àjj]Ê`iÊÌÕÌiÃÊiÃÊ«mViÃÊ`jviVÌÕiÕÃiÃÊÕÊiÕÀÃÊV«Ã>ÌðÊÊV>ÃÊ`iÊÀi«>ViiÌÊÕÊ
ÀiÌÕÀÊ`½ÕÊ«À`ÕÌ]ÊÊ`ÌÊkÌÀiÊÀiÌÕÀjÊÌÕÌÊ«ÀÌÊ«>Þj°ÊiÊ`miÊiÕvÊÕÊÀj«>ÀjÊÃiÀ>ÊÀiÌÕÀjÊ>ÕÝÊvÀ>ÃÊ
de la société.
iÌÌiÊ}>À>ÌiÊiÊý>««µÕiʵÕiÊ`>ÃÊiÃÊV>ÃÊÙʽ>««>ÀiÊiÃÌÊÕÌÃjÊVvÀjiÌÊ>ÕÝÊÃÌÀÕVÌÃÊ`iÊ
l’usine qui l’accompagnent et sur un circuit électrique à courant alternatif (c.a.).
Combien de temps dure la garantie?
iÌÌiÊ}>À>ÌiÊ`ÕÀiÊ`iÕÝÊÓ®Ê>jiÃÊDÊ«>ÀÌÀÊ`iÊ>Ê`>ÌiÊ`½>V
>ÌÊ`µÕjiÊÃÕÀÊÛÌÀiÊÀiXÕÊiÌÊý>««µÕiÊ
uniquement à l’acheteur initial pour l’utilisation.
Qu’est ce qui n’est pas couvert par cette garantie?
Cette garantie ne couvre ni les défauts ou dégâts résultant de réparations ou altérations apportées à
l’appareil en dehors de notre usine ou des centres de réparation agréés ni les appareils qui ont été
ÃÕÃÊDÊÕÊ>ÕÛ>ÃÊÌÀ>ÌiiÌ]ÊÕiÊ>ÕÛ>ÃiÊÕÌÃ>Ì]ÊÕiÊj}}iViÊÕÊ`iÃÊ>VV`iÌðÊÊÕÌÀi]Ê
les dommages-intérêts directs ou indirects résultant de l’utilisation de ce produit ou de la rupture d’un
contrat ou du non-respect de cette garantie ne sont pas recouvrables dans le cadre de cette garantie.
iÀÌ>ÃÊjÌ>ÌÃÊÕÊ«ÀÛViÃʽ>ÕÌÀÃiÌÊ«>ÃʽiÝVÕÃÊÕÊ>ÊÌ>ÌÊ`iÃÊ`>}iÃÌjÀkÌÃÊ`ÀiVÌÃÊ
ÕÊ`ÀiVÌðÊ*>ÀÊVÃjµÕiÌ]Ê>ÊÌ>ÌÊV`iÃÃÕÃÊ«iÕÌÊiÊ«>ÃÊý>««µÕiÀÊDÊÛÕð
Comment faire réparer l’appareil?
-Ê`iÃÊÀj«>À>ÌÃÊý>ÛmÀiÌÊjViÃÃ>ÀiÃ]ÊVÃÕÌiâÊiÃÊvÀ>ÌÃÊV`iÃÃÕÃ\
Résidents des États-Unis: 6iÕiâÊ >««iiÀÊ ÌÀiÊ }iÊ `½>ÃÃÃÌ>ViÊ Ã>ÃÊ vÀ>ÃÊ >ÕÊ ä£nÈÈxÓnnÎÓÎÊ
ä£nÈÈ>ÌÌiiÃÌ®ÊÕÊViVÌiâÛÕÃÊDÊÌÀiÊÃÌiÊ7iLÊDÊÜÜÜ°`i}
°V°ÊÊ
Résidents du Canada: 6iÕiâÊ >««iiÀÊ ÌÀiÊ }iÊ `½>ÃÃÃÌ>ViÊ Ã>ÃÊ vÀ>ÃÊ >ÕÊ ä£nnnÎÎxÈÈ{{Ê ÕÊ
ViVÌiâÛÕÃÊDÊÌÀiÊÃÌiÊ7iLÊDÊÜÜÜ°`i}
°V°ÊÊ
Résidents du Mexique: 6iÕiâÊ >««iiÀÊ ÌÀiÊ }iÊ `½>ÃÃÃÌ>ViÊ Ã>ÃÊ vÀ>ÃÊ >ÕÊ ä£nääÇ££nnäxÊ ÕÊ
ViVÌiâÛÕÃÊDÊÌÀiÊÃÌiÊ7iLÊDÊÜÜÜ°`i}
°V°ÊÊ
>Ê }>À>ÌiÊ V`iÃÃÕÃÊ Ài«>ViÊ ÌÕÌiÃÊ iÃÊ >ÕÌÀiÃÊ }>À>ÌiÃÊ iÌÊ Ài«ÀjÃiÌ>ÌÃÊ iÝ«VÌiÃ°Ê /ÕÌiÃÊ iÃÊ
garanties implicites sont limitées à la période de garantie applicable établie ci-dessus. Cette limitation
iÊý>««µÕiÊ«>ÃÊÃÊÛÕÃÊVVÕiâÊÕÊVÌÀ>ÌÊ`½iÝÌiÃÊ`iÊ}>À>ÌiÊ>ÛiVÊi½}
°Ê
iÀÌ>ÃÊjÌ>ÌÃÊÕÊ
«ÀÛViÃʽ>ÕÌÀÃiÌÊ«>ÃÊiÃÊÌ>ÌÃÊÃÕÀÊ>Ê`ÕÀjiÊ`iÃÊ}>À>ÌiÃÊ«VÌiðÊ*>ÀÊVÃjµÕiÌ]ÊiÃÊiÝclusions ci-dessus peuvent ne pas s’appliquer à vous. De’Longhi n’autorise aucune personne ni société
à assumer des responsabilités en association avec la vente ou l’utilisation de ses appareils.
Comment s’appliquent les lois du pay ou de la province?
iÌÌiÊ}>À>ÌiÊÛÕÃÊ`iÊ`iÃÊ`ÀÌÃÊÕÀ`µÕiÃÊ«ÀjVÃÊiÌÊÛÕÃÊ«ÕÛiâÊj}>iiÌÊ>ÛÀÊ`½>ÕÌÀiÃÊ`ÀÌÃÊ
qui peuvent varier d’un pay à un autre ou d’une province à une autre.
40