1
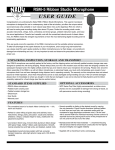
16.june.2014
2
A Word from Marco De Virgiliis
MARK VISION
Thank you for choosing DV Mark!
We are thrilled to have you join us for an exciting new chapter in the history of guitar amplification. In a decade, we have succeeded in making Markbass the
world’s leading bass amp brand, using technology to better serve the needs of bassists: great tone, reliability, versatility/flexibility, and light weight. Now it’s time
for guitarists to have their turn!
The classic tones guitarists have come to know and love over the last few decades are worthy of great respect. We have designed our amps with a great reverence
for these sounds. We’re not trying to start a revolution in guitar tone… because guitarists don’t want or need that.
However—there are some important areas where the classic amplifiers can be greatly improved upon, to better suit the needs of guitarists:
The first is reliability—and we are very proud of the high quality standard that we’re able to offer thanks to our innovative technology, state-of the-art testing
and quality control facilities and top-quality components! You need to be able to always trust your amp… and we understand that!
The second is flexibility. DV Mark amps have great versatility with a wide range of clean and distorted sounds for any musical style, from jazz to rock to
metal—and never sacrifice your tone!
The third is light weight. Many of you have seen your bass players easily loading in and out of gigs with their lightweight Markbass gear, while you struggle
with a heavy 2x12 combo or 4x12 cabinet. It’s time you enjoyed the same benefits of lightweight gear! DV Mark combos and cabinet feature the DV NEOCLASSIC
speaker, a super lightweight neo magnet custom made by DV Mark. These innovative speakers are the result of hard work and many test on
neodymium speaker tonal character: a lightweight speaker that sounds and response like a classic speaker.
We hope you will enjoy your new guitar amp, and we invite you to contact us any time with your comments and questions, at
[email protected].
Marco De Virgiliis
Thanks again, and good music!
3
FRONT PANEL
1) INPUT Connect your guitar to this input using a standard ¼” shielded instrument cable.
2) GAIN This knob sets the gain level (on each channel), and it is the preamp’s most powerful control. It not only determines the amount of
drive or saturation (for getting clean, crunch or overdriven sounds, or anywhere in between), but also plays an important role in tone shaping.
3) MASTER This control is the master feed from the end of the preamp channel to the tube power stage. Each channel features its own
MASTER control thats allow you to perfectly balance the volumes of the three channels, which can have very different sound styles and gain/
drive levels. On each channel, the master control allows you to obtain a wide range of sounds in relation to the gain setting—for example,
very low-gain sounds at high volumes, or high-gain sounds at low volumes.
4) PRESENCE The PRESENCE knob featured on each channel controls high frequencies, above those controlled by the High knob. It’s an
effective and useful part of the channel’s tone controls. Turning up the Presence knob gets you a crisp and sparkling clean sound in channel 1,
or crunchy rhythm sounds for aggressive riffs in channel 2. On channel 3, turning down the presence control gets you a darker, more rounded
tone for single-note lead playing.
5) BASS This knob controls the amount of low frequencies in your sound. The EQ curves of the bass controls are different on each channel.
When you’re starting to explore sounds on the amp, avoid boosting the lows too much as this can reduce your attack and muddy your sound.
Also as the gain is turned up, it’s a good idea to slightly lower the bass control for a more balanced sound (starting with the bass setting at
around 12 o’clock).
6) MIDDLE The Middle control regulates the midrange frequencies and it is an important part of your tone shaping. The frequency range it
boosts or cuts has a big effect on the character of your sound. For a more scoopy tone, lower the mids. Turn the knob up for more focused
attack and better pitch definition.
7) HIGH The High knob controls the amount of high frequencies in your sound. It can produce unwanted noise (hiss) or pickup feedback when
really cranked, so it’s best to avoid extreme settings, especially on channels 2 and 3, due to their higher gain. On Channel 3 you may find that
the highs need to be set a bit lower than the other channels, especially for soloing.
8) SOLO) This +6 dB boost is activated by the Smart Controller, and it is optimized for notching up your volume for solos during live performance. The SOLO control can only be engaged when the effects loop is active, since it’s part of the effects loop circuit.
4
9) STANDBY Before powering on, make sure this switch is in standby position.
When you turn on the power, make sure this switch is in standby position for about 30 seconds. Between sets or whenever you’re on a break
from playing, put the amp in standby position, this will extend the power tubes life.
10) POWER This switch delivers AC power to the amp. Make sure the unit is grounded; all three terminals of the AC power plug must be
connected to avoid any injury to the user or damage to the unit.
The TRIPLE 6 III amp features Dual Voltage Switch 120V/240V to use the amp in countries with different voltages, so make sure the switch
on the rear panel is on the correct voltage before connecting it to the AC power, and the fuse is the right value for that voltage. Follow the
procedure described in the STANDBY section above (12) before powering up your amp.
TRIPLE SIX III
9
5
6
7
5
6
7
5
6
7
BASS
MIDDLE
HIGH
BASS
MIDDLE
HIGH
BASS
MIDDLE
HIGH
10
ON
STAND BY OFF
CH1
0
INPUT
MAX
GAIN
2
1
21
CH2
20
0
MAX
MASTER
3
0
MAX
PRESENCE
4
CH3
0
MAX
GAIN
2
0
MAX
MASTER
3
0
MAX
PRESENCE
4
0
MAX
GAIN
2
0
MAX
MASTER
3
0
MAX
PRESENCE
4
SOLO
ON
8
5
REAR PANEL
11) MIDI IN This input port receives incoming MIDI information from an external MIDI device. The MIDI receiving address is set to “0” by
default. If your external MIDI device transmits on another address, you can change the default address by holding the CH SELECT (18) switch
for about 10 seconds—the unit enters “Learn Mode” and you can then set the new address by pressing any switch on your MIDI pedal board
to initialize the connection to the amp.
12) MIDI THROUGH This output jack sends out MIDI messages identical to those coming in through the MIDI IN.
13) CONTROLLER This stereo input jack is exclusively for the Smart Controller. Other footswitches will not work connected to this input.
14) CH SELECT This switch allows you to change channels manually when the Smart Controller is not connected to the amp. By pressing this
button you can switch channels in sequence (1-2-3-1-2-3 etc), each channel - when active - is identified by a different color of the DV Mark
logo on the amp’s front panel (CH1=green, CH2=yellow, CH3=red).
15) LOOP ASSIGN The Loop Assign knob allows you to assign the effects loop to whichever channel you want, to all the channels, or to none
of the channels. You can make this selection in manual mode (using this knob) or by using the SMART CONTROLLER. When you connect the
Smart Controller to its dedicated input (16), this rotary knob must be set to ENABLE. The Controller automatically recalls the settings you last
used before the amp was powered off. For example, if you assign your effects to channel 2 using the controller, and turn off the amp, the next
time you turn on the amp and plug in the Controller, the effects will still be assigned to channel 2.
16) 0/-15 dB SWITCH This switch -15db or 0 db allows you to optimize the send level signal to external effects
17-18) SEND - RETURN The TRIPLE 6 III features an effects loop for use with outboard effect processors or pedals. The effects send/return
loop is positioned between the preamp and the power amp in the signal chain. Connect the SEND jack to the input of your processor or pedal
chain, and connect your effects output to the RETURN jack.
6
19) SPEAKERS OUTS The
amp SIX
offers
TRIPLE
III the following speaker output jacks for connecting the head to a speaker cabinet or cabinets: two 8 ohm
6
6
6
5
5
5
10
7
7
7
(or, for one 4 ohm cab, use either of these
16 ohm (or,
one
8 ohm
jacks)9 and
BASS for MIDDLE
HIGH cab, use
BASS either
MIDDLEof these
HIGH
ON one 16 ohm jack. Verify
BASS jacks),
MIDDLEtwoHIGH
the impedance of your speaker/s prior to connection, and make sure you are using the correct speaker output/s
OFF
20) VOLTAGE SELECTOR The DV Mark
TRIPLE 6 III amp features
a 120V/240V Voltage
Selector (23) to useSTAND
theBY amp
in countries with
CH1
CH2
CH3
different voltages, so make sure the switch on the rear panel is on the correct voltage before connecting it to the AC power, and the fuse is the
INPUT
MASTER
PRESENCE
GAIN
MASTER
PRESENCE
GAIN
GAIN
MASTER
PRESENCE
SOLO
ON
right value for that voltage (This1 selector is
version).
3
3
3
2 not available
4 on the 100V
2
4
2
4
8
Please change the voltage/fuse values label located near the voltage selector matching the voltage/fuse values when you need to change the
voltage of the apparatus.
21) AC POWER SOCKET Make sure the unit is grounded; all three terminals of the AC power cord must be connected to avoid any injury
to the user or damage to the unit.
0
21
MAX
0
MAX
0
0
MAX
0
MAX
MAX
0
MAX
0
MAX
0
MAX
0
MAX
20
Model
Ser.Nr.
CAUTION:
TRIPLE 6 III
FOR CONTINUED PROTECTION
AGAINST RISK OF FIRE
REPLACE ONLY WITH SAME
TYPE AND RATING FUSE.
Date
ATTENTION:
REMPLACER UNIQUEMENT PAR
UN FUSIBLE DE MEME TYPE.
19
LOAD
MIDI
ENABLE
CH3
ALL
CH2
OFF
CH1
IN
THROUGH
CONTROLLER
CH
SELECT
LOOP ASSIGN
11
12
13
14
15
TOTAL 4 Ω
OR 8 Ω + 8 Ω
TOTAL 8 Ω
OR 16 Ω + 16 Ω
LOAD
LOAD
SPEAKER
OUT
SPEAKER
OUT
SPEAKER
OUT
16 Ω
0 dB
-15 dB
SEND
LEVEL
SEND
RETURN
16
17
18
DO NOT OPERATE THIS
AMPLIFIER WITHOUT
CONNECTING LOUDSPEAKERS
7
TECHNICAL SPECS
Power Output: 120W (CLASS A/B)
Preamp Tubes: 3x ECC83
Power Tubes: 2x KT88 - 1x ECC83
Channels: 3
Controls: Gain - Master - Presence
EQ Controls: Low - Mid - High (passive)
Speaker Outputs:
. . . . . . . . 2x 4 ohm (total)
. . . . . . . . 2x 8 ohm (total)
. . . . . . . . 1x 16 ohm
Other features:
. . . . . . . . MIDI ports
. . . . . . . . Switch Loop Assign rotary control
. . . . . . . . Channels switch
. . . . . . . . Send FX level switch 0/-15 dB
. . . . . . . . Smart Controller
. . . . . . . . Voltage selector 120V/240V
Dimensions: 575 x 205 x 263 mm / 22.63” x 8.07” x 10.35”
Weight: 12.1 kg / 26.67 lbs
BLOCK DIAGRAM
Ch2/Ch3
Gain2
½ ECC83
Input
High
Pass2
½ ECC83
½ ECC83
Tone
control 2
½ ECC83
High
Pass3
Tone
control 3
Gain3
Passive
tone
control
Gain1
½ ECC83
½ ECC83
Master1
Master 2
Master 3
-10/+4dB
To PA
Send
Return
Low
Mid
High
Send
Return
KT88
ECC83
To PA
16 Ohm
KT88
Output
transformer
8 Ohm
4 Ohm
Ch select
Smart Loop Assign
mains
fuse
Supply
Microcontroller
POWER REQUIREMENT: 100V; 120V; 230V; 240V - 50/60Hz
FUSES: T 4A 250V for 100V/120V setting;
T 2A 250V for 230V/240V setting
8
On/Off
St/By
Controller
Midi In
Midi through
NOTES
Product specifications are subject to change without notice
TM
www.markbass.it
srl
Italy - 66020 San Giovanni Teatino CH - Via Po, 52
Tel: +39 0854407764 / 0854465705 - Fax: +39 0854407764 / 0854407399 - www.dvmark.it - [email protected]