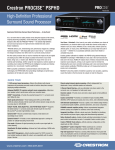
1
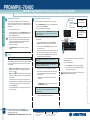
PROAMP(I)-7X400
quickstart guide
PROCISE™ High-Definition Professional Surround Sound Amplifier
Introduction
1
As shown in the diagram below, rack ears and carrying handles (on front and
rear of the amplifier) are preinstalled.
NOTE: The PROAMP-7X400 and the PROAMPI-7X400 are functionally
identical. For simplicity, the name “PROAMP-7X400” is used throughout
this guide.
Rear
Handles
The PROAMP-7X400 PROCISE™ High-Definition Professional Surround
Sound Amplifier is a high-powered seven-channel amplifier designed for use
with the PSPHD PROCISE High-Definition Surround Sound Processor. The
PROAMP-7X400 is equipped with seven balanced XLR input connectors,
seven speaker output terminal block connectors, Ethernet, and Cresnet®.
NOTE: If you are pairing the PROAMP-7X400 with the PSPHD using a
direct connection, connect the included CAT5e cable from the LAN port on
the amplifier to the LAN port on the PSPHD. When using a network
connection to the PSPHD, connect the CAT5e cable from the LAN port on
the amplifier to the local area network. When using a network connection,
the PSPHD and the amplifier must be on the same subnet. For additional
information about pairing, refer to section 4 .
INPUT:
From PSPHD Or
Other Preamplifier
Contents
LAN:
10/100 Base-T Ethernet
to LAN Or PSPHD
NET:
To Cresnet Devices
POWER:
From Line Voltage
The PROAMP-7X400 package contains the following:
●
(1) PROAMP-7X400 PROCISE High-Definition Professional Surround
Sound Amplifier
●
(2) AC power cords
●
(1) CAT5e Ethernet patch cord
●
Terminal block connectors for the OUTPUT and NET ports
●
(1) Operations Guide
(Optional) Rack Installation
●
This Quickstart Guide
Using a #1 or #2 Phillips screwdriver, install the PROAMP-7X400 into a rack
as follows:
Front
Handles
(2) Rack Ears
Recommended Accessories
2. Position the amplifier into the rack and secure the device to the rack by
screwing four rack screws (not included) into the top and bottom mounting
holes of the rack ears.
3. Remove the front handles.
Installation
4. Install four more screws (not included) into the middle mounting holes of the
rack ears.
Observe the following guidelines when installing the PROAMP-7X400:
!
WARNING: Failure to observe the following installation guidelines may
result in personal injury or damage to the equipment.
5. (Optional) Remove the rear handles.
●
The PROAMP-7X400 is very heavy; therefore, two people should lift and
install the device.
●
The installation location must be able to support the weight of the
PROAMP-7X400. The weight is 108.0 lbs (49.0 kg).
●
When installing the PROAMP-7X400 into a rack:
●
Hardware Hookup
!
WARNING: This amplifier is capable of delivering immense amounts of
undistorted power to your loudspeakers. Please use caution and adequate ear
protection if listening to content at high volume levels. Continued exposure to
high sound pressure levels can cause permanent hearing impairment or loss.
–
Load the rack from the bottom to the top with the heaviest components
at the bottom of the rack.
!
CAUTION: Keep the amplifier unplugged until all input, network, and speaker
wiring is complete.
–
If the rack is provided with stabilizing devices, install the stabilizers
before mounting or servicing the unit in the rack.
!
!
CAUTION: Do not bridge speaker outputs.
When wiring the amplifier, ensure that the amplifier’s power switch is off.
CAUTION: Check the speaker wires for shorts and frayed wiring around
the connectors.
NOTE: When making power connections, two independent
AC feeds are required.
For details, refer to the latest version of the PROAMP(I)-7X400
Operations Guide, Doc. 6976.
QUICKSTART DOC. 6977A (2027299, Sheet 1 of 2)
www.crestron.com
07.10
GROUND:
Tie To Preamplifier
Ground
©2010 Specifications subject to
change without notice.
888.273.7876
201.767.3400
All brand names, product names, and trademarks
are the property of their respective owners.
To connect the PROAMP-7X400 to a PSPHD, refer to the diagram below for
additional connection information.
PROAMP(I)-7X400
2
OUTPUT:
To Speakers
1. Remove the feet on the bottom of the amplifier.
For optimum performance, Crestron® recommends the optional
CBL-PRO-XLR-2 (two-foot cable length) or CBL-PRO-XLR-6 (six-foot cable
length) cable kit for the PROAMP-7X400.
1
Connect the PROAMP-7X400 as shown in the diagram below. Connect the
power cords last.
PROAMP(I)-7X400
quickstart guide
PROCISE™ High-Definition Professional Surround Sound Amplifier
3
Testing Amplifier Operation
4A
If desired, operation of the PROAMP-7X400 can be tested by placing the
amplifier in Override mode. Override mode turns on all amplifier channels and
ignores any commands from a control system or from a PSPHD (if connected
to the amplifier).
1. Using the NETWORK/DIRECT switch on the rear of the PROAMP-7X400,
set the connection type to NETWORK.
2. Power on the PROAMP-7X400 and the PSPHD.
1. With the amplifier powered on, press the OVERRIDE/SETUP button on the
rear of the PROAMP-7X400. The amplifier will be in the Override mode
and the associated LED will light.
NOTE: If you change the position of the NETWORK/DIRECT switch again
on the PROAMP-7X400, you must then power cycle the device in order for
the new setting to take effect.
2. Test the amplifier as needed. If amplifier faults are indicated on the front
panel, refer to the latest version of the PROAMP(I)-7X400 Operations
Guide (Doc. 6976) for additional information and troubleshooting tips.
The manual is available from the Crestron website
(www.crestron.com/manuals).
3. Using the INSTALLER MENU on the PSPHD, pair the PROAMP-7X400
with the PSPHD:
●
NETWORK: Choose NETWORK if you already have a DHCP network
available and plan to eventually control the amplifier and PSPHD over a
LAN, refer to section 4A .
DIRECT: Choose DIRECT for a quick installation test without networking
or LAN setup. The LAN port of the amplifier connects directly to the LAN
port of the PSPHD.
To later integrate with a control system program controlling via the LAN,
the pairing process must be executed again when the amplifier is installed
on a network. The original pairing must be removed and then re-paired,
refer to section 4B on page 3.
If the amplifier and PSPHD are to be controlled by Cresnet, pairing does
not need to be repeated.
NOTE: The PSPHD and the PROAMP-7X400 must be set to the same
connection type.
NOTE: When using the Network connection type, the PSPHD and the
PROAMP-7X400 must be on the same subnet.
e. Press the selection knob to select the Network connection type.
f.
When prompted on the PSHPD display, press either of the following
buttons on the PROAMP-7x400 while the appropriate LEDs blink
(about two minutes):
●
RESET (front panel). Press this button while the front panel
LEDs blink.
or
●
OVERRIDE/SETUP (rear panel). Press this button while the red
OVERRIDE/SETUP LED blinks.
NOTE: If the RESET or OVERRIDE/SETUP button is not pressed within two
minutes, the LEDs stop blinking and the PSPHD display returns to the
Network Setup section.
When the PSPHD is successfully paired with the PROAMP-7X400, a
message is displayed indicating the successful pairing.
2
For details, refer to the latest version of the PROAMP(I)-7X400
Operations Guide, Doc. 6976.
QUICKSTART DOC. 6977A (2027299, Sheet 1 of 2)
www.crestron.com
07.10
AMPLIFIER PAIRING
INSTALLER MENU
Crestron Amplifier Connection
Audio Setup
Network
Direct
HOME
PSPHD
DISPLAY
INSTALLER MENU
Audio Setup
©2010 Specifications subject to
change without notice.
888.273.7876
201.767.3400
All brand names, product names, and trademarks
are the property of their respective owners.
Selection
Knob
g. Press the selection knob to exit. The PSPHD display returns to the
Network Setup section.
h. Reboot the PSPHD as follows:
1)
Press the HOME button to return to the INSTALLER MENU.
2)
Turn the selection knob until “Exit Installer Mode” is displayed,
and then press the selection knob.
For additional information about the PSPHD, refer to the latest version of
the PSPHD Operations Guide (Doc. 6837).
PROAMP(I)-7X400
The PROAMP-7X400 can be paired with a PSPHD Surround Sound Processor
for control and monitoring of the amplifier. Use the connection type that best
fits the application:
NETWORK SETUP
Pair Crestron Amplifier
b. Turn the selection knob until Network Setup is displayed, and then
press the selection knob.
d. Turn the selection knob to highlight Network as the connection type
between the PSPHD and the PROAMP-7X400.
NOTE: Pairing is for use with the PSPHD only.
●
a. To open the INSTALLER MENU, press and hold the HOME and
DISPLAY buttons simultaneously for approximately five seconds.
c. Turn the selection knob until “Pair Crestron Amplifier” is displayed, and
then press the selection knob to open the Amplifier Pairing Control.
Pairing
INSTALLER MENU
Audio Setup
Network Setup
Control Setup
About
Exit Installer Mode
To pair the PROAMP-7X400 with the PSPHD use a “network” connection:
To place the amplifier in Override mode:
3. Press OVERRIDE/SETUP to exit the Override mode. The LED will
extinguish.
4
Pairing with a “Network” Connection
PROAMP(I)-7X400
quickstart guide
PROCISE™ High-Definition Professional Surround Sound Amplifier
4B
INSTALLER MENU
Audio Setup
Network Setup
Control Setup
About
Exit Installer Mode
Pairing with a “Direct” Connection
To pair the PROAMP-7X400 with the PSPHD use a “direct” connection:
1. Using the NETWORK/DIRECT switch on the rear of the PROAMP-7X400,
set the connection type to DIRECT.
2. Power on the PROAMP-7X400 and the PSPHD.
NOTE: If you change the position of the NETWORK/DIRECT switch again
on the PROAMP-7X400, you must power cycle the device in order for the
new setting to take effect.
3. Using the INSTALLER MENU on the PSPHD, pair the PROAMP-7X400
with the PSPHD:
6
NETWORK SETUP
Pair Crestron Amplifier
Crestron Amplifier Connection
Audio Setup
Network
DISPLAY
d. Turn the selection knob to highlight Direct as the connection type
between the PSPHD and the PROAMP-7X400.
Audio Setup
Testing the Pairing Operation
To test that the PROAMP-7X400 and the PSPHD are paired, press the
DISPLAY button on the PSPHD. Observe that the brightness of the
PROAMP-7X400 front panel display tracks the brightness of the PSPHD
front panel display. The tracking of the brightness indicates that the
devices are paired.
www.crestron.com
07.10
Turn the selection knob until “Pair Crestron Amplifier” is displayed, and
then press the selection knob to open the Amplifier Pairing Control.
4.
When prompted, turn the selection knob to highlight the Clear option, and
then press the selection knob.
5.
When prompted by the PSPHD display as to whether you are sure that
you want to clear the pairing information, turn the selection knob to Yes,
and then press the selection knob.
To unpair the PROAMP-7X400, press and hold the RESET button on the
front panel while you power cycle the device. The LEDs on the front panel
blink, indicating that the PROAMP-7X400 is unpaired.
PROAMP(I)-7X400
For additional information about the PSPHD, refer to the latest version of the
PSPHD Operations Guide (Doc. 6837).
QUICKSTART DOC. 6977A (2027299, Sheet 2 of 2)
3.
6.
The PSPHD automatically reboots. After the PSPHD reboots, the
PROAMP-7X400 and the PSPHD are paired.
For details, refer to the latest version of the PROAMP(I)-7X400
Operations Guide, Doc. 6976.
Turn the selection knob until Network Setup is displayed, and then press
the selection knob.
The PSPHD automatically reboots. After the PSPHD reboots, it is
unpaired.
e. Press the selection knob to select the Direct connection type.
3
2.
Selection
Knob
NOTE: The PSPHD and the PROAMP-7X400 must be set to the same
connection type.
5
To open the INSTALLER MENU on the PSPHD, press and hold the
HOME and DISPLAY buttons simultaneously for approximately five
seconds.
INSTALLER MENU
b. Turn the selection knob until Network Setup is displayed, and then
press the selection knob.
c. Turn the selection knob until “Pair Crestron Amplifier” is displayed, and
then press the selection knob to open the Amplifier Pairing Control.
1.
Direct
HOME
PSPHD
To unpair the PROAMP-7X400 and PSPHD, you must clear pairing
information from both devices.
AMPLIFIER PAIRING
INSTALLER MENU
a. To open the INSTALLER MENU, press and hold the HOME and
DISPLAY buttons simultaneously for approximately five seconds.
Unpairing
©2010 Specifications subject to
change without notice.
888.273.7876
201.767.3400
All brand names, product names, and trademarks
are the property of their respective owners.