1
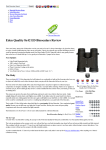
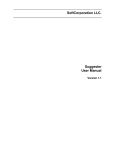
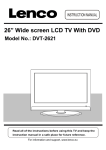
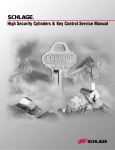
CDVD90W2SW QUICK SETUP GUIDE 1. Remove the Protective disc from the tray. 3 1. Remove the battery cover (as shown). 1 2. Slide the power switch to ON. 3. Insert a DVD and close the tray lid 2. Insert 2 x AAA batteries, taking note that the polarities match up. 4. Wait a few seconds for the disc to be read. 3. Replace the battery cover. 5. The DVD will begin to play automatically. 1 2 3 Protective Card Disc 2 Before using the built-in battery, please make sure it is fully charged. 4 Slide the power switch to the OFF position and connect the DC adaptor to the DC input & mains supply. When the battery is fully charged the red LED charging indicator will go off. Please refer to page 5 of the supplied manual for remote control & button layout functions. 1. Use the navigation buttons on either the main unit or the remote control to navigate the DVD menu. 2. Press the OK or ENTER button to select the menu item and begin playback of the DVD disc. NOTE: The battery can only be charged when the power switch is set to OFF. CHARGE If you have damaged or missing parts, call the Customer Helpline: 0870 600 3030 BUSH - Portable DVD player Installation & User Instructions – Please keep for future reference 533/8887 (D) Important – Please read these instructions fully before installing or using These instructions contain important information which will help you get the best from your appliance and ensure safe and correct installation, use and maintenance. If you need help or have damaged or missing parts, call the Customer Helpline: 0870 600 3030 Contents Safety Information Safety precaution Warning 2-4 3 4 Functions & Controls 5 Installation Remote control battery installation Connection to a TV Electrical connection 6-7 6 6 7 User Instructions Supported Formats Charging the built-in battery Getting started Setting the volume level Skipping forward and back Rapid advance and reverse Slow motion playback (DVD only) Repeat playback 6HDUFKIRUDVSHFL¿FVFHQHRUWLWOH 3URJUDPSOD\EDFNXSWRWUDFNV =RRPIXQFWLRQ 2QVFUHHQGLVSOD\ %ULJKWQHVVDQGFRORXUDGMXVWPHQWV &KDQJLQJWKHDXGLRVRXQGWUDFN'9' 0XOWLDQJOHYLHZLQJ &KDQJLQJWKHVXEWLWOHWUDFN'9'RQO\ Return to the main menu (DVD only) Kodak Picture CD / JPG playback Additional slide show functions USB, SD & MMC operation Slide show Video Playback Supported video formats and standards Supported media formats Switching media inputs Listening with earphones 8-11 8 8 8 8 8 8 8 8 10 10 10 10 10 11 11 11 11 11 The Setup Menu System Setup menu Language Setup menu Video Setup menu Speaker Setup menu 12-14 12 13 13 14 Care and Maintenance 14 Troubleshooting 14 7HFKQLFDO6SHFL¿FDWLRQV Disposal information Guarantee 1 15 16 Product Codes &'9':6: Safety Information Important – Please read these instructions fully before installation Before Use During Use This appliance is not intended for use by persons (including children) with reduced physical, sensory or mental capabilities, or lack of experience and knowledge, unless they have been given supervision or instruction concerning use of the appliance by a person responsible for their safety. Children should be supervised to ensure that they do not play with the appliance. This appliance is not intended for use by young FKLOGUHQRULQ¿UPSHUVRQVXQOHVVWKH\KDYHEHHQ DGHTXDWHO\VXSHUYLVHGE\DUHVSRQVLEOHSHUVRQ to ensure that they can use the appliance safely. Young children should be supervised to ensure that they do not play with the appliance. Do not push objects of any kind into this product through openings as they may touch dangerous voltage points or short out parts that could result in D¿UHRUHOHFWULFVKRFN1HYHUVSLOOOLTXLGRIDQ\NLQG on the product. The appliance shall not be exposed to dripping or VSODVKLQJDQGWKDWQRREMHFWV¿OOHGZLWKOLTXLGVVXFK as vases, shall be placed on the appliance. The top and rear panels of the product may become warm after a long period if use. This is not a malfunction. Do not use attachments not recommended by the manufacturer as they may cause hazards. When the unit is not in use, remove the disc and turn off the power. Do not place this product on an unstable cart, stand, tripod, bracket or table. The product may fall, causing serious injury to users and damage to the product. Use the accessories that recommended by the manufacturer. If you do not use the unit for a long period, the unit may not function properly in the future. Turn on and use the unit occasionally. Do not place foreign objects on the tray. Do not attempt to repair the appliance yourself. Contact the Customer Helpline: 0870 600 3030 Dispose of all packaging carefully and responsibly. The appliance is designed for indoor use only and must be protected from rain, moisture and extreme temperature variations. This appliance is designed for household use. Do not use the appliance for industrial and commercial use, or any other purpose. The appliance MUSTEHSRVLWLRQHGRQD¿UPOHYHO base. Do not place the appliance near a heat source such as radiators, heat registers, stoves or other products that produce heat. Slots and openings in the cabinet are provided for ventilation and to ensure operation of the product. These openings must not be blocked or covered by placing the product on bed, sofa, rug or others. A product and cart combination should be moved with care. Quick stops, excessive force and uneven surfaces may cause the product and cart combination to overturn. .HHS\RXU¿QJHUVZHOOFOHDURIWKHGLVFWUD\DVLWLV closing. Neglecting may cause serious personal injury and damage to the product. Do not place heavy object or step on the product. This appliance must be positioned so that the plug is accessible. For added protection for this product during storm, or when it is left unattended and unused for long periods of time, unplug it from the wall outlet. This will prevent damage to the product due to lightning and power line surges. Rating label is located at the bottom of the unit. 2 Safety Information Important – Please read these instructions fully before installation Safety Precautions 7KHOLJKWQLQJÀDVKZLWKDUURZKHDGV\PEROZLWKLQ DQHTXLODWHUDOWULDQJOHLVLQWHQGHGWRDOHUWWKH user to the presence of uninsulated “dangerous voltage” within the product’s enclosure that may EHRIVXI¿FLHQWPDJQLWXGHWRFRQVWLWXWHDULVNRIHOHFWULF shock to persons. Locations Do not locate the unit in places near heating devices, high temperature (40C or higher), high humidity RUKLJKHUGLUW\SODFHVDQGDYRLGGLUHFW exposure to sunshine. The pick up may be condensed with water under the following situation. 7KHH[FODPDWLRQSRLQWZLWKLQDQHTXLODWHUDO triangle is intended to alert the user to the presence of important operating and maintenance (servicing) instructions in the literature accompanying the appliance. )URPDFROGSODFHWRZDUPSODFH 2SHUDWHVLQDURRPZKHUHWKHKHDWHULVMXVW turned on, or a place where the cold air from the air conditioner directly hits the unit. 'XULQJVXPPHUWKHXQLWPRYHVIURPDQDLU conditioned room to a hot and humid place. The symbol for CLASS II (Double Insulation). $URRPLVYDSRURXVRUGDPS :$51,1*7RUHGXFHWKHULVNRI¿UHRUHOHFWULFVKRFNGR not expose this appliance to rain or moisture, dangerous high voltages are present inside the enclosure. Do not RSHQWKHFDELQHWUHIHUVHUYLFLQJWRTXDOL¿HGSHUVRQQHO only. CAUTION: When replacing the direct plug in power supply or a separable, cord-connected power supply, the replacement must be exact duplicate, or one recommended by the manufacturer. This is a CLASS-1 laser product. Use of controls or DGMXVWPHQWVRUSURFHGXUHVRWKHUWKDQWKRVHVSHFL¿HG herein, may result in hazardous laser light beam exposure. Do not open the cover and do not repair yourself. Refer VHUYLFLQJWRTXDOL¿HGSHUVRQQHO DANGER: Visible and invisible laser radiation when open and interlock failed or defeated. Avoid direct exposure to laser beam. 3 If condensation exists, the unit will not operate properly. Remove the disc, power up the unit and leave it for two to three hours. The unit will warm up and evaporate any moisture. Warning Important – Please read these instructions fully before using Disc handling Do not touch the playback side of the disc. Do not attach paper or tape to disc. Fingerprints and dust on the disc cause picture and sound deterioration. Wipe the disc from the centre outwards with a soft cloth. Always keep the disc clean. Copyrights This product incorporates copyright protection technology that is protected by U.S. patents and other intellectual property rights. Use of this copyright protection technology must be authorized by Macrovision, and is intended for home and other limited viewing uses only unless otherwise authorized by Macrovision. Reverse engineering or disassembly is prohibited. Manufactured under license from Dolby Laboratories. Dolby and the double-D symbol are trademarks of Dolby Laboratories. Disc types - Audio and Video If you cannot wipe off the dust with a soft cloth, wipe the disc lightly with a slightly moistened soft cloth DQG¿QLVKZLWKDGU\FORWK Do not use any type of solvent such as thinner, benzene, commercially available cleaners or antistatic spray for vinyl. It may damage the disc. Do not store discs in a place subject to direct sunlight or near heat source. Do not store discs in a place subject to moisture and GXVWVXFKDVDEDWKURRPRUQHDUDKXPLGL¿HU Store discs vertically in a case, stacking or placing object on discs outside or their case may cause warping. Normally, DVD discs are divided into titles, and the titles are sub-divided into chapters. Audio CD discs are divided into tracks. Disc size 12cm Single side, single layer / single side, double layer PAL and NTSC DVD disc Playback time 135min / 240min max - Audio Disc size 12cm / 8cm CD disc Playback time 74min/20min max - Picture JPG format disc * Player is DVD-Video, DVD+/-R, DVD+/-RW, CD-DA, CD-R, CD-RW compatible. Region Management Information This DVD Player is designed and manufactured to respond to the Region Management Information that is recorded on a DVD disc. If the Region number described on the DVD disc does not correspond to the Region number of this DVD Player, this DVD player can¬not play that disc. The Region number of this DVD player is Each title, chapter, or track is assigned a number, which is called title number, chapter number or track number respectively. There may be discs that do not have these numbers. 4 If you have damaged or missing parts, call the Customer Helpline: 0870 600 3030 Functions & Controls Please familiarize yourself with the parts and accessories listed below Accessories included Others Mains adaptor, DVD Player, Remote, Manual, Quick setup guide, Batteries x 2 AAA, Earphones 20 22 21 23 Main Panel 1 24 26 28 25 27 29 2 12 13 14 15 16 17 18 19 1. TFT display 2. Speakers 3. DISPLAY button 4. SETUP button SKIP UP / F.FWD button 5. PLAY/PAUSE button 6. 7. VOLUME + button 8. NAVIGATION UP button 1$9,*$7,215,*+7EXWWRQ 10. NAVIGATION DOWN button 11. DISC Lid OPEN button 12. AUDIO button 13. MENU button SKIP BACK / F.BWD button 14. 15. STOP/DVD/USB/CARD button 16. VOLUME - button 17. DISC lid 18. NAVIGATION LEFT button (17(5EXWWRQ 5 3 5 4 6 1 2 3 4 5 7 8 9 10 11 6 7 8 20. Built-In Rechargeable battery FRONT FR 21. Charge indicator 22. Remote IR sensor 23. Power indicator 24. USB port 25. PHONES output 26. AUDIO/VIDEO output 27. POWER ON/OFF switch 28. SD/MMC card input '&32:(5LQSXW REMOTE CONTROL 1. SCREEN ON/OFF & BRIGHTNESS / COLOUR button 2. TITLE button SKIP BACK / F.BWD button 3. SKIP UP / F.FWD button 4. 5. NAVIGATION buttons 9 10 11 12 13 14 15 16 17 18 19 20 6. NUMERIC buttons 7. PROGRAM / ANGLE button 8. VOLUME - button 087(EXWWRQ 10. SETUP button 11. MENU button 12. DISPLAY button 13. STOP / DVD/USB/CARD button 14. OK/PLAY/PAUSE button 15. SUBTITLE button 16. AUDIO button 17. SEARCH button 18. REPEAT button =2206/2:EXWWRQ 20. VOLUME + button Installation Remote control battery installation 1. Remove the battery cover (as shown). 2. Insert 2 x AAA batteries, taking note that the polarities match up. 1 2 3 3. Replace the battery cover, in the same manner as you removed it. Notes on battery usage Do not insert battery into the remote control in the wrong direction. Do not charge, heat, open or short-circuit the battery. Do not throw battery into a ¿UH If the remote control does not function correctly or if the operating range becomes reduced, replace all batteries with new ones. Improper replacement of batteries may result in explosive hazard. It must be replaced only by batteries with the same RUHTXLYDOHQWW\SH Connection to a TV before attempting to connect this unit to D79HQVXUHWKDWWKH&'9':6:DQG79 are both switched off. TV 1. Insert the 3.5mm end of an AV cable (not supplied ) into the AV OUT socket on the side of the unit. 2. Insert the other ends ( coloured red, white & \HOORZLQWR\RXU79RUDPSOL¿HU 3. The red & white sockets carry audio. They can be connected to either the TV inputs or DQH[WHUQDODPSOL¿HU7DNHQRWHWRPDWFKWKH colours when connecting. 4. The yellow cable is the video cable and must be connected to the yellow video input on your TV. AV Cable DVD Player 6 Installation Electrical connection Any electrical work that is required to install this appliance MUST be carried out E\DTXDOL¿HGHOHFWULFLDQ Before making any electrical connections, ensure the following: 7 Do not bend, stretch or pull the supply cable in order to avoid electric shock. The supply voltage should be the same as that LQGLFDWHGLQWKHWHFKQLFDOVSHFL¿FDWLRQVDQGWKH appliance rating plate. When installed, the power socket must be within easy reach. If the socket outlets in your home are not suitable for the plug supplied with this XQLWFKHFNZLWKDTXDOL¿HGHOHFWULFLDQIRU replacement. The use of multiple connectors or extension cables are not recommended. The appliance must be connected to a 220-240 volt 50Hz AC supply by means of a three pin socket. The main plug is used as the disconnect device, the disconnect device shall remain readily operable. In order to disconnect the apparatus from the mains completely, the mains plug should be disconnected from the mains socket outlet completely. User Instructions Supported Formats Setting the volume level Full compatibility with DVD, CD, Kodak picture CD, CD-R & CD-RW Multi-language, multi-angle, multi-subtitle, multi-mode of image zoom, parental control Dolby Digital Audio CD Multi-Angle DVD Video Subtitle Choices TV aspect ratio modes 1. Use the VOLUME - / + buttons on either the main unit or remote to increase or decrease the listening level. 2. Use the MUTE button to silence the audio, press again to resume. Skipping forward and back Press either PREVIOUS or NEXT buttons during playback to skip a chapter (DVD) or a track (CD) ahead or backwards. Rapid advance and reverse Charging the built-in battery 7KH&'9':6:LV¿WWHGZLWKDEXLOWLQ rechargeable battery. Before using the battery, please make sure it is IXOO\FKDUJHG Slide the power switch to the OFF position and connect the DC adaptor to the DC input (28) & mains supply. When the battery is fully charged the red LED charging indicator will go off. NOTE: 1. The battery can only be charged when the power switch is set to OFF. 2. If the unit is not in use for a prolonged period of time, it is recommended to charge the built-in battery every three months. Getting started 6OLGHWKHPOWER switch to the ON position to turn on the player ( the green power LED will light up). 3UHVVWKHGLVFOLGEXWWRQWRRSHQWKHGLVFWUD\ 3ODFHD'9'GLVFRQWRWKHGLVFWUD\ODEHOIDFLQJ upwards). &ORVHWKHGLVFWUD\DQGWKHSOD\EDFNVWDUWV automatically. :KHQDPHQXVFUHHQDSSHDUVRQWKHVFUHHQXVH the navigation buttons to select the menu option \RXUHTXLUHWKHQSUHVVWKHPLAY/PAUSE button to start playback. During playback, press and hold either the or buttons to initiate fast scan at X2, keep the button pressed to cycle through X2, X4, X8 X20 DQGQRUPDOVSHHG:KHQ\RXUHDFKWKHUHTXLUHG speed setting release the button. Press the PLAY/ PAUSE button to resume normal play. Stopping playback Press the STOP button on either the main unit or remote control to stop playback. To resume playback from the stopped position, press PLAY/ PAUSE again. To reset the playback position memory press the STOP button twice or open the disc lid. Slow motion playback (DVD only) Press and hold the SLOW button during playback, WKHGLVFZLOOEHSOD\HGDWQRUPDOVSHHGDW¿UVW each time this button is pressed (and held), the play speed becomes slower (down to 1/7 normal speed). Press the PLAY/PAUSE button, to resume normal playback. Repeat playback 1. Press the REPEAT button once during DVD playback to activate the REPEAT TITLE, press again to activate REPEAT ALL, once more turns OFF the repeat function. 2. Press the REPEAT button during CD playback activates REPEAT TRACK, a second press activates REPEAT DISC, once more turns OFF the repeat function. 8 User Instructions Repeat playback 3. The REPEAT A-B function allows you to repeat a section between point A and point B. 6HDUFKIRUDVSHFL¿FVFHQHRUWLWOH 7R¿QGDVSHFL¿FWLPHFRGHRQDGLVF\RXFDQXVH the SEARCH function. 1. Press the SEARCH button during playback to activate the search options. 2. Use the navigation buttons to select the correct option you wish to set. 3. Use the numeric buttons to enter the Title, Chapter or Chapter time. 4. Press the OK button (remote) or ENTER (main unit) to jump to the set position. Program playback (up to 16 tracks) 1. Press the PROGRAM button 2. A list of tracks 1-16 will appear on the display with ____ next to them. 3. Use the navigation buttons to select the space next to the playback number. 4. Use the numeric buttons to enter the playback order. 5. Once setup navigate to PLAY option and press ENTER/OK. 6. To clear the setup screen navigate to CLEAR and press ENTER/OK. Zoom function To use the zoom function, press the ZOOM button to activate the default zoom setting ZOOM 2. Every VXEVHTXHQWSUHVVF\FOHVWKURXJKWKH]RRPRSWLRQV eg: ZOOM 2, ZOOM 3, ZOOM 4, ZOOM 1/2, ZOOM 1/3 & ZOOM 1/4. The next press will return to the OFF setting. On-screen display When playing a disc, pressing the DISPLAY button will display various information about the playing disc. EG: Current disc type, Title number, Chapter number, Playtime, Audio language, Audio type, Subtitle language and Multi angle. You will need to press the DISPLAY button a few times to view all the info another press will hide the display info. Brightness and colour adjustments To adjust the colour and brightness settings, press the BRI/COL button on the remote. One press activates the BRIGHTNESS setting. Use the navigation buttons to adjust the levels. A second press of the BRI/COL button activates the COLOUR setting. This is adjusted in the same manner. :KHQ¿QLVKHGMXVWOHDYHWKHEXWWRQVXQWRXFKHGIRU a few seconds and the menu will disappear. Changing the audio sound track (DVD) When viewing a DVD, you may wish to change the audio track for example. You wish to use a 2 FKDQQHOYHUVLRQLQVWHDGRI\RXPD\UHTXLUH another language other than the default. 1. Press the AUDIO button, every press will cycle through the available audio tracks, and the details will be displayed on the screen. NOTE: This function is only available on discs with multiple audio tracks. When no extra audio tracks are available, pressing the button will do nothing. Multi-angle viewing Press and hold the ANGLE button to select the desired angle you wish to view the scene in. NOTE: Not all DVD discs have multi-angles and as such pressing the button will do nothing. Changing the subtitle track (DVD only) You may wish to watch a DVD with a subtitle track enabled. To activate and choose the correct subtitle track follow these steps. 1. Press the SUBTITLEEXWWRQWRYLHZWKH¿UVW subtitle option. 2. Press repeatedly to cycle through the available subtitle options. 3. When you have found the track you wish to view release the button for a few seconds to activate. 4. To cancel press the SUBTITLE button until you see [OFF]. User Instructions Return to the main menu (DVD only) Press the MENU button to return to the main menu, press the TITLE button to play the title. Kodak Picture CD / JPG playback 1. Insert a Kodak Picture CD / JPG Picture CD into the disc tray 2. Use the navigation buttons to select the appropriate option when the menu appears. 3. A slide show of the picture CD will begin to play automatically. To start a slide show at any point press the OK/ENTER button. ,I\RXZLVKWRYLHZDVSHFL¿FLPDJHWKHQSUHVV the STOP button to return to the list of folders & images. 5. Use the navigation buttons to select the image or folder you wish to view. If the image is within a folder, press OK/ENTER to open the folder. Press OK/ENTER again to view the image. 6. As you peruse the images you will notice details appearing on the left hand section of the screen VKRZLQJLPDJHUHVROXWLRQ¿OHVL]HDQG'DWH NOTE: To return to the main menu press the TITLE button USB, SD & MMC operation To use an external memory stick or SD/MMC card. 1. Switch the unit ON. ,QVHUWWKHPHPRU\GHYLFHLQWRWKHUHTXLUHGVORW SD/MMC goes into (27) and USB goes into (23). 3. The unit will read the device and start the media selection screen (unless a disc is present in the tray, if so then press and hold the STOP button to activate the media selection menu). ENTER 4. Use the navigation buttons to select the appropriate option when the menu appears. And press the OK/ENTER button to activate. Slide show 1. When the image viewer option is activated you will see this screen. ... [FOLDER] 001.JPG ... Additional slide show functions 001 002 3/$<02'(6 Press the REPEAT button repeatedly to cycle through the available play modes. Press STOP to resume preview mode. 3,&785(527$7,21 Press the or navigation buttons to rotate the image Anti-Clockwise or Clockwise. 3,&785()/,3 Press the or QDYLJDWLRQEXWWRQVWRÀLSWKH image. 3,&785(=220 To use the zoom function, press the ZOOM button to activate the default zoom setting ZOOM 2. Every VXEVHTXHQWSUHVVF\FOHVWKURXJKWKH]RRPRSWLRQV eg: ZOOM 2, ZOOM 3, ZOOM 4, ZOOM 1/2, ZOOM 1/3 & ZOOM 1/4. The next press will return to the OFF setting. 6/,'(6+2:75$16,7,216 During the slide show, pressing the PROGRAM button will cycle through all the available transition presets. 003 004 005 RESO: 800x600 SIZE: 236KB DATE: 2009:07:20 SELECT PGUP/DN 006 007 TITLE BACK ENTER PLAY MENU MODE 2. Use the the or navigation buttons to scroll through the list of images. Pressing the or navigation buttons scrolls page UP or DOWN. 3. To start a slide show press OK/ENTER button. ,I\RXZLVKWRYLHZDVSHFL¿FLPDJHWKHQSUHVV the STOP or MENU button to return to the list of folders & images. 5. Use the navigation buttons to select the image or folder you wish to view. if the image is within a folder, press OK/ENTER to open the folder. Press OK/ENTER again to view the image. 6. As you peruse the images you will notice details appearing on the left hand section of the screen VKRZLQJLPDJHUHVROXWLRQ¿OHVL]HDQG'DWH NOTE: To return to the media main menu press the MENU button 10 User Instructions Video Playback Listening with earphones This unit is capable of playing MPEG encoded videos from the USB or SD/MMC inputs. 1. Activate the video playback menu from the media selection screen. ... [MY VIDEOS] VIDEO_01.MPG ... VIDEO_01 SELECT PGUP/DN TITLE BACK ENTER PLAY 2. Use the the or navigation buttons to scroll through the list of videos. Pressing the or navigation buttons scrolls page UP or DOWN. 3. To start a video press the OK/ENTER button. NOTE: To return to the media main menu press the MENU button Supported video formats and standards Supported video standard: MPEG1, MPEG2 Supported audio standards: MP1, MP2 & PCM Supported resolutions: 352 x 240, 352 x 288 Supported media formats The below memory types are compatible with this unit. SD, SDHC (up to 16GB), MMC & USB Switching media inputs It is possible to switch between inputs. For example: USB, SD and Disc. 1. Press and hold the STOP button 2. Quickly when the menu appears use the or QDYLJDWLRQEXWWRQVWRVHOHFWWKHLQSXW\RXUHTXLUH 3. Press OK/ENTER to select the input. 11 Ɣ/LVWHQDWPRGHUDWHYROXPHVWRDYRLGKHDULQJ damage. Ɣ,I\RXKHDUQRVRXQGGXULQJSOD\LQJGRQRWWXUQ up volume up as the music may suddenly begin at a high volume. Excessive sound pressure from earphones and headphones can cause hearing loss. Ɣ7RDYRLGGDPDJLQJ\RXUHDUVDGMXVWWKHYROXPH to the lowest safe level before playing, and turn up to the desired level when playback has started. The Setup Menu System Setup menu NOTE: Use the navigation buttons to scroll up and down, left to right and press the OK/ENTER button to select. TV SYSTEM Set this option to whatever type of disc you are watching. NTSC, PAL or AUTO (to set automatically). SCREEN SAVER When the unit is not in use, the DVD logo will appear as a screen saver to prevent screen burn in. Choose ON or OFF. The setup menu gives additional options for PDQ\RIWKHIXQFWLRQV%HORZLVDGHVFULSWLRQRI HDFKIXQFWLRQDQGZKDWLWGRHV SYSTEM SETUP TV SYSTEM SCREEN SAVER TV TYPE PASSWORD RATING DEFAULT TV TYPE Choose a setting between 4:3PS ( pan and scan), 4:3LB (letter box) or 16:9 (widescreen). PASSWORD A password can be set to prevent unwanted usage of the unit. 1. Scroll down to the password option and press the navigation button to activate the password options. 2. Input the user password ( the default is 0000). 3. To change the default password, press the button again to re-enter another password. 4. Press ENTERWRFRQ¿UPWKHQHZSDVVZRUG 5. You will need to enter the new password once more to allow usage. NOTE: To navigate to the other Setup Screens, use the navigation buttons to set the selection to the top option (ie: the menu title eg: SYSTEM SETUP) and then use either or WRF\FOHWKURXJKWKHVHWXSPHQXV NOTE: If you forget your user password the master password to unlock the system is (8200). RATING You can set a system rating so only movies that fall within that rating can be played. Choose between: Kid Safe, G, PG, PG13, PG-R, R, NC-17 and Adult. DEFAULT This setting when activated restores the default settings to the system. 12 User Instructions Language Setup menu OSD LANGUAGE This sets the On Screen Display language. Choose between: English, German & French. AUDIO LANG Choose the default audio setting. This means the DVD player will automatically select this language as the audio track ( if available ). LANGUAGE SETUP OSD LANGUAGE AUDIO LANG SUBTITLE LANG MENU LANG Choose between: English, Chinese, Japanese, French, Spanish, Portuguese, German & Latin. SUBTITLE LANG Choose the default subtitle language. Select between: English, Chinese, Japanese, French, Spanish, Portuguese, German & OFF. MENU LANG This option sets the default DVD menu language, once set if the DVD you are ZDWFKLQJFRQWDLQVDPHQXZLWK\RXUVSHFL¿HG language that is used by default. The options are: English, Chinese, Japanese, French, Spanish, Portuguese, German & Latin. Video Setup menu BRIGHTNESS This option sets the brightness level. Use the navigation buttons or to increase or decrease the brightness. CONTRAST This option sets the contrast level. Use the navigation buttons or to increase or decrease the contrast. HUE This option sets the Hue adjustment. Use the navigation buttons or to increase or decrease the hue. SATURATION This option sets the saturation levels. Use the navigation buttons or to increase or decrease the saturation. 13 VIDEO SETUP BRIGHTNESS CONTRAST HUE SATURATION User Instructions Speaker Setup menu DOWNMIX This option allows you to change the way the audio is assigned to each speaker SPEAKER SETUP DOWNMIX Choose from : LT/RT - Left / Right mixed mode STEREO - Stereo audio output Care and Maintenance Important: Always unplug the appliance from the power socket during cleaning and PDLQWHQDQFH Never use any sharp instruments or abrasive substances, soap, household cleaner, detergent or wax polish for cleaning. Clean the external surfaces with a damp soft cloth only. Never use abrasive products or solvents as it may damage the appliance. Troubleshooting ,QWKHXQOLNHO\HYHQWRIGLI¿FXOWLHVZLWK\RXUDSSOLDQFHSOHDVHIROORZWKHWURXEOHVKRRWLQJJXLGHEHORZ If the problem persists, contact the retailer if the machine is still under guarantee. Customer helpline: 0870 600 3030 Problem Solution No Power/The unit suddenly switches off 0DNHVXUHWKHDGDSWRULVVHFXUHO\FRQQHFWHG 7XUQWKHSRZHURIIDQGEDFNRQDJDLQ &KHFNWKHEDWWHU\SDFNLVFRUUHFWO\DWWDFKHG Remote control does not work &KHFNWKHEDWWHULHVDUHLQVHUWHGLQWKHFRUUHFW direction, the + & - symbols must match. 7KHEDWWHULHVPD\EHÀDW5HSODFHZLWKQHZRQHV (QVXUHWKHUHDUHQRREVWDFOHVEHWZHHQWKHUHPRWH the sensor. No Picture or sound &KHFNWKHGLVF\RXDUHXVLQJLVFRPSDWLEOH 'RQRWXVHGGDPDJHGVFUDWFKHGGLVFV &KHFNWKHODEHOLVIDFLQJXSZDUGV &KHFNWKHYROXPHOHYHOLVVXI¿FLHQWWRKHDU &KHFNKHDGSKRQHVDUHQRWFRQQHFWHGQRVRXQGZLOOEH heard from the speakers if connected. 14 7HFKQLFDO6SHFL¿FDWLRQV Power Source DC Power Consumption 9 Supported TV systems PAL, NTSC, AUTO LCD Display ´ Dimensions 242(L) 180(W) 42.6(H) mm Supported Discs CD, CD-R, CD-RW, DVD, DVD-R, DVD-RW, DVD+R, DVD+RW Supported Memory formats SD, MMC, USB We apologise for any inconvenience caused by any minor inconsistencies in these instructions, which may occur as a result of product improvements and development. This appliance complies with the following EEC directives: ((&/RZYROWDJHGLUHFWLYH 2004/108/EEC EMC directive Disposal Information The symbol on the product or its packaging indicates that this product may not be treated as household waste. Instead it should be handed over to the applicable collection point for WKHUHF\FOLQJRIHOHFWULFDODQGHOHFWURQLFHTXLSPHQW%\HQVXULQJWKLVSURGXFWLVGLVSRVHG RIFRUUHFWO\\RXZLOOKHOSSUHYHQWSRWHQWLDOQHJDWLYHFRQVHTXHQFHVIRUWKHHQYLURQPHQWDQG human health, which could otherwise be caused by inappropriate waste handling of this product. For more detailed information about recycling this product, please contact your local FRXQFLORI¿FH\RXUKRXVHKROGZDVWHGLVSRVDOVHUYLFHRUWKHVKRSZKHUHWKHSURGXFWZDV purchased. Battery Disposal Information Your product contains a built-in rechargable battery covered by the European Directive 2006/66/EC. To VDIHJXDUGWKHIXQFWLRQDOLW\DQGVDIHW\RI\RXUSURGXFWDOZD\VWDNH\RXUSURGXFWWRDQRI¿FLDOFROOHFWLRQ point or service centre where a professional can remove the battery. Please inform yourself about the local rules on separate collection of batteries because the correct GLVSRVDOZLOOKHOSSUHYHQWQHJDWLYHFRQVHTXHQFHVIRUWKHHQYLURQPHQWDODQGKXPDQKHDOWK3OHDVHGRQRW dispose of your batteries with your normal household waste. always bring your product to a professional to remove the battery. 15 Guarantee PRODUCT GUARANTEE This product is guaranteed against manufacturing defects for a period of Year This product is guaranteed for twelve months from the date of original purchase. Any defect that arises due to faulty materials or workmanship will either be replaced, refunded or repaired free of charge where possible during this period by the dealer from whom you purchased the unit. The guarantee is subject to the following provisions: y The guarantee does not cover accidental damage, misuse, cabinet parts, knobs or consumable items. y The product must be correctly installed and operated in accordance with the instructions contained in this manual. y It must be used solely for domestic purpose. y The guarantee will be rendered invalided if the product is re-sold or has been damaged by inexpert repair. y Specifications are subject to change without notice. y The manufacturer disclaims any liability IRUWKHLQFLGHQWDORUFRQVHTXHQWLDOGDPDJHV y The guarantee is in addition to, and does not diminish your statutory or legal rights. Guarantor: Home Retail Group $YHEXU\%RXOHYDUG Central Milton Keynes 0.1: 16