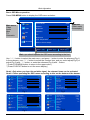
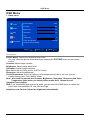
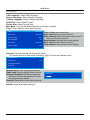
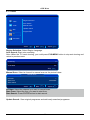
1
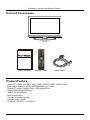
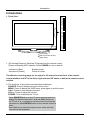
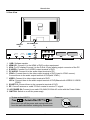
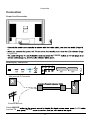
26” Wide screen LCD TV With DVD Model No.: DVT-2621 For information and support, www.lenco.eu Contents Contents Caution Safety Information 2 3 Unit and Accessories Product Feature 4 4 Introduction 1. Front View 2. Rear View 3. Remote Control 5-8 5 6 7 Basic Operation 9-10 OSD Menu 1. Video menu 2. Audio menu 3. Misc menu 4. TV menu 5. PC menu 11-14 11 12 12 14-15 15 DVD operation System operation 16 20 Simple Troubleshooting 23 24 1 Caution Caution 7KHOLJKWHQLQJÀDVKZLWKDUURZKHDGV\PEROZLWKLQDQHTXLODWHUDOWULDQJOH is intended to alert the user to the presence of un-insulated "dangerous YROWDJHZLWKLQWKHSURGXFWVHQFORVXUHWKDWPD\EHRIVXI¿FLHQWPDJQLWXGH to constitute a risk of electric shock to the persons. 7KHH[FODPDWLRQSRLQWZLWKLQDQHTXLODWHUDOWULDQJOHLVLQWHQGWRDOHUWWKH user to the presence of important operating and maintenance (servicing) LQVWUXFWLRQVLQWKHOLWHUDWXUHDFFRPSDQ\LQJWKHDSSOLDQFH Correct disposal of this Product :DVWH(OHFWULFDO(OHFWURQLF(TXLSPHQW:((( <RXUSURGXFWLVGHVLJQHGDQGPDQXIDFWXUHGZLWKKLJKTXDOLW\PDWHULDOVDQG FRPSRQHQWVZKLFKFDQEHUHF\FOHGDQGUHXVHG 7KLVV\PEROPHDQVWKDWHOHFWULFDODQGHOHFWURQLFHTXLSPHQWDWWKHLUHQG RIOLIHVKRXOGEHGLVSRVHGRIVHSDUDWHO\IURP\RXUKRXVHKROGZDVWH 3OHDVHGLVSRVHRIWKLVHTXLSPHQWDW\RXUORFDOFRPPXQLW\ZDVWHFROOHFWLRQ UHF\FOLQJFHQWUH ,QWKH(XURSHDQ8QLRQWKHUHDUHVHSDUDWHFROOHFWLRQV\VWHPVIRUXVHG electrical and electronic products. Please help us to conserve the environment we live in! 7KLVXQLWFRPSOLHVZLWK(XURSHDQVDIHW\DQGHOHFWULFDOLQWHUIHUHQFH directives. 2 Safety Information Safety Information 7RHQVXUHUHOLDEOHDQGVDIHRSHUDWLRQRIWKLVHTXLSPHQWSOHDVHUHDGFDUHIXOO\DOOWKH LQVWUXFWLRQVLQWKLVXVHUJXLGHHVSHFLDOO\WKHVDIHW\LQIRUPDWLRQEHORZ Electrical safety 7KH79VHWVKRXOGRQO\EHFRQQHFWHGWRDPDLQVVXSSO\ZKLFKPDWFKHVWKDWVWDWHGRQ WKHODEHORQWKHPDLQVDGDSWRU 7RSUHYHQWRYHUORDGGRQ WVKDUHWKHVDPHPDLQVVXSSO\VRFNHWZLWKWRRPDQ\RWKHU LWHPVRIHTXLSPHQW 'RQRWSODFHDQ\FRQQHFWLQJZLUHVZKHUHWKH\PD\EHVWHSSHGRQRUWULSSHGRYHU 'RQRWSODFHKHDY\LWHPVRQWKHOHDGVZKLFKPD\GDPDJHWKHP +ROGWKH0DLQVSOXJQRWWKHZLUHVZKHQUHPRYLQJIURPDVRFNHW 'XULQJDWKXQGHUVWRUPRUZKLOHOHDYLQJWKH79IRUORQJSHULRGVGLVFRQQHFWWKHDHULDOLI RXWGRRUDQGPDLQVDGDSWRUIURPWKHVXSSO\ -Do not allow water or moisture to enter the TV or mains adaptor. Do NOT use in wet RUPRLVWDUHDVVXFKDV%DWKURRPVVWHDP\NLWFKHQVRUQHDUVZLPPLQJSRROV 3XOOWKHSOXJRXWLPPHGLDWHO\DQGVHHNSURIHVVLRQDOKHOSLI WKHPDLQVSOXJRUFDEOHLVGDPDJHG OLTXLGLVVSLOWRQWRWKHVHWRULILWLVDFFLGHQWDOO\H[SRVHGWRZDWHURUPRLVWXUH DQ\WKLQJDFFLGHQWDOO\SHQHWUDWHVWKHYHQWLODWLRQVORWV WKHVHWGRHVQRWZRUNQRUPDOO\ 'R127UHPRYHWKHVDIHW\FRYHUV7KHUHDUHQRXVHUVHUYLFHDEOHSDUWVLQVLGH <RXPD\LQYDOLGDWHWKHZDUUDQW\4XDOL¿HGSHUVRQQHORQO\DUHSHUPLWWHGWRVHUYLFHWKLV apparatus. 7RDYRLGEDWWHU\OHDNDJHUHPRYHH[KDXVWHGEDWWHULHVIURPWKHUHPRWHFRQWURO KDQGVHWRUZKHQQRWXVLQJIRUDORQJSHULRG 'R127EUHDNRSHQRUWKURZH[KDXVWHGEDWWHULHVRQD¿UH Physical safety 'R127EORFNYHQWLODWLRQVORWVLQWKHEDFNFRYHU<RXPD\SODFHWKH79LQDFDELQHWEXW ensure at least 5cm (2") clearance all around the unit. 'R127WDSRUVKDNHWKH79VFUHHQ\RXPD\GDPDJHWKHLQWHUQDOFLUFXLWU\7DNHJRRG FDUHRIWKHUHPRWHFRQWUROGRQRWGURSLWRUDOORZLWWRFRPHLQWRFRQWDFWZLWKOLTXLGV 7RFOHDQWKH79XVHDVRIWGU\FORWK'R127XVHVROYHQWVRUSHWUROEDVHGÀXLGV)RU VWXEERUQVWDLQV\RXPD\XVHDGDPSVRIWFORWKZLWKGLOXWHGGHWHUJHQW 3 Unit and Accessories and Product Feature Unit and Accessories TV set User's manual Remote control Mains Cable Product Feature - Inputs: RF, VIDEO, S-VIDEO, VGA, YPbPr, SCART, HDMI1, HDMI2, DVD - Audio Input: Audio R/L(YPbPr/VIDEO/SVIDEO), PC Audio - Support TV mode: PAL(B/G,D/K,I), SECAM(B/G,D/K) - Support NICAM and FM Stereo - Search TV: Auto/Manual - Auto-shutting down - Program exchange and edit - Speaker output: 2x8W - Power(AC 100-240V 50/60Hz) 4 Introduction Introduction SOURCE MENU CH+ 1. Front View CHVOL+ VOL- POWER Led Indicator Remote Control window (Keep clear) 1. (IR) Infrared Receiver: Receives IR signals from the remote control. (Power on/Standby)LED Indicator: Press POWER to turn on and off. Indicator on(Red) Indicator on(Green) Standby mode Power on mode The effective receiving range for the signal is 5-8 metres from the front of the remote control window, and 300 to the left or right side and 200 above or below the remote control window. 2. The functions of the buttons are described as bellows: SOURCE: Press to display the input source menu. MENU: Press to display the OSD menu, press again to exit the menu. CH+/-: Press to scan through channels. VOL+/-: Press to adjust the volume. POWER: Turn on/standby the TV set. Press SOURCE button on the TV set or remote control to display the input source menu, and use CH+/- button on the TV set or / button on remote control to select the input source, press ENTER button on the remote control to enter. Note: Before you select the input source, make sure the connections are prepared. 5 Introduction 2. Rear View SWITCH AC POWER IN 11 10 5 6 Pb USBfor uodate 1 Pr 2 3 R in L in Video R in L in Y 4 1 7 2 8 9 1. 2. 3. 4. 5. 6. USB: Software update. HDMI1/2/: Connect it to the HDMI of DVD or other equipment. VGA: For PC display.Connect it to the D-Sub 15 pins analog output connector of the PC. S-VIDEO: Connect it to S-VIDEO output terminal of DVD. PC AUDIO: Connect it to the audio output terminal of PC. YPbPr: Connect them to the video output terminal of DVD.(used in YPbPr source). Connect them to the audio output terminal of DVD(with YPbPr ). 7. VIDEO: Connect it to video output terminal of DVD. L/R in: Connect them to the audio output terminal of DVD(Shared with VIDEO/ S-VIDEO/ YPbPr). 8. SCART1/2 Connect them to the composite terminal of DVD. 9. RF: Connect antenna or cable 75 Ohm coaxial to receive TV signal. 10. AC POWER IN: Connect to an earth 100-240V,50-60Hz AC outlet with the Power Cable. 11. SWITCH: Switch on or off the power suply. Power on - To turn on the LCD TV - Be sure to turn off the power and unplug both units from the wall outlet before making any connections. 6 Power off Introduction 1. POWER: Turn the TV on or turn it standby 2. MUTE: Silence status or cancel 3. SOURCE: Source select 4. 0-9, -/--: Choose channel 6. DISPLAY: Display playing status 7. RETURN: Do to play the latest program 8. VOL+/-: Volume up/down 9. CH+/-: Channel up/down CH+/-, : Cursor buttons for OSD operation ENTER: Confirmation 10. SYS MENU: TV system menu 11. SYS-EXIT: Exit from the OSD menu 12. SOUND: Select the sound mode 13. PICTURE: Select the picture mode 14. TIMER: Time shutting down 12. NICAM/A2 SOURCE OPEN PLAY /PAUSE STOP 15 16 17 Buttons for DVD operation 5. : Load/eject DVD disc : Play/pause DVD program : Stop DVD program 16. LANGUAGE: Select DVD disc language ZOOM: Adjust picture size in DVD mode SUBTITLE: Turn on/off the DVD subtitle display SEARCH: DVD search, Tracks or Chapters SETUP: DVD system setup MENU: DVD play list/Disc menu ANGLE: Select DVD picture angle TITLE: DVD title : DVD fast reverse : DVD fast forward : DVD previous chapter : DVD next chapter PROGRAM: Edit the program and play SLOW: play DVD programs at slow speed REPEAT: Play the title or chapter once again A-B: Select and play the preferable paragraph of DVD program by pressing this key twice at the beginning and end of it. Buttons for TELETEXT 17. TV/TXT: Teletext on/off MIX: Display Teletext on top of the normal TV picture CANCEL: Turn off the Teletext display REVEAL: Reveal any hidden text, for example-quiz answer HOLD: Hold or carry on the current subpage SIZE: Press to see top half of page double size, Press again to see the bottom half of page double size Press again for normal size INDEX: Direct recall of page 100 SUBPAGE: Go to subpage COLOUR BUTTONS: Short cuts-follow the coloured links in the text 7 Connection Connection Power Cord Connection on. 5) lights red. POWER Antenna(RF) Connection Pb USBfor uodate Pr R in L in Video R in L in Y 1 2 Wall jack with F-Connector RF External Antenna Press SOURCE to select TV ENTER 8 Basic Operation Basic Operation Power on/off 1. Connect to the power with a power code, and turn on the switch. 2.-To turn on the TV Press POWER button on the TV or remote control. -To turn off the TV Press POWER button on the TV or remote control. Main: Input Source select Press SOURCE button on the TV set or remote control to display the input source menu, and use CH+/- button on the TV set or / button on remote control to select the input source, press ENTER button on the remote control to enter. Note: Before you select the input source, make sure the connections are prepared. TV AV DVD S-Video SCART 1 SCART 2 YPbPr HDMI1 HDMI2 VGA Basic buttons on the remote control POWER: Turn the TV on/standby. MUTE: Press to mute the sound, press again or press VOL+ to unmute. PICTURE : Press repeatedly to cycle through the available video picture modes. SOUND: Press to cycle through the different sound settings. NICAM/A2: TV Nicam/A2 select. Number Buttons: Choose channel directly. Press number buttons and press ENTER button to play the channel. : Return to the previous channel viewed. DISPLAY: Display the information of the current mode. SYS-MENU: Press to display the OSD menu. SYS-EXIT : Press to exit the OSD menu. ASPECT: Press to change the screen display mode. Thumbstick( ): Allows you to navigate the on-screen menus and adjust the system settings to your preference. ENTER: CONFIRM button. Timer: Shutdown timer. SOURCE : Press to display the input source menu. VOL+/-: Press to adjust the volume. CH+/-: Press to scan through channels. 9 Basic Operation Basic OSD Menu operation Press SYS-MENU button to display the OSD menu as below: Video Main menu Video Audio Misc TV Geometric Audio Misc Picture Mode Vivid Contrast 65 Brightness 53 Saturation 72 Submenu (Video menu for example) Hue TV Sharpness 4 Color Temperature Geometric Normal Advance Picture Adjust Select Back Adjust MENU /ENTER Hint---you should operate the OSD menu according to the hint. Use ∧ / ∨ button to select the main menu, and press > button to enter the submenu(Fig.1). In the submenu, use ∧ / ∨ button to select the function item, and you could adjust(Fig.2) or select(Fig.3) with < / > button, or enter the submenu(Fig.4) with > button. * (Press SYS-MENU button to return to the upper menu.) * (Press SYS-EXIT button to exit the menu display.) Note1: Only when you input the suitable signal, the relevant items can be activated Note2: Please operating the OSD menu according to hint on the bottom of the banner. Video Picture Mode Contrast Audio Misc Vivid Video 65 Brightness 53 Saturation 72 Audio Misc Hue TV 65 Brightness 53 Saturation 72 Sharpness TV 4 Normal Sharpness Color Temperature Geometric Advance Picture Adjust Audio Misc Picture Mode Fig.2 Vivid Contrast 65 Brightness 53 Saturation Video Audio 72 Misc Hue TV Color Temperature Geometric OSD Language English Region Language Hebrew Teletext Language TV 4 Normal Geometric Advance Picture Adjust On Picture Size Full SCART 2 Timer Parental Default Fig.3 10 Arabic Blue Mute SCART 1 Sharpness 4 Normal Advance Picture Adjust Fig.1 Video Vivid Contrast Hue Color Temperature Geometric Picture Mode Fig.4 OSD Menu OSD Menu 1. Video menu Video Audio Misc Picture Mode Vivid Contrast 65 Brightness 53 Saturation 72 Hue TV Sharpness 4 Color Temperature Geometric Normal Advance Picture Adjust Select Back Adjust MENU /ENTER Description Picture Mode: Select your desired picture mode. You may select the picture mode directly by pressing the PICTURE button on the remote control. Contrast: Adjust image contrast. Brightness: Adjust image black level. Saturation: Adjust image saturation. Hue: Adjust the tint of the picture (in NTSC mode). Sharpness: Adjust the sharpness. ColourTemperature: Select an optimum color temperature mode to suit your eyes for viewing among User, Cool, Middle, Warm. Note: You could not operate the Contrast, Brightness, Saturation, Sharpness and Color Temperature items when you select picture mode Vivid , Normal or soft. Advance Picture Adjust: DNR: If the broadcast signal received is weak, you can select the DNR option to reduce the video noise level between Off, Low, Mid and High. Adaptive Luma Control: Adjust the brightness automatically. 11 OSD Menu 2. Audio menu Video Audio Sound Mode User Bass 50 Treble 50 Balance Misc 0 Surround Off TV Geometric Select Back Adjust MENU /ENTER Description Sound Mode: Select your desired picture mode. You may select the sound mode directly by pressing the SOUND button on the remote control. Bass: Adjust the level of the lower-pitched sounds. Treble: Adjust the level of the higherpitched sounds. Balance: Adjust the audio output between left and right speakers. Surround: Turn on/off on the surround function. 3. Misc menu Video Audio Misc TV OSD Language English Region Language Hebrew Teletext Language Arabic Blue Mute On Picture Size Full SCART 1 SCART 2 Geometric Timer Parental Default Select Back Adjust MENU 12 /ENTER Description(see next page) OSD Menu Description OSD Language: Select OSD language. Region Language: Select Region Language. Teletext Language: Select Teletext language. SCART1/2: Select SCART mode . Picture Size: Adjust Picture Size. Blue Mute: Turn on/off the Blue Back function while no signal. Timer: Timer settings, as the picture below. Time 00:13:24 Start Time 00:00:00 Start Channel 001 Start Activate 0ff Start Time Stop Activate 00:00:00 Off Time: Display the current time. Start Time: Set the on time of the TV. Start Channel: Select the channel when the TV turns on at the time you set. Start Activate: Activate the on time setting. Start Time:Set the off time of the TV. Stop Activate: Activate the off time setting. Parental: Parental settings, as the picture below. You should enter the code(Initial Password: 0000) to enter the Parental menu. Channel Lock Video Lock 1 TV Change Password Clear All Channel Lock: Lock to playing a channel. Video Lock: Lock to playing a input source. Change Password: Change the pssword. You have to enter the password to enter the Parental menu above. Clear All: Reset all the Hotel Mode settings. Password ------- Default: Reset all the Misc settings. 13 OSD Menu 4. TV menu Video Region Selection Auto Search Audio Misc Manual Scam Update Search Program Edit TV Geometric Select Back Adjust MENU /ENTER Region Selection: Select Region Language. Auto Search: Start auto searching. Note: When the TV is auto tunning, you could press SYS-MENU button to stop auto tunning and return to preview menu. Searching 0 46.87 MHz 0% Stop MENU Manual Scan: Select a channel to manual scan as the picture below. Manual Scan 1 45.00 MHz PR Start Start From Start Search Select Back Adjust MENU /ENTER PR Start: Select the channel you want to manual scan. Start From: Select the freq. you want to start from. Start Search: Press ENTER button to start search. Update Search: Save original programes and add newly searched programes. 14 OSD Menu Program Edit: Select a channel to manual scan as the picture below. Program Edit Channel Freq System Name Skip 1 --- --- --- On 2 90.75 B/G --- On 3 --- --- --- On 4 --- --- --- On 5 --- --- --- On 6 --- --- --- On 7 --- --- --- On 8 --- --- --- On Swap Insert Select Copy Back Delete MENU Adjust /ENTER Swap: Swap two channels' position. Select the channel, and press RED button, then select the channel you want to swap, and press ENTER button to swap. Insert: Insert a channel. Select the channel, and press Green button to pick-up, then select the position you want the channel to be inserted to, and press ENTER button. Copy: Copy a channel. Select the channel, and press YELLOW button to copy, then select the position you want the channel to be copied to, and press ENTER button. Delete: Delete a channel. Select the channel, and press BLUE button to delete the channel. 5. PC menu Video Audio Misc Auto Setting Phase 50 Manual Clock 50 H Position 0 V Position 50 TV Geometric Select Back MENU Adjust /ENTER Auto Setting: Press button to setup the parameter of the screen automatically Phase: Adjust the phase of the ADC sampling clock relative to the sync signal, until a stable image is obtained. Manual Clock : Adjust the pixel clock frequency, until the image size is maximized for the screen. . H/V Position: Adjust the transverse/vertical position of the screen. 15 DVD Operation 16 DVD Operation 17 DVD Operation 18 DVD Operation 19 DVD System Operation 20 DVD System Operation 21 Disc Care 22 Simple Troubleshooting Simple Troubleshooting ,IWKHGLVSOD\IDLOVRUSHUIRUPDQFHGUDPDWLFDOO\GHWHULRUDWHVFKHFNWKH'LVSOD\LQDFFRUGDQFH ZLWKWKHIROORZLQJLQVWUXFWLRQV5HPHPEHUWRFKHFNWKHSHULSKHUDOVWRSLQSLRQWWKHVRXUFHRIWKH failure. ,IWKHGLVSOD\VWLOOIDLOVWRSHUIRUPDVH[SHFWHGFRQQHFW\RXUKHOSOLQHIRUDVVLVWDQFH No power - Check all connections to the TV. 3UHVVHLWKHUWKHSRZHUEXWWRQRUWKH6WDQGE\EXWWRQRQWKH5HPRWHFRQWURO No picture or sound - Ensure that the TV is plugged in and the power is on. - Ensure that the aerial is connected. 7U\DGLIIHUHQWSURJUDPPH Poor picture quality - Check the aerial connections. &KHFNWKDWWKHFKDQQHOLVWXQHGLQSURSHUO\ $GMXVWWKHSLFWXUHVHWWLQJVEULJKWQHVVFRORXUVKDUSQHVVFRQWUDVWKXH 0DNHVXUHWKDWWKH79LVQRWORFDWHGFORVHWRHOHFWULFDODSSOLDQFHVWKDWPD\HPLWUDGLR IUHTXHQF\LQWHUIHUHQFH No colour - Adjust the colour setting. &KHFNWKDWWKHSURJUDPPHLVEURDGFDVWLQFRORXU &KHFNWKDWWKHFDQQHOLVWXQHGSURSHUO\ TV does not respond to remote control &KHFNWKDWWKHUHDUHQRREVWUXFWLRQVEHWZHHQWKHUHPRWHFRQWURODQGWKHXQLW - Check that the remote control is within range of the unit. &KHFNWKDWWKHEDWWHULHVLQWKHUHPRWHFRQWURODQGQRWZHDNRUH[KDXVWHG 7KLV/&'79LVIRUKRXVHKROGXVHDQGUHJLVWHUHGDVKDUPOHVVRQHOHFWURPDJQHWLFZDYHV 7KHUHIRU\RXFDQXVHLWLQHYHU\ORFDWLRQDVZHOODVUHVLGHQWLDODUHDV 23 LCD Panel Input Connector Panel Size 26 inch(diagonal) Brightness 600 cd/m2 Contrast 5000:1 Resolution 1366x768 Video 1 Audio(L/R) 1 S-VIDEO 1 VGA 1 PC Audio 1 HDMI 3 SCART 1 YPbPr 1 RF 1 Power Source AC100-240V 50/60Hz Power Consumption 160W improving the performance. 24