1
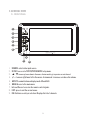
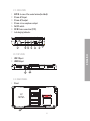
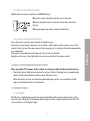
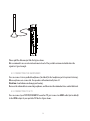
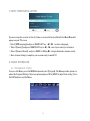
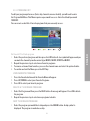
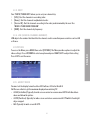
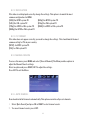
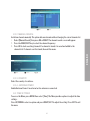
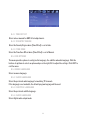
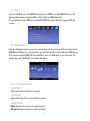
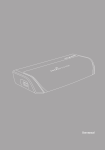
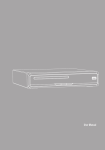
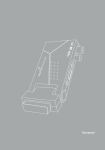
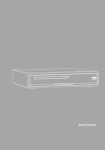
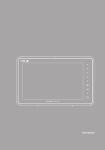
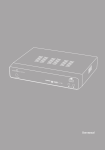
ESPAÑOL
PORTABLE MULTIMEDIA HDTV
ENERGY LED
Manual de usuario / User manual / Manuel de l’utilisateur
TV3170 / 3190 HDTV
ESPAÑOL
User manual
29
To ensure your safety and the safety of others, please ensure that you read all the safety information before operating this product.
Keep this information in a safe place for future reference.
This symbol indicates that this product incorporates double insulation between hazardous
mains voltage and user accessible parts.
WARNING: To reduce the risk of fire or electric shock, do not expose your TV3170/TV3190 HDTV
to rain or moisture.
Safety Considerations.
≥≥ Position the cables so that they cannot be walked on or pinched by items placed on or against them.
≥≥ Do not remove the cover or back.
≥≥ Do not expose your TV3170/TV3190 HDTV to water (dripping or splashing).
≥≥ No objects filled with liquids, such as vases, should be placed on the unit.
≥≥ Keep the product away from direct sunlight and heat source such as radiators or stoves.
≥≥ Do not place the product on unstable cart, stand, tripod, bracket or table. The unit may fall,
resulting in possible damage or injury.
≥≥ Do not let the device drop or shock.
≥≥ We recommend you to unplug the power from the outlet when the unit is not in use.
Ventilation
The slots and openings on the set top box are for ventilation. Do not cover or block them as it may
cause overheating.
NEVER let children push anything into the holes or slots on the case.
Battery Disposal
Please ensure batteries are disposed of safely.
Never dispose of batteries in a fire or with other household waste.
Check with your local authority for disposal regulations.
Cleaning
ALWAYS turn off your TV3170/TV3190 HDTV before cleaning it.
Do not use liquid or aerosol cleaners.
Clean your TV3170/TV3190 HDTV with a soft, damp (not wet) cloth.
31
ENGLISH
1. Important Safety Instructions
2. General View
2.1. front Panel
3
1
2
3
4
85
6
8
7
1.
2.
3.
4.
5.
6.
7.
8.
9.
95
SOURCE: select video input source.
SETUP: to access to TV3170/TV3190 HDTV setup menu.
▲/ ▼: to move up/ move down in the menus. In view mode to go to previous or next channel.
+/ - : to move right/move left in the menus. In view mode to increase or reduce the volume.
ASPECT: conmute between display mode 4:3 and 16:9.
MENU: Access to the main menu.
Infrared Sensor to receive the remote control signals.
EXIT: press to exit the current menu.
OK: Confirms an entry or selection. Displays the list of channels.
32
1
2.2. SIDE VIEW
1. ANT IN: to conect the coaxial antena (included).
2. 3.5 mm A/V input.
3. 3.5 mm A/V output.
4. 3.5 mm stereo earphones output.
5. On/Off switch.
6. DC IN Power connection (12 V).
7. Led charging indicator.
12
13
14
15
16
23. top view
1. USB 2.0 port.
2. HDMI Output.
17
18
2.4. REAR PANEL
1. Stand.
19
33
ENGLISH
11
10
3. REMOTE CONTROL
2
3.1 Button descriptions
1.
2.
3.
4.
5.
6.
7.
8.
9.
3
1
4
5
17
6
7
9
15
26
8
18
10
20
14
21
16
23
24
27
28
29
12
Note: The TEXT, SUBTITLES, AUDIO availability
depends on the broadcasting channels.
11
19
13
22
25
MUTE: Mute or restore audio output.
INFO: Displays additional channel information.
ASPECT: to change between display mode 4:3 and 16:9.
SETUP: to access to TV3170/TV3190 HDTV setup menu.
TTX: Displays Teletext information.
SUBTITLE: Selects subtitles language.
AUDIO: Selects an audio track or audio mode.
REPEAT: Selects repeat mode or turns it off.
RECALL: Used to switch between the last two viewed
channels.
10. MENU: Displays the main menu.
11. ▲: move up in the menus. In view mode to go to next
channel.
12. ▼: move down in the menus. In view mode to go to previous
channel.
13. ►: move to the right/change setup settings. In view mode to
increase the volume.
14. ◄: move to the left/change setup settings. In view mode to
reduce the volume.
15. OK: Confirms an entry or selection. Displays the list of
channels.
16. FAV: Displays the favourites channels menu.
17. 0-9 (Numeric Buttons): Selects a channel or setting.
18. GOTO: Jumps to a desired playback time.
19. PLAY/PAUSE: Starts or resumes media playback/ Pauses
media playback.
20. STOP: Stops media playback.
21. TV/RADIO: Switches from TV function to Radio function and
from Radio to TV.
22. EXIT: Exits the current menu or returns to the previous menu.
23. EPG (Electronic Program Guide): Turns the program guide on.
24. REV: Searches backwards during media playback.
25. FWD: Searches forwards during media playback.
26. PREV: Skips to the previous track during media playback and
skips to the previous channel during DTV playback.
27. NEXT: Skips to the next track during media playback and
skips to the next channel during playing DTV playback.
28. REC: Record the program manually.
29. COLOUR BUTTONS (GREEN/YELLOW/BLUE): Operate
different function in TEXT screen.REC: Record the program
manually.
34
3.2 Installing the Batteries
Pull the battery loader out and insert a CR2025 battery.
Make sure to place the battery in the correct direction.
1
When not using the remote control for a long time remove the
battery.
When operating range reduces replace the battery.
3.3 Using the remote control
To use the remote control, point it towards to the IR receiver.
The remote control range is 4 metres or less within a ±30° angle from the remote sensor. If the
remote’s battery is low, the remote may not function properly, so replacing the battery immediately
is recommended.
The remote control will not work if the way to the receiver is blocked.
Sunlight or other very strong light will decrease the sensitivity of the remote control.
4. BUILT-IN RECHARGEABLE BATTERY
This portable TV comes with a built-in rechargeable Lithium-Ion battery.
≥≥ Charge the battery fully before initial use for at least 8 hours. Charging time is normally about
4hours. A fully charged battery delivers about 2.5 hours of use.
≥≥ When the battery is weak, an indication symbol will appear on the screen and the unit will
power off automatically after a few minutes.
5. CONNECTIONs
5.1. antenna
The TV unit is supplied with an external antenna that will provide good reception in most situations. Be sure to keep the TV stationary when trying to receive a signal. Any movement of the TV
can result in loss of the digital signal.
35
ENGLISH
2
Please pull the Antenna just like the figure shows.
We recommend to use an external antenna instead of the portable antenna included when the
signal isn’t good enough.
5.2. Connecting the earphones
You can connect stereo padded headphones (included) to the headphone jack for private listening.
When earphones are connected, the speakers will automatically turn off.
Caution: Loud volume can damage your hearing.
Decrease the volume before connecting earphones, and then raise the volume back to a comfortable level.
5.3. Connecting to a tv
You can connect your TV3170/3190 HDTV to another TV, just connect an HDMI cable (not included)
to the HDMI output of your portable TV like the figure shows.
36
ANT IN
CV BS
LR
ENGLISH
HDMI
6. USER INTEFACE
6.1. Powering ON the system
1. Power On: Switch ON/OFF button from OFF to ON.
The system will enter DVB mode as soon as the system is powered on.
37
7. FIRST TIME INSTALLATION
If you are using the receiver for the first time or restored to Factory Default, the Main Menu will
appear on your TV screen.
1. Select [OSD Language] and press RIGHT/LEFT key ◄ /► to select a language.
2. Select [Country] and press RIGHT/LEFT key to ◄ /► select your country of residence.
3. Select [Channel Search] and press RIGHT or OK key ► to begin Automatic channel search.
4. Once channel tuning is complete, you are now ready to watch TV.
8. BASIC OPERATION
8.1. Program Settings
To access the Menu, press the MENU button and select [Program]. The Menu provides options to
adjust the Program Settings. Select an option and press OK or RIGHT to adjust that setting. Press
the EXIT button to exit the Menu.
38
Set Favorite TV or Radio program:
1. Select the preferred program, and then press the FAV button. A star symbol will appear and you
can mark the channel by media content type: MOVIE, NEWS, SPORTS or MUSIC.
2. Repeat the previous step to select more Favorite programs.
3. To remove a channel from favorites, press on the channel name and select the option disable.
4. To confirm and exit the Menu, press the EXIT key.
View Favorite Program
1. Press the Favorite button and the Favorite Menu will appear.
2. Press UP/DOWN to select your Favorite Programs.
3. Press OK to select your favorite program.
Delete a TV or Radio Program
1. Select the Program and then press the BLUE button. A message will appear. Press OK to delete
the program.
2. Repeat the previous step to select more programs to delete.
Skip TV or Radio Program
1. Select the program you would like to skip and press the GREEN button. A skip symbol is
displayed. The program is marked as a skip.
39
ENGLISH
8.1.1. PROGRAM EDIT
To edit your program preferences (lock, skip, favourite, move or delete), you will need to enter
the Program Edit Menu. This Menu requires a password to access. Enter the default password
'000000'.
You can create a shortlist of favorite programs that you can easily access.
2. Repeat the previous step to select more programs.
3. To add a TV/Radio channel press green button until the skip mark dissapear.
4. To confirm and exit the menu, press EXIT key.
Move a TV or Radio Program
1. Select the preferred program then press the RED button. A move symbol will appear.
2. Press UP/DOWN to move the program.
3. Press OK to confirm.
4. Repeat the above steps to move more channels.
Lock Program
You can lock selected programs for restricted view. To lock a TV or Radio Program:
1. Select the preferred program then press the YELLOW button. A lock shaped symbol is displayed. The program is now marked as locked.
2. Repeat the previous step to select more programs.
3. Press the YELLOW button to disable the locked program.
4. To view the locked program, you will be require to enter either the default password '000000'
or your last set password.
5. To confirm and exit the menu, press the EXIT button.
8.1.2. EPG (Electronic program guide)
The EPG is an on-screen TV guide that shows scheduled programs seven days in advance. Press
the EPG button on the Remote Control to access the guide.
You can use the UP/DOWN key to select the preferred program. If there is more than one page of
information, use the BLUE button for page up and the YELLOW button for page down.
Note: The availability of EPG information depends on the broadcasting channel.ç
40
8.1.3. SORT
Your TV3170/TV3190 HDTV allows you to sort your channels by:
1. [LCN] - Sort the channels in ascending order.
2. [Name] - Sort the channels in alphabetical order.
3. [Service ID] - Sort the channels according to the order predetermined by the user. See
"MOVE A TV OR RADIO PROGRAM".
4. [ONID] - Sort the channels by frequency.
8.2.PICTURE
To access the Menu, press MENU then select [PICTURE]. The Menu provides options to adjust the
video settings. Press UP/DOWN to select an option and press RIGHT/LEFT to adjust that setting.
Press EXIT to exit the menu.
8.2.1. Aspect Ratio
You must set the display format to either 4:3 PanScan, 4:3 Letter Box,16:9
Full Screen or Auto to get the maximum display when watching TV.
≥≥ 4:3 LB (LetterBox): Typically for wide screen content on convencional 4:3 TV with black bars
above and below the picture.
≥≥ 4:3 PS (PanScan): Typically for wide screen content on convencional 4:3 TV with left and right
edges cropped.
≥≥ 16:9: Typically for wide screen 16:9 TV.
41
ENGLISH
8.1.4. LCN (Logical channel number)
LCN adjusts the number that identifies the channel, used in some Europeans countries such as UK
or France.
8.2.2. Resolution
If the video is not displayed correctly, change the settings. This option is to match the most
common configuration for HDMI.
[480i]: For NTSC system TV.
[480p]: For NTSC system TV.
[576i]: For PAL system TV.
[576p]: For PAL system TV.
[720p]: For NTSC or PAL system TV. [1080i]: For NTSC or PAL system TV.
[1080p]: For NTSC or PAL system TV.
8.2.3. TV Format
If the video does not appear correctly, you need to change the settings. This should match the most
common setting for TVs in your country.
[NTSC]: for NTSC system TV.
[PAL]: for PAL system TV.
8.3. CHANNEL SEARCH
To access the menu, press MENU and select [Search Channel]. The Menu provides options to
adjust the Channel Search settings.
Select an option and press RIGHT/LEFT to adjust the settings.
Press EXIT to exit the Menu.
8.3.1. Auto Search:
Search and install all channels automatically. This option overwrites all preset channels.
1. Select [Auto Search] and press OK or RIGHT to start channel search.
2. To cancel channel search, press EXIT.
42
ENGLISH
8.3.2. Manual Search:
Install new channels manually. This option adds new channels without changing the current channels list.
1. Select [Manual Search] then press OK or RIGHT. The channel search screen will appear.
2. Press the RIGHT/LEFT key to select the channel frequency.
3. Press OK to start searching channels If a channel is found, it is saved and added to the
channels list. If channels can’t be found, then exit the menu.
8.3.3. Country
Select the country of residence.
8.3.4. Antenna power
Enable Antenna Power if an external active antenna is connected.
8.4. TIME SETTINGS
To access the Menu, press MENU then select [Time]. The Menu provides options to adjust the time
settings.
Press UP/DOWN to select an option and press RIGHT/LEFT to adjust the setting. Press EXIT to exit
the menu.
43
8.4.1. Time Offset
Select auto or manual for GMT offset adjustments.
8.4.2. Country Region
Select the Country Region when [Time Offset] is set to Auto.
8.4.3. Time Zone
Select the Time Zone Offset when [Time Offset] is set to Manual.
8.5. OSD OPTIONS
The menu provides options to configure the language, the subtitle and audio language. Click the
buttons of up/down to select an option and press the right/left to adjust the settings. Click EXIT to
exit the menu.
8.5.1.MENU Language
Select an menu language.
8.5.2. Audio Language
Select the preferred audio language for watching TV channels.
If the language is not available, the default program language will be used.
8.5.3. Subtitle Language
Select the preferred subtitle language.
8.5.4. AUDIO LANGUAGE
Select digital audio output mode.
44
8.6. SYSTEM SETTING
The menu provides options to adjust the system settings.
Press the UP/DOWN key to select an option and press RIGHT/LEFT to adjust the setting.
Press EXIT to exit the Menu.
8.6.1. Parental Guidance
8.6.2. Set Password
Set or change the password for locked programs. Enter your old password or the default password
'000000'. You will then be asked to enter your new password. To confirm re-enter your new
password. Once it is confirmed, press EXIT to exit the Menu.
8.6.3. Factory Default
Reset your Set Top Box to the Default Factory Settings.
In Main Menu select [Factory Default] and press OK or RIGHT to select. Enter your password or the
default password '000000' and press OK to confirm. This option will delete all preset channels and
settings.
8.6.4. Information
View model, hardware and software information.
8.6.5. Software update
You can upgrade the firmware through USB port. Just visit our Download area in our website:
www.energysistem.com, where you will find the upgrading files and instructions.
45
ENGLISH
You can restrict access to channels that are unsuitable for children. To restrict/lock the channel
you will need to enter either the default password '000000' or your own password.
8.7. USB
To access the Menu, press the MENU button and select [USB] using the RIGHT/LEFT keys. The
menu provides options to playback Music, Photo, Video and Multimedia files.
The unit will only support USB devices with FAT/FAT32 file system. It will not support NTFS file
system.
8.7.1. MULTIMEDIA
From the multimedia menu you can access information stored in an external device connected via
USB. When a USB devices is attached you can select from the Music, Photo, Movie or PVR options
in this menu using the RIGHT/LEFT keys and OK to select. If a USB device is not connected, the
warning message "No USB device is Found" will appear.
8.7.2. Photo configure
Slide Time
≥≥ Adjust slide show interval to 1~8 seconds.
Slide Mode
≥≥ Adjust slide show effect as mode 0~59 or random.
Aspect Ratio
≥≥ Keep: displays the picture as its original aspect.
≥≥ Discard: displays the picture in full screen mode.
46
8.7.3. Movie Configure
Subtitle Specific
≥≥ [Small]: Displays the subtitle as small mode.
≥≥ [Normal]: Displays the subtitle as normal mode.
≥≥ [Big]: Displays the subtitle as big mode.
Subtitle BG
≥≥ [White]: Displays the subtitle in white background.
≥≥ [Transparent]: Displays the subtitle in transparent background.
≥≥ [Grey]: Displays the subtitle in grey background.
≥≥ [Yellowgreen]: Displays the subtitle in yellowgreen background.
Note: We cannot guarantee compatibility (operation and/or bus power) with all USB mass storage
devices and assumes no responsibility for any loss of data that may occur when connected to this
unit.
≥≥ With large amounts of data, it may take longer for the system to read the contents of a USB device.
≥≥ Some USB devices may not be properly recognized.
≥≥ Even when they are in a supported format, some files may not play or display depending on the content.
9. PVR
The system supports two recording modes for DVB-T broadcasting channels (One button recording
and Scheduled recording) as follows bellow. You can read the files you had recorded by accessing
to Menu->USB->Multimedia->PVR, or by pressing directly the PVR LIST button from the remote
control.
Note:
1. If you have more than one storage disks connected to your device, do not forget to set the PVR
target disk from Menu->USB->PVR configure before you start recording a program.
2. Different recording tasks can not be set at the same time.
47
ENGLISH
Subtitle Font Color
≥≥ Red]: Displays Subtitle in red font.
≥≥ [Blue]: Displays Subtitle in blue font.
≥≥ [Green]: Displays Subtitle in green font.
≥≥ [White]: Displays Subtitle in white font.
≥≥ [Black]: Displays Subtitle in black font.
9.1. One button recording:
While watching TV, press “REC” button to start recording the channel. Press “stop” button to exit.
While recording, you can press “Play” key to start to start the timeshift feature to review the
program while recording is in progress. Then you can use “FR” or “FF” key to select the recorded
segment you want to watch or review, while the recording process continues its normal course.
Press “exit” to hide the timeshift bar. Press “INFO” key to show detailed information, and to show
again the timeshift bar. Press “STOP” key to finish the recording process.
9.2. Scheduled recording:
You can also schedule a recording, or tune into the channel selected when you set. For recording /
viewing of a desired program perform the following steps:
9.2.1. Manual Reservation Recording
Press “Blue” key to enter the Schedule mode and open PVR booking menu. Then press “red” key
to add the current recording task. You can use “green” or ”blue” keys to edit or delete any existent
booking. Press “OK” to confirm the scheduled recording and save the changes.
9.2.2. EPG Reservation Recording
Press EPG to show the TV programs list. Choose the program you want to record and click OK to
access to the event add window. Establish the settings and press “OK” to confirm the scheduled
recording and save the changes. Then the system will show the list of scheduled events. Then use
the “red”, ”green” or ”blue” keys to add, edit or delete.
In both cases (direct/scheduled recording), it will be created a file with the name of the tuned
channel, time and starting date of the recording. You can rename the file by clicking the green
button. To play recorded programs press LIST in the remote control and select the file with up/
down buttons, then press OK to play it.
Note: Recorded program files do not support changing values such as subtitles, languages, EPG,
etc. You must have a USB data storage device connected. The playback and recorded multimedia
files should be supported with USB devices in FAT/FAT32 format.
48
10. TROUBLESHOOTING
Problem
Possible cause
What to do
Power is not connected
Connect the power adapter
The power is not on
Switch on the power by pressing the STANDBY button
Antenna cable is not connected
Connect the antenna cable
Incorrect setting
Set up correct parameter
The sound is mute
Switch on the sound by
pressing the MUTE key
Incorrect audio track
Try another audio track
The program is a radio
program
Press <TV/RADIO> key to shift
into TV mode
The battery is exhausted
Change new battery
Remote control unit is not in the
right opposite of the IR receiver
or too far from it
Adjust the way of holding
remote control unit and near
from the IR receiver
The signal is too weak
Strengthen the signal
The program signals no subtitle
date
Try pressing the SUB button to
open the subtitle
The subtitle doesn’t open or
signal is too weak
Make sure the signal is good
Can’t play the music file
correctly
The file is damaged or the
code is wrong
Change the file
OR
Can’t play the video
The format of the video is not compatible, or file is damaged
No picture
Screen shows No Signal
No sound
Only sound, no image on the
screen
Remote control unit is not
workable
The image stop suddenly or
mosaic
Doesn’t display the subtitle
49
ENGLISH
If you experience problems with your TV3170/TV3190 HDTV or its installation, in the first instance
please read carefully the relevant sections of this User Manual and this Troubleshooting section.
11. TECHNICAL SPECIFICATION
Item
Especificaction
Especificaction
Display
TV 3170 White
7" LED backlight widescreen
TV 3190 Black
9" LED backlight widescreen
VHF: 170 - 230 MHz
Input Frequency
Tuner
Video
Audio
Image
Power
UHF: 470 - 862 MHz
RF Input Level
-78 ~ -10 dBm
IF Bandwidth
7 MHz & 8 MHz
Modulation
QPSK, 16QAM, 64QAM
Decoder Format
MPEG2 MP@HL , MPEG4 SP, ITU-T
H.264 MP Y [email protected], VC-1 MP@HL
and AP@L3.
Output Format
480i, 576p, 720p, 1080i, 4:3 & 16:9
Output Port
HDMI, AV OUT
Supported Formats
MPEG1/MPEG2/MPEG4/H264/VC-1
(.FLV/.RM/.AVI/.MPG/.DAT/.VOB/.MOV/.
MKV/.MJPEG/.TS/.TRP)
Decoder Format
MPEG-1, MPEG-2 (layer 1&2), MP3,
WMA, AAC, LC.
Audio Output
Stereo, Mono, Dual Mono, HDMI.
Supported Formats
WMA/MP3/AAC
Supported Formats
JPG/BMP/PNG
Input
DC 5V
Consumption
Max. 10 W
Rechargeable lithium battery 2.200 mAh.
Battery
Battery life: Up to 3 hours *
* The battery life varies by use and settings.
50
12. WARRANTY
Energy Sistem Soyntec S.A. warrants its products to be free from defects in materials
and workmanship at the time of purchase.
The special 36-months warranty is valid for the European Union. For other countries,
please refer to your specific legislation or your local distributor.
13. WARRANTY PROCEDURE
2.If you cannot find an appropriate solution in the Support section, you may send
us your enquiry or warranty service request by email: [email protected]
3.Alternatively, you may prefer to contact the distributor from which you
purchased the product, presenting the purchase receipt or invoice.
Specifications are subject to change without notice.
© 2011/2012 by Energy Sistem®. All rights reserved.
Trademarks All company, brand and product names are trademarks or registered
trademarks of their respective companies.
51
ENGLISH
1. Visit the Support section at http://support.energysistem.com and select your
product to view the FAQ (Frequently Asked Questions). The solution to your
problem is very likely to have been already published there. You will also be able
to download user manuals, user guides, drivers and updates.
14. DECLARATION OF CONFORMITY
Manufacturer Name: Energy Sistem Soyntec S. A.
Address: Pol. Ind. Finestrat, C/.Calpe, 1 - 03509, Finestrat Alicante (Spain)
Tel: 902 388 388
Fax: 902 119 034
NIF: A53107488
We declare under our own exclusive responsibility that the product:
Energy Sistem® Portable Multimedia TV Energy™ LED TV3170/3190 HDTV
Is in compliance with the essential directives, norms and standards of the
European Union 89/336/EEC (EMC Directive).
Manufacturing country: China
This symbol on the product or the instructions means that your electrical and electronic
equipment should be disposed at the end of life separately from your household waste.
For more information, please contact the local authority or dealer where you purchased
the product.
52
80