1
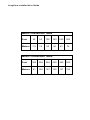
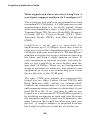
Installer/User Guide
4991 Corporate Drive
Huntsville, Alabama 35805-6201 • USA
256-430-4000 (Fax) 256-430-4030
www.cybex.com
FCC NOTIFICATION
This equipment complies with the requirements in Part 15 of FCC
Rules for a Class A computing device. Operation of this equipment
in a residential area may cause unacceptable interference to radio
and TV reception, requiring the operator to take whatever steps
that are necessary to correct the interference.
CANADIAN NOTIFICATION
This digital apparatus does not exceed the Class A limits for radio
noise emissions from digital apparatus set out in the Radio Interference Regulations of the Canadian Department of Communications.
Le présent appareil numérique n'émet pas de bruits radioélectriques
dépassant les limites applicables aux appareils numériques de la
classe A prescrites dans le Règlement sur le brouillage
radioélectrique édicté par le Ministère des Communications du
Canada.
CAUTION
Before plugging in your remote monitor, verify
that AC line and neutral are not cross-wired
between the system unit and remote monitor.
ALSO, ensure that a protective ground (green)
wire is established with NO potential difference
between both AC sources. Failure to adhere to
these precautionary measures can result in
lethal shock hazards or in severe damage to
your equipment.
© 1999 Cybex Computer Products Corporation. All rights reserved
TRADEMARK NOTICE
IBM, PC/XT, PC/AT, and PS/2 are registered trademarks of International Business
Machines Corporation. Cybex, the Cybex logo, Extender, Companion, Expander,
AutoBoot, LongView, AutoTuning and Commander are trademarks or registered
trademarks of Cybex Computer Products Corporation. Microsoft, IntelliMouse and
Logitech are trademarks of their respective companies.
Table of Contents
1. Product Overview
Overview ............................................................ 1
Application Examples .........................................2
Features and Benefits ........................................3
Limitations/Restrictions ..................................... 5
Application Compatibility ....................................7
2. Installation & Configuration
Installing Your LongView ....................................9
3. Appendices
Appendix
Appendix
Appendix
Appendix
Appendix
Appendix
Appendix
A: Customer/Technical Support .
B: Troubleshooting .......................
C: Technical Specifications .........
D: Agency Approvals ....................
E: Typical Distance ......................
F: Customer Problem Report ......
G: Advanced Questions ...............
15
16
19
20
20
21
23
LongView Installer/User Guide
Metric Conversion Table
Feet
25
50
100
150
200
250
Meters
7.5
15
30
45
61
76
Metric Conversion Table
Feet
300
328
350
400
450
500
Meters
91
100
107
122
137
152
1
Product Overview
Overview
The LongView and LongView Companion
Keyboard/Video/Mouse (KVM) Extender allows
you to extend the distance from your computer to
your VGA monitor, PS/2 keyboard, PS/2 mouse,
stereo speakers, microphone and serial port device.
All of these signals are extended up to 500 feet
(152 meters) using a single inexpensive and
commonly available Category 5 Unshielded
Twisted Pair (UTP) cable - the type used in most
Local Area Networks.
In addition to the extension capability, the
LongView Companion model allows two users
(one local user near the computer and one remote
user up to 500 feet away) to share a single computer.
(Sharing is when two users can view and control
the actions of a single computer.)
LongView and LongView Companion are the first
KVM extenders to include support for serial port,
speakers and microphone using a single Category
5 cable (patents pending), and are by far the simplest
to install. Advanced Cybex technology (patents
pending) provides automatic compensation for
different cable lengths, video resolutions and COM
serial port data rates. There is no software to
install - LongView works with your PC just like
your regular peripherals.
LongView consists of a Transmitter placed near
the computer and a Receiver placed near the user’s
monitor. Versions are available with and without
audio capabilities (speakers and microphone).
1
LongView Installer/User Guide
Application
Examples
Harsh
environments
Many PC users need to use their keyboard, mouse
and monitor in a harsh or crowded environment,
such as manufacturing or construction areas.
LongView lets you keep your peripherals where
you need them and keep your system unit in a
climate-controlled, dust/chemical-free setting.
Control and
security
LongView serves effectively as an anti-theft device
by allowing you to place the system unit in a secure
area, while providing keyboard, mouse, monitor,
audio and serial device (such as a touchscreen)
access to those who need it. Protect your system
unit, software, and sensitive/valuable data from
unauthorized activities or losses.
Space saving
Locate your system unit away from your desk and
work area, freeing up valuable space for other uses.
Shared access
LongView Companion models allow two users to
share the use of a single computer. A local user is
next to the connected computer while a remote user
can be up to 500 feet away.
2
Product Overview
Features
and Benefits
For all practical purposes, LongView works just
like an ordinary extension cord, allowing remote
operation of your keyboard, mouse, monitor, speakers, microphone and a serial device (such as a
touchscreen) up to 152 meters from your computer. LongView consists of a Transmitter and
cable assembly at the computer’s system unit, one
Category 5 UTP extension cable (purchased separately), and a Receiver connected to your peripherals at the remote location. LongView can be powered from either the Transmitter or Receiver
location using a single wall-mount power supply.
Choose the location most convenient for you.
Single Cat 5
cable
A single Category 5 cable with four unshielded
twisted pairs (UTP) is used to extend the
computer peripherals up to 152 meters away
from the computer.
High resolution
video
SVGA resolutions up to 1600x1200 are supported.
See the Appendices for details.
PS/2 keyboard
Standard PS/2 keyboards are supported.
PS/2 or serial
mouse
PS/2 mice, including the Microsoft IntelliMouse,
or serial mice are supported.
Serial port
When using a PS/2 mouse, LongView can also
extend the computer’s COM serial port to the
desktop to be used for devices such as touchscreens,
modems, or serial printers. LongView automatically configures itself for any COM data rate up to
19.2Kbps.
3
LongView Installer/User Guide
Audio
Extend your computer’s speaker output and
microphone input to a remote workstation. Fully
bidirectional (full-duplex), stereo audio is
supported. Versions of LongView without audio
capabilities are also available.
AutoTuning no user
configuration
required
LongView not only provides the most features, it
is also the easiest KVM extender to install. There
are no jumpers to install or switches to set for cable
length or Com port data rate. No software
installation or configuration of any kind is required.
Just connect the cables, plug in the power supply,
and you’re done!
Privacy
Privacy options in the LongView Companion allow
the user to blank the inactive user’s screen when
content sensitive work is in progress.
AutoBoot
feature
Longview Companion includes the AutoBoot feature
which prevents attached computers from locking up
when there is no keyboard or mouse attached during
boot-up. This same feature allows a user to unplug
and reconnect a mouse at the Transmitter or Receiver
ends without having to reboot.
Flexibility
For access to multiple computers, use your
LongView Companion in conjunction with a Cybex
KVM switch. Control and operate all of your data
center’s servers either locally or remotely from the
computer lab down the hall.
4
Product Overview
Limitations/
Restrictions
Mouse support
LongView supports a PS/2 mouse plus a serial device
(such as a touchscreen or printer) or a serial mouse
only. Only PS/2 mice manufactured by IBM,
Microsoft and Logitech have been tested for compatibility with LongView. Other manufacturers’ products generally operate with LongView. If you experience problems, contact Cybex Technical Support
with the manufacturer and model number of the
mouse. LongView does not provide mouse translation from serial mouse to PS/2 mouse or from PS/2
mouse to serial mouse.
External power
supply
LongView is powered by a single wall-mount power
supply which is provided with the unit. To avoid
damage, use only the power supply which you
received with your LongView. For installations with
poor AC ground, a power supply may be used at each
end. Contact your Cybex dealer or Technical Support.
Keyboard
power
LongView provides power to the keyboard which is
connected to the LongView Receiver. LongView’s
power supply is able to supply enough current to
power any normal keyboard. It is possible, however,
that a very unusual keyboard may require more power
than LongView can supply (see the Specifications
chart in the Appendices). If your keyboard needs
more current than LongView provides, contact Cybex
Technical Support. Please note that many keyboards
use much less current than what they specify on their
product labels. For example, some keyboards have
labels calling for 275mA, but in reality require only
about 40mA.
5
LongView Installer/User Guide
Speakers and
microphone
LongView requires speakers with built in amplifiers for proper operation. LongView accommodates standard electret microphones, the type generally used with PCs.
Video support
LongView supports all VGA video modes up to
1600x1200 with the exception of interlaced mode.
If you are running in an Interlaced mode you will
need to change to non-interlaced mode prior to
installation of LongView.
Category 5
cable
For the best video quality, particularly at maximum distances, we recommend using Cybex cable
types C5T or P5T, or Belden cable part numbers
1583A or 1585A with the LongView. This cable
should be terminated to the EIA (TIA) 568 B
standard, commonly used for 10BaseT Ethernet,
(as shown in appendix E)
Local System
Power Supply
Audio
Transmitter
5
(25’ to 5
300’)
Remote System
6
Product Overview
Compatibility
with Cybex The LongView and LongView Companion can be
used in conjunction with most Cybex KVM
KVM
switches. In the illustrations below, some
Switches
possibilities are shown.
In illustration above, the LongView is used to connect a
remote server to a local AutoView unit. A LongView
Companion Receiver at the remote server would allow for the
addition of a second user console that would share access to
all attached computer with the local console.
7
In this example, the LongView is used to connect a remote
AutoView Expansion unit to a local AutoView base unit. In
this application, a LongView Companion would not provide
additional benefits.
For this situation, the LongView is used to extend the distance
that an AutoView user can be from the servers connected to
the AutoView. Again, a LongView Companion would allow
two users to have access to all servers attached to the base
AutoView unit.
8
2
Installing
Your
LongView
Installation & Configuration
Test your LongView before permanently installing
your extension cable into a wall or ceiling. The
following instructions apply to both testing and
installation of the unit.
LongView is available in versions with and without
audio capabilities. The following instructions apply
to all versions. Simply ignore instructions to
connect to the audio connectors if your LongView
does not have audio capability.
TRANSMITTER
LongView
Transmitter
+
REMOTE I/O
24VDC
.5A
INPUT
PATENT PENDING
TRANSMITTER
LongView
Companion
Transmitter
LOCAL
+
24VDC
.5A
REMOTE I/O
SETTINGS
INPUT
1-------------------------- 8
PATENT PENDING
1. Power down your computer.
2. Place the Transmitter near the computer. Connect the Cybex custom cable (marked CUFC)
to the 25 pin INPUT connector on the rear of
the Transmitter.
3. Unplug the peripherals (keyboard, mouse, monitor, speakers, microphone and serial device if
applicable) from your computer.
9
LongView Installer/User Guide
4. Connect the CUFC cable’s 15 pin video connector to the video output connector on your PC.
5. If both users are using PS/2 mice, plug the
CUFC cable’s PS/2 mouse connector, designated by a yellow band or mouse icon, into
your PC’s PS/2 mouse jack.
If both users are connecting serial mice to a
Companion model: Use a standard serial cable
(9 pin male to 9 pin female) to connect the
LongView’s lower (female)
port to your
PC’s COM serial port. Leave the CUFC cable’s
PS/2 mouse connector unattached.
If both users are using serial mice on a standard LongView unit: Connect the CUFC
cable’s 9-pin mouse connector to the serial
COM port of your PC.
6. Plug the remaining 6-pin connector into the
PS/2 Keyboard jack on your PC.
7. On a standard LongView unit, if you use the serial mouse connector on the Transmitter’s CUFC
cable, do not connect anything to the
Transmitter’s
port. If you use the PS/2
mouse connector you may extend the serial Com
port from the PC to the user for other devices.
If you have a Companion model, and did not
connect a serial mouse to LongView’s serial
port, both users may share your computer’s
serial COM port for other devices. To do this,
connect a standard serial cable from the
LongView’s
port to your PC’s COM serial port.
10
Installation & Configuration
8. Using standard 3.5mm stereo patch cords, conconnector on the rear of the Transnect the
mitter to the speaker or line output jack of your
computer and the connector to the microphone
input jack of your PC.
9. For Companion Models: Connect the local
user’s monitor and serial cable to the rear of
the LongView Transmitter and the remaining
peripherals to the front of the LongView
Transmitter. If your computer uses “plug and
play” technology, it will identify the local
monitor only. If you choose not to connect a
local monitor, set the local monitor switch as
shown below.
10. For Companion Models: Set the user options
switches on the rear of the Transmitter according to the following table. For most users,
there will be no changes needed.
Local Monitor Options
Function
Switch 7
Local Monitor Present
Down
No Local monitor
Up
11
LongView Installer/User Guide
Video Privacy Options
Function
Switch 6
Video always on at both users
Down
Video only on at active user
Up
Serial Options
Function
Switch Switch
5
4
Remote User Only
Down
Down
Local User Only
Down
Up
Switched to Active User
Up
Down
Timeout Options (Time until user can take control)
Function
Switch Switch
3
2
0.5 seconds
Down
Down
5 seconds
Down
Up
30 seconds
Up
Down
5 minutes
Up
Up
12
Installation & Configuration
Mouse Sense Options
Function
Switch 1
Mouse movement can activate
a user
Down
Mouse movement cannot
activate a user
Up
11. Plug the circular power plug from the provided
wall-mount power supply into the
jack
on the rear of the Transmitter, then plug the
power supply into a convenient electrical outlet. Verify that the POWER light on the front
of the Transmitter is lit. (You may connect the
LongView wall-mount power supply to the Receiver instead of the Transmitter, if you wish.)
12. Plug a standard Category 5 Unshielded Twisted
Pair cable (up to 500 feet) into the remote I/O
jack on the rear of the Transmitter. Cybex C5T,
Cybex P5T, Belden 1583A or Belden 1585A
cable is strongly recommended to achieve best
performance and maximum distance. If you use
a different Category 5 cable, make sure it is
terminated to the EIA (TIA) 568 B standard,
commonly used for 10BaseT Ethernet. Do NOT
use a crossover cable. Incorrect termination can
damage the LongView. (see appendix E)
13. Route the Category 5 cable to the location
where you intend to place the remote monitor,
keyboard, mouse and speakers.
RECEIVER
LongView
Companion
Receiver
24VDC
.5A
REMOTE I/O
AUDIO
IN
SERIAL
OUT
13
MSE
KBD
VIDEO
LongView Installer/User Guide
14. Place the Receiver near the monitor and connect your monitor, keyboard, mouse, speakers
and microphone to the connectors on the rear
of the Receiver just as you would connect them
to your PC. Make sure you connect your monitor and your speakers’ power supply to appropriate electrical outlets. You must use speakers
with built-in amplifiers for proper operation.
15. If you connected the Transmitter for a serial
mouse, plug your serial mouse into the
connector on the rear of the Receiver. If you
are using a PS/2 mouse and you are extending
your computer’s serial COM port for some
other peripheral, plug this peripheral into the
Receiver’s
connector.
16. Connect the Category 5 cable to the remote
I/O jack on the rear of the Receiver. Verify that
the POWER light on the front of the Receiver
is lit. The Receiver gets its power from the
Transmitter through the Category 5 cable, so
no power supply is required at the Receiver.
(You may choose to connect the LongView
wall-mount power supply to the Receiver
rather than the Transmitter. If so, verify that
the Transmitter’s POWER light is now lit.)
17. For Companion models: The three position
slide switch on the front of the Transmitter is
a privacy switch to allow two users to share
the computer or for either user to be locked
out.
18. Turn on the computer and your monitor and
you are ready to go!
14
3
Appendix A:
Customer/
Technical
Support
Appendices
Our Customer Support staff is ready to assist you
if you have any installation or hardware problems
with your Cybex product. If a problem should
develop, please follow the steps listed below for
the fastest possible service:
1. Check the Troubleshooting Section of this
manual to see if the problem can be resolved by
following the procedures outlined.
2. If you are unable to resolve the problem,
recreate the problem when possible. Fill out
the Customer Problem Report in Appendix A.
3. Call Cybex Customer Support. Have your
Customer Problem Report with you when you
call, or fax it to Technical Support. To expedite
the assistance, have a copy of this manual with
you when you call, along with a copy of the
invoice giving the date purchased, serial
numbers and other identifying data.
15
LongView Installer/User Guide
Appendix B:
TroubleSYMPTOM
shooting
ACTION
No
Keyboard
or Video
Check POWER indicators on the
Transmitter and Receiver. They should be
lit. If not, check the wall mount power
supply and the extension cable going from
the Transmitter to the Receiver.
No Video
Ensure that the Transmitter's video input
cable is plugged into the computer.
Ensure that the monitor's video cable is
plugged into the Receiver, that the monitor
is plugged into an AC outlet and that the
power is turned on.
Ensure that both ends of the extension
cable between the Transmitter and
Receiver are firmly seated.
Have qualified personnel check AC power
polarity and grounding at both the
computer and monitor.
No
Keyboard
Function
Ensure that the keyboard cables are
plugged into the proper jacks and then
reboot the computer.
Re-test the keyboard by plugging it directly
into the computer. If the keyboard still
does not operate, the motherboard fuse
has probably blown and must be replaced
by qualified personnel. Verify this by trying
a known good keyboard.
Compare the power requirements of your
keyboard to the Specifications chart in this
User Guide. If LongView cannot provide
enough power for your keyboard, contact
Cybex Technical Support.
16
Appendices
SYMPTOM
ACTION
Keyboard
Erratic
See if the keyboard L.E.D.'s flash when the
computer is turned on. Keyboard behavior
should be exactly the same as when
directly connected to the computer.
Compare the power requirements of your
keyboard to the Specifications chart in this
User Guide. If LongView cannot provide
enough power for your keyboard, contact
Cybex Technical Support.
No Mouse
Ensure that the mouse cable is plugged
into the proper jacks and reboot the
computer. Re-test the mouse by plugging it
directly into the computer and rebooting
the computer. If the mouse does not
operate when plugged directly into the
computer, replace the mouse.
Poor Video Verify that the length of Category 5 cable
between the Transmitter and Receiver is
Quality
within the limits shown in the Specifications Table for the resolution and refresh
rate you are using. Make sure the video
connectors at both ends are firmly seated.
Make sure that the Category 5 connectors
are properly inserted. Make sure that the
modular plugs on the Category 5 cable
were properly crimped onto the cable.
Have qualified personnel check AC power
polarity and grounding at both the computer and monitor.
Noise
Spikes in
Audio
Verify that the length of Category 5 cable
between the Transmitter and Receiver is
within the limits shown in the Specifications Table. Speakers without amplifiers may result in low volume and/or
noisy audio.
17
LongView Installer/User Guide
SYMPTOM
Low or No
Audio from
Speakers
ACTION
Verify that your speakers have built-in
amplifiers, that their power supply is
plugged in, the power switch is on, and
the volume control is turned up. Speakers
without amplifiers may result in low
volume and/or noisy audio. Check the
volume control in your PC’s software.
Check all audio cables. If your speakers
have a power switch and volume control,
they have amplifiers. Test your speakers
by plugging them directly into the
computer’s audio output jack.
Microphone LongView is designed to accommodate
standard electret microphones, the type
Does Not
generally used with PCs. Dynamic
Work
microphones will work, but will result in
lower volumes. Verify the volume setting
of your software on your PC. Try connecting LongView’s audio output jack to your
computer’s Auxiliary (AUX) or line in audio
input rather than the microphone input.
Test your microphone by plugging it
directly into your PC’s microphone input.
18
Appendices
Appendix
The Transmitter is located near the computer, the
C:
Receiver is located near the user.
Technical
Specifications Mechanical
Weight
1 lb. (0.45kg)
Transmitter or
Receiver
Environmental
/Power
Supported
Hardware
Audio
Height
1.9 in. (48cm)
Width
8.1 in. (206cm)
Depth
4.8 in. (122cm)
Power Supply
24Vdc @ 500mA from 115Vac
or 230Vac adapter
Operating
Temperature
0ºC to +40ºC
Storage
Temperature
-20ºC to +50ºC
Computers
Computers using 100% IBM
PS/2 compatible peripherals.
Video Modes
non-interlaced VGA, SVGA
640x480 to 1600x1200
Peripherals
PS/2 or Serial mouse, PS/2
Keyboard (150mA max)
VGA, SVGA, XGA 15 pin high
density "D" connector
Serial Port
(OR serial
mouse)
EIA-232 async up to 19.2Kbps,
9-pin “ D” connector (female
to PC, male to peripheral) TD,
RD, RTS, CTS, DTR , DSR,
Ground
to Speakers
3.5mm stereo jack for powered
speakers, 3Vpp max, 200 ohms
output impedance, <0.01% THD
at 1KHz
from
Microphone
3.5mm stereo/mono jack, 5.6K
ohm pullup for two powered
electret microphones in a single
stereo jack, dynamic microphone
supported with reduced volume
and quality.
Agency
Approvals
FCC class A, UL, C-UL, CE,
VCCI Class A
19
LongView Installer/User Guide
Appendix D FCC class A Label, UL, C-UL, CE Mark, VCCI
Agency
Class A
Approvals
Appendix E Typical distances using Cybex C5T-nnn, Cybex
P5T-nnn, Belden 1583A, or Belden 1585A Datatwist
Typical
5 Category 5 unshielded twisted pair cable.
Distance
640 x
480
800 x
600
1024 x
768
1280 x
1024
1600 x
1200
60 HZ
refresh
500ft
500ft
500ft
400ft
300ft
(152.4 m) (152.4 m) (152.4 m) (121.9 m) (91.4m)
70 HZ
refresh
500ft
500ft
500ft
400ft
250ft
(152.4 m) (152.4 m) (152.4 m) (121.9 m) (76.2m)
80 HZ
refresh
500ft
500ft
500ft
400ft
200ft
(152.4 m) (152.4 m) (152.4 m) (121.9 m) (61 m)
PR2
Pair 3
PR1 PR4
+-+-+-+T R T R T RT R
1 2 3 4 5 6 7 8
20
Standard 4-Pair
Wiring Color Codes
Pair 1 T White/Blue
R Blue/White
Pair 2 T White/Orange
R Orange/White
Pair 3 T White/Green
R Green/White
Pair 4 T White/Brown
R Brown/White
Appendices
Appendix F
Customer
Problem
Report
Photocopy the next 2 pages before you complete
them. You may fax the completed copy directly to
Cybex Technical Support. Filling out the Problem
Report accurately and completely will allow us to
understand your problem in detail.
Company Name: ___________________________
Contact Name: ____________________________
Phone Number: ____________________________
Fax Number: ______________________________
Attached Peripherals
LongView MFG P/N & S# on the bottom of the
Transmitter: ______________________________
LongView MFG P/N & S# on the bottom of the
Receiver: _________________________________
Extension cable Length in Ft. (between Transmitter
& Receiver): ______________________________
Name/Model of Monitor: ___________________
Name/Model of Keyboard: __________________
Name/Model of Mouse: ____________________
21
LongView Installer/User Guide
Computer Information
Manufacturer: __________ Model: ___________
RAM: _________________ Clock (MHz): _____
BIOS Manufacturer: _______________________
BIOS Revision: ___________________________
Operating System: _________________________
Graphics Card Name: ______________________
Graphics Card Model: ______________________
Operating Video Resolution: ________________
Do you use a KVM switch with the LongView?
Problem Description: _________________________
______________________________________________________
______________________________________________________
______________________________________________________
______________________________________________________
______________________________________________________
______________________________________________________
Please continue on a blank sheet if more space is
required.
Problem Resolution: __________________________
______________________________________________________
______________________________________________________
22
Appendices
Appendix G
Is there anything I should do to optimize the
Advanced
video quality for my particular cable?
Questions
LongView automatically tunes its circuits to
optimize video performance for your specific
cable length. However, for optimum performance
at the maximum distances, particularly for high
video resolutions, Cybex cable or Belden 1583A
or 1585A Datatwist is recommended.
Category 5 cables have different twists-per-inch
rates for the four pairs of wires within a cable to
reduce crosstalk. These rates vary by
manufacturer. In cases involving maximum length
cables and high video resolutions some
manufacturers’ cable may cause the red, green,
and blue colors to be “misaligned” such that a
vertical white line shows up as a vertical line of
two or three colors in parallel. In this case, you
may be able to improve the video by making your
category 5 cable more closely match Cybex or
Belden cable by using a special adapter available
from Cybex.
Note: Before modifying your cable, connect your
monitor directly to your computer to verify that
any misalignment is not caused by the computer
or the monitor. If the problem persists, contact
the manufacturer of the monitor or the video card
for assistance in improving your video quality.
If the problem was solved when the monitor was
directly connected to the computer, you may
have a power problem. See Appendix B for
information on troubleshooting power problems.
If you wish to proceed to optimize your cable,
contact Cybex Customer Support, describe your
problem, and inquire about a special adapter.
23
LongView Installer/User Guide
What signals and data rates does LongView’s
serial port support and how do I configure it?
The serial port on LongView is intended to extend
a standard PC COM port. A COM port uses serial
asynchronous data (i.e. no clock signal) along
with some handshake lines. LongView provides
Transmit Data (TD), Receive Data (RD), Requestto-Send (RTS), Clear-to-Send (CTS), Data
Terminal Ready (DTR), and Data Set Ready
(DSR).
LongView’s serial port is specified for
applications up to 19.2Kbps, but it may work at
rates up to twice that, depending upon your PC’s
COM port and your serial device. TD and RD are
sampled at a high rate at one end and recreated at
the other end with a slight amount of jitter. If
your equipment is tolerant of jitter, you may be
able to use LongView at rates higher than the
specified 19.2Kbps. There are no configuration
straps or switches for data rate. Just connect your
equipment as if you were connecting your serial
device directly to the COM port.
The only COM port signals not supported by
LongView are Data Carrier Detect (DCD) and
Ring Indicator (RI), which are seldom used.
Consult the manufacturer of your serial device
and communication software to determine if you
need DCD or RI. If so, you may be able to use
LongView’s extension of CTS or DSR in its place
by building an adaptor at each end (one between
the computer and the LongView Transmitter, the
other between the LongView Receiver and your
device). A similar adaptor is required between
the LongView Receiver and the serial device.
24
Appendices
An example of using LongView’s DSR to extend
RI follows:
COM Port
your adaptor
LongView
Transmitter
1 DCD
1 ----
no connect
2 RD
2 --------- 2
2
3 TD
3 --------- 3
3
4 DTR
4 --------- 4
4
5 GROUND
5 --------- 5
5
6 DSR
6 ----
no connect
7 RTS
7 -------- 7
7
8 CTS
8 --------- 8
8
9 RI
9 --------- 6
6
25
LongView Installer/User Guide
In some applications, DSR (at the computer) may need to be
active for your application’s software to work, but end-to-end
DSR signaling may not be necessary. For these applications
you can still extend DCD or RI as shown below and tie DSR
to DTR in your adaptor at the computer. This would be done
as follows:
Your Adaptor
COM Port
4
6
4
LongView
26
LIMITED WARRANTY
Cybex Computer Products Corporation warrants to the original retail
purchaser that this product is and will be free from defects in materials
and workmanship for a period of 12 months from the date of purchase.
Additionally, all Cybex products carry an unconditional thirty-day
satisfaction guarantee. If, for any reason, you are dissatisfied with the
performance of this product, you may return it to the point of purchase
for a refund of the purchase price (excluding shipping charges). This
guarantee does not apply to special order products, and may not be
available through all resellers. During the warranty period, purchaser
must promptly call Cybex for a RETURN MATERIALS
AUTHORIZATION (RMA) number. Make sure that the RMA number
appears on the packing slip, proof of purchase, AND ON THE OUTSIDE
OF EACH SHIPPING CARTON. Unauthorized returns or collect
shipments will be refused.
Ship prepaid to:
Cybex Computer Products Corporation
4991 Corporate Drive
Huntsville, AL., 35805-6201 U.S.A.
Telephone: (256) 430-4000
The warranty is void under the following conditions:
1. If defect or malfunction was caused by abuse, mishandling,
unauthorized repair, or use other than intended.
2. If unauthorized modifications were made to product.
3. If unreported damages occurred in any shipment of the product.
4. If damages were due to or caused by equipment or software not
provided by Cybex Computer Products Corporation.
EXCEPT AS SPECIFICALLY PROVIDED ABOVE, CYBEX COMPUTER
PRODUCTS CORPORATION MAKES NO WARRANTIES EITHER
EXPRESS OR IMPLIED AS TO ANY MATTER WHATSOEVER,
INCLUDING, WITHOUT LIMITATION, THE CONDITION OF THE
PRODUCT, ITS MERCHANTABILITY, OR ITS FITNESS FOR ANY
PARTICULAR PURPOSE. EXCEPT AS EXPRESSLY PROVIDED
ABOVE, CYBEX COMPUTER PRODUCTS CORPORATION SHALL
NOT BE LIABLE FOR LOSS OF PROFIT, LOSS OF BUSINESS, SPECIAL
OR CONSEQUENTIAL DAMAGES, OR OTHER FINANCIAL LOSS
WHICH MAY BE CAUSED BY, DIRECTLY OR INDIRECTLY, THE
INADEQUACY OF THE PRODUCT FOR ANY PURPOSE OR USE
THEREOF OR BY ANY DEFECT OR DEFICIENCY THEREIN EVEN IF
CYBEX COMPUTER PRODUCTS CORPORATION OR AN
AUTHORIZED CYBEX DEALER HAS BEEN ADVISED OF THE
POSSIBILITY OF SUCH DAMAGES OR LOSSES.
Cybex Computer Products Corporation
4991 Corporate Drive
Huntsville, Alabama 35805-6201 • USA
Tel: 800 932 9239
Fax: 256 430 4031
E-Mail: [email protected]
Cybex Computer Products International Ltd.
Cybex Germany
Cybex House
Dachauerstrasse 44a
Shannon Free Zone
80335 Munchen
Shannon, Co. Clare, Ireland
Germany
Tel: 00353 61 471 877
Tel:. 0049 89 599 0830
Fax: 00353 61 471 871
Fax: 0049 89 599 08350
E-mail: [email protected]
E-mail: [email protected]
Cybex Asia Pacific
Singapore Representative Office
19-B Bukit Pasoh Road
Singapore 089833
Tel: 0065 223 9198
Fax: 0065 223 9155
E-mail: [email protected]
Cybex Canada
20 Mural Street, Unit#5
Richmond Hill
Ontario, L4B 1K3
Tel: 1 877 992 9239
Fax: 1 877 524 2985
E-mail: [email protected]
590-085-001 Rev. A