1
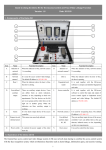
Access Control in Surveillance Station 7.0 With Axis Network Door Controller A1001 Synology Inc. Synology_ACISS_20150305 Table of Contents Chapter 1: Introduction ............................................................................................... 3 1.1 What Is Access Control? ............................................................................................................................................... 3 1.2 Why Does Axis A1001 Work Better with Synology Surveillance Station? ............................................................. 4 Chapter 2: Configure Axis A1001 before Installation .............................................. 5 Chapter 3: Install Axis A1001 in Synology Surveillance Station 7.0 ................... 13 3.1 Access Controllers ....................................................................................................................................................... 15 3.2 Cardholders ................................................................................................................................................................... 16 3.3 Log Center ..................................................................................................................................................................... 18 3.4 Advanced ....................................................................................................................................................................... 19 Chapter 4: Use Synology Door Monitor with Axis A1001 ..................................... 20 4.1 Door Preview................................................................................................................................................................. 20 4.2 Desktop Shortcuts ........................................................................................................................................................ 21 4.3 Door Viewer on Live View ........................................................................................................................................... 21 4.4 Door Viewer Operations .............................................................................................................................................. 22 4.5 Door Units on E-map ................................................................................................................................................... 23 Chapter 5: More Applications ................................................................................... 24 5.1 Action Rule .................................................................................................................................................................... 24 5.2 Notification ..................................................................................................................................................................... 25 Chapter 6: Axis A1001 Note ...................................................................................... 26 2 Chapter Chapter 1: Introduction 1.1 What Is Access Control? In the era of networking exploration, most of the electronic devices are being connected to the Internet so that people are capable of controlling all the devices remotely. Network camera is one of the examples when it comes to connecting things to the Internet. With the network connection as replacement of the coaxial cable using analog signal, the installation of surveillance camera becomes way easier than before. Recently, manufacturers are trying to connect an independent access controller to the Internet so that they can communicate with the controller via the Internet. Access control has played an essential role in security deployment. However, it has always been an independent device from a security system. All the access management data would be recorded into another server for future revision. It contains the operation of access control at the reception, and whether a person has the privilege to be access granted. A set of access control system includes a database server, a card reader, door locks, and possibly a lock monitor and a REX (Requestto-exit) button. All the access privilege settings will be stored in the server and it controls whether a certain card has the privilege to open the door. Of course, the receptionist or a security guard can open the door, too. From time to time, network / IT based companies are developing devices such as Axis A1001, which is known as the network door controller. It contains multiple analog I/O ports and with one Ethernet connection to the local network. Therefore, administrators can easily operate the device via network interface, pretty much like how we did to the network camera. In Surveillance Station 7, Synology NAS is taken as an access control server communicating with Axis A1001, so that all the access management operations can be conducted via the Surveillance Station interface. 3 1.2 Why Does Axis A1001 Work Better with Synology Surveillance Station? The rudiment of integrating Axis A1001 into Surveillance Station is the combination of access management operations and the existing video source saved in the NAS. Surveillance Station retrieves the access log from Axis A1001 and pairs them with related video sources so that administrators can easily review the access data with a related video source, consolidating and maximizing the value of stored access logs. Below are some key values of using Axis A1001 with Synology Surveillance Station. Easy to deploy and install with UPnP search in Surveillance Station Having one camera paired with one door to have a clear view when monitoring the door Attaching photos to cardholders so that administrators can check cardholder frauds Instant playback when clicking on the access log Aligning with the design of Action Rule to have a customized behavior corresponding to events detected by Axis A1001 Supporting notifications from Surveillance Station with access control events More details will be introduced in the following chapters. 4 Chapter Chapter 2: Configure Axis A1001 before Installation Axis Door Controller A1001 is a network controller with multiple I/O ports embedded that connects analog devices such as magnetic door lock, lock monitors, and card readers to the Internet. An Axis A1001 is able to connect up to two sets of doors, including door lock, lock monitor, card reader, REX button, and some other I/O devices. Before installing the Axis A1001 with Synology Surveillance Station, a few settings are required to be configured on its web user interface. Use Axis IP Utility to discover Axis A1001 in your local network. Log in to the web interface of Axis A1001. The default username/password is root/pass. 5 In the Overview page, basic information such as IP address and firmware version are stated here. However, the statements highlighted in red inform you of the hardware settings in need of configuration. Click on Hardware Configuration for further configurations. In the Hardware Configuration page, you can either start new hardware configuration or import a hardware configuration file. To create a new hardware configuration, click Start new hardware configuration. 6 Assuming that there is only one door that needs to be configured, enter the name and select the number of doors that need to be configured here. In the step of Configuring locks connected to this controller, there will be a few settings that need to be configured. For most general settings, only the settings below need to be checked. Access time: for how long (seconds) the door will be unlocked after the access being granted. Open too long time: for how long (seconds) the door will be alarmed as open too long. Pre-alarm time: for how long (seconds) before the actual alarm is occurred. In Lock 1, if Fail-secure is chosen, the door will remain locked when the Axis A1001 is offline. On the contrary, Fail-safe will keep the door open when Axis A1001 is offline. If a lock monitor is installed, please tick the Lock monitor checkbox. Normally Open circuit will be set as locked. 7 When it comes to the reader configurations, it depends on the devices that would be used at the entrance and exit. For example, if a company is using a card reader for entrance and a REX button to exit, just select Entrance reader and Exit REX. After this configuration, you are good to finish the setup wizard. After clicking Finish, it will take a few seconds to proceed the configurations. When the hardware configuration is complete, hardware pin chart can then be checked for the actual analog devices connection. 8 The Hardware Pin Chart is a reference for the actual connections of all the analog devices such as card readers, door lock, lock monitor, and some other I/O devices. In this Pin Chart, the device wires are clearly marked. Connect all the devices to the Axis A1001 correctly then the door controller is perfectly set. After the hardware configuration, another essential setting would be the cardholder privileges. In the Access Management, there are three different sections that need to be checked. Users | Doors: this section is for adding and editing the users and doors. Access Schedules: this section is for customizing schedules for various scenario. Groups: this section is for identifying cardholders from groups with different privileges. 9 To start over the configuration, add a user first. Enter the basic information for this user. If needed, valid duration can be configured here. If this is a permanent user, leave them in blank. If you have a card reader connected to the Axis A1001, Axis A1001 can retrieve the last card number and row read on the card reader. Just put the card in front of the card reader until you hear a beep. Select the card reader, and then click Retrieve. After the user configuration, the door needs to be configured, too. There are two identification types that need to be checked before further configuration – entering and exiting. To configure the identification type, click Add identification type. For example, a company requires the use of a card for access check at the entrance, and a REX button to exit. Thus, for the identification type at the entrance, card number or card row is required. Multiple identification types are allowed here. 10 For certain identification types, scheduling is required. In the controller system there are three default schedules which are Always, Office Hours, and Weekends. By dragging and dropping the preferred schedule to a certain identification type, the specified schedule will be applied to the selected type. It is the same for setting up the identification type for exiting. In this example, REX button is required to exit. Once the configuration of users and doors are finished, a group would be the last configuration. After adding a new group by clicking Add new group and naming it, group members (users), valid doors, and duration are required to be set up. By dragging and dropping users, doors, and schedules into the created group, settings will be applied instantly. 11 At least a user, a door, and a schedule are required to be applied to a group. From the configured group above, a statement can be read. Group member Max Wu is always allowed to access the door with his card to enter and REX button to exit. Once you finish all the configurations, the hardware and cardholder configurations are completed as well. 12 Chapter Install Axis A1001 in Synology Surveillance Station 7.0 Chapter 3: Axis Door Controller A1001 is an add-on which is not pre-enabled in Surveillance Station. Therefore, go to Addons to enable Axis Door Controller for further configuration. Open Axis Door Controller and click Add. The wizard will go through all the settings. Enter the basic information of Axis A1001 then click Next. Use the UPnP search to find the Axis A1001 connected to the local area network. 13 Axis A1001 needs to be synchronized with an NTP server to make sure the time is exactly correct. Also, each door configured in Surveillance Station can be further paired with a network camera. In general, the paired camera will be monitoring the door so that any events happening at the door can be clearly recorded. To have the paired camera shown in the list of video sources, make sure the camera is added to Surveillance Station before going through the door controller settings. Select a preferred camera to pair with the door, and then click Finish. The paired camera does not need to be an Axis camera. With Surveillance Station, all supported cameras can be paired with the door controller. To change the paired camera, click Edit to open the window again then paired camera can be configured here. After the configuration wizard, a door unit is added to Axis Door Controller. There are four different tabs in the application, which are Access Controllers, Cardholders, Log Centre, and Advanced. Access Controllers: to check the overview of the door controller and some more operations to the controllers. 14 Cardholders: to edit the cardholders which have been created in Axis A1001. Log Center: to record event logs that are related to the door controller. Advanced: to configure more advanced functions such as event logs and alarms. 3.1 Access Controllers All the door controllers added to Surveillance Station will be shown in this tab. Besides the controller itself and the paired camera, controllers which are peer connected with each other will be shown here. Peer connection is the function to connect multiple Axis A1001 as peers so that they will share the cardholder database with each other. Axis A1001 supports up to 66 peer connections so that installers need not configure the cardholders repeatedly. Since Axis A1001 is a separate device from Synology NAS, there might be a time difference when synchronizing with each other. If there is any change made in the Axis A1001, a manual retrieval is sometimes required by clicking the Retrieve button on the tool bar. Surveillance Station will check with Axis A1001 every 24 hours to see if there are any updates available. If there are any updates that need to be retrieved, notification number will be shown on the desktop icon. 15 To avoid potential risks, privilege settings for access control is also configurable here. For those users in Surveillance Station, it is not necessary to grant them the privilege to control the door. Therefore, administrators can configure the authority of door controller by clicking Privilege on the tool bar. Manual Lock is a unique and serious privilege because it allows certain users to manually lock / unlock the door. That is why this option is configured separately. 3.2 Cardholders After retrieving the database back to Surveillance Station, cardholders information can be edited in Surveillance Station. Retrieved cardholders will be listed in the Cardholders tab. In Surveillance Station, cardholders can be edited with different photos. To add a photo to certain cardholder, select the cardholder and click Edit. If administrators wish to block / unblock certain users, click Block for further operations. 16 Administrators can of course delete a certain user; however, that specific user needs to be registered again in Axis A1001. Block function offers the flexibility to remain this user in the system and all the access logs will still remain in the system. Validation period for cardholders can also be edited in Surveillance Station. Besides adding cardholders photos to Surveillance Station, administrators can also configure the validation period for a certain cardholder. Simply click Edit in the toolbar and the edit window will show up for further configuration. Surveillance Station offers the retrieval of card numbers and rows from the last read on the card reader. After the reader reads the card provided and click Retrieve, the card number and row will be filled into its column. 17 3.3 Log Center Log Center integrates all the event logs including the manual lock / unlock, cardholder block and all relevant events generated by Axis A1001. This tab provides different categories such as Date, Status, and Controllers so that administrators can easily find out the events that they are looking for. If an event is related to a door which is paired with a certain camera, click on the log icon to playback the recordings from the paired camera. A filter is also available for advanced search with Source, Door, Status, Time interval, and Keywords. The number of logs stored on Axis A1001 can be up to 30,000, and Surveillance Station can store 60,000 logs for administrators. Logs can be cleared and downloaded by clicking the buttons on the toolbar. 18 3.4 Advanced In the Advanced tab, events are separated into two different columns, which are Log Event and Log Alarm. Some of the events are locked to be Log Event because these events are greatly important in Surveillance Station, so they need to be logged. However, administrators can choose to enable or disable a certain event to be an event log. If administrators wish to take a certain event as a log alarm and mark them in the Log Center, check the Log Alarm for a certain event. Those events that are checked with Log Alarm will be marked as alarms when they occurred. 19 Chapter Chapter 4: Use Synology Door Monitor with Axis A1001 There are two different ways to implement the door monitor in Surveillance Station with Axis A1001. To have a quick preview of the door monitor, click on the door icon right after the configuration of Axis Door Controllers. 4.1 Door Preview In the door previewer, administrators can check the access logs and their correspondent video sources. The access log tray can be expanded with more detailed information. 20 4.2 Desktop Shortcuts Thanks to the desktop design in Surveillance Station 7, door units can be created as shortcuts on the desktop for easier management. To create the shortcuts on the desktop, either right click on the door unit and select Create desktop shortcut, or drag and drop the items onto the desktop directly. To open up the door preview, simply double click the shortcuts on the desktop. 4.3 Door Viewer on Live View Every time a door is created, a 1-channel layout will be created automatically. This layout contains only the door unit so that administrators can easily change the layout to check the access status and its paired video source. 21 However, if administrators wish to check the door status within Live View, a door unit can be dragged and dropped into a separated Live View layout. Note that if a door unit is put into a Live View layout, it will occupy at least one quarter of the whole layout and Surveillance Station will merge the cells automatically. This is to ensure the readability of the door status so that the size of the embedded door viewer will not be too small to read. 4.4 Door Viewer Operations When checking on the door viewer, there are various operations that can be controlled by the administrators. Lock: to permanently lock the door. Unlock: to permanently unlock the door. Access: to grant a temporary and anonymous access within the pre-configured access time. Log: to open up another window for viewing full event logs. There will be a status indicator on the upper right corner, with five different statuses. Administrators can check on the door statuses with different colors of indicators. If more details are needed, simply hover the indicator, and then a tooltip will show up. 22 4.5 Door Units on E-map Door units can be seen on the e-map as well. Surveillance Station offers three different statuses so that administrators can check on the statuses directly on the e-map. To have a direct preview of a certain door, simply click on the door icon on the e-map then the door preview will pop-out for further checking. 23 Chapter Chapter 5: More Applications Axis Door Controller in Surveillance Station can be implemented with other useful applications such as Action Rule and Notifications. 5.1 Action Rule Action Rule is a dedicated application for configuring an action corresponding to a triggered or scheduled event. By setting up an Action Rule properly, Surveillance Station will execute certain actions automatically. In Action Rule, door alarm trigger can be treated as an event. With this event triggered, Surveillance Station may carry out a certain action in response to that event. Take the action rule below as an example. Event: The alarm of door [Door] on server [Local host] was triggered. Action: Instruct camera [Camera_Door] on server [Local host] to move to preset position [door1] hold for [1] [minute(s)], and move to return position [Home]. This means whenever a door alarm is detected, either it is an open too long alarm or forced open alarm, the paired PTZ camera will go to the defined preset position to correspond to the event. 24 5.2 Notification Surveillance Station supports push notifications via SMS, E-mail, and Synology mobile application DS cam. Notification supports different messages from the Access Control, and the messages sent out to the administrators can be customized. Once an event is detected, Surveillance Station will notify the administrator with the selected methods. 25 Chapter Chapter 6: Axis A1001 Note Credentials within Axis A1001 can be up to 15,000 of third-party access management software depending on server capacity. Axis A1001 can also be peer connected for sharing the cardholder database when there are multiple controllers required. The maximum number of peer connections is 66. For more updated information, please visit www.axis.com. 26