1
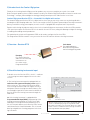
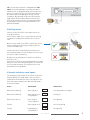
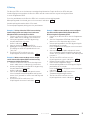
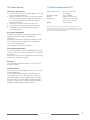
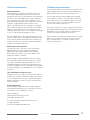
Comfort Digisystem User manual
SecureStream
Technology
Comfort Digisystem
Receiver
DT10
North America
/ English
User manual
Table of contents Page
1) Regulatory information
3
2) Introduction Comfort Digisystem
4
3) Overview - Receiver DT10
4
4) Check the hearing instruments input 4
5) Getting started
5
6) Acoustic indication, sound signals
5
7) Modes in the Receiver DT10
6
8) Output for user with different input types and
programs in the hearing instrument
6
9) Pairing
8
10) Trouble shooting
9
11) Technical data
12) Service and warranty
9
10
13) Radio range and channels
10
14) Important safety instructions
11
Receiver DT10
2
1) Regulatory information
Comfort Digisystem products are not to be used as a substitute to the hearing aids and should be used in accordance
with the specifications and recommendations provided by
your physician.
WARNING!
Changes or modifications not expressly approved by the party
responsible for compliance could void the user’s authority to
operate the equipment.
NOTE! Max output > 130 dB SPL (Sound Pressure Level).
Could be very dangerous for your hearing.
It is recommended that customers keep the volume control
in the lowest position, when turning on the device. If not, the
sound could potentially cause harm to the customers’ hearing.
NOTE:
This equipment has been tested and found to comply with the
limits for a Class B digital device, pursuant to Part 15 of the
FCC Rules. These limits are designed to provide reasonable
protection against harmful interference in a residential installation. This equipment generates, uses and can radiate radio
frequency energy and, if not installed and used in accordance
with the instructions, may cause harmful interference to radio
communications. However, there is no guarantee that interference will not occur in a particular installation. If this equipment does cause harmful interference to radio or television
reception, which can be determined by turning the equipment
off and on, the user is encouraged to try to correct the interference by one or more of the following measures:
-- Reorient or relocate the receiving antenna.
-- Increase the separation between the equipment and
receiver.
-- Connect the equipment into an outlet on a circuit
different from that to which the receiver is connected.
-- Consult the dealer or an experienced radio/TV technician
for help.
Comfort Audio is not liable for damages arising from usage
of the equipment not in accordance with the instructions provided by Comfort Audio. Comfort Audio shall not be liable for
performance problems and/or damages caused in any way
by customer’s modification of any part of the equipment.
Federal Communications Commission Statement, This device
complies with part 15 of the FCC Rules. Operation is subject to
the following two conditions:
(1) this device may not cause harmful interference, and
(2) this device must accept any interference received, including
interference that may cause undesired operation.
Programmer DT05 - FCC ID: UOJ-DG04T
Industry Canada,
This device complies with Industry Canada licence-exempt
RSS standard(s). Operation is subject to the following two
conditions:
(1) this device may not cause interference, and
(2) this device must accept any interference, including interference that may cause undesired operation of the device.
Le présent appareil est conforme aux CNR d’Industrie
Canada applicables aux appareils radio exempts de licence.
L’exploitation est autorisée aux deux conditions suivantes :
(1) l’appareil ne doit pas produire de brouillage, et
(2) l’utilisateur de l’appareil doit accepter tout brouillage
radioélectrique subi, même si le brouillage est susceptible
d’en compromettre le fonctionnement.
Model: DT05
IC: 6769A-DG04T
Model: DT10
IC: 6769-DG02R
DANGER!
DO NOT USE the COMFORT DIGISYSTEM products if
you have a PACEMAKER or other implanted device.
The Comfort Digisystem products could cause the
pacemaker or other implanted device to malfunction
and cause serious injury or death.
Receiver DT10
3
2) Introduction to the Comfort Digisystem
Thank you for choosing Comfort Digisystem. Our products are easy to use and give you crystal clear sound.
Before using the product, please read this manual carefully. The Comfort Digisystem products feature SecureStream
Technology – a unique, patented digital technology allowing eavesdrop-secure radio transfer in real time.
Comfort Digisystem Receiver DT10 — the world’s first digital mini receiver
The Comfort Digisystem Receiver DT10 is a digital mini receiver that you can easily connect to any hearing aid with a
standard three-pin Europlug audio shoe. The receiver weighs 0,05 oz (1,5 g) and is powered by the hearing instrument’s
battery. To minimize energy consumption, the mini receiver is equipped with an optional auto-sleep feature.
Together with existing microphones and receivers in the Comfort Digisystem assortment, the Receiver DT10 provides
clear speech perception. The Receiver DT10 is the world’s first mini receiver, taking full advantage of digital technology
in enabling outstanding sound reproduction.
The optional professional tool Programmer DT05 can be used to configure the Receiver DT10.
The Programmer DT05 also makes it easy to test the Receiver DT10 with or without a hearing instrument.
Push-button
For toggling between
different listening modes
and activating pairing mode.
3) Overview - Receiver DT10
Europlug
For connecting to the
audio shoe on a hearing
instrument or to
the socket on the
Programmer DT05.
4) Check the hearing instruments input
To be able to use the Receiver DT10, check if — and how
— the hearing instrument supports the use of a mini
receiver:
1. The hearing instrument must be equipped with an
audio shoe with a powered Europlug socket made for
mini receiver use. This connects the Receiver DT10
to the hearing instrument and also supplies the DT10
with power from the hearing instrument’s battery. The
received audio signal will then be transferred from the
Receiver DT10 to the hearing instrument through the
audio shoe.
2a. If the hearing instrument is equipped with a
Programmable DAI input (DPAI), programming of the
hearing instrument might be necessary (check with
audiologist or hearing instrument manufacturer). In
this case the push-button on the Receiver DT10 cannot
switch between the R and R+M modes. This is instead
done by using different listening programs in the hearing instrument.
Europlug
TIP! The volume of the Receiver DT10’s R and R+M mode
can be set individually by using the Programmer DT05.
This makes it possible to use the push-button as a simple
volume control in combination with a hearing instrument
with Programmable DAI input (DPAI).
Receiver DT10
4
2b. If the hearing instrument is equipped with a DAI
input (check with audiologist or hearing instrument
manufacturer), no programming of the hearing instrument is necessary. The Receiver DT10 works with the
Microphone (M) listening program on your hearing
instrument. By setting up the Receiver DT10 with the
Programmer DT05, the push-button on the Receiver
DT10 can be used to select the listening mode: Radio
only (R mode) or Radio + Hearing instrument microphone (R+M mode).
Europlug
5) Getting started
Connect the Receiver DT10 to the audio shoe on the
hearing instrument.
Check that the audio shoe is connected to the hearing
instrument according to the manufacturer’s instructions.
Make sure that the Receiver DT10 is fitted in the correct
manner and push the Euro-plug completely into the
socket of the audio shoe.
The Receiver DT10 is powered by the hearing instrument’s battery. Make sure that the battery is fresh. If you
are unsure, replace the battery.
Briefly press the push-button on the Receiver DT10 to
turn it on or off.
(If the Receiver DT10 has been programmed to the mode
Always on, it will start automatically when it’s connected
to the hearing instrument. The on/off function of the
push-button is then disabled.)
6) Acoustic indication, sound signals
The following is a description of the acoustic indications
(sound signals). The sound signals consist of various
combinations of two different tones: one high pitch tone
(1000 Hz) and one low pitch tone (500 Hz), and two different tone lengths.
Action:Sound signal:Indicate this:
•
Button pressed briefly
Short high pitch
Selecting mode or turning on
••
Button pressed briefly Short high pitch x 2
—
Turning off
+ long low pitch
•
• Button pressed 2 sec.
Short low pitch
Pairing mode
+ short high pitch
••
Pairing Short high pitch x 2
Successful pairing
—
Pairing Long high pitch
—
Pairing failed
+ long low pitch
Receiver DT10
5
7) Listening modes in the Receiver DT10
The available listening modes in the Receiver DT10
can be setup in different configurations:
R Default setting
R+M Setup with Programmer DT05
is necessary
R and R+M Setup with Programmer DT05
is necessary
The Programmer DT05 is used to configure and enable
or disable different listening modes in the Receiver
DT10. The push-button on the Receiver DT10 is used to
toggle between the activated listening modes.
It is also possible to disable the push-button completely.
8) Output for user with different input types and programs in the hearing instrument
Different hearing instrument electrical input types and available programs in the hearing instrument will result
in different output for the user. Output for the user is shown in the white sections of the charts below.
Receiver DT10 with R mode enabled (default setting)
The chart below shows the output (what the user can hear) when Receiver DT10 listening mode R is enabled in
combination with different input types and programs in the HI.
When pressing the push button on the Receiver DT10, the listening mode is shifted in the following sequence:
Receiver DT10 push-button
Off
R mode
Off
Radio only
Off
Radio + HI microphone
Off
Radio only
Hearing instrument:
DAI input
Programmable DAI input
(DPAI)
DAI + M program
Programmable DAI input
(DPAI)
DAI program only
Receiver DT10
6
Receiver DT10 with R+M mode enabled and R mode disabled
The chart below shows the output (what the user can hear) when Receiver DT10 listening mode R+M is enabled,
in combination with different input types and programs in the HI.
When pressing the push-button on the Receiver DT10, the listening mode is shifted in the following sequence:
Receiver DT10 push-button
Off
R+M mode
Off
Radio + HI microphone
Off
Radio + HI microphone
Off
Radio only
Hearing instrument:
DAI input
Programmable DAI input
(DPAI)
DAI + M program
Programmable DAI input
(DPAI)
DAI program only
Receiver DT10 with both R and R+M modes enabled
The chart below shows the output (what the user can hear) when Receiver DT10 listening modes R and R+M both
are enabled, in combination with different input types and programs in the HI.
When pressing the push-button on the Receiver DT10, the listening mode is shifted in the following sequence:
Receiver DT10 push-button
Off
R mode
R+M mode
Off
Radio only
Radio +
HI microphone
Off
Radio +
HI microphone *
Radio +
HI microphone *
Off
Radio only *
Radio only *
Hearing instrument:
DAI input
Programmable DAI input
(DPAI)
DAI + M program
Programmable DAI input
(DPAI)
DAI program only
* When using this setup in combination with Programmable DAI input (DPAI), the level of the two modes (R+M and R)
can be programmed individually to serve as a volume control.
Note! Difference in volume can occur
When using a hearing aid with Programmable DAI input (DPAI) and having both R and R+M modes in the Receiver DT10 enabled
there can be a difference in volume between the R and R+M modes even if the Receiver DT10 has been programmed with identical
output levels for the two modes. The reason for this difference is that the output level in the Receiver DT10 is affected by the input
impedance of the hearing instrument.
The difference in output level can vary between different hearing instruments - usually the output level will be slightly higher in the
R+M mode. An adjustment might be done with the Programmer DT05 in order to meet the users requirements.
Receiver DT10
7
9) Pairing
The Receiver DT10 can receive but not transmit pairing information. To pair the Receiver DT10 with your
Comfort Digisystem transmitter the Receiver DT10 must be connected either to your hearing instrument
or to the Programmer DT05.
Press the push-button on the Receiver DT10 for 2 seconds to activate pairing mode.
When pairing mode is activated, you receive an acoustic indication: • •
Send the pairing information within 15 seconds.
To interrupt pairing mode, briefly press the push-button.
Example 1: Pairing a Receiver DT10 into an existing
Comfort Digisystem consisting of one Conference
Microphone DC10 and one Receiver DH10:
1. Connect the Receiver DT10 to the hearing instru
ment’s audio shoe according to the instructions.
2. Initiate pairing mode in the DT10 by pressing
the push-button for 2 seconds.
Acoustic indication: • •
3. Start the Conference Microphone DC10.
4. Rapidly press the pairing button on the DC10 twice. The display on the DC10 responds with the text “Info sent”.
5. The Receiver DT10 confirms success
ful pairing with an acoustic indication: • •
Example 2: Make a new eavesdrop secure configuration with one Microphone DM10 and two hearing
instruments with Receiver DT10s:
1. Connect the Receiver DT10s to the hearing instru-
ment’s audio shoes according to the instructions.
2. Activate pairing mode in the two DT10’s by pressing
the push-buttons for 2 seconds.
Acoustic indication: • •
3. Start the Microphone DM10 and open the menu. Select Communication/Pairing/New code key and answer Yes if you want to create a new code key and
transmit it.
4. The Receiver DT10s confirm success
ful pairing with an acoustic indication: • •
Example 3: Make a new eavesdrop secure configuration with one Microphone DM10 and two Receiver
DT10s using the Programmer DT05:
1. Put one of the Receiver DT10s into the Programmer DT05.
2. Start the Programmer DT05 and connect head
phones or a neck loop to be able to listen.
3. Activate pairing mode for the DT10 by pressing the push-button for 2 seconds.
In the headphones/neckloop you receive an acoustic indication: • •
4. Start the Microphone DM10 and open the menu. Select Communication/Pairing/New code key and answer Yes if you want to create a new code key and
transmit it.
5. The Receiver DT10 confirms success••
ful pairing with an acoustic indication:
6. Remove the paired DT10 and connect the other DT10 into the Programmer DT05.
7. Activate pairing mode on the DT10 by pressing the push-button for 2 seconds.
In the headphones/neckloop you receive an acoustic indication: • •
8. Open the menu on the DM10 and select
Communication/Pairing/Send info.
9. The Receiver DT10 confirms success
ful pairing with an acoustic indication: • •
Receiver DT10
8
10) Trouble shooting
11) Technical data Receiver DT10
The receiver does not start
1. Check that the correct listening program is selected
on the hearing instrument.
2. Make sure the Receiver DT10 is correctly connected
to the hearing instrument’s audio shoe. Also check
the connection between the audio shoe and the
hearing instrument.
3. Make sure all connecting surfaces are clean.
4. Check/replace the hearing instrument’s battery.
5. Remember to press the push-button briefly to
switch the DT10 on.
Radio transmission:
SST - SecureStream
Technology
Frequency range:
904 - 927 MHz
Range:
Approx. 50 feet (15 m)
Dimensions:
0,38 x 0,44 x 0,84 inches
(9,7 x 11,2 x 21,3 mm)
Weight: 0,05 oz (1,5 g)
The weights, dimensions, capacities, performance ratings and other data in
Comfort Audio’s brochures, prospectus, circulars, advertisements, price lists and
instructions sheets are mentioned only as general information. They are only approximate and shall not bind Comfort Audio.
Poor speech intelligibility
The distance between the transmitter and the receiver
may be too long. The range is around 50 feet
(15 meters).
The distance between the microphone and the talking
person may also be too long; move the microphone
closer to the talking person.
Try changing the channel/environment.
Poor range and interference
In some environments, such as in buildings with a lot of
concrete, iron or sheer metal structures, the range may
be reduced.
There may also be electronic equipment nearby causing
interference. Change the channel.
No sound
Check that the transmitter and the receiver are set to
the same channel.
Loud hissing noise
Check that the Comfort Digisystem units you are using
are paired together.
If Auto sleep is enabled, the Receiver DT10 goes into
sleep mode if there is no radio signal. But if another
radio signal (with the same frequency you are using) is
present, the Receiver DT10 might start again automatically. This could cause a loud hissing noise and that’s
why Auto sleep should be used with caution.
Receiver DT10
9
12) Service and warranty
13) Radio range and channels
Warranty extension
Comfort Audio Inc. warrants this product sold to the
first end user (buyer) against defects in materials or
workmanship for the time period and as set forth below.
Pursuant to this Limited Warranty, Comfort Audio will,
at its own option, either (a) repair the product or the
parts determined to be defective, using new or refurbished parts, or (b) provide you with a new, or at our
option, a refurbished unit. The repaired or exchanged
unit is under warranty for the remainder of the original
product’s warranty period. The warranty does not include any other direct, indirect or consequential damage
or loss, or any third party damages or losses.
This Limited Warranty is for a period of two years from
the date of purchase as indicated by an original receipt
from a Comfort Audio authorized retailer, dispenser or
medical facility. For accessories the warranty period is
90 days as of the date of delivery.
The transmitter and receiver have built-in antennas. The
radio range between the units varies depending on the
product and the particular environment you are in.
Like all radio systems, Comfort Digisystem communicates on specific channels. If you use two transmitters
on the same channel or a neighbouring one, there may
be interference. Other electronic equipment can also
interfere with radio transmissions.
The channel that you use in your country is perhaps not
permitted abroad. Always get in touch with your hearing
aid provider in your country in order to find out which
channels are permitted in different countries.
Comfort Audio is not liable for unauthorized use of radio
waves, such as, but not limited to: interferences with
police communication, or strategic communication,
military installations etc.
How to make a warranty claim
For warranty service, you must contact the Comfort
Audio Customer Service listed below to obtain an
RMA (Return Merchandise Authorization) number.
A description of the defect, your name, address and
telephone number is required.
Ship the product freight prepaid via UPS or its equivalent, including a copy of the original purchase receipt,
any cables, earphones and base/charger unit, in its
original packaging or one that offers equal protection.
Insure your shipment for loss or damage. Comfort Audio
accepts no liability in case of damage or loss en route to
our offices.
This Limited Warranty does not cover
Damage from misuse, neglect or normal wear and tear.
Products that have been modified. Products purchased
or serviced outside the territory. If you purchased your
product outside the territory, see your retailer for warranty information.
Product Registration
Please complete, sign and mail the Product Registration Card packed with your unit. It will make it easier to
contact you if it ever would be necessary.
Comfort Audio Inc.
350 South Northwest Hwy, Ste 300
Park Ridge, IL 60068 USA
To contact the Comfort Audio Customer Service,
call (847) 656 5450
or by e-mail [email protected]
Receiver DT10
10
14) Important safety instructions Read these before using your product
17) Never use a transmitter or receiver set to a nonpermitted frequency. Check with the frequency authority in
the country where the equipment is to be used.
1) Read these instructions.
18) The product contains sensitive electronic equipment
and must be handled carefully.
2) Keep these instructions.
19) Never charge product in closed, unaired spaces
such as handbags, cases or other closed storage bags.
3) Heed all warnings.
4) FolIow all instructions.
20) Only use batteries and power supply specified by
Comfort Audio AB.
5) Do not use this apparatus near water.
6) Clean only with dry cloth.
21) You must not change the battery yourself; please
contact your point of purchase.
7) Do not use near any heat sources such as radiators
heat registers stoves, or other apparatus (including
amplifiers) that produce heat.
22) CAUTION! Danger of explosion if battery is incorrectly replaced.
8) Do not defeat the safety purpose of the polarized or
arounding-type plug. A polarized plug has two blades
with one wider than the other. A grounding type plug has
two blades and a third grounding prong.
The wide blade or the third prong are provided for your
safety. If the provided plug does not fit into your outlet
consult an electrician for replacement of the obsolete
outlet. (Only when using polarized plug)
23) The product shall not be exposed to excessive heat
such as sunshine, fire or the like.
24) Products include radio transmitters. Do not use
products where it is not allowed to use electronic
equipment, e.g. on airplanes.
25) The necklace should not be used if there is a risk of
getting stuck, e.g. in a machine or other objects.
9) Protect the power cord from being walked on or
pinched particularly at plugs convenience receptacles.
and the point where they exit from the apparatus.
26) Keep small parts out of reach of children and
animals.Choking hazard if swallowed.
10) Only use attachments/accessories specified by
Comfort Audio AB.
27) Do not leave the product unloaded for too long, the
battery could get damaged.
11) Unplug this apparatus during Iightning storms or
when unused for long periods of time.
28) Do not keep the product connected to the charger if
it is not used for a longer period.
12) Refer all servicing to qualified service personnel.
Servicing is required when the apparatus has been
damaged in any way such as power-supply cord or
plug is damaged Iiquid has been spilled or objects
have fallen into the apparatus, the apparatus has
been exposed to rain or moisture does not operate
normally or has been dropped.
13) Start listening at a low volume.
14) Too high a volume can seriously damage your
hearing.
15) Don’t disassemble the product.
16) Should the product break open because of damage,
service should only be done by qualified service
personnel.
Subject to change
Receiver DT10
11
Manufactured by:
Comfort Audio AB, Box154, SE-301 05 Halmstad, Sweden
Tel. +46 (0)35 260 16 00 Fax +46 (0)35 260 16 50
Local US office:
Comfort Audio Inc, 350 South Northwest Hwy, Ste 300
Park Ridge, IL 60068 USA
T (847) 656 5450
[email protected] www.comfortaudio.us
MA0367 Ver 1.0 Rev C 130115
Comfort Audio AB