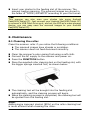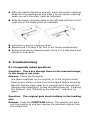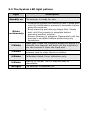
1
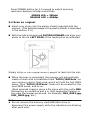
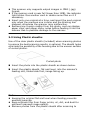
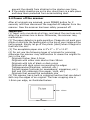
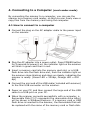
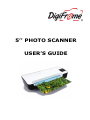
5’’ PHOTO SCANNER USER’S GUIDE System Requirements ¾ IBM compatible PC 586, Pentium or higher ¾ Windows XP, Vista or Windows 7 ¾ At least 100 MB of free hard disk space (500 MB is recommended) ¾ At least 128 MB of system memory (512 MB of RAM is recommended) ¾ At least 1 GB of RAM for Windows Vista/7 ¾ USB port 2.0 (compatible with USB 1.0) What’s in the box? ¾ ¾ ¾ ¾ ¾ ¾ ¾ ¾ ¾ 1. 2. 3. 4. 5. 6. 7. 8. 9. Photo scanner CD (Scan to PC Manager) Sensor cleaning swab Roller cleaning tool Calibration chart AC adapter USB cable 5’’ x 7’’ plastic sheath 2GB USB flash drive Contents 1. Introduction…………………………………………………………….1 2. Overview………………………………………………………………….1 2.1 Front view…………………………………………………………………………………1 2.2 Rear view…………………………………………………………………………………1 3. Installation & Operation…………………………………………….3 3.1 Initial setup………………………………………………………………………………3 3.2 Scan an original………………………………………………………………………4 3.3 Using plastic sheaths………………………………………………………………5 3.4 Power off the scanner………………………………………………………………6 4. Connecting To A Computer…………………………………………7 4.1 How to connect to a computer……………………………………………….7 4.2 Disconnect the scanner from a computer ……………………………… 8 5. Scanning Photos To Your Computer …………………………… 9 5.1 Starting the Scan To PC manager …………………………………………… 9 5.2 Uninstalling the Scan To PC manager…………………………………….10 6. Scanning Photos To iPad or A Macintosh Computer………11 6.1 Scanning photos to iPad…………………………………………………………11 6.2 Scanning photos to a Macintosh computer…………………………….12 7. Scanning Photos To Smart Phone………………………………12 8. Maintenance………………………………………………………..…13 8.1 Cleaning the roller…………………………………………………………………13 8.2 Calibrating the scanner…………………………………………………………14 8.2 Cleaning the image sensor……………………………………………………14 9. Troubleshooting…………………………………………………..…15 9.1 Frequently asked questions……………………………………………………15 9.2 The system LED light pattern…………………………………………………17 10.Specifications…………………………………………………..…….18 1. Introduction Congratulations on your purchase of a DigiFrame EzyScan. With this scanner, you can scan and store your photos & documents directly to your memory card or USB flash drive without connecting the scanner to a computer. If you wish to store a document directly into your computer, just plug in a USB cable and/or use the supplied Scan to PC utility (Compatible with Windows 2000, XP, Vista & 7 ) Before you operate the product, please take a few minutes to read through this manual. It provides instructions for you to install, operate and maintain the product. 2. Overview 2.1 Front view 3 4 1 2 2.2 Rear view 5 6 7 -1- 8 Name Function/ Description 1 Indicator light Indicates the operating status and scanning resolution of the scanner. 2 Feeding Slot Insert an original to start scanning. Power button( To turn the scanner ON and OFF. In ready mode, short press this button to switch the scanning resolution between 300dpi and 600dpi. Green LED: 300dpi Orange LED: 600dpi 3 ) Function button 4 ( ) Press to start cleaning the scanner’s roller (Refer to the Cleaning the roller section). Press to eject paper during paper jam condition. Press until the indicator light starts blinking to calibrate the scanner. (Refer to the Calibrating the scanner section). Insert a memory card. 5 Memory Card Slot 6 USB Flash Drive Port Insert a USB flash drive. 7 8 Connect the scanner to a computer via Mini USB Connector a supplied USB cable To connect the supplied AC adapter to Power jack the scanner. -2- 3. Installation & Operation Precautions Keep the product out of direct sunlight. Direct exposure to the sun or excessive heat may cause damage to the unit. Do not install the product in a humid or dusty place. Be sure to use the proper AC power source. Place the product securely on an even, flat surface. Tilted or uneven surfaces may cause mechanical or paper-feeding problems. Retain the product box and packing materials for shipping purposes. 3.1 Initial setup Plug the small end of the AC adapter cable to the power jack on the scanner. Plug the AC adapter into a power outlet. Press and hold the POWER button for 1-2 seconds. The indicator light on the scanner will blink in green and then in red. Insert a memory card (SD/SDHC/MMC card) into the memory card slot, or insert a USB flash drive into the flash drive slot, the indicator light on the scanner stops blinking and stays on steadily, indicating the scanner is ready. -3- Press POWER button for 0.5 second to switch scanning resolution between 300dpi and 600dpi. GREEN LED = 300dpi ORANGE LED = 600dpi 3.2 Scan an original Insert your photo into the plastic sheath supplied with the scanner. (The detailed usage of the plastic sheath is described in the section 3.3.) With the side to be scanned FACING UPWARD and align your photo to the far LEFT EDGE of the feeding slot as indicated. Simply let go of the original when it begins to feed into the slot. When the scan is completed, the scanner will automatically create a folder with its subfolder titled “DCIM\100Photo” on your memory card or flash card, which will hold the first 9999 scans. Then “DCIM\101Photo” folder will be created for the next 9999 scans, and so on. (Each scanned image is given a file name with the prefix IMG followed by an underline and a 4- digit sequential number in the order the images are stored. For example, IMG_0001.jpg, IMG_0002.jpg, etc.) Note: z Do not remove the memory card/USB flash drive or disconnect the power supply while the indicators are blinking after each scan. -4- z This scanner only supports output images in JPEG (.jpg) format. z If the memory card is near full (lower than 1MB), the indicator light blinks. Use another card or delete some files on it if necessary. z Insert only one original at a time, and insert the next original only when the previous one is done and the blinking has stopped, otherwise the scanner may malfunction. z Remove any foreign matter from the photo, such as staples, paper clips, and paper sticky notes before feeding it into the scanner due to possible damage to the scanner. 3.3 Using Plastic sheaths Use of the clear plastic sheath (included) when scanning photos to ensure the best scanning results, is optional. The sheath helps eliminate the possibility of de-focusing due to the uneven surface of curled photos. Curled photo Insert the photo into the plastic sheath as shown below. Insert the plastic sheath, flat and level, into the scanner’s feeding slot, folded side first, image facing up. Note: z Keeping the original flat and level when feeding prevents possible jamming. z Keep originals free from finger prints, oil, dirt, and dust for optimum scanned image quality. z Remove photos from the plastic sheath after scanning to -5- prevent the sheath from sticking to the photos over time. z If the plastic sheaths are not in use, store them in a safe place and keep them protected from accumulating dust. 3.4 Power off the scanner After all originals are scanned, press POWER button for 2 seconds, and then disconnect the supplied AC adapter from the scanner. Now the scanner has been safely powered off. Important: (1) Insert only one photo at a time, and insert the next one only when the previous one is done. Otherwise, the scanner may malfunction. (2) The paper detector is quite sensitive. Please do not push your photo or card into the feeding slot or the top of your image will be cut/cropped. Simply let go of the photo (card) when it begins to feed into the slot. (3) The acceptable paper size is 2”x 2” ~ 5” x 11.8”. (4) Do not use the following types of originals for scanning; otherwise the scanner may malfunction or cause the original to jam in the slot. Originals thicker than 0.5mm Originals with either side shorter than 55mm Originals with lots of black or dark colors Originals with dark colors surrounding the edges Transparencies(filmstrips, celluloid, etc.) Printed images (pictures on newspapers, magazines, etc.) Soft and thin materials (thin paper, cloth, etc.) Originals that exceed the acceptable size (5) The scanner has a built-in cropping function that can detect and crop the edges of an original. The max cropping size is 1.5mm per edge, as illustrated below: Max. 1.5mm Max. 1.5mm -6- 4. Connecting to a Computer (card reader mode) By connecting the scanner to a computer, you can use the scanner as a memory card reader, so that you can freely view or copy files from the memory card using the computer. 4.1 How to connect to a computer Connect the plug on the AC adapter cable to the power input on the scanner. Plug the AC adapter into a power outlet. Press POWER button for 2 seconds to power it on, the indicator light on the scanner will blink in green and then in red. Insert a memory card into the memory card slot, or a USB flash drive into the flash drive slot, then the indicator light on the scanner stops blinking and stays on steady, indicating the scanner is ready. (Green LED = 300dpi, Orange LED = 600 dpi) Connect the mini end of the USB cable (included with scanner) to the Mini USB connector on the scanner. Power on your PC, and then connect the large end of the USB cable to a USB port on your PC. When the scanner connects successfully with a computer, a Removable Disk (F) (F represents the removable drive letter) will be shown in Windows Explorer. If a memory card or USB flash drive is inserted to the scanner, the Removable Disk will be replaced with the name of the memory card or flash disk. -7- After your scan, a folder with its subfolder titled DCIM\100Photo is added to the memory card and the scanned image will be saved in JPEG file format. Each scanned image is given a file name with the prefix scan followed by an underline and a 4- digit sequential number in the order the images are stored, for example, IMG_0001.jpg, IMG_0002.jpg. If the file name reaches IMG_9999.jpg in the 100Photo folder, a new folder titled 101Photo will automatically be created to store subsequent new files, and so on. You can now view or copy the image files from the memory card via your computer. Note: When this scanner is connected to your computer, please note that removing/deleting the image files in the memory card from your computer is not permitted. Instead, please plug the memory card to your card reader or USB flash drive to your computer’s USB port to remove these images files. 4.2 Disconnecting the scanner from a computer On the Windows System Tray, click the hardware removal icon. Click the ‘Safely remove USB mass Storage device’ message with the corresponding Drive. When the ‘Safe to Remove Hardware’ message appears, you can safely remove the scanner’s USB cable. -8- 5. Scanning Photos to Your Computer With the Scan To PC Manager, you can easily scan photos and save the scanned images directly to a connected computer. You can also choose the location where the scanned images will be saved. 5.1 Starting the Scan to PC Manager Insert the supplied ‘Scan to PC’ disc and install using your computers install system (e.g. Install wizard) After installation, connect the scanner to your computer with the USB cable. If successfully installed, a Removable Disk (F) (F represents the removable drive letter) will be shown in the Windows Explorer. If a memory card is inserted to the scanner, the Removable Disk will be replaced with the name of the memory card. Double click the bundled ScanToPC.exe. Now, the Scan To PC Manager runs, and the icon stays on the system tray. in the system tray and select Setting to Right click the icon invoke the Scan To PC Utility screen, as shown below: To save the scanned images to your computer, select Scan To PC in the drop-down menu of Save Type. To save the scanned images to your memory card or USB flash drive connected to the scanner, select Memory Card in the drop-down menu of Save Type. -9- Important: Once you have installed the Scan To PC Manager and you wish to save your scanned images to a memory card or USB flash drive, you still need to use Scan To PC Manager and select Memory Card in the drop-down menu of Save Type. (if connected to PC) Click the Browse button to save your scanned images to a specified location. (Default is C:\temp\) Click Apply to save the settings or Cancel to leave the Setting screen without saving the changes. Note the Scan to PC Utility icon is still running in your system tray. Scan your photo’s as described. After your scan, a folder with its subfolder titled DCIM\100Photo to save the scanned images is added to a default or specified location. Note each scanned image is given a file name with the prefix scan followed by a 4-digit sequential number. For example, img0001.jpg, img_0002.jpg. To exit the Scan To PC Manager, right-click the icon system tray and select Exit. in the Note: z If you have not inserted a memory card to the scanner, a Removable Disk drive will still be shown in Explorer window though you can not access anything from the drive. z If you have inserted a memory card to the scanner, the name of memory card will be shown in Explorer window. z In Windows 2000, XP, Vista or Windows 7, you can start Scan to PC Manager to scan and save images to your computer without inserting a memory card to the scanner. 5.2 Uninstalling the Scan To PC Manager From the PC Start menu, select: All Programs >Scan To PC>Uninstall Driver Follow the uninstall wizard to uninstall the software. Restart your PC when prompted to do so. - 10 - 6. Scanning photos to iPad or a Macintosh computer 6.1 Scanning photos to iPad With this scanner, you can scan your photos and import the scanned images to your iPad. To scan photos to your iPad, Important! Since the scanner is a USB device, please first make sure you have an iPad camera connector which is included in the iPad Camera Connection Kit. The iPad camera connector offers a USB adapter that plugs into the dock connector. Insert a memory card to your scanner and turn on the scanner. Plug the iPad camera connector into the dock connector port on your iPad. Connect small end of the supplied USB cable to the scanner and the bigger end to the camera connector. Turn on your iPad. Insert your photos to the feeding slot of the scanner. The scanner begins scanning. The thumbnail of the scanned images will be displayed in the Photo application of your iPad. - 11 - Choose “Import” to import and organize the scanned images into the albums of your iPad. Tips z If the scanned images do not display in your iPad, try to turn off and on your iPad. z This scanner also supports a variety of Android pads on the market. This means you can scan your documents directly to many pads that run Google’s operating system, Android. The operating steps are similar with “Scanning Photos To Smart Phone” section. 6.2 Scanning photos to a Macintosh computer Insert a memory card or USB flash drive and turn on your scanner. Connect the scanner to your Macintosh computer with the supplied USB cable(Bigger USB end connect to Macintosh). Insert your photos to the feeding slot of the scanner. The scanner begins scanning and save images to memory card / USB flash drive. Choose the USB device by selecting the “No name” folder on your desktop. The scanned images are stored in folder of DCIM and PHOTO in succession. 7. Scanning Photos To Smart Phone With this scanner, you can scan your photos and import the scanned images to many Android smart phones-Compatible cable or connector kit may be required. Remove the memory card from your scanner and turn on. Connect the larger end of the USB cable (included with scanner) to the USB flash drive slot on the scanner. And connect the other mini USB end to your Smart Phone. Or use the supplied USB cable of your smart phone to connect to scanner’s USB flash drive slot. On the screen of your Smart Phone, an enquiring of your connection type will be prompted. Choose “mass storage device” on your Smart Phone. - 12 - Insert your photos to the feeding slot of the scanner. The scanner begins scanning. The scanned images are stored in the folder of “DCIM\100PHOTO” according to your file format. Tips: This scanner can also scan your photos into some Android Pads(MID/Tablet PC). Just connect your Android Pad(MID/Tablet PC) to scanner’s USB Flash Drive port, and set the MID as a mass storage device, you can easy save the scanned images to your Android Pad(MID/Tablet PC). 8. Maintenance 8.1 Cleaning the roller Clean the scanner roller if you notice the following conditions: z The scanned images have streaks or scratches. z The scanner does not feed document smoothly. Clean the scanner’s outer casing first using a soft cloth. Connect the AC supply to the scanner and power on. Press the FUNCTION button Place the supplied roller cleaning tool on the feeding slot, with the bigger sponge inserted first, as shown below: The cleaning tool will be brought into the feeding slot automatically, and the cleaning process will begin. When the cleaning process is completed, the cleaning tool will be ejected from the feeding slot. Note: Adding some isopropyl alcohol (95%) on the roller cleaning tool is more efficient when cleaning the roller. - 13 - 8.2 Calibrating the scanner If the scanned image looks fuzzy or there are strange stripes on it, the scanner may need calibrating in order for the sensor to resume its original precision. To calibrate the scanner: Power on the scanner. Press the FUNCTION button until the indicator light starts blinking. Insert the calibration chart to the feeding slot, as shown below: The scanner starts calibrating. Note: Keep the calibration chart clean. Any dirt may make the calibration chart invalid or impact the calibration result. 8.3 Cleaning the image sensor Make sure the scanner is disconnected from the power supply. - 14 - With one hand holding the product, insert the sensor cleaning swab into the feeding slot and align it to the sensor cleaning swab icon with the other hand as indicated. Slide the sensor cleaning swab to the left end and then to the right end of the feeding slot as indicated. Remove the sensor cleaning swab. Repeat step 3 to step 5 for five or six times consecutively. Remove the sensor cleaning swab, store it in a safe place and protect it from dust. 9. Troubleshooting 9.1 Frequently asked questions Question: There are strange lines on the scanned image, or the image is not clear. Answer: Check the following: Are there scratches on the original, or is the original clean? Remove any stains or dust from the original before scanning. Has the scanner been used for a long period of time without cleaning and calibration? Follow the instructions for "Cleaning the Scanner" and "Calibrating the Scanner", and then try again. Question: The original gets stuck halfway in the feeding slot. Answer: Press the FUNCTION button. The scanner will back out the original so you can remove the jammed original from the output slot. - 15 - Question: The System LED blinks rapidly and no scan is possible. Answer: Check the following: Is the memory card inserted properly into the memory card slot? Re-insert the card and try again. Is the SD card locked (set to write-protect)? Unlock the card. (small switch on side of SD card) Is the memory card full? The indicator blinks when the free space on the memory card is below 1MB. Use another card if necessary. Make sure the memory cards are in FAT or FAT32 file formats only, not NTFS or any other file format. Did you insert the next original before the scanning process of the previous one was completed? Power the scanner off and back on and try again. Make sure that you scan the next original only after the scanning process of the previous one has completed. Does the length of the original exceed the maximum acceptable size? Question: The scanner feels warm to the touch. Answer: It is normal for the scanner to emit a small amount of heat (around 30-45 Celsius) after prolonged use. However, if there are strange odors coming from the scanner or the scanner feels hot to the touch, disconnect the scanner immediately from the power supply or the computer. - 16 - 9.2 The System LED light pattern Light Steadily on Description The scanner is ready for use. Initializing system and memory card. Please wait until the initialization process is complete before using the scanner. Busy scanning and storing image files. Please Blinks wait until the process is complete before continuously scanning another original. Sensor cleaning in progress. Please wait until the process is complete before performing any operations. 2 Blinks 3 Blinks Paper jam. Press the Function button for about 0.5 seconds; the scanner will back out the original so you can remove it from the input slot. Memory card error. Remove and Replace the memory card to clear this error status. 4 Blinks Calibration failed. Error indication only. 5 Blinks Scan to PC failed. The PC may be busy or unavailable. No light The scanner is powered off. - 17 - 10. Specifications All specifications are subject to change without notice. Specification Scanning Technology Acceptable paper size Output image formats Flash Memory Internal Resolution Scanned image Color Scan color depth Output format Memory Cards Interfaces USB USB Mass Storage Supported Power Input Output CIS (Contact Image Sensor) 2”x 2” ~5” x 11.8” JPEG with compression 512KB 32MB (DDRI) 300dpi/600dpi (dots per inch) Color – 48 bit Color – 24 bit (JPEG) SD/SDHC/MMC/USB flash drive Mini USB port compatible with the USB 2.0 / 1.1 device Windows XP/Vista/7 Mac OS 10.5.x (memory device only) 100-240V 5V DC, 1.5A Weight 200 g (approx) Dimensions (WxDxH) 183 x 74 x 43 mm Paper Thickness (g/m² or lb) Recommended Environment 34~127 g/m²(9 to 34 lb) up to 0.5mm Operating 15ºC ~ 35ºC (59oF~95oF); 20% RH ~ 70% RH - 18 -