1
Use& CareGuide
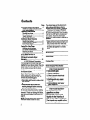
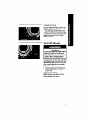
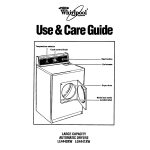
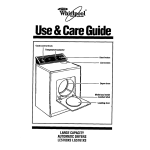
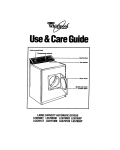
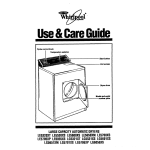
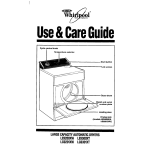
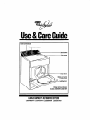
Cycle control
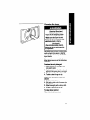
I
knob
Temperature
selector
Start button
Unt screen
models
Drying rack (not shown)
E92OOXW LG9201 XW
IARGECAPACITYAUTOMATKDRYERS
LE9100XT LG91OlX-TLE9200XW LG92OlXW
Contents
Page
...... .3
Important Safety lnstructlons..
Additional safety instructions and
your responsibilities ...................... .3
Cparatlng InstructIons
Starting your dryer. ......................... 4
The automatic cycles .................... .6
TIMED DRYING ............................ .7
The FLUFF AIR cyde ..................... 7
Addltlonal
Dryer Features
Gentle Heat system ...................... .8
FINISH GUAROO setting ................ 8
Endof-cycle signal ........................ .8
Using the drying rack .................... .9
Caring For Your Dryer
Cleaning the lint screen ................ 10
Lint screen maintenance .............. 10
Cleaning the dryer.. ..................... .11
Lint removal ................................. 12
lfYouNeedservlceor
13
Asslstatlce ......................................
Whlrlpool Automatic Dryer
16
Warranty .........................................
63 1992 Whirlpool Corporation
The drawings in this book may vary
slightly from your dryer model. They are
designed to show the different features
of the models revered by this book.
NOTE: Your modal may not include all
the features shown.
lf your dryer has a Consumer Buy Guide
label, remove it tt will be easier to
remove before the dryer is used. To
remove any remaining glue:
l Rub briskly with thumb to make a ball,
then remove.
or
l Soak area with liquid hand dishwashing detergent before removing
glue as describsd above.
Do not use sharp instruments, rubbing
alcohol, flammable fluids or abrasive
cleaners. These can damage the finish.
See ‘Important Safety Instructions’ on
page 3.
NOTE: Do not remove any permanent
instrudion labels inside the dryer.
2
You should wipe out the dryer drum
with a damp doth before using to
remove dust from storing or shipping.
Thank you for buying a Whirlpool
appliance. Please complete and mail
the Owner Registration Card provided
with this product. Then complete the
form below. Have this information
ready if you need service or call with a
question.
l Copy model and serial numbers
from
plate (on the frame behind the door)
and purchase date from sales slip.
l Keep this book, the Dryer Guide and
the sales slip together in a handy
place.
Model Number
Sadal Number
Rmhaae
Date
!SedoeCompnny
Phone Number
FOR YOUR SAFETY
If you smell gas:
1. Open wlndows.
2. Don’t touch electrlcal
switches.
3. fiFiegulsh any open
.
4. lmmedlately call your
gas suppller.
FOR YOUR SAFETY
Do not store or use
gasollne or other
flammable vapors and
llqulds In the vlclnlty of
thls or any other appliance.
The fumes can create a fire
hazard or exploslon.
ImportantSafety Instructions
To reduce the rlsk of fire, electrlcal shock, or
Injury to persons when uslng your dryer, follow
lncludlng the followlng:
bask precautions,
You are responsible
for maklng
sure that your dryer is installed,
repaired and has parts replaced by a
qualified person.
l Use only fabric softeners
sp&fcally
labeled as not being harmful to the
dryer.
l FfRE HAZARD
and DAMAGE to
materials can resuft from:
-drying rubber, rubber-like and heat
sensitive materials with heat.
-allowing lint build-up inside the
dryer or exhaust system. Cleaning
should be done periodically by a
qualified person.
l Clean lint screen before or after
each bad.
l DO NOT let dust, lint, paper, rags,
chemicals, etc. pile up around or
under the dryer.
l Dryer must be electrically
grounded.
See the Installation Instructions.
- SAVE THESE INSTRUCTfONS -
Read all lnstructlons
before uslng
the dryer.
l NEVER dry items cleaned,
washed,
soaked in or spotted with wax, paint,
gasoline or flammable fluids in the
dryer. The fumes can create a FIRE
HAZARD or EXPLOSION. ALWAYS
hand launder and air dry fabrics
containing these materials.
l NEVER allow children to operate,
play with or crawl inside the dryer.
Close supervision of children is
necessary when the dryer is used
near children.
) DO NOT reach into a dryer if the
drum is moving.
1When discarding an oki dryer,
ALWAYS remove the door to
prevent accidental entrapment.
1DO NOT install or store dryer where
it will be exposed to the weather.
1DO NOT tamper with the controls.
l
l
Additional safety instructions and your responsibilities
l
l
l
l
NEVER operate the dryer if:
-it is not working right (i.e. noisy,
too hot).
-it is damaged.
-parts are missing (i.e. door latch).
-all panels are not in place.
-the lint screen is loose, damaged
or missing.
ALWAYS shut off the gas valve
before leaving on vacation if you
have a gas dryer.
ALWAYS unplug the power supply
cord or turn off electrical power
before attempting to service the
dryer. Shut off GAS VALVE if you
have a gas dryer.
You are responsible
for maklng
sure that your dryer:
-is properly maintained.
-is properly installed and leveled on a
floor that can support the weight in a
well ventilated room:
-is located in an area where the
temperature is above-45°F (7°C).
-is connected to the proper outlet and
electrical supply.’
-is properly connected to fuel and
exhaust systems.*
-is not installed against drapes or
cuff ains.’
-is used only for jobs normally
expected of home clothes dryers.
-is not used by anyone unable to
operate it properly.
*See the Installation Instructions for
complete information.
3
Operatinginstructions
Starting your dryer
Be sure to refer to the chart bebw and the Dryer Guide for proper sorting, bading
and control setting information before starting your dryer.
NOTE: Do not overdry. Overdrying can cause shrinkage, static ding, and damage
some fabrics.
SUGGESTED
TYPE Of LOAD
cononssnd lhflr
EXTRA HEAW-Badspreads, mattrass
padb, WNs
HEAVYWEIGHT-Towels, jaans, cordumys.
work dothes
MEDIUMWEIGHTSheets, pillowcasas.
cottul undarwear. diapers
LIGHTWEIGHT~tistes,
organdies,
lingerie
ParmsnenI
pm64
SUGGESTED
CYCLE
TEMPERATURE
AUTOMATlC
REGULAR
HEAW HIGH
HEAW HIGH
PERMT PRESS
KNITS GENTLE
syntheIk#
snd bhda
HEAVYWEIGHT-Wok dothas, jackets,
mk
MEDIUMWEIGHTShirk, play dothas.
AUTOhhTlC
PERMANENT PRESS
PERMT PRESS
PERMT PRESS
sheees, dada
KNITS GENTLE
LIGHTWEIGHT-Lingerie, blouses. drassas
Kdb
HEAWWEIGHTXottcns, rayons, blends,
T-&ii,
slacks. shirk
MEDlUMWElGHTSynthet
(polyester,
aqtic, etc.), dress da&, skirts, sweaters
UGHTWEIGHT-Synthet
(polyestar,
acrylic, etc.) and bkds, rlngerie, blouses.
AUTOMATlC
PERMANENT PRESS
PERMT PRESS
KNITS GENTLE
KNITS GENTLE
dlt3St3Mi
Ddkate faklcr
Sheer cwkins (2 or 3 panels)
gauze, lace, etc.
RubN Wtlc,
best-lttve
fabrIca
FOAM RUBBERPillows, bras, stuffad toys
rumcurtains. tablecloth6
RUBBER-BACKED RUGS
OLEFIN, POLYPROPYLENE,
SHEER NYLON
4
AUTOMATlC
PERMANENT PRESS
KNITS GENTLE
-
FLUFF AIR’
20-30 minutes
20-30 minutes
40250 minutes
15-20 minutas
No temperature
needs to be selected. Cycle is
unheated.
‘see page 7.
1. Select a cycle by turning the Cycle
Control Knob either way. Stop
when the indicator on the knob’s
outer ring points to the cycle and
setting you want. See pages 6-7 for
further cycle information.
2. Prasa a temperature
s&actlon
which matches the type of fabric
being dried. The indicator will
appear over the temperature
selectian you have chosen.
3. Push the Start Button to start
the dryer.
4. To stop and restart the dryer:
l Open the door or turn the Cycle
Control Knob to OFF to stop the
dryer.
l Close the door, select a cycle (if
necessary) and push the Start
Button to restart the dryer.
The Cycle Control Knob should point
to an Off area when the dryer is not
in use. If the dryer is stopped before
the cycle is finished, turn the Cycle
Control Knob to an OFF area
5
Operating
Contlnued
lnstructlons
The automatic cycles
The automatic cycles albw you to
select the degree of dryness you
prefer for the cbthes being dried.
The automatic DRY-MISEfVcontrol
is a thermostat that senses the dryer
air temperature. The dryer automatically shuts off when the selected
dryness fs reached.
2
The Cycle Control Knob will not
move until the bad is almost dry or the
cooldown portion of the cycle has
been reached. After the cool-down
portion fs complete, the Cycle Control
Knob automatically moves to an OFF
area and tumbling stops.
Use AUTOMAllC
REGULAR to dry
heavy or mediumweight cotton items.
The bad tumbles without heat during
the last 5 minutes. This helps make
the bad easier to handle.
Use AUTOMADC
PERMANENT
PRESS to dry permanent press, knlts
and other synthetic items. The bad
tumbles without heat during the last
10 minutes. This helps keep wrinkles
from setting in and makes the bad
easier to handle.
For the first few bads; set the Cycle
Control Knob to point to the + in either
automatic cycle. When the dryer stops,
feel the dried items.
l II items are drier than you like, use a
setting to the right of the *the next
time you dry a similar bad.
l ff items are not as dry as you like,
use a setting to the left of the + the
next time you dry a similar bad.
NOTE: Overdrying can cause shrinkage, static cling and damage to some
fabrics.
6
number of minutes you want from 10 to
70. The last 5 minutes of this cycle are
without heat to help make the load
easier to handle.
The FLUFF AIR cycle
Fire Hazard
Do not dry plastic or rubber Items
with heat. Use FLUFF AIR cycle,
or line dry. Failure to do so could
result In flre or damaged ttems.
The dryer does not heat when the Cycle
Control Knob is set in FLUFF AIR. This
cyde can be used to fluff or air dry bedding, plastic tablecloths, foam rubber
pillows, stuffed toys, sneakers, etc.
1. Turn the Cycle Control Knob to the
number of minutes you want in
FLUFF AIR.
2. Push the Start Button.
NOTE: Repeat steps above if more
time is needed to dry items.
7
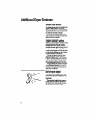
Additional Dryer Features
Gentle tieat system
For better fabric care, the Gentle Heat
system helps prevent overdrying.
Drying temperatures are automatiilly
reduced to a bwer heat setting during
the last few minutes of drying.
Gentle Heat is followed by a cooldown period in all cydes to make your
clothes easier to handle. 3
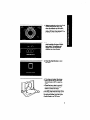
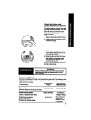
FINISH GUARD’ setting
‘5
r,
/3 \=-
When you are unable to remove a bad
from the dryer as soon as it stops,
wrinkles ten form. FINISH GUARD
tumbles the bad, without heat, every 5
minutes for up to 40 minutes. This
tumbling rearranges and fluffs the bad
to help avoid wrinkles that set in when
the bad remains in the drum.
You do not have to set the Cycle
Control Knob for FINISH GUARD.
FINISH GUARD takes over automatically to proted the bad if you do not
open the door within 5 minutes after
the PERMANENT PRESS cycle stops.
A signal will sound every 5 minutes
during FINISH GUARD, for up to 40
minutes. The signal will stop when the
dryer door is opened.
End-of-cycle signal
The dryer sounds a signal to let you
know when the cycle is finished. The
signal cannot be turned off and is not
adjustable.
The signal is helpful when you are
drying permanent press, synthetics
and other items that should be taken
out as soon as the dryer stops.
Using the drying rack
(models LE9200XW and LG9201 XW)
The drying rack lets you dry items that
you may not want to tumble. The rack
does not move, but the drum turns.
Make sure nothing hangs over the
edge of the rack.
1. Fit rear legs of the rack into indentations in the back wall of the dryer.
2. Lower the front so the legs rest on
the dryer opening.
3. Put wet items on top of the rack
Leave space between them so air
can reach all surfaces.
4. Close the door and start the dryer.
See below for suggested cycles
and temperature settings when
using the drying rack.
NOTE: The rack must be removed for
normal tumble drying.
Fire Hazard
Drying rubber, plastic and other heat-sensltlve
materials wlth heat can damage them or be a
E HAZARD.
Drying ra& suggestions
Drying time will depend on how much moisture the items hold. The following chart
suggests cycles and temperature settings for the different kinds of items that
might best be rackdried.
SUGGESTED
SUGGESTED
TO RACK DRY:
CYCLE
TEMPERATURE
Wool 8weaters
(Bbck to shape and lay flat on the rack)
TIMED DRYING
KNfTS GENTLE
StUffd
TIMED DRYING
AUTOMATfC
PERM’T PRESS
toy8
01 p11bW8
(Cotton or polyester fiber filled)
ShrffSd
toy8
Or p11kW8
(Foam rubber filled)
Sneak8r8
or canvas
shoes
FLUFF AIR
No temperature
needs to bs
selected. Cycle
is unheated.
9
CaringFor Your Dryer
Product and Fabric Damage Hazard
Do not run the dryer wlth the llnt screen loose,
damaged, blocked or mlsslng. Dolng so can
cause overheating
and damage to both the
dryer and fabrics.
Cleaning the lint screen
The lint screen is located under a lid
on top of the dryer. Clean it before
each load. A screen blocked by lint
can increase drying time.
1. Open the lid and pull the lint screen
straight out.
2. Roll lint off the screen with your
fingers. Do not rinse or wash the
screen to remove lint. Wet lint is
hard to remove.
3. Push the lint screen firmly back into
place and close the lid.
Lint screen maintenance
Laundry detergents and fabric
softeners can cause a residue build-up
on the lint screen. A clogged lint
screen can extend drying times. Clean
the lint screen every six months or
more frequently il it becomes clogged
due to a residue build-up. Use the
following method:
1. Wet both sides of lint screen with
hot water.
2. Wet a nylon brush with hot water
and liquid detergent.
3. Scrub lint screen with the brush
until all residue build-up is removed.
4. Rinse with hot water.
5. Thoroughly
dry lint screen with a
clean towel and replace in dryer.
10
Cleaning the dryer
Electrical Shock 8nd
Personal Injury Hazard
l Turn off the 8kctrkal
power
before cleaning the lnterbr.
l Make sure the dryer
Is c&l.
Failure to do so could result In
electrkal
shock or krjury.
Fire Hazard
l Use non-flammable
cleaner.
Failure to do so could result In
8n eXpk8bn.
Garments which contain unstable dyes,
such as denim blue jeans or brightly
colored wtton items, may discolor the
dryer interior.
If you want to remove stains from
dryer drum use one of the folbwlng
methods:
Powdered laundry detergent
1. Make a paste with detergent and
very warm water.
2. Apply paste to a soft cbth and scrub
area until all excess dye is removed.
3. Wipe thoroughly with a damp cbth.
4. Tumble a bad of rags to dry.
Llquld non-flammable
household
cleaner
1. Apply to stained area
2. Rub with a doth until all excess dye
is removed.
3. Wipe thoroughly with a damp cloth.
4. Tumble a bad of rags to dry.
To clean dry& oxterlor:
Wipe with a soft, damp doth.
11
Caring For Your Dryer
Continued
. . .
.
wit removal
Lint can gather inside the dryer and be
a fuel for fire. It is recommended the lint
be removed every 2 to 3 years, or more
often, depending on dryer usage.
Cleaning should be done by a qualified
person. ff you have any questions,
please call our Consumer Assistance
Center at 1800-253-1301.
Ebctrlcal Shock and
Personal Injury Hazard
l Unplug
the power supply cord
or turn off the electrlcal power
before rmovlng
dryer panels.
l Make sure the dryer
is cool.
+ Dryer parts can have sharp
edgea Use care when handllng.
Failure to do so could result In
8lectrkA
shock, personal Injury
or damage.
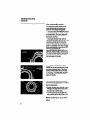
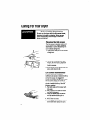
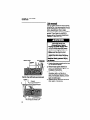
1. Unplug the power supply cord or turn
Ektrk
drya
with badt pond removed
tonher I
Gas dryer wtth tower front
scc680 pend removed
t2
off the electrical power.
2. Remove back panel (electric) or
lower front access panel (gas). See
Installation Instructions.
3. Remove lint from shaded area in
illustration with a soft brush or
vacuum deaner. Avoid damaging
wires, thermostats (electric), funnel
(gas) or igniter (gas).
4. Replace panel; reconnect and level
dryer again, if necessary.
If You NeedService OrAssistance
We suggest you follow
these steps:
1. Before calling for asslstanca
_.
Performance problems often result
from little things you can find and fix
yoursetf without tools of any kind.
If your dryer doe8 not run:
l
l
l
l
Is the power supply plugged into a
live circuit with the proper voltage?
fs the door dosed tightly?
Did you push the Start Button?
Have you checked your home’s main
fuses or circuit breaker box?
If your dryer does not heat:
l
l
l
l
The FLUFF AIR cyde ls without heat.
The last minutes of heat settings are
without heat.
II you have a gas dryer, is the gas
turned on? tf not, turn the Cyde
Control Knob to OFF. Turn on gas.
Wait 5 minutes. Reset controls and
start.
The circuit supplying an electric dryer
uses 2 breakers or 2 fuses. if one
breaker is tripped or one fuse is
blown. the dryer may run, but not
heat.
If drying tlme seems too bng:
l
l
l
Is the lint screen clean? See page 10
for cleaning instructions.
ls the exhaust duct or outside
exhaust hood dogged? Clean lf
needed.
See the Dryer Guide.
2. If you need assktance*.,
Call Whirlpool ConsumerAsslstance
Center telephone number. Dial free
from anywhere In the U.S.:
l-90&253-1391
and talk with one of our trained consultants. The consultant can instruct you in
how to obtain satisfactory operation from
your appliance or, if service is necessary, recommend a qualified service
company in your area
tf you prefer, write to:
Mr. William Clark
Consumer Assistance Representative
Whirlpool Corporation
2000 M-63
Benton Harbor, Ml 49022
Please include a daytime phone number
in your correspondence.
3. If you need sewloe*...
Whirfpool has a
-.
1-
y$+ixz{;~
Yf@companies.
Whirlpool service technicians are trained
to fulfill the product warranty and provide
after-warranty service, anywhere in the
United States. To locate the authorized
Whirlpool service company in your area,
call our Consumer Assistance Center
telephone number (see Step 2) or look in
your telephone directory Yellow Pages
under:
4. If you need FSP
replacement
parts’,
FSP is a registered trademark of
Whirlpool Corporation for quality parts.
Look for this symbol of quality
whenever you need a replacement part
for your Whirlpool appliance. FSP
replacement parts will fit right and work
right, because they are made to the
same exacting specifications used to
build every new Whirlpool eppliance.
To bcate FSP replacement parts in
your area, refer to Step 3 or call the
Whirlpcal Consumer Assistance Center
number in Step 2
5. If you ate not satlsfled with how
the problem was solved’-.
l Contact
the Major Appliance
Consumer Action Panel (MACAP).
MACAP is a group of independent
consumer experts that voices
consumer views at the highest levels
of the major appliance industry.
l Contact
MACAP only when the
dealer, authorized servicer and
Whirfpcal have failed to resolve your
problem.
Major Appliance Consumer
Action Panel
20 North Wacker Drive
Chicago, IL 60606
l MACAP
will in turn inform us of your
action.
When requesting assistance, please
provide: model number, serial
number, date of purchase, and a
complete description of the problem.
This information is needed in order
to better respond to your request.
14
Notes
15
WHIRLPOOL=
Automatic Dryer Warranty
LENGTH OF WARRANTY
WlilRLPOOL
FULL ONE-YEAR
WARRANTY
From Date of Purchase
FSPO replacement parts and repair labor to
correct defects in materials or workmanship.
Service must be provided by an authorized
Whirtpool~ service company.
WHIRLPOOL
DR006
WILL PAY FOR
WILL NOT PAY FOR
A. service calls to:
1. Correct the installation of the dryer.
2. Instruct you how to use the dryer.
3. Replace house fuses or correct house wiring or plumbing.
4. Replace light bulbs.
B. Repairs when dryer is used in other than normal, single-family
household use.
C. Pi&up and delivery. This product is designed to be repaired in the
home.
D. Damage to dryer caused by accident, misuse, fire, flood, acts of God
or use of products not approved by Whirlpool.
L Repairs to parts or systems caused by unauthorized modifications
made to the appliance.
WHIRLPOOL CORPORATION
SHALL NOT BE LIABLE FOR INCIDENTAL OR
CONSEQUENTIAL
DAMAGES. Some states do not allow the exclusion or
limitation of incidental or consequential damages so this limitation or exdusion
may not apply to you. This warranty gives you specifii legal rights, and you may
also have other tights which vary from state to state.
Outside the United States, a different warranty may apply. For details, please
contad your authorized Whirlpool distributor or military exchange.
lf you need service, first see the ‘Service and Assistance’ section of this book.
After checking ‘Service and Assistance.’ additional help can be found by calling
our Consumer Assistance Center telephone number, 1-800-253-l 301, from
anywhere in the U.S.
60 Registered
Trademark
Part No. 3391372 Rev. A
01992 Whirlpool Corporation
/ SM Service Mark of Whirlpool Corporation
Printed in U.S.A.