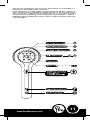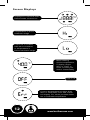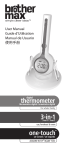
1
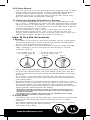
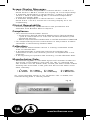
Contents
02
02
02
Frequently Asked Question’s
06
Introduction
06
A Bit about Body Temperature
07
Ensuring Safe, Accurate Measurements
08
Specific Notes for Measuring Ear Temperature
Specific Notes for Measuring Forehead Temperature 09
10
General Warnings
10
Key to Functions & Screen Display
12
Screen Displays
13
How to Use the Thermometer
15
How to Use the Accessories
16
Battery Power and Replacement
16
Battery Safety Guidelines
17
Product Specification
Your Family Members’ Normal Temperature Range 19
20
Other Products in our Range
20
Further Information
• In this Box
• Important
•
•
•
•
•
•
•
•
•
•
•
•
•
•
•
•
•
In this Box
The packaging box your thermometer came in should have
contained:
1 x Digital Thermometer
1 x Stand
1 x Carry Case
2 x AAA batteries
1 x User’s Manual
If any parts were missing please contact Brother Max directly. Our contact details can be found at the end of this manual.
Important
• Before using your thermometer, you should read this manual
thoroughly so that you understand all instructions and follow
all warnings.
• This manual is provided for information purposes only.
• The product is not meant to be a substitute for the advice
provided by your own physician or other medical professional.
You should not use the information contained herein, or from
this product’s temperature readings, for diagnosing or treating
a health problem or disease, or prescribing any medication. If
you have or suspect that you have a medical problem, promptly
contact your healthcare provider.
• For specific information about your own body temperature, including what measurement is considered normal for you, CONSULT YOUR PHYSICIAN.
• Before doing so - and only if you have done so before the
condition you are consulting a physician about has commenced
- it is likely to help your physician if you have completed the
measuring exercise described in the ‘Your Family Members’
Normal Temperature Range’ section of this manual on page 19.
F.A.Q’s - Frequently Asked Questions
‘‘Why might I be getting an inaccurate ear or forehead
temperature reading?”
•The most common cause of inaccurate readings is the probe
not being clean; earwax, perspiration, cosmetics, oil, dust or any
other dirt will affect accuracy.
Other causes are:
• Incorrect setting between ear and forehead modes.
• Taking ear temperature when the thermometer is set to forehead mode, and vice versa.
• Not allowing 30 minutes to elapse:
• Before taking ear or forehead temperature when coming
indoors from the cold or hot.
• If a coldpack or hotpack has been used.
• If the thermometer has been stored in a significantly cooler
or warmer environment.
• Not allowing 10 seconds in-between each repeated body temperature reading (to allow the probe to re-acclimatise).
• Comparing a reading from another thermometer that is:
• Calibrated to a different range or format.
• Faulty.
2
www.brothermax.com
‘‘How do I clean wax and other dirt off the thermometer probe?”
• Clean the probe by very gently wiping it with, ideally, a cotton
swab moistened with alcohol or a very soft cloth moistened with
alcohol. Alternatively a dry cotton swab can be used, or a baby
wipe so long as it is very soft and its water content is not so
high that it is dripping wet.
• Never use an abrasive cloth as it will damage the probe.
• Always allow the alcohol (or moisture) to completely dry out
before taking temperature after cleaning.
• Visit our website to watch movies demonstrating cleaning the probe.
‘‘Why does my thermometer make a ticking noise when
turned upside down?”
• This is not a fault! When you turn the thermometer upside
down, the soft ‘ticking’ sound you can hear is the ‘tilt switch’
that enables the screen to always know which way up it should be.
• This is because our ‘tilt switch’ is mercury-free.
‘‘Is it best to measure temperature in the ear of forehead?”
“Why does the thermometer have both forehead and ear
temperature modes?”
‘‘If measuring the forehead is more convenient, why do we
need the option to measure ear temperature?”
• Readings from the ear are always best as you need an internal
reading to get the all-important core body temperature which
measuring the eardrum gives you as it shares blood supply with
the temperature control centre in the brain1.
1
Netter H F, Atlas of Human Anatomy, Novartis Medical Education, East Hanover, NJ, 1997
• However, many children and adults don’t want to have a probe
put in their ear, either because they just feel uncomfortable
with it, or maybe because they are ill and their ear hurts, so the
forehead reading provides a convenient alternative.
“Why can I get different measurements from forehead vs. ear readings?”
• It is not uncommon to obtain different readings between ear
and forehead as ear readings reflect internal temperature whilst
forehead is external.
• Furthermore, forehead temperature will be affected by environmental factors such as exposure to heat or cold. For example, sitting next to a hot radiator or cold air
conditioning unit will directly affect forehead temperature,
and can even make the temperature on one side of the head
different to the other.
“Why can I get different measurements from one ear reading to the next?”
• It is not uncommon for small variances in temperature between
each ear, so always take the temperature in the same ear.
• Larger differences will be caused by positioning and technique, such as:
• The angle you are holding the thermometer.
• How far you have inserted the probe in to your ear.
• How much your hand may be moving.
This is because different positioning and technique will result
in different parts of the ear canal being measured. This is illustrated in Fig. 1-3 (see page 5).
www.brothermax.com
3
• Larger differences will also occur throughout the day as body
temperature fluctuates.
• External factors also influence ear temperature, such as:
• Having been lying on an ear.
• One ear being covered.
• Being exposed to very hot or very cold temperatures.
• Recently been bathing or swimming.
• Obstructions in the ear like earwax will also result in inaccurate
or different readings as they will interfere with the infrared heat
being measured by the eardrum and surrounding tissues. This
is illustrated in Fig. 4. (see page 5) • Also remember to wait 10 seconds in-between each reading.
“Why can I get different measurements from one forehead
reading to the next?”
• Every time you place the probe on your forehead, it is likely to
be in a different part of your head. Since forehead temperature
is affected by environmental factors such as exposure to heat or
cold, placing the probe on a different part of your forehead will
result in different temperatures especially if, for example, you
are sitting next to a hot radiator or cold air conditioning unit.
• Forehead temperature is also affected by proximity to blood
veins, as an area which has more veins close to the skin will be
warmer than an area that has bone under the skin.
• So, for the most accurate forehead temperature, use the Scan
Mode function (as it measures the highest temperature across
the whole forehead), as follows:
• Place the probe gently on your left temple, press and KEEP
pressed the ‘On/Off/Take Temp’ button, move the probe
across your forehead to the right temple (Fig. 5, see page
5) - always keeping the probe in contact with your forehead
- and then let go of the ‘On/Off/Take Temp’ button. Once a
beep sounds, remove the probe from your forehead to read
the temperature on the screen.
• Also remember to wait 10 seconds in-between each reading.
“What is the difference between readings from different parts of the body?”
• Normal body temperature is a range that, as the following table
shows, varies by site:
Axillary2:
Oral2:
Rectal2:
94.5 - 99.1 ºF
34.7 - 37.3 ºC
95.9 - 99.5 ºF
35.5 - 37.5 ºC
97.9 - 100.4 ºF
36.6 - 38.0 ºC
2
Chamberlain, J.M., Terndrup, T.E., New Light on Ear Thermometer Readings, Contemporary
Paediatrics, March 1994.
• Medical research has not yet determined a definitive correlation
between oral, rectal, ear, and armpit temperature measurements,
which is unsurprising given how different sites can be so effected
by external factors. Many medical practitioners advise that measurements from different sites should not be directly compared, however some medical practitioners advise the following correlation of temperature results based on an
average normal oral temperature of 37.0°C3 / 98.6°F3 :
Armpit temperature3:
0.5°F (0.3°C) to
1.0°F (0.6°C)
lower than Oral
temperature.
3
Oral temperature3:
Rectal temperature3:
0.5°F (0.3°C) to
1.0°F (0.6°C)
lower than Rectal
or Ear temperature
0.5°F (0.3°C) to
1.0°F (0.6°C)
higher than Oral
temperature.
Ear temperature3:
0.5°F (0.3°C) to
1.0°F (0.6°C)
higher than Oral
temperature.
Jan Nissl, RN, BS, Rectal, Ear, Oral, And Axillary Temperature Comparison, Everyday Health, Inc, April 2007
4
www.brothermax.com
Note: W
hen consulting your physician or other medical professional, communicate
if you have used the Brother Max thermometer to measure ear
or forehead temperature and if possible, note the individual’s
normal Brother Max ear or forehead temperature range as additional
reference (see User’s Manual).
“If I choose to use a probe cover on the Brother Max
thermometer, will this affect the accuracy of my readings?”
• Yes, using a probe cover from another brand of thermometers
WILL affect accuracy as the Brother Max thermometer is calibrated to work WITHOUT probe covers. So never cover the
probe on the Brother Max thermometer.
“Should the screen light up when the thermometer is in use?”
• Yes, the screen does light up when the thermometer is in use. The
screen’s light automatically turns itself on every time any button is
pressed or any time the thermometer is turned upside down, and
automatically turns itself off after 10 seconds (to conserve the batteries).
• Please note that the back-light is barely visible in daylight.
“Why are the digits sometimes only partly visible when I
first switch the Thermometer on?”
• As the screen in an LCD (liquid crystal display), the liquid
crystals sometimes need to re-set themselves during the first
10-20 seconds of power running through the screen. So long as
all digits and icons are visible within 20 seconds, and remain
visible when on, this is not a fault.
“What do the different definitions of temperature taking sites mean?”
•
•
•
•
•
•
Tympanic = ear temperature
Oral
= mouth temperature
Ear = ear canal temperature
Axillary = armpit temperature
Rectal = anus temperature
Forehead = temple or forehead temperature
Fig. 1
Fig. 2
Fig. 3
infrared
beam
Fig. 4
www.brothermax.com
Fig. 5
5
Introduction
This thermometer takes both ambient and body temperature in 1
second by measuring either the temperature in the immediately surrounding area or the heat generated by the eardrum or the
surface of the forehead.
It has been developed for optimum comfort, ease and speed of
use and utilises digital, infra-red technology to ensure optimum
accuracy.
In this manual, ‘ambient’ refers to both inside and outside
temperature. However, because this is more commonly used inside
than outside, the product’s packaging and manual only refers to
ambient mode as ‘room’.
This device has the following advantages:
1F
ast and accurate
Accurate digital reading to 0.1º in just 1 second
2M
ulti temperature reading
Digitally measures ear, forehead and room temperature.
3E
asy to use
Simple function per button, with clear symbols
4U
se anywhere
At Home: Fix to a flat surface or wall mount on its
own stand
Or Travel: Protective case for the road
5H
ygienic and economical
Just wipe clean, no need for expensive probe covers
6D
ay or night
Back-lit for easy reading
A Bit about Body Temperature
Body temperature refers to the internal temperature of the body
(also known as core temperature). ‘Normal’ body temperature depends on when, where and in whom it is measured. Body temperature fluctuates in any given 24-hour cycle. It tends to be
lowest in the early morning and highest in the late afternoon. Body
temperature also varies from one body part to another, as well as
amongst different ages, especially under 6 months and over 65
years of age. Body temperature may also increase as a result of
overdressing or strenuous exercise, especially during hot weather.
Incorrect temperature taking may cause false alarm. There are
many things that can affect your body temperature like extreme
activity, ovulation, pregnancy, smoking and so on.
Whilst this thermometer can measure body temperature from the
ear and forehead, changes in core body temperature are reflected
more quickly and accurately in the eardrum since it shares blood
supply with the temperature control centre in the brain. And 6
www.brothermax.com
since forehead temperature can be more easily affected by perspiration, skin oil, cosmetics and the ambient temperature
itself, measurements are usually more accurate when taken from
the ear.
The following temperature ranges are considered normal:
Normaltemperaturerangesbyage
Information from “Determination of Normal Ear Temperature with an Infrared Emission
Detection Thermometer” by Chamberlain, J.M., MD, and Terndrup, T.E., MD,
published in the Annals of Emergency Medicine, January 1995
Note: Do not self-diagnose. The use of any thermometer is not intended as a
substitute for consultation with a physician.
If the temperature of a child under 6 months old reaches 40.0°C / 104.0°F or
more, consult a doctor immediately. Please note that, as the patient becomes
older, this 40.0°C / 104.0°F ceiling actually falls e.g. a 2 year old may need to
consult a doctor immediately if their temperature reaches 39.0°C / 102.2°F.
CAUTION: High prolonged fever always requires medical attention, especially
for young children.
Ensuring Safe, Accurate Measurements
This thermometer has been designed to work without probe covers,
so never use probe covers from other brands as this will give an inaccurate temperature reading.
It is therefore important to always keep the probe clean as earwax,
perspiration, cosmetics, oil, dust or any other dirt will affect the
accuracy of temperature measurement.
Clean the probe by very gently wiping it with, ideally, a cotton swab
moistened with alcohol or a very soft cloth moistened with alcohol.
Alternatively a dry cotton swab can be used, or a baby wipe so long
as it is very soft and its water content is not so high that it is dripping wet. Never use an abrasive cloth as it will damage the
probe. Always allow the alcohol (or moisture) to completely dry out
before taking temperature after cleaning. Visit our website to watch
movies demonstrating cleaning the probe.
The thermometer is not waterproof so do not place any part of it
in liquid.
Do not expose the thermometer to extreme high or low temperatures
for prolonged periods, such as in a particularly hot or cold vehicle
or in direct sunlight.
When taking ambient temperature, please wait 10 minutes before
taking temperature for the probe to acclimatise when moving from
one room to another, and 30 minutes when moving from indoors to
outdoors (or vice versa).
Measuring body temperature within 30 minutes of eating, exercising
or bathing can give an inaccurate temperature measurement.
www.brothermax.com
7
When taking ear and forehead temperature, please wait 30 minutes
before taking temperature to allow body temperature to adjust
when coming indoors from the cold or hot, or if a coldpack or
hotpack have been used.
In all modes, please wait 30 minutes before taking temperature
if the thermometer has been stored in a significantly cooler or
warmer environment.
When repeatedly taking body temperature, allow 10 seconds in-between each reading to allow the probe to re-acclimatise and
take average reading as small deviations may naturally occur.
If and when informing a medical practitioner of your temperature,
ensure you inform them if you measured ear or forehead and,
ideally, what your normal temperature range is. For help in gaining
a more accurate indication of your own body’s normal temperature
range, please refer to the ‘Your Family Members’ Normal Temperature Range’ section of this manual.
Specific Notes for Measuring Ear Temperature
In ear mode, it is not uncommon for small variances in temperature
between each ear, so always take the temperature in the same ear.
Larger differences will be caused by positioning and technique, such as:
• The angle you are holding the thermometer.
• How far you have inserted the probe in to your ear.
• How much your hand may be moving.
This is because different positioning and technique will result in different
parts of the ear canal being measured. This is illustrated in Fig. 1-3.
Fig. 1
Fig. 2
Fig. 3
Larger differences will also occur throughout the day as body temperature fluctuates.
External factors also influence ear temperature, such as:
• Having been lying on an ear.
• One ear being covered.
• Being exposed to very hot or very cold temperatures.
• Recently been bathing or swimming.
Obstructions in the ear like earwax will also
result in inaccurate or different readings as
they will interfere with the infrared heat being
measured by the eardrum and surrounding
tissues. This is illustrated in Fig. 4.
infrared
beam
Fig. 4
8
www.brothermax.com
Also remember to:
• Correctly choose between ear and forehead modes, as taking ear temperature when the thermometer is set to forehead mode will give an inaccurate temperature reading, and vice versa.
• Wait 10 seconds in-between each reading (to allow the probe
to re-acclimatise).
• Allow 30 minutes to elapse:
• Before taking ear or forehead temperature when coming
indoors from the cold or hot.
• If a coldpack or hotpack has been used.
• If the thermometer has been stored in a significantly cooler
or warmer environment.
Do not force the thermometer further in to the ear canal than feels
natural as it may cause injury or damage to the ear. Remove it
immediately if it causes pain or discomfort as this may also cause
injury or damage to the ear.
Do not insert the probe if suffering from an outer ear infection
(also known as otitis externa or otitis media) or if the ear contains
medication, blood or any drainage as it may cause further damage
to the ear.
Do not insert the probe if the ear canal is wet (such as after
bathing or swimming) as it may cause injury or damage to the ear.
Specific Notes for Measuring Forehead
Temperature
In forehead mode, it is not uncommon for variances in
temperature between different parts of the forehead. This is
because forehead temperature is affected by:
• Proximity of the temperature probe to blood veins, since an
area which has more veins close to the skin will be warmer
than an area that has bone under the skin.
• Environmental factors such as exposure to heat or cold. For example, sitting next to a hot radiator or cold air conditioning unit will directly affect forehead temperature, and
can even ensure that the temperature on one side of the head
is different to the other.
So every time you place the probe on your forehead, it is
likely to be in a different part of your head. This is why our
thermometer takes forehead temperature by scanning the probe
from one temple to the other, as this measures the highest
temperature across the whole forehead. See “Measuring Forehead
Temperature” for full instructions.
Fig. 6
Next Reading Countdown
If you do not wait 10 seconds in-between
each (ear or forehead) reading, a 10
second countdown will appear on the
LCD screen and the device will not read
the temperature. This allows the probe to
re-acclimatise. After 10 seconds the device
will be ready to take another temperature.
If you do not, the ‘Next Reading Countdown’
feature will automatically activate. See Fig. 6.
www.brothermax.com
Countdown 10-0
9
General Warnings
Keep the thermometer out of children’s reach to ensure they
do not inflict damage on themselves by forcibly inserting the
thermometer too far in to their own ear.
Immediately consult a doctor if your child accidentally swallows
a battery.
Avoid knocking, shaking, dropping or stepping on the thermometer.
In such an event, carefully inspect the device for signs of damage
and immediately return to Brother Max for repair if you suspect
any faults.
Do not use a mobile or cordless phone near the thermometer.
Do not disassemble, repair, or modify the thermometer.
Do not use this thermometer other than for measuring ambient,
ear or forehead temperature.
Key to Functions & Screen Display
10
www.brothermax.com
Note: Do not self-diagnose. The use of any thermometer is not intended as a
substitute for consultation with a physician.
If the temperature of a child under 6 months old reaches 40.0°C / 104.0°F or
more, consult a doctor immediately. Please note that, as the patient becomes
older, this 40.0°C / 104.0°F ceiling actually falls e.g. a 2 year old may need to
consult a doctor immediately if their temperature reaches 39.0°C / 102.2°F.
CAUTION: High prolonged fever always requires medical attention, especially
in young children.
www.brothermax.com
11
Screen Displays
Displays for 2 seconds when
thermometer is turned on
Temperature is above
maximum range
Probe not in contact
with ear or forehead,
or temperature is
below minimum range
When reading
child’s temperature,
if display shows
40ºC or 104ºF or
more, consult your
doctor immediately
Unit is off
If room temperature is higher than
40ºC or lower than 10ºC, the screen
will display ‘Err’ when you take either
ear or forehead temperature
12
www.brothermax.com
How to Use the Thermometer
1W
hen Using Thermometer for the 1st Time:
• Open the battery compartment cover by sliding it to the small
end of the thermometer.
• Put 2 x AAA batteries into the battery compartment in the
direction illustrated inside the battery compartment.
• Replace the battery compartment cover.
• Turn on and use thermometer as described below.
Note: If the batteries have been inserted the wrong way, the thermometer
will not work and the handle might warm up, in which case immediately
remove the batteries (to prevent damaging the thermometer) and re-insert.
2 Switching Thermometer ON:
• The thermometer can be switched ON in all 3 temperature
modes - Forehead, Ear or Ambient (room or outside).
• Start by briefly pressing ‘On/Off/Take Temp’ button which turns
on the thermometer. All icons will display on the screen for 2
seconds followed by a short beep sound indicating that the
thermometer is now ready to use. The screen is also automatically backlit for 10 seconds.
• Once ON, if the probe is IN (Fig. 7), the screen displays the ambient temperature which is continued to be measured
until either the thermometer is turned OFF or the temperature
mode is changed.
• Once ON, if the probe is OUT (Fig. 8), the screen displays the
last ear or forehead temperature taken. Briefly pressing the
‘On/Off/Take Temp’ button now will measure ear or forehead
temperature.
Fig. 7
Fig. 8
Probe IN for
Ambient temp
Probe OUT for
Ear and Forehead temp
3 Switching Thermometer OFF:
• If ON in ambient temperature mode, press the ‘On/Off/Take
Temp’ button - which will instantly sound an immediate short
beep - and hold it for 3 seconds until you hear a second short
beep and OFF appears on the screen.
• If ON in Ear or Forehead temperature mode, the thermometer
can not be switched off manually because it turns itself OFF
automatically after 30 seconds if left idle. This is a power save
feature. If you want to switch it OFF before 30 seconds, you can
switch to ambient temperature mode (see 6 on next page) and
repeat the above operation.
4 Measuring Ambient Temperature:
• If ON with the probe IN (Fig. 7), the thermometer is in Ambient
temperature mode as displayed on the screen by a House
icon. No further action is required as the temperature is
taken automatically and will automatically be re-taken every 4
minutes.
Note: Always keep the probe guard closed in Ambient temperature mode
to prevent a build up of dirt and dust on the probe.
www.brothermax.com
13
5 Measuring Ear or Forehead Temperature:
• If ON with the probe OUT (Fig. 8), the thermometer is in Ear
or Forehead temperature mode. The screen will display either
an Ear or Forehead icon to indicate which temperature mode it
is currently in, and it will also display the last ear or forehead
temperature taken.
• If it is in Ear mode but you want Forehead or vice versa, see 7
for switching between Ear and Forehead modes.
Measuring Ear Temperature:
• Place the probe gently in to the ear, briefly press the ‘On/Off/
Take Temp’ button and leave the probe in contact with the
ear until a beep sounds. Then remove the probe and read the
temperature on the screen.
Measuring Forehead Temperature:
• Place the probe gently on your left temple, press and KEEP pressed
the ‘On/Off/Take Temp’ button, move the probe across your forehead to the right temple - always keeping the probe in
contact with your forehead - and then let go of the ‘On/Off/Take
Temp’ button. Once a beep sounds, remove the probe from your
forehead to read the temperature on the screen.
• The backlight will automatically turn itself off after 10 seconds.
Note: Make sure you are in the correct mode before taking the temperature
by checking if the screen is displaying an Ear or Forehead icon.
It takes 1 second to read forehead temperature and 1 - 2 seconds to read
ear temperature.
6 Switching Between Ambient and Body (Ear or Forehead)
Temperature Modes:
• If ON with the probe IN (Fig. 7 see page 13), switch to Body
(Ear or Forehead) temperature mode by opening the probe
guard and then folding the probe OUT. A short beep will
sound to confirm that it has now changed to Ear or Forehead
temperature mode.
• If ON with the probe OUT (Fig. 8 see page 13), switch to
Ambient temperature mode by folding the probe IN and then
closing the probe guard. A short beep will sound to confirm that
it has now changed to Ambient temperature mode.
7 Switching Between Ear or Forehead Temperature Modes:
• Briefly press ‘Ear/Forehead’ button to change between Ear
and Forehead modes. A short beep will sound to confirm this
change and the screen will display an Ear or Forehead icon to
indicate which temperature mode it is in. It will also show the
last temperature taken in that mode.
Note: Pressing the ‘Ear/Forehead’ button when in Ambient mode will
produce no response.
8 Switching Between Celsius and Fahrenheit:
• Briefly press ‘Celsius/Fahrenheit’ button to convert between Celsius
and Fahrenheit. A short beep will sound to confirm this change.
9 Backlight:
• To turn the backlight ON again after it has automatically turned OFF:
• In Ambient temperature mode, briefly press the ‘On/Off/Take
Temp’ button.
• In Ear or Forehead temperature modes, re-take the
temperature, or switch between Celsius and Fahrenheit, or
switch between Ear and Forehead temperature modes.
• A short beep will sound to confirm that the backlight is now ON.
Note: The backlight will always automatically
switch itself off after 10 seconds.
14
www.brothermax.com
10 Probe Guard:
• You can open or close the probe guard by flipping it up or down.
• Always keep the probe guard closed in Ambient temperature
mode or after measuring ear or forehead temperature to
prevent a build up of dirt and dust on the probe, which may
give an inaccurate temperature reading.
11 Switching Display Direction on Screen:
• In Ambient temperature mode, the screen automatically flips
up or down - depending on which way the thermometer is being
held (by hand or on the stand) - so it can always be read in the
correct orientation. A short beep will sound after each time the
screen display flips up or down.
• You will also hear a soft ‘ticking’ sound when you turn the
thermometer upside down. This is not a fault! It is the ‘tilt
switch’ that enables the screen to always know which way up it
should be, doing so without the need for mercury.
How To Use the Accessories
1 Stand:
• The Stand is provided so the thermometer can be conveniently
and safely positioned whilst measuring Ambient temperature
and/or so you always know where it is.
• Once on the Stand, the thermometer is free to rotate through
180°, allowing it to be positioned on horizontal or vertical surfaces, such as:
• on a table (Fig. 9) • under a shelf (Fig. 10)
• on a shelf (Fig. 9) • on a wall (Fig. 11)
Fig. 9
Fig. 10
Fig. 11
• The screen will automatically display the right way in all positions.
• To place the thermometer onto the Stand, gently pull the two
arms on the Stand apart and insert the thermometer in-between
the arms. • To remove it, use one hand to gently pull the two arms open
and, at the same time, hold and lift out the thermometer with
your other hand.
• An adhesive pad is supplied already affixed to the base of the
Stand to easily mount it to a wall or under a shelf. To do so, first
remove the paper from the adhesive pad placed underneath
the Stand, then position the Stand in the required location and
finally add the thermometer (as above).
Note: When affixing the Stand to a wall, be careful to ensure that it is
straight to ensure that the thermometer does not appear wonky when
placed in the Stand.
You do not need to remove the paper from the adhesive pad if simply
freestanding the Stand on a shelf or table.
2 Carry Case:
• The Carry Case (Fig. 12 see page 16) is provided to conveniently
protect the thermometer when not being used or is taken
outside.
• The Probe Guard should be closed and thermometer switched
OFF before placing the thermometer
inside the Carry Case.
www.brothermax.com
15
• Please ensure the thermometer is always placed inside the
Carry Case when it’s travelling with you.
• The lid of the Carry Case can also act as a temporary shelf
stand for the thermometer (Fig. 13).
Fig. 12
Fig. 13
Note: Unlike when in the Stand, the thermometer is not securely held
when standing on the Lid of the Carry Case so take care to ensure
stability; please do not place it where it might get knocked, such as on a
table, as the thermometer might get damaged if it falls to the floor.
Battery Power and Replacement
1T
he thermometer has been designed to use as little power
as possible. One set of batteries will, on average, allow it to
remain constantly ON in Ambient temperature mode for 6
months or take 3,000 ear or forehead measurements.
2 The
battery levels are indicated on the screen as they drop
(see pictures below).
eplace both batteries when the screen indicates LOW
3R
BATTERY. It is not recommended to let the batteries get VERY
LOW to ensure there is always sufficient power available to take
temperature.
Note: The screen backlight will become less bright when the battery
becomes LOW.
4W
hen the batteries get VERY LOW, an audible alarm will sound
intermittently for 10 seconds before the thermometer turns itself off.
5T
o change the batteries, open the battery compartment by
sliding the cover towards the small end of the thermometer,
remove the old batteries and replace with 2 new AAA batteries.
Battery Power Levels
Full Battery
Used Battery
Low Battery
Very Low Battery
Battery Safety Guidelines
1 If the batteries have been inserted the wrong way, the
thermometer will not work and the handle may warm up,
in which case immediately remove the batteries (to prevent
damaging the thermometer) and re-insert correctly.
2 The supply terminals are not to be short circuited. (Fig. 14
see page 17)
3 Help the environment by disposing of your products
16
www.brothermax.com
responsibly. The wheelie bin symbol indicates the product
and batteries must not be disposed of in the domestic waste
as they contain substances which can be damaging to the
environment and health. Please use designated collection
points or recycling facilities when disposing of the device or
batteries. (Fig. 15)
Fig. 14
Fig. 15
Note: Please comply with local guidelines or regulations if discarding the
batteries or any part of the thermometer and its packaging.
Remove empty batteries from product to prevent corrosion.
The enclosed batteries are non-rechargeable although rechargeable
batteries can be used.
Batteries should be inserted with correct polarity.
Do not mix old and new batteries.
Product Specification
www.brothermax.com
17
Screen Display Messages:
• If Ear or Forehead temperature is above 42.9°C / 109.2°F or
below 32.0°C / 89.6°F, screen will display HI or LO respectively.
• If Ambient temperature is above 40.0°C / 104.0°F or below
10.0°C / 50.0°F when taking Ear or Forehead temperature,
screen will display ERR.
• If Ambient temperature is above 40.0°C / 104.0°F or
below 5.0°C / 41.0°F, screen will correctly display HI or LO
respectively.
Clinical Repeatability:
• Clinical repeatability characteristics and procedures are
available from Brother Max on request.
Compliance:
• This infrared thermometer device:
• Conforms to BS EN 12470-5:2003 Clinical Thermometers
– part 5: Performance of infra-red ear thermometers (with
maximum device)
• Meets requirements established in ASTM standard E1965-98
• Full responsibility for the conformance of the product to these
standards is assumed by Brother Max.
Calibration:
• The infrared thermometer device is initially calibrated at the
time of manufacture.
• If the thermometer is used and cared for according to the
instructions in this user manual, periodic re-adjustment is not
required.
• If at any time you question the accuracy, contact Brother Max.
Manufacturing Date:
• Manufacturing date is indicated by the LOT number located on
the inside of the battery cover (see Fig. 16). To interpret the
LOT number in to an actual date, look at just the first two letters
whereby the first letter is the year and the second letter is the
date, whereby:
E = 2011 • 1st Letter D = 2010
• 2nd Letter A = January B = February F = 2012 etc.
C = March etc.
So, in the example shown in Fig. 16 where “DA” is stated, the manufacturing date is January 2010.
Fig. 16
18
www.brothermax.com
Your Family Members’ Normal Temperature Range
Whilst normal temperature ranges by age are shown on page 7
of this manual, every member of the family will have a slightly
different ‘normal’ temperature range.
So it’s a good idea to build up a picture of those normal ranges for
each member of the family using your regular thermometer, no matter what type or brand of thermometer you use.
This will help you and your medical practitioner when a family
member is unwell as you will have a far more reliable benchmark to
compare against.
To do this, take temperature readings for each member of your family:
• At three different times of the day, such as 8am, 1pm and 6pm,
but always with at least five hour intervals;
• Over five different days;
• Always from the same body part;
• Always using the same thermometer;
• Always in the same room in your home.
Our family members’ normal
temperature range: Ear
Family Member's Name:
Date:
08:00
13:00
18:00
°C / °F
°C / °F
°C / °F
°C / °F
°C / °F
°C / °F
°C / °F
°C / °F
°C / °F
°C / °F
°C / °F
°C / °F
°C / °F
°C / °F
°C / °F
Our family members’ normal
temperature range: Forehead
Family Member's Name:
Date:
08:00
13:00
18:00
°C / °F
°C / °F
°C / °F
°C / °F
°C / °F
°C / °F
°C / °F
°C / °F
°C / °F
°C / °F
°C / °F
°C / °F
°C / °F
°C / °F
°C / °F
Notes: Do not self-diagnose.
The use of any thermometer is not intended as a substitute for consultation
with a physician. If the temperature of a child under 6 months old reaches
40.0°C / 104.0°F or more, consult a doctor immediately. Note that this danger
level drops the older the patient becomes.
www.brothermax.com
19
Other Products in our Range
We have over 30 products in our range, including:
Visit www.brothermax.com for further information
Further Information
If you have any questions about, or problems with, your thermometer,
please get in touch with us (see below for contact details).
For more information on this and all products in our range,
including movies demonstrating the features, benefits and
maintenance of this product, visit www.brothermax.com
We’d really like to hear from you. We want to know what you like
and how our products could make your life even easier or happier.
We want to know if you have a parenting challenge that you need a solution for, or a product that you find frustrating. Don’t be shy,
drop us a line at [email protected]
Please retain our address and packaging for future reference
Brother Max, Simple Clever Ideas™ and Inspired by Family® are registered
trade marks. © and Designright 2011 Brother Max. Worldwide registered
designs and patents granted and pending.
Product Code: 70001
Version 5.0
20
www.brothermax.com