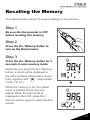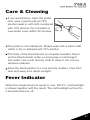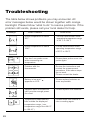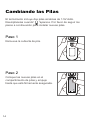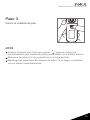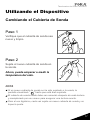
1
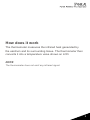
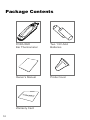
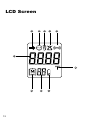
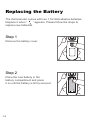
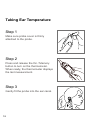
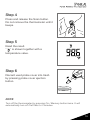
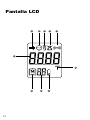
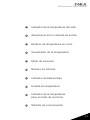
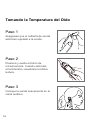
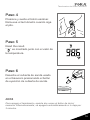
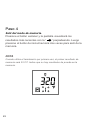
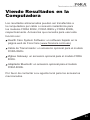
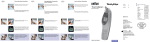
Ear Thermometer
IR20c / IR20z / IR20b
Owner’s Manual
311-1261000-030 Version 3.0 2012/11
IMPORTANT SAFETY
INSTRUCTIONS
READ THIS BEFORE USING
The following basic safety precautions
should always be taken.
1. Close supervision is necessary when the thermometer
is used by, on, or near children, handicapped persons or
invalids.
2. Use the thermometer only for the intended use described in
this manual.
3. Do not use the thermometer if it is not working properly, or if it
has suffered any damage.
4. Do not use accessories which are not supplied or
recommended by the manufacturer.
KEEP THESE INSTRUCTIONS IN A SAFE PLACE
TABLE OF CONTENT
06
Cautions and Warnings
07
Restrictions of Use
08Introduction
10
Package Contents
11
Thermometer Parts
12
LCD Screen
14
Replacing the Battery
16
About Normal Body Temperature & Fever
17
Using the Device
17
Replacing Probe Cover
18
Taking Ear Thermometer
20
Hints on Taking Ear Temperature
21
Recalling the Memory
23
Viewing Results on a Personal Computer
27
Care & Cleaning
27
Fever Indicator
28Troubleshooting
29
Specifications
30
Warranty
Cautions and Warnings
As with any thermometer, proper technique is crucial to
getting accurate temperature readings. Please read this
manual thoroughly and carefully before using.
Always store the thermometer in a cool and dry place:
temperatures between -4℉ to 140℉ relative humidity less
than 95%. Avoid direct sunlight.
Avoid dropping the thermometer from a height or strongly
hitting it with a hard object.
Only use the probe cover for infrared FORA IR20 ear
thermometer.
For proper hygiene, do not share probe cover. Damaged
probe cover may result in error display.
Do not disassemble the thermometer.
Basic safety precautions should always be observed,
especially when the thermometer is used on or near children
and disabled persons.
This thermometer is not intended to be a substitution for
consultation with your physician.
Keep probe cover out of reach of children.
Temperature of left and right ear may differ. Always measure
using same ear.
6
Restrictions of Use
This thermometer is clinically proven to produce accurate
temperature measurements. However, please be advised if you
have the following situations:
The accuracy cannot be ensured for a person who has
deformity in the ear such that the thermometer probe can not
be properly inserted into the ear canal.
The accuracy cannot be ensured when blood or drainage is
found in the ear canal.
Take temperature from the other ear if ear drops or
medications have been placed in an ear.
For a person who wears ear plug or hearing aid, remove the
device and wait for 15 minutes before taking temperature.
NOTE
Never try to clean inside the ears. You may accidentally damage the
eardrum or its surrounding tissues. Remove excess earwax only when
you can reach it with a clean cloth. Consult a physician if you suspect the
presence of excess earwax.
7
Introduction
Thank you for choosing FORA IR20 ear thermometer. This
innovative medical device relies on on advanced infrared (IR)
technology to measure temperature instantly FORA IR20 ear
thermometer is an elegantly designed infrared thermometer
meant for your family.
Intended use
FORA IR20 ear thermometer is intended for the intermittent
measurement and monitoring of human body temperature from
ear canal. The device is intended for use by people of all ages
in the home.
8
How does it work
The thermometer measures the infrared heat generated by
the eardrum and its surrounding tissue. The thermometer then
converts it into a temperature value shown on LCD.
NOTE
The thermometer does not emit any infrared signal.
9
Package Contents
FORA IR20
Ear Thermometer
Two 1.5V AAA
Batteries
Owner’s Manual
Probe Cover
Warranty Card
10
Thermometer Parts
1
Probe cover
2
Probe cover ejection
button
3
On/Memory button
4
Sticker
5
Battery cover
6
Data port
7
Probe lens
8
Probe
9
Probe cover detector
1
7
8
2
2
9
10
3
5
4
10
Scan button
6
11
LCD Screen
3
9
1
2
10
4
8
5
12
6
7
1
Ear temperature indicator
2
Non-probe cover warning
3
Temperature scanning in progress
4
Temperature display
5
Memory mode
6
Record numbers
7
Low bettery indicator
8
Temperature unit
9
Temperature indicator for
memory mode
10
Communication symbol
13
Replacing the Battery
The thermometer comes with two 1.5V AAA alkaline batteries.
Replace it when “
” appears. Please follow the steps to
replace new batteries.
Step 1
Remove the battery cover.
Step 2
Place the new battery in the
battery compartment and press
it in until the battery is firmly secured.
14
Step 3
Reattach the battery cover.
NOTE
Although the thermometer works when “
” appears, we still
recommend that you change the battery to obtain an accurate result.
Remove the battery if stored for a long period of time.
The battery should be kept out of reach of children. If they are swallowed, promptly see a doctor for help.
15
About Normal Body
Temperature & Fever
Body temperature can vary from one individual/person to next.
It also varies by location on the body and different time of the
day. Below shows the statistical normal ranges from different
sites. Please keep in mind that temperatures measured from
different sites, even at the same time, should not be directly
compared.
Fever indicates that the body temperature is higher than
normal. This symptom may be potentially caused by infection,
overdressing or immunization. Some people may not
experience fever even when they are ill. These include, but
are not limited to, infants younger than 3 months old, persons
with compromised immune systems, persons taking antibiotics,
steroids or antipyretics (aspirin, ibuprofen, acetaminophen), or
persons with certain chronic illnesses. Please consult your
physician when you feel ill even if you do not have fever.
1
Table 1*
Body Site
Normal Temperature Range
Oral
95.9℉ - 99.5℉ (35.5℃ - 37.5℃)
Axillary
(underarm)
94.5℉ - 99.1℉ (34.7℃ - 37.3℃)
Rectal
97.9℉ - 100.4℉ (36.6℃ - 38.0℃)
Ear
96.4℉ - 100.4℉ (35.8℃ - 38.0℃)
*1. Chamberlain, J. M. Terndrup, T. E., New Light on Thermometer
Readings,Contemporary Pediatrics, March 1994.
16
Using the Device
Replacing Probe Cover
Step 1
Check the probe cover is clean and
new.
Step 2
Attach new probe cover into the
probe.
Now, you can start to test your ear
temperature.
NOTE
If a probe cover is not attached on the probe, LCD will show “
” until
a new probe cover is firmly attached to the probe.
The used probe cover should be removed after each measurement by a
clean and new probe cover to ensure accuracy reading.
For hygiene use, attach a new probe cover each time and do not touch
its tip.
17
Taking Ear Temperature
Step 1
Make sure probe cover is firmly
attached to the probe.
Step 2
Press and release the On / Memory
button to turn on the thermometer.
When ready, the thermometer displays
the last measurement.
Step 3
Gently fit the probe into the ear canal.
18
Step 4
Press and release the Scan button.
Do not remove the thermometer until it
beeps.
Step 5
Read the result.
“ ” is shown together with a
temperature value.
Step 6
Discard used probe cover into trash
by pressing probe cover ejection
button.
NOTE
Turn off the thermometer by pressing On / Memory button twice. It will
automatically turn off if left idle for 3 minutes.
19
Hints on Taking Ear
Temperture
1. As with other of thermometer, you may observe slight variations in consecutive measurements. It is recommended
that you take 3 temperature readings and use the highest
one for the following situations:
Infants younger than 3 months old.
Children younger than 3 years old and who have a
compromised immune system and the presence / absence of
fever is critical.
When you are learning to use the thermometer.
2. Do not take a reading while eating and /or talking. Wait 30 minutes after any of the following situations before taking a measurement:
When you have your ear covered.
After exercising, swimming, or taking a bath. When expose to
extreme temperature.
3. To take accurate readings, the ear must be free from excess earwax build-up.
20
Recalling the Memory
Your thermometer stores 10 recent readings in the memory.
Step 1
Be sure the thermometer is OFF
before recalling this memory.
Step 2
Press the On / Memory button to
turn on the thermometer.
Step 3
Press the On / Memory button for 3
seconds to enter memory mode.
▲
Each time you press the On / Memory
button, a result will be displayed in
the order of dates (latest result shown
first), together with “ ” and number
( from 1 to 10 ).
When the memory is full, the oldest
result is deleted as the new one
added. When the last record is
displayed in the LCD, press On /
Memory button again to return the first
record.
21
Step 4
Exit the memory.
Press the Scan button and LCD will show latest results with
flashing “ ” . Then press On/Memory button again and LCD
will show “ OFF ” to exit memory.
NOTE
When using the thermometer for the first time, the first memory result will
display 32.0℉. It indicates that there are no test results in memory.
22
Viewing Results on a Personal
Computer
Results in memory can be transmitted to the personal computer
by either cable or wireless connection for FORA IR20c, FORA
IR20z and FORA IR20b, respectively. Accessories needed to
activate this function are:
Health Care Software System: a software downloaded from
Fora Care’s website (www.foracare.com/usa)
Interface Cable: an optional accessory for FORA IR20c.
ZigBee Gateway: an optional accessory for FORA IR20z.
Bluetooth Adapter: an optional accessory for FORA IR20b.
Please contact your local customer service for above accessories.
Transmitting data via Cable (FORA IR20c)
Step 1 Install Software
Install Health Care System Software on your computer by
following the instructions provides on Fora Care’s website.
Step 2 Connect to Personal Computer
Connect the interface cable to a serial port on the back of your
computer. With the thermometer turn off, connect the interface
cable to the data port located at the bottom of the thermometer.
Then “ PCL ” will appear in the display, indicating that the
thermometer is ready to transmit data.
23
Step 3 Transmit Data
Follow the instructions provided in the software to transmit
data. Results transmitted will include date and time. Remove
the cable and the thermometer will automatically turn off.
Transmitting data via ZigBee Gateway
Module (FORA IR20z)
Step 1 Install ZigBee Gateway and switch on
the device.
(Please contact your agent to set up the device.)
Step 2 Transmit Data.
After finishing measurement, your results will be transmitted
automatically; the communication symbol on the thermometer
will flash and you will hear two beeps from the Gateway. It
means your result is successfully transmitted to the server.
The thermometer will turn off without pressing any button for 1
minute.
Transmitting data via Bluetooth Adapter
(FORA IR20b)
Step 1
Install Health Care System Software on your computer by
following the instructions provided on Fora Care’s website.
Step 2
Install Bluetooth Adapter Software.
24
Step 3
Reset FORA IR20b thermometer.
Step 4
Pair FORA IR20b thermometer with your computer.
Select FORA IR20b thermometer device code:
“TaiDoc-BTM” and key in the Bluetooth passkey (PIN): 111111
for pairing.
Step 5
Connect Bluetooth Serial Port Service:
Right click on icon “TaiDoc-BTM” and select “connect” and
“Bluetooth Serial Port Service” for connection. The results will
be transmitted automatically to your computer once you finish
taking the temperature. In the meanwhile, the communication
symbol on the thermometer will flash.
If you are using the Bluetooth Adapter provided by Fora Care
Inc., please follow the installation guide “Bluetooth Easy Card”
within the package.
Bluetooth Indicator
Flash fast
Flash slowly
Lit solid
Description
The meter is searching the
device of Bluetooth signal.
The meter is pairing with the
device of Bluetooth.
The meter is transmitting the
data now the connection is
completed.
Bluetooth Indicator
25
NOTE
While the thermometer is connected to the PC or the server, it is unable
to perform a test.
When the ZigBee Gateway device is normal, the indicator on the device
appears green light. If you find the indicator showing red light, please
contact your agent for help.
If you hear a long “beep” produced from the gateway, that means an
error occurs, please try the connection again. If the problem still exists,
please contact your agent for help.
We recommend that you use bluetooth adaptor provided by Fora Care Inc.
26
Care & Cleaning
If you would like to clean the probe
lens, wipe it gently with an 70%
alcohol swab or soft cloth moistened
with 70% alcohol. Do not attach a
new probe cover within 30 minutes.
The probe is not waterproof. Please wipe with a clean cloth
which is dry or damped with 70% alcohol.
The body of the thermometer is not water-resistant. Never
put the thermometer under a running tap or submerge it
into water. Use a soft and dry cloth to clean it. Do not use
abrasive cleaners.
Store the thermometer in a cool and dry location. Free from
dust and away from direct sunlight.
Fever Indicator
When the measurement is equal or over 100.4℉, red backlight
is shown together with the result. The red backlight will last for
3 seconds and turn off.
27
Troubleshooting
The table below shows problems you may encounter. All
error messages below would be shown together with orange
backlight. Please follow “what to do” to resolve problems. If the
problem still exists, please call your local dealer for help.
Message
What it means
What to do
Room temperature is below
50℉.
Room temperature is above
104℉.
Put the thermometer under
operating temperature range
of 50℉ to 104℉.
You don’t use probe cover
while measuring ear
temperature.
Please place probe cover into
probe again.
Problem with the
thermometer.
Review the instructions and
re-start the measurement
procedure. If the above steps
do not work.
Please contact the dealer.
Battery is low and “
appears on LCD.
28
Put the thermometer under
operating temperature range
of 50℉ to 104℉.
”
Please replace batteries as
soon as possible.
Appears when the batteries
can’t provide enough power
for a test.
Please replace new batteries.
Temperature measurement
falls outside the displayed
temperature range: ( ear
temperature range from 89.6℉
to 109.4℉)
Please follow this manual to
take a reading again.
Specifications
Dimensions
160.5mm(W) x 45.9mm(H) x 32.5mm(D)
Weight
98.33g (include 2 x1.5V AAA batteries)
Battery
2 x 1.5V AAA alkaline batteries
External output
UART (USB& RS232) /ZigBee /Bluetooth
Displayed
temperature range
89.6℉ to 109.4℉ (32℃ to 43℃)
Display resolution
Accuracy
Temperature unit
Operating temperature range
Operating humidity
Storage temperature range
0.1℉
Meet the accuracy requirement specified
in ASTM E1965-98
±0.4℉ (±0.2℃) for the range of 96.8℉
to 102.2℉ (36.0℃ to 39.0℃)
±0.5℉ (±0.3℃) from 93.2℉ to 96.6℉
(34.0℃ to 35.9℃) and from 102.4℉ to
108.0℉ (39.1℃ to 42.2℃)
℉
50℉ to 104℉ (10℃ to 40℃)
95% RH or less
-4℉ to 140℉ (-20℃ to 60 ℃)
Storage humidity
95% RH or less
Memory capacity
10 measurements
The specifications may be changed without prior notice.
29
Warranty
Fora Care Inc. (“Fore Care”) warrants this product to be free
of defects in workmanship and materials for a period on ONE
year from the date of purchase.
During the warranty period, if this product is found to be
defective, you may bring it together with the purchase receipt
and Warranty Certificate on a carry-in basis to Fora Care's
office during normal business hours for warranty service.
We will then repair or replace defective parts or exchange
the whole product as we select, at no charge to the original
owner. After such repair, replacement or exchange, the
product will be warranted from the date of purchase.
This warranty is valid only if the Warranty Certificate and
Warranty Registration Card are duly complete with date
of purchase, serial number and dealer’s stamp, and if the
Warranty Registration Card is sent to local distributor office
not later than 14 days from the date of purchase.
This warranty is void if this product has been repaired or
serviced by unauthorized person. This warranty does not
cover defects caused by misuse, abuse, accident, tampering,
poor maintenance, fire or any other acts beyond human
control.
Except as stated in the above paragraphs, Fora Care
disclaims all other warranties, implied or expressed, including
the warranties of merchantability of fitness for a particular
purpose with respect to the use of this product. Fora Care
shall not be liable for any direct, consequential or incidental
damages arising out of the use or inability to use product.
30
NOTE
31
NOTE
32
Termómetro de Oído
IR20c / IR20z / IR20b
Manual del Usuario
311-1261000-030 Versión 3.0 2012/11
INSTRUCCIONES
IMPORTANTES DE
SEGURIDAD
Termómetro de Oído Fora IR20
LEA LO SIGUIENTE ANTES DE UTILIZAR
Siempre deben tomar las siguientes
precauciones básicas.
1.Una supervisión cuidadosa es necesaria cuando el
dispositivo es utilizado por, para o cerca de niños, personas
impedidas o minusválidos.
2. Utilice el dispositivo solamente para el uso previsto descrito
en este manual.
3. No utilice el dispositivo si no funciona bien o si ha sufrido
algún daño.
4. No utilice accesorios que no son abastecidos o
recomendados por el fabricante.
CONSERVE ESTAS INSTRUCCIONES EN UN LUGAR
SEGURO
TABLA DE CONTENIDO
06
Advertencias y Precauciones
07
Restricciones de Uso
08Introducción
10
Contenido del Paquete
11
Partes del Termómetro
12
Pantalla LCD
14
Cambiando las Pilas
16
Acerca de la Temperatura Corporal & Fiebre
Termómetro de Oído Fora IR20
17
Utilizando el Dispositivo
17
Cambiando el Cubierta de Sonda
18
Tomando la Temperatura del Oído
20
Pistas para Tomar la Temperatura del Oído
21
Repasar la Memoria
23
Viendo Resultados en la Computadora
28
Mantenimiento y Limpieza
28
Indicador de Fiebre
29
Guías Para Resolver Problemas
30
Especificaciones
31
Garantía
Advertencias y Precauciones
Como con cualquier otro termómetro, la técnica apropiada es
decisiva para obtener medidas correctas de la temperatura.
Por favor de leer este manual detenidamente antes de
usar.
Siempre almacene el termómetro en un lugar fresco y seco
entre -4°F a 140°F con la humedad relativa bajo el 95%.
Evite la luz solar directa.
Evite dejar caer el termómetro.
Utilice solamente el cubierta de sonda infrarrojo del
termómetro de oído FORA IR20.
Para asegurar una buena higiene, no comparta el cubierta de
sonda. Los cubierta de sonda dañados pueden dar error en
el resultado.
NO desarme el termómetro.
Debe observar precauciones básicas, especialmente cuando
el termómetro es usado en o cerca de niños o personas
minusválidas.
El uso de este termómetro no es previsto substituir para una
consulta con su médico.
Mantenga los cubierta de sonda fuera del alcance de niños.
La temperatura del oído izquierdo y del derecho pueden
variar. Siempre mida usando el mismo oído.
6
Termómetro de Oído Fora IR20
Restricciones de Uso
Es clínicamente probado que este termómetro mide
temperaturas exactas; sin embargo, sea aconsejado de lo
siguiente:
No se puede asegurar la exactitud para las personas que
tiene una deformidad en el oído tal que no puede colocar
bien el termómetro en el canal auditivo. No se puede asegurar la exactitud cuando se encuentra
sangre o desagüe en el canal auditivo.
Si se ha puesto medicamentos o gotas en un oído, mida la
temperatura del otro oído.
Si lleva un audífono o tapón para el oído, remueva
el dispositivo y espere 15 minutos antes de medir la
temperatura.
NOTA
Nunca trate de limpiar dentro de la oreja. Puede dañar sin querer
al tímpano o los tejido circundantes. Remueva la cera de los oídos
solamente cuando puede alcanzar con un algodón limpio. Consulte su
medico si sospeche la presencia de excesiva cera en los oídos.
7
Introducción
Gracias por elegir el Termómetro de Oído FORA IR20. Este
innovador dispositivo medico depende de avanzada tecnología
infrarroja para medir la temperatura del oído instantáneamente
y con exactitud. El Termómetro de Oído FORA IR20 es un
termómetro infrarrojo de diseño elegante para su familia.
Uso previsto
El Termómetro de Oído FORA IR20 es previsto para la
medición intermitente e vigilancia de la temperatura corporal
humana del canal auditivo. El dispositivo es previsto para el
uso para personas de todas las edades en el hogar.
8
Termómetro de Oído Fora IR20
Cómo funciona
El termómetro mide el calor infrarrojo generado por el tímpano
y sus tejidos circundantes. Luego el termómetro lo convierte en
un valor de la temperatura demostrado en la pantalla.
NOTA
El termómetro no emite ningún señal infrarroja.
9
Contenido del Paquete
Termómetro de Oído
Fora IR20
Dos Pilas de
1.5V AAA
Manual de Usuario
Cubierta de Sonda
Tarjeta de Garantía
10
Termómetro de Oído Fora IR20
Partes del Termómetro
1
Cubierta de sonda
2
Botón de eyección para
el cubierta de sonda
3
Botón de inicio /
memoria
4
Etiqueta
5
Cubierta de pila
6
Puerto de dato
7
Lente
8
Sonda
9
Detectador del cubierta
de sonda
1
7
8
2
2
9
10
3
5
4
10
Botón escáner
6
11
Pantalla LCD
3
1
9
2
10
4
8
5
12
6
7
Termómetro de Oído Fora IR20
1
Indicador de la temperatura del oído
2
Advertencia de no cubierta de sonda
3
Escáner de temperatura en curso
4
Visualizador de la temperatura
5
Modo de memoria
6
Número de lecturas
7
Indicador de bateria baja
8
Unidad de temperatura
9
Indicador de la temperatura
para el modo de memoria
10
Símbolo de comunicación
13
Cambiando las Pilas
El termómetro incluye dos pilas alcalinas de 1.5V AAA.
Reemplácelas cuando“
”aparece. Por favor de seguir los
pasos a continuación para instalar nuevas pilas.
Paso 1
Remueva la cubierta de pila.
Paso 2
Coloque las nuevas pilas en el
compartimiento de pilas y empuje
hasta que esté firmemente asegurada.
14
Termómetro de Oído Fora IR20
Paso 3
Cierre la cubierta de pila.
NOTA
Aunque el termómetro funciona cuando “ ” aparece, todavía le
recomendamos que cambie las pilas para obtener un resultado preciso.
Remueva las pilas si lo va a guardar por un largo periodo.
Mantenga las pilas fuera del alcance de niños. Si se traga, contáctese
con un médico inmediatamente.
15
Acerca de la Temperatura
Corporal & Fiebre
La temperatura corporal puede variar de una persona a otra.
También varía entre diferentes lugares del cuerpo y según la
hora del día. La tabla abajo muestra los rangos estadísticos
normales de diferentes lugares. Por favor de tener en cuenta
que las temperaturas medidas de lugares diferentes, aun a la
misma vez, no deben ser comparados directamente.
La fiebre indica que la temperatura corporal es más alta de lo
normal. Este síntoma puede ocurrir debido a la infección, el
vestirse con demasiada ropa, o la inmunización. Puede que
algunas personas no experimenten fiebre aun cuando estén
enfermos. Estas incluyen, pero no se limitan a los bebés
menores de 3 meses, individuos con sistemas inmunológicas
comprometidos, personas que toman antibióticos, esteroides,
o antipiréticos (aspirina, ibuprofeno, acetaminofén), o personas
con ciertas enfermedades crónicas. Por favor de consultar
a su profesional sanitario cuando se siente mal, aun si no
tiene fiebre.
1
Tabla 1*
Lugar del Cuerpo
Rango Normal de Temperatura
Oral
95.9℉ - 99.5℉ (35.5℃ - 37.5℃)
Auxiliar
(las axilas)
94.5℉ - 99.1℉ (34.7℃ - 37.3℃)
Rectal
97.9℉ - 100.4℉ (36.6℃ - 38.0℃)
Oído
96.4℉ - 100.4℉ (35.8℃ - 38.0℃)
*1. Chamberlain, J. M. Terndrup, T. E., New Light on Thermometer
Readings,Contemporary Pediatrics, March 1994.
16
Termómetro de Oído Fora IR20
Utilizando el Dispositivo
Cambiando el Cubierta de Sonda
Paso 1
Verifique que el cubierta de sonda sea
nuevo y limpio.
Paso 2
Sujete el nuevo cubierta de sonda en
la sonda.
Ahora, puede empezar a medir la
temperatura del oído.
NOTA
Si un nuevo cubierta de sonda no ha sido sujetado a la sonda, la
pantalla visualizará “
” hasta que esté bien sujetado.
El cubierta de sonda usado debe ser removido después de cada lectura
y reemplazado por uno nuevo para asegurar una lectura exacta.
Para el uso higiénico, cada vez sujete un nuevo cubierta de sonda y no
toque la punta.
17
Tomando la Temperatura del Oído
Paso 1
Asegúrese que el cubierta de sonda
esté bien sujetado a la sonda.
Paso 2
Presione y suelte el botón de
inicio/memoria. Cuando esté listo,
el termómetro visualizara la última
lectura.
Paso 3
Coloque la sonda suavemente en el
canal auditivo.
18
Termómetro de Oído Fora IR20
Paso 4
Presione y suelte el botón escáner.
Remueva el termómetro cuando oiga
el pito.
Paso 5
Read the result.
“ ” es mostrado junto con el valor de
la temperatura.
Paso 6
Deseche el cubierta de sonda usado
en el basurero presionando el botón
de eyección de cubierta de sonda.
NOTA
Para apagar el termómetro, apriete dos veces el botón de inicio/
memoria. Alternativamente, se apagará automáticamente si lo deja por
3 minutos.
19
Pistas para Tomar la
Temperatura del Oído
1. Como con cualquier otro termómetro, usted puede observar variaciones ligeras en las medidas consecutivas. Se recomienda que tome la temperatura 3 veces y use el resultado más alto para las siguientes situaciones:
Bebés menores de 3 meses.
Niños menores de 3 años que tienen un sistema
inmunológico comprometido para quienes la presencia/
ausencia de fiebre es critico.
Cuando está aprendiendo a usar el termómetro.
No mida mientras que come y/o habla.
2. Espere 30 minutos antes de tomar una lectura después de cualquier de las siguientes situaciones:
Cuando tienes la oreja cubierta.
Después de hacer ejercicio, nadar, o bañarse.
Cuando se ha expuesto a temperaturas extremas.
3. Para tomar mediciones exactas, el oído tiene que estar libre de la acumulación excesiva de cera en la oreja.
20
Termómetro de Oído Fora IR20
Repasar la Memoria
Su termómetro almacena las diez lecturas más recientes.
Paso 1
Asegúrese que el termómetro esté
APAGADO antes de repasar la
memoria.
Paso 2
Presione el botón de inicio /
memoria para encender el
termómetro
Paso 3
Presione el botón de inicio/memoria
por 3 segundos para entrar en el
modo de memoria.
▲
Cada vez que presiona el botón
de inicio/memoria, un resultado se
visualizará en orden cronológico (el
ultimo resultado aparecerá primero)
junto con “
” y el número (de 1 a 10).
Cuando la memoria está llena, la lectura
más antigua será borrado mientras el
nuevo es guardado. Al visualizarse la
última lectura guardada en la pantalla,
presione el botón de inicio/memoria otra
vez y regresará a la primera lectura.
21
Paso 4
Salir del modo de memoria.
Presione el botón escáner y la pantalla visualizará los
resultados más recientes con la “
” parpadeando. Luego
presione el botón de inicio/memoria dos veces para salir de la
memoria.
NOTA
Cuando utiliza el termómetro por primera vez, el primer resultado de
memoria será 32.0°F. Indica que no hay resultados de prueba en la
memoria.
22
Termómetro de Oído Fora IR20
Viendo Resultados en la
Computadora
Los resultados almacenados pueden ser transferidos a
la computadora por cable o conexión inalambrica para
los modelos FORA IR20c, FORA IR20z y FORA IR20b,
respectivamente. Accesorios que necesita para usar esta
función son:
Health Care System Software: un software bajado en la
página web de Fora Care (www.foracare.com/usa).
Cable de Transmissión: un accesorio opcional para el modelo
FORA IR20c.
Zigbee Gateway: un accesorio opcional para el modelo FORA
IR20z.
Adaptador Bluetooth: un accesorio opcional para el modelo
FORA IR20b.
Por favor de contactar a su agenta local para los accesorios
mencionados.
23
Transmitiendo los datos por Cable
(FORA IR20c)
Paso 1 Instalar el Software
Instale en su computadora el software de Health Care System
Software y siga las instrucciones proporcionadas en la página
web de Fora Care.
Paso 2 Conectar a la Computadora
Conecte el cable de transmissión al puerto que está detrás de
su computadora. Con el termómetro apagado, conecte el cable
de transmissión al puerto de dato que está localizado en la
parte posterior del termómetro. Luego “PCL” aparecerá en la
pantalla, indicando que el termómetro está listo para transmitir
los datos.
Paso 3 Transmitir los Datos
Siga las instrucciones proporcionadas en el software para
transmitir los datos. Los resultados transmitidos incluirán la
fecha y la hora. Remueva el cable y el medidor se apagará
automáticamente.
24
Termómetro de Oído Fora IR20
Transmitiendo los datos por el Zigbee
Gateway (FORA IR20z)
Paso 1 Instale el Zigbee Gateway y
Encienda el Dispositivo.
(Favor de contactar a su agente para configurar el dispositivo)
Paso 2 Transmitir los Datos.
Después de que termine midiendo, sus resultados serán
transmitidos automáticamente; el símbolo de transmisión
parpadeara en el termómetro y oirá dos pitos del
gateway, indicando que su resultado ha sido transmitido
satisfactoriamente al servidor. El termómetro se apagará sin
que presione ningún botón después de un minuto.
Transmitiendo los datos por el Adaptador
Bluetooth (FORA IR20b)
Paso 1
Instale en su computadora el software de Health Care System
Software y siga las instrucciones proporcionadas en la página
web de Fora Care.
Paso 2
Instale el software del Adaptador Bluetooth.
25
Paso 3
Reajuste el termómetro FORA IR20b.
Paso 4
Empareje el termómetro FORA IR20b con su computadora.
Seleccione el código del dispositivo FORA IR20b:
“TaiDoc-BTM”. Teclee la contraseña del Bluetooth (PIN):
111111 para emparejamiento.
Paso 5
Conecte el Servicio del Puerto de Serie Bluetooth:
Presione el botón derecho del ratón sobre el icono
“TaiDoc-BTM”. Selecionne “connect” y “Bluetooth Serial Port
Service” para conectar. Después de que termine midiendo,
sus resultados serán transmitidos automáticamente. Mientras
tanto, el símbolo de transmisión parpadeara en el termómetro.
Si usted está usando el Adaptador Bluetooth proporcionado
por Fora Care Inc., por favor de seguir la guía de instalación
“Bluetooth Easy Card” dentro del paquete.
Indicador Bluetooth
Parpadea
rápidamente
Parpadea
lentamente
Iluminado
constantemente
Indicador Bluetooth
26
Descripción
El medidor está buscando
en el dispositivo de la señal
Bluetooth.
El medidor está
emparejamiento con el
dispositivo de Bluetooth.
El medidor está transmitiendo
los datos ahora la conexión
se completa.
Termómetro de Oído Fora IR20
NOTA
Mientras que el termómetro está conectado a la computadora o al
servidor, no podrá hacer una prueba.
Cuando el dispositivo Zigbee Gateway está normal, el indicador está
verde. Si está rojo, por favor de contactar a su agente para la ayuda.
Si oye un largo “pito” del gateway, ha ocurrido un error. Por favor,
intente conectar otra vez. Si el problema continúa, por favor de
contactar a su agente para la ayuda.
Le recomendamos que utilice el adaptador de bluetooth proporcionado
por Fora Care Inc.
27
Mantenimiento y Limpieza
Si le gustaría limpiar el lente,
use un algodón suave o hisopo
humedecidos con alcohol al 70%.
No sujete un nuevo cubierta de
sonda dentro de los siguientes 30
minutos.
La sonda no es impermeable. Por favor de limpiarla con
un algodón limpio que es seco o humedecido con 70% de
alcohol.
El cuerpo del termómetro no es resistente al agua. Por favor
nunca ponga el termómetro en una agua que este corriendo
o sumergirlo dentro del agua. Use un algodón suave y limpio
para limpiar el termómetro. No utilice productos ásperos de
limpieza.
Almacene el termómetro en un lugar fresco y seco, libre de
polvos y fuera de la luz solar directa.
Indicador de Fiebre
Cuando la medición es igual o mayor de 100.4°F, el controluz
será rojo mostrando junto con el resultado. La iluminación roja
durará por 3 segundos y luego se apagará.
28
Termómetro de Oído Fora IR20
Guías Para Resolver
Problemas
La tabla abajo demuestra los problemas con que puede
encontrarse. Todos los mensajes de error abajo se mostrarían
juntos con una contraluz anaranjado. Por favor de seguir “Que
hacer” para resolver los problemas. Si el problema continúa,
por favor de llamar a su vendedor local para la ayuda.
Mensaje
Qué significa
Qué hacer
La temperatura ambiental es
menor de 50°F.
Ponga el termómetro en
temperatura del rango
operacional, 50°F a 104°F.
La temperatura ambiental es
mayor de 104°F.
Ponga el termómetro en
temperatura del rango
operacional, 50°F a 104°F.
No esta utilizando el cubierta
de sonda mientras que mide
la temperatura del oído.
Favor de colocar la cubierta
de sonda en la sonda otra
vez.
Problema con el termómetro.
Repase las instrucciones y
reinicier el procedimiento de
medición. Si esos paso no
funcionan, favor de contactar
a su agente local.
La batería esta baja y “ ”
aparece en la pantalla.
Por favor de reemplazar las
pilas tan pronto que pueda.
La batería esta muy baja. El
termómetro no puede hacer
otra prueba.
Por favor de reemplazar las
pilas.
La temperatura de medición
está fuera del rango visualizado:
rango de la temperatura del
oído de 89.6°F a 109.4°F.
Por favor de seguir este
manual para medir otra vez.
29
Especificaciones
Dimensiones
160.5mm(W) x 45.9mm(H) x 32.5mm(D)
Peso
98.33g (incluye 2 pilas alcalinas de 1.5V AAA)
Fuente de energía
2 pilas alcalinas AAA 1.5V
Salida externa
UART (USB & RS232) / Zigbee / Bluetooth
Rango de temperatura
visualizado
89.6℉ a 109.4℉ (32℃ a 43℃)
Resolución LCD
0.1°F
Exactitud
Cumple con el requerimiento de exactitud
especificado en ASTM E1965-98
±0.4°F (±0.2°C) para el rango de 96.8°F
a 102.2°F (36.0°C a 39.0°C)
±0.5°F (±0.3°C) de 93.2°F a 96.6°F
(34.0°C a 35.9°C) y de 102.4°F a
108.0°F (39.1°C a 42.2°C)
Unidad de temperatura
°F
Temperatura de
funcionamiento
50°F a 104°F (10°C a 40°C)
Humedad operacional
Igual o bajo el 95% de HR
Temperatura de
almacenamiento
-4°F a 140°F (-20℃ a 60°C)
Humedad de
almacenamiento
Igual o bajo el 95% de HR
Capacidad de memoria
10 lecturas
Estas especificaciones pueden cambiar sin noticia previa.
30
Termómetro de Oído Fora IR20
Garantía
Fora Care Inc. (“Fora Care”) garantiza que este producto
está libre de materiales y defectos de mano de obra por un
período de UN año a partir de la fecha de compra.
Durante el periodo de garantía, si encuentra que esté
producto sea defectivo, puede llevarlo junto con el recibo de
compra y el Certificado de Garantía a la oficina de Fora Care
durante las horas de atención para el servicio de garantía.
Reparemos o reemplazaremos las partes defectivas,
o cambiaremos el producto según nuestra discreción,
gratuito al propietario original. Después de tal reparación,
reemplazamiento o cambio, el producto está garantizado a
partir de la fecha de compra.
Esta garantía es valida solamente si el Certificado de Garantía
y la Tarjeta de Registro de Garantía sean debidamente
cumplimentados con la fecha de compra, el número de serie
y el sello del vendedor, o si la Tarjeta de Registro de Garantía
es mandada a la oficina del distribuidor local dentro de 14
días a partir de la fecha de compra.
Esta garantía no es valida si este producto ha sido reparado o
revisado por personal no autorizado. La garantía no cubre los
defectos causados por el uso incorrecto, abuso, accidente,
manipulación, mal mantenimiento, fuego u otros actos ajenos
al control humano.
31
Excepto en lo que los párrafos arriba especifican, Fora Care
renuncia el resto de las garantías, implicadas o expresadas,
incluso a las garantías de comerciabilidad de aptitud para
un propósitos particular con respeto al uso de este producto.
Fora Care no debe ser responsable para ningún daño directo,
consecuente o incidental que surge del uso o incapacidad de
usar este producto.
32