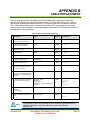
1
AirborneDirect™ Serial Bridge User’s Guide 802.11b/g ABDG-SE Series WLNG-SE Series 802.11b ABDB-SE Series WLNB-SE Series Document number 100-8006-152G Quatech, Inc. Confidential ALL RIGHTS RESERVED. No part of this publication may be copied in any form, by photocopy, microfilm, retrieval system, or by any other means now known or hereafter invented without the prior written permission of Quatech, Inc. This document may not be used as the basis for manufacture or sale of any items without the prior written consent of Quatech, Inc. AirborneDirect™ is a trademark of Quatech, Inc. All other trademarks used in this document are the property of their respective owners. Copyright © 2005-2007 Quatech, Inc Disclaimer The information in the document is believed to be correct at the time of print. The reader remains responsible for the system design and for ensuring that the overall system satisfies its design objectives taking due account of the information presented herein, the specifications of other associated equipment and the test environment. Quatech, Inc has made commercially reasonable efforts to ensure that the information contained in this document is accurate and reliable. However, the information is subject to change without notice. No responsibility is assumed by Quatech, Inc for the use of the information, nor for infringements of patents or other rights of third parties. This document is the property of Quatech, Inc. and does not imply license under patents, copyrights or trade secrets. Quatech, Inc. Headquarters QUATECH Inc.. 5675 Hudson Industrial Parkway Hudson, OH 44236 USA Telephone: Toll Free: Fax: Email: Web Site: 330-655-9000 800-553-1170 330-655-9010 [email protected] [email protected] www.quatech.com CONTENTS CHAPTER 1 INTRODUCTION................................................................................................................................1 FEATURES AND BENEFITS ............................................................................................................................ 2 SAMPLE APPLICATION .................................................................................................................................. 3 USING THIS DOCUMENT ............................................................................................................................... 5 CONVENTIONS ............................................................................................................................................. 6 Terminology .......................................................................................................................................... 6 Notes ..................................................................................................................................................... 6 Cautions ................................................................................................................................................ 6 RELATED DOCUMENTATION .......................................................................................................................... 7 CHAPTER 2 HARDWARE INSTALLATION ........................................................................................................9 STANDARD PACKAGE CONTENTS .................................................................................................................. 9 ITEMS SUPPLIED BY THE USER ................................................................................................................... 10 STANDARD PACKAGE HARDWARE DESCRIPTION .......................................................................................... 11 Reset Switch ....................................................................................................................................... 11 Interface Selector Shunts.................................................................................................................... 13 Indicator LEDs..................................................................................................................................... 14 Mounting Cradle.................................................................................................................................. 16 HEAVY-DUTY PACKAGE ............................................................................................................................. 17 Indicator LEDs..................................................................................................................................... 19 SELECTING A LOCATION ............................................................................................................................. 20 CONNECTING THE BRIDGE.......................................................................................................................... 21 CHAPTER 3 INITIAL CONFIGURATION............................................................................................................23 WIRELESS CONFIGURATION ........................................................................................................................ 23 VERIFYING YOUR CONNECTIONS ................................................................................................................ 25 WPA-LEAP SECURITY .............................................................................................................................. 26 System Requirements......................................................................................................................... 26 Computer Resource Requirements .................................................................................................... 26 System Implementation Considerations ............................................................................................. 26 CHAPTER 4 AIRBORNE CONTROL CENTER.................................................................................................29 LAUNCHING THE ACC ................................................................................................................................ 29 NAVIGATING AROUND THE ACC ................................................................................................................... 31 PERFORMING CONFIGURATION ACTIVITIES .................................................................................................. 31 SAVING CONFIGURATION CHANGES ............................................................................................................ 33 BASIC CONFIGURATION SETTINGS .............................................................................................................. 34 Status Page (Basic Configuration Settings)........................................................................................ 34 Serial Interface Configuration Page (Basic Configuration Settings) ................................................... 35 Miscellaneous Settings Page (Basic Configuration Settings)............................................................. 39 Network Settings Page (Basic Configuration Settings) ...................................................................... 41 ADVANCED CONFIGURATION SETTINGS....................................................................................................... 49 Services Page (Advanced Configuration Settings)............................................................................. 49 Security Settings Page (Advanced Configuration Settings) ............................................................... 51 Update Firmware Page (Advanced Configuration Settings)............................................................... 53 Reset Page (Advanced Configuration Settings) ................................................................................. 56 CHAPTER 5 USING VCOM...................................................................................................................................59 OVERVIEW ................................................................................................................................................ 59 DESCRIPTION OF VCOM COMPONENTS...................................................................................................... 60 Network Management Service (NMS) ................................................................................................ 60 VCOM Serial Device Driver ................................................................................................................ 60 100-8006-152G AirborneDirect™ Serial Bridge User’s Guide Quatech, Inc. Confidential Page i Contents VCOM Configuration Utility ................................................................................................................. 61 SYSTEM REQUIREMENTS ........................................................................................................................... 61 INSTALLING VCOM.................................................................................................................................... 61 STARTING THE VCOM CONFIGURATION UTILITY ......................................................................................... 66 UNDERSTANDING THE VCOM CONFIGURATION UTILITY WINDOW................................................................. 67 LISTING VIRTUAL COM PORTS ................................................................................................................... 68 ADDING VIRTUAL COM PORTS ................................................................................................................... 68 MODIFYING VIRTUAL COM PORT PARAMETERS .......................................................................................... 70 DELETING VIRTUAL COM PORTS ............................................................................................................... 70 CHAPTER 6 TROUBLESHOOTING....................................................................................................................71 TROUBLESHOOTING SUGGESTIONS ............................................................................................................ 71 LED TROUBLESHOOTING ........................................................................................................................... 73 APPENDIX A UDP AND POWER MANAGEMENT ..........................................................................................75 UDP INTERACTION .................................................................................................................................... 75 UDP Only Mode .................................................................................................................................. 75 Both Mode ........................................................................................................................................... 75 HOST INTERACTION USING UDP ................................................................................................................75 Pass-Through Mode............................................................................................................................ 76 Detecting and Executing the Escape Sequence................................................................................. 76 Using Pass-Through Mode ................................................................................................................. 76 POWER MANAGEMENT MODES — UART MODEL ONLY ................................................................................ 77 APPENDIX B CABLE REPLACEMENT ..............................................................................................................79 INFRASTRUCTURE NETWORK CONSIDERATIONS .......................................................................................... 81 APPENDIX C SPECIFICATIONS .........................................................................................................................83 APPENDIX D FCC COMPLIANCE.......................................................................................................................89 FCC STATEMENT ...................................................................................................................................... 89 FCC RF EXPOSURE STATEMENT ............................................................................................................... 89 INFORMATION FOR CANADIAN USERS (IC NOTICE) ...................................................................................... 89 MANUFACTURER’S DECLARATION OF CONFORMITY ..................................................................................... 90 INDUSTRY CANADA NOTICE (APPLICABLE TO USE WITHIN CANADA) ............................................................. 90 AVIS DE CONFORMITE A LA REGLEMENTATION D’INDUSTRIE CANADA ............................................................ 91 INDUSTRY CANADA (IC) EMISSIONS COMPLIANCE STATEMENT..................................................................... 91 AVIS DE CONFORMITE A LA REGLEMENTATION D’INDUSTRIE CANADA ............................................................ 91 EUROPEAN COMMUNITY—CE NOTICE ........................................................................................................ 91 ...................................................................................................................................................... 91 ............................................................................................................................................................. 92 APPENDIX E ASLIP PROTOCOL .......................................................................................................................95 TRANSMISSION OF IP DATAGRAMS OVER SERIAL USING AIRBORNEDIRECT™ SERIAL .................................... 95 Introduction ......................................................................................................................................... 95 Protocol ............................................................................................................................................... 95 Packet Transfer................................................................................................................................... 96 GLOSSARY...............................................................................................................................................................97 INDEX.......................................................................................................................................................................101 Page ii AirborneDirect™ Serial Bridge User’s Guide Quatech, Inc. Confidential 100-8006-152G Contents LIST OF FIGURES Figure 1. Basic Application Involving a LAN Host and Serial Client Figure 2. Sample Application Involving a Customer Device Figure 3. AirborneDirect™ Serial Bridge Hardware (standard package) Figure 4. Reset Switch and Interface Selector Shunts & Header on Bottom of Bridge Figure 5. Interface Selector Shunts Figure 6. Indicator LEDs on the AirborneDirect™ Serial Bridge Figure 7. Mounting Cradle Dimensions Figure 8. AirborneDirect™ Serial Bridge Hardware (heavy-duty package) Figure 9. AirborneDirect™ Heavy-Duty Cable (Evaluation Kit Item) Figure 10. End Cap Pin-out and Connector Location Figure 11. Device detection Figure 12. Device login Figure 13. Status Page Figure 14. ACC Navigation Bar Figure 15. Saved Settings Screen Figure 16. Reset Notice Screen Figure 17. Status Page Figure 18. Serial Interface Configuration Page Figure 19. Miscellaneous OEM Settings Page XFigure 20. Wireless Network Configuration Page Figure 21. Network Services Page Figure 22. Security Configuration Page Figure 23. Update Firmware Page Figure 24. Precautionary Message Figure 25. Update Complete Message Figure 26. Reset Page Figure 27. Confirm Restart Figure 28. Reset In Progress Figure 29. Initial Screen Figure 30. Welcome Screen Figure 31. License Agreement Figure 32. Customer Information Screen Figure 33. Destination Folder Screen Figure 34. Ready to Install the Program Screen Figure 35. InstallShield Wizard Completed Screen Figure 36. Screen Prompting You to Reboot Figure 37. VCOM Configuration Utility Window Figure 38. Selecting Virtual COM Port 7 Figure 39. Adding a Virtual COM Port Figure 40. Reboot Message Figure 41. Reboot Message 100-8006-152G AirborneDirect™ Serial Bridge User’s Guide Quatech, Inc. Confidential 3 4 11 12 13 14 16 17 18 19 29 30 30 31 33 33 34 35 39 41 49 51 53 54 55 56 57 57 61 62 62 63 63 64 65 65 66 67 68 69 70 Page iii Contents LIST OF TABLES Table 1. AirborneDirect™ Serial Bridge Features and Benefits...................................................2 Table 2. AirborneDirect™ Serial Bridge Indicator LEDs .............................................................15 Table 3. AirborneDirect™ Heavy-Duty Serial Bridge Indicator LEDs..........................................19 Table 4. Recording Information from Your Access Point’s Configuration Application ................24 Table 5. Serial Interface Configuration Settings .........................................................................36 Table 6. Miscellaneous OEM Settings .......................................................................................40 Table 7. Wireless Network Configuration Settings......................................................................43 Table 8. Region Country Codes..................................................................................................48 Table 9. Network Services Configuration Settings......................................................................50 Table 10. Security Configuration Settings...................................................................................52 Table 11. Settings for Adding Virtual COM Ports........................................................................69 Table 12. Indicator LED Troubleshooting ..................................................................................73 Table 13. Power Management Modes ........................................................................................77 Table 14. Slave Configuration and Set-up ..................................................................................79 Table 15. Master Configuration and Set-up ................................................................................80 Table 16. Specifications..............................................................................................................83 Table 17. Heavy-Duty Power Supply Specifications ...................................................................88 Table 18. Heavy-Duty DC Specifications ....................................................................................88 Page iv AirborneDirect™ Serial Bridge User’s Guide Quatech, Inc. Confidential 100-8006-152G CHAPTER 1 INTRODUCTION This guide describes the AirborneDirect™ Serial Bridge from Quatech, Inc. AirborneDirect™ is a fully integrated, 802.11 wireless Local Area Network (LAN) bridge designed to provide wireless LAN and Internet connectivity in industrial, scientific, medical, and transportation applications where an existing communications interface already exists. Examples of applications for which the AirborneDirect™ Serial Bridge is well-suited include: Point-of-sale devices. Medical equipment. Manufacturing machinery. Bar-code readers. Time clocks. Scales. Data-collection devices. Vehicle Diagnostics. Telematics. The AirborneDirect™ Serial Bridge provides true plug-and-play wireless connectivity right out of the box, with minimal configuration. It delivers convenient, easy-to-deploy wireless network connectivity for your productivity and application-critical devices. At the same time, you can move equipment without the cost and time associated with wired network drops, providing flexibility for seasonal requirements, line and staffing changes, and more. The AirborneDirect™ Serial Bridge provides a bridge between the 802.11 wireless LAN and three leading serial interfaces: RS-232, RS-422, and RS-485. The Bridge acts transparently between any device using these interfaces and a wireless LAN. Using a virtual communications port device driver or Dynamic Link Library (DLL), OEMs can communicate with their devices from any workstation on the same network as if the workstation and devices were directly attached. The AirborneDirect™ Serial Bridge opens the world of remote device monitoring and management, as well as wide-area data collection, to any device, machine, or plant that has an external serial connection and a network infrastructure. The development kit provides quick and easy access to the Bridge’s configuration and functions, while providing OEMs with a platform to develop their branded solutions. The Bridge also provides the capability to perform firmware upgrades that allow new features to be added quickly and easily, protecting your investment. 100-8006-152G AirborneDirect™ Serial Bridge User’s Guide Quatech, Inc. Confidential Page 1 Introduction FEATURES AND BENEFITS Table 1 describes the key features and benefits of the AirborneDirect™ Serial Bridge. Table 1. AirborneDirect™ Serial Bridge Features and Benefits Feature Benefit Industry-standard RS-232, RS-422, and RS-485 interfaces Easily integrated into a wide range of embedded applications and serial-output system designs. Bridge can be the basis for an entire application. Software configurable serial interfaces Remotely configurable to a broad range of industrial-control, dataacquisition, and equipment-monitoring applications. Small package outline Easy to attach to existing equipment, light enough to allow easy mounting to vertical surfaces. External antenna connection Improved control over deployment by using a standard antenna connector that provides multiple antenna configurations, including omni-directional wand, patch, and panel solutions. Allows the Bridge to be placed close to the serial link and power supply, while the antenna can be located remotely from the Bridge for optimum placement and reception. Integrated serial cable and connector Simplifies deployment by requiring no extra cables or connectors. Ideal OEM solution A complete package for OEMs to easily and quickly integrate the AirborneDirect™ Serial Bridge into their product range. Fully integrated 802.11 WLAN module includes radio, baseband, and application processor No RF design or network software development needed (accelerates time to market while reducing development costs and risks). Full 802.11 compatibility Eliminates cables: provides Intranet or Internet connectivity using industry-standard wireless infrastructure. Built-in TCP/IP stack, RTOS and application software Provides embedded products with LAN and Internet connectivity. Does not require special programming, only simple configuration. Designed specifically for industrial, scientific, medical, and automotive applications Industrial specifications ensure robust and reliable performance in demanding system environments. Connectivity options include TCP/IP, ARP, ICMP, DHCP, DNS, Telnet, and UDAP Reliable data transport for serial client devices. Page 2 AirborneDirect™ Serial Bridge User’s Guide Quatech, Inc. Confidential 100-8006-152G Introduction SAMPLE APPLICATION Figure 1 shows a basic application where the AirborneDirect™ Serial Bridge is exchanging data wirelessly between a serial client and a LAN host. In this application: The serial client can be a notebook personal computer (PC), or other Data Terminal Equipment (DTE) whose serial port is directly connected to the AirborneDirect™ Serial Bridge. The LAN host can be a PC or PDA running a HyperTerminal or Telnet session, Web Browser, or LAN-based application. The LAN host communicates with the AirborneDirect™ Serial Bridge over a wireless network connection via an attached Access Point or directly in Ad Hoc mode. Figure 1. Basic Application Involving a LAN Host and Serial Client 100-8006-152G AirborneDirect™ Serial Bridge User’s Guide Quatech, Inc. Confidential Page 3 Introduction Figure 2 shows a sample application that uses the AirborneDirect™ Serial Bridge and the VCOM driver from Quatech. In this application, a customer device (or “serial client”) is an instrument or data logger that is connected directly to the Bridge and exchanges data wirelessly with an Access Point. The Access Point is connected to the company LAN. Also connected to the company LAN is a remote PC (or “LAN host”). The LAN host is running a customer application that collects data from the serial client and stores it in a database. The VCOM driver installed on the LAN host allows the collected data to pass to the customer’s application, without requiring modifications to the PC hardware or software. Figure 2. Sample Application Involving a Customer Device Page 4 AirborneDirect™ Serial Bridge User’s Guide Quatech, Inc. Confidential 100-8006-152G Introduction USING THIS DOCUMENT In addition to this chapter, this guide contains the following chapters and appendixes: Chapter 2, Hardware Installation ⎯ describes the AirborneDirect™ Serial Bridge hardware and how to install it. Chapter 3, Initial Configuration ⎯ describes how to configure the AirborneDirect™ Serial Bridge on your network. Chapter 4, Using the Airborne Control Center (ACC) ⎯ describes how to use the Windows-based application to configure, manage and view the status of AirborneDirect™ Serial Bridges. Chapter 5, Using VCOM ⎯ describes how to use VCOM to provide a LAN-based serial connection to the AirborneDirect™ Serial Bridge. Chapter 6, Troubleshooting ⎯ provides troubleshooting suggestions in the unlikely event you encounter a problem using the AirborneDirect™ Serial Bridge. Appendix A, UDP and Power Management ⎯ lists the AirborneDirect™ Serial Bridge specifications. Appendix B, Cable Replacement ⎯ contains information for replacing the cable. Appendix C, Specifications ⎯ lists the AirborneDirect™ Serial Bridge specifications. Appendix D, FCC Compliance ⎯ contains FCC compliance information. Appendix E, ASLIP Protocol ⎯.provides information on the transmission of IP Datagrams over Serial using Airborne WLN. Glossary ⎯ defines the terms associated with the AirborneDirect™ Serial Bridge and wireless networks in general. For convenience, an Index appears at the end of this guide. 100-8006-152G AirborneDirect™ Serial Bridge User’s Guide Quatech, Inc. Confidential Page 5 Introduction CONVENTIONS The following conventions are used in this guide: Terminology In the following chapters, these terms are used: “AirborneDirect™ Serial Server” is synonymous with “AirborneDirect™ Serial Bridge” in this document. “AirborneDirect™ Serial Bridge” is used the first time the Bridge is mentioned in a chapter. Thereafter, the term “Bridge” is used. “Serial client” refers to the device to which the AirborneDirect™ Serial Bridge is connected and which communicates with the Bridge over a serial connection. “LAN host” refers to a LAN-based computer running a HyperTerminal or Telnet session, Web Browser, or LAN-based application, which communicates with the Bridge via a wireless network connection. Notes A note is information that requires special attention. The following convention is used for notes. Note: A note contains information that deserves special attention. Cautions A caution contains information that, if not followed, can cause damage to the product or injury to the user. The following convention is used for cautions. A caution contains information that, if not followed, can cause damage to Caution: the product or injury to the user. Page 6 AirborneDirect™ Serial Bridge User’s Guide Quatech, Inc. Confidential 100-8006-152G Introduction RELATED DOCUMENTATION In addition to this guide, the following documents are provided on the CD supplied with the AirborneDirect™ Serial Bridge: AirborneDirect™ Serial Bridge Quick Start Guide. Command Line Interface (CLI) Reference Guide. Airborne™ VCOM User’s Guide. Airborne™ VCOM Utility Quick Start Guide. Product Briefs and Application Notes. These documents are provided as Portable Document Format (PDF) files. To read them, you need Adobe® Acrobat® Reader® 4.0.5 or higher. For your convenience, Adobe Reader is provided on the Evaluation Kit CD. For the latest version of Adobe Acrobat Reader, go to the Adobe Web site: www.adobe.com. Additional literature about AirborneDirect™ products and the Airborne WLN Module that powers them, such as application notes, product briefs, and white papers, can be found on the Quatech site: www.quatech.com. Quatech also offers developer documentation for its AirborneDirect™ products. Please contact Quatech for more information. 100-8006-152G AirborneDirect™ Serial Bridge User’s Guide Quatech, Inc. Confidential Page 7 Introduction This page intentionally left blank Page 8 AirborneDirect™ Serial Bridge User’s Guide Quatech, Inc. Confidential 100-8006-152G CHAPTER 2 HARDWARE INSTALLATION This chapter describes the AirborneDirect™ Serial Bridge. It also provides an overview of the Bridge hardware. Topics in this chapter include: Package Contents. (below) Items Supplied by the User. (page 10) Hardware Description. (page 11) Selecting a Location. (page 17) Connecting the Bridge. (page 21) Verifying Your Connections. (page 25) STANDARD PACKAGE CONTENTS Before beginning the hardware installation, verify that the hardware package contains: One AirborneDirect™ Serial Bridge with an attached cable and a male DB9 DTE interface connector One AC power adapter and cord One AirborneDirect™ mounting cradle (mounting hardware is user-supplied) One female-to-female null-modem adapter If you have the AirborneDirect™ Evaluation Kit, you should also have received: One Access Point (AP), IEEE 802.11b/g-compliant with DHCP enabled (optional) An AirborneDirect™ Serial Bridge Quick Start Guide A CD containing this AirborneDirect™ Serial Bridge User’s Guide, the AirborneDirect™ Serial Bridge Evaluation Kit Quick Start Guide, product briefs and application notes, Adobe® Reader® for viewing the documents, an Airborne Control Center (ACC), and a VCOM driver. If any item is missing, damaged, or improperly functioning, contact Quatech. 100-8006-152G AirborneDirect™ Serial Bridge User’s Guide Quatech, Inc. Confidential Page 9 Hardware Installation ITEMS SUPPLIED BY THE USER The following items, which are not included in the package contents, are also required: A serial client with at least one serial port. The serial client must be within the transmit and receive range of the Access Point to be used with the Bridge. A LAN host running Microsoft® Windows® XP or Windows 2000. An IEEE 802.11b/g-compliant Access Point with DHCP enabled. Mounting hardware for the AirborneDirect™ Bridge cradle. Other Access Points in the area may interfere with the Bridge’s ability to Note: associate with your chosen Access Point (the Bridge will try to associate with the first available “best-quality” AP). If you encounter difficulties with connecting to your chosen AP, either remove power from these Access Points or move to an isolated location, and then perform the setup in Figure 1 on page 3. Page 10 AirborneDirect™ Serial Bridge User’s Guide Quatech, Inc. Confidential 100-8006-152G Hardware Installation STANDARD PACKAGE HARDWARE DESCRIPTION Figure 3 identifies the components on the Bridge in its standard packaging. These components include: An external antenna. A DB9 male DTE connector and cable attached to the Bridge. A Reset switch and interface selector shunts on the bottom of the Bridge. Three indicator Light Emitting Diodes (LEDs) on the top of the Bridge. A mounting cradle. Figure 3. AirborneDirect™ Serial Bridge Hardware (standard package) Reset Switch The bottom of the AirborneDirect™ Bridge provides access to a Reset Switch. The Reset switch returns all Bridge parameters to their factory default firmware settings. To reset Bridge parameters, press (and hold) this switch for at least 5 seconds after power is applied to the Bridge. To protect against accidental resets, the Reset switch is recessed. 100-8006-152G AirborneDirect™ Serial Bridge User’s Guide Quatech, Inc. Confidential Page 11 Hardware Installation Shunts The bottom of the AirborneDirect™ Bridge provides access to a Reset button and interface selector shunts & header (see Figure 4). Figure 4. Reset Switch and Interface Selector Shunts & Header on Bottom of Bridge Page 12 AirborneDirect™ Serial Bridge User’s Guide Quatech, Inc. Confidential 100-8006-152G Hardware Installation Interface Selector Shunts Figure 4 (see page 12) shows the interface selector shunts and header. These configure the Bridge’s serial interface for RS-232, RS-422, or RS-485, as follows: RS-232 Cable Sense 1 RS-232 Power Pin 9, Cable Sense 1 RS-422 w/ Termination 1 RS-485 w/ Termination 1 Figure 5. Interface Selector Shunts To allow reliable connection through an RS-232, RS-422, or RS-485 interface, set these shunts appropriately before using the Bridge with your application. The interface type selected by the interface selector shunts must match the Note: Interface Type setting on the Serial Interface Configuration page of the ACC interface (see page 35). Otherwise, this mismatch prevents data from being exchanged. 100-8006-152G AirborneDirect™ Serial Bridge User’s Guide Quatech, Inc. Confidential Page 13 Hardware Installation Indicator LEDs The Bridge has three indicator LEDs for viewing its current status and connections (see Figure 6). These indicators allow for monitoring and troubleshooting of the Bridge. They also indicate the Bridge’s power-up status, link, connection, and data-activity status. Table 2 (on page 15) describes the status of the indicator LEDs. Figure 6. Indicator LEDs on the AirborneDirect™ Serial Bridge Page 14 AirborneDirect™ Serial Bridge User’s Guide Quatech, Inc. Confidential 100-8006-152G Hardware Installation Table 2. AirborneDirect™ Serial Bridge Indicator LEDs LED Power Link Comm LED Color Off Function Bridge is not receiving power. Red Bridge failed its Power On Self Test (POST) and is not configured for wireless communication. Amber Bridge passed its POST but is not configured for wireless communication. Green Bridge passed its POST and is configured for wireless communication. Off Bridge is not receiving power. Blinking Red Bridge is searching for an Access Point. Green Wireless network and MAC have associated with an Access Point. Off No power, or no wireless TCP session is established and no physical serial connection is detected. Red No wireless TCP session is established; a physical connection is detected. Blinking Red A physical serial connection was detected and there is serial traffic present on that connection, but no wireless TCP session is established. Amber A wireless TCP connection is established but no physical serial connection is detected (i.e., no serial cable is attached to the Bridge). Blinking Green A wireless TCP session is established, a physical serial connection is detected, and the Bridge is transmitting or receiving data across the wired serial port. Green A wireless TCP session is established, a physical serial connection is detected, but there is no active data movement across the wired serial port. 100-8006-152G AirborneDirect™ Serial Bridge User’s Guide Quatech, Inc. Confidential Page 15 Hardware Installation Mounting Cradle The Bridge comes with a mounting cradle (see Figure 7) that allows the Bridge to be installed on a vertical surface, such as a wall. Be careful not to tighten the mounting hardware (usersupplied) excessively to avoid damaging the cradle. When mounting the Bridge vertically, attach the cradle to the vertical surface, and then insert the Bridge into the cradle. Figure 7. Mounting Cradle Dimensions Page 16 AirborneDirect™ Serial Bridge User’s Guide Quatech, Inc. Confidential 100-8006-152G Hardware Installation HEAVY-DUTY PACKAGE The heavy-duty version of the Bridge is supplied in a Deutsch EEC-325X4B enclosure and is available in both sealed and unsealed versions. The heavy-duty Bridge supports SAE J1455 power specifications (+4.5 to 36 VDC). Figure 8 identifies the components on the Bridge in its heavy-duty packaging. These components include: An external antenna. A Deutsch 12-pin DTM13-12PA-R008 receptacle for power and signal connections. A Reset switch. Four indicator Light Emitting Diodes (LEDs) on the top of the Bridge. The Heavy-Duty Bridge supports only the RS-232 interface type, so there are no Note: interface selection shunts. There is no mounting cradle for the Heavy-Duty Bridge. Figure 8. AirborneDirect™ Serial Bridge Hardware (heavy-duty package) Figure 9 shows the universal adapter cable supplied with AirborneDirect™ Heavy-Duty Evaluation Kits. 100-8006-152G AirborneDirect™ Serial Bridge User’s Guide Quatech, Inc. Confidential Page 17 Hardware Installation Figure 9. AirborneDirect™ Heavy-Duty Cable (Evaluation Kit Item) Page 18 AirborneDirect™ Serial Bridge User’s Guide Quatech, Inc. Confidential 100-8006-152G Hardware Installation Indicator LEDs The Heavy-Duty Bridge has four indicator LEDs for viewing its current status and connections (see Figure 8). These indicators allow for monitoring and troubleshooting of the Bridge. They also indicate the Bridge’s power-up status, link, connection, and data-activity status. Table 3 describes the status of the indicator LEDs. Table 3. AirborneDirect™ Heavy-Duty Serial Bridge Indicator LEDs CONN LINK CFG POST Name Description POST Power on self test completed CFG Device has a valid IP address LINK Device has successfully associated/authenticated with an AP. CONN TCP/IP connection established with device. End Cap Layout The connectors required to attach to the device are: Interface and Power: RF: Deutsch DTM-06-12SSA RP-SMA (Male) Note: FACTORY RESET hole is optional, if a sealed enclosure is required. Figure 10. End Cap Pin-out and Connector Location 100-8006-152G AirborneDirect™ Serial Bridge User’s Guide Quatech, Inc. Confidential Page 19 Hardware Installation SELECTING A LOCATION You can mount the Bridge on a flat surface, such as a desk or table, or on a vertical surface, such as a wall. It can also be mounted on the ceiling. If you mount the Bridge vertically, use the supplied mounting cradle previously described. Choosing a good location for the Bridge is important because it affects the reliability of the wireless link. The most important considerations are distance from the Access Point and clearance from obstacles. The location you choose for installing the Bridge must: Provide sufficient ventilation around the Bridge. Allow easy access to disconnect the Bridge from the AC wall outlet if necessary. Not expose the Bridge to excessive heat, humidity, vibration, or dust. Must conform to local regulations. Because radio waves travel in a straight line, the location where you will install the Bridge must provide a clear path to the Access Point that is free of major obstacles. The effects of obstacles, both along and near the path, have a significant bearing on the travel of radio signals and can cause both interference and signal cancellation. Consider the effects of the following common obstacles: Page 20 Trees and large plants A tree or large plant directly in the path can totally block the signal. With clearance above the trees, there are usually no blocking effects. Man-made obstacles Square or rectangular objects, in or near the path, have rectangular surfaces that can block and interfere with signals over and around them. Floor A floor can interfere with signals if the Bridge is mounted too low. Mount the Bridge so the antenna is high enough to allow adequate clearance from the floor. AirborneDirect™ Serial Bridge User’s Guide Quatech, Inc. Confidential 100-8006-152G Hardware Installation CONNECTING THE BRIDGE Use the following procedure to connect the Bridge: • Place the Bridge in a dry, clean location near the device to which it will be connected. The location is required to have a power source and should be within 300 feet (100 meters) of a Wi-Fi compliant wireless LAN Access Point. The location should be away from transformers, heavy-duty motors, fluorescent lights, microwave ovens, refrigerators or other equipment that could cause radio-signal interference. • Connect the male, DB9 DTE connector on the Bridge’s serial cable to a female, DCE serial port on your device. If your device has a 9-pin male DTE connector, use the female-to-female null-modem adapter supplied with the Evaluation Kit (or equivalent) to make this connection. • Raise the antenna on the Bridge so it is pointing vertically. • If your Access Point is using WEP or WPA, disable the security. You can re-enable WEP or WPA after the Bridge has been configured. • Connect the supplied power adapter to the Bridge and to a grounded 110/240V, 5060Hz power source. 100-8006-152G AirborneDirect™ Serial Bridge User’s Guide Quatech, Inc. Confidential Page 21 Hardware Installation This page intentionally left blank. Page 22 AirborneDirect™ Serial Bridge User’s Guide Quatech, Inc. Confidential 100-8006-152G CHAPTER 3 INITIAL CONFIGURATION This chapter describes configuring the AirborneDirect™ Serial Bridge. Topics in this chapter include: Wireless Configuration (below) Verifying Your Connections (page 25) WPA-LEAP Security (page 24) WIRELESS CONFIGURATION After you verify that the indicator LEDs have gone through their power-up sequence, start the configuration application for your Access Point (your Access Point manual should describe this procedure). Then go the appropriate screen in the application and perform the following steps: Access Point configuration applications vary between models and Note: manufacturers. In the following steps, there are suggested screen names where you might find the Access Point settings required to operate the Bridge. The screens in your Access Point’s configuration application may differ from those mentioned below. Refer to the documentation that came with your Access Point to locate the appropriate screens where these settings can be accessed. • Find the Service Set Identifier String (SSID) Go to the Wireless Settings or equivalent screen in your Access Point’s configuration application that shows the Access Point’s SSID. Record the SSID in Table 4 (on page 24). You will need this information to configure the Bridge. • Disable Wireless Security Go to the Wireless Settings, Security, Encryption, or equivalent screen in your Access Point’s configuration application that shows the WEP/WPA setting. If WEP or WPA is enabled, disable it (you can enable the AP security after the Bridge has been configured). • Find the Bridge’s Internet Protocol (IP) Address Go to the Attached Devices or equivalent screen in your Access Point’s configuration application that lists the IP addresses of devices attached to the Access Point. Find the IP address for the Bridge and record it in Table 4 (on page 24). You will need it to access the Bridge with the Airborne Control Center (ACC). 100-8006-152G AirborneDirect™ Serial Bridge User’s Guide Quatech, Inc. Confidential Page 23 Initial Configuration If you do not see the Bridge as an attached device, refresh the configuration Note: screen (some Access Point programs provide a Refresh button for this purpose). If the Bridge still does not appear, refer to the troubleshooting chapter in this Guide and in the documentation for your Access Point. Note: You can also use the device discovery feature of the Airborne Control Center software (see page 29) to help determine the Bridge’s IP address. X • Verify the MAC Address Go to the Attached Devices or equivalent screen in your Access Point’s configuration application that lists the MAC addresses of attached devices. Verify that the MAC address shown for the Bridge matches the one on the label on the back of the Bridge. • Verify the Dynamic Host Configuration Protocol (DHCP) Name Go to the Router Status or equivalent screen in your Access Point’s configuration application that shows the Bridge’s DHCP client name. Verify that this name matches the last six characters in the Bridge’s MAC address (AIRBORNExxxxxx) on the label on the back of the Bridge. Table 4. Recording Information from Your Access Point’s Configuration Application Parameter Value Access Point’s SSID Bridge’s IP address Note: If the Bridge is unable to obtain an IP address through DHCP, after the acquire limit is exceeded (150 seconds) the bridge will install the fallback IP address (192.168.10.1) and subnet (255.255.255.0). The bridge can be accessed using this address, after DHCP fails, by the attached host using a different IP address in the same subnet (192.168.10.8). Page 24 AirborneDirect™ Serial Bridge User’s Guide Quatech, Inc. Confidential 100-8006-152G Initial Configuration VERIFYING YOUR CONNECTIONS When the Bridge is powered-up, the indicator LEDs at the top of the Bridge will indicate the status of the Bridge. See Table 2 on page 15 for standard packaging, or Table 3 on page 19 for Heavy-Duty packaging. If the LEDs indicate a problem with a wired or wireless connection, remove the power source from the Bridge, wait a few seconds, and re-apply power. If the LEDs still do not behave appropriately, see the guidelines in Table 12 on page 73. Other Access Points in the area may interfere with the Bridge’s ability to Note: associate with your chosen Access Point (the Bridge will try to associate with the first available “best-quality” AP). If you encounter difficulties with connecting to your chosen AP, either remove power from these Access Points or move to an isolated location and perform the setup shown in Figure 1 on page 3. 100-8006-152G AirborneDirect™ Serial Bridge User’s Guide Quatech, Inc. Confidential Page 25 Initial Configuration WPA-LEAP SECURITY The WPA and LEAP software modules provide advanced security configuration and communication services required by today’s enterprise-class deployments. Please refer to IEEE standard 802.1x 2001 (section 4) and IEEE standard 802.11i 2004 (section 4) for additional information. System Requirements For the 802.11b Bridge, both WPA and LEAP require radio firmware version 1.1.1.111.8.4 or later. All versions of the 802.11b/g Bridge support WPA and LEAP. The AP requires WPA support. LEAP must be supported in the AP or a separate authentication server. Computer Resource Requirements WPA-PSK In order to function properly, an Access Point that supports WPA-PSK must be available. The WPA-PSK passphrase installed on the Access Point must match the passphrase configured on the bridge. LEAP In order to function properly, a RADIUS server configured for LEAP containing usernames/passwords, and an Access Point that supports LEAP, must be available. The RADIUS server username and password must match the user-leap and pw-leap command values configured on the bridge. The blank character (space) may not be included in a passphrase or LEAP Note: password. System Implementation Considerations The bridge must be in infrastructure mode for WPA-PSK or LEAP to operate properly. A bridge configured for WPA-PSK requires a connection to an AP with WPA-PSK enabled. A bridge configured for LEAP requires a connection to an AP with LEAP enabled and connected to a RADIUS server to provide authentication. Until the bridge is authenticated by either the WPA-PSK enabled AP or the RADIUS server, no IP network communication can proceed. Symptoms of an unauthenticated client include: A bridge with serial-default set to “PASS” will not connect to the network client. Page 26 AirborneDirect™ Serial Bridge User’s Guide Quatech, Inc. Confidential 100-8006-152G Initial Configuration A bridge configured for DHCP will not obtain host configuration from the DHCP server; therefore, the IP address will remain 0.0.0.0. The Link LED turns green when 802.11 association completes. However, if the 802.1x authentication fails, the bridge becomes disassociated by the AP and the Link LED goes back to flashing red. The bridge will not respond to discovery requests. Once the bridge is authenticated, additional impacts include: Roaming A bridge configured for WPA-PSK can only roam to APs that have WPA-PSK enabled in the same ESS. A bridge configured for LEAP can only roam to APs that support LEAP, roaming, and are connected to the same RADIUS server. Data Throughput and Latency Round trip latency may increase and overall throughput may decrease, due to the additional steps to encrypt or decrypt data. Re-Keying The session key may expire and the authentication process will be executed again causing streaming data to stop until a new key is authorized. 100-8006-152G AirborneDirect™ Serial Bridge User’s Guide Quatech, Inc. Confidential Page 27 Initial Configuration This page intentionally left blank Page 28 AirborneDirect™ Serial Bridge User’s Guide Quatech, Inc. Confidential 100-8006-152G CHAPTER 4 AIRBORNE CONTROL CENTER This chapter describes how to use the Airborne Control Center (ACC) to configure the AirborneDirect™ Serial Bridge. The ACC is a user-friendly graphical-user interface (GUI) menu and data display. The interface is intuitive, allowing tasks to be performed simply by pointing and clicking your mouse. LAUNCHING THE ACC On the Windows XP Start menu, navigate to the Quatech submenu and click on Airborne Control Center. The ACC scans the local subnet for Airborne devices and displays a list like the one shown in Figure 5. X X Figure 11. Device detection Highlight the desired device and click the Select button. The ACC displays the login page for the selected device as shown in Figure 6. X X The MAC address for the device you wish to connect to can be found on the Note: label located on the back of the enclosure. The 802.11b Bridge (ABDB or WLNB models) has a web interface available Note: if the firmware does not contain the optional LEAP feature. The web interface is virtually identical to the ACC interface, so all of the information in this chapter applies to the web interface also. To access the web interface, enter the IP address of the Bridge in the address bar of the browser. The web interface requires Microsoft Internet Explorer 5 or later. Note: The 802.11b/g Bridge (ABDG or WLNG models) have no web interface. 100-8006-152G AirborneDirect™ Serial Bridge User’s Guide Quatech, Inc. Confidential Page 29 Airborne Control Center Figure 12. Device login The IP address and telnet port number of the selected device are automatically transferred to the login page. Enter the user name and password (defaults “dpac” and “dpac”) and click on the OK button to login. To select a different device, click the Discover button to reinitiate the device detection scan. The Status page is displayed as shown in Figure 7. X X Figure 13. Status Page Page 30 AirborneDirect™ Serial Bridge User’s Guide Quatech, Inc. Confidential 100-8006-152G Airborne Control Center NAVIGATING AROUND THE ACC A navigation bar appears at the top-right side of every screen in the ACC interface (see Figure 8). This bar contains links that correspond to the pages you can access. To go to a page, click the appropriate link in the navigation bar. X X Figure 14. ACC Navigation Bar PERFORMING CONFIGURATION ACTIVITIES The ACC allows you to perform a variety of configuration activities. Basic configuration activities consist of the following steps. See “Network Settings Page” on page 41. X X X X Configuring the Bridge for Infrastructure mode Infrastructure mode prepares the Bridge for use with an Access Point. Assigning a Service Set Identifier (SSID) to the Bridge To allow a connection between the Bridge and an Access Point, the SSID of the two devices must be identical. If the Bridge is configured with an SSID of “any”, it will connect to the Access Note: Point with the best signal, so long as all security settings match. Enabling Wireless Security (optional) Wired Equivalent Privacy (WEP) and WiFi Protected Access (WPA) are security mechanisms for wireless local area networks (WLANs), defined in the 802.11 standard. Choosing Static or DHCP Assignment of IP Address If DHCP is used, a client name can be assigned to allow identification of specific bridges on a network. Assigning user discovery name The user discovery name identifies the Bridge in Evaluation and Management Utilities (if Enable UDAP is checked in the Services Page). Specifying serial port parameters Configure the Bridge to use the appropriate serial interface type, as well as the same baud rate, data bits, parity, and flow control as the attached serial device. See “Serial Interface Configuration Page” on page 35. 100-8006-152G AirborneDirect™ Serial Bridge User’s Guide Quatech, Inc. Confidential Page 31 Airborne Control Center Advanced configuration activities consist of the following: Changing the user name and administrator password Lets you change the user name and administrator password for accessing the configuration interface. See “Security Settings Page” on page 51. X X X X X X X Resetting the Bridge Lets you reset the Bridge to the factory-default settings. See “Reset Page” on page 56. X X Updating Bridge Firmware Updating Bridge firmware allows you to take advantage of new features as they become available. See “Update Firmware Page” on page 53. X X Restarting the Bridge Lets you restart (reboot) the Bridge. See “Reset Page” on page 56. X X X X X Modifying Device Services Settings Lets you change port numbers and timeouts for the TCP and telnet ports. See “Services Page” on page 49. X X Page 32 X X AirborneDirect™ Serial Bridge User’s Guide Quatech, Inc. Confidential 100-8006-152G Airborne Control Center SAVING CONFIGURATION CHANGES Some pages have Save and Cancel buttons. If you change parameters on one of these pages, click Save to apply your changes or Cancel to discard them. Once the changes are saved, the ACC displays the screen shown in Figure 9. To continue, click Yes, or you can go to another page to make more changes then click Restart to apply all the changes at one time. X X The ACC will display Figure 10. Wait for the Restart to complete. Once the Restart has completed, the ACC will redisplay the Status Page. X X If the Status Page does not reappear, determine whether the Bridge’s IP Note: address changed. If it did, click the Login button on the ACC navigation bar and let the ACC discover the Bridge. Otherwise, try the Bridge’s old IP address again. The ACC may timeout before the Bridge can obtain its DHCP lease. Figure 15. Saved Settings Screen Figure 16. Reset Notice Screen 100-8006-152G AirborneDirect™ Serial Bridge User’s Guide Quatech, Inc. Confidential Page 33 Airborne Control Center BASIC CONFIGURATION SETTINGS Status Page (Basic Configuration Settings) Figure 17. Status Page The Status Page is the first page that appears in the ACC. This read-only page shows information about the Bridge. You may need to click the Status button in the navigation bar to update the contents on this page. This page shows the Bridge’s version number, 802.11 status, network settings, and resources. Parameters to note on this screen are: MAC address is the MAC address of the Bridge. BSSID is the MAC address of the associated Access Point (AP). RSSI indicates the receive signal strength in dBm. Page 34 AirborneDirect™ Serial Bridge User’s Guide Quatech, Inc. Confidential 100-8006-152G Airborne Control Center Serial Interface Configuration Page (Basic Configuration Settings) Figure 18. Serial Interface Configuration Page (scroll bars not shown) The Serial Interface Configuration page lets you change the Bridge’s serial port and network connection settings. 100-8006-152G AirborneDirect™ Serial Bridge User’s Guide Quatech, Inc. Confidential Page 35 Airborne Control Center Table 5. Serial Interface Configuration Settings Parameter Description Serial Port Settings Interface Type Bridge serial interface type. • RS232 (default) • RS422 • RS485 This setting must match the setting of the Bridge’s Interface Selection Shunts (see page 13). Otherwise, this mismatch prevents data from being exchanged. Enable ASLIP When checked, enables the ASLIP Protocol. See page 95 for details. Default is unchecked. (Disabled) Bridge baud rate. 300 – 921600 bps (9600 default) (Current AirborneDirect™ Serial hardware design limits speed to 460800) Number of data bits used by the Bridge. • 7 • 8 (default) Baud Rate Data Bits Parity Parity, if any, used by the Bridge. Flow Control • None (default) • Even • Odd Flow control method, if any, used by the Bridge. • none (default) • hardware (RTS/CTS) • software (XON/XOFF) Stop Bit Sets the number of stop bits to 1 or 2. Default is 1. Serial Input Buffer Size (1 – 1460) Sets the maximum input buffer size that triggers data transfer to the LAN. The serial input buffer will be transferred to the LAN if no data is received for more than 10ms. The buffer range is 1 – 1460 bytes. Default is 1460. Serial Assert Asserts the xon or xoff value on the receive port of the Bridge's serial interface as if the Bridge had received an xon or xoff from the serial host. This parameter is valid only when software flow control is enabled. Default is xon. Sets the behavior of the Connect LED to toggle on to indicate TCP or PASS mode. Connect Mode When set to TCP, the Module will turn on this LED if the Module accepts a TCP connection on the Telnet Port or the TCP listen port to Tunneling. It will also turn on this LED if the Module establishes a TCP connection to the Primary LAN Server IP Address or Secondary LAN Server IP Address target server. When set to PASS, the Module will turn on this LED if a data bridge is active. If the data bridge becomes inactive (because of the escape sequence or lost of connection on the wireless interface), the Module will turn off this LED. Default is tcp. Page 36 AirborneDirect™ Serial Bridge User’s Guide Quatech, Inc. Confidential 100-8006-152G Airborne Control Center Network Connection Settings Primary LAN Server IP Address Specifies the Primary IP Address of the LAN device to which the Bridge will deliver incoming serial data, when a TCP tunnel is open. An IP address of 0.0.0.0 will disable this function. Default is 0.0.0.0. Secondary LAN Server IP Address Specifies the Secondary IP Address of the LAN device to which the Bridge will deliver incoming serial data, when a TCP tunnel is open. An IP address of 0.0.0.0 will disable this function. LAN Server Port Port number of the LAN host to which the Bridge will connect. Default is 0.0.0.0. Default is 2571. TCP Session Inactivity Timeout – seconds Serial Default Number of seconds of inactivity after which the TCP session with the LAN host ends. A value of 0 makes the timeout infinite. Default is 60. Specifies whether the serial port will initialize in LISTEN or PASS mode. Default is LISTEN. Connection Retry Time – seconds Defines the delay, in seconds, between attempts to establish a TCP connection with a LAN TCP server. Default is 10. Outbound Connection Mode Select TCP, UDP or Both. Default is TCP. Enable TCP Direct Tunnel on Specified Tunnel Port Enables the TCP tunnel server capability. If enabled, the Tunnel TCP Server is accessible from a LAN application and immediately enters data pass mode without requiring authentication. Default is unchecked. (Disabled) Select the Tunnel Mode Select TCP or UDP. TCP Listen Port to Tunneling 100-8006-152G Default is TCP. Defines the TCP port the Tunnel server will listen on for an inbound TCP connection. Default is 8023. AirborneDirect™ Serial Bridge User’s Guide Quatech, Inc. Confidential Page 37 Airborne Control Center UDP Connection Settings Configures the IP address to use when the Serial Host wishes to send UDP data UDP Target IP packets to a remote UDP listener/server. Address Default is: 0.0.0.0. UDP Target Port Configures the UDP port number to use when the Serial Host wishes to send UDP unicast data packets to a remote listener/server. Default is: 8023 (decimal). UDP Listen Port Configures the UDP port the Tunnel server will listen on for inbound UDP data. Unicast and broadcast packets will be received and transferred to the serial interface. Only when the Module is in pass mode will UDP payload be conveyed to the serial interface. Default is 8023 (decimal). UDP Transmit Mode Configures the outbound UDP transmission mode. disable – disables outbound UDP packet transmission. ucast – enables UDP unicast only. bcast – enables UDP broadcast only. both – enables UDP broadcast and unicast – a broadcast and a unicast packet is transmitted. If wl-xmit-type is set to both, three packets will be transmitted: TCP, UDP unicast, and a UDP broadcast. Default is disable. Page 38 AirborneDirect™ Serial Bridge User’s Guide Quatech, Inc. Confidential 100-8006-152G Airborne Control Center Miscellaneous Settings Page (Basic Configuration Settings) Figure 19. Miscellaneous OEM Settings Page Clicking the Misc link in the navigation bar displays the Miscellaneous OEM Settings page. In this page, you can enter the Bridge’s OEM version string and discovery name. This page also lets you specify the OEM user name and password. 100-8006-152G AirborneDirect™ Serial Bridge User’s Guide Quatech, Inc. Confidential Page 39 Airborne Control Center Table 6. Miscellaneous OEM Settings Parameter Description Miscellaneous OEM Settings OEM Version String Specifies the OEM version string to be associated with the Bridge. Default is oemverstr. OEM Discovery Name Specifies the OEM discovery name to be associated with the Bridge. Default is OEM-Cfg1. OEM Authentication Settings OEM User Name Specifies the name of the OEM, from 1 to 31 alphanumeric characters. Name is case-sensitive. Default is oem. OEM Password Two fields where you type and retype the OEM password, from 1 to 31 alphanumeric characters. Password is case-sensitive. For security, each password character appears as an asterisk. Default is oem. Page 40 AirborneDirect™ Serial Bridge User’s Guide Quatech, Inc. Confidential 100-8006-152G Airborne Control Center Network Settings Page (Basic Configuration Settings) The Network Settings Page allows you to modify the 802.11 wireless network settings, including network identification, security, data rate, and discovery name. You are also able to set Network IP settings for control of the wired LAN, including enabling DHCP, static IP address and associated network settings. This page actually displays more than one page of information. Use the Note: scroll bar to scroll down to see all of the items on the page. Figure 20. Wireless Network Configuration Page X 100-8006-152G AirborneDirect™ Serial Bridge User’s Guide Quatech, Inc. Confidential Page 41 Airborne Control Center X Figure 20. Wireless Network Configuration Page (continued) X Page 42 AirborneDirect™ Serial Bridge User’s Guide Quatech, Inc. Confidential 100-8006-152G Airborne Control Center Table 7. Wireless Network Configuration Settings Parameter Description Wireless Network Settings SSID Service Set Identifier that identifies the common service set for the Bridge and AP. To make this connection, the Bridge and AP must have the same SSID. Default setting is any (this field may not be blank). Wireless Network Type Specifies the type of network in which the Bridge will be used: • Infrastructure – connects to a WLAN using an AP. (default) • Ad-Hoc – used to connect two peer-topeer devices. Ad-Hoc Mode Channel When Wireless Network Type is Ad-Hoc, selects the channel used for communication. The two peer-to-peer devices must use the same channel. Range is 1 to 14 channels. Default channel is 1. WLAN Region Code Bridge Operation Region Specifies the wireless channels allowed. See Table 8. Region Country Codes on page 48. Default is US. 100-8006-152G AirborneDirect™ Serial Bridge User’s Guide Quatech, Inc. Confidential Page 43 Airborne Control Center Wireless Security Settings Enables or disables wireless security: Wireless Security Mode • Disable – Disable any security (default) • WEP64 – 64-bit key length (11 ASCII characters) • WEP128 – 128-bit key length (26 ASCII characters) • WPA-PSK - WPA with preshared key. Requires preshared key • WPA-LEAP - WPA with 802.1x (LEAP) • WPA-LEAP64 • WPA-LEAP128 - WPA with 802.1x (LEAP) authentication, and using "WPA Migration Mode" (static 128-bit WEP key is used for broadcast and multicast traffic) • WPA-PSK64 - WPA with preshared key, and using "WPA Migration Mode" (static 64-bit WEP key is used for broadcast and multicast traffic) Requires preshared key. • WPA-PSK128 - WPA with preshared key, and using "WPA Migration Mode" (static 128-bit WEP key is used for broadcast and multicast traffic) Requires preshared key. authentication. Requires LEAP username and password - WPA with 802.1x (LEAP) authentication, and using "WPA Migration Mode" (static 64-bit WEP key is used for broadcast and multicast traffic) WPA Passphrase (Preshared Key) Configures the Pre-Shared Key used with WPA-PSK security. LEAP Username Configures the WPA-LEAP username. The input range is 8 to 63 ASCII characters or 64 hex characters. This key must match the key on the AP. The LEAP username [1 to 32 characters] must match the LEAP username assigned on the LEAP server. The LEAP username cannot contain spaces. LEAP Password Configures the WPA-LEAP password. The LEAP password [1 to 32 characters] must match the LEAP password assigned to the LEAP user on the LEAP server. The LEAP password cannot contain spaces. Page 44 AirborneDirect™ Serial Bridge User’s Guide Quatech, Inc. Confidential 100-8006-152G Airborne Control Center Defines the type of key authentication, if any, to be used: Authentication • Automatic • Open System – communicates the key across the network • Shared Key – automatically detects the authentication (default) – allows communication only with devices with identical WEP settings Default Key Default WEP Key from 1 – 4 if Shared Key or Both is selected for Authentication. Default is WEP Key 1. WEP Key 1 through 4 Up to four WEP key values. These values must be the same as the key implemented by the Access Point. Enable WPA Information Element format compatibility mode • If WEP Encryption = 64, enter 10 hexadecimal digits for each key. • If WEP Encryption = 128, enter 26 hexadecimal digits for each key. Controls the format of the WPA Information Element used in the Association Request management frame. Several brands of Access Points still use the legacy WPA format. When unchecked, enables the Legacy WPA Information Element format. When checked, enables the 802.1x WPA Information Element format. Default is unchecked. Parameter Description Advanced Settings Module MAC Address Bridge’s MAC address. Default is factory set. Do not change this value; otherwise, unexpected results can occur. Antenna Mode • Ant2 • Diversity – allows the Bridge to select the antenna receiving the best quality signal. Maximum Transmission Rate 100-8006-152G – use primary antenna (J2) (default) Bridge’s maximum wireless transmission rate. The Bridge will attempt the highest specified rate and fallback to a lower rate if necessary. Default is 5.5 Mbps. AirborneDirect™ Serial Bridge User’s Guide Quatech, Inc. Confidential Page 45 Airborne Control Center Network IP Settings Enable DHCP When checked, enables the Dynamic Host Configuration Protocol (DHCP). For this parameter to work, the AP or network must support DHCP. DHCP Client Name Bridge’s DHCP client name. Enable DHCP Fixed Interval Retransmission Enables the interval value below. DHCP Retransmit Interval Configures the DHCP request retransmission interval (in seconds) to use when the DHCP retransmission is set to fixed. This is an integer with a range of 1-64. Default is 15. Configures the number of seconds that the Module should wait to acquire its IP configuration using DHCP before applying the DHCP fallback algorithm (if enabled). DHCP Acquire Time Limit This is an integer with a range of 1-255 seconds. Default is 150. Note: “0” will turn of IP Fallback. Enable DHCP Fallback to fixed IP Enables the DHCP fallback algorithm. When the DHCP fallback algorithm is enabled, the Module will apply the configuration from DHCP Fallback IP, Subnet, and Gateway as the static IP configuration, if the DHCP client has not received its IP configuration after DHCP Acquire Time Limit seconds. unchecked = Disable DHCP fallback algorithm (default) checked = Enable DHCP fallback algorithm Enable DHCP Fallback to last DHCP IP. Save current DHCP IP Address as Fallback DHCP IP Address DHCP Fallback IP Address When enabled, use the last good DHCP IP address as the fallback. Each time the IP address is successfully received via DHCP, the fallback IP address is updated to use the new IP address. It is *not* saved across reboots unless DHCP Fallback Persist is also enabled. This setting is ignored if DHCP Fallback is not enabled. When the DHCP Fallback Auto address is updated, enabling this setting causes the fallback IP address to be saved to NVRAM, so that it is saved across reboots. This setting is ignored if DHCP Fallback and DHCP Fallback Auto are not enabled. Configures the IP address used by the DHCP fallback algorithm. Default is 192.168.10.1. DHCP Fallback Subnet Configures the Subnet Mask used by the DHCP fallback algorithm. Default is 255.255.255.0 Page 46 AirborneDirect™ Serial Bridge User’s Guide Quatech, Inc. Confidential 100-8006-152G Airborne Control Center DHCP Fallback Gateway Configures the gateway address used by the DHCP fallback algorithm. Default is 0.0.0.0. Static IP Address If you use a static IP, each Bridge must have a unique IP address. The IP address must adhere to the network’s subnet mask and fall within the valid range of IP addresses for the network. The Bridge’s static IP address must contain up to four octets separated by a period. If Enable DHCP is checked, this parameter is ignored. Default is 0.0.0.0. Subnet Mask Bridge’s subnet mask, up to four octets separated by a period. Default is 0.0.0.0. Default Gateway/Router IP Address Bridge’s LAN IP address, up to four octets separated by a period. Default is 0.0.0.0. Primary DNS Sets the primary DNS server address for DNS look-ups. If DHCP is enabled, the IP address provided by the DHCP server is used. Default is 0.0.0.0. Secondary DNS Sets the secondary DNS server address for DNS look-ups when the primary DNS server is unavailable. Default is 0.0.0.0. Discovery Settings User Discovery Name 100-8006-152G Sets the name_device field, which can be retrieved with the CLI name_device command. Default is Device. AirborneDirect™ Serial Bridge User’s Guide Quatech, Inc. Confidential Page 47 Airborne Control Center Table 8. Region Country Codes Page 48 Code Country Channels US AT AU BR CA CH CY CZ DE DK EE FI GB GR HK HU IE IS IT LT LU LV NL NO NZ PH PL PT SE SI SK CN ID IL IN KR MY SG BE TH TW ZA JP FR ES United States Austria Australia Brazil Canada Switzerland and Liechtenstein Cyprus Czech Republic Germany Denmark Estonia Finland Great Britain Greece Hong Kong Hungary Ireland Iceland Italy Lithuania Luxembourg Latvia Netherlands Norway New Zealand Philippines Poland Portugal Sweden Slovenia Slovak Republic China Indonesia Israel India Korea Malaysia Singapore Belgium Thailand Taiwan South Africa Japan Wideband France Spain 1-11 1-11 1-11 1-11 1-11 1-11 1-11 1-11 1-11 1-11 1-11 1-11 1-11 1-11 1-11 1-11 1-11 1-11 1-11 1-11 1-11 1-11 1-11 1-11 1-11 1-11 1-11 1-11 1-11 1-11 1-11 1-13 1-13 1-13 1-13 1-13 1-13 1-13 1-13 1-13 1-13 1-13 1-14 10-13 10-11 AirborneDirect™ Serial Bridge User’s Guide Quatech, Inc. Confidential 100-8006-152G Airborne Control Center ADVANCED CONFIGURATION SETTINGS Services Page (Advanced Configuration Settings) The Services Page lets you configure the Bridge’s network services like Telnet and TCP Port settings. Figure 21. Network Services Page 100-8006-152G AirborneDirect™ Serial Bridge User’s Guide Quatech, Inc. Confidential Page 49 Airborne Control Center Table 9. Network Services Configuration Settings Parameter Description Enable UDAP When checked, enables Universal Data Appliance Protocol (UDAP). This allows the Bridge to be discovered from a LAN-based device that supports the UDAP protocol. Default is checked. Telnet Port Port number of the Telnet server. Default is 23. Telnet Inactivity Timeout – seconds Number of seconds of inactivity that must occur for the Telnet session to timeout. Default is 60. Serial Escape Mode Determines whether the Bridge looks for the escape sequence in the data stream from the serial host and reacts to it. Default is On. LAN Escape Mode Determines whether the Bridge looks for the escape sequence in the data stream from a LAN-based device and reacts to it. Default is On. Escape Sequence Defines the characters used as the escape sequence. Page 50 AirborneDirect™ Serial Bridge User’s Guide Quatech, Inc. Confidential 100-8006-152G Airborne Control Center Security Settings Page (Advanced Configuration Settings) The Security Settings Page allows management of the authentication-based access services. You can change user names and passwords. Figure 22. Security Configuration Page 100-8006-152G AirborneDirect™ Serial Bridge User’s Guide Quatech, Inc. Confidential Page 51 Airborne Control Center Table 10. Security Configuration Settings Parameter Description Configuration User Name Specifies the user name required to log into the Bridge’s configuration interface, from 1 to 31 alphanumeric characters. User name is case-sensitive. Default is cfg. If you change it, you are prompted for the user name and password at the next transaction (for example, when you move to another page or refresh the current page). Configuration Password Two fields where you type and then retype the configuration password required to access the Bridge’s configuration interface, from 1 to 31 alphanumeric characters. Password is case-sensitive. For security, each password character appears as an asterisk. Default is cfg. If you change it, you are prompted for the user name and password at the next transaction (for example, when you move to another page or refresh the current page). Data Access User Name Specifies the name required to pass data through the Bridge. The configuration user name can be 1 to 31 alphanumeric characters, and is case-sensitive. Default is user. Data Access Password Two fields where you type and then retype the password required to pass data through the Bridge, from 1 to 31 alphanumeric characters. Password is case-sensitive. For security, each password character appears as an asterisk. Default is password. Page 52 AirborneDirect™ Serial Bridge User’s Guide Quatech, Inc. Confidential 100-8006-152G Airborne Control Center Update Firmware Page (Advanced Configuration Settings) The Update Firmware Page allows you to update the firmware running on the AirborneDirect™ Ethernet Bridge. Updating firmware may cause the Bridge to stop operating if it is not Caution: performed properly. Only advanced users should update firmware. If you encounter problems, contact Quatech, Inc. Figure 23. Update Firmware Page 100-8006-152G AirborneDirect™ Serial Bridge User’s Guide Quatech, Inc. Confidential Page 53 Airborne Control Center Obtain the updated firmware and make it accessible to a computer connected to the Bridge. The firmware must come from Quatech, Inc. as a .bin file and follow the file name format: DirectSerial_x.x.x.x.bin Note: Where xxxx is the version number of the firmware. For example: DirectSerial_4.2.0.12.bin Do not attempt to load firmware for an 802.11b/g bridge on an 802.11b Caution: bridge or vice-versa. T T To update the firmware, the following sequence must be performed: • Select the Update link on the ACC screen. • Enter the name of the new firmware version source file. This file must be of type .bin and have come from Quatech, Inc. If the file is located on your hard drive, click Browse… and locate the source directory and file. • Verify the correct firmware file has been selected (the file name is displayed in the File to Upload: field). The file’s name structure must be as follows: o DirectSerial_x.x.x.x.bin Where x.x.x.x is the version number of the firmware. • Click the Update button. • The message shown in Figure 17 will be displayed. Wait for the upload to complete. X X Figure 24. Precautionary Message Page 54 AirborneDirect™ Serial Bridge User’s Guide Quatech, Inc. Confidential 100-8006-152G Airborne Control Center • The ACC will display the message shown in Figure 18. X X Figure 25. Update Complete Message • Upon restarting, the Status Page will be displayed. If this does not happen automatically, close the ACC and restart it. Caution: Updating firmware may cause loss of saved parameters. 100-8006-152G AirborneDirect™ Serial Bridge User’s Guide Quatech, Inc. Confidential Page 55 Airborne Control Center Reset Page (Advanced Configuration Settings) The Reset Page allows you restart or reset the Bridge to the factory default values. Resetting the AirborneDirect™ unit to factory defaults will remove all Caution: customer changes. If the target AP has WEP or WPA enabled, the AirborneDirect™ unit will not be able to associate (WEP/WPA default is disabled). Figure 26. Reset Page Page 56 AirborneDirect™ Serial Bridge User’s Guide Quatech, Inc. Confidential 100-8006-152G Airborne Control Center Restarting the Bridge When you click the Restart button, you will see the Warning displayed in Figure 20. Click Yes to complete the Bridge restart or No to stop the process and return to the Reset Page. X X Figure 27. Confirm Restart Figure 21 will be displayed after you have clicked Yes. Click OK to dismiss this informational dialog. Once the restart has been completed, the ACC will display the Status Page. X X Figure 28. Reset In Progress Note: 100-8006-152G If the Status Page does not reappear, click the Status link on the navigation bar. If it still does not reappear, determine whether the Bridge’s IP address changed. If it did, click the Login link on the navigation bar and log in to the Bridge again. Otherwise, try the Bridge’s old IP address again. The ACC may timeout before the Bridge can obtain its DHCP lease. AirborneDirect™ Serial Bridge User’s Guide Quatech, Inc. Confidential Page 57 Airborne Control Center This page intentionally left blank Page 58 AirborneDirect™ Serial Bridge User’s Guide Quatech, Inc. Confidential 100-8006-152G CHAPTER 5 USING VCOM This chapter describes the DPAC Technologies Airborne™ VCOM (Virtual COM port) driver and its associated Configuration Utility. Topics in this chapter include: Overview. (below) Description of VCOM Components. (page 60) System Requirements. (page 61) Installing VCOM. (page 61) Starting the VCOM. Configuration Utility (page 66) Understanding the VCOM Configuration Utility Window. (page 67) Listing Virtual COM Ports. (page 68) Adding Virtual COM Ports. (page 68) Modifying Virtual COM. Port Parameters (page 70) Deleting Virtual COM. Ports (page 70) OVERVIEW VCOM is a serial-to-IP redirector driver and configuration utility for Microsoft® Windows® XP and Windows 2000. Using this utility, you can create a virtual communication (COM) port and associate it with a network device that has a known Internet Protocol (IP) address. The VCOM driver allows a LAN host computer to assign a virtual COM port to a remote device. Once configured, this allows applications that communicate through COM ports to use a TCP/IP network, without requiring changes to the application. This driver is designed specifically to provide LAN connectivity for the AirborneDirect™ Serial Bridge. 100-8006-152G AirborneDirect™ Serial Bridge User’s Guide Quatech, Inc. Confidential Page 59 Using VCOM DESCRIPTION OF VCOM COMPONENTS The VCOM components consist of the following: Network Management Service (NMS) VCOM Serial Device Driver VCOM Configuration Utility Network Management Service (NMS) The Network Management Service (NMS) is a Microsoft® Windows® service that performs the network-related operations for the VCOM serial device driver. The NMS has two operating modes, pass-through mode and communications mode. In passthrough mode, the NMS authenticates with the Bridge and establishes a pass-through connection with it. In this mode, data sent to the Bridge is forwarded to the host serial device. In communications mode, the NMS establishes only a Transmission Control Protocol (TCP) connection with the Bridge. The application or DLL is responsible for authenticating with the Bridge, sending commands to it, and interpreting responses from it. In this mode the NMS is a pass-through for communications through an application or DLL. Note: Communications mode is only available through the DPAC Technologies’ developer program. For more information, please contact DPAC Technologies. VCOM Serial Device Driver The heart of the VCOM software is the VCOM serial device driver (dpacvcom.sys). This device driver is a fully functional Windows® XP/2000 serial port driver that acts as a buffer manager, enabling data to pass from an application through the device driver to the NMS. The VCOM application accesses the device driver through the same standard serial communications port method used to access the standard serial device driver. This device driver presents the following interfaces: A standard serial port interface to the Windows® XP/2000 operating system. This interface standard is known as the VCOM API. All serial port accesses, irrespective of programming paradigm (C/C++, Visual Basic, etc.), use this interface to access serial ports. Through this interface a virtual serial port looks like a physical serial port on a system. A proprietary interface (unique to VCOM) that allows the application control of serial port functions and the ability to map them to physical IP addresses. Page 60 AirborneDirect™ Serial Bridge User’s Guide Quatech, Inc. Confidential 100-8006-152G Using VCOM VCOM Configuration Utility The VCOM configuration utility is a powerful tool that lets you configure and map physical COM ports to physical IP addresses. Most users will want to use the VCOM configuration utility in stand-alone form, as described in this guide. Other users, such as programmers, value-added resellers, or customers with complex requirements, may want to consider using the VCOM API to implement custom requirements. For more information about our developer program and documentation, please contact DPAC Technologies. SYSTEM REQUIREMENTS To install VCOM, you need a computer running Windows® XP Professional or Windows® 2000 connected to a Local Area Network that has an Access Point. INSTALLING VCOM The following procedure describes how to install the VCOM driver and VCOM configuration utility. You perform this installation on the LAN host. Before proceeding, be sure the LAN host has the application you want to use with VCOM to communicate with the serial client device and Bridge connected to the serial client. • Double-click the file nms_vcom_setup.exe. The InstallShield Wizard starts and the initial screen in Figure 29 appears. Figure 29. Initial Screen 100-8006-152G AirborneDirect™ Serial Bridge User’s Guide Quatech, Inc. Confidential Page 61 Using VCOM • Click the Next button. The Welcome screen appears (see Figure 30). Figure 30. Welcome Screen • Click the Next button. The License Agreement appears (see Figure 31). • Read the License Agreement, and then click the top radio button to accept it (you must accept the license agreement to continue with the installation). Figure 31. License Agreement • Click the Next button. The Customer Information screen appears, with the user name and organization completed (see Figure 32). Page 62 AirborneDirect™ Serial Bridge User’s Guide Quatech, Inc. Confidential 100-8006-152G Using VCOM Figure 32. Customer Information Screen • Change the user name and/or organization if necessary. At the bottom of the screen, select whether VCOM will be available to all users of this computer or just for the one whose user name is shown. • Click the Next button. The Destination Folder screen appears, showing the location where VCOM will be installed (see Figure 33). Figure 33. Destination Folder Screen 100-8006-152G AirborneDirect™ Serial Bridge User’s Guide Quatech, Inc. Confidential Page 63 Using VCOM • We recommend that you install VCOM in the default destination folder. If you want to select another location, click the Change button and select the location where you want VCOM installed. • Click the Next button. The Ready to Install the Program screen appears, showing the selections you made in the previous screens (see Figure 34). Figure 34. Ready to Install the Program Screen • Review your selections to make sure they are correct. If you need to change them, click the Back button until you return to the appropriate screen, make your change, and click the Next button until you return to the Ready to Install the Program screen. • Click Install. A screen appears as InstallShield installs NMS_VCOM (this may take several minutes). After NMS_VCOM is installed, the InstallShield Wizard Completed screen appears (see Figure 35). Page 64 AirborneDirect™ Serial Bridge User’s Guide Quatech, Inc. Confidential 100-8006-152G Using VCOM Figure 35. InstallShield Wizard Completed Screen • Click Finish. The screen in Figure 36 appears, prompting you to reboot the computer. Figure 36. Screen Prompting You to Reboot • Click Yes to reboot your computer. Note: You must reboot your computer to start using VCOM. This completes the VCOM installation procedure. 100-8006-152G AirborneDirect™ Serial Bridge User’s Guide Quatech, Inc. Confidential Page 65 Using VCOM STARTING THE VCOM CONFIGURATION UTILITY After you install VCOM, you can start the VCOM Configuration Utility. This Utility lets you add, remove, and configure virtual COM ports on the LAN host. • Click the Start button in the Windows taskbar. • Point to Programs. • Point to Quatech Airborne. • Click VCOM Configuration Utility. The VCOM Configuration Utility window appears (see Figure 37). Figure 37. VCOM Configuration Utility Window Page 66 AirborneDirect™ Serial Bridge User’s Guide Quatech, Inc. Confidential 100-8006-152G Using VCOM UNDERSTANDING THE VCOM CONFIGURATION UTILITY WINDOW All VCOM activities are performed from the VCOM Configuration Utility window. When you start VCOM, a list of virtual COM ports appears in the VCOM List pane at the left side of the window. When you click a virtual COM port in this pane, the settings associated with that COM port appear in the right side of the window. If you click Port -7 in the left pane, for instance, the right pane shows the settings associated with virtual COM port 7 (see Figure 38). To change the parameters for a virtual COM port, select the COM port in the VCOM List pane, change the parameters in the right side of the window, and click the Save button. For more information, see “Modifying Virtual COM Port Parameters” on page 70. Note: You must reboot your computer for the new virtual COM port parameters to take effect. Figure 38. Selecting Virtual COM Port 7 Three buttons appear at the bottom of the left pane: List ⎯ lets you list the virtual COM ports (page 68). Add ⎯ lets you add virtual COM Ports (page 68). Delete ⎯ lets you remove virtual COM ports (page 70). 100-8006-152G AirborneDirect™ Serial Bridge User’s Guide Quatech, Inc. Confidential Page 67 Using VCOM LISTING VIRTUAL COM PORTS To view the available virtual COM ports, click the List button below the VCOM List pane. Clicking this button refreshes the virtual COM ports shown in the pane. ADDING VIRTUAL COM PORTS To add virtual COM ports, use the following procedure: • Under the VCOM List pane, click the Add button. The VCOM Configuration Utility window appears as in Figure 39. Figure 39. Adding a Virtual COM Port • Using the parameter controls on the right side of the window, select the desired settings for the virtual COM port you are adding (see Table 11). Note: • The virtual COM port parameters are organized into two sections, VCOM Settings and NMS Settings. If you change the VCOM Settings, you must reboot your computer for your selections to take effect. If you change the NMS Settings, you do not need to reboot. Click the Save button. If you changed VCOM settings, the message in Figure 40 appears. Page 68 AirborneDirect™ Serial Bridge User’s Guide Quatech, Inc. Confidential 100-8006-152G Using VCOM Figure 40. Reboot Message • Click the OK button. • To add more virtual COM ports, repeat steps 1 through 4. • Reboot your computer to have your VCOM settings take effect. Table 11. Settings for Adding Virtual COM Ports Parameter VCOM Settings VCOM Port Port Type Port Open Timeout NMS Settings IP Address/DNS IP Port UDP Port Keep Alive Timeout Enable WLN Override User Name Password Buffer Count Buffer Size 100-8006-152G Description Select the virtual COM port number from this drop-down list. A device port indicates that the port can be used for communications. A management port indicates that the port should not be used as a communications port for applications. The number of seconds required to open a VCOM port using the standard communications port interface. Default is 10. The IP address string, in dot notation, of the AirborneDirect™ Serial Bridge to which you want to connect. Default is 0.0.0.0. The IP port of the Bridge to which you want to connect. Default is 23. The UDP connection of the Bridge to which you want to connect. Default is 5000. The number of seconds inactivity is allowed on the virtual COM port before the connection times out. Default is 6000 (100 minutes). If checked, the Bridge acts as a pass-through device that passes received data without acting on it. If not checked, the Bridge is in communication mode. Default is unchecked (disabled). Disabling this option is recommended for developers only. The VCOM user ID login. Default is dpac. Do not change this default setting. The VCOM password login. Default is dpac. Do not change this default setting. Maximum number of buffers allocated to the driver. Default is 5. Maximum size of buffers allocated to the driver. Default is 1500. AirborneDirect™ Serial Bridge User’s Guide Quatech, Inc. Confidential Page 69 Using VCOM MODIFYING VIRTUAL COM PORT PARAMETERS To select virtual COM port parameters, use the following procedure: • In the VCOM List pane, click the virtual COM port whose parameters you want to change. The right side of the window displays the current parameters for the virtual COM Port you selected. Using the parameter controls on the right side of the window, select the desired settings for the selected virtual COM port (see Table 11 on page 69). Note: • When modifying virtual COM port parameters, the parameters VCOM Port and Port Type become read-only fields and cannot be changed. Click the Save button. If you changed the VCOM Settings, the message in Figure 41 appears. Figure 41. Reboot Message • Click the OK button. • Reboot your computer to have your VCOM settings take effect. DELETING VIRTUAL COM PORTS If you no longer need a virtual COM port, use the following procedure to delete it: Note: A precautionary message does not appear before you delete a virtual COM port. Therefore, be sure you no longer need a virtual COM port before you delete it. If you delete a virtual COM port that you need, use the procedure on page 68 to add it again. • In the VCOM List pane, click the virtual COM port you want to delete. • Under the VCOM List pane, click the Delete button. The selected virtual COM port is deleted from the pane. • To delete additional virtual COM ports, repeat steps 1 and 2. Page 70 AirborneDirect™ Serial Bridge User’s Guide Quatech, Inc. Confidential 100-8006-152G CHAPTER 6 TROUBLESHOOTING This chapter provides troubleshooting suggestions you can follow in the unlikely event you encounter a problem using the AirborneDirect™ Serial Bridge. TROUBLESHOOTING SUGGESTIONS The Bridge cannot find the Access Point. Verify that the Link LED is solid green. If it isn’t, refer to “LED Troubleshooting” on the next page. The Access Point cannot find the Bridge. Click the Refresh button in your Access Point’s configuration application. If the problem remains, check the Bridge’s physical connections. Then power-down the Bridge, power it up, and check the power-up LED sequence described under “Verifying Your Connections” on page 25. Make sure that there is not another AP in the area that may be interfering with your AP. The Bridge may be associated to another AP. Check the Link LED on the Bridge. If the problem remains, contact Quatech, Inc. You cannot access the Bridge’s configuration interface via the ACC. You may have typed the wrong IP address. The Bridge cannot associate with an Access Point. Change the location of the Bridge to improve reception. If you typed the correct IP address, your computer may be on a different subnet than the Bridge. Be sure the computer and Bridge are on the same subnet of the same network. If that does not help, launch the ACC, go to the Network Settings Page, and be sure the SSID matches that of the Access Point (remember the SSID is case sensitive). X 100-8006-152G X AirborneDirect™ Serial Bridge User’s Guide Quatech, Inc. Confidential Page 71 Troubleshooting After changing the Bridge’s static IP address, the ACC stops responding. Once the static IP address is changed and you click Save, the Bridge switches to the new IP address and loses connection with the ACC. To resolve this problem, restart the ACC. You used the ACC to change the Bridge’s configuration settings, but the new settings did not take effect. You may not have clicked the Save button on the ACC page. Click this button after making your changes on the page. You tried to update the firmware, but the new firmware did not take effect. You uploaded an incorrect file. Go to the Firmware Update page and check the current level. Make sure the one you will upload has a higher (later) revision level (see the Firmware Update Page on page 53). Repeat the procedure using the appropriate file. Page 72 AirborneDirect™ Serial Bridge User’s Guide Quatech, Inc. Confidential 100-8006-152G Troubleshooting LED TROUBLESHOOTING The following table provides LED troubleshooting suggestions. Table 12. Indicator LED Troubleshooting If the… Perform These Tasks… Power LED does not turn On. Check power connector is properly inserted. Power LED turns Red. Remove power and re-apply. If the Power LED remains Red, contact Quatech, Inc. Power LED is Amber. Bridge has not established an IP address either through DHCP or Static methods. DHCP is the default method by which the unit obtains an IP address. Your network must have a DHCP server available when the bridge is poweredup. Most AP/Routers have a DHCP server built-in. Enable your DHCP server and re-start the module. Link LED continues to Blink Red. Bridge has not found an Access Point with which to associate. Be sure the Access Point you want to use is turned on and has WEP and WPA disabled (you can enable WEP or WPA after the Bridge has been configured). If this does not help, be sure there are no nearby devices causing interference. If there are, either turn off or move the device causing the interference or move the Bridge and Access Point to another location. Comm LED is Off or Amber. Be sure a serial device is connected to the Bridge and that the device is turned on. Comm LED is Red and Link LED is Green but you are unable to pass data. No open TCP socket is recognized by the Bridge. Be sure you have an open TCP connection to the bridge and the connection is in data pass mode. 100-8006-152G AirborneDirect™ Serial Bridge User’s Guide Quatech, Inc. Confidential Page 73 Troubleshooting This page intentionally left blank. Page 74 AirborneDirect™ Serial Bridge User’s Guide Quatech, Inc. Confidential 100-8006-152G APPENDIX A UDP AND POWER MANAGEMENT UDP INTERACTION The Module includes UDP support. There are two configuration options to activate UDP. UDP transmit can be enabled either in a “UDP” only or “both” mode. The UDP Target IP Address, UDP Target IP Port, UDP Transmit Mode, and UDP Listen Port settings apply to UDP functions for the Bridge. UDP Only Mode The factory default UDP transmit and receive port number is 8023. You can change this default value using the settings UDP Target Port and UDP Listen Port. UDP frames will be passed to the UDP Target IP Address and UDP Target Port address and/or broadcasted if UDP Transmit Mode is set to bcast or both, when the unit is in PASS mode. In addition, UDP frames will be received on the UDP Listen Port when the unit is in PASS mode. Both Mode A connection must be made using the TCP tunnel. UDP will transmit and receive UDP frames (like in UDP only mode) when the TCP tunnel is established and active. When the TCP connection closes, UDP operations halt. If the TCP tunnel is active, thereby allocating the serial port, then received UDP datagrams will be dropped. HOST INTERACTION USING UDP The UDP functions (between the Bridge and the Host) operate in pass-through mode. By factory default, the Module starts up in master-Listen mode. 100-8006-152G AirborneDirect™ Serial Bridge User’s Guide Quatech, Inc. Confidential Page 75 UDP and Power Management Pass-Through Mode If the Module has been set to start up in pass-through mode, or is directed into pass-through mode using the CLI command pass, it will transmit to the UDP target last defined with the UDP Target IP Address and UDP Target Port settings. The UDP functions must be enabled via the CLI commands Outbound Transmit Mode and UDP Transmit Mode. The configuration must be saved to write the UDP settings to non-volatile memory and the bridge restarted for the setting to have effect. When the Host sets the Bridge for pass-through mode: The Serial Default field set to pass causes the Module to transmit data to the UDP Target IP Address and UDP Target Port target. The module will also broadcast the data if the UDP Transmit Mode is set to bcast or both. All data received on the serial port from the Host is sent to the UDP Target IP Address and UDP Target Port target as UDP payload. All data received from the LAN on the UDP Listen Port is delivered to the Host on the serial interface. Detecting and Executing the Escape Sequence If the Module detects and executes the escape sequence from the Host: The escape sequence is transmitted to the LAN application. The Module sends an OK response to the Host. The Host becomes the owner of the serial interface. The Module processes data received from the Host as CLI commands. Using Pass-Through Mode The UDP functions are kept active until the Host breaks PASS mode. Page 76 AirborneDirect™ Serial Bridge User’s Guide Quatech, Inc. Confidential 100-8006-152G UDP and Power Management POWER MANAGEMENT MODES — UART MODEL ONLY The Bridge supports several power-management modes that can be used to reduce the average current consumption. Use the CLI command pm-mode to change the powermanagement settings. summarizes the different settings and their affect. Table 13. Power Management Modes Power Management Mode Association Wake-Up Methods Active Associated Already awake Doze Associated Wireless data or Serial data Snooze Associated Wireless data or Serial Break Sleep Disassociated Serial Break character Off Disassociated Serial Break character The IEEE 802.11b standard dictates that the AP can reject requests for Low Power operation, and require the Module to operate in the active mode. The actual current consumption depends on the AP and its low-power support implementation. Transitions into the Sleep and Off modes are allowed under control of the Serial Host. Snooze is intended for network-initiated activity and waking after a UART Break is received. The Module automatically transitions back to Snooze after 60-to-120 seconds of inactivity. After waking on receipt of a radio packet, the Module transitions back to Snooze immediately after the processor idles. When in Sleep mode, the Module automatically transitions back to Sleep after 60-to-120 seconds of inactivity following waking on UART activity or Radio Transmit. From the Off mode, the Module goes to the Active state after receiving a UART Break. It remains in the Active state until the CLI command pm-mode off is issued. 100-8006-152G AirborneDirect™ Serial Bridge User’s Guide Quatech, Inc. Confidential Page 77 UDP and Power Management This page intentionally left blank. Page 78 AirborneDirect™ Serial Bridge User’s Guide Quatech, Inc. Confidential 100-8006-152G APPENDIX B CABLE REPLACEMENT The following tables outline the steps to set-up a wireless cable replacement connection between two serial ports, using the Airborne products. This connection relies upon a type of peer-to-peer wireless network call an Ad Hoc. This network type does not require an Access Point. The setup is written using Command Line Interface (CLI) commands but can just as easily be set up via the Bridge’s configuration pages. Please see the CLI Reference Guide for a full description of the commands. Table 14. Slave Configuration and Set-up Description Setting Webpage CLI Command 1 Set the SSID of the unit to the name of the AdHoc network AdHoc Network Name Network wl-ssid AdHocNetwork 2 Set network type to AdHoc (Infrastructure is default) AdHoc Network wl-type p 3 Set AdHoc Channel 1 Network wl-chan 1 4 Disable DHCP Disable Network wl-dhcp 0 5 Assign a static IP 192.168.10.150 Network wl-ip 192.168.10.150 6 Assign a network mask 255.255.255.0 Network wl-subnet 255.255.255.0 7 Enable the Direct tunnel Enable Serial wl-tunnel 1 8 Assign the tunnel port (8023 is the default and there is no need to change it) 8023 Serial wl-tunnel-port 8023 9 Set the tunnel mode to TCP (this is default) - Assumes setting up a TCP/IP connection between the devices TCP Serial wl-tunnel-type tcp 10 Configure the serial port settings to match the attached system Baud Rate = 9600 Data Bits = 8 Parity = None Flow Control = Hardware (RTS/CTS) Stop Bits = 1 Serial Bit-rate 9600 data-bits 8 parity n flow h stop-bit 1 11 Set serial default mode to LISTEN (CLI is default) Listen Serial serial-default listen 12 Save the settings and restart the unit. Save and Restart Reset commit restart Note: 100-8006-152G All parameters values are included for the purpose of demonstration only. Although valid, they should be changed to meet the application requirements. AirborneDirect™ Serial Bridge User’s Guide Quatech, Inc. Confidential Page 79 Cable Replacement Table 15. Master Configuration and Set-up Description Setting Web or ACC page CLI Command 1 Set the SSID of the unit to the name of the AdHoc network AdHoc Network Name Network wl-ssid [AdHoc Network Name] 2 Set network type to AdHoc (Infrastructure is default) AdHoc Network wl-type p 3 Set AdHoc Channel 1 Network wl-chan 1 4 Disable DHCP Disable Network wl-dhcp 0 5 Assign a static IP (Slave address + 1) 192.168.10.151 Network wl-ip 192.168.10.151 6 Assign a network mask 255.255.255.0 Network wl-subnet 255.255.255.0 7 Set the Primary LAN Server IP Address to match the slaves static IP address 192.168.10.150 Serial wl-tcp-ip 192.168.10.150 8 Set the LAN Server port to match the tunnel port on the slave 8023 Serial wl-tcp-port 8023 9 Configure the serial port settings to match the attached system Baud Rate = 9600 Data Bits = 8 Parity = None Flow Control = Hardware (RTS/CTS) Stop Bits = 1 Serial Bit-rate 9600 data-bits 8 parity n flow h stop-bit 1 10 Set serial default mode to PASS (CLI is default) Pass Serial serial-default pass 11 Save the settings and restart the unit. Save and Restart Reset commit restart Note: All parameters values are included for the purpose of demonstration only. Although valid, they should be changed to meet the application requirements. As long as the slave device is on and is waiting for the connection, the master will boot and establish a TCP/IP connection with the slave. The slave will accept the connection and a serialto-serial data tunnel will be established between the two units. Once the tunnel is established data can be sent between the two devices. Page 80 AirborneDirect™ Serial Bridge User’s Guide Quatech, Inc. Confidential 100-8006-152G Cable Replacement INFRASTRUCTURE NETWORK CONSIDERATIONS If you want to use Infrastructure mode, there are a couple of modifications: • The SSID must match the AP you want to you (step 1 in Table 14& Table 15) • Leave the network type as Infrastructure (step 2 in Table 14& Table 15). If you are using static IP addresses no further changes are required to the set-up. If not, you will need to do a couple of things: • • Enable DHCP (default). Find out the IP address assigned to the slave unit by the DHCP server. To do this you can look at the wireless routers attached devices table, search for the device using the Airborne Control Center (ACC) or guess (if the device has been on the network before in all likelihood the DHCP server has assigned it the same IP address). Once you have found the IP address this needs to be used in the Primary LAN Server IP field (step 7 in Table 15). Again as long as the Slave is on and associated with the AP, the devices will establish a TCP/IP connection and bridge data between the serial ports. 100-8006-152G AirborneDirect™ Serial Bridge User’s Guide Quatech, Inc. Confidential Page 81 Cable Replacement This page intentionally left blank. Page 82 AirborneDirect™ Serial Bridge User’s Guide Quatech, Inc. Confidential 100-8006-152G APPENDIX C SPECIFICATIONS This appendix lists the specifications of the AirborneDirect™ Serial Bridge. Table 16. Specifications Serial Interface – standard package Interface: Selectable RS-232, RS-422, or RS-485 Connector: DB9 (Male DTE) Flexible stranded copper conductor cable Data Rates: RS-232: RS422/485: Characters: 7 or 8 bits Parity: Odd, Even or None Stop Bits: 1 or 2 Flow Control: None, Hardware (RTS/CTS), or Software (Xon/Xoff) Pin Assignments: 100-8006-152G DB9 Pin 300 to 230.4 Kbps Up to 921 Kbps RS-232 RS-422 RS485 RS485 (4-Wire) (2-Wire) 1 NC RxD+ RxD+ NC 2 RxD RxD- RxD- -Tx/-Rx 3 TxD TxD+ TxD+ +Tx/+Rx 4 NC TxD- TxD- NC 5 GND GND GND GND 6 NC RTS- NC NC 7 RTS RTS+ NC NC 8 CTS CTS+ NC NC 9 NC CTS- NC NC AirborneDirect™ Serial Bridge User’s Guide Quatech, Inc. Confidential Page 83 Specifications Serial Interface – Heavy-Duty package Interface: RS-232 Connector: Deutsch DTM-06-12SSA Data Rates: 300 to 230.4 Kbps Characters: 7 or 8 bits Parity: Odd, Even or None Stop Bits: 1 or 2 Flow Control: None, Hardware (RTS/CTS), or Software (Xon/Xoff) Pin Assignments on Deutsch connector: (See Figure 9 on page 18 for the pin assignments on the RS-232 connector of the evaluation kit cable.) Pin No. Name Description 1 NC No Connect 2 NC No Connect 3 RTS Request To Send 4 TxD Transmit Data 5 ON/IGN Device power OBN. Active High (internal pull-down). Default ON Pulling signal LOW shuts off the internal power supply. 6 VBAT Battery Power Input 7 GND Ground 8 /F_RESET Factory RESET. Active LOW (internal pull-up). Default OFF Pulling signal low as power is applied will RESET device settings to factory default values. Page 84 9 RxD Receive Data 10 CTS Clear To Send 11 NC No Connect 12 NC No Connect AirborneDirect™ Serial Bridge User’s Guide Quatech, Inc. Confidential 100-8006-152G Specifications Wireless Network Interface Interface (ABDB, WLNB): IEEE 802.11b DSSS, WiFi compliant (ABDG, WLNG): IEEE 802.11b/g, WiFi compliant (802.11i, 802.11e, 802.11d capable) Frequency: 2.4 ~ 2.4835 GHz (US, Europe, Canada, Japan) 2.471 ~ 2.497 GHz (Japan) Channels: 11 US/Canada 13 Europe 14 Japan 4 France Data Rates (ABDB, WLNB): 11, 5.5, 2, 1 Mbps (ABDG, WLNG): 802.11b mode: 11, 5.5, 2, 1 Mbps 802.11g mode: 54, 48, 36, 24, 18, 12, 9, 6 Mbps RF Power (ABDB, WLNB): (ABDG, WLNG): +16 dBm (typical) Approx 32 mW +19.3 dBm (typical) Approx. 85 mW peak for B rates +15 dBm (typical) Approx. 32 mW average for B rates +21.5 dBm (typical) Approx. 143 mW peak for G rates +12 dBm (typical) Approx. 16 mW average for G rate WEP standard encryption, 64/128 bit Key Mapped WEP Security: WPA-PSK Cisco LEAP authentication access control Antenna: RP-SMA (Included Wand Antenna) Protocols: TCP/IP, UDP/IP, ARP, ICMP, DHCP, DNS, Telnet, and UDAP Data Transfer Protocols: TCP/IP, UDP, and Telnet Sensitivity (ABDB, WLNB): -82 dBm for 11 Mbps -86 dBm for 5.5 Mbps -88 dBm for 2 Mbps -90 dBm for 1 Mbps -71 dBm for 54 Mbps (ABDG, WLNG): -77 dBm for 36 Mbps -83 dBm for 18 Mbps -85 dBm for 11 Mbps -87 dBm for 1 Mbps Memory: 100-8006-152G 128 K x 8 SRAM, 512 K x 8 Flash. SRAM and Flash are not available to external applications. AirborneDirect™ Serial Bridge User’s Guide Quatech, Inc. Confidential Page 85 Specifications Indicators LEDs (standard): Power, Link, Comm LEDs (heavy-duty): Post, Cfg, Link, Conn Power (See Table 17 for Heavy-Duty) Input: 110/240 V, 50-60 Hz, external power supply wall wart Consumption: 2 W max (AC Adaptor) Power Supply Connector: 2.1 mm Barrel Jack Software Configuration: Telnet Login, Serial Login, Airborne Control Center Management: Device Discovery and Configuration, Remote Firmware Upgrade Utility Operating System Compatibility: Any operating system with TCP/IP (the Airborne utilities require Microsoft Windows 2000/XP) Environmental Operating Temperature: -40º C to 85º C Storage Temperature: -40º C to 100º C Page 86 AirborneDirect™ Serial Bridge User’s Guide Quatech, Inc. Confidential 100-8006-152G Specifications Standard Packaging Enclosure: Nylon – Grey Dimensions: 2.58 in. W x 4.03 in. L x 1.90 in. D (65.5 mm x 102.3 mm x 48.2 mm) Heavy-Duty Packaging Enclosure: Plastic Dimensions: 4.63 in. W x 5.24 in. L x 1.43 in. D (117.6 mm x 133.0 mm x 36.2 mm) 100-8006-152G AirborneDirect™ Serial Bridge User’s Guide Quatech, Inc. Confidential Page 87 Specifications Table 17 and Table 18 list power supply specifications for the Heavy-Duty Bridge. The standard package Bridge is powered by the included AC adapter. Table 17 Note: and Table 18 do not apply to the standard package. Table 17. Heavy-Duty Power Supply Specifications Parameter Min Max Normal Operating (J1455 – 12 V system) 9V 16V Normal Operating (J1455 – 24 V system) 18V 32V Cold Cranking (J1211) 4.5V Jumper Start 5 minute (J1455 – 12 V system) Reverse Polarity (J1455 – 24 V system) 24V -24V Max. Voltage 36V Additional filtering is provided to accommodate the ISO 7637 Power Line Immunity and the SAE J1113 Power Line Conducted Emissions requirements. Table 18. Heavy-Duty DC Specifications Symbol Parameter Min VSupply Supply Voltage 4.5 ISupply Supply Current @ VSupply = 12 V IInrush Peak Inrush Current For 25 ms Page 88 Typ 200 AirborneDirect™ Serial Bridge User’s Guide Quatech, Inc. Confidential Max Units 32 V 350 mA 2.9 A 100-8006-152G APPENDIX D FCC COMPLIANCE This appendix lists FCC compliance information for the AirborneDirect™ Serial Bridge. FCC STATEMENT This equipment has been tested and found to comply with the limits for a Class B digital device, pursuant to Part 15 of the FCC Rules. These limits are designed to provide reasonable protection against harmful interference in a residential installation. This equipment generates, uses and can radiate radio frequency energy and if not installed and used in accordance with the instructions, may cause harmful interference to radio communications. However, there is no guarantee that interference will not occur in a particular installation. If this equipment does cause harmful interference to radio or television reception, which can be determined by turning the equipment off and on, the user is encouraged to try to correct the interference by one or more of the following measures: Reorient or relocate the receiving antenna. Increase the separation between the equipment and receiver. Connect the equipment into an outlet on a circuit different from that to which the receiver is connected. Consult the dealer or an experienced radio / TV technician for assistance. FCC RF EXPOSURE STATEMENT To satisfy RF exposure requirements, this device and its antenna must operate with a separation distance of a least 20 cm from all persons and must not be co-located or operating in conjunction with any other antenna or transmitter. INFORMATION FOR CANADIAN USERS (IC NOTICE) This device has been designed to operate with an antenna having a maximum gain of 2.7 dB. An antenna having a higher gain is strictly prohibited per regulations of Industry Canada. The required antenna impedance is 50 ohms. To reduce potential radio interference to other users, the antenna type and its gain should be so chosen that the equivalent isotropically radiated power (EIRP) is not more than required for successful communication. 100-8006-152G AirborneDirect™ Serial Bridge User’s Guide Quatech, Inc. Confidential Page 89 FCC Compliance MANUFACTURER’S DECLARATION OF CONFORMITY Trade Name: AirborneDirect™ Serial Bridge AirborneDirect™ Ethernet Bridge Airborne Embedded Radio Module Model Number: ABDB-SE-DP101 ABDB-ET-DP101 WLRG-RA-DP101 Compliance Test Report Number: B31211D3 F4AWLNG1 Compliance Test Report Date: December 11, 2003 July 17, 2006 Responsible Party (in USA): Address: Quatech, Inc. 5675 Hudson Industrial Parkway Hudson, Ohio 44236 USA Telephone Number: (330) 655-9000 This equipment has been tested and found to comply with the limits for a Class B digital device, pursuant to Part 15 of the FCC Rules. These limits are designed to provide reasonable protection against harmful interference in a residential installation. This equipment generates, uses and can radiate radio frequency energy and if not installed and used in accordance with the instructions, may cause harmful interference to radio communications. However, there is no guarantee that interference will not occur in a particular installation. If the unit does cause harmful interference to radio or television reception, please refer to your user’s manual for instructions on correcting the problem. INDUSTRY CANADA NOTICE (APPLICABLE TO USE WITHIN CANADA) This device complies with Canadian RSS-210. To prevent radio interference to the licensed service, this device is intended to be operated indoors and away from windows to provide maximum shielding. Equipment (or its transmit antenna) that is installed outdoors is subject to licensing. The installer of this radio equipment must ensure that the antenna is located or pointed such that it does not emit RF field in excess of Health Canada limits for the general population; consult Safety Code 6, obtainable from Health Canada’s web site: www.hc-sc.gc.ca/rpb. Page 90 AirborneDirect™ Serial Bridge User’s Guide Quatech, Inc. Confidential 100-8006-152G FCC Compliance AVIS DE CONFORMITE A LA REGLEMENTATION D’INDUSTRIE CANADA Pour empêcher toute interférence aux services faisant l’objet d’une licence, cet appareil doit être utilisé à l’intérieur seulement et devrait être placé loin des fenêtres afin de fournir un écran de blindage maximal. L’installateur du présent matériel radio doit s’assurer que l’antenne est située ou pointée de manière à ce que cette dernière n’ émette pas de champs radioélectriques supérieurs aux limites specifées par Santé Canada pour le grand public; consulter le Code de sécurité 6, disponible sur le site Web de Santé Canada, à l’adresse suivante: www.hc-sc.gc.ca/rpb. INDUSTRY CANADA (IC) EMISSIONS COMPLIANCE STATEMENT This Class B digital apparatus complies with Canadian ICES-003. AVIS DE CONFORMITE A LA REGLEMENTATION D’INDUSTRIE CANADA Cet appareil numérique de la classe B est conform à la norme NMB-003 du Canada. EUROPEAN COMMUNITY—CE NOTICE Marking by the symbol: indicates compliance with the essential requirements of Directive 73/23/EC and the essential requirements of articles 3.1(b), 3.2 and 3.3 of Directive 1999/5/EC. Such marking is indicative that this equipment meets or exceeds the following technical standards: EN 300 328-2—Electromagnetic compatibility and Radio spectrum Matters (ERM); Wideband Transmission systems; data transmission equipment operating in the 2.4 GHz ISM band and using spread spectrum modulations techniques. EN 301 489-17—Electromagnetic compatibility and Radio Spectrum Matters (ERM); Electromagnetic Compatibility (EMC) standard for radio equipment and services; Part 17: Specific conditions for 2.4 GHz wideband transmission systems and 5 GHz high performance RLAN equipment. EN 60950—Safety of information technology equipment, including electrical business equipment. 100-8006-152G AirborneDirect™ Serial Bridge User’s Guide Quatech, Inc. Confidential Page 91 FCC Compliance Marking by the symbol: indicates that usage restrictions apply. To ensure compliance with local regulations, be sure to select the country in which the access point is installed. This product can be used as shown in the following table: EC DECLARATION OF CONFORMITY Application of Council Directives: Manufacturer’s Name: Manufacturer’s Address: Importer’s Name: Importer’s Address: Type of Equipment: Equipment Class: Model: Conforms to Standards: Year of Manufacture: Countries France Italy Luxembourg Romania Austria, Denmark, Finland, Germany, Greece, Iceland, Ireland, Liechtenstein, Luxembourg, The Netherlands, Norway, Portugal, Spain, Sweden, Switzerland, The United Kingdom English Finnish Page 92 999/5/EC, 73/23/EEC Quatech, Inc. 5675 Hudson Industrial Parkway Hudson,OH 44236, USA Micro Puissance 1, av de Norvege, ZA de courtaboeuf BP79, 91 943 Les Ulis Cedex France Information Technology Equipment Commercial and Light Industry AirborneDirect™ Serial Bridge AirborneDirect™ Ethernet Bridge EN 300 328 V1.4.1, EN 310 489-17 V1.2.1, EN 60950-1 First Edition 2006 Restrictions Outdoor use limited to 10 mW e.i.r.p. within the band 2454 to 2483.5 MHz. If used outside of own premises, general authorization is required. General authorization is required for public service. On a secondary basis. Individual license required. None. Hereby, DPAC Technologies Corp. declares that this AirborneDirect™ Serial/Ethernet Bridge is in compliance with the essential requirements and other relevant provisions of Directive 1999/5/EC. DPAC Technologies Corp. vakuuttaa täten että AirborneDirect™ Serial/Ethernet Bridge tyyppinen laite on direktiivin 1999/5/EY oleellisten vaatimusten ja sitä koskevien direktiivin muiden ehtojen mukainen. AirborneDirect™ Serial Bridge User’s Guide Quatech, Inc. Confidential 100-8006-152G FCC Compliance Countries Dutch French Danish German Swedish Greek Italian Spanish Portuguese 100-8006-152G Restrictions Hierbij verklaart DPAC Technologies Corp. dat het toestel AirborneDirect™ Serial/Ethernet Bridge in overeenstemming is met de essentiële eisen en de andere relevante bepalingen van richtlijn 1999/5/EG. Bij deze verklaart DPAC Technologies Corp. dat deze AirborneDirect™ Serial/Ethernet Bridge voldoet aan de essentiële eisen en aan de overige relevante bepalingen van Richtlijn 1999/5/EC. Par la présente DPAC Technologies Corp. déclare que l’appareil AirborneDirect™ Serial/Ethernet Bridge est conforme aux exigences essentielles et aux autres dispositions pertinentes de la directive 1999/5/CE. Undertegnede DPAC Technologies Corp. erklærer herved, at følgende udstyr AirborneDirect™ Serial/Ethernet Bridge overholder de væsentlige krav og øvrige relevante krav i direktiv 1999/5/EF. Hiermit erklärt DPAC Technologies Corp. dass sich dieser AirborneDirect™ Serial/Ethernet Bridge in Übereinstimmung mit den grundlegenden Anforderungen und den anderen relevanten Vorschriften der Richtlinie 1999/5/EG befindet”. (BMWi) Hiermit erklärt DPAC Technologies Corp. die Übereinstimmung des Gerätes AirborneDirect™ Serial/Ethernet Bridge mit den grundlegenden Anforderungen und den anderen relevanten Festlegungen der Richtlinie 1999/5/EG. (Wien) Härmed intygar DPAC Technologies Corp. att denna AirborneDirect™ Serial/Ethernet Bridge står I överensstämmelse med de väsentliga egenskapskrav och övriga relevanta bestämmelser som framgår av direktiv 1999/5/EG. ΜΕ ΤΗΝ ΠΑΡΟΥΣΑ DPAC Technologies Corp. ΔΗΛΩΝΕΙ ΟΤΙ AirborneDirect™ Serial/Ethernet Bridge ΣΥΜΜΟΡΦΩΝΕΤΑΙ ΠΡΟΣ ΤΙΣ ΟΥΣΙΩΔΕΙΣ ΑΠΑΙΤΗΣΕΙΣ ΚΑΙ ΤΙΣ ΛΟΙΠΕΣ ΣΧΕΤΙΚΕΣ ΔΙΑΤΑΞΕIΣ ΤΗΣ ΟΔΗΓΙΑΣ 1999/5/ΕΚ Con la presente DPAC Technologies Corp. dichiara che questo AirborneDirect™ Serial/Ethernet Bridge è conforme ai requisiti essenziali ed alle altre disposizioni pertinenti stabilite dalla direttiva 1999/5/CE. Por medio de la presente DPAC Technologies Corp. declara que el AirborneDirect™ Serial/Ethernet Bridge cumple con los requisitos esenciales y cualesquiera otras disposiciones aplicables o exigibles de la Directiva 1999/5/CE. DPAC Technologies Corp. declara que este AirborneDirect™ Serial/Ethernet Bridge está conforme com os requisitos essenciais e outras disposições da Directiva 1999/5/CE. AirborneDirect™ Serial Bridge User’s Guide Quatech, Inc. Confidential Page 93 FCC Compliance This page intentionally left blank. Page 94 AirborneDirect™ Serial Bridge User’s Guide Quatech, Inc. Confidential 100-8006-152G APPENDIX E ASLIP PROTOCOL TRANSMISSION OF IP DATAGRAMS OVER SERIAL USING AIRBORNEDIRECT™ SERIAL Introduction ASLIP (Airborne Serial Line IP) is a simple packet framing protocol: ASLIP defines a sequence of characters that frame IP packets on a serial line, and nothing more. It provides no addressing, packet type identification, error detection/correction or compression mechanisms. Because the protocol does so little, though, it is usually very easy to implement. Protocol The proposed ASLIP protocol defines four special characters: Character Definition START 0xC1 (decimal 193) END 0xC0 (decimal 192) ESC 0xDB (decimal 219) • Each data packet sent will begin with the START character. • Each data packet sent will end with the END character. • The ESC character is inserted by the transmitter to indicate that the following byte is a literal data byte. The receiver removes the ESC character and passes the following byte as data without interpretation. • If the data packet contains a character the same as the END character a two-byte sequence of ESC and END is sent instead. • If the data packet contains a character the same as the START character a two-byte sequence of ESC and START is sent instead. • If the data packet contains a character the same as the ESC character a two-byte sequence of ESC and ESC is sent instead. • ASLIP is applicable only in data pass-through mode. • If the data packet contains a START character between a START and END sequence, it will be treated as an END START sequence i.e. all data preceding the START will be sent as a data packet and a new data packet will be started. 100-8006-152G AirborneDirect™ Serial Bridge User’s Guide Quatech, Inc. Confidential Page 95 ASLIP Protocol Packet Transfer Each datagram received across the serial line will be sent as a separate IP packet from the wireless interface. Each IP packet received on the wireless interface will be identified as a separate datagram, using the above protocol across the serial interface. Platform The above protocol will be implemented on the Airborne UART v4 WPA only firmware platform. It will be designed to be portable to the Airborne UART 802.11g product. Page 96 AirborneDirect™ Serial Bridge User’s Guide Quatech, Inc. Confidential 100-8006-152G GLOSSARY This appendix provides a glossary of wireless terminology. 802.11 The wireless standards developed by the IEEE that specify an "over-the-air" interface for wireless Local Area Networks. 802.11 is composed of several standards operating in different radio frequencies. 802.11b 802.11b is the international standard for wireless networking that operates in the 2.4 GHz frequency range (2.4 GHz to 2.4835 GHz) and provides a throughput of up to 11 Mbps. 802.11g 802.11g is the international standard for wireless networking that operates in the 2.4 GHz frequency range (2.4 GHz to 2.4835 GHz) and provides a throughput of up to 54 Mbps. Access Point An interface between a wireless network and a wired network. Access Points can combine with a distribution system (such as Ethernet) to create multiple radio cells (BSSs) that enable roaming throughout a facility. Ad Hoc mode A wireless network composed of only stations and no Access Point. Association service An IEEE 802.11 service that enables the mapping of a wireless station to the distribution system via an Access Point. Asynchronous transmission A type of synchronization where there is no defined time relationship between the transmission of frames. Authentication The process a station uses to announce its identify to another station. IEEE 802.11 specifies two forms of authentication: open system and shared key. Bandwidth The amount of transmission capacity available on a network at any point in time. Available bandwidth depends on several variables such as the rate of data transmission speed between networked devices, network overhead, number of users, and the type of device used to connect PCs to a network. Basic Service Set (BSS) A set of 802.11-compliant stations that operate as a connected wireless network. Bits per second (bps) A measurement of data transmission speed over communication lines based on the number of bits that can be sent or received per second. BSSID Basic Service Set Identifier. A 48-bit identifier used by all stations in a BSS in frame headers. Usually a MAC address. Clear channel assessment A function that determines the state of the wireless medium in an IEEE 802.11 network. Client Any computer connected to a network that requests services (files, print capability) from another member of the network. Direct Sequence Spread Spectrum (DSSS) Combines a data signal at the sending station with a higher data rate bit sequence, which many refer to as a “chip sequence” (also known as “processing gain”). A high processing gain increases the signal’s resistance to interference. The minimum processing gain that the FCC allows is 10, and most products operate under 20. 100-8006-152G AirborneDirect™ Serial Bridge User’s Guide Quatech, Inc. Confidential Page 97 Glossary Disassociation service An IEEE 802.11 term that defines the process a station or Access Point uses to notify that it is terminating an existing association. Distribution service An IEEE 802.11 station uses the distribution service to send MAC frames across a distribution system. GPIO General Purpose Input/Output refers to the digital I/O lines. Hot spot Same as an Access Point, usually found in public areas such as coffee shops and airports. IEEE Institute of Electrical and Electronic Engineers, an international organization that develops standards for electrical technologies. The organization uses a series of numbers, like the Dewey Decimal system in libraries, to differentiate between the various technology families. Independent Basic Service Set Network (IBSS Network) An IEEE 802.11-based wireless network that has no backbone infrastructure and consists of at least two wireless stations. This type of network is often referred to as an “Ad Hoc network” because it can be constructed quickly without too much planning. Infrastructure mode A client setting providing connectivity to an Access Point. As compared to Ad Hoc mode, whereby PCs communicate directly with each other, clients set in Infrastructure mode all pass data through a central Access Point. The Access Point not only mediates wireless network traffic in the immediate neighborhood, but also provides communication with the wired network. See Ad Hoc mode and Access Point. LAN application A software application that runs on a computer (which is attached to a LAN, Intranet or the Internet) and using various protocols, can communicate with the Bridge. LEAP Lightweight Extensible Authentication Protocol developed by Cisco. LEAP provides username/password-based authentication between a wireless client and a RADIUS server. It is one of several protocols used with the IEEE 802.1X standard for LAN port access control. Local Area Network A system of connecting PCs and other devices within the same physical proximity for sharing resources such as Internet connections, printers, files and drives. When Wi-Fi is used to connect the devices, the system is known as a wireless LAN or WLAN. Media Access Control (MAC) Layer One of two sub-layers that make up the Data Link Layer of the OSI reference model. The MAC layer is responsible for moving data packets to and from one network node to another across a shared channel. Peer-to-peer network A wireless or wired computer network that has no server, central hub or router. All the networked PCs are equally able to act as a network server or client, and each client computer can communicate with all the other wireless computers without having to go through an Access Point or hub. However, since there is no central base station to monitor traffic or provide Internet access, the various signals can collide with each other, reducing overall performance. RS-232 An EIA standard that specifies up to 20 Kbps, 50 foot, serial transmission between computers and peripheral devices. RS-422 An EIA standard that provides a longer transmission distance, but fewer signal lines, than RS-232. RS-422 uses differential transmission technology and thus provides high-speed transmission of up to 10 Mbps. The maximum transmission distance is 1.2 km at a transmission speed of 9600 bps. Page 98 AirborneDirect™ Serial Bridge User’s Guide Quatech, Inc. Confidential 100-8006-152G Glossary RS-485 An enhanced version of RS-422. It uses a 2-wire bus topology and is compatible with the RS-422 interface. RTOS An operating system implementing components and services that explicitly offer deterministic responses, and therefore allow the creation of real-time systems. An RTOS is characterized by the richness of the services it provides, the performance characteristics of those services, and the degree that those performance characteristics can be controlled by the application engineer (to satisfy the requirements of the application). Service Set Identifier (SSID) An identifier attached to packets sent over the wireless LAN that functions as a "password" for joining a particular radio network (BSS). All radios and Access Points within the same BSS must use the same SSID, or their packets will be ignored. Telnet A virtual terminal protocol used in the Internet, enabling users to log into a remote host. TKIP Temporal Key Integrity Protocol and is used in encryption. TKIP is an IEEE 802.11i standard and an enhancement to WEP security. Transceiver A device for transmitting and receiving packets between the computer and the medium. Transmission Control Protocol (TCP) A commonly used protocol for establishing and maintaining communications between applications on different computers. TCP provides full-duplex, acknowledged, and flow-controlled service to upper-layer protocols and applications. Wide Area Network (WAN) A communication system of connecting PCs (and other computing devices) across a large local, regional, national, or international geographic area. Also used to distinguish between phone-based data networks and Wi-Fi. Phone networks are considered WANs and Wi-Fi networks are considered wireless LANs. Wi-Fi Wi-Fi is a name for 802.11 wireless network technology. Wi-Fi Alliance A non-profit international association formed in 1999 to certify interoperability of wireless LAN products based on the IEEE 802.11 specification. A security protocol for wireless LANs defined in the IEEE 802.11 standard. WEP is designed to provide the same level of security as a wired LAN. Wired Equivalent Privacy (WEP) WLAN Also referred to as a wireless LAN. A type of local area network that uses high-frequency radio waves rather than wires to communicate between nodes and provide network connectivity. WPA Wi-Fi Protected Access. It addresses all known Wired Equivalent Privacy (WEP) vulnerabilities. WPA uses RC4 for encryption and TKIP for key management. It includes a message integrity mechanism commonly called Michael or MIC. WPA-LEAP Wi-Fi Protected Access - Light Extensible Authentication Protocol, an implementation based on the IEEE 802.11i 2004 and IEEE 802.1X 2001 standards, which includes the LEAP protocol for initial key assignment. WPA-PSK Wi-Fi Protected Access - Pre-Shared Key, an implementation based on the IEEE 802.11i 2004 and IEEE 802.1X 2001 standards, where the PSK is stored on the client. 100-8006-152G AirborneDirect™ Serial Bridge User’s Guide Quatech, Inc. Confidential Page 99 Glossary This page intentionally left blank Page 100 AirborneDirect™ Serial Bridge User’s Guide Quatech, Inc. Confidential 100-8006-152G INDEX A I Accessing the Web interface, 29 ADDING VIRTUAL COM PORTS, 68 AirborneDirect Ethernet Bridge reset switch, 11 AirborneDirect Serial Client Bridge features and benefits, 2 hardware description, 11 installation, 21 LEDs, 14, 19 package contents, 9 reset button, 12 sample application, 3 shunts, 12 Application, 3 Installing AirborneDirect Serial Client Bridge, 21 VCOM, 61 Interface Selector Shunts, 13 B Basic Configuration Settings, 34, 49 Benefits, 2 C CLI Commands Descriptions DHCP Acquire Limit, 46 DHCP Fallback Method, 46 Outbound UDP Mode, 38 Command Line Interface host interaction using UDP, 75 UDP interaction, 75 Configuring using the Web interface, 31 CONNECTIONS VERIFYING, 25 Conventions manual, 6 Cradle, 16 L LED TROUBLESHOOTING, 73 LEDs, 14, 19 LISTING VIRTUAL COM PORTS, 68 Location selection, 20 M Miscellaneous Settings Page, 39 MODIFYING VIRTUAL COM PORTS, 70 Mounting cradle, 16 N Navigating through the Web interface, 31 Network Management Service, 60 O Outbound UDP Mode, 38 P Package contents, 9 Pages in the Web interface Reset, 56 Services Page, 49 Status, 34 D R DELETING VIRTUAL COM PORTS, 70 DHCP Acquire Limit, 46 DHCP Fallback Method, 46 Related documentation, 7 REQUIREMENTS FOR INSTALLING VCOM, 61 Reset button, 11 Reset Button, 12 Reset page, 56 F FCC COMPLIANCE, 89 Features, 2 G Glossary, 97 H Hardware description, 11 100-8006-152G S Sample application, 3 Saving Configuration Changes, 33 Security Settings Page, 51 Selecting a location, 20 Services Page, 49 Shunts, 12 interface selector shunts, 13 Software WPA-LEAP Security, 23, 26 AirborneDirect™ Serial Bridge User’s Guide Quatech, Inc. Confidential Page 101 Index SPECIFICATIONS, 83 STARTING VCOM CONFIGURATION UTILITY, 66 Status page, 34 T Troubleshooting, 71 LEDs, 73 U UDP AND POWER MANAGEMENT, 75 Update Firmware Page, 53 serial device driver, 60 STARTING CONFIGURATION UTILITY, 66 SYSTEM REQUIREMENTS, 61 VCOM Components, 60 configuration utility, 61 Network Management Service, 60 serial device driver, 60 VERIFYING YOUR CONNECTIONS, 25 VIRTUAL COM PORTS ADDING, 68 DELETING, 70 LISTING, 68 MODIFYING, 70 W V VCOM ADDING VIRTUAL COM PORTS, 68 configuration utility, 61 CONFIGURATION UTILITY WINDOW, 67 DELETING VIRTUAL COM PORTS, 70 INSTALLING, 61 LISTING VIRTUAL COM PORTS, 68 MODIFYING VIRTUAL COM PORTS, 70 OVERVIEW, 59 Page 102 Web interface accessing, 29 configuration activities, 31 navigating through, 31 Web interface pages Reset, 56 Services Page, 49 Status, 34 WPA-LEAP Security, 23, 26 AirborneDirect™ Serial Bridge User's Guide Quatech, Inc. Confidential 100-8006-152G 100-8006-152G Revision 1.52 April 2007