1
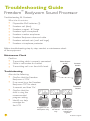
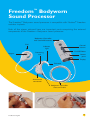
Freedom™ Bodyworn
Sound Processor
The Freedom™ Bodyworn sound processor is compatible with Nucleus® Freedom
cochlear implants.
Each of the pieces pictured here are important parts comprising the external
components of the Freedom™ Bodyworn sound processor.
Bodyworn Controller
with two AAA batteries
Coil
Control
buttons
Indicator
light
Magnet
On/Off//Select
Processing
unit
Buzzer
ports
Display
Earhook
Accessories
connection
Bodyworn Controller
Shoe and Cable
Troubleshooting Kit
27
Troubleshooting Guide
Freedom™ Bodyworn Sound Processor
Troubleshooting Kit Contents
What the kit contains:
Disposable AAA batteries (2)
Freedom coil (8cm)
Freedom magnet - #2 beige
Freedom lapel microphone
Freedom monitor earphones
Freedom Bodyworn shoe and cable
Freedom earhook set (small and large)
Freedom microphone protector
•
•
•
•
•
•
•
•
Before troubleshooting step-by-step, conduct a maintenance check
of the equipment.
Maintenance Check
Confirm:
Transmitting cable is properly connected.
Cable is not broken or cracked.
Transmitting coil is on the child’s head.
•
•
•
Select button
on/off
Troubleshooting:
Also do the following:
Confirm that the Freedom
Bodyworn is ‘ON’.
If no sound, turn the Freedom
Bodyworn ‘Off ’ for about
3 seconds, and then ‘On’.
Confirm that the
child is using the
recommended
program setting.
Identify any help
messages on
the LCD.
Increase
button
•
•
Decrease
button
•
•
Program 3 in use
Microphone only
28
Program 2 in
use Telecoil
only
Program 2 in
use Microphone
and Telecoil
together
Troubleshooting Kit
Help message H1 = battery flat
Change the batteries (ensure that both of
the batteries are changed).
Ensure that both of the batteries are
inserted correctly (make sure the “+”
and “-” symbols on the batteries match
the “+” and “-” symbols on the compartment.
•
•
Help message H2 = battery low
Replace/recharge both of the batteries.
•
Battery full
Battery low
Battery flat
Help message H3 = coil error
Check that the coil is fully inserted
in the socket.
Check that the coil is correctly
located above the Implant.
Check for cable damage.
•
+
+
•
•
Help message H4 = sound/stimulation error
Check using the lapel microphone
(refer to lapel microphone section, below).
Change the processing unit (use backup processing unit).
Contact the child’s cochlear implant clinician.
•
•
•
Help message H5 = MAP corrupt
Try your other backup system.
Contact the child’s cochlear implant clinician.
•
•
Troubleshooting Kit
29
Presented Complaints:
No sound/intermittent sound (help messages H1, H2, H3, H4)
Check that the batteries are correctly inserted.
Turn the sound processor off and then on.
Change the batteries (ensure that all of the batteries are changed).
Check using the lapel microphone.
Check that the coil is fully inserted in the processing unit socket
(and correctly located above the Implant).
Change the coil.
Change the bodyworn controller (can also try the BTE controller).
Change the processing unit (use back-up processing unit or contact the child’s cochlear implant clinician).
•
•
•
•
•
•
•
•
Sound unclear/muffled
Check the LCD for help message (H4 = see steps 2 – 5,
H5 = contact your clinician).
Check using the lapel microphone. Determine whether
the sound improves.
Disconnect the lapel microphone and remove the microphone cover.
Determine whether the sound improves.
Replace the microphone cover, if the sound does not improve.
Replace the processing unit (use back-up processing unit or contact the child’s cochlear implant clinician).
•
•
•
•
•
LCD blank (but sound OK)
Change the bodyworn controller (return the suspected faulty controller).
Sounds uncomfortably loud
Contact the child’s cochlear implant audiologist.
•
•
Indicator light
When the indicator light is turned on, it:
Flickers when incoming sounds are being received.
Shows a slow flash rate as a low battery warning.
Shows a fast flash rate for all other warnings e.g. the coil is off its position over the implant, or there is a sound error (help message H4).
To stop the alarm, push any button.
•
•
•
30
Troubleshooting Kit
Microphone and accessories
Monitor earphones can be used by a hearing person to listen to the sound signal from either of the following:
Microphone
Built-in telecoil
Microphone and built-in telecoil, together
An ‘X’ on the
Accessory
Bodyworn controller
display shows the
Accessory and microphone together
•
•
•
•
•
To use the lapel microphone:
Use your fingernail to lift the
socket cover.
Push the accessory plug
into the socket.
Push both the Increase and
Decrease buttons at the same
time for a few seconds to
activate the accessory.
‘EA’ (external accessory) shows briefly
on the display while the change
is happening.
accessory has been
activated.
•
•
•
•
To use the monitor earphones:
Ensure the sound processor is on.
Plug the monitor earphones into the Bodyworn
controller shoe accessory connection
- Caution: Do not use force.
Press any button on the Bodyworn controller,
for more than one second,
to activate the earphones.
Should you wish to test an accessory, plug it in to the monitor
earphone connector.
Listen to sounds.
•
•
•
•
•
Monitor earphones only indicate that sound can be heard. They do not
indicate the quality of sound as heard by the speech processor user.
Electromagnetic Interference
Move away from any electronic device that may be causing interference, e.g. buzzing sounds or distorted speech.
Troubleshooting Kit
31
Most electronic devices produce electromagnetic fields. Headset cables, like antennae, pick them up. Common sources of interference include:
Radio and TV transmission towers
Mobile phone towers
Shopping center and airport security systems
Some digital mobile phones
Battery chargers
The electronic interference (EMI) will be no louder than the programmed levels and will neither hurt nor damage the processor. If buzzing is still heard,
or distorted speech, turn off the speech processor, take off the coil and
consult the implant clinician.
•
•
•
•
•
32
Troubleshooting Kit