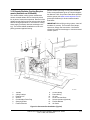
1
Installation Manual
Generator Set
Cummins NPower GF Series
English Version
03/2014
Doc 17855
This manual contains proprietary information to equipment produced by Cummins NPower
LLC and Cummins Inc. and is being supplied solely for the purpose of operating, maintaining, and servicing the natural gas generator set purchased from Cummins NPower LLC.
© Copyright 2013, Cummins Inc.
Cummins NPower LLC Generator Sets
Limited Warranty
Commercial Generating Set
This limited warranty applies to all Cummins NPower LLC (hereinafter referred to as “Cummins NPower”
branded commercial generating sets and associated accessories (hereinafter referred to as "Product").
This warranty covers any failures of the Product, under normal use and service, which result from a defect
in material or factory workmanship.
Warranty Period:
The warranty start date for stationary Product is the date of initial start up, demonstration or 18 months
after factory ship date, whichever is sooner. The warranty start date for rental or oil and gas products is
the date of receipt of Product by the end customer. See table for details.
Base Warranty Duration
(Whichever occurs first)
Rating
Months
Emergency Standby Power (ESP)
12
Prime Power (PRP)
12
Maximum Hours
500
Unlimited
Emergency Standby Power (ESP) is defined as the maximum power available during a variable
electrical power sequence, under the stated operating conditions, for which a generating set is capable of
delivering in the event of a reliable utility power outage. The permissible average power output over 24
hours of operation shall not exceed 70% of the ESP. For applications supporting an unreliable utility
service, the Prime Power (PRP) rating should be used.
Prime Power (PRP) is defined as being the maximum power which a generating set is capable of
delivering continuously while supplying a variable electrical load. The permissible average power output
over 24 hours of operation shall not exceed 70% of the PRP.
Cummins NPower Responsibilities:
In the event of a failure of the Product during the warranty period due to defects in material or
workmanship, Cummins NPower will only be responsible for the following costs:
x
All parts and labor required to repair the Product.
x
Reasonable travel expenses to and from the Product site location.
x
Maintenance items that are contaminated or damaged by a warrantable failure.
Owner Responsibilities:
The owner will be responsible for the following:
x Notifying Cummins NPower distributor or dealer within 30 days of the discovery of failure.
x Installing, operating, commissioning and maintaining the Product in accordance with Cummins
NPower’s published policies and guidelines.
x Providing evidence for date of commissioning.
x Providing sufficient access to and reasonable ability to remove the Product from the installation in
the event of a warrantable failure.
In addition, the owner will be responsible for:
x Incremental costs and expenses associated with Product removal and reinstallation resulting from
difficult or non-standard installations.
x Costs associated with rental of generating sets used to replace the Product being repaired.
x Costs associated with labor overtime and premium shipping requested by the owner.
x All downtime expenses, fines, all applicable taxes, and other losses resulting from a warrantable
failure.
Cummins NPower LLC 1600 Buerkle Road
White Bear Lake, MN 55110 Phone 651 636 1000
www.npower.cummins.com
Limitations:
This limited warranty does not cover Product failures resulting from:
x Inappropriate use relative to designated power rating or application guidelines.
x Normal wear and tear, negligence, accidents or misuse.
x Improper and/or unauthorized installation.
x Lack of maintenance or unauthorized repair.
x Noncompliance with any Cummins NPower published guideline or policy.
x Use of improper or contaminated fuels, coolants or lubricants.
x Improper storage before and after commissioning.
x Owner’s delay in making Product available after notification of potential Product problem.
x Replacement parts and accessories not authorized by Cummins NPower.
x Use of Battle Short Mode.
x Owner or operator abuse or neglect such as: operation without adequate coolant or
lubricants; over-fueling; over-speeding; lack of maintenance to lubricating, cooling or air
intake systems; late servicing and maintenance; improper storage, starting, warm-up, run-in
or shutdown practices, or for progressive damage resulting from a defective shutdown or
warning device.
x Damage to parts, fixtures, housings, attachments and accessory items that are not part of the
generating set.
This limited warranty does not apply to:
x Costs of maintenance, adjustments, installation, commissioning or start-up.
x Starting batteries, heating elements, trailers and enclosures.
x Components added to the Product after shipment from Cummins NPower.
Please contact your local Cummins NPower Distributor for clarification concerning these limitations.
Extended Warranty
Cummins NPower offers the Cummins ENCOMPASS Extended Coverage program for parts and labor as
listed in Cummins Bulletin # 3624424 for a period of 5 years or 2000 hours.
Cummins NPower Right to Failed Components:
Failed components claimed under warranty remain the property of Cummins NPower. Cummins NPower
has the right to reclaim any failed component that has been replaced under warranty.
THE WARRANTIES SET FORTH HEREIN ARE THE SOLE WARRANTIES MADE BY
CUMMINS NPOWER IN REGARD TO THE PRODUCT. CUMMINS NPOWER MAKES
NO OTHER WARRANTIES, EXPRESS OR IMPLIED, OR OF MERCHANTABILITY
OR FITNESS FOR A PARTICULAR PURPOSE. IN NO EVENT IS CUMMINS
NPOWER LIABLE FOR INCIDENTAL OR CONSEQUENTIAL DAMAGES.
This limited warranty shall be enforced to the maximum extent permitted by applicable law. This limited
warranty gives the owner specific rights that may vary from state to state or from jurisdiction to
jurisdiction.
Cummins NPower LLC 1600 Buerkle Road
White Bear Lake, MN 55110 Phone 651 636 1000
www.npower.cummins.com
Table of Contents
Warranty Information
Section 1 - Safety
1.1 Advisory and Cautionary Statements . . . . . . . . . . . . . . . . . . . . . . . . . . . . . . . . . . . . . . . . . . . . . . . . . . . 1-1
1.2 Safety/Data Labels . . . . . . . . . . . . . . . . . . . . . . . . . . . . . . . . . . . . . . . . . . . . . . . . . . . . . . . . . . . . . . . . . . 1-3
Section 2 - Introduction
2.1 About This Manual. . . . . . . . . . . . . . . . . . . . . . . . . . . . . . . . . . . . . . . . . . . . . . . . . . . . . . . . . . . . . . . . . .
2.2 Installation Overview . . . . . . . . . . . . . . . . . . . . . . . . . . . . . . . . . . . . . . . . . . . . . . . . . . . . . . . . . . . . . . . .
2.3 Application and Installation . . . . . . . . . . . . . . . . . . . . . . . . . . . . . . . . . . . . . . . . . . . . . . . . . . . . . . . . . . .
2.4 Safety Considerations . . . . . . . . . . . . . . . . . . . . . . . . . . . . . . . . . . . . . . . . . . . . . . . . . . . . . . . . . . . . . . .
2.5 Standby Heating Devices . . . . . . . . . . . . . . . . . . . . . . . . . . . . . . . . . . . . . . . . . . . . . . . . . . . . . . . . . . . .
2.6 Product Modifications . . . . . . . . . . . . . . . . . . . . . . . . . . . . . . . . . . . . . . . . . . . . . . . . . . . . . . . . . . . . . . .
2-1
2-1
2-1
2-1
2-2
2-2
Section 3 - Installation
3.1 Mounting the Generator Set . . . . . . . . . . . . . . . . . . . . . . . . . . . . . . . . . . . . . . . . . . . . . . . . . . . . . . . . . . 3-1
3.1.1 Location . . . . . . . . . . . . . . . . . . . . . . . . . . . . . . . . . . . . . . . . . . . . . . . . . . . . . . . . . . . . . . . . . . . . . . 3-1
3.1.2 Mounting . . . . . . . . . . . . . . . . . . . . . . . . . . . . . . . . . . . . . . . . . . . . . . . . . . . . . . . . . . . . . . . . . . . . . 3-1
3.1.3 Access To Set . . . . . . . . . . . . . . . . . . . . . . . . . . . . . . . . . . . . . . . . . . . . . . . . . . . . . . . . . . . . . . . . . 3-1
3.1.4 Mechanical Connections . . . . . . . . . . . . . . . . . . . . . . . . . . . . . . . . . . . . . . . . . . . . . . . . . . . . . . . . . 3-2
3.1.5 Base Drains (Optional). . . . . . . . . . . . . . . . . . . . . . . . . . . . . . . . . . . . . . . . . . . . . . . . . . . . . . . . . . . . 3-2
3.2 Fuel System. . . . . . . . . . . . . . . . . . . . . . . . . . . . . . . . . . . . . . . . . . . . . . . . . . . . . . . . . . . . . . . . . . . . . . . 3-2
3.2.1 Fuel Lines - Routing. . . . . . . . . . . . . . . . . . . . . . . . . . . . . . . . . . . . . . . . . . . . . . . . . . . . . . . . . . . . . 3-2
3.2.2 Natural Gas/Propane Vapor/Propane Liquid Fuel System (Dual Fuel System). . . . . . . . . . . . . . . . 3-2
3.2.3 Fuel Supply Pressure. . . . . . . . . . . . . . . . . . . . . . . . . . . . . . . . . . . . . . . . . . . . . . . . . . . . . . . . . . . . 3-3
3.2.4 Check Gas Leaks and Correct. . . . . . . . . . . . . . . . . . . . . . . . . . . . . . . . . . . . . . . . . . . . . . . . . . . . . 3-3
3.2.5 Fuel Heater (Optional-MOH models only) . . . . . . . . . . . . . . . . . . . . . . . . . . . . . . . . . . . . . . . . . . . . . 3-3
3.2.6 Regulator (Optional). . . . . . . . . . . . . . . . . . . . . . . . . . . . . . . . . . . . . . . . . . . . . . . . . . . . . . . . . . . . . . 3-3
3.2.7 Fuel Filters (Optional-MOH models only). . . . . . . . . . . . . . . . . . . . . . . . . . . . . . . . . . . . . . . . . . . . . . 3-3
3.3 Battery Selection . . . . . . . . . . . . . . . . . . . . . . . . . . . . . . . . . . . . . . . . . . . . . . . . . . . . . . . . . . . . . . . . . . . 3-3
3.3.1 Battery Requirements . . . . . . . . . . . . . . . . . . . . . . . . . . . . . . . . . . . . . . . . . . . . . . . . . . . . . . . . . . . 3-3
3.3.2 Battery Installation . . . . . . . . . . . . . . . . . . . . . . . . . . . . . . . . . . . . . . . . . . . . . . . . . . . . . . . . . . . . . . 3-4
3.4 Exhaust System. . . . . . . . . . . . . . . . . . . . . . . . . . . . . . . . . . . . . . . . . . . . . . . . . . . . . . . . . . . . . . . . . . . . 3-4
3.5 Installation of Sensors . . . . . . . . . . . . . . . . . . . . . . . . . . . . . . . . . . . . . . . . . . . . . . . . . . . . . . . . . . . . . . . 3-5
3.6 Air Fuel Ratio (AFR) Controller . . . . . . . . . . . . . . . . . . . . . . . . . . . . . . . . . . . . . . . . . . . . . . . . . . . . . . . . 3-6
3.7 Catalyst-Removable Elements (Only available on some models). . . . . . . . . . . . . . . . . . . . . . . . . . . . . . . 3-6
3.8 Engine 3-Way Catalyst (Model Specific) . . . . . . . . . . . . . . . . . . . . . . . . . . . . . . . . . . . . . . . . . . . . . . . . . 3-6
3.8.1 Installation and Applications Guidelines . . . . . . . . . . . . . . . . . . . . . . . . . . . . . . . . . . . . . . . . . . . . . . 3-6
3.8.2 Owner’s Responsibilities . . . . . . . . . . . . . . . . . . . . . . . . . . . . . . . . . . . . . . . . . . . . . . . . . . . . . . . . . . 3-7
3.8.3 Preparation . . . . . . . . . . . . . . . . . . . . . . . . . . . . . . . . . . . . . . . . . . . . . . . . . . . . . . . . . . . . . . . . . . . . 3-8
3.8.4 3-Way Catalyst Installation . . . . . . . . . . . . . . . . . . . . . . . . . . . . . . . . . . . . . . . . . . . . . . . . . . . . . . . . 3-9
3.9 Air Fuel Setting and Emission Measurement . . . . . . . . . . . . . . . . . . . . . . . . . . . . . . . . . . . . . . . . . . . . 3-10
3.10 Ventilation and Cooling . . . . . . . . . . . . . . . . . . . . . . . . . . . . . . . . . . . . . . . . . . . . . . . . . . . . . . . . . . . . 3-10
3.11 Vents and Ducts . . . . . . . . . . . . . . . . . . . . . . . . . . . . . . . . . . . . . . . . . . . . . . . . . . . . . . . . . . . . . . . . . 3-10
3.12 Oil Reservoir (Optional) . . . . . . . . . . . . . . . . . . . . . . . . . . . . . . . . . . . . . . . . . . . . . . . . . . . . . . . . . . . . . 3-10
3.13 Dampers . . . . . . . . . . . . . . . . . . . . . . . . . . . . . . . . . . . . . . . . . . . . . . . . . . . . . . . . . . . . . . . . . . . . . . . 3-10
Natural Gas Generator Set Installation Manual-GF Series
Doc. 17855, Rel. 03/2014
TOC-i
Table of Contents
3.14 Radiator Set Cooling Requirements . . . . . . . . . . . . . . . . . . . . . . . . . . . . . . . . . . . . . . . . . . . . . . . . . . 3-10
3.15 Remote Radiator Cooling Requirements (Available on All Models). . . . . . . . . . . . . . . . . . . . . . . . . . . .3-11
Section 4 - Controls
4.1 Control System Overview . . . . . . . . . . . . . . . . . . . . . . . . . . . . . . . . . . . . . . . . . . . . . . . . . . . . . . . . . . . . 4-1
4.2 Control Wiring Installation . . . . . . . . . . . . . . . . . . . . . . . . . . . . . . . . . . . . . . . . . . . . . . . . . . . . . . . . . . . . 4-1
4.3 Remote Monitor/Control Connections (PCC) . . . . . . . . . . . . . . . . . . . . . . . . . . . . . . . . . . . . . . . . . . . . . . 4-1
4.4 Control Relays (Optional). . . . . . . . . . . . . . . . . . . . . . . . . . . . . . . . . . . . . . . . . . . . . . . . . . . . . . . . . . . . . 4-3
4.5 AC Electrical Connections . . . . . . . . . . . . . . . . . . . . . . . . . . . . . . . . . . . . . . . . . . . . . . . . . . . . . . . . . . . . 4-3
4.6 AC Wiring . . . . . . . . . . . . . . . . . . . . . . . . . . . . . . . . . . . . . . . . . . . . . . . . . . . . . . . . . . . . . . . . . . . . . . . . . 4-4
4.6.1 Generator Voltage Connections . . . . . . . . . . . . . . . . . . . . . . . . . . . . . . . . . . . . . . . . . . . . . . . . . . . . 4-4
4.6.2 Load Connections . . . . . . . . . . . . . . . . . . . . . . . . . . . . . . . . . . . . . . . . . . . . . . . . . . . . . . . . . . . . . . .4-5
4.6.3 Load Balancing. . . . . . . . . . . . . . . . . . . . . . . . . . . . . . . . . . . . . . . . . . . . . . . . . . . . . . . . . . . . . . . . . .4-5
4.6.4 Current Transformers . . . . . . . . . . . . . . . . . . . . . . . . . . . . . . . . . . . . . . . . . . . . . . . . . . . . . . . . . . . . .4-5
4.7 Coolant Heater (Optional) . . . . . . . . . . . . . . . . . . . . . . . . . . . . . . . . . . . . . . . . . . . . . . . . . . . . . . . . . . . . 4-6
4.7.1 Battery Heater (Optional) . . . . . . . . . . . . . . . . . . . . . . . . . . . . . . . . . . . . . . . . . . . . . . . . . . . . . . . . . . . 4-6
4.7.2 Control Heater (Optional) . . . . . . . . . . . . . . . . . . . . . . . . . . . . . . . . . . . . . . . . . . . . . . . . . . . . . . . . . . . .4-6
4.7.3 Breather Heater (Optional) . . . . . . . . . . . . . . . . . . . . . . . . . . . . . . . . . . . . . . . . . . . . . . . . . . . . . . . . . . .4-7
Section 5 - Pre-Start Preparation
5.1 Electrical System . . . . . . . . . . . . . . . . . . . . . . . . . . . . . . . . . . . . . . . . . . . . . . . . . . . . . . . . . . . . . . . . . . . 5-1
5.2 Battery Connections. . . . . . . . . . . . . . . . . . . . . . . . . . . . . . . . . . . . . . . . . . . . . . . . . . . . . . . . . . . . . . . . . 5-1
5.3 InPower Service Tool General Information (PCC) . . . . . . . . . . . . . . . . . . . . . . . . . . . . . . . . . . . . . . . . . . 5-1
5.4 PCC Options Pre-Start Checks . . . . . . . . . . . . . . . . . . . . . . . . . . . . . . . . . . . . . . . . . . . . . . . . . . . . . . . . 5-1
5.5 Start Up Procedure . . . . . . . . . . . . . . . . . . . . . . . . . . . . . . . . . . . . . . . . . . . . . . . . . . . . . . . . . . . . . . . . . 5-1
5.6 Emissions Requirements . . . . . . . . . . . . . . . . . . . . . . . . . . . . . . . . . . . . . . . . . . . . . . . . . . . . . . . . . . . . . .5-2
5.7 Fuel Pressure and Mixture Adjustments . . . . . . . . . . . . . . . . . . . . . . . . . . . . . . . . . . . . . . . . . . . . . . . . . 5-2
5.7.1 Fuel Supply Pressure . . . . . . . . . . . . . . . . . . . . . . . . . . . . . . . . . . . . . . . . . . . . . . . . . . . . . . . . . . . . 5-2
5.7.2 Fuel System Components . . . . . . . . . . . . . . . . . . . . . . . . . . . . . . . . . . . . . . . . . . . . . . . . . . . . . . . . 5-3
5.7.3 Fuel System Operation. . . . . . . . . . . . . . . . . . . . . . . . . . . . . . . . . . . . . . . . . . . . . . . . . . . . . . . . . . . 5-3
5.7.4 Fuel Mixture Adjustments. . . . . . . . . . . . . . . . . . . . . . . . . . . . . . . . . . . . . . . . . . . . . . . . . . . . . . . . . 5-4
5.7.4.1 Electronic Engines . . . . . . . . . . . . . . . . . . . . . . . . . . . . . . . . . . . . . . . . . . . . . . . . . . . . . . . . . . 5-4
5.7.4.2 Non-Electronic Engines . . . . . . . . . . . . . . . . . . . . . . . . . . . . . . . . . . . . . . . . . . . . . . . . . . . . . . 5-4
Section 6 - Installation Checklist
6.1 General . . . . . . . . . . . . . . . . . . . . . . . . . . . . . . . . . . . . . . . . . . . . . . . . . . . . . . . . . . . . . . . . . . . . . . . . . .
6.2 Generator Set Support . . . . . . . . . . . . . . . . . . . . . . . . . . . . . . . . . . . . . . . . . . . . . . . . . . . . . . . . . . . . . . .
6.3 Cooling Air Flow . . . . . . . . . . . . . . . . . . . . . . . . . . . . . . . . . . . . . . . . . . . . . . . . . . . . . . . . . . . . . . . . . . . .
6.4 Fuel System . . . . . . . . . . . . . . . . . . . . . . . . . . . . . . . . . . . . . . . . . . . . . . . . . . . . . . . . . . . . . . . . . . . . . . .
6.5 Exhaust System . . . . . . . . . . . . . . . . . . . . . . . . . . . . . . . . . . . . . . . . . . . . . . . . . . . . . . . . . . . . . . . . . . . .
6.6 AC And DC Wiring . . . . . . . . . . . . . . . . . . . . . . . . . . . . . . . . . . . . . . . . . . . . . . . . . . . . . . . . . . . . . . . . . .
6.7 Generator Set Pre-Start . . . . . . . . . . . . . . . . . . . . . . . . . . . . . . . . . . . . . . . . . . . . . . . . . . . . . . . . . . . . . .
6-1
6-1
6-1
6-1
6-2
6-2
6-2
Section 7 - Wiring Diagrams
7.1 General . . . . . . . . . . . . . . . . . . . . . . . . . . . . . . . . . . . . . . . . . . . . . . . . . . . . . . . . . . . . . . . . . . . . . . . . . . .7-1
Wiring Diagrams - Electronic Engines. . . . . . . . . . . . . . . . . . . . . . . . . . . . . . . . . . . . . . . . . . . . . . . . . . . . . . .7-1
Wiring Diagrams - Hydro-Mechanical Engines . . . . . . . . . . . . . . . . . . . . . . . . . . . . . . . . . . . . . . . . . . . . . . . .7-1
TOC-ii
Natural Gas Generator Set Installation Manual-GF Series
Doc. 17855, Rel. 03/2014
Table of Contents
Natural Gas Generator Set Installation Manual-GF Series
Doc. 17855, Rel. 03/2014
TOC-iii
Table of Contents
TOC-iv
Natural Gas Generator Set Installation Manual-GF Series
Doc. 17855, Rel. 03/2014
Section 1 - Safety
IMPORTANT SAFETY INSTRUCTIONS - This
manual contains important instructions that should be
followed during installation and maintenance of the
generator and batteries. SAVE THESE INSTRUCTIONS.
Before operating the generator set (genset), read the
Operator’s Manual and become familiar with it and
the equipment. Safe and efficient operation can be
achieved only if the equipment is properly operated
and maintained. Many accidents are caused by
failure to follow fundamental rules and precautions.
The following symbols, found throughout this manual,
alert you to potentially dangerous conditions to the
operator, service personnel, or the equipment.
1.1 Advisory and Cautionary Statements
Advisory and Cautionary Statements are used
throughout this manual to call attention to special
information, correct operating procedures, and safety
precautions.
NOTE: A general advisory statement relating to
equipment operation and maintenance procedures.
IMPORTANT: A specific advisory statement intended
to prevent damage to the equipment or associated
components.
Cautionary Statements consist of three levels:
DANGER
This symbol warns of immediate hazards which
will result in severe personal injury or death.
WARNING
This symbol refers to a hazard or unsafe practice
which can result in severe personal injury or
death.
CAUTION
This symbol refers to a hazard or unsafe practice
which can result in personal injury or product or
property damage.
CAUTION
Fuel And Fumes Are Flammable.
Fire, explosion, and personal injury or death can
result from improper practices.
• DO NOT fill fuel tanks while the engine is running unless the tanks are outside the engine
compartment. Fuel contact with the hot engine
or exhaust is a potential fire hazard.
• DO NOT permit any flame, cigarette, pilot light,
spark, arcing equipment, or other ignition source
near the generator set or fuel tank.
• Fuel lines must be adequately secured and free
of leaks. The fuel connection at the engine
should be made with an approved flexible line.
Do not use copper piping on flexible lines as
copper will become brittle if continuously
vibrated or repeatedly bent.
• Natural gas is lighter than air, and will tend to
gather under hoods. Propane is heavier than air,
and will tend to gather in sumps or low areas.
NFPA code requires all persons handling propane to be trained and qualified.
• Be sure all fuel supplies have a positive shut-off
valve.
• Be sure the battery area has been well-ventilated prior to servicing near it. Lead-acid batteries emit a highly explosive hydrogen gas that
can be ignited by arcing, sparking, smoking, etc.
Natural Gas Generator Set Installation Manual-GF Series
Doc. 17855, Rel. 03/2014
1-1
WARNING
Exhaust Gases Are Deadly.The engine exhaust
from this product contains chemicals known to
the State of California and some of its constituents cause cancer, birth defects, or other reproductive harm.
• Provide an adequate exhaust system to properly
expel discharged gases away from enclosed or
sheltered areas and areas where individuals are
likely to congregate. Visually and audibly inspect
the exhaust daily for leaks per the maintenance
schedule. Make sure that exhaust manifolds are
secured and not warped. Do not use exhaust
gases to heat a compartment.
• Disconnect electric power before removing protective shields or touching electrical equipment.
Use rubber insulative mats placed on dry wood
platforms over floors that are metal or concrete
when around electrical equipment. Do not wear
damp clothing (particularly wet shoes) or allow
skin surface to be damp when handling electrical
equipment.
• Use extreme caution when working on electrical
components. High voltages can cause injury or
death. DO NOT tamper with interlocks.
• Follow all applicable state and local electrical
codes. Have all electrical installations performed
by a qualified licensed electrician. Tag and lock
open switches to avoid accidental closure.
• Be sure the unit is well ventilated.
WARNING
Moving Parts Can Cause Severe Personal Injury
or Death.
• Keep your hands, clothing, and jewelry away
from moving parts.
• DO NOT CONNECT GENERATOR SET
DIRECTLY TO ANY BUILDING ELECTRICAL
SYSTEM. Hazardous voltages can flow from the
generator set into the utility line. This creates a
potential for electrocution or property damage.
Connect only through an approved isolation
switch or an approved paralleling device.
General Safety Precautions
• Before starting work on the generator set, disconnect the battery charger from its AC source,
then disconnect the starting batteries, negative
(-) cable first. This will prevent accidental starting.
• Coolants under pressure have a higher boiling
point than water. DO NOT open a radiator or
heat exchanger pressure cap while the engine is
running. Allow the generator set to cool and
bleed the system pressure first.
• Make sure that fasteners on the generator set
are secure. Tighten supports and clamps. Keep
guards in position over fans, drive belts, etc.
• Used engine oils have been identified by some
state or federal agencies as causing cancer or
reproductive toxicity. When checking or changing engine oil, take care not to ingest, breathe
the fumes, or contact used oil.
• Do not wear loose clothing or jewelry in the vicinity of moving parts, or while working on electrical
equipment. Loose clothing and jewelry can
become caught in moving parts. Jewelry can
short out electrical contacts and cause shock or
burning.
• If adjustment must be made while the unit is running, use extreme caution around hot manifolds,
moving parts, etc.
WARNING
Electrical Shock Can Cause Severe Personal
Injury or Death.
1-2
• Keep multi-class ABC fire extinguishers handy.
Class A fires involve ordinary combustible materials such as wood and cloth; Class B fires
involve combustible and flammable liquid fuels
and gaseous fuels; Class C fires involve live
electrical equipment. (Ref. NFPA No. 10).
• Make sure that rags are not left on or near the
engine.
• Make sure the generator set is mounted in a
manner to prevent combustible materials from
accumulating under the unit.
Natural Gas Generator Set Installation Manual-GF Series
Doc. 17855, Rel. 03/2014
• Substances in exhaust gases have been identified by some state or federal agencies as causing cancer or reproductive toxicity. Take care not
to breath or ingest or come into contact with
exhaust gases.
• Remove all unnecessary grease and oil from the
unit. Accumulated grease and oil can cause
overheating and engine damage which present
a potential fire hazard.
• Keep the generator set and the surrounding area
clean and free from obstructions. Remove any
debris from the set and keep the floor clean and
dry.
• Do not store any flammable liquids, such as fuel,
cleaners, oil, etc., near the generator set. A fire
or explosion could result.
• Wear hearing protection when going near an
operating generator set.
• Do not work on this equipment when mentally or
physically fatigued, or after consuming any alcohol or drug that makes the operation of equipment unsafe.
• To prevent serious burns, avoid contact with hot
metal parts such as the radiator, turbo charger,
and exhaust system.
1.2 Safety/Data Labels
10
9
5
WARNING
CAUTION
FOR PROPER FILL
PETCOCK MUST BE OPEN
DURING COOLING
SYSTEM FILL
DISCONNECT BOTH POSITIVE AND
NEGITIVE BATTERY CABELS BEFORE
WELDING ON VEHICLE. ATTACH
GROUND CABEL ON WELDER NO MORE
THAN 2 FEET FROM PART BEING
WELDED. DO NOT WELD ON ENGINE
OR ENGINE MOUNTED COMPONENTS
6940-04
REFER TO SERVICE
MANUAL BEFORE
REMOVING COVERS
12
2
DANGER
6940-01
*Some units may also have
this decal on the engine.
STARTS
AUTOMATICALLY
6940-07
7
!
5
CAUTION
CAUTION
DISCONNECT BOTH POSITIVE AND
NEGITIVE BATTERY CABELS BEFORE
WELDING ON VEHICLE. ATTACH
GROUND CABEL ON WELDER NO MORE
THAN 2 FEET FROM PART BEING
WELDED. DO NOT WELD ON ENGINE
OR ENGINE MOUNTED COMPONENTS
HOT
6940-02
1
6940-01
1
4
2
3
DANGER
3
DANGER
4
DANGER
STARTS
AUTOMATICALLY
HIGH VOLTAGE
WILL CAUSE SEVERE INJURY
OR DEATH. DO NOT OPERATE
GENERATOR SET WITHOUT
COVER IN PLACE.
6940-03
HIGH VOLTAGE
WILL CAUSE SEVERE INJURY
OR DEATH. DO NOT OPERATE
GENERATOR SET WITHOUT
COVER IN PLACE.
6940-03
6940-07
6
1
WARNING
11
8
!
CAUTION
HOT
6940-13
*One per side on center post of enclosure.
1.
2.
3.
4.
5.
6.
7.
ROTATING FAN
CAN CAUSE SEVERE
INJURY.
STAY CLEAR OF
FAN WHEN ENGINE
IS RUNNING.
Decal, Caution
Decal, Danger Auto Start (P/N 6940-07)
Decal, Danger High Voltage (P/N 6940-03)
Decal, Caution Shock Hazard
Decal, Caution Welding (P/N 6940-01)
Decal, Warning Rotating Fan (P/N 6940-06)
Decal, Caution Hot, Sm (P/N 6940-02)
6940-06
8.
9.
10.
11.
12.
Decal, Caution Hot, Lg (P/N 6940-13)
(Enclosed Units Only)
Decal, Caution Cover
Decal, Warning Petcock (P/N 6940-04)
(KTA19 Only)
Decal, Ground
Data Tag, Genset (P/N 24588)
Figure 1-1 Generator Decal Locations (typical)
Natural Gas Generator Set Installation Manual-GF Series
Doc. 17855, Rel. 03/2014
1-3
KEEP THIS MANUAL NEAR THE GENSET FOR EASY REFERENCE
1-4
Natural Gas Generator Set Installation Manual-GF Series
Doc. 17855, Rel. 03/2014
Section 2 - Introduction
2.1 About This Manual
2.3 Application and Installation
This manual provides installation instructions for the
generator set models listed on the front cover. This
includes the following information:
A power generation system must be carefully
planned and correctly installed for proper operation.
This involves two essential elements: application and
installation.
Mounting Recommendations - for fastening
the generator set to the base and space requirements for normal operation and service.
Mechanical and Electrical Connections - covers most aspects of the generator set installation. Pre-start - checklist of items or procedures
needed to prepare generator set for operation.
Initial Startup - tests the complete system to
ensure proper installation, satisfactory performance, and safe operation. Refer to Operator
Manual for troubleshooting information.
Installation Checklist - reference checks upon
completion of installation.
This manual DOES NOT provide application information for selecting a generator set or designing the
complete installation. If it is necessary to design the
various integrated systems (fuel, exhaust, cooling,
etc.), additional information is required. Review standard installation practices. For engineering data specific to the generator set, refer to the Specification
and Data Sheets. For application information, refer to
Cummins Application Manual T-030, Liquid Cooled
Generator Sets.
2.2 Installation Overview
These installation recommendations apply to typical
installations with standard model generator sets.
Whenever possible, these recommendations also
cover factory designed options or modifications. However, because of the many variables in any installation, it is not possible to provide specific
recommendations for every situation. If there are any
questions not answered by this manual, contact your
nearest Cummins distributor for assistance.
Application (as it applies to generator set installations) refers to the design of the complete power generation system that usually includes power
distribution equipment, transfer switches, ventilation
equipment, mounting pads, and cooling, exhaust, and
fuel systems. Each component must be correctly
designed so the complete system will function as
intended. Application and design is an engineering
function generally done by specifying engineers or
other trained specialists. Specifying engineers or
other trained specialists are responsible for the
design of the complete standby system and for
selecting the materials and products required.
Installation refers to the actual set-up and assembly
of the power generation system. The installers set up
and connect the various components of the system
as specified in the system design plan. The complexity of the system normally requires the special skills of
qualified electricians, plumbers, sheet metal workers,
etc. to complete the various segments of the installation. This is necessary so all components are assembled using standard methods and practices.
2.4 Safety Considerations
The generator set has been carefully designed to
provide safe and efficient service when properly
installed, maintained, and operated. However, the
overall safety and reliability of the complete system is
dependent on many factors outside the control of the
generator set manufacturer. To avoid possible safety
hazards, make all mechanical and electrical connections to the generator set exactly as specified in this
manual. All systems external to the generator (fuel,
exhaust, electrical, etc.) must comply with all applicable codes. Make certain all required inspections and
tests have been completed and all code requirements
have been satisfied before certifying the installation is
complete and ready for service.
Natural Gas Generator Set Installation Manual-GF Series
Doc. 17855, Rel. 03/2014
2-1
2.5 Standby Heating Devices
2.6 Product Modifications
In accordance with NFPA 110, Cummins NPower recommends installing generator sets (life safety systems) equipped with engine jacket water coolant
heaters in locations where the minimum ambient temperature is below 4°C (40°F). NFPA also requires that
the engine jacket water coolant be maintained at a
minimum of 32°C (90°F) and, for most applications,
accept the emergency load in 10 seconds or less.
Agency certified products purchased from Cummins
NPower comply only with those specific requirements
and as noted on company product specification
sheets. Subsequent modifications must meet commonly accepted engineering practices and/or local,
state and national codes and standards. Product
modifications must be submitted to the local authority
having jurisdiction for approval.
The Engine Cold (Code 1435) message, in conjunction with illumination of the warning light is provided to
meet the requirements of NFPA 110. The engine cold
sensing logic initiates a warning when the engine
jacket water coolant temperature falls below 21°C
(70°F). In applications where the ambient temperature falls below 4°C (40°F), a cold engine may be
indicated even though the coolant heaters are connected. Under these conditions, although the generator set may start, it may not be able to accept load
within 10 seconds. When this condition occurs, check
the coolant heaters for proper operation. If the
coolant heaters are operating properly, other precautions may be necessary to warm the engine before
applying a load.
The information, specifications, and recommended
guidelines in this manual are based on information in
effect at the time of printing. Cummnis Npower, LLC.
and Cummins, Inc. reserves the right to make
changes at any time without obligation. If you find differences between your engine and the information in
this manual, contact your local Cummins Authorized
Repair Location or call 1-800-DIESEL (1-800-3437357) toll free in the U.S. and Canada.
2-2
2.7 Product Inquiries (Model 150 GFPA)
For Model 150 GFPA engine related inquires, contact
a PSI representative at the service department
technical support line at 1-888-331-5764 or e-mail
[email protected]. For questions
relating to the generator controls on this model,
please contact Npower Service at 1-866-831-7620 or
www.cumminsnpower.com for more information.
Natural Gas Generator Set Installation Manual-GF Series
Doc. 17855, Rel. 03/2014
Section 3 - Installation
3.1 Mounting the Generator Set
Generator set installations must be engineered so the
generator set will function properly under the
expected load conditions. Use these instructions as a
general guide only. Follow the instructions of the consulting engineer when locating or installing any components. The complete installation must comply with
all local and state building codes, fire ordinances, and
other applicable regulations. Consider these requirements before installation:
•
Level mounting surface
•
Adequate cooling air
•
Adequate fresh induction air
•
Discharge of generator set air
•
Non-combustible mounting surface
•
Discharge of exhaust gases
•
Electrical connections
•
Accessibility for operation and servicing
•
Noise levels
•
Vibration isolation
3.1.1 Location
Generator set location is decided mainly by related
systems such as ventilation, wiring, fuel, and
exhaust. The set should be located as near as possible to the main power service entrance. Exhaust must
not be able to enter or accumulate around inhabited
areas.
Provide a location away from extreme ambient temperatures and protect the generator set from adverse
weather conditions. An optional housing is available
for outside operation.
WARNING
Incorrect installation, service, or parts replacement, can result in severe personal injury, death,
and/or equipment damage. Service personnel
must be trained and experienced to perform electrical and mechanical component installation.
IMPORTANT: Depending on location and intended
use, federal, state, or local laws and regulation may
require the customer to obtain an air quality emissions permit before beginning installation of the
genset. Be sure to consult local pollution control or air
quality authorities before completing construction
plans.
3.1.2 Mounting
Generator sets are mounted on a steel skid that provides proper support. The engine-generator assembly is isolated from the skid frame by rubber mounts
that provide adequate vibration isolation for normal
installations. Where required by building codes or
special isolation needs, generator sets may be
mounted on rubber pads or mechanical spring isolators. The use of unapproved isolators may result in
harmful resonances and may void the genset warranty.
Mount the generator set on a substantial and level
base such as a concrete pad. A non-combustible
material must be used for the pad.
Use 16 mm or (5/8) inch anchored mounting bolts to
secure the generator set skid to the floor to prevent
movement.
3.1.3 Access To Set
Generally, at least 1 meter (3 ft) of clearance should
be provided on all sides of the generator set for maintenance and service access. (Increase clearance by
width of door if optional housing is used.) A raised
foundation or slab of 150 mm (6 in) or more above
floor level will make servicing easier.
Lighting should be adequate for operation, maintenance and service operations and should be connected on the load side of the transfer switch so that
it is available at all times.
Natural Gas Generator Set Installation Manual-GF Series
Doc. 17855, Rel. 03/2014
3-1
3.1.4 Mechanical Connections
The generator set mechanical system installation
includes connecting the fuel, exhaust, ventilation and
cooling systems. Before starting any type of fuel
installation, all pertinent state and local codes must
be complied with and the installation must be
inspected before the unit is put in service.
IMPORTANT: All pipe threaded fuel system fittings,
including container fittings, must be assembled using
a pipe joint sealing compound designed for use with
natural gas or propane as applicable per industry
standards.
3.1.5 Base Drains (Optional)
Some units are equipped with drain extensions that
allow for oil or coolant (or both) drains to be brought
out to the base edge for convenient maintenance.
These drains have an in-line ball valve or Fumoto
valve installed for control. Factory drains require no
further installation at site.
3.2 Fuel System
These gensets can be equipped to operate on:
Support fuel lines to restrain movement and prevent
chaffing or contact with sharp edges, electrical wiring
and hot exhaust parts.
CAUTION
Sparks and hot surfaces can ignite fuel, leading
to severe personal injury or death. Do not route
fuel lines near electrical wiring or hot exhaust
parts.
Fuel lines must be routed and secured per local, state
and national codes.
Install a dry-type fuel filter ahead of the service pressure regulator to protect the sensitive pressure regulating components and orifices downstream from rust,
scale and other solid substances carried along in the
gas stream.
3.2.2 Natural Gas/Propane Vapor/Propane Liquid
Fuel System (Dual Fuel System)
• Natural gas
• Combination of natural gas and propane (Dual
Fuel for select models)
In all fuel system installations, cleanliness is of the
upmost importance. Make every effort to prevent
entrance of moisture, dirt or contaminants of any
kind. Clean all fuel system components before installing
3.2.1 Fuel Lines - Routing
A flexible fuel hose(s) or section of flexible fuel
hose(s) must be used between the engine’s fuel
system and fuel supply line to protect the fuel system
from damage caused by vibration, expansion and
contraction. Genset fuel supply line must be dedicated supply line from utility.
CAUTION
Fuel leaks create fire and explosion hazards
which can result in severe personal injury or
death. Always use flexible tubing between engine
and fuel supply to avoid line failure and leaks due
to vibration. The fuel system must meet applicable codes.
3-2
Installation of the fuel hose must be done according
to all applicable codes and standards, and installation
recommendations provided by the manufacturer. The
flexible hose used must be approved by the hose
manufacture for use with the genset fuel type and
product application.
WARNING
Gaseous fuels are flammable and explosive and
can cause severe personal injury or death. Do not
smoke if you smell gas or are near fuel tanks or
fuel-burning equipment or are in an area sharing
ventilation with such equipment. Keep flames,
sparks, pilot lights, electrical arcs and arc-producing equipment and all other sources of ignition well away from genset and areas sharing
ventilation. Keep a type ABC fire extinguisher
handy.
WARNING
NFPA No. 58 requires all persons handling and
operating propane to be trained in proper handling and operating procedures.
Gaseous-fuel supply system design, materials, components, fabrication, assembly, installation, testing,
inspection, operation and maintenance must comply
with the applicable codes. See NFPA No. 37, No. 54,
and No. 58.
Most codes require both manual and electric (batterypowered) shutoff valves ahead of the flexible fuel
hose(s). The manual valve should be of the indicating
Natural Gas Generator Set Installation Manual-GF Series
Doc. 17855, Rel. 03/2014
type. The electric valve should be wired so that the
valve is closed when the genset is off.
The recommendations in Cummins Application
Manual T-030 should be followed in regard to fuel
supply system pipe sizes, manual shut-off valves, fuel
filters, and gas pressure regulators.
3.2.3 Fuel Supply Pressure
WARNING
High gas supply pressure can cause gas leaks
which can lead to fire and severe personal injury
or death. Gas supply pressure must be adjusted
to Specifications by qualified personnel.
For propane (vapor withdrawal) and natural gas, the
maximum permissible fuel supply pressure is 5.0 kPa
(20 in WC) and the recommended minimum is 3.7
kPa (15 in WC).
For propane (liquid withdrawal), the maximum permissible fuel supply pressure is 2,153 kPa (312 psi)
under any operating condition.
WARNING
Gaseous fuel leaks into an inadequately ventilated space can lead to explosive accumulations
of gas. Natural gas rises when released into the
air and can accumulate under overhanging hoods
and inside housings and buildings. Propane
sinks when released into the air and can accumulate inside housings, basements and other belowgrade spaces. Precautions must be taken to
prevent gas leaks and the accumulation of
gaseous fuel in the event of a leak.
3.2.6 Regulator (Optional)
Prime regulators are available on some models for
fuel pressure reduction from source. Regulators vary
by manufacturer and model. Check with your distributor or service technician for details on use and settings of your Regulator. Factory Regulator requires
no further installation at site, connect fuel supply.
3.2.7 Fuel Filters (Optional-MOH models only)
Our in-line fuel filters are designed for optimal performance of the generator set. They provide the best
choice for Customers who want to extend service
intervals and increase Genset uptime. Optional pressure indicators and automatic drains are available on
some models. Check the installation and service
manuals for your specific filter (models vary by unit)
for details. Factory Fuel Filter require no further
installation at site, connect fuel supply.
3.3 Battery Selection
The minimum recommended reserve capacity (SAE
RC) and cold cranking ampere (SAE CCA) values for
a particular engine can be found on the Model specific Genset specification sheet is provided with the
genset (visit www.cumminsnpower.com for genset
specifications). RC and CCA definitions can be found
in SAE Standard J537. All battery information is for
lead/acid batteries.
3.3.1 Battery Requirements
For battery replacement information, refer to Figure
3-1. Batteries may be supplied by Cummins Distribution as an option, or may be supplied by the customer.
3.2.4 Check Gas Leaks and Correct
All fuel-system connections, including the container
with associated valves and fittings, must be tested for
leaks with a soap and water solution or equivalent,
while the system is under pressure.
3.2.5 Fuel Heater (Optional-MOH models only)
PECO fuel heaters are available on some MOH
models. They are designed to provide heating of
engine fuel for optimal performance of the Genset.
The PECO Fuel Heater is designed to provide uninterrupted fuel flow in cold temperature environments
when it is needed most. Factory Fuel Heater requires
power source to be wired. See owner’s manual for
instructions.
_
_
NG-00045
Figure 3-1 Series Battery Connection - 24 VDC
Natural Gas Generator Set Installation Manual-GF Series
Doc. 17855, Rel. 03/2014
3-3
3.4 Exhaust System
WARNING
Battery electrolyte (sulfuric acid) is highly caustic
and can burn clothing and skin. Wear acid impervious neoprene gloves and safety goggles, or full
face shield, when working with the batteries.
Always disconnect the negative (-) battery cable
first and attach the negative (-) battery cable last.
CAUTION
DO NOT connect battery charging cables to any
electronic control system component. This can
damage the electronic control system.
3.3.2 Battery Installation
1. Provide adequate room for servicing or replacing
the batteries. Provide protection from extremes
of temperature and weather.
2. Locate the batteries near the engine or increase
the size of the conductors as required by applicable codes. Ensure that the batteries are configured properly for 24 VDC standard operations.
Refer to Figure 3-1.
3. Check the battery cables and connections to
ensure they are installed correctly and in good
condition.
NOTE: Coat the terminals with NOCO/Anti-OX to
prevent corrosion. Install the cables and tighten the
battery connections.
WARNING
Batteries can emit explosive gases during charging. Always ventilate the compartment before servicing the batteries. Remove sources of spark or
open flame. To avoid arcing, remove the negative
(-) battery cable first and attach the negative (-)
battery cable last.
3-4
WARNING
Inhalation of exhaust gases can result in severe
personal injury or death. Do not use exhaust heat
to warm a room, compartment or storage area.
Pipe exhaust gases to the outside of any enclosure.
Locate the exhaust outlets away from any air inlets to
avoid gases re-entering the enclosure. Exhaust
installations are subject to various detrimental conditions such as extreme heat, infrequent operation and
light loads. Regularly inspect the exhaust system
both visually and audibly to see that the entire system
remains fume tight and safe for operation.
WARNING
Inhalation of exhaust gasses can result in severe
personal injury or death. Use extreme care during
installation to provide a tight exhaust system.
Terminate exhaust pipe away from enclosed or
sheltered areas, windows, doors and vents.
For indoor installation, the exhaust system shall use
sealed joint type fittings, (for example NPT fittings) to
provide a tighter exhaust system. Use of slip type fittings (secured with a muffler clamp) may allow
leakage of exhaust gases into the building.
The exhaust system design should meet Federal,
State and local code requirements.
Use an approved thimble (Figure 3-2) where exhaust
pipes pass through walls or partitions. Insulated wall/
roof thimbles are used where exhaust pipes pass
through a combustible roof or wall. This includes
structures, such as wood framing or insulated steel
decking, etc. Uninsulated wall/roof thimbles are used
where exhaust pipes pass through a non-combustible
wall or roof, such as concrete. Refer to NFPA 37
Stationary Combustion Engines and Gas Turbines”
for accepted design practices. Build according to the
code requirements in effect at the installation site.
Natural Gas Generator Set Installation Manual-GF Series
Doc. 17855, Rel. 03/2014
11
22
33
55
44
Weight applied to the engine exhaust components can result in damage. Support the muffler
and exhaust piping so no weight or stress is
applied to engine exhaust.
IMPORTANT: Liability for injury, death, damage, and
warranty expense due to use of unapproved mufflers
or modifications to the exhaust system becomes the
responsibility of the person installing the unapproved
muffler or performing the modification. Contact a
Cummins NPower distributor for approved exhaust
system parts.
Avoid sharp bends by using sweeping, long radius
elbows and provide adequate support for muffler and
tailpipe. Pitch a horizontal run of exhaust pipe
DOWNWARD (away from engine) to allow any moisture condensation to drain away from the engine. If
an exhaust pipe must be turned upward, install a condensation trap at the point where the rise begins.
Refer to Figure 3-3.
66
1.
2.
3.
4.
5.
6.
7.
CAUTION
77
Rain Cap
Drip Cap
Holes in End of Inner Sleeve
Roof
Thimble in Vertical Orientation
Thimble in Horizontal Orientation
Wall of Partition
NG-00038
NG-00038
Figure 3-2 Mounting Exhaust Thimble
WARNING
Hot exhaust pipes can start a fire and cause
severe injury or death if improperly routed
through walls. Use an approved thimble where
exhaust pipes pass through walls or partitions.
Rain caps are available for the discharge end of vertical exhaust pipes. The rain cap clamps onto the end
of the pipe and opens due to exhaust discharge force
from the generator set. When the generator set is
stopped, the rain cap automatically closes, protecting
the exhaust system from rain, snow, etc.
Use a section of flexible exhaust pipe between the
engine and remainder of exhaust system. Support
exhaust system to prevent weight from being applied
to engine exhaust outlet.
Shield or insulate exhaust lines if there is danger of
personal contact. Allow at least 305 mm (12 in) of
clearance if the pipes pass close to a combustible
wall or partition. Before installing insulation on
exhaust system components, check the exhaust
system for leaks while operating the genset under full
load and correct all leaks.
WARNING
Exhaust pipes are very hot and they can cause
severe personal injury or death from direct
contact or from fire hazard. Shield or insulate
exhaust pipes if there is danger of personal
contact or when routed through walls or near
other combustible materials.
3.5 Installation of Sensors
On select model specific engines the natural gas, O2
and temp sensors to be mounted in exhaust ports
located pre and post catalyst. See Figure 3-4 and
Figure 3-5. Customer is responsible for installation of
sensors. Reference AEB 10.124
NOTE: 4.00’ clearance for insulation and other items
around sensors is required.
Natural Gas Generator Set Installation Manual-GF Series
Doc. 17855, Rel. 03/2014
3-5
3.8 Engine 3-Way Catalyst (Model Specific)
11
The natural gas 3-way catalyst reduces the oxides of
nitrogen (NO, NO2), and hydrocarbons (HC) from the
natural gas exhaust. Read this manual before installing, operating or servicing the engine equipped with a
natural gas catalytic converter.
The natural gas 3-way catalyst, when installed properly, meets state and local emission reduction
requirements on NO, NO2, CO, and HC as OEM
technology on stoichiometric natural gas engine.
Removal of these devices without prior approval from
the state and regulatory agencies can be constituted
as tampering.
22
33
1.
2.
3.
NG-00039
NG-00039
Exhaust Line
Condensation Trap
Valve Handle (shown in open position)
Figure 3-3 Condensation Trap
3.6 Air Fuel Ratio (AFR) Controller
Select model specific natural gas engines are
equipped with an air fuel ratio controller, and are
designed to meet emission requirements for EPA, SI,
and NSPS codes. The engines are also capable of
meeting NSPS emissions standards with an AFR
controller and factory supplied catalyst.
The AFR control system uses a O2 sensor architecture with catalyst, if applicable, to control exhaust
emissions. The AFR control system controls fuel flow
based on exhaust O2. The controller opens or closes
the fuel control valve (FCV) in the fuel line based on
feedback from the O2 sensor(s).
3.7 Catalyst-Removable Elements (Only
available on some models)
Some Gensets require a 3-way or Oxidation catalyst
to meet emission requirements. There is a precious
metals element inside the housing of the catalyst that
converts exhaust to EPA requirements. Some catalysts have a removable body that can be replaced
with a new element when required. Most catalysts
come installed on Genset from factory. Some catalysts require customer mounting. Check with your distributor or service technician for details on your
product.
3-6
CAUTION
Handle the natural gas 3-way catalyst with care.
Do not hammer or drop the unit. Do not weld or
drill holes in the body of the natural gas 3-way
catalyst without prior approval of Cummins® or
its distributors.
3.8.1 Installation and Applications Guidelines
The following are recommendations for installation
and application of natural gas 3-way catalyst for
select models of natural gas engines. It is recommended that systems incorporating natural gas 3-way
catalyst be designed by, or in conjunction with
Cummins Engineering. In order to receive Cummins
approval of the 3-way catalyst installation, the installation shall meet the following requirements. (Exceptions to these requirements shall be approved by
Cummins Engineering.)
1. The 3-way catalyst and housing shall be the correct part number for the application.
2. The 3-way catalyst shall be mounted with a
mounting system strong enough to support both
the additional weight and dynamic loads.
3. It is recommended to use exhaust piping material compatible with the 3-way catalyst housing
material, either cold-rolled steel or appropriate
grade of stainless steel.
4. The exhaust piping shall be supported separately from the 3-way catalyst.
5. The 3-way catalyst is designed to be supported
by the piping to which it is attached. See Figure
3-4 and Figure 3-5.
Natural Gas Generator Set Installation Manual-GF Series
Doc. 17855, Rel. 03/2014
6. Do not impose external force(s) on the catalyst
housing greater than 22.7 kg (50 lb) in any direction.
12. The catalyst can be installed either upstream or
downstream of the silencer to obtain sufficient
exhaust inlet temperatures.
7. It is required to put a flexible tubing (i.e. bellows
or flex pipe) between the engine and the beginning of the exhaust piping. This will isolate the 3way catalyst and other downstream components
from engine vibration.
3.8.2 Owner’s Responsibilities
1. The owner is responsible for keeping the natural
gas 3-way catalyst system on the equipment
because the removal of the system may cause a
violation of the local emission regulations.
8. For vertical flow mounting, ensure that the stack
above the catalyst is independently supported.
See Figure 3-5.
9. Avoid cantilevering loads off the end of the 3way catalyst.
10. The engine oil shall meet CES 20074 or better
specifications as required by the engine manufacturer.
11. The catalyst must be installed to guarantee air
exhaust temperature into the catalyst of 482°649° C (900°-1200° F). Any temperature outside
this range may affect catalyst performance or
life.
2. The owner is responsible for periodic inspection
of the system in accordance with these and
other operational instructions.
3. The owner is responsible for maintaining the
operation of the engine in a way that would NOT
adversely affect the natural gas 3-way catalyst
system. Any misfire, stack detonations, oil or
debris in the exhaust system, shall be recorded
in the equipment’s service record.
4. The owner is responsible for maintaining complete oil consumption and service records, as
well as software files, where applicable, and to
make them available to a requesting Cummins®
authorized repair location for troubleshooting
purposes.
Natural Gas Generator Set Installation Manual-GF Series
Doc. 17855, Rel. 03/2014
3-7
2. Depress E-Stop.
3.8.3 Preparation
3. Disconnect the equipment batteries.
WARNING
Do not touch the surface of the existing silencer
during or up to 30 minutes after operation. All
surfaces are hot and can cause personal injury.
4. Turn off the fuel supply.
5. Ensure the engine and auxiliary equipment are
safely locked out and can not be engaged.
1. Ensure the engine ignition system and air-fuel
ratio controller system is functioning properly per
the manufacturer's specifications prior to starting
installation of the 3-way catalyst.
1
7
8
D
3xD
MAX
HANGER
SPACING
3xD
MAX
HANGER
SPACING
5
4
3
2
6
NG-00035
1.
2.
3.
4.
Hangers
3-Way Catalyst (Model specific)
Air Exhaust Temperature 482°-649° C (900°1200° F)
Silencer
5.
6.
7.
8.
Expansion Joint
Engine
Pre O2 and Temp Sensor Port (180° offset)
Post O2 and Temp Sensor Port
Figure 3-4 Recommended Horizontal Mounting Configuration (Typical)
3-8
Natural Gas Generator Set Installation Manual-GF Series
Doc. 17855, Rel. 03/2014
2. Install the customer supplied mounting clamps to
the natural gas 3-way catalyst housing. Tighten
the mounting clamps enough to hold them in
place (per Figure 3-4 and Figure 3-5) and to
allow movement to connect the inlet and outlet
exhaust pipes.
3.8.4 3-Way Catalyst Installation
WARNING
To reduce the possibility of personal injury, use a
hoist or get assistance to lift the assembly.
3. Connect the inlet and outlet exhaust pipes to the
catalyst inlet and outlet.
CAUTION
The existing exhaust pipe silencer hangers can
not hold the weight of a natural gas catalyst.
Install appropriate customer supplied natural gas
3-way catalyst mounting brackets.
4. Connect the customer supplied mounting
clamps to the catalyst mounting bracket.
5. Tighten the natural gas catalyst mounting
clamps.
1. Bolt the natural gas 3-way catalyst mounting
bracket (supplied by the customer according to
the application), to a solid structure.
2
3
1
8
4
7
3xD
MAX
HANGER
SPACING
6
5
9
NG-00036
1.
2.
3.
4.
5.
Hangers
Fixed Support
Expansion Joint (optional)
3-Way Catalyst
Silencer
6.
7.
8.
9.
Expansion Joint
Pre O2 and Temp Sensor Port (180° offset)
Post O2 and Temp Sensor Port
Engine
Figure 3-5 Recommended Vertical Mounting Configuration (Typical)
Natural Gas Generator Set Installation Manual-GF Series
Doc. 17855, Rel. 03/2014
3-9
3.9 Air Fuel Setting and Emission Measurement
This procedure shall be performed at the time of
installation of the natural gas 3-way catalyst, after any
re-assembly, and periodically per schedule provided
by manufacturer throughout the life of the 3-way catalyst.
Follow the air fuel ratio controller’s instructions and
engine manufacturer’s instructions to set the air fuel
ratio. Analyze the engine exhaust gases with a Nox,
CO, or HC analyzer down stream of the 3-way catalyst.
If the emissions do not meet specifications, replace
the catalyst module(s) as needed.
3.10 Ventilation and Cooling
Generator sets dissipate heat and fumes that must be
removed by proper cooling and ventilation.
Generator sets in factory-mounted housings for
outdoor installation are designed for proper cooling
and ventilation.
Indoor installations require careful design with
respect to cooling and ventilation. In an indoor installation, all radiator cooling air must be discharged outdoors. Duct adapter kits are available. See Figure 3-6
for a typical indoor installation.
WARNING
Engine or radiator cooling air may carry deadly
carbon monoxide gas which can cause asphyxiation and death. All engine or radiator cooling air
must be discharged outdoors. Do not use it for
heating a room or compartment.
3.11 Vents and Ducts
For indoor installations, locate vents so incoming air
passes through the immediate area of the installation
before exhausting. Install the air outlet higher than
the air inlet to allow for convection air movement.
Size the vents and ducts so they are large enough to
allow the required flow rate of air. The ”free area” of
ducts must be as large as the exposed area of the
radiator. Refer to the genset data sheet for the airflow
requirements and allowed airflow restriction.
3-10
3.12 Oil Reservoir (Optional)
5 or 10 gallon Oil Tanks are optional on some units to
allow for extended service intervals between maintenance. These tanks are typically plumbed to an Oil
Maintainer Switch that controls the flow into the
engine oil pan. It is imperative the switch is functioning properly without obstruction and if the switch is
vented, the vent is not obstructed as well. The tank
should be filled with oil per Engine Manufacturer
guidelines.
3.13 Dampers
Dampers or louvres protect the generator set and
equipment room from the outside environment. Their
operation of opening and closing should be controlled
by operation of the generator set.
In cooler climates movable or discharge dampers are
used. These dampers allow the air to be recirculated
back to the equipment room. This enables the equipment room to be heated while the generator set
engine is still cold, increasing the engine efficiency.
3.14 Radiator Set Cooling Requirements
Radiator set cooling air is drawn past the control end
of the set by a pusher fan that blows air through the
radiator (Figure 3-6). Locate the air inlet to the rear of
the set. Make the inlet vent opening 1-1/2 times
larger than the radiator area.
NOTE: Louvers and screens over air inlet and outlet
openings restrict air flow and vary widely in performance. A louver assembly with narrow vanes, for
example, tends to be more restrictive than one with
wide vanes. The effective open area specified by the
louver or screen manufacturer should be used.
Locate the cooling air outlet directly in front of the
radiator and as close as possible. The outlet opening
must be at least as large as the radiator area. Length
and shape of the air outlet duct should offer minimum
restriction to airflow.
Attach a canvas or sheet metal duct to the air outlet
opening using screws and nuts so duct can be
removed for maintenance purposes. The duct prevents recirculation of heated air. Before installing the
duct, remove the radiator core guard.
Natural Gas Generator Set Installation Manual-GF Series
Doc. 17855, Rel. 03/2014
3.15 Remote Radiator Cooling Requirements (Available on All Models)
Remote radiator plumbing will vary with installation.
Follow recommendations given in Cummins Application Manual T-030. See product Data Sheet provided
with the genset (visit www.cumminsnpower.com for
genset specifications) for friction head and static
head limits.
The remote radiator cooling system substitutes a
remote mounted radiator and an electrically driven
fan in place of mounted components. Removal of the
radiator and the fan from the set reduces noise levels
without forcing dependence on a continuous cooling
water supply (necessary with heat exchanger cooling). The remote radiator installation must be completely protected against freezing.
1
2
3
IMPORTANT: Before filling cooling system, check all
hardware for security. This includes hose clamps,
capscrews, fittings and connections. Use flexible
coolant lines with heat exchanger or remote mounted
radiator options.
8
4
6
7
9
5
10
14
13
11
12
1.
2.
3.
4.
5.
6.
7.
Thimble
3-Way Catalyst
Exhaust Line
Silencer
Condensation Drain Plug
Sweeping Elbow
Flexible Sections
8.
9.
10.
11.
12.
13.
14.
NG-00041
Control Wiring
Power Wiring
Air Inlet
Level Concrete Base
Seismic Isolators (Optional)
Flexible Bellows
Air Outlet
Figure 3-6 Generator Set Installation (Typical)
Natural Gas Generator Set Installation Manual-GF Series
Doc. 17855, Rel. 03/2014
3-11
3-12
Natural Gas Generator Set Installation Manual-GF Series
Doc. 17855, Rel. 03/2014
Section 4 - Controls
4.1 Control System Overview
The PowerCommand Control (PCC) which is a microprocessor-based control can be provided in a
mechanical and electronic version. All generator set
control functions are contained on one circuit board
(Base board). The Base board provides engine
speed governing (optional), main alternator voltage
output regulation, and complete generator set monitoring. The operating software provides control of the
Description
generator set and its performance characteristics and
displays performance information on a digital display
panel. It accepts menu-driven control and set-up
input from the push button switches on the front
panel.
For specific information on the control panel for your
unit, please refer to the following documentation provided separately from this manual.
Application
Part Number
PCC 1.1 (1302) Owner’s Manual
Standby/Prime
900-0661
PCC 2.2 (2300) Operator Manual
Standby/Prime
900-0665
PCC 3.3 (3300) Owner’s Manual
Standby/Prime/Paralleling
A029M414
Table 4-1
4.2 Control Wiring Installation
The generator set control panel box contains connection points for remote control and monitor options.
Use cable ties to keep control wiring away from sharp
edges and AC power cables within the control housing.
4.3 Remote Monitor/Control Connections
(PCC)
CAUTION
Stranded copper wire must be used for all customer connections to the control panel. Solid
copper wire may break due to genset vibration.
Use flexible conduit for all wiring connections to the
generator set. All conduit used for control wiring is
attached to the control housing.
Route the control wiring through the control housing
and access holes. Access holes should be used
according to where the wires are terminated inside
the control box.
A compression type strain-relief connector should be
used to prevent dust, insects, etc. from entering the
control box.
Customer monitor/control connections are attached
to terminal block TB-1. Optional equipment such as a
remote annunciator panel, sensing devices used to
monitor genset operation, remote start/stop switches,
battery charger, etc. are attached to TB-1. Refer to
the customer connections diagram in Section 7 Wiring Diagrams.
CAUTION
Always run control circuit wiring in a separate
metal conduit from AC power cables to avoid
inducing currents that could cause problems
within the control.
Natural Gas Generator Set Installation Manual-GF Series
Doc. 17855, Rel. 03/2014
4-1
Table 4-2
Temperature rating of wire that
is intended to be used for
connection of the unit.
Copper conductors only
Aluminum conductors or
copper-clad conductorsa
Row 1
60 or 75° C
Use either b AWG, 60° C or c
AWG, 75° C copper wire.
Use 60° C wire, either b AWG
copper or b AWG aluminum; or
75° C wire, either c AWG copper
or c AWG aluminum.
Row 2
60° C
Use b AWG, 60° C copper wire.
Use 60° C wire, either b AWG
copper or b AWG aluminum.
Row 3
75° C
Use c AWG, 75° C copper wire.
Use 75° C wire, either c AWG
copper or c AWG aluminum.
Row 4
90° C
Use c AWG, 90° C copper wire.
Use 90° C wire, either c AWG
copper or c AWG aluminum.
a
Reference to copper wire is not to be included when wiring terminals are intended for only the conductors
specified in the code.
b
The wire size for 60° C wire is not required to be included in the marking; however, when it is included, it
shall be based on the ampacities given in Table 310-16 of the National Electrical Code, ANS/NFPA 70, for
60° C wire and the derating factor described in 12.1.3.
c
The conductor size shall be no smaller than the larger of the following:
1. The conductor size used for the temperature test; or
2. The 75° C wire size based on the ampacities given in Table 310-16 of the National Electrical Code,
ANSI/NFPA 70, and the derating factor described in 12.1.3.
Digital Connections: Connection points, other than
relayed outputs, network, switched B+ and B+ are
considered digital connections to terminal strip TB-1.
The type/gauge wire to use for these connections
are:
• Less than 305 m (1000 ft), use 20 gauge
stranded copper wire.
• 305 to 610 m (1000 to 2000 ft), use 18 gauge
stranded copper wire.
4-2
Relay Connections: Due to the wide variety of
devices that can be attached to the relay outputs of
TB1, the electrical contractor must determine the
gauge of the stranded copper wire that is used at this
installation site. Refer to PCC Customer Connections
diagram in Section 7 - Wiring Diagrams.
Network Connections: Refer to 900-0366 PowerCommand Network Installation and Operation
Manual for the type/gauge wire to use for these connections or refer to Figure 4-1.
Natural Gas Generator Set Installation Manual-GF Series
Doc. 17855, Rel. 03/2014
NG-00052
NG-00052
Figure 4-1
Switched B+: (Fused at 5 amps.) Same as Relay
Connection description.
B+: (Fused at 10 amps.) Same as Relay Connection
description.
4.4 Control Relays (Optional)
CAUTION
Damage to the base board can occur if the
voltage suppressors are not installed across
relay coils (A1/A2) of control relays K11, K12 and
K13 before connecting genset battery cables.
The three optional control relays are rail mounted
inside the control panel housing. Each relay is a 4pole relay with 2 poles normally open and two poles
normally closed.
These relays are used to control auxiliary equipment,
such as fans, pumps and motorized air dampers.
Energizing of the relays is user definable.
The contacts are rated at 10 amps at 600 VAC.
Refer to Customer Connections diagram in Section 7
- Wiring Diagrams.
4.5 AC Electrical Connections
This section provides the procedure that is used to
connect the AC electrical system of the genset.
Before making any AC electrical connections, make
certain the generator set cannot be accidentally
started. Place the control panel run switch in the OFF
position. Turn off or remove AC power from the
battery charger, depress the E-Stop, and then
remove the negative (-) battery cable from the set
starting battery.
WARNING
Ignition of explosive battery gases can cause
severe personal injury or death. Arcing at battery
terminals, light switch or other equipment, flame,
pilot lights and sparks can ignite battery gas. Do
not smoke, or switch trouble light ON or OFF near
battery. Discharge static electricity from body
before touching batteries by first touching a
grounded metal surface.
Ventilate battery area before working on or near
battery—Wear goggles—E-Stop gen set and disconnect charger before disconnecting battery
Natural Gas Generator Set Installation Manual-GF Series
Doc. 17855, Rel. 03/2014
4-3
cables—Disconnect negative (-) cable first and
reconnect last.
Check that the load cables from the genset are properly connected.
CAUTION
Disconnect battery charger from AC source
before disconnecting battery cables. Otherwise,
disconnecting cables can result in voltage spikes
damaging to DC control circuits of the set.
WARNING
Accidental starting of the generator set can cause
severe personal injury or death. Prevent accidental starting by disconnecting the negative (-)
cable from the battery terminal.
WARNING
Each of the operations described in this section
should be done only by persons trained and
experienced in electrical maintenance. Improper
procedures may result in property damage,
bodily injury or death.
Socket Size Across
Flats
Tightening Torque
mm
inch
N-m
lb inches
3.2
1/8
5.1
45
4.0
5/32
11.4
100
4.8
3/16
13.8
120
5.6
7/32
17.0
150
6.4
1/4
22.6
200
7.9
5/16
31.1
275
9.5
3/8
42.4
375
12.7
1/2
56.5
500
14.3
9/16
67.8
600
Connecting the genset AC electrical system involves:
Table 4-3
•
•
•
•
Installation of transfer switch
Generator output voltage selection
Load cable connection
Standard and optional AC equipment connections (e.g., control box heater, coolant heater,
etc.).
Local regulations often require that wiring connections be made by a licensed electrician, and that the
installation be inspected and approved before operation. All connections, wire sizes, materials used, etc.
must conform to the requirements of electrical codes
in effect at the installation site. Contractor guidelines
for appropriate conduit and wire sizing for this generator set can be found by referring to Figure 4-1.
WARNING
Improper wiring can cause a fire or electrocution,
resulting in severe personal injury or death and/
or property and equipment damage.
Before starting the genset, check to make sure that
all electrical connections are secure, and that all
wiring is complete. Replace and secure any access
panels that have been removed during installation.
4-4
WARNING
Backfeed to utility system can cause electrocution or property damage. Do not connect to any
building electrical system except through an
approved device and after building main switch is
opened.
4.6 AC Wiring
4.6.1 Generator Voltage Connections
The available generator output voltages and
maximum current ratings are specified on the generator set nameplate. Line-to-neutral voltage is always
the lower voltage shown and line-to-line voltage is the
higher rating.
These generators can be configured to the nameplate voltages as shown on the Reconnection
Diagram located in the generator manual supplied
with this equipment. Many of the voltages listed will
require reconfiguration of the generator output leads
on the connection terminal block. This reconfiguration
must only be done by service personnel that are
trained and experienced to perform electrical installation. The generator set was adjusted to produce a
specified voltage during production verification testing
Natural Gas Generator Set Installation Manual-GF Series
Doc. 17855, Rel. 03/2014
prior to shipment. The installer must always check the
stator lead terminal block connections and perform
any necessary reconnect to obtain the voltage
required. Refer to applicable Alternator Installation,
Service & Maintenance Manual as identified in Table
4-4 .
Description
Application
Part
Number
Alternator Installation,
Service and Maintenance Manual
UCI, UCM,
UCD 224 &
274
UCH-027
Alternator Installation,
Service and Maintenance Manual
HCI Series
UCI-056
Table 4-4
Some generator sets are capable of producing a wide
range of voltages and connection configurations,
others have specific limited capabilities. Refer to
wiring diagram and generator voltages (from the
nameplate) when reviewing the voltage connection
information and use the wiring diagram supplied with
your generator set when actually performing load
connections.
CAUTION
Reconfiguring generator sets to higher voltages
can exceed the voltage capability of the specific
generator windings. This will damage the generator, decrease line current, and render line circuit
breakers too large. Consult with your distributor
before performing reconnection for a different
voltage.
All loads are connected to the generator by bolting
stranded load wires to the appropriate terminals on
the generator reconnection terminal block or circuit
breaker lugs. The terminals are stamped U, V, W and
N to indicate the line and neutral connections. (Reference: U, V, and W correspond with L1, L2 and L3;
and N with L0 respectively).
4.6.3 Load Balancing
When connecting loads to the generator set, balance
the loads so the current flow from each line terminal
(L1, L2 and L3) is about the same. This is especially
important if both single phase and three phase loads
are connected. Any combination of single phase and
three phase loading can be used as long as each line
current is about the same, within 10 percent of
median value and no line current exceeds the nameplate rating of the generator. Check the current flow
from each line after connections by observing the
control panel display.
4.6.4 Current Transformers
The CT’s must be installed as noted in the following
CT Installation Requirements.
Refer to the reconnection diagram to identify the
output leads/phase that must be routed through each
CT, and also appropriate transformer post selection
for meter sensing leads. The transformers are labeled
CT1, CT2 and CT3 on the reconnection wiring diagram. (The reconnection diagram is located on the
upper side cover of the control housing.)
CT Installation Requirements:
The CT has a dot on one side. This dot must be
facing toward the generator (conventional current
flowing into the dot). A dot is also used to indicate pin
1 of the CT.
a. CT1 - U load leads (A phase)
CAUTION
Reconfiguring generator sets to lower voltages
can reduce generator set ratings, and also
increase line current, rendering line circuit breakers too small. Consult with your distributor before
performing reconnection for a different voltage.
4.6.2 Load Connections
Flexible conduit and stranded conductors must be
used for connections to take up movement of the
generator set.
b. CT2 - V load leads (B phase)
c. CT3 - W load leads (C phase)
d. Route the appropriate load wires through
each CT. The CT’s have dual secondaries (3
posts). The CT secondary wire marked 1 is
connected to post 1 of the CT. CT secondary
wire marked 2/3 is connected to post 2 for
high voltage gensets or to post 3 for low
voltage gensets. (Refer to the Reconnection
Diagram in Section 7 - Wiring Diagrams.)
Natural Gas Generator Set Installation Manual-GF Series
Doc. 17855, Rel. 03/2014
4-5
4.7 Coolant Heater (Optional)
2
CAUTION
The coolant heater must not be operated while
the cooling system is empty or damage to the
heater will occur.
1
Coolant heaters keep the engine coolant warm when
the engine is shut down. It heats and circulates the
coolant within the engine. This reduces startup time
and lessens engine wear caused by cold starts. It is
electrically operated and thermostatically controlled.
Figure 4-2 shows a typical coolant heater. Connect
the heater to a source of power that will be on during
the time the engine is not running. Be sure the
voltage rating is correct for the heater element rating
and that the thermostat is set to the correct temperature prior to starting.
2
1
NG-00033
1.
2.
Coolant Outlet
Coolant Inlet
Figure 4-2 Coolant Heater
1
1
2
2
NG-00042
3
1.
2.
Heater Leads
Heater Terminal Box
3.
Heater
Figure 4-3 Generator Heater Installation (Typical)
4.7.1 Battery Heater (Optional)
4.7.2 Control Heater (Optional)
Battery heaters ensure the batteries are ready for
starting the engine in cold standby conditions. They
also protect against condensation during standby and
prevent corrosive damage of electrical components in
high humidity environments. Factory Battery Heater
requires power source to be wired. See owner’s
manual for instructions.
Control heaters protect the control cabinet components from condensation during standby and prevent
corrosive damage of electrical and mechanical components in high humidity environments. Heaters are
available for most PowerCommand Controls models.
Factory Control heater is wired and requires no
further installation at site.
4-6
Natural Gas Generator Set Installation Manual-GF Series
Doc. 17855, Rel. 03/2014
4.7.3 Breather Heater (Optional)
This heater is designed to prevent crankcase
breather freezing. The heater has a set point of 50° F.
If the ambient temperature inside the enclosure drops
below 50° F, the heater will automatically switch on.
Factory Breather heater is wired and requires no
further installation at site.
4.8 Generator Heater (Optional)
WARNING
Water or moisture inside a generator increases
the possibility of flashing and electrical shock,
which can cause equipment damage and severe
personal injury or death. Do not use a generator
which is not dry inside and out.
A generator heater(s) is used to help keep the generator free of condensation when the generator set is
not running. During cool and humid conditions, condensation may form within a generator, creating
flashing and shock hazards.
Figure 4-3 illustrates the installation of two heater elements. Connect the heater(s) to a source of power
that will be on during the time the engine is not running. Power connections are made to the terminal
block in the heater terminal box. Be sure the voltage
rating is correct for the heater element rating.
Natural Gas Generator Set Installation Manual-GF Series
Doc. 17855, Rel. 03/2014
4-7
4-8
Natural Gas Generator Set Installation Manual-GF Series
Doc. 17855, Rel. 03/2014
Section 5 - Pre-Start Preparation
Before attempting the initial start of the generator set,
be sure to complete the Installation Checklist in
Section 6.
5.1 Electrical System
Verify all electrical connections are secure and all
wiring is complete and inspected. Replace and
secure any access panels that may have been
removed during installation.
5.2 Battery Connections
WARNING
Accidental starting of the generator set can cause
severe personal injury or death. Make sure that
the Run/Off/Auto switch on the control panel is
set to the Off position before connecting the
battery cables.
Starting the unit requires batteries per the model specific genset data sheet as provided with the genset
(visit www.cumminsnpower.com to locate specifications). E-Stop the genset before the connection or
disconnection of battery cables. Connect positive
battery cable before connecting negative battery
cable to prevent arcing.
Service the batteries as necessary. If an automatic
transfer switch is installed without a built-in charge
circuit, connect a separate battery charger. A battery
charger is required when the PowerCommand Controller is set to the Awake mode.
5.3 InPower Service Tool General Information (PCC)
InPower is a PC based service tool for the PowerCommand Controller (PCC) to be used by Cummins
authorized factory service technicians. InPower is
used to:
• Make adjustments to the controls trims and settings.
WARNING
Ignition of explosive battery gases can cause
severe personal injury or death. Always connect
negative (-) battery cable last to prevent arcing.
WARNING
Ventilate battery area before working on or near
battery. Arcing at battery terminals, light switch
or other equipment, flame, pilot lights and sparks
can ignite battery gas. Do not smoke, or switch
trouble light ON or OFF near battery. Discharge
static electricity from body before touching batteries by first touching a grounded metal surface.
5.4 PCC Options Pre-Start Checks
All generator set configuration options are set at the
factory except for site related options, (e.g., Language, Start/Stop Time Delays, Cycle Crank, Customer Fault 1 and 2, etc.
Adjustment of these options are divided into two categories within the menu driven system. These two categories are Setup and Controller Configuration/
Adjust.
The Setup submenus are intended for qualified
service personnel only and require a password to
modify these submenus. The Controller Configuration
and Adjust submenus are intended for service personnel and site personnel.
The Controller Configuration, submenus are used to
change the default language, temperature units, and
pressure units to be displayed in menus.
The Adjust submenus allow site personnel to
calibrate the generator set voltage/frequency, idle
speed and start/stop time delays. For the pre-start
checks, adjustment of only the start/stop delays is
required. Refer to the model specific Power Controller
(PCC) Manual for installation, operator, and service
information per Table 4-1 .
• Perform diagnostics and monitoring.
5.5 Start Up Procedure
• Create a capture file of the controls trims and
settings.
Refer to the appropriate Operator Manual for important safety precautions and recommended procedures for starting the genset and verifying proper
operation. Start the generator set and verify all engine
and generator menus are displaying the correct
values.
• Update control calibrations (InPower PRO version).
Natural Gas Generator Set Installation Manual-GF Series
Doc. 17855, Rel. 03/2014
5-1
5.6 Emissions Requirements
WARNING
It is the owner/operator’s responsibility to complete site specific emission requirements to
ensure compliance with the US EPA SI NSPS.
Emissions on this Generator Set must be dialed-in at
the job-site per the following requirements before
operation:
GTA855E refer to manual 4325956 and AEB 10.124
and 24.52
KTA19SLB and QSK19 refer to AEB 28.07
the ignition system are functioning properly.
Especially check air cleaner restriction due to dirt
accumulation.
IMPORTANT: Read the warranty statement provided
with the genset for US Environmental Protection
Agency (EPA) restrictions on servicing specific components.
5.7.1 Fuel Supply Pressure
The fuel supply pressure must be 3.75-5 kPa (15-20
inches WC) under full-load operation not to exceed
5.0 kPa (20 inches WC) under any condition. See
Figure 5-1 for the pressure test ports.
5.7 Fuel Pressure and Mixture Adjustments
WARNING
Gaseous fuels are flammable and explosive and
can cause severe personal injury or death. Do not
allow cigarettes, flame, pilot lights, arcing
switches or equipment in area or areas sharing
ventilation. Keep a type ABC fire extinguisher
nearby.
WARNING
Natural gas is lighter than air, and will tend to
gather under hoods. LPG is heavier than air, and
will tend to gather in sumps or low areas. NFPA
Standard No. 58 requires all persons handling
and operating LPG to be trained in proper handling and operating procedures.
1
WARNING
Do not attempt to correct power by adjusting fuel
system before determining that the engine and
5-2
1.
NG-00044
NG-00044
Pressure Test Port (2)
Figure 5-1 Demand Regulator (Natural Gas)
Natural Gas Generator Set Installation Manual-GF Series
Doc. 17855, Rel. 03/2014
1
2
3
4
5
7
6
NG-00043
1.
2.
3.
4.
Air-Fuel Mixture Test Port
Solenoid Valve
Demand Regulator
Carburetor
5.
6.
7.
Fuel Mixture Adjuster
Natural Gas Supply Pressure Test Port
Throttle Body/Governor Actuator
Figure 5-2 Natural Gas Fuel System (Typical)
5.7.2 Fuel System Components
Engine is equipped with one shut-off solenoid valve
and a demand pressure regulator. Gensets for
optional liquid withdrawal of propane are equipped
with a converter that vaporizes the fuel with hot
engine coolant. See Figure 5-2 for a typical fuel
system. A genset equipped for dual fuel, natural gas
and propane, has a gas mixer that serves both fuels.
A fuel pressure switch to detect loss of natural gas
pressure is provided for automatic changeover to
propane while the engine is running. Manual shut-off
valves are provided in each supply line for manual
changeover systems.
5.7.3 Fuel System Operation
During normal operation, the engine fuel/air ratio is
determined by the fuel trim valve operating in conjunction with the oxygen sensor and the air/fuel
control module. Your authorized Cummins distributor
can monitor fuel system/oxygen sensor operation
using the service tool.
Natural Gas Generator Set Installation Manual-GF Series
Doc. 17855, Rel. 03/2014
5-3
5.7.4 Fuel Mixture Adjustments
IMPORTANT: Always use Nox and CO test equipment to set emission levels.
1. Check for recommended fuel supply pressure
3.7-5.0 kpa (15-20 inches WC) at engine
mounted regulator
2. Check the operation of fuel shut-off solenoids.
5.7.4.1 Electronic Engines
For electronic engines:
• Model GTA855E see Cummins AEB 24.51.
• Model KTA19 SLB and QSK19, see Cummins AEB
28.07. Model 150 GFPA, GFMC, and GCDC are self
adjusting per engine manufacturer. Visit
www.psiengines.com for additional information and
updates.
5.7.4.2 Non-Electronic Engines
Some engines are site compliant capable. Generator
set certification is per local, regional and national
codes and may require frequent site testing. A
summary of the testing procedure is listed here. For
non-electric engines, apply 100% load.
1. Install the emission tester in the exhaust post
catalyst. The emission tester needs to read Nox
and CO in grams per break horsepower (g/bhp).
Install an O2 meter per catalyst in port on turbo
exhaust elbow.
2. Connect the laptop to RS232 connection at the
Gill air-fuel ratio controller module. Start the
engine. Click on the Gill icon when connected,
click on View, then click on Fuel Valve Control.
(The engine has to be running for the laptop to
connect to the air-fuel ratio controller.)
3. On the screen, go to the Mode column, and click
on Open Loop. The air-fuel valve will go to the
closed position.
4. Apply full generator name plate load.
5. All adjustments and emission readings need to
be at full load of the generator rating.
6. Run at full load for 5 minutes. Check O2 at the
turbo exhaust elbow. It should be at 0.5. If O2 is
not at 0.5, proceed to step 7. If at 0.5, proceed to
5-4
step 10. THIS READING NEEDS TO BE WITH
AFR IN OPEN LOOP.
7. Adjust the carburetor air-fuel mixing screw. If O2
is above 0.5, turn screw out. This will lower the
O2 setting. If O2 is below 0.5, adjust the carburetor screw in, this will raise the O2.
8. Run the engine for 5 minutes and check the O2
setting. Repeat adjustment until O2 is at 0.5.
9. Under the Mode column, click on Close Loop,
and the fuel valve will open.
10. Run the engine for 5 minutes. Check the
exhaust emissions. Emission should be under 4
g/hp for CO and under 2 g/hp for Nox. O2
reading, post catalyst should be 0.0 to -0.3.
11. O2 reading at the turbo exhaust elbow should
drop to about 0.1.
12. If the emission readings are not correct, the airfuel ratio controller will need to be adjusted.
13. Under the Control column, record the number in
the set point box. (This is in case you need to go
back and start from the beginning).
14. Double click on the set point box. It will turn red.
Now you can change the set point value.
15. Change the set point value in small increments
(sample if the set point is -0.1550, change to 0.1750), click Enter on the laptop. This will save
the new set point and the box will change back
to white.
16. Wait 5 to 10 minutes after every adjustment
before taking the emission readings. Be very
patient doing this part of the set up. Making a
change to the setting before emissions have stabilized will make it very difficult to get AFR
adjusted correctly.
17. As the set point value goes up, the valve will
open more.
18. Under output, you will see % Open and Steps.
This is the amount the valve is open. The
maximum opening is 200 steps.
19. The CO and NOx reading will fluctuate.
Natural Gas Generator Set Installation Manual-GF Series
Doc. 17855, Rel. 03/2014
Section 6 - Installation Checklist
6.1 General
□ Generator set wattage capacity is sufficient to handle maximum anticipated load.
□ At least.91 m (3 ft) of clearance (or greater for housing door) is provided around entire generator set for servicing and ventilation.
□ Generator set is located in an area not subject to flooding.
□ All operating personnel have read and are familiar with Operator Manual.
□ All operators have been thoroughly briefed on preventive maintenance procedures.
□ All operators have read and understand all Important Safety Instructions in Operator Manual.
6.2 Generator Set Support
□ Floor, roof or earth on which the generator set rests is strong enough and will not allow shifting or movement.
Observe local codes on soil bearing capacity due to freezing and thawing.
□ Generator set is properly supported and retained to approved base.
□ Supporting base is large enough and is of non-combustible materials.
6.3 Cooling Air Flow
□ Generator set air inlet is faced into direction of strongest, prevailing winds.
□ Air inlet openings are unrestricted and at least 1-1/2 times larger than air outlet area.
□ Cooling air outlet is on downwind side of building (if not, wind barrier is constructed).
□ Proper ducting material (sheet metal, canvas) is used between radiator and air outlet.
6.4 Fuel System
□ Fuel tanks meet or exceed all Local, State or National codes.
□ Fuel lines are properly installed, supported and protected against damage.
□ Approved flexible fuel line is installed between main fuel supply line and generator set’s fuel system, near
the generator set, to protect the fuel system from damage caused by vibration, expansion and contraction.
□ Fuel supply line shutoff valve is installed to prevent fuel flow in case of leaks.
□ No fuel leaks are found in supply line or engine fuel system.
Natural Gas Generator Set Installation Manual-GF Series
Doc. 17855, Rel. 03/2014
6-1
6.5 Exhaust System
□ Operators are thoroughly briefed on the dangers of carbon monoxide gas.
□ Areas around set are well ventilated. No possibility of exhaust fumes entering building doors, windows, or
intake fans.
□ Exhaust gases are piped safely outside and away from building.
□ The correct length of approved rigid pipe is connected to the generator set flexible pipe using approved
securing methods with no weight resting on engine exhaust components. There are no bends in flex section.
□ Condensation drain is provided in lowest section of exhaust piping.
□ Exhaust piping is insulated to guard against burns to personnel.
□ Exhaust piping passing through walls or ceilings have approved fire-proof materials and are in compliance
with all codes.
□ Exhaust piping is large enough in diameter to prevent excessive back pressure on engine.
□ For model GTA855E, verify O2 and temperature sensors are installed pre and post catalyst.
6.6 AC And DC Wiring
□ Wire sizes, insulation, conduits and connection methods all meet applicable codes.
□ AC and DC wires are separated in their own conduit to prevent electrical induction.
□ All load, line and generator connections are proper and correct.
□ Flexible conduit between generator set and building or surrounding structure.
6.7 Generator Set Pre-Start
□ Generator set engine is properly serviced with oil and coolant.
□ E-Stop is depressed.
□ Batteries are properly installed, serviced and charged.
□ Battery charger and engine coolant heater are connected and operational.
□ All generator set covers and safety shields are installed properly.
6-2
Natural Gas Generator Set Installation Manual-GF Series
Doc. 17855, Rel. 03/2014
Section 7 - Wiring Diagrams
7.1 General
This section consists of the schematic and connection wiring diagrams referenced in the text. The following drawings are included.
Wiring Diagrams - Electronic Engines
Drawing Title
Drawing No.
Rev.
Schematic, Controls Interface GFBC GTA855E w/ PCC 1302
GFBC-PCC1.3-Wiring
B
Schematic, Controls Interface GFBC GTA855E w/ PCC 2300
GFBC-PCC 2.3-Wiring
B
Schematic, Controls Interface GFBC GTA855E w/ PCC 3300
GFBC-PCC 3.3-Wiring
B
Schematic, Controls Interface GFEB KTA19SLB w/ PCC 1302
GFEB-PCC1.3-Wiring
A
Schematic, Controls Interface GFEB KTA19SLB w/ PCC 2300
GFEB-PCC 2.3-Wiring
A
Schematic, Controls Interface GFEB KTA19SLB w/ PCC 3300
GFEB-PCC 3.3-Wiring
A
22726
-
Schematic, Overall GFPA Model 150 w/PCC 1.1/PCC 2.2
Wiring Diagrams - Hydro-Mechanical Engines
Drawing Title
Drawing No.
Rev.
Schematic, Controls Interface HM ENG w/PCC 1302
25538
-
Schematic, Controls Interface HM ENG w/PCC 3300
25539
-
Natural Gas Generator Set Installation Manual-GF Series
Doc. 17855, Rev. 03/2014
7-1
7-2
Natural Gas Generator Set Installation Manual-GF Series
Doc. 17855, Rev. 03/2014
ALTERNATOR
2
RECONNECT
TERMINAL BLOCK
N
3B
C28
CR11
PMG
C26
1
U
V
W
ENGINE INTERFACE HARNESS (C1 MATES UP TO 47 PIN ON ENGINE HARNESS CONNECTOR)
E-STOP
MAIN CONTROL PANEL
(SEE SHEET 2 FOR LAYOUT)
3
8
C27
12
F2 (6A)
3A
(F1) X+
CR4
3
C26
8
1B
FIELD
(F2) XX- WINDING
9
12
2
4
4
8
5
5
6
6
7
7
6
10
8
MAIN BREAKER
MCB_1
4
CUSTOMER
LOAD
CT1
X1
V V
CT1 COM
CT2
CT2
X1
W W
CT2 COM
CT3
CT3
X1
CT3 COM
4
J12
G
G
1
CT1
K
K
4
CT1 COM
H
H
2
CT2
L
L
5
CT2 COM
J
J
3
CT3
M
M
6
CT3 COM
STARTER RELAY DRIVER
J20
STARTER
15
CR10
1
L1
L2
C
C
2
L2
L3
B
B
3
L3
B+ INPUT (FUSED B+)
9
N
A
A
4
N
B+ INPUT (FUSED B+)
10
B+ INPUT (FUSED B+)
20
J17
PMG 2
PMG 3
SWITCHED B+ LOW SIDE DRIVER
3
B+ INPUT (FUSED B+)
21
F
F
2
FIELD -
CHASSIS GROUND
1
E
E
1
FIELD +
BATT -
2
BATT -
4
J18
F9 (10A)
P
P
O
O
N
N
Q
Q
2
PMG 1
PMG 2
3
PMG 3
1
F8 (10A)
1
1
C3
8
4
9
5
CR6
4
12
CR7
5
5
1
4
5
BATT -
7
BATT -
12
13
9
CR8
5
1
C8
CR3
1
14
3
3
GND
5
5
AUTO COMMAND
MANUAL COMMAND
TERMINAL BLOCK, RELAY AND FUSE DESCRIPTIONS
1
+24VDC SUPPLY
2
+24VDC SUPPLY
3
+24VDC SUPPLY
5A FUSED B+ FROM F5
4
-24VDC RETURN
6
-24VDC RETURN
6
7
6
1
PCC NET B
2
2
SYSTEM WAKEUP
4
4
J6
HMI 114
DISCRETE INPUT RETURN
2
LOCAL E-STOP
11
SPL C
SPL C
SPL A
PCC NET A
1
SPL B
10
19
ENG SHUTDOWN LAMP
21
21
22
22
23
23
24
24
C23
41
41
44
44
28
43
6
46
46
5
47
47
5
7
5
1
SPEED ADJUST 5VDC SUPPLY
IGN SHUTDOWN SIGNAL
STOP/START SWITCH
ENG WARNING LAMP
CD200 OVERSPEED
IDLE/RATED SWITCH
CR2
8
13
CR4
14
F1 (20A)
1
30
30
31
31
34
34
36
36
8
14
14
7
11
11
27
27
29
29
CR3
4
3
35
J1939 +
J1939 SHIELD
SPEED ADJUST 0-5VDCSPEED ADJUST 0-5VDC+
IGN GND
IGN GND
FSO DRIVER +
35
IGNITION +24VDC
ECM KEY SWITCH
PRE/POST CAT OXYGEN SHIELD
PRE/POST CAT TEMPERATURE SHIELD
PRE/POST CAT OXYGEN HEATER POST CAT OXYGEN HEATER +
PRE CAT OXYGEN HEATER +
CR1
SW BATT +24VDC
3
AUTO COMMAND
MANUAL COMMAND
PCC NET SHIELD
BATT -24VDC
4
PCC NET A
3
PCC NET B
5
SYSTEM WAKEUP
4
THROTTLE GROUND
5
ECM GROUND
6
ECM +24VDC
7
FCV +24VDC
8
FCV GROUND
9
EGO PRE CAT POWER UP RELAY LSD
16
SWITCH RET GND
19
ENG SHUTDOWN LAMP
20
SPEED ADJUST 5VDC SUPPLY
21
IGN SHUTDOWN SIGNAL
22
STOP/START SWITCH
23
ENG WARNING LAMP
24
CD200 OVERSPEED
25
IDLE/RATED SWITCH
32
EGO POST CAT RELAY
26
J1939 -
41
J1939 +
44
J1939 SHIELD
28
SPEED ADJUST 0-5VDC-
43
SPEED ADJUST 0-5VDC+
46
IGN GND
47
IGN GND
30
FSO DRIVER +
31
BATTERY CONSERVATION RELAY
34
IGNITION +24VDC
BATTERY CONSERVATION RELAY
7
9
THROTTLE +24VDC
J1939 -
PE
BATT +24VDC
10
19
SWITCH RET GND
4
4
5
36
ECM KEY SWITCH
29
PRE CAT TEMPERATURE SUPPLY
35
PRE CAT TEMPERATURE SIGNAL
45
POST CAT TEMPERATURE SIGNAL
42
POST CAT TEMPERATURE SUPPLY
27
PRE CAT OXYGEN RETURN
14
PRE CAT OXYGEN SIGNAL
37
POST CAT OXYGEN SIGNAL
38
POST CAT OXYGEN RETURN
ECM
C5
J6
C3
SPL A
POST CAT OXYGEN RETURN
PRE CAT OXYGEN RETURN
A
A
PRE CAT OXYGEN SIGNAL
B
B
POST CAT OXYGEN SIGNAL
C
POST CAT OXYGEN HEATER +
D
POST CAT OXYGEN HEATER -
FUSED B+
1
1
PRE CAT OXYGEN HEATER +
C
GND
2
2
PRE CAT OXYGEN HEATER -
D
J1
P1
PCC NET A
3
3
PCC NET B
4
4
5
5
SYSTEM WAKEUP
5
7
BATT -
9
16
26
C25
J25
6
9
16
26
13.8VDC OUT+
8
EGO PRE CAT POWER UP RELAY LSD
C24
13.8VDC OUTSPL D
8
32
PE
9
FCV GROUND
25
5
9
J1
FUSED B+
FCV +24VDC
32
24VDC TO 13.8VDC
CONVERTOR
J1
ECM +24VDC
25
C21
HMI 211
ECM GROUND
1
EGO POST CAT RELAY
7
CR11
C1
THROTTLE +24VDC
THROTTLE GROUND
20
SWITCHED B+
D
PMG 1
CR5
5
CR9
C8
J22
ALT. GROUND BOLT
1
CR9
D
FIELD +
8
C8
L1
FIELD -
CR1
5
PCC1302
C1 C6
CT1
TO
1
6
CR4
F4 (6A)
U U
C2
1
F3 (10A)
1A
ALTERNATOR HARNESS
C4
SPL C
SPL C
PRE CATALYST O2
POST CATALYST O2
SPL B
C6
C4
PRE CAT TEMPERATURE SUPPLY
1
1
POST CAT TEMPERATURE SUPPLY
PRE CAT TEMPERATURE SIGNAL
2
2
POST CAT TEMPERATURE SIGNAL
E-STOP
POST CATALYST TEMP
PRE CATALYST TEMP
2B
7
-24VDC RETURN
8
-24VDC RETURN
9
20A FUSED B+ FROM F6
2A
10
SYSTEM WAKEUP
C1
FUEL SHUTOFF VALVE CONTROL CONTACT
C2
FUEL SHUTOFF VALVE CONTROL CONTACT
120 OHM
POWER AND SENSOR HARNESS
J11
C3
B
C23
20
J1939 CAN HIGH
A
C24
19
J1939 CAN LOW
C
C25
17
J1939 CAN SHIELD
C6
A
C5
9 PIN ECM DIAGNOSTIC
4
B
ECM SWITCH COMMON
A
C
C23 J1939 CAN HIGH
C8
IDLE/RATED INPUT
D
C24 J1939 CAN LOW
E
C25 J1939 CAN SHIELD
ECM KEYSWITCH
C21
+24VDC ED3 DISPLAY POWER (SWITCHED)
8
CR7
F1 (20A)
BATT +
C3
C20
1
10
BATT -
CR2
6
3
4
CR5
3
CR8
4
4
3
CR5
8
6
5
CR9
10
CR7
12
CR11
C1
6
8
ED3 DISPLAY GROUND
C23
J1939 DATA LINK+
C24
J1939 DATA LINK-
C25
J1939 DATA LINK SHIELD
C26
5A FUSED B+ FROM F5
C27
CUSTOMER NORMAL SHUTDOWN (FSO)
C28
CUSTOMER IGNITION SHUTDOWN (FSO AND SPARK)
6
10
C1 C1
A
A
6
5
C2
C
C
C2
SPL D
A
CR2
SPL E
"FSO"
B
W4
GND
CR10
2
C22
"FSO #2"
B
3
4
C
F
F
W5
SW B+
W3
B+
W6
S TERM
STARTER
S TERM
C3
ALTERNATOR LAMP
22
C2
CR11
ED3 DISPLAY
2
1
C21 SWITCHED B+
7
C23 J1939 CAN HIGH
8
C24 J1939 CAN LOW
C22 ED3 GROUND
STARTER DISCONNECT INPUT
11
LOW COOLANT LEVEL SWITCH 2
18
5
9
S
S
B
LAMP
T
T
D
SENSE
MOT
C4
F7 (5A)
3
P
C25 J1939 CAN SHIELD
P
F10 (1A)
LOW COOLANT LEVEL SWITCH 1
"ALT"
17
C
C
D
D
B
B
C5
SPL C
H
H
C
C
L
L
D
D
B
B
SPL A
ECM
RESET
S1
8
U
U
8
G
G
8
E
E
3
R
R
2
B
B
1
D
D
M
M
"LCL2"
ENGINE
ALTERNATOR
"LCL1"
SPL A
C20 ECM KEYSWITCH
C26 +24VDC
C26
F5 (5A)
4
SPL B
F6 (20A)
9
+
-
BATTERY
REFERENCE: 1) SEE CPG DRAWING #0630-3440 FOR PCC SCHEMATICS AND INTERFACE
2) SEE CUMMINS DRAWING #4021936-02 FOR ENGINE SIDE WIRING AND INTERFACE
LEGEND
CR#
-
-
= RELAY COIL
CR#
-
10
= RELAY CONTACT
= TERMINAL BLOCK
AUTO CAD
S1
E-STOP
"RESET"
"E-STOP"
"C3"
TERMINATING RESISTOR
C3
PCC1302
"C2"
ED3 DISPLAY
C2
J18
"P1"
J17
P1
TB1
C6
J22
"J6"
J6
"J1"
J1
J12
J25
TB15
J11
J20
F5
F4
F3
F2
F1
F10
F9
F8
F7
F6
13
"F7"
F8
"F8"
F9
"F9"
F10
CR1 CR2
CR3
CR4
CR5
CR6
CR7
CR8
CR9
CR10
F7
C28
"F6"
C27
F6
C26
"F1"
C25
F1
C25
"F2"
C24
F2
C24
"F3"
C23
F3
C23
"F4"
C22
F4
C21
"F5"
C20
F5
1
2
3
4
PE
5
6
7
8
8
8
9
9
10
C1
C2
C3
C8
REAR VIEW OF FUSE PANEL
DEPICTING WIRE ROUTING
12
CR11
"F10"
SPLICE DETAILS
STAGGER SPLICES IN SHIELDED CABLE
C5
C1
C4
SPL A
SPL B
SPL D
C28
C27
C26
C25
C25
C24
C24
C23
C23
C22
C21
C20
C8
C3
C2
C1
10
9
9
8
8
8
7
6
5
PE
4
3
2
1
SPL C
TERMINAL STRIP DETAIL
AUTO CAD
ALTERNATOR
C1
3
A
B
2
RECONNECT
TERMINAL BLOCK
A
1
U
V
C
MAG SWITCH
C2
PMG
B
(F1) X+
FIELD
(F2) XX- WINDING
"FSO"
C4
STARTER
C
C
D
D
B
B
S TERM
"LCL1"
MOT
C
C
D
D
B
B
"LCL2"
C1
C1
C6
C1
C5
C3
B
LAMP
D
SENSE
"ALT"
B+
+
-
ENGINE
ALTERNATOR
BATTERY
C4
C5
9 PIN SERVICE
C1
POST CAT TEMP
C4
A
B
PRE CAT TEMP
C6
A
B
C2
W
C
N
"FSO #2"
C3
POST CAT O2
C
D
B
C5
PRE CAT O2
C
D
B
AUTO CAD
ALTERNATOR
2
RECONNECT
TERMINAL BLOCK
N
3B
C28
F2 (6A)
CR11
PMG
C26
1
U
V
W
ENGINE INTERFACE HARNESS (C1 MATES UP TO 47 PIN ON ENGINE HARNESS CONNECTOR)
E-STOP
MAIN CONTROL PANEL
(SEE SHEET 2 FOR LAYOUT)
3
8
3A
C27
12
CR4
3
C26
8
12
6
(F1) X+
9
8
CR4
F4 (6A)
6
10
8
4
MAIN BREAKER
MCB_1
CUSTOMER
LOAD
CT1
X1
CT1 COM
CT2
CT2
X1
W W
PCC2300
C1 C6
CT1
CT2 COM
CT3
CT3
X1
CT3 COM
4
J12
G
G
1
CT1
K
K
4
CT1 COM
H
H
2
CT2
L
L
5
CT2 COM
J
J
3
CT3
M
CR1
5
1
6
M
CT3 COM
CR5
5
1
8
CR9
C8
J20
STARTER RELAY DRIVER
15
1
4
STARTER
1
CR10
C3
9
5
CR6
4
12
CR7
5
5
9
1
4
CR8
5
5
L1
SWITCHED B+ LOW SIDE DRIVER
3
C
C
B
B
3
L3
B+ INPUT (FUSED B+)
9
N
A
A
4
N
B+ INPUT (FUSED B+)
10
B+ INPUT (FUSED B+)
20
B+ INPUT (FUSED B+)
21
L2
J17
FIELD +
PMG 1
PMG 2
F
F
2
FIELD -
CHASSIS GROUND
1
E
1
FIELD +
BATT -
2
BATT -
4
BATT -
7
BATT -
12
PMG 3
P
P
O
O
J18
N
N
Q
Q
2
PMG 1
PMG 2
3
PMG 3
1
F8 (10A)
1
1
13
CR11
GND
3
3
TERMINAL BLOCK, RELAY AND FUSE DESCRIPTIONS
AUTO COMMAND
4
4
MANUAL COMMAND
6
6
1
+24VDC SUPPLY
PCC NET A
1
PCC NET B
2
2
2
+24VDC SUPPLY
SYSTEM WAKEUP
3
3
3
+24VDC SUPPLY
J6
J6
1
1
4
5A FUSED B+ FROM F5
5
-24VDC RETURN
FUSED B+
-24VDC RETURN
6
7
-24VDC RETURN
8
-24VDC RETURN
GND
SPL C
SPL A
1
HMI 114
SPL C
2
2
J1
J1
PCC NET A
3
3
PCC NET B
4
4
SYSTEM WAKEUP
5
5
SPL B
10
19
19
21
21
22
22
23
23
24
24
26
26
3
C23
41
41
F12 (4A)
3
F13 (4A)
F14 (4A)
C25
5
44
3
43
PE
6
5
46
5
7
1
CR2
47
8
BATT -
6
DISCRETE INPUT RETURN
2
LOCAL E-STOP
11
AUTO COMMAND
10
MANUAL COMMAND
9
PCC NET SHIELD
4
PCC NET A
3
PCC NET B
5
SYSTEM WAKEUP
ENG SHUTDOWN LAMP
SPEED ADJUST 5VDC SUPPLY
IGN SHUTDOWN SIGNAL
STOP/START SWITCH
ENG WARNING LAMP
CD200 OVERSPEED
IDLE/RATED SWITCH
4
THROTTLE GROUND
5
ECM GROUND
6
ECM +24VDC
7
FCV +24VDC
8
FCV GROUND
9
EGO PRE CAT POWER UP RELAY LSD
16
SWITCH RET GND
19
ENG SHUTDOWN LAMP
20
SPEED ADJUST 5VDC SUPPLY
21
IGN SHUTDOWN SIGNAL
22
STOP/START SWITCH
23
ENG WARNING LAMP
24
CD200 OVERSPEED
25
IDLE/RATED SWITCH
32
EGO POST CAT RELAY
26
46
47
30
30
31
31
34
34
J1939 +
J1939 -
41
J1939 SHIELD
J1939 +
SPEED ADJUST 0-5VDC-
44
J1939 SHIELD
28
SPEED ADJUST 0-5VDC+
SPEED ADJUST 0-5VDC-
43
IGN GND
SPEED ADJUST 0-5VDC+
46
IGN GND
IGN GND
FSO DRIVER +
47
IGN GND
30
FSO DRIVER +
31
BATTERY CONSERVATION RELAY
34
IGNITION +24VDC
36
ECM KEY SWITCH
29
PRE CAT TEMPERATURE SUPPLY
35
PRE CAT TEMPERATURE SIGNAL
45
POST CAT TEMPERATURE SIGNAL
42
POST CAT TEMPERATURE SUPPLY
27
PRE CAT OXYGEN RETURN
14
PRE CAT OXYGEN SIGNAL
37
POST CAT OXYGEN SIGNAL
38
POST CAT OXYGEN RETURN
BATTERY CONSERVATION RELAY
7
13
CR4
14
F1 (20A)
1
36
36
8
14
14
7
11
11
27
27
29
29
CR3
13.8VDC OUT+
8
44
28
5
SWITCH RET GND
THROTTLE +24VDC
J1939 -
3
J25
J29 J29
9
16
C24
1
14
C21
SPL D
9
16
1
EGO POST CAT RELAY
PE
9
EGO PRE CAT POWER UP RELAY LSD
32
J28 J28
1
8
25
13.8VDC OUTFUSED B+
FCV GROUND
32
CR3
24VDC TO 13.8VDC
CONVERTOR
HMI 220
FCV +24VDC
F11 (4A)
E
F9 (10A)
7
25
7
L3
2
7
ECM +24VDC
SWITCHED B+
L2
FIELD -
ALT. GROUND BOLT
D
6
ECM GROUND
20
C8
D
5
CR9
J22
L1
5
C1
THROTTLE +24VDC
THROTTLE GROUND
4
6
8
C8
ALTERNATOR HARNESS
V V
1
4
F3 (10A)
2
1A
TO
C2
1
1B
FIELD
(F2) XX- WINDING
U U
C4
4
3
35
35
IGNITION +24VDC
ECM KEY SWITCH
PRE/POST CAT OXYGEN SHIELD
PRE/POST CAT TEMPERATURE SHIELD
PRE/POST CAT OXYGEN HEATER POST CAT OXYGEN HEATER +
PRE CAT OXYGEN HEATER +
CR1
SW BATT +24VDC
3
4
4
BATT +24VDC
BATT -24VDC
5
ECM
C5
C3
SPL A
POST CAT OXYGEN RETURN
PRE CAT OXYGEN RETURN
A
A
PRE CAT OXYGEN SIGNAL
B
B
POST CAT OXYGEN SIGNAL
C
POST CAT OXYGEN HEATER +
D
POST CAT OXYGEN HEATER -
PRE CAT OXYGEN HEATER +
C
PRE CAT OXYGEN HEATER -
D
SPL C
PRE CATALYST O2
SPL C
POST CATALYST O2
SPL B
C6
C4
PRE CAT TEMPERATURE SUPPLY
1
1
POST CAT TEMPERATURE SUPPLY
PRE CAT TEMPERATURE SIGNAL
2
2
POST CAT TEMPERATURE SIGNAL
POST CATALYST TEMP
PRE CATALYST TEMP
E-STOP
2B
9
20A FUSED B+ FROM F6
10
SYSTEM WAKEUP
C1
FUEL SHUTOFF VALVE CONTROL CONTACT
2A
120 OHM
C2
FUEL SHUTOFF VALVE CONTROL CONTACT
C3
ECM SWITCH COMMON
C8
IDLE/RATED INPUT
POWER AND SENSOR HARNESS
J11
C3
B
C23
20
J1939 CAN HIGH
A
C24
19
J1939 CAN LOW
C
C25
17
J1939 CAN SHIELD
C6
A
"FSO #2"
B
C5
9 PIN ECM DIAGNOSTIC
B
4
BATT +
8
BATT -
C20
ECM KEYSWITCH
A
C
C23 J1939 CAN HIGH
C21
+24VDC ED3 DISPLAY POWER (SWITCHED)
D
C24 J1939 CAN LOW
E
C22
ED3 DISPLAY GROUND
C25 J1939 CAN SHIELD
CR7
F1 (20A)
1
10
CR2
6
3
4
CR5
3
CR8
4
4
3
CR5
8
6
5
CR9
10
6
CR7
12
CR11
C1
8
6
10
C1 C1
A
A
C
C
A
CR2
6
5
C2
C2
SPL D
SPL E
"FSO"
B
W4
GND
CR10
C23
J1939 DATA LINK+
C24
J1939 DATA LINK-
C25
J1939 DATA LINK SHIELD
C26
5A FUSED B+ FROM F5
C27
CUSTOMER NORMAL SHUTDOWN (FSO)
C28
CUSTOMER IGNITION SHUTDOWN (FSO AND SPARK)
2
3
4
C
F
W5
F
SW B+
W3
B+
W6
S TERM
STARTER
S TERM
C3
ALTERNATOR LAMP
22
C2
CR11
ED3 DISPLAY
2
1
C21 SWITCHED B+
7
C23 J1939 CAN HIGH
8
C24 J1939 CAN LOW
C22 ED3 GROUND
STARTER DISCONNECT INPUT
11
LOW COOLANT LEVEL SWITCH 2
19
5
9
S
S
B
LAMP
T
T
D
SENSE
MOT
C4
F7 (5A)
3
P
C25 J1939 CAN SHIELD
P
F10 (1A)
LOW COOLANT LEVEL SWITCH 1
"ALT"
17
C
C
D
D
B
B
C5
SPL C
H
H
C
C
L
L
D
D
B
B
SPL A
ECM
RESET
S1
8
U
U
8
G
G
8
E
E
3
R
R
2
B
B
"LCL2"
ENGINE
ALTERNATOR
"LCL1"
SPL A
C20 ECM KEYSWITCH
C26 +24VDC
C26
F5 (5A)
4
SPL B
F6 (5A)
9
1
D
D
M
M
+
-
BATTERY
REFERENCE: 1) SEE CPG DRAWING #0630-3440 FOR PCC SCHEMATICS AND INTERFACE
2) SEE CUMMINS DRAWING #4021936-02 FOR ENGINE SIDE WIRING AND INTERFACE
LEGEND
CR#
-
-
= RELAY COIL
CR#
-
10
= RELAY CONTACT
= TERMINAL BLOCK
AUTO CAD
S1
E-STOP
"RESET"
"E-STOP"
"C3"
TERMINATING RESISTOR
C3
"C2"
ED3 DISPLAY
C2
TB15
TB8
J17
F5
F13
F4
F12
F11
F3
F10
F2
F9
"J1"
F1
J1
PCC2300
C6
J18
"J6"
J6
"J29"
J29
J12
F8
"J28" J28
TB1
REAR VIEW OF FUSE PANEL
DEPICTING WIRE ROUTING
J25
J22
J11
F7
"F7"
F6
"F6"
F5
"F5"
F4
"F4"
F3
"F3"
F2
"F2"
F1
"F1"
J20
GND
F9
CR1 CR2
CR3
CR4
CR5
CR6
CR7
CR8
CR9
CR10
C28
C27
C26
C25
C25
C24
C24
C23
C23
C22
C21
C20
"F8"
1
2
3
4
PE
5
6
7
8
8
8
9
9
10
C1
C2
C3
C8
F8
CR11
"F9"
F10
"F10"
F11
"F11"
F12
"F12"
F13
"F13"
F14
"F14"
SPLICE DETAILS
STAGGER SPLICES IN SHIELDED CABLE
C5
C1
C4
SPL A
SPL B
SPL D
C28
C27
C26
C25
C25
C24
C24
C23
C23
C22
C21
C20
C8
C3
C2
C1
10
9
9
8
8
8
7
6
5
PE
4
3
SPL C
2
F14
F6
1
F7
TERMINAL STRIP DETAIL
AUTO CAD
ALTERNATOR
C1
3
A
B
2
RECONNECT
TERMINAL BLOCK
A
1
U
V
C
MAG SWITCH
C2
PMG
B
(F1) X+
FIELD
WINDING
(F2) XX-
"FSO"
C4
STARTER
C
C
D
D
B
B
S TERM
"LCL1"
MOT
C
C
D
D
B
B
"LCL2"
C1
C1
C6
C1
C5
C3
B
LAMP
D
SENSE
"ALT"
B+
+
-
ENGINE
ALTERNATOR
BATTERY
C4
C5
9 PIN SERVICE
C1
POST CAT TEMP
C4
A
B
PRE CAT TEMP
C6
A
B
C2
W
C
N
"FSO #2"
C3
POST CAT O2
C
D
B
C5
PRE CAT O2
C
D
B
AUTO CAD
ALTERNATOR
N
C26
PMG
C28
8
12
C27
3A
C26
1
U
V
W
3B
CR11
2
RECONNECT
TERMINAL BLOCK
ENGINE INTERFACE HARNESS (C1 MATES UP TO 47 PIN ON ENGINE HARNESS CONNECTOR)
E-STOP
MAIN CONTROL PANEL
(SEE SHEET 2 FOR LAYOUT)
3
(F1) X+
F2 (6A)
CR4
3
1B
FIELD
(F2) XX- WINDING
8
9
1A
12
4
4
5
5
6
6
7
7
6
MAIN BREAKER
MCB_1
U U
CT1
X1
V V
CT1 COM
CT2
CT2
X1
W W
CT2 COM
CT3
CT3
X1
CT3 COM
4
PCC3300
C1 C6
CT1
TO
CUSTOMER
LOAD
10
8
ALTERNATOR HARNESS
J12
G
G
1
CT1
K
K
4
CT1 COM
H
H
2
CT2
L
L
5
CT2 COM
J
J
3
CT3
M
M
6
CT3 COM
4
STARTER RELAY DRIVER
J20
STARTER
15
CR10
1
D
D
1
L1
C
C
2
L2
L3
B
B
3
L3
B+ INPUT (FUSED B+)
9
N
A
A
4
N
B+ INPUT (FUSED B+)
10
B+ INPUT (FUSED B+)
20
PMG 3
5
FSO LOW SIDE DRIVER
14
13
CR11
F11 (4A)
F12 (4A)
F14 (4A)
3
1
PE
E
E
1
FIELD +
BATT -
2
BATT -
4
BATT -
7
BATT -
12
N
N
Q
Q
2
PMG 1
PMG 2
3
PMG 3
1
CR8
5
1
1
CR3
5
C23
C25
GND
AUTO COMMAND
+24VDC SUPPLY
2
+24VDC SUPPLY
3
+24VDC SUPPLY
4
5A FUSED B+ FROM F5
5
-24VDC RETURN
6
-24VDC RETURN
7
-24VDC RETURN
8
-24VDC RETURN
9
20A FUSED B+ FROM F6
3
3
1
CR2
8
7
13
CR4
14
F1 (20A)
MANUAL COMMAND
4
6
4
SPL C
SPL C
SPL A
1
1
PCC NET B
2
2
SYSTEM WAKEUP
3
3
2
LOCAL E-STOP
11
6
PCC NET A
DISCRETE INPUT RETURN
SPL B
10
10
PCC NET SHIELD
PCC NET A
3
PCC NET B
5
SYSTEM WAKEUP
24
25
25
32
32
26
26
41
44
46
47
47
30
30
31
31
34
34
36
14
7
11
11
27
27
4
THROTTLE GROUND
ECM GROUND
ECM +24VDC
FCV +24VDC
FCV GROUND
EGO PRE CAT POWER UP RELAY LSD
SWITCH RET GND
ENG SHUTDOWN LAMP
SPEED ADJUST 5VDC SUPPLY
IGN SHUTDOWN SIGNAL
STOP/START SWITCH
ENG WARNING LAMP
CD200 OVERSPEED
IDLE/RATED SWITCH
EGO POST CAT RELAY
3
29
29
35
35
J1939 +
J1939 SHIELD
SPEED ADJUST 0-5VDCSPEED ADJUST 0-5VDC+
IGN GND
IGN GND
FSO DRIVER +
BATTERY CONSERVATION RELAY
IGNITION +24VDC
ECM KEY SWITCH
PRE/POST CAT OXYGEN SHIELD
PRE/POST CAT TEMPERATURE SHIELD
PRE/POST CAT OXYGEN HEATER POST CAT OXYGEN HEATER +
PRE CAT OXYGEN HEATER +
CR1
SW BATT +24VDC
MANUAL COMMAND
4
24
14
CR3
AUTO COMMAND
9
23
36
13.8VDC OUT+
BATT -
23
8
13.8VDC OUT-
6
22
46
5
5
7
8
22
44
6
J25
SPL D
21
5
24VDC TO 13.8VDC
CONVERTOR
9
21
43
PE
J29 J29
TERMINAL BLOCK, RELAY AND FUSE DESCRIPTIONS
1
1
19
28
J28 J28
1
19
41
C21
FUSED B+
16
C1
THROTTLE +24VDC
3
4
4
BATT +24VDC
BATT -24VDC
5
C5
2
PRE CAT OXYGEN HEATER +
C
PRE CAT OXYGEN HEATER -
D
5
5
SPL C
SYSTEM WAKEUP
C1
FUEL SHUTOFF VALVE CONTROL CONTACT
C2
FUEL SHUTOFF VALVE CONTROL CONTACT
ENG SHUTDOWN LAMP
20
SPEED ADJUST 5VDC SUPPLY
21
IGN SHUTDOWN SIGNAL
22
STOP/START SWITCH
23
ENG WARNING LAMP
24
CD200 OVERSPEED
25
IDLE/RATED SWITCH
32
EGO POST CAT RELAY
26
J1939 -
41
J1939 +
44
J1939 SHIELD
28
SPEED ADJUST 0-5VDC-
43
SPEED ADJUST 0-5VDC+
46
IGN GND
47
IGN GND
30
FSO DRIVER +
31
BATTERY CONSERVATION RELAY
34
IGNITION +24VDC
36
ECM KEY SWITCH
29
PRE CAT TEMPERATURE SUPPLY
35
PRE CAT TEMPERATURE SIGNAL
45
POST CAT TEMPERATURE SIGNAL
42
POST CAT TEMPERATURE SUPPLY
27
PRE CAT OXYGEN RETURN
14
PRE CAT OXYGEN SIGNAL
37
POST CAT OXYGEN SIGNAL
38
POST CAT OXYGEN RETURN
C3
SPL A
SPL C
PRE CATALYST O2
POST CATALYST O2
SPL B
C6
E-STOP
C4
PRE CAT TEMPERATURE SUPPLY
1
1
POST CAT TEMPERATURE SUPPLY
PRE CAT TEMPERATURE SIGNAL
2
2
POST CAT TEMPERATURE SIGNAL
2B
10
SWITCH RET GND
19
POST CAT OXYGEN HEATER -
2
SYSTEM WAKEUP
EGO PRE CAT POWER UP RELAY LSD
16
POST CAT OXYGEN HEATER +
GND
4
FCV GROUND
9
C
B
3
8
D
PRE CAT OXYGEN SIGNAL
4
FCV +24VDC
POST CAT OXYGEN SIGNAL
1
3
ECM +24VDC
7
B
1
PCC NET B
ECM GROUND
6
POST CAT OXYGEN RETURN
FUSED B+
PCC NET A
THROTTLE GROUND
5
A
J6
J1
4
A
J6
J1
THROTTLE +24VDC
ECM
PRE CAT OXYGEN RETURN
HMI 114
1
J1939 -
C24
1
HMI 320
16
3
21
J18
9
1
3
F13 (4A)
CR7
5
3
CHASSIS GROUND
F8 (10A)
5
12
5
7
B+ INPUT (FUSED B+)
P
9
14
FIELD -
O
8
9
20
C8
2
P
9
CR6
4
4
F
O
C3
4
F
F9 (10A)
PMG 2
C8
PCC FSO
L2
PMG 1
1
8
CR9
J17
ALT. GROUND BOLT
5
CR5
8
CR9
J22
FIELD +
1
C8
L1
FIELD -
5
CR1
1
8
CR4
F4 (6A)
C2
1
6
F3 (10A)
2
C4
POST CATALYST TEMP
PRE CATALYST TEMP
2A
ECM SWITCH COMMON
C3
IDLE/RATED INPUT
C8
C20
ECM KEYSWITCH
C21
+24VDC ED3 DISPLAY POWER (SWITCHED)
C22
ED3 DISPLAY GROUND
POWER AND SENSOR HARNESS
C5
9 PIN ECM DIAGNOSTIC
B
4
BATT +
C6
A
8
BATT -
A
C
C23 J1939 CAN HIGH
D
C24 J1939 CAN LOW
E
C25 J1939 CAN SHIELD
F1 (20A)
1
CR7
10
6
CR2
3
CR5
4
3
4
CR5
8
6
5
CR8
4
3
CR7
12
8
C1 C1
CR9
10
6
C1
A
A
C2
C
C
F
F
A
CR2
6
5
C2
SPL D
SPL E
"FSO"
B
J1939 DATA LINK+
C23
"FSO #2"
B
W4
GND
CR10
C24
J1939 DATA LINK-
C25
J1939 DATA LINK SHIELD
2
3
4
C
W5
SW B+
W3
B+
W6
S TERM
STARTER
S TERM
5A FUSED B+ FROM F5
C26
C27
CUSTOMER NORMAL SHUTDOWN (FSO)
C28
CUSTOMER IGNITION SHUTDOWN (FSO AND SPARK)
C3
ALTERNATOR LAMP
J26
15
9
120 OHM
CR11
KEY SWITCH
STARTER DISCONNECT INPUT
11
LOW COOLANT LEVEL SWITCH 2
19
C3
B
C23
11
ECM CAN HIGH
A
C24
10
ECM CAN LOW
C
C25
1
ECM CAN SHIELD
2
BACKUP START DISCONNECT
7
FIELD CURRENT -
14
FIELD CURRENT +
C2
ED3 DISPLAY
2
1
C21 SWITCHED B+
7
C23 J1939 CAN HIGH
8
C24 J1939 CAN LOW
C22 ED3 GROUND
3
AVR PWM -
16
AVR PWM +
5
LOW COOLANT LEVEL SWITCH 1
B+ RETURN (B-)
9
AVR FUSED B+
AUX 103 (AVR)
1
AVR FUSED B+
8
B+ RETURN (B-)
2
AVR PWM +
9
AVR PWM -
4
FIELD CURRENT +
10
FIELD CURRENT -
3
CR#
-
-
CR12
2
4
C20 ECM KEYSWITCH
C26 +24VDC
B
LAMP
T
T
D
SENSE
"ALT"
MOT
C4
F7 (5A)
3
P
P
F10 (1A)
17
C
C
D
D
B
B
H
C
C
L
L
D
D
B
B
8
U
U
8
G
G
8
E
E
3
R
R
"LCL2"
C5
SPL C
H
SPL A
ENGINE
ALTERNATOR
"LCL1"
SPL A
C26
4
9
PE
S1
9
S
SPL B
F6 (5A)
J19
ECM
RESET
5
S
F5 (5A)
C25 J1939 CAN SHIELD
LEGEND
22
14
2
B
B
1
D
D
M
M
+
-
BATTERY
BACKUP START DISCONNECT
GND CHASSIS
REFERENCE: 1) SEE CPG DRAWING #0630-3440 FOR PCC SCHEMATICS AND INTERFACE
2) SEE CUMMINS DRAWING #4021936-02 FOR ENGINE SIDE WIRING AND INTERFACE
= RELAY COIL
CR#
-
10
= RELAY CONTACT
= TERMINAL BLOCK
AUTO CAD
CONNECTOR WIRE INSERTION VIEW
C1
C2
6
C4
C3
C5
C6
C13
A
7
J1,TB15
1
J6
5
J12
J17
J18
J19
J20
3
1
1
3
11
6
4
2
1
22
J22
J25
1 4
J26
6
J28
1
J29
5
1
2
1
4
3 15
B
1
12
C
S1
E-STOP
12
12
1
7
11
"RESET"
"E-STOP"
"C3"
TERMINATING RESISTOR
C3
"C2"
ED3 DISPLAY
C2
TB15
TB9
J14
TB7
TB10
TB8
PCC3300
CT1
"J1"
J18
J17
J1
C6
CT2
"J6"
REAR VIEW OF FUSE PANEL
DEPICTING WIRE ROUTING
F7
F6
F5
F4
F3
J6
J19
TB5
CT3
F2
"J29"
J29
"J28"
J28
AUX103
AVR
J12
F1
TB3
TB1
J25
J22
"F3"
F2
"F2"
F1
"F1"
GND
F8
"F8"
F9
"F9"
F10
"F10"
F11
"F11"
F12
"F12"
F13
"F13"
F14
"F14"
CR1 CR2
CR3
CR4
C5
CR5
CR6
CR7
CR8
CR9
C1
CR11
CR12
F3
CR10
"F4"
C28
F4
C27
"F5"
C26
F5
C25
"F6"
C25
F6
C24
"F7"
J20
J26
C24
F7
F8
C23
F9
C23
F10
C22
F11
C21
F12
C20
F13
1
2
3
3
3
4
PE
5
6
7
8
8
8
9
9
9
10
C1
C2
C3
C8
F14
C4
SPLICE DETAILS
STAGGER SPLICES IN SHIELDED CABLE
C28
C27
C26
C25
C25
C24
C24
C23
C23
C22
C21
C20
C8
C3
C2
C1
10
9
9
9
8
8
8
7
6
5
PE
4
3
3
3
2
1
SPL A
SPL B
TERMINAL STRIP DETAIL
SPL C
SPL D
AUTO CAD
ALTERNATOR
C1
3
A
B
2
RECONNECT
TERMINAL BLOCK
A
1
U
V
C
MAG SWITCH
C2
PMG
B
(F1) X+
FIELD
WINDING
(F2) XX-
"FSO"
C4
STARTER
C
C
D
D
B
B
S TERM
"LCL1"
MOT
C
C
D
D
B
B
"LCL2"
C1
C1
C6
C1
C5
C3
B
LAMP
D
SENSE
"ALT"
B+
+
-
ENGINE
ALTERNATOR
BATTERY
C4
C5
9 PIN SERVICE
C1
POST CAT TEMP
C4
A
B
PRE CAT TEMP
C6
A
B
C2
W
C
N
"FSO #2"
C3
POST CAT O2
C
D
B
C5
PRE CAT O2
C
D
B
AUTO CAD
ALTERNATOR
2
RECONNECT
TERMINAL BLOCK
N
3B
C28
C4
CR11
PMG
C26
8
1
U
V
W
ENGINE HARNESS MATES DIRECTLY UP TO CONNECTORS
C4 AND C13 ON MAIN CONTROL PANEL.
E-STOP
MAIN CONTROL PANEL
(SEE SHEET 2 FOR LAYOUT)
3
3A
C27
12
8
C26
(F1) X+
F3 (10A)
2
1B
FIELD
(F2) XX- WINDING
CR4
F4 (6A)
9
6
1A
10
8
4
CR1
5
1
C8
4
MAIN BREAKER
MCB_1
ALTERNATOR HARNESS
U U
CUSTOMER
LOAD
CT1
X1
TO
V V
CT1 COM
CT2
CT2
X1
W W
CT3
CT2 COM
X1
CT3
CT3 COM
G
G
1
CT1
K
4
CT1 COM
H
H
2
CT2
CT2 COM
L
L
5
J
J
3
CT3
M
M
6
CT3 COM
D
D
1
C8
15
ALT. GROUND BOLT
SWITCHED B+ LOW SIDE DRIVER
1
3
C
C
2
L2
B
B
3
L3
B+ INPUT (FUSED B+)
9
N
A
A
4
N
B+ INPUT (FUSED B+)
10
B+ INPUT (FUSED B+)
20
J17
F
F
2
E
E
1
FIELD +
J18
F9 (10A)
PMG 1
PMG 2
PMG 3
B+ INPUT (FUSED B+)
FIELD -
P
P
O
O
N
N
Q
Q
F8 (10A)
1
PMG 1
2
PMG 2
3
PMG 3
H
ECM +24VDC
P
FCV +24VDC
N
FCV GROUND
V
EGO SENSOR POWER RELAY DRIVER
b
SWITCH RETURN GROUND
f
ENGINE SHUTDOWN RELAY DRIVER
1
BATT -
2
BATT -
4
BATT -
7
BATT -
12
CR7
5
5
CR6
5
9
1
CR10
7
5
CR3
1
5
U
IGNITION SHUTDOWN SIGNAL
e
STOP/START SWITCH
g
ENGINE WARNING RELAY DRIVER
M
RSVD
13
CR11
14
4
CR8
5
C24
Z
J1939 LOW
C23
T
J1939 HIGH
C25
a
J1939 SHIELD
L
CD200 RELAY DRIVER
C8
Y
IDLE/RATED SWITCH
6
h
IGNITION CASE GROUND
5
c
IGNITION CASE GROUND
B
FSO RELAY DRIVER
I
ECM KEYSWITCH
1
9
21
CHASSIS GROUND
12
STARTER
J20
STARTER RELAY DRIVER
L3
FIELD +
9
4
L2
FIELD -
C3
4
SWITCHED B+
L1
ECM GROUND
CR9
J12
K
1
8
CR9
J22
L1
5
PCC1302
C1 C6
CT1
CR5
G
PE
7
CR2
1
5
8
C21
F1 (20A)
1
5
7
13
CR4
14
A
IGNITION +24VDC
m
BATTERY CONSERVATION RELAY +
W
EGO SENSOR GROUND
C
EGO SENSOR B+ 13.8VDC
24VDC TO 13.8VDC
CONVERTOR
PE
13.8VDC OUTCR3
13.8VDC OUT+
J1
HMI 211
TERMINAL BLOCK, RELAY AND FUSE DESCRIPTIONS
+24VDC SUPPLY
1
+24VDC SUPPLY
2
3
3
GND
5
5
AUTO COMMAND
7
7
MANUAL COMMAND
6
6
1
1
PCC NET B
2
2
4
4
J6
J6
FUSED B+
1
1
GND
2
2
J1
P1
PCC NET A
3
3
PCC NET B
4
4
SYSTEM WAKEUP
5
5
+24VDC SUPPLY
3
5A FUSED B+ FROM F5
4
9
J25
SPL D
SPL C
SPL C
SPL A
PCC NET A
HMI 114
SPL B
10
CR1
SW BATT +24VDC
8
BATT -
6
DISCRETE INPUT RETURN
BATT +24VDC
2
LOCAL E-STOP
BATT -24VDC
11
AUTO COMMAND
10
MANUAL COMMAND
9
PCC NET SHIELD
4
PCC NET A
3
PCC NET B
5
SYSTEM WAKEUP
3
-24VDC RETURN
6
4
4
5
C13
PWM DRV+
TB1-1
P
THROTTLE PWM+
PWM DRV-
TB1-2
N
THROTTLE PWM-
FEED BACK+
TB2-1
L
THROTTLE FEEDBACK+
FEED BACK0
TB2-2
A
THROTTLE FEEDBACK
FEED BACK-
TB2-3
B
THROTTLE FEEDBACK-
FEED BACK SHIELD
TB2-4
M
THROTTLE FEEDBACK SHIELD
PWM -
TB4-5
F
THROTTLE PWM 2 COMMAND -
PWM +
TB4-4
E
THROTTLE PWM 2 COMMAND +
SHIELD
TB4-3
D
SHIELD
FEEDBK -
TB4-2
J
THROTTLE POSITION FEEDBACK -
FEEDBK +
TB4-1
I
THROTTLE POSITION FEEDBACK +
WOODWARD
PROACT II
DRIVER BOX
F2 (6A)
SPL C
CR4
3
8
12
6
TB3-2
POWER+
TB3-1
POWER-
-24VDC RETURN
5
3
J1
FUSED B+
SYSTEM WAKEUP
4
E-STOP
SPL E
2B
7
-24VDC RETURN
8
-24VDC RETURN
9
20A FUSED B+ FROM F6
2A
120 OHM
SYSTEM WAKEUP
10
C1
FUEL SHUTOFF VALVE CONTROL CONTACT
C2
FUEL SHUTOFF VALVE CONTROL CONTACT
POWER AND SENSOR HARNESS
J11
C3
B
C23
20
J1939 CAN HIGH
A
C24
19
J1939 CAN LOW
C
C25
17
J1939 CAN SHIELD
C6
A
C5
9 PIN ECM DIAGNOSTIC
B
4
BATT +
8
BATT -
C3
ECM SWITCH COMMON
A
C
C23 J1939 CAN HIGH
C8
IDLE/RATED INPUT
D
C24 J1939 CAN LOW
E
C25 J1939 CAN SHIELD
C20
ECM KEYSWITCH
C21
+24VDC ED3 DISPLAY POWER (SWITCHED)
CR7
F1 (20A)
1
10
CR2
6
3
4
CR5
3
CR8
4
4
3
CR5
8
6
5
CR9
10
6
CR7
12
CR11
C1
8
ED3 DISPLAY GROUND
C23
J1939 DATA LINK+
C24
J1939 DATA LINK-
C27
CUSTOMER NORMAL SHUTDOWN (FSO)
C28
CUSTOMER IGNITION SHUTDOWN (FSO AND SPARK)
A
6
5
C2
C
C
C2
SPL D
A
SPL E
"FSO"
B
W4
GND
3
4
C
F
F
W5
SW B+
W3
B+
W6
S TERM
STARTER
S TERM
C3
ALTERNATOR LAMP
22
C2
CR11
ED3 DISPLAY
5A FUSED B+ FROM F5
C26
10
A
CR10
J1939 DATA LINK SHIELD
C25
6
C1 C1
CR2
2
C22
"FSO #2"
B
2
1
C21 SWITCHED B+
7
C23 J1939 CAN HIGH
8
C24 J1939 CAN LOW
C22 ED3 GROUND
STARTER DISCONNECT INPUT
11
LOW COOLANT LEVEL SWITCH 2
18
5
9
S
S
B
LAMP
T
T
D
SENSE
MOT
C4
F7 (5A)
3
P
C25 J1939 CAN SHIELD
P
F10 (1A)
LOW COOLANT LEVEL SWITCH 1
"ALT"
17
C
C
D
D
B
B
C5
SPL C
H
H
C
C
L
L
D
D
B
B
SPL A
ECM
RESET
S1
8
U
U
8
G
G
8
E
E
3
R
R
2
B
B
1
D
D
M
M
"LCL2"
ENGINE
ALTERNATOR
"LCL1"
SPL A
C20 ECM KEYSWITCH
C26 +24VDC
C26
F5 (5A)
4
SPL B
F6 (20A)
9
+
-
BATTERY
REFERENCE: 1) SEE CPG DRAWING #0630-3440 FOR PCC SCHEMATICS AND INTERFACE
2) SEE CUMMINS DRAWING #4021667-01 FOR ENGINE SIDE WIRING AND INTERFACE
LEGEND
CR#
-
-
= RELAY COIL
CR#
-
10
= RELAY CONTACT
= TERMINAL BLOCK
AUTO CAD
S1
E-STOP
"RESET"
"E-STOP"
"C3"
TERMINATING RESISTOR
C3
"C2"
ED3 DISPLAY
C2
PCC1302
J18
J17
TB1
C6
J22
"J1"
J1
"J6"
J6
J12
J25
"J29"
J29
TB15
J11
J20
"J28"
J28
F5
F4
F3
F2
F1
F10
F9
F8
F7
F6
REAR VIEW OF FUSE PANEL
DEPICTING WIRE ROUTING
F4
"F4"
F3
"F3"
F2
"F2"
F1
"F1"
F6
"F6"
F7
"F7"
F8
"F8"
F9
"F9"
CR1 CR2 CR3
CR4
CR5 CR6
CR7
CR8
CR9
CR10
C28
C27
C26
C25
C25
C24
C24
C23
C23
C22
C21
C20
5
6
7
8
8
8
9
9
10
C1
C2
C3
C8
"F5"
1
2
3
4
F5
CR11
SPLICE DETAILS
STAGGER SPLICES IN SHIELDED CABLE
C5
SPL A
SPL B
F10
C1
C4
C13
"F10"
C28
C27
C26
C25
C25
C24
C24
C23
C23
C22
C21
C20
C8
C3
C2
C1
10
9
9
8
8
8
7
6
5
PE
4
3
2
SPL D
1
SPL C
TERMINAL STRIP DETAIL
AUTO CAD
ALTERNATOR
C1
3
A
B
2
RECONNECT
TERMINAL BLOCK
A
1
U
V
MAG SWITCH
C2
PMG
B
(F1) X+
FIELD
WINDING
(F2) XX-
"FSO"
C4
STARTER
C
C
D
D
B
B
S TERM
"LCL1"
MOT
C
C
D
D
B
B
"LCL2"
C1
C1
C6
C1
C5
C3
B
LAMP
D
SENSE
"ALT"
B+
+
-
ENGINE
ALTERNATOR
BATTERY
C4
C13
C5
9 PIN SERVICE
C2
C1
C2
W
C
C1
N
"FSO #2"
AUTO CAD
ALTERNATOR
2
RECONNECT
TERMINAL BLOCK
N
V
W
3B
C28
C4
CR11
PMG
C26
8
1
U
ENGINE HARNESS MATES DIRECTLY UP TO CONNECTORS
C4 AND C13 ON MAIN CONTROL PANEL.
E-STOP
MAIN CONTROL PANEL
(SEE SHEET 2 FOR LAYOUT)
3
3A
C27
12
8
C26
(F1) X+
G
ECM GROUND
H
ECM +24VDC
P
FCV +24VDC
N
FCV GROUND
V
EGO SENSOR POWER RELAY DRIVER
b
SWITCH RETURN GROUND
f
ENGINE SHUTDOWN RELAY DRIVER
U
IGNITION SHUTDOWN SIGNAL
e
STOP/START SWITCH
g
ENGINE WARNING RELAY DRIVER
M
RSVD
C24
Z
J1939 LOW
C23
T
J1939 HIGH
C25
a
J1939 SHIELD
L
CD200 RELAY DRIVER
C8
Y
IDLE/RATED SWITCH
6
h
IGNITION CASE GROUND
5
c
IGNITION CASE GROUND
B
FSO RELAY DRIVER
I
ECM KEYSWITCH
A
IGNITION +24VDC
m
BATTERY CONSERVATION RELAY +
W
EGO SENSOR GROUND
C
EGO SENSOR B+ 13.8VDC
F3 (10A)
2
1B
FIELD
(F2) XX- WINDING
CR4
F4 (6A)
9
6
1A
10
8
4
CR1
5
1
C8
4
MAIN BREAKER
MCB_1
ALTERNATOR HARNESS
U U
X1
TO
CUSTOMER
LOAD
CT1
V V
CT1 COM
CT2
CT2
X1
W W
CT2 COM
CT3
CT3
X1
CT3 COM
G
1
CT1
K
4
CT1 COM
H
H
2
CT2
L
L
5
CT2 COM
J
J
3
CT3
6
CT3 COM
M
C8
D
1
15
L1
SWITCHED B+ LOW SIDE DRIVER
1
CR10
3
C
C
2
L2
B
B
3
L3
B+ INPUT (FUSED B+)
9
N
A
A
4
N
B+ INPUT (FUSED B+)
10
B+ INPUT (FUSED B+)
20
J17
PMG 2
PMG 3
B+ INPUT (FUSED B+)
2
FIELD -
CHASSIS GROUND
1
E
E
1
FIELD +
BATT -
2
BATT -
4
BATT -
7
P
O
O
J18
N
N
Q
Q
2
PMG 1
PMG 2
3
PMG 3
1
F8 (10A)
5
CR6
5
7
5
13
CR11
CR3
1
5
BATT -
F12 (4A)
4
3
CR8
5
1
3
F13 (4A)
F14 (4A)
3
3
PE
7
CR2
1
5
8
C21
F1 (20A)
12
1
5
7
13
CR4
14
24VDC TO 13.8VDC
CONVERTOR
PE
13.8VDC OUT-
CR3
13.8VDC OUT+
FUSED B+
1
1
GND
3
3
9
J25
SPL D
J29 J29
1
2
3
4
5
6
+24VDC SUPPLY
+24VDC SUPPLY
+24VDC SUPPLY
5A FUSED B+ FROM F5
AUTO COMMAND
4
4
MANUAL COMMAND
6
6
1
1
PCC NET B
2
2
3
3
SYSTEM WAKEUP
J6
J6
FUSED B+
1
1
GND
2
2
HMI 114
7
-24VDC RETURN
8
-24VDC RETURN
SPL C
SPL C
SPL A
PCC NET A
-24VDC RETURN
-24VDC RETURN
4
3
J28 J28
HMI 220
TERMINAL BLOCK, RELAY AND FUSE DESCRIPTIONS
9
1
14
21
F
P
CR7
F11 (4A)
F
F9 (10A)
PMG 1
12
5
SWITCHED B+
L3
FIELD +
9
4
STARTER
J20
STARTER RELAY DRIVER
L2
FIELD -
ALT. GROUND BOLT
D
C3
4
J22
L1
8
CR9
G
1
CR9
J12
K
M
5
PCC2300
C1 C6
CT1
CR5
J1
J1
PCC NET A
3
3
PCC NET B
4
4
SYSTEM WAKEUP
5
5
SPL B
10
CR1
8
BATT -
6
DISCRETE INPUT RETURN
2
LOCAL E-STOP
11
AUTO COMMAND
10
MANUAL COMMAND
9
PCC NET SHIELD
4
PCC NET A
3
PCC NET B
5
SYSTEM WAKEUP
SW BATT +24VDC
3
4
4
BATT +24VDC
BATT -24VDC
5
C13
PWM DRV+
TB1-1
P
THROTTLE PWM+
PWM DRV-
TB1-2
N
THROTTLE PWM-
FEED BACK+
TB2-1
L
THROTTLE FEEDBACK+
FEED BACK0
TB2-2
A
THROTTLE FEEDBACK
FEED BACK-
TB2-3
B
THROTTLE FEEDBACK-
FEED BACK SHIELD
TB2-4
M
THROTTLE FEEDBACK SHIELD
PWM -
TB4-5
F
THROTTLE PWM 2 COMMAND -
PWM +
TB4-4
E
THROTTLE PWM 2 COMMAND +
SHIELD
TB4-3
D
SHIELD
FEEDBK -
TB4-2
J
THROTTLE POSITION FEEDBACK -
FEEDBK +
TB4-1
I
THROTTLE POSITION FEEDBACK +
WOODWARD
PROACT II
DRIVER BOX
F2 (6A)
SPL C
CR4
3
8
12
6
TB3-2
POWER+
TB3-1
POWER-
E-STOP
SPL E
2B
9
20A FUSED B+ FROM F6
10
SYSTEM WAKEUP
C1
FUEL SHUTOFF VALVE CONTROL CONTACT
2A
120 OHM
C2
FUEL SHUTOFF VALVE CONTROL CONTACT
C3
ECM SWITCH COMMON
C8
B
C23
20
J1939 CAN HIGH
A
C24
19
J1939 CAN LOW
C
C25
17
J1939 CAN SHIELD
9 PIN ECM DIAGNOSTIC
B
4
BATT +
8
BATT -
ECM KEYSWITCH
A
C
C23 J1939 CAN HIGH
C21
+24VDC ED3 DISPLAY POWER (SWITCHED)
D
C24 J1939 CAN LOW
E
C25 J1939 CAN SHIELD
C22
ED3 DISPLAY GROUND
C24
J1939 DATA LINK-
C25
J1939 DATA LINK SHIELD
C26
5A FUSED B+ FROM F5
C27
CUSTOMER NORMAL SHUTDOWN (FSO)
C28
CUSTOMER IGNITION SHUTDOWN (FSO AND SPARK)
A
"FSO #2"
B
C20
J1939 DATA LINK+
C6
C5
IDLE/RATED INPUT
C23
POWER AND SENSOR HARNESS
J11
C3
CR7
F1 (20A)
1
10
CR2
6
3
4
CR5
3
CR8
4
4
3
CR5
8
6
5
CR9
10
6
CR7
12
CR11
C1
8
6
10
C1 C1
A
A
C
C
F
F
A
CR2
6
5
C2
C2
SPL D
SPL E
"FSO"
B
W4
GND
CR10
2
3
4
C
W5
SW B+
W3
B+
W6
S TERM
STARTER
S TERM
C3
ALTERNATOR LAMP
22
C2
CR11
ED3 DISPLAY
2
1
C21 SWITCHED B+
7
C23 J1939 CAN HIGH
8
C24 J1939 CAN LOW
C22 ED3 GROUND
STARTER DISCONNECT INPUT
11
LOW COOLANT LEVEL SWITCH 2
19
5
9
S
S
B
LAMP
T
T
D
SENSE
MOT
C4
F7 (5A)
3
P
C25 J1939 CAN SHIELD
P
F10 (1A)
LOW COOLANT LEVEL SWITCH 1
"ALT"
17
C
C
D
D
B
B
C5
SPL C
H
H
C
C
L
L
D
D
B
B
SPL A
ECM
RESET
S1
8
U
U
8
G
G
8
E
E
3
R
R
"LCL2"
ENGINE
ALTERNATOR
"LCL1"
SPL A
C20 ECM KEYSWITCH
C26 +24VDC
C26
F5 (5A)
4
SPL B
F6 (5A)
9
2
B
B
1
D
D
M
M
+
-
BATTERY
REFERENCE: 1) SEE CPG DRAWING #0630-3440 FOR PCC SCHEMATICS AND INTERFACE
2) SEE CUMMINS DRAWING #4021667-01 FOR ENGINE SIDE WIRING AND INTERFACE
LEGEND
CR#
-
-
= RELAY COIL
CR#
-
10
= RELAY CONTACT
= TERMINAL BLOCK
AUTO CAD
S1
E-STOP
"RESET"
"E-STOP"
TB15
"C3"
TERMINATING RESISTOR
C3
TB8
F7
F6
F5
F4
F3
F2
F1
"C2"
ED3 DISPLAY
J17
C2
PCC2300
F13
F12
F11
F10
F9
"J1"
J1
"J6"
J6
F8
J12
"J29"
J29
REAR VIEW OF FUSE PANEL
DEPICTING WIRE ROUTING
TB1
"J28"
J28
J25
J22
F7
"F7"
F6
"F6"
F5
"F5"
F4
"F4"
F3
"F3"
F2
"F2"
F1
"F1"
J11
J20
GND
F9
CR1 CR2
CR3
CR4
CR5
CR6
CR7
CR8
CR9
CR10
C28
C27
C26
C25
C25
C24
C24
C23
C23
C22
C21
C20
5
6
7
8
8
8
9
9
10
C1
C2
C3
C8
"F8"
1
2
3
4
F8
CR11
"F9"
F10
"F10"
F11
"F11"
F12
"F12"
F13
"F13"
F14
"F14"
SPLICE DETAILS
STAGGER SPLICES IN SHIELDED CABLE
C5
SPL A
C1
C4
C13
SPL B
C28
C27
C26
C25
C25
C24
C24
C23
C23
C22
C21
C20
C8
C3
C2
C1
10
9
9
8
8
8
7
6
5
PE
4
3
SPL D
2
SPL C
1
F14
C6
J18
TERMINAL STRIP DETAIL
AUTO CAD
ALTERNATOR
C1
3
A
B
2
RECONNECT
TERMINAL BLOCK
A
1
U
V
MAG SWITCH
C2
PMG
B
(F1) X+
FIELD
WINDING
(F2) XX-
"FSO"
C4
STARTER
C
C
D
D
B
B
S TERM
"LCL1"
MOT
C
C
D
D
B
B
"LCL2"
C1
C1
C6
C1
C5
C3
B
LAMP
D
SENSE
"ALT"
B+
+
-
ENGINE
ALTERNATOR
BATTERY
C4
C13
C5
9 PIN SERVICE
C2
C1
C2
W
C
C1
N
"FSO #2"
AUTO CAD
ALTERNATOR
N
C26
PMG
8
12
C28
C27
C4
3A
8
C26
1
U
V
W
3B
CR11
2
RECONNECT
TERMINAL BLOCK
ENGINE HARNESS MATES DIRECTLY UP TO CONNECTORS
C4 AND C13 ON MAIN CONTROL PANEL.
E-STOP
MAIN CONTROL PANEL
(SEE SHEET 2 FOR LAYOUT)
3
F3 (10A)
2
(F1) X+
CR4
F4 (6A)
1B
FIELD
(F2) XX- WINDING
9
6
10
8
1A
4
CR1
5
1
C8
4
MAIN BREAKER
MCB_1
ALTERNATOR HARNESS
U U
X1
TO
CUSTOMER
LOAD
CT1
V V
CT1 COM
CT2
CT2
X1
W W
CT2 COM
CT3
CT3
X1
CT3 COM
G
1
CT1
K
4
CT1 COM
H
H
2
CT2
L
L
5
CT2 COM
J
J
3
CT3
6
CT3 COM
M
C8
D
15
L1
FSO LOW SIDE DRIVER
1
CR10
14
C
C
2
L2
B
B
3
L3
B+ INPUT (FUSED B+)
9
N
A
A
4
N
B+ INPUT (FUSED B+)
10
B+ INPUT (FUSED B+)
20
B+ INPUT (FUSED B+)
21
J17 AUX 103 (AVR)
PMG 1
PMG 2
F
2
FIELD -
CHASSIS GROUND
1
E
E
1
FIELD +
BATT -
2
BATT -
4
BATT -
7
BATT -
12
PMG 3
P
P
O
O
J18
N
N
Q
Q
2
PMG 1
PMG 2
3
PMG 3
1
F8 (10A)
9
CR6
5
7
13
CR11
CR7
9
1
CR3
1
P
FCV +24VDC
N
N
FCV GROUND
V
V
EGO SENSOR POWER RELAY DRIVER
b
b
SWITCH RETURN GROUND
f
f
ENGINE SHUTDOWN RELAY DRIVER
U
U
IGNITION SHUTDOWN SIGNAL
e
e
STOP/START SWITCH
g
g
ENGINE WARNING RELAY DRIVER
M
M
RSVD
C24
Z
Z
J1939 LOW
C23
T
T
J1939 HIGH
C25
a
a
J1939 SHIELD
L
L
CD200 RELAY DRIVER
5
14
F12 (4A)
F13 (4A)
F14 (4A)
4
3
AVR FUSED B+
1
9
AVR FUSED B+
B+ RETURN (B-)
8
5
B+ RETURN (B-)
AVR PWM +
2
16
AVR PWM +
AVR PWM -
CR8
5
1
3
C8
Y
Y
IDLE/RATED SWITCH
3
6
h
h
IGNITION CASE GROUND
5
c
c
IGNITION CASE GROUND
B
B
FSO RELAY DRIVER
I
I
ECM KEYSWITCH
A
A
IGNITION +24VDC
m
m
BATTERY CONSERVATION RELAY +
13.8VDC OUT-
W
W
EGO SENSOR GROUND
13.8VDC OUT+
C
C
EGO SENSOR B+ 13.8VDC
3
PE
7
CR2
1
8
5
C21
F1 (20A)
1
5
J26
J19
12
5
7
PE
4
5
5
F11 (4A)
F
F9 (10A)
ECM +24VDC
P
PCC FSO
1
L3
FIELD +
ECM GROUND
H
STARTER
J20
STARTER RELAY DRIVER
L2
FIELD -
ALT. GROUND BOLT
D
C3
4
J22
L1
G
H
CR9
J12
G
1
8
CR9
K
M
5
PCC3300
C1 C6
CT1
CR5
G
13
CR4
14
24VDC TO 13.8VDC
CONVERTOR
AVR PWM -
9
3
FIELD CURRENT +
4
14
FIELD CURRENT +
FIELD CURRENT -
10
7
FIELD CURRENT -
BACKUP START DISCONNECT
3
2
BACKUP START DISCONNECT
GND CHASSIS
14
CR1
TERMINAL BLOCK, RELAY AND FUSE DESCRIPTIONS
SW BATT +24VDC
BATT -24VDC
120 OHM
C13
WOODWARD
PROACT II
DRIVER BOX
B
5A FUSED B+ FROM F5
4
-24VDC RETURN
5
6
-24VDC RETURN
7
-24VDC RETURN
8
-24VDC RETURN
SYSTEM WAKEUP
C1
FUEL SHUTOFF VALVE CONTROL CONTACT
C2
FUEL SHUTOFF VALVE CONTROL CONTACT
ECM SWITCH COMMON
C3
IDLE/RATED INPUT
C8
C20
ECM KEYSWITCH
C21
+24VDC ED3 DISPLAY POWER (SWITCHED)
11
C23
A
C24
10
C
C25
1
ECM CAN HIGH
ECM CAN SHIELD
F2 (6A)
FUSED B+
1
1
3
3
9
J29 J29
AUTO COMMAND
4
4
MANUAL COMMAND
6
6
PCC NET A
1
1
PCC NET B
2
2
SYSTEM WAKEUP
3
3
J6
J6
SPL C
HMI 114
SPL A
FUSED B+
1
1
GND
2
2
J1
J1
PCC NET A
3
3
PCC NET B
4
4
SYSTEM WAKEUP
SPL C
5
SPL B
10
12
6
8
BATT -
6
DISCRETE INPUT RETURN
2
TB1-1
P
P
THROTTLE PWM+
PWM DRV-
TB1-2
N
N
THROTTLE PWM-
FEED BACK+
TB2-1
L
L
THROTTLE FEEDBACK+
FEED BACK0
TB2-2
A
A
THROTTLE FEEDBACK
THROTTLE FEEDBACK-
FEED BACK-
TB2-3
B
FEED BACK SHIELD
TB2-4
M
M
THROTTLE FEEDBACK SHIELD
PWM -
TB4-5
F
F
THROTTLE PWM 2 COMMAND -
PWM +
TB4-4
E
E
THROTTLE PWM 2 COMMAND +
SHIELD
TB4-3
D
D
SHIELD
CR4
8
J25
SPL D
PWM DRV+
B
ECM CAN LOW
3
20A FUSED B+ FROM F6
10
KEY SWITCH
J28 J28
HMI 320
GND
9
15
C3
+24VDC SUPPLY
3
5
PE
9
+24VDC SUPPLY
2
TB3-2
POWER+
TB3-1
POWER-
SPL E
LOCAL E-STOP
FEEDBK -
TB4-2
J
J
THROTTLE POSITION FEEDBACK -
11
AUTO COMMAND
FEEDBK +
TB4-1
I
I
THROTTLE POSITION FEEDBACK +
10
MANUAL COMMAND
9
PCC NET SHIELD
4
PCC NET A
3
PCC NET B
5
SYSTEM WAKEUP
POWER AND SENSOR HARNESS
C6
A
SPL C
F1 (20A)
1
5
CR7
10
6
CR2
3
CR5
4
3
4
CR5
8
6
5
CR8
4
3
CR7
12
8
C1 C1
CR9
10
6
C1
A
A
C2
C
C
F
F
A
CR2
6
5
C2
SPL D
SPL E
"FSO"
B
2B
C23
J1939 DATA LINK+
C24
J1939 DATA LINK-
C27
CUSTOMER NORMAL SHUTDOWN (FSO)
C28
CUSTOMER IGNITION SHUTDOWN (FSO AND SPARK)
GND
3
4
C
W5
C5
SW B+
W3
B+
W6
S TERM
STARTER
9 PIN ECM DIAGNOSTIC
B
5A FUSED B+ FROM F5
C26
W4
CR10
2
2A
J1939 DATA LINK SHIELD
C25
"FSO #2"
B
E-STOP
C22
4
4
BATT +24VDC
+24VDC SUPPLY
1
3
A
S TERM
4
BATT +
8
BATT -
C
C23 J1939 CAN HIGH
D
C24 J1939 CAN LOW
E
C25 J1939 CAN SHIELD
C3
ALTERNATOR LAMP
22
CR11
STARTER DISCONNECT INPUT
11
LOW COOLANT LEVEL SWITCH 2
19
5
9
S
S
B
LAMP
T
T
D
SENSE
MOT
C4
F7 (5A)
3
P
P
F10 (1A)
LOW COOLANT LEVEL SWITCH 1
"ALT"
17
C
C
D
D
B
B
C5
SPL C
H
H
C
C
L
L
D
D
B
B
SPL A
8
U
U
8
G
G
8
E
E
3
R
R
"LCL2"
ENGINE
ALTERNATOR
"LCL1"
SPL A
C26
F5 (5A)
4
SPL B
F6 (5A)
9
2
B
B
1
D
D
M
M
+
-
BATTERY
S1
LEGEND
ECM
RESET
CR#
-
-
CR12
2
4
C20 ECM KEYSWITCH
C26 +24VDC
REFERENCE: 1) SEE CPG DRAWING #0630-3440 FOR PCC SCHEMATICS AND INTERFACE
2) SEE CUMMINS DRAWING #4021667-01 FOR ENGINE SIDE WIRING AND INTERFACE
= RELAY COIL
CR#
-
10
= RELAY CONTACT
= TERMINAL BLOCK
AUTO CAD
S1
E-STOP
"RESET"
"E-STOP"
TB15
"C3"
TERMINATING RESISTOR
TB9
C3
J14
TB7
TB10
TB8
F7
F6
F5
F4
F3
F2
"C2"
ED3 DISPLAY
F1
PCC3300
C2
CT1
J18
J17
C6
CT2
"J1"
J1
J19
TB5
CT3
"J6"
F13
F12
F11
F10
F9
J6
J12
F8
"J29"
J29
TB3
TB1
REAR VIEW OF FUSE PANEL
DEPICTING WIRE ROUTING
"J28"
J28
J25
J22
J20
J26
F7
"F7"
F6
"F6"
F5
"F5"
F4
"F4"
F3
"F3"
F2
"F2"
F1
"F1"
F9
CR1 CR2
CR3
CR4
CR5
CR6
CR7
CR8
CR9
CR12
C28
C27
C26
C25
C25
C24
C24
C23
C23
C22
C21
C20
5
6
7
8
8
8
9
9
9
10
C1
C2
C3
C8
"F8"
1
2
3
4
F8
CR10
GND
CR11
"F9"
F10
"F10"
F11
"F11"
F12
"F12"
F13
"F13"
F14
"F14"
SPLICE DETAILS
C5
STAGGER SPLICES IN SHIELDED CABLE
C1
C4
C13
SPL A
SPL B
C28
C27
C26
C25
C25
C24
C24
C23
C23
C22
C21
C20
C8
C3
C2
C1
10
9
9
9
8
8
8
7
6
5
PE
4
3
2
SPL C
1
F14
AUX103
AVR
TERMINAL STRIP DETAIL
SPL D
AUTO CAD
ALTERNATOR
C1
3
A
B
2
RECONNECT
TERMINAL BLOCK
A
1
U
V
MAG SWITCH
C2
PMG
B
(F1) X+
FIELD
WINDING
(F2) XX-
"FSO"
C4
STARTER
C
C
D
D
B
B
S TERM
"LCL1"
MOT
C
C
D
D
B
B
"LCL2"
C1
C1
C6
C1
C5
C3
B
LAMP
D
SENSE
"ALT"
B+
+
-
ENGINE
ALTERNATOR
BATTERY
C4
C13
C5
9 PIN SERVICE
C2
C1
C2
W
C
C1
N
"FSO #2"
AUTO CAD
CNP 22801
CNP 22692
C4
(F2) XX-
ALTERNATOR
UCI274
(F1) X+
ALT. GROUND BOLT
FIELD
WINDING
RECONNECT
TERMINAL BLOCK
L2(V)
B
B
LP SOLENOID
A
A
B
B
C7
L1(U)
C4
C
B
120 OHM
CT1 COM
CT2
CT2
X1
CT2 COM
CT3
CT3
X1
CT3 COM
J12
G
G
1
CT1
K
K
4
CT1 COM
H
H
2
CT2
L
L
5
CT2 COM
J
J
3
CT3
M
M
6
CT3 COM
D
1
L1
L2
C
C
2
L2
L3
B
B
3
L3
N
A
A
N
J17
E
F
2
E
1
PMG 2
PMG 3
F2 (10A)
N
O
Q
2
3
PMG
N
O
Q
F3 (10A)
PE
A
A
A
20
16
16
N
N
CAN HIGH
19
17
17
P
P
CAN LOW
J1939 CAN SHIELD
17
18
18
S
S
CAN SHIELD
KEYSWITCH LOW SIDE DRIVER
21
10
10
F
F
START COMMAND
9
9
A
A
KEYSWITCH
11
11
C
C
SECONDARY FUEL LOCKOFF GND
B
B
PRIMARY FUEL LOCKOFF GND
G
G
FAULT LAMP GND
H
H
FUEL SELECT (OPEN = NG / CLOSED = LP)
K
K
OPTIONAL SWITCH INPUT (GND TO RUN)
SPL B
KEYSWITCH
1
5
CR3
SPL C
CR1
3
KEYSWITCH RELAY COIL B+
4
CR3
22
FIELD -
3
J20
B+ INPUT (FUSED B+)
9
B+ INPUT (FUSED B+)
10
B+ INPUT (FUSED B+)
20
B+ INPUT (FUSED B+)
21
B+
B+
B+
4
4
T26
F1 (20A)
6
6
STARTER
1
5
CR1
FIELD +
STARTER RELAY DRIVER
SHUNT APPLICATION
C
B
15
J18
2
PMG 2
PMG 3
3
PMG 4
1
SWITCHED B+
1
5
CR2
SWITCHED B+ LOW SIDE DRIVER
3
RELAY COIL B+
13
CHASSIS GROUND
1
PE
BATT -
2
BATT -
4
BB-
BATT -
7
BATT -
12
SPL B
SPL C
-
F
C
B
120 OHM
CR2
D
FIELD -
C
B
C9
J1939 CAN LOW
J22
L1
FIELD +
C8
J1939 CAN HIGH
3
4
A
C2 ENGINE INTERFACE
C2 C1
SPL A
B
+
CT1
X1
J11
PCC1302 / PCC2300
C1 C1
CT1
C
B
C6
A
CNP 17995
C
A
BATTERY
L3(W)
A
C5
SPL A
N
NG SOLENOID
A
7
7
NOTE: IF USING A BATTERY CHARGER,
DC OUT WIRES SHALL BE CONNECTED
DIRECTLY TO THE BATTERY, OR STARTER,
AND NOT TO THE CONTROL PANEL.
(OPTIONAL)
C3
4
17
LOW GAS PRESSURE SWITCH
18
2
LCL INPUT
2
B+ SUPPLY
SPL D
TB1
3
3
4
4
BATT -
A
A
D
D
C
C
B
B
5
C10
OUTPUT 1-A
6
A
OUTPUT 1-B
7
OUTPUT 2-A
8
OUTPUT 2-B
9
REMOTE START RETURN
10
REMOTE START
11
INPUT #1
12
INPUT COMMON
13
INPUT #2
14
REMOTE E-STOP RETURN
15
REMOTE E-STOP
16
COOLANT
LEVEL
SENSOR
-
+
DC OUT
B+ OUTPUT (3A)
L N
AC IN
BATTERY CHARGER
A
LOW GAS
PRESSURE SWITCH
B
B
CR2
6
5
CNP 22725
C3
E-STOP
1
9
2
8
C3
J25
DISCRETE INPUT RETURN
6
9
LOCAL E-STOP
2
8
J1
J1
3
3
7
HMI 211
HMI B+
BATT -
12
1
8
7
2
IF PCC1302 OPTION SELECTED
4
AUTO COMMAND
11
6
MANUAL COMMAND
10
5
PCC NET SHIELD
9
5
10
PCC NET A
4
3
11
PCC NET B
3
4
12
SYSTEM WAKEUP
5
6
3
OR
ACC HARN 0338-4804
BARGRAPH
J2
J2
J6
J6
3
3
1
1
FUSED B+
2
2
GND
FUSED B+
4
5
5
GND
5
5
6
7
7
AUTO COMMAND
7
7
5
6
6
MANUAL COMMAND
6
6
J1
J1
11
1
1
PCC NET A
1
1
3
3
PCC NET A
12
2
2
PCC NET B
2
2
4
4
PCC NET B
3
4
4
SYSTEM WAKEUP
4
4
5
5
SYSTEM WAKEUP
10
AUDIBLE ALARM
1
2
IF PCC2300 OPTION SELECTED
1
2
CNP 22727
E-STOP
C3
1
9
2
8
SPL D
7
SPL E
4
CNP 22894
CNP 22895
CNP 22896
FAULT RELAY
13
21
31
41
A1
J14
J5
J6
2
J1
4
5
14
22
32
42
A2
J1
3
4
5
NOT IN AUTO RELAY
13
PCC NET B
2
SYSTEM WAKEUP
1
PCC NET A
J14
14
21
22
31
32
41
42
14
21
22
31
32
41
42
3
3
GND
4
AUTO COMMAND
6
6
MANUAL COMMAND
1
1
PCC NET A
2
2
PCC NET B
3
3
SYSTEM WAKEUP
J6
J6
1
1
FUSED B+
2
2
GND
J1
J1
3
3
PCC NET A
4
4
PCC NET B
5
5
SYSTEM WAKEUP
12
2
SPL A
SPL B
SPL C
BARGRAPH
A2
RUN RELAY
13
FUSED B+
4
1
A1
1
5
11
3
HMI 220
1
6
3
GND
AUX101 MODULE
1
J28 J28
J29 J29
10
FUSED B+
NOTE: IF USING SHUNT APPLICATION, USE
ALTERNATOR CENTER TAPS OR A
TRANSFORMER IF L-L VOLTAGE IS
> 240 VAC.
LOW COOLANT LEVEL SWITCH 1
A1
A2
AUDIBLE ALARM
AUX102 MODULE
NOTES: 1) ALL ITEMS IN DASHED LINES ARE OPTIONAL.
AUTO CAD
ALTERNATOR
2
RECONNECT
TERMINAL BLOCK
N
PMG
1
U
V
W
POWER AND SENSOR HARNESS
MAIN CONTROL PANEL
(SEE SHEET 2 FOR LAYOUT)
3
(F1) X+
FIELD
(F2) XX- WINDING
MAIN BREAKER
MCB_1
PCC1302
ALTERNATOR HARNESS
U U
C1 C6
CT1
CT1
X1
TO
V V
CUSTOMER
LOAD
CT1 COM
CT2
CT2
X1
W W
CT2 COM
CT3
CT3
X1
CT3 COM
J12
G
G
1
CT1
K
K
4
CT1 COM
H
H
2
CT2
L
L
5
CT2 COM
J
J
3
CT3
M
6
M
CT3 COM
J11
C1 C1
OIL PRESSURE SENDER +5V
1
23
23
B
OIL PRESSURE SENDER RETURN
2
12
12
A
OIL PRESSURE SENDER
3
13
13
C
MAGNETIC PICK UP SHIELD
8
14
14
MAGNETIC PICK UP SUPPLY
9
15
15
A
MAGNETIC PICK UP RETURN
10
16
16
B
OIL PRESSURE
SENSOR
PC TOOL
5
3
2
ENGINE SPEED
SENSOR
F-SERIES THROTTLE BODY
J22
L1
D
D
1
L1
L2
C
C
2
L2
L3
B
B
3
L3
N
A
A
4
N
FIELD -
F
E
F
2
E
1
P
PMG 2
PMG 3
P
O
O
N
N
Q
Q
J2
J2
FUSED B+
3
3
GND
5
5
2
-24VDC RETURN
3
RELAY AND FSO FUSED B+ THROUGH E-STOP
4
2
3
PMG 3
C2
J25
8
9
12
B+ FOR HMI
8
BATT -
6
DISCRETE INPUT RETURN
2
LOCAL E-STOP
6
PCC NET B
7
SYSTEM WAKEUP
8
HMI's B+ SUPPLY FROM PCC
PWM+
PWM-
1
FUSED B+
16
B-
PWM INVERTOR MODULE
5
PWM + (TO F-SERIES THROTTLE BODY)
4
PWM - (TO F-SERIES THROTTLE BODY)
3
GROUND
2
PWM - INPUT FROM PCC
1
B+
4
4
2
4
5
5
6
6
24
24
AUTO COMMAND
MANUAL COMMAND
B+ RETURN (B -)
9
PCC NET SHIELD
B+ RETURN (B -)
7
PCC NET A
1
1
4
PCC NET A
B+ RETURN (B -)
12
PCC NET B
2
2
3
PCC NET B
SYSTEM WAKEUP
4
4
5
SYSTEM WAKEUP
J6
J6
STARTER DISCONNECT INPUT
11
ALTERNATOR LAMP
22
B+ INPUT
21
5
6
7
B+
J1
J1
B+ INPUT
9
PCC NET A
3
3
B+ INPUT
10
PCC NET B
4
4
B+ INPUT
20
SYSTEM WAKEUP
5
5
FSO RELAY DRIVER
14
3
3
2
2
28
28
11
11
GND SPL
1A
STARTER RELAY LOW SIDE DRIVER
15
SWITCHED B+ LOW SIDE DRIVER
3
CONFIGURABLE INPUT 3
17
CONFIGURABLE INPUT 4
RELAY COIL B+ SUPPLY
+
BATT2 (12V)
-
+
BATT1 (12V)
B+ SPL
A
E-STOP
1B
B
1
1
7
7
C
8
8
D
18
9
9
B
13
29
29
30
30
FSO
LCL1
C
31
D
LCL2
B
A
S TERM
AFR
POWER
C
HMI's GND FROM PCC
B+
MAG SWITCH
B
AUX 101 INPUT 3-
10
AUX 101 INPUT 3+
11
OIL TEMPERATURE SENSOR RETURN
13
OIL TEMPERATURE SENSOR SUPPLY
BMOT
STARTER
PCC NET B
3
PCC NET A
J14
1
27
27
ALTERNATOR
SENSE
B
P11
SYSTEM WAKEUP
4
2
D
AUX 101
P1
5
12
ENGINE
ALTERNATOR
IGNITION
MODULE
-
31
9
AUX POWER OUT
10
1
11
PCC NET A
5
RUN INPUT
2
18
B+ RETURN (B -)
PCC NET SHIELD
4
5
22
CHASSIS GROUND
10
1
GND
22
10
7
2
RX
15
21
10
6
1
B
11
21
J20
6
2
18
COOLANT
TEMPERATURE
SENSOR
A
-
7
GND
17
2
AUTO COMMAND
FUSED B+
18
FIELD +
+24VDC SUPPLY
1
12
MANUAL COMMAND
HMI 114
17
TX
FIELD -
PMG 1
PMG 2
1
F8 (10A)
4
TERMINAL BLOCK, RELAY AND FUSE DESCRIPTIONS
GOVERNOR -
11
J18
F9 (10A)
PMG 1
HMI 211
COOLANT TEMP SENDER RETURN
J17
FIELD +
ALT. GROUND BOLT
COOLANT TEMP SENDER
3
C
INPUT 3-
5
20
20
INPUT 3+
6
19
19
INPUT 4-
7
26
26
A
INPUT 4+
8
25
25
B
OIL TEMPERATURE
SENSOR
J10
GND
GND
9
CS1
3
FUSED B+
CS2
4
GND
10
LEGEND
CR#
-
-
= RELAY COIL
REFERENCE: 1) SEE CPG DRAWING #0630-3440 FOR PCC SCHEMATICS AND INTERFACE
CR#
-
10
= RELAY CONTACT
= TERMINAL BLOCK
AUTO CAD
E-STOP
"E-STOP"
AUX101
PCC1302
J4
J17
J18
TB1
J3
J10
J22
C6
J2
"J1"
J1
"J6"
J6
P11
J14
P1
J12
J25
TB15
J20
"J2"
J11
J2
F14
12
11
9
10
8
7
6
5
4
3
3
2
2
2
13
CR3
13
12
11
10
9
8
7
6
5
"F13"
4
F13
CR1 CR2
C1
3
"F12"
3
F12
2
"F11"
2
F11
2
"F10"
1
F10
2
"F9"
2
F9
2
"F8"
1
F8
1
"F1"
2
F1
1
"F4"
1
F4
1
"F5"
1
F5
1
PWM
CONVERTOR
TERMINAL STRIP DETAIL
"F14"
AUTO CAD
POWER AND SENSOR HARNESS
J11
AUX105
C1 C1
OIL PRESSURE SENDER +5V
1
23
23
B
OIL PRESSURE SENDER RETURN
2
12
12
A
OIL PRESSURE SENDER
3
13
13
C
MAGNETIC PICK UP SHIELD
8
14
14
OIL PRESSURE
SENSOR
MAGNETIC PICK UP SUPPLY
9
15
15
A
MAGNETIC PICK UP RETURN
10
16
16
B
OIL TEMP SENDER
13
25
25
A
OIL TEMP SENDER RETURN
14
26
26
B
COOLANT TEMP SENDER
11
17
17
COOLANT TEMP SENDER RETURN
12
18
18
PC TOOL
5
2
3
ENGINE SPEED
SENSOR
F-SERIES THROTTLE BODY
OIL
TEMPERATURE
SENSOR
COOLANT
TEMPERATURE
SENSOR
A
B
2
N
U
V
W
19
19
5
RUN INPUT
16
20
20
2
AUX POWER OUT
GOVERNOR -
4
21
21
18
PWM+
22
22
10
PWM-
ECM FUSED B+
9
KEYSWITCH IN (WAKEUP)
11
BATTERY - IN
5
BATTERY - IN
6
PMG
BATTERY - IN
1
BATTERY + IN
10
PCCNET RS485 A
(F1) X+
FIELD
(F2) XX- WINDING
GND
15
MAIN CONTROL PANEL
(SEE SHEET 2 FOR LAYOUT)
1
RX
15
INTAKE MANIFOLD TEMP SENDER
ALTERNATOR
RECONNECT
TERMINAL BLOCK
TX
INTAKE MANIFOLD TEMP SENDER RETURN
J21
3
3
11
8
PCCNET RS485 B
12
PCCNET RS485 SHIELD
7
J1939 CAN (+)
2
J1939 CAN (-)
3
J1939 CAN (SHIELD)
4
1
16
C2
5
PWM + (TO F-SERIES THROTTLE BODY)
4
PWM - (TO F-SERIES THROTTLE BODY)
3
GROUND
2
PWM - INPUT FROM PCC
1
B+
FUSED B+
B-
MAIN BREAKER
MCB_1
ALTERNATOR HARNESS
U U
CT1
X1
TO
V V
CUSTOMER
LOAD
CT1 COM
CT2
CT2
X1
W W
CT2 COM
CT3
CT3
X1
J12
G
G
1
CT1
K
K
4
CT1 COM
H
H
2
CT2
L
L
5
CT2 COM
J
CT3 COM
M
J
M
3
CT3
6
CT3 COM
J22
L1
D
D
L2
C
L3
B
N
A
J1939 (+)
11
J1939 (-)
10
PCCNET A
12
PCCNET B
13
PCCNET SHIELD
4
KEYSWITCH LOW SIDE DRIVER
15
KEYSWITCH B+ OUT / B + OUT
18
B+ RETURN (B -)
8
1
L1
C
2
L2
B
3
L3
B+
A
4
N
-
J17
FIELD FIELD +
ALT. GROUND BOLT
J26
PCC3300
C1 C6
CT1
F
F
2
FIELD -
E
E
1
FIELD +
J18
F9 (10A)
PMG 1
PMG 2
PMG 3
P
P
O
O
N
N
Q
Q
10
10
CHASSIS GROUND
1
4
4
B+ RETURN (B -)
2
B+ RETURN (B -)
4
5
5
2
PMG 1
PMG 2
B+ RETURN (B -)
7
6
6
3
PMG 3
B+ RETURN (B -)
12
24
24
3
3
B+ INPUT
21
B+ INPUT
9
B+ INPUT
10
B+ INPUT
20
1
F8 (10A)
J20
IGNITION
MODULE
GND SPL
2
-
J25
J28 J28
HMI 320
FUSED B+
GND
1
3
8
1
12
9
3
J29 J29
AUTO COMMAND
4
4
MANUAL COMMAND
6
6
4
TERMINAL BLOCK, RELAY AND FUSE DESCRIPTIONS
1
+24VDC SUPPLY
2
-24VDC RETURN
PCC NET A
1
1
PCC NET B
2
2
SYSTEM WAKEUP
3
3
J6
HMI 114
1
1
GND
2
2
J1
RELAY AND FSO FUSED B+ THROUGH E-STOP
3
4
PCC NET SHIELD
5
PCC NET A
J6
FUSED B+
J1
PCC NET A
3
3
PCC NET B
4
4
SYSTEM WAKEUP
5
5
ENGINE
ALTERNATOR
8
BATT -
6
DISCRETE INPUT RETURN
2
LOCAL E-STOP
11
AUTO COMMAND
10
MANUAL COMMAND
9
5
6
7
B+ FOR HMI
FSO RELAY DRIVER
+
BATT2 (12V)
2
2
28
28
11
11
-
+
BATT1 (12V)
B+ SPL
14
A
B
STARTER RELAY LOW SIDE DRIVER
15
SWITCHED B+ LOW SIDE DRIVER
3
CONFIGURABLE INPUT 5
17
CONFIGURABLE INPUT 12
RELAY COIL B+ SUPPLY
1
1
7
7
C
8
8
D
19
9
9
B
13
29
29
30
30
FSO
PCC NET SHIELD
4
PCC NET A
3
PCC NET B
5
SYSTEM WAKEUP
LCL1
C
STARTER DISCONNECT INPUT
ALTERNATOR LAMP
D
11
22
31
31
C
27
27
LCL2
B
A
S TERM
AFR
POWER
B
B+
MAG SWITCH
STARTER
E-STOP
6
PCC NET B
7
SYSTEM WAKEUP
8
HMI's B+ SUPPLY FROM PCC
9
HMI's GND FROM PCC
1B
D
B
ALTERNATOR
SENSE
C
1A
LEGEND
CR#
-
-
= RELAY COIL
CR#
-
10
= RELAY CONTACT
= TERMINAL BLOCK
REFERENCE: 1) SEE CPG DRAWING #0630-3440 FOR PCC SCHEMATICS AND INTERFACE
AUTO CAD
BMOT
E-STOP
"E-STOP"
TB15
TB9
TB15
J14
J17
TB7
TB10
TB8
AUX105
PCC3300
CT1
J18
C6
CT2
"J1"
J1
TB5
CT3
"J6"
J6
J12
"J29"
TB3
J29
TB1
"J28"
J28
J25
J21
J22
J11
J20
J26
F14
9
8
7
6
"F13"
5
F13
9
8
7
6
5
4
3
3
2
2
CR3
C1
4
"F12"
CR1 CR2
3
F12
3
"F11"
2
F11
2
"F10"
1
F10
2
"F9"
2
F9
2
"F8"
2
F8
2
"F1"
1
F1
1
"F3"
2
F3
1
"F4"
1
F4
1
"F5"
1
F5
1
PWM
CONVERTOR
TERMINAL STRIP DETAIL
"F14"
AUTO CAD
Cummins NPower, LLC
1600 Buerkle Rd
White Bear Lake, MN 55110
Customer Assistance Center: 1 866 831 7620
www.cumminsnpower.com