1
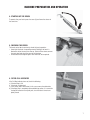
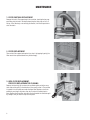
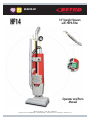
E88820-00
HF14
14” Upright Vacuum
with HEPA Filter
Operator and Parts
Manual
1001 Brown Avenue • Toledo, Ohio 43607-0127
Customer Service: 888-GO-BETCO • Fax: 800-445-5056 • Technical Service: 877-856-5954 • www.betco.com
1
TABLE OF CONTENTS
TECHNICAL INFORMATION ........................................... 3
GENERAL SAFETY INFORMATION ...........................4 - 5
MACHINE PREPARATION AND OPERATION ............6 - 7
MAINTENANCE .........................................................8 - 9
MACHINE DIAGRAM AND PARTS LISTING ..........10 - 13
WIRING DIAGRAM....................................................... 14
WARRANTY ................................................................. 16
2
TECHNICAL DESCRIPTION
Measurement Unit
HF14
Vacuum Motor Power
Watts
1000
Brush Motor Power
Watts
250
Dust Bag Capacity
Gallons
1.2
Working Surface
Inches
14
Weight
Lbs.
15
Noise Level
dB(A)
67
Volt / HZ
120 Volt / 60 HZ
Voltage
3
GENERAL SAFETY INFORMATION
PACKAGING
• The box and packaging materials have been designed to protect the appliance during shipping and are biodegradable and
recyclable. Please dispose of these items as you would any other product that can be recycled.
USED VACUUM CLEANER
• The symbols for the materials used to manufacture parts and accessories, and the recycle symbols, are located on the parts
themselves, where there is room to do so. Old vacuum cleaners may contain materials that can be re-used or recycled.
IMPORTANT SAFETY MEASURES
When using an electrical appliance, there are several basic precautions to be taken at all times, including:
• Always read all of the instructions for use before using the appliance.
• Always abide by these safety instructions.
• Never use the appliance on people or animals.
IMPORTANT: TO REDUCE THE RISK OF FIRE, ELECTRIC SHOCK OR INJURY:
• Check the voltage stated on the vacuum cleaner before connecting the power cable to the main power supply; the main voltage needs to be the same as the voltage stated on the appliance rating plate, which is located on the bottom of the vacuum
cleaner. If you are not sure of your power supply voltage, please check with a qualified electrician.
• A damaged vacuum cleaner can be dangerous. Check the packaging, the vacuum cleaner and the attachments for any signs
of damage. Never use a damaged appliance.
• Never leave the vacuum cleaner plugged into the main power. Unplug the cleaner when not in use or before carrying out any
cleaning or maintenance to the appliance itself.
• Only use the vacuum cleaner on dry surfaces; do not use it outdoors, on wet surfaces or to clean up any type of liquid. Do
not use this appliance to clean up liquids as this could reduce the electrical safety of the cleaner. This also applies in the case
of carpets that have just been washed: wait until they are dry.
• Do not allow the vacuum cleaner to be used as a toy. Take care if it is used by or near children.
• If the power cable rewind or the cable itself are damaged, they should be replaced only by an authorised after-sales assistance service. Never use the vacuum cleaner with a damaged cable or plug.
• If the appliance does not operate correctly or if it has been dropped or damaged, left outdoors or immersed in water, take it
to your retailer or to an after sales assistance service.
• For any repairs or to purchase parts or accessories, please contact your retailer or an authorised technical service centre. Do
not try to carry out repairs yourself.
• Do not pull or carry the vacuum cleaner by the cable; do not use the cable as a handle; do not close the cable in doors or
pull it across sharp edges or around corners. Never pass the appliance over the cable. Keep the cable well away from hot
surfaces.
• Do not unplug the appliance by pulling on the power cable: grip the plug and not the cable. Do not touch the cable or the
appliance with wet hands.
• Always keep hair, clothing, fingers and all other body parts well away from openings and moving parts.
• Set the switch to OFF after use.
• Take special care when cleaning stairs.
• When using this appliance with an accessory always remove the plug from the electric socket before attaching any rotating
brush. In any case, never touch the rotating brush while it is operating.
• Do not pass attachments over the appliance power cable or any extension lead.
• Do not clean up sharp objects.
• Always switch off the appliance before fitting or removing the hose.
• The poles in the plug and the contacts in the power socket must never come into contact with water. These parts can only be
wiped clean with a dry cloth and must not be allowed to come into contact with moisture. Danger of electric shock.
4
GENERAL SAFETY INFORMATION
• Only wipe the appliance clean with a dry (or very slightly damp) cloth while it is unplugged. Never place the appliance in
water.
• Never clean up anything that is burning or smoking, such as cigarettes, matches, hot ash, etc.
• Never place any items in the appliance openings. Never use the vacuum cleaner with openings blocked in any way; keep
them free from dust, dirt, hair and anything else that might reduce air flow.
• Do not clean up toner powder. The toner used in printers and copiers can conduct electricity.
• Do not use the vacuum cleaner without a dust bag and/or without the filters in place. Dust bags need to be disposed of and
can be used only once. Do not try to re-use them.
IMPORTANT: The manufacturer cannot accept any liability for damage to people or property caused by improper use,
maintenance carried out by persons without the proper authorisation, the use of non-original or unauthorised spare parts,
or any form of tampering with and/or changes made to the original product.
The manufacturer reserves the right to make changes to the appliance and/or accessories supplied without any prior
notice.
5
MACHINE PREPARATION AND OPERATION
1
1
Ergonomic handgrip
2
Power cable
3
Hose
4
Telescopic extension
5
Switch
6
Carrying handle
7
Cord Wrap Hooks
8
Hatch
9
Air vent
7
2
4
3
5
6
8
7
9
10 Motor housing
10
11 Electric brush
12 Base
11
2. CONNECTING THE HOSE
Insert the straight coupling into the dust bag container hole: insert the
angled coupling into the side slot of the motor housing.
3. TELESCOPIC EXTENSION OPERATION
Pull out the extension and lock it by turning the special collar in a counterclockwise direction.
6
12
MACHINE PREPARATION AND OPERATION
4. STARTING UP THE BRUSH
To operate: Use your foot to press the cover (A) and lower the cleaner at
the same time.
A
5. CHECKING THE BRUSH
The brush control device constantly checks the brush operation:
• Green light: the brush is operating correctly Red light: the brush is
blocked or subject to excessive stresses. Switch off the cleaner, remove
the mains plug and check the cause of the blockage.
• Simultaneous red and green lights: roller worn out: to be replaced.
6. FILTER-FULL INDICATOR
If the Full Bag Indicator turns red, check the following:
a) if the dust bag is full
b if the brush is obstructed
c) if the suction tube is obstructed; in this case, remove the obstruction
d) if the Hepa filter is completely obstructed during suction, it is normal for
the bag full indicator to turn partly red, since the tube is almost completely closed.
7
MAINTENANCE
1. FILTER DUST BAG REPLACEMENT
Remove the hatch. Place paper bag in the container, inserting the bag support fitting into the hole in the bag and pushing the safety ring as far as it
will go. If the filter bag is not correctly positioned, it will not be possible to
close the hatch.
2. FILTER REPLACEMENT
Take out the filter support and replace it or clean it by tapping it gently (the
filter needs to be replaced about every 20 dust bags).
3. HEPA FILTER REPLACEMENT;
PREFILTER REPLACEMENT OR CLEANING
Depress the black clip (A) to release the ventilation grille and at the same
time slide out the grille (in the direction of the arrow) to free it. The prefilter
is located in the air outlet area under the Hepa filter. Replace or clean the
prefilter by washing it with water, then dry it and put it carefully back in
place. Replace the Hepa filter when dirty and reassemble the ventilation grill
by sliding it until you hear the clip lock into place.
8
A
MAINTENANCE
4. REMOVING OBSTRUCTIONS FROM THE EXTERNAL HOSE
• Obstructions can be removed from the hose by sliding the hose out from
its seating and starting up the suction function but blocking it intermittently
with your hand.
• Do not insert any items to remove obstructions from the pipe.
5. REMOVING OBSTRUCTIONS FROM THE INTERNAL HOSE
•
•
•
•
Disconnect power.
Put the suction unit in a horizontal position in line with the electric brush.
Remove the screws from the base: remove the base.
Remove the obstruction from the hose with the aid of a flexible cleaning
swab.
ATTACHMENTS SUPPLIED
1 – Small brush
2 – Cervice nozzle
3 - Hose
4 – Extension
9
BASE SPARE PARTS DIAGRAM
10
BASE SPARE PARTS LISTING
Item # Part #
Description
Item # Part #
Description
1
E22020
Lower Base
14
E22061
Screw, M3 x 20, Phps Pan Head Tapping
2
E22060
Screw, M4.2 x 16, Zinc Phps
15
E22062
Screw, M3.5 x 16, Phps Pan Head Tapping
3
E88929
Roller Brush Assembly
16
E88931
Microswitch
4
E88928
Belt, Brush Drive
17
E22062
Screw, M3.5 x 16, Phps Pan Head Tapping
5
E22022
Upper Base
18
E22030
Clamp
6
E22023
Bumper
19
E88932
Circuit Board
7
E22024
Grommet
20
E88926
Motor, Brush Drive
8
E22025
Wire Harness
23
E22063
Screw, M3 x 26, Phps Pan Head Tapping
9
E88927
Wheel
24
E22064
Washer, 3.2 x 9 x 0.8 Steel
10
E88930
Axle, Plastic
25
E22031
Clamp
11
E22026
Cover, Upper Base
26
E22032
Pivot Joint, Handle
12
E22027
Wire Harness
27
E22033
Clip, Handle Lock
13
E22028
Cover, Microswitch
11
VACUUM BODY PARTS DIAGRAM
12
VACUUM BODY PARTS LISTING
Item# Part #
Description
Item# Part #
Description
1
E22034
Housing, Vac Motor
28
E88936
Prefilter, HEPA
2
E22065
Screw, M4 x 40, Phps Pan Head Tapping
29
E22045
Protection, HEPA Filter
3
E22035
Cover, Rear Vac Bag
30
E22067
Screw, M3.5 x 12, Phps Pan Head Tapping
4
E22036
Support, Vac Motor
31
E22061
Screw, M3 x 20, Phps Pan Head Tapping
5
E88933
Motor, Vacuum
32
E22068
Screw, M3 x 10, Phps Pan Head Tapping
6
E22037
Wiring, Vac Motor
33
E22046
Clamp
7
E22040
Gasket, Vac Motor
34
E22047
Condensor, Anti-Emission
7A
E22038
Ring, Vac Motor
35
E88945
Hook, Lower Cord Wrap
8
E22039
Spacer, Vac Motor
36
E22067
Screw, M3.5 x 12, Phps Pan Head Tapping
9
E22066
Screw, M3.5 x 22, Phps Pan Head Tapping
37
E22048
Wire Harness
10
E22041
Terminal, 2 Pole
38
E22049
Mount, Handle Base
11
E22042
Main Body
39
E22050
Cord Fastener
12
E88943
Filter, Secondary, Vac Motor
40
E22069
Screw, M4.2 x 9.5, Phps Pan Head Tapping
13
E22043
Case, Vac Motor Filter
41
E22051
Cover
14
E22067
Screw, M3.5 x 12, Phps Pan Head Tapping
42
E22052
Clip, Extension Wand
15
E88942
Filter, Vac Motor
43
E22067
Screw, M3.5 x 12, Phps Pan Head Tapping
17
E22067
Screw, M3.5 x 12, Phps Pan Head Tapping
44
E22053
Handle Assembly
18
E22068
Screw, M3 x 10, Phps Pan Head Tapping
45
E22070
Screw, M4 x 16, Phps Pan Head Tapping
19
E22061
Screw, M3 x 20, Phps Pan Head Tapping
46
E22054
Cord Guide
20
E22044
Indicator, Full Bag
47
E88946
Cord Wrap Assembly, Upper
21
E88772
Filter Bag, HF14 (Pack of 10)
48
E88944
Switch, On/Off
22
E88941
Hose, Vacuum
49
E22056
Cover, Switch
23
E88940
Wand, Telescoping
50
E88937
Power Cord
24
E88939
Dusting Tool
51
E22057
Hose Elbow
25
E88938
Crevice Tool
52
E22058
Spring, Bag Safety System
26
E88934
Filter, HEPA
53
E22059
Clip, Bag Safety System
27
E88935
Cover, HEPA Filter
13
WIRING DIAGRAM
CAUTION! Any job involving the electric equipment must be carried out by qualified personnel only.
14
15
BETCO US WARRANTY POLICY
10 year coverage
3 Year Coverage
1 Year Coverage
Subject to the conditions stated below,
Betco warrants parts and labor on
rotationally molded polyethylene tanks/
housings and injection molded vacuum
head assemblies to be free from defects
in materials and workmanship for
a period of ten years to the original
purchaser.
Subject to the conditions stated below,
Betco warrants parts and labor on all
other Betco components to be free from
defects in materials and workmanship
for a period of three years to the original purchaser.
Subject to the conditions stated below,
Betco offers a limited warranty on parts
and labor on the following equipment:
parts and accessories to be free from
defects in materials and workmanship
for a period of one year to the original
purchaser.
• HF14 Upright Vacuum: #E88820-00
• Bac Pac Lite Vacuum: #85903-00
• FiberPRO® Floor Dryer: #85507-00
• WORKMAN™ Series Vacuums:
#85024-00, #85025-00, #85026-00,
#85027-00
• CV100T Vacuum: #85023-00
• All Tools and Accessories
• All Battery Chargers
• All Batteries are pro-rated for 1 year
Allowable Travel Time Warranty Reimbursement:
Eligible equipment: All battery and propane powered equipment products. Warranty period: 90 days from date of sale to the
original purchaser. A maximum 60 mile round trip at 44 cents per mile will be allowed for warranty consideration.
Propane Machine Warranty:
Honda engines are warranted by Honda for a period of 2 years against manufacturer defects. Kawasaki engines are warranted
by Kawasaki for a period of 2 years against manufacturer defects. All other components (except wear items)* are warranted
by Betco for a period of 3 years.
*Wear Items exempt from Warranty consideration include but may not be limited to: power cords, transport wheels,
vacuum bags, belts, squeegee blades, pad drivers, clutch plates, handle grips, filters, screens, throttle cables, brushes
and carbon brushes.
Subject to the conditions and exceptions stated in this warranty, Betco warrants the Betco products to be free from defects in
material and workmanship, under normal use and service, for the periods listed under the warranty policy to the original purchaser. At any time during the warranty period, Betco will furnish replacement parts for the Betco parts to the original purchaser. Such parts will be furnished and charged including transportation costs, to the original owner through any Betco authorized
Service Distributor. If the original part is returned within the warranty policy period from date of delivery for inspection by
Betco and is found to be defective the owner will be credited for the cost of replacement parts plus shipping and handling.
Replacement parts that have become defective through wear or abuse are not included in this warranty.
This warranty does not apply to damage or defect caused by accident, misuse. Negligence, fire, or to any Betco product which
has been serviced or repaired by other than an authorized Betco Service Distributor or Betco factory personnel. This warranty
is void if products are used for any purpose other than that which was intended. There are no other warranties expressed or
implied. In no event shall Betco be liable for incidental or consequential damages or any damage to person or property. (Please
note some states do not allow the exclusion or limitations for incidental and consequential damages)
16
1001 Brown Avenue • Toledo, Ohio 43607-0127
Customer Service: 888-GO-BETCO • Fax: 800-445-5056 • Technical Service: 877-856-5954 • www.betco.com
E88820-00 Sept11B