1
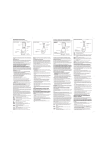
RACH
R ACH E L A L L E N
glass jug
BLENDER
Model No. RAGB1
Instructions and Guarantee
1
Important Safeguards
14 This product is intended for household use
only.
When using electrical appliances, basic
safety precautions should always be
followed, including the following:
15 Handle the sharp blades with care especially
during removing and emptying the container
and during cleaning.
16 Always operate the blender with the lid in
place.
For Your Safety
Compulsory Warning
When using electrical appliances, in order to
reduce the risk of fire, electric shock, and/or
injury to persons, basic safety precautions should
always be followed, including the following:
If the supply cord is damaged, the cord must be
replaced by the manufacturer, its service agent
or similarly qualified persons in order to avoid a
hazard.
1 Read all instructions carefully, even if you are
familiar with the appliance.
*To protect against the risk of electric shock
DO NOT IMMERSE the appliance, cord or
plug in water or other liquid.
This product has not been designed for any uses
other than those specified in this booklet.
2 To clean, wipe the exterior with a damp cloth.
3 Not to be used by children.
Save These Instructions
4 Close supervision is necessary when any
appliance is used by or near children. Never
leave an appliance unattended when in use.
For Household Use Only
5 Switch off and remove the plug from the power
outlet when not in use, before assembling or
disassembling parts and before cleaning. To
unplug, grasp plug and pull from power outlet
Never pull cord.
PLEASE NOTE: ALWAYS ENSURE THE
BLENDER IS SWITCHED OFF AND IS
DISCONNECTED FROM THE POWER
OUTLET BEFORE ASSEMBLING OR
DISASSEMBLING PARTS AND BEFORE
CLEANING
6 Do not operate any appliance with a
damaged cord or plug, or after the appliance
malfunctions or is dropped or damaged in
any manner. Return the complete appliance
to your nearest authorised service facility for
examination, electrical repair, mechanical
repair or adjustment.
7 The use of attachments or accessories not
recommended or sold by this appliance
manufacturer may result in fire, electric shock
or personal injury.
8 Do not overfill.
9 Do not allow the cord to hang over the edge of
a table, counter or to touch any hot surfaces.
10 Avoid touching hot surfaces, use handles and
knobs.
11 Do not operate or place any part of this
appliance on or near any hot surface (such as
a gas or electric burner) or in a heated oven.
12 Do not abuse the cord. Never carry the
appliance by the cord or yank it to disconnect
it from the outlet; instead, grasp the plug and
pull to disconnect.
13 When using the extension cord with your
appliance make sure the extension cord is
correctly wired and rated for its use.
2
Connection to the
Mains Supply
NOTE:-The ‘L’ or ‘N’ wire must NOT be
connected to the EARTH terminal marked ‘E’
or coloured GREEN or GREEN and YELLOW.
Check that the voltage marked on the product
corresponds with your supply voltage.
If in doubt consult a qualified electrician who
will be pleased to do this for you. This product
conforms to EC Directive 92/31/EEC with
respect to
Electromagnetic Compatibility.
This product is fitted with a 13A plug complying with
BS1363. If this plug is unsuitable or needs to be
replaced, please note the following:
NON-REWIREABLE MAINS PLUG
This product is double insulated and therefore does
not require an earth connection.
Important: The wires in the mains lead are coloured
in accordance with the following code:
BLUE – NEUTRAL
BROWN – LIVE
If your appliance is supplied with a
nonrewireable
plug fitted to the mains lead, you will find that it
incorporates a fuse, the value of which is
indicated either on the base of the plug or
on the fuse carrier. Should the fuse need
replacing, you must use an
ASTA approved one (conforming to BS1362) of
the same rating.
If the fuse cover is lost, the plug must not be
used until a replacement is obtained from an
electrical supplier.
If you need to remove the plug, cut it from
the mains lead and immediately dispose of it.
Never attempt to re-use this plug or insert it into
a socket outlet as there is a very great risk of
an electric shock.
This appliance is fitted with a plug which has a
13 amp fuse. Should the fuse fail, then it must be
replaced with an ASTA approved fuse (conforming to
BS1362) of the same rating. If you need to replace the
plug or if the plug is of the incorrect type for your
socket, remove it and replace it with an appropriate
plug. Dispose of the old plug safely.
Important: The wires in the mains lead are coloured
in accordance with the following code:
Blue=neutral, Brown=live
As the colours of the wires in the mains lead may not
correspond with the coloured markings in your plug,
proceed as follows:
Connect the BROWN wire to the terminal marked ‘L’
or coloured RED.
Connect the BLUE wire to the terminal marked
‘N’ or coloured BLACK.
3
PLEASE NOTE: ALWAYS ENSURE
THE BLENDER IS SWITCHED OFF
AND IS DISCONNECTED FROM
THE POWER OUTLET BEFORE
ASSEMBLING OR DISASSEMBLING
PARTS AND BEFORE CLEANING
Getting to Know Your
Jug Blender
1
1- Measuring cap
2- Jug lid
3- Glass jug
2
4- Rubber gasket
5- Blade assembly
6- Retainer ring
7- Main unit
8- Pulse button
9- On/Off and variable speed control knob
3
4
5
6
7
8
9
4
Important Information
Blender will:
1 Read all use instructions thoroughly before
using this product.
2 This appliance is designed for normal
household use only.
3 Keep this appliance out of the reach of children
4 Your voltage must correspond to the voltage
printed on the rating plate located on the
bottom of the main unit.
When connecting to an outlet, the motor must
always be turned off.
STIR
Frozen juices, whole eggs, instant
puddings, gelatins
BEAT
Thin batters and sauces
PUREE
Cooked fruits and vegetables for baby
foods, special diet foods.
CREAM
Smooth spreads and dips.
CHOP
Fresh fruits, vegetables, nuts, pickles,
hard-cooked eggs, cooked meats
MIX
Batters, fillings, sauces, dips and
gravies.
5 Blades are very sharp, handle carefully.
WHIP
Mixed drinks, whipped cream.
6 Before switching on, make sure the jug is in
place on the main unit with the lid on.
MINCE
Onions, garlic, vegetables, nuts and
cooked meat.
7 Do not use without any load in the jug ( e.g.
Solid or liquid ingredients ).
GRATE
Coconut, citrus peel, hard cheeses,
whole spices. Ice ( add liquid first ).
Add cubes one at a time.
SHRED
Coarsely chopped vegetables.
BLEND
Mayonnaise, hollandaise sauce and
salad dressings.
GRIND
Cheese, cooked meats, coffee, split
peas, bread, dry cereal, crackers,
cookies and nuts.
2 Position the rubber gasket onto the rim of the
blade.
CRUSH
Fitness drinks, smoothies, malts and
milk shakes.
3 Screw the jug securely into the retainer ring
LIQUIFY
Fruits and vegetables in liquid,
desserts and heavy batters.
Instructions For Use
Jug assembly
1 Carefully place the blade assembly in to the
retainer ring.
Attaching the jug
1
Make sure that the switch is in the “off”
position.
2
Place the jug on the main unit.
NOTE Due to varying amounts and the
consistency of some foods, a higher
or lower speed than suggested may
occasionally be preferred.
How to use
1
Put the food to be processed into the jug.
2
Place the lid firmly on the jug. Insert the
measuring cap into the lid opening and turn it
clockwise to lock.
3
Turn the main unit on .
PLEASE NOTE: ALWAYS ENSURE THE
BLENDER IS SWITCHED OFF AND IS
DISCONNECTED FROM THE POWER
OUTLET BEFORE ASSEMBLING OR
DISASSEMBLING PARTS AND BEFORE
CLEANING
DO NOT USE THE BLENDER CONTINUOUSLY
FOR MORE THAN 20 SECONDS AT A TIME.
AFTER 20 SECONDS ALLOW THE BLENDER
MOTOR TO COOL DOWN TO ROOM
TEMPERATURE BEFORE OPERATING AGAIN
Speed Applications
1-7
light applications with liquid ingredients.
8-15
for thicker consistency - mixing both liquids
and solid ingredients.
Pulse instant power bursts
After use, always turn the switch to the “off”
position and unplug the main unit.
To remove the jug, lift it straight up; there is no
need to twist it.
5
Cleaning
Main Unit
Do not immerse the main unit in water. Wipe
clean with a damp cloth only.
Easy cleaning / rinsing of assembled jug
After emptying the jug, fill it with water. Place it on
the main unit and press the pulse button. Empty
the jug and rinse clean.
Thoroughly cleaning the disassembled jug
Make sure the jug is empty before you unscrew
the fastener ring. Exercise caution when handling
the blade.
Service
This product is manufactured to the highest
standards, for more information or if you have a
query with the product which is not covered in this
manual, please contact our Customer Support
Team on the telephone number or the email
address below.
Customer Helpline: 0844 800 7850
Email Address: [email protected]
Disposal of the Product
Please do not dispose of this product as
household waste. The appliance should be taken
to the applicable collection point for the recycling
of electrical and electronic equipment.
For more detailed information, please contact your
local council, household waste disposal service or
the shop where you purchased the product.
WEEE Registration Number: WEE/FC0057TS
6
Warranty
DO NOT SEND IN THIS WARRANTY
Fill out the following details and file with your
purchase invoice.
This guarantee does not confer any rights other
than those expressly set out below and does
not cover any claims for consequential loss or
damage.
RETAIN & FILE WITH YOUR RECEIPT.
Your Purchase Receipt/Invoice is proof of date
of purchase. You must be able to present it at
the place of purchase to obtain a replacement or
service under warranty.
This guarantee is offered as an additional benefit
and does not affect your statutory rights as a
consumer.
This guarantee is valid in the UK and Ireland only.
Premium Appliance Brands Ltd reserves the right
to discontinue items, modify designs and change
specifications without incurring obligation. Whilst
every effort is made to ensure that descriptions,
specifications and other information in this
publication is correct, no warranty is given in
respect thereof and the company shall not be
liable for any errors therein.
Premium Appliance Brands Ltd warrant this
product for a period of 1 year from the date of
purchase for all parts defective in workmanship or
materials.
The product or defective parts will be replaced
free of charge.
Purchased from:
WARRANTY CONDITIONS
1.
This warranty is only valid for appliances
used according to the manufacturer’s
instructions.
2.
This appliance must not be modified or
changed in any way.
3.
Connection must be to the voltage
requirements as specified in the ratings label
located on the product.
4.
The manufacturer does not accept liability
for any direct or consequential damage,
loss or other expense arising from misuse
or incorrect installation and operation of the
appliance.
5.
Warranty will only be given where proof of
purchase is provided, e.g. original invoice.
6.
Not designed or warranted for industrial or
commercial use.
Date of Purchase:
NOTE: Consistent with our continuing
product development policy,
improvements may have been made
which render the contents of this
package slightly different to that shown.
Cranage House, 730 Mandarin Court, Centre Park,
Warrington WA1 1GG
United Kingdom
Premium Appliance Brands has a policy of continual improvement throughout the
product range.
As such the unit contained within may differ slightly from the unit illustrated on
the Pack.
MADE IN CHINA for Premium Appliance Brands Limited
Premium Appliance Brands Ltd. are an authorised licensee of the Rachel Allen
Brand. Rachel Allen is represented by Limelight Management.
www.pabl.co.uk
7
RECIPES
Freshly Squeezed Juices
It’s Sunday and you have time to indulge, so go ahead and treat yourself to freshly squeezed
juice. These are zingy breakfast juices, but if you’re having guests for brunch, try the raspberry
and orange juice mixed with champagne, cava, prosecco or sparkling wine.
Each makes 4 glasses
Vegetarian
Cranberry and apple juice
Cranberry and apple juice
75g (3oz) raw cranberries
8 apples, cut into quarters
Raspberry and orange juice
Juice of 6 oranges
125g (41/2 oz) raspberries
For a great punchy juice, run the cranberries
through the juicer followed by the apples, or
liquidise in the blender and push through a
sieve. Serve immediately.
Place the orange juice and raspberries in the
blender and whiz, then push through a sieve.
Serve immediately.
Peach and raspberry juice
Apple, banana and
strawberry smoothie
8 peaches
125g (41/2 oz) raspberries
6 apples, cut into quarters
2 bananas
225g (8oz) strawberries
Stone the peaches and run through a juicer
with the raspberries, or liquidise in the
blender jar and push through a sieve. Serve
immediately.
Juice the apples, then put the juice, banana
and strawberries in a blender and whiz. Or,
peel and core the apples and liquidise in the
blender with the other ingredients and push
through a sieve. Serve immediately.
Mango and apple juice
1 mango, peeled and
stone removed
8 apples, cut into quarters
Melon and strawberry juice
Place the mango flesh in a juicer followed
by the apples and whiz, or liquidise in the
blender and push through a sieve. Serve
immediately.
1 charentais, ogen, galia, canteloupe, watermelon
or honeydew melon, skin removed and flesh
chopped
225g (8oz) strawberries
Blackberry and apple juice
Place the chopped melon and strawberries in
a juicer and whiz in the blender, or liquidise
in the blender and push through a sieve.
Serve immediately.
125g (41/2 oz) blackberries
8 apples, cut into quarters
Whiz the blackberries followed by the apples
in a juicer, or liquidise in the blender and
push through a sieve. Serve immediately.
8
RECIPES
Fresh Fruit Sorbets
If you fancy a frozen dessert but don’t want the heaviness of ice cream, sorbets are just the ticket.
These ones are real crowd-pleasers and are perfect as an afternoon treat on a hot summer’s day.
Each serves 4
Vegetarian
Pear sorbet
Raspberry and Blueberry
sorbet
3 small or 2 medium pears, peeled, cored and
quartered
125g (41/2 oz) raspberries (can be frozen)
125g (41/2 oz) blueberries (can be frozen)
Juice of 1 large lemon
60ml (2fl oz) stock syrup (see handy tip)
Juice of 2 large or 3 small lemons
75g (3oz) caster sugar
150ml (1/4 pint) water
Liquidise all the ingredients in the blender and
push through a sieve to strain. Freeze. (see To
freeze).
Place the pears in a small saucepan with the juice
of half a lemon and the sugar and water. Cook
on a medium heat until the pears are just soft,
about 10 minutes. Remove the pears and boil the
cooking liquid until it’s slightly thick and syrupy.
Allow to cool then liquidise it with the pears and
the rest of the lemon juice and sieve. Taste and
adjust juice if necessary. Then follow the freezing
method below.
To freeze
Pop the liquid sorbet into a medium-sized bowl,
cover and place in the freezer. After about 2
hours, remove the bowl and whisk the sorbet to
break up the ice crystals. Repeat 2 hours later,
adding one slightly whisked egg white. If you have
a sorbetière, use this instead as it is much simpler.
Follow the manufacturer’s instructions.
Melon and lime sorbet
1/
2
ripe melon, such as Ogen or Charentais
(about 400g/14oz)
Juice of 1 large or 2 small limes
30ml (1fl oz) stock syrup (see handy tip)
Rachel’s handy tip
Stock syrup is a useful mixture to have at hand
for such things as cocktails and poaching fruit,
as well as for making sorbet. Store it in a jar
or bottle with a lid in a cool place and it keeps
indefinitely.
To make 150ml (1/4 pint), place 200g (7oz)
caster sugar and 200ml (7fl oz) water in a
saucepan and bring slowly to the boil, stirring to
dissolve the sugar. Then boil for 2 minutes and
leave to cool.
Liquidise all the ingredients in the blender and
push through a sieve to strain. Freeze (see To
freeze).
9
Notes
10
All recipes are taken from
Rachel’s Food for Living (£20) and
Rachel’s Favourite Food at Home
(Paperback £14.99)
by Rachel Allen
(published by Collins)
For more delicious recipes from Rachel Allen
you can save 25% off both of these books.
SPECIAL OFFER
To save 25% and order your copy of Rachel’s Food at Home or
Rachel’s Food for Living please call
HarperCollins Hotline on: 0870 787 1732
and quote Dept 276X.
Or write to
Mail Order Dept 276X,
HarperCollins Publishers,
Westerhill Road, Bishopsbriggs,
Glasgow G64 2QT
enclosing a cheque made payable to HarperCollins Publishers.
Free P & P for all UK orders. Please allow 21 days for delivery.
Offer ends March 2009 or whilst stocks last.
11
My new range of small domestic appliances has been
designed to help make life easier for you in the kitchen.
HAND MIXER
FOOD
OOD
D CHO
CHOPPER
OPPER
HAND BLENDER
BREAD MAKER
STAND
STAN
ND MIXER
SLOW COOKER
WHOLE FRUIT JUICER
PROCESSOR
FOOD PR
ROCESSOR
GLASS
S JUG BLENDER
12