1
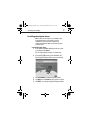
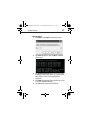
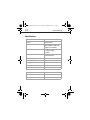
DX-PCIGB English.fm Page 1 Thursday, September 24, 2009 9:07 AM
Gigabit PCI Adapter
DX-PCIGB
USER GUIDE
DX-PCIGB English.fm Page 2 Thursday, September 24, 2009 9:07 AM
2
Gigabit PCI Adapter
Contents
Introduction .............................................................2
Features ....................................................................3
Important safety instructions ...................................4
Package contents ......................................................5
Installing the adapter ...............................................5
Troubleshooting .......................................................8
Legal notices ...........................................................13
One-year limited warranty .....................................15
Introduction
The DX-PCIGB is the easiest way to upgrade your computer’s network
speed to 2 Gigabits per second (Gbps) in full-duplex transfer mode. It also
supports 10 Mbps/100 Mbps in both half-duplex and full-duplex transfer
modes, using auto-negotiation technology to automatically detect the
network speed. It can be used with most operating systems, supports
Quality of Service (QoS) on high-speed local area networks, and supports
a boot ROM socket for use with diskless workstations, providing network
security and easy management.
DX-PCIGB English.fm Page 3 Thursday, September 24, 2009 9:07 AM
3
Features
Features
• Integrated Ethernet MAC (physical chip and transceiver in
one chip)
• PCI local bus single-chip Ethernet controller
• Two large independent receive and transmit FIFOs
• One STP/UTP connector
• LEDs to indicate network link, activity, and speed
• Supports:
• Windows 7/Vista/XP/2000, Mac OS X 10.4 or higher
• Wake on LAN
• Full duplex flow control (IEEE 802.3x)
• IEEE 802.1P Quality of Service (QoS)
• IEEE 802.1Q TAG virtual local area network (VLAN)
• Jumbo frame
• ACPI and PCI power management
• Auto-negotiation feature that auto-detects network
speed
• Smart remote boot ROM (requires additional boot
ROM IC)
• Complies with:
• IEEE802.1P
• IEEE802.1Q
• IEEE802.3 10Base-T
• IEEE802.3u 100Base-TX
• IEEE802.3ab 1000Base-T
• PCI revision 2.1/2.2/2.3
DX-PCIGB English.fm Page 4 Thursday, September 24, 2009 9:07 AM
4
Important safety instructions
Important safety instructions
Before getting started, read these instructions and save them for later
reference.
• Before you install your Gigabit PCI adapter into your
computer, read this user guide. In some operating systems,
the driver must be installed before you install your adapter.
• Do not drop or hit your adapter.
• Do not install your adapter in a location that is subject to
strong vibrations, because vibration may damage your
adapter.
• Do not disassemble or try to modify your adapter.
Disassembly or modification may void your warranty and
could damage your adapter could cause a fire or electric
shock.
• Do not store your adapter in a damp location. Do not allow
moisture or liquids to drip into your adapter. Liquids can
damage your adapter leading to a fire or electric shock.
• Do not insert metal objects, such as coins or paper clips,
into your adapter.
• Your adapter is for general computer use. Do not use your
adapter in a computer that requires exceptional reliability,
especially if a breakdown or malfunction of your adapter
might jeopardize life or health, such as aerospace
equipment, atomic power control systems, traffic-related
equipment, transportation equipment, industrial robotics,
combustion equipment, safety devices, and life-support
systems.
DX-PCIGB English.fm Page 5 Thursday, September 24, 2009 9:07 AM
Package contents
5
Package contents
Make sure that the package contains the following items:
• DX-PCIGB gigabit PCI adapter
• CD containing drivers and manuals
• Low-profile bracket
• This User Guide
Installing the adapter
Caution: Opening your computer’s case may void your computer’s
warranty. Contact your computer’s manufacturer before opening
the case to make sure that you do not void the warranty. You may
need to have the adapter installed by your computer’s
manufacturer or an authorized computer technician.
Caution: Before touching any electronic components, make sure
that you first touch an unpainted, grounded metal object to
discharge any static electricity stored on your clothing or body.
To install your adapter:
1 Turn off your computer and unplug the power cord and all
cables.
2 Remove your computer’s case cover. See your computer’s
user guide for information about removing the cover.
3 Locate an available PCI slot. PCI slots are usually white.
4 Remove the screw that secures the backplate (the small
piece of metal that covers the opening for PCI card on the
back panel of your computer), then remove the backplate.
5 If the bracket on the DX-PCIGB is too tall to fit your
computer’s case, remove the bracket and replace it with the
included low-profile bracket.
DX-PCIGB English.fm Page 6 Thursday, September 24, 2009 9:07 AM
6
Installing the adapter
6 Carefully insert the adapter into the PCI slot. Do not touch
the metal connector on the adapter.
7 Secure the adapter to the case using the screw you
removed from the backplate.
8 Reinstall your computer’s case cover.
9 Plug in the power cord and other cables, then turn on your
computer.
DX-PCIGB English.fm Page 7 Thursday, September 24, 2009 9:07 AM
Installing the adapter
7
Installing the adapter driver
Note: For Mac OS X 10.4 or higher users, your adapter is Plug
& Play capable in Mac OS X 10.4 or higher, so no driver
installation is needed. For Windows 7, Windows Vista,
Windows XP, and WIndows 2000 users: Follow the steps below
to install the driver.
To install the adapter driver:
1 If the Found New Hardware Wizard opens when you start
your computer, click Cancel.
Note: This may not appear on Windows 7 or Windows Vista.
2 Insert the DX-PCIGB CD into your CD or DVD drive. The
Dynex Gigabit PCI Adapter window opens automatically.
3 Click Install Driver to start the installation wizard.
4 Click Next, then click Finish when the wizard is complete.
5 Click EXIT to close the Dynex Gigabit PCI Adapter window.
DX-PCIGB English.fm Page 8 Thursday, September 24, 2009 9:07 AM
8
Troubleshooting
Using Wake-On-LAN
Your DX-PCIGB features Wake On LAN (WOL).This feature lets a remote
station "wake" your computer when it is in Standby or Hibernate mode.
Note: The WOL function is system dependent. In addition to the
following instructions, you may need to download WOL software
from Intel or another manufacturer's Web site. See your computer's
user guide for specific BIOS settings.
Troubleshooting
If you are having problems with your network, check the following topics.
Verify adapter installation
If your adapter is not installed correctly, including the network system
software or device drivers, your network will not function correctly.
To verify that your adapter is correctly installed:
1 Click Start, then right-click My Computer and click
Properties. The System Properties window opens.
2 Click the Hardware tab, then click Device Manager. The
Device Manager window opens.
DX-PCIGB English.fm Page 9 Thursday, September 24, 2009 9:07 AM
Troubleshooting
9
3 Double-click Network adapters to display the list of
network adapters. You see Dynex Gigabit PCI Adapter.
You should see a yellow exclamation point or red "X" over
the icon adjacent to Dynex Gigabit PCI Adapter, your
adapter is not installed correctly or may have a problem.
Double-click Dynex Gigabit PCI Adapter to read the
explanation of the problem. This information will be
helpful if you need to contact a Dynex technical support.
Verify cable connections
To verify cable connections:
1 Make sure that the computer(s) you are troubleshooting
are connected correctly.
2 Each network adapter must be connected to the network
with Category 5 UTP (unshielded twisted pair) cables.
3 Examine the network cables and make sure that they have
not been damaged.
4 Make sure that no electromagnetic interference, like
unshielded speakers or appliances on the same circuit, is
affecting your network.
5 If you are using a hub, router, or switch, make sure that
your network cables are not plugged into a dedicated
Uplink port. The Uplink port is only used when connecting
your hub to another hub or switch.
DX-PCIGB English.fm Page 10 Thursday, September 24, 2009 9:07 AM
10
Troubleshooting
Understanding indicators
Your adapter has two indicators or lights labeled 100M and 1000M on its
back plate. They can give you information about your network traffic and
help you determine problems when troubleshooting.
• A steady green light of 100M indicates a good connection
at 100 Mbps.
• A flashing green light of 100M indicates that the network
adapter is sending or receiving data at 100 Mbps.
• A steady green light of 1000M indicates a good connection
at 1000 Mbps.
• A flashing green light of 1000M indicates that the network
adapter is sending or receiving data at 1000 Mbps.
Pinging your adapter
PING (Packet Internet Groper), is a utility to determine if a specific
IP address is accessible. It works by sending a packet to the
specified address and waiting for a reply. Ping is primarily used to
troubleshoot Internet connections. By sending out a PING, you are
verifying that a specific computer is available. Because all
computers on the network must have a unique IP address, a reply
means that a computer is on the network and that it can
communicate.
If the computers can communicate, the hardware and cabling are
probably installed correctly. If you cannot ping another computer,
there is probably a problem with the hardware. Check the cabling
and adapter installation. If you are unable to access the network,
even when you receive a reply to your ping, there is probably a
software configuration issue. Verify that all the settings are correct.
DX-PCIGB English.fm Page 11 Thursday, September 24, 2009 9:07 AM
Troubleshooting
11
To ping the adapter:
1 Click Start, then click Run. The Run dialog box opens.
2 Type cmd in the Open box, then click OK. The command
window opens.
3 Type ping xxx.xxx.xxx.xxx (where xxx.xxx.xxx.xxx is the
IP address you want to ping). In this case, computer B with
the IP address=192.168.1.1 is being pinged from
computer A.
4 Press Enter to begin pinging. If the connection is good, you
receive four “Reply from” messages.
5 Type exit at the prompt to return to Windows.
DX-PCIGB English.fm Page 12 Thursday, September 24, 2009 9:07 AM
12
Troubleshooting
Specifications
Normal
Interface
32-bit PCI interface
Standards
IEEE802.1P, IEEE802.1Q, IEEE802.3
10Base-T, IEEE802.3u 100Base-TX,
and IEEE802.3ab 1000Base-T
Transmission rate
• 10 Mbps or 20 Mbps
• 100 Mbps or 200 Mbps
• 2000 Mbps
Hardware
IBM PC-compatible
(it must have PCI slot)
Connector supported
RJ45
IRQ line
Assigned by system
Topology
Star
I/O Address
Assigned by system
Safety and emission
FCC
Environmental and Physical
Operating temp
32°F~104°F (0°C~40°C)
Humidity
10% - 90%, non-condensing
DX-PCIGB English.fm Page 13 Thursday, September 24, 2009 9:07 AM
Legal notices
13
Legal notices
FCC Part 15
This device complies with Part 15 of the FCC Rules. Operation of this
product is subject to the following two conditions: (1) this device may not
cause harmful interference, and (2) this device must accept any
interference received, including interference that may cause undesired
operation.
This equipment has been tested and found to comply within the limits for
a class B digital device, pursuant to Part 15 of the FCC Rules. These limits
are designed to provide reasonable protection against harmful
interference in a residential installation. This equipment generates, uses,
and can radiate radio frequency energy and, if not installed and used in
accordance with the instructions, may cause harmful interference to radio
communications. However, there is no guarantee that interference will
not occur in a particular installation. If this equipment does cause
harmful interference to radio or television reception, which can be
determined by turning the equipment off and on, the user is encouraged
to try to correct the interference by one or more of the following
measures:
• Reorient or relocate the receiving antenna.
• Increase the separation between the equipment and
receiver.
• Connect the equipment into an outlet on a circuit different
from that to which the receiver is connected.
• Consult the dealer or an experienced technician for help.
Canada ICES-003 statement
This Class B digital apparatus complies with Canadian ICES-003.
DX-PCIGB English.fm Page 14 Thursday, September 24, 2009 9:07 AM
14
Legal notices
DX-PCIGB English.fm Page 15 Thursday, September 24, 2009 9:07 AM
Legal notices
15
One-year limited warranty
Dynex Products (“Dynex”) warrants to you, the original purchaser of this
new DX-PCIGB (“Product”), that the Product shall be free of defects in
the original manufacture of the material or workmanship for a period of
one (1) year from the date of your purchase of the Product (“Warranty
Period”). This Product must be purchased from an authorized dealer of
Dynex brand Products and packaged with this warranty statement. This
warranty does not cover refurbished product. If you notify Dynex during
the Warranty Period of a defect covered by this warranty that requires
service, terms of this warranty apply.
How long does the coverage last?
The Warranty Period lasts for one year (365 days) from the date you
purchased the Product. The purchase date is printed on the receipt you
received with the Product.
What does this warranty cover?
During the Warranty Period, if the original manufacture of the material or
workmanship of the Product is determined to be defective by an
authorized Dynex repair center or store personnel, Dynex will (at its sole
option): (1) repair the Product with new or rebuilt parts; or (2) replace the
Product at no charge with new or rebuilt comparable products or parts.
Products and parts replaced under this warranty become the property of
Dynex and are not returned to you. If service of products and parts are
required after the Warranty Period expires, you must pay all labor and
parts charges. This warranty lasts as long as you own your Dynex Product
during the Warranty Period. Warranty coverage terminates if you sell or
otherwise transfer the Product.
DX-PCIGB English.fm Page 16 Thursday, September 24, 2009 9:07 AM
16
Legal notices
How to obtain warranty service?
If you purchased the Product at a retail store location, take your original
receipt and the Product to the store you purchased it from. Make sure that
you place the Product in its original packaging or packaging that provides
the same amount of protection as the original packaging. If you
purchased the Product from an online web site, mail your original receipt
and the Product to the address listed on the web site. Make sure that you
put the Product in its original packaging or packaging that provides the
same amount of protection as the original packaging.
To obtain in-home warranty service for a television with a screen 25
inches or larger, call 1-888-BESTBUY. Call agents will diagnose and
correct the issue over the phone or will have an Dynex-approved repair
person dispatched to your home.
Where is the warranty valid?
This warranty is valid only to the original purchaser of the Product in the
United States, Canada, and Mexico.
What does the warranty not cover?
This warranty does not cover:
• Customer instruction
• Installation
• Set up adjustments
• Cosmetic damage
• Damage due to acts of God, such as lightning strikes
• Accident
• Misuse
• Abuse
• Negligence
• Commercial use
• Modification of any part of the Product
• Plasma display panel damaged by static (non-moving) images
applied for lengthy periods (burn-in).
This warranty also does not cover:
• Damage due to incorrect operation or maintenance
DX-PCIGB English.fm Page 17 Thursday, September 24, 2009 9:07 AM
Legal notices
17
• Connection to an incorrect voltage supply
• Attempted repair by anyone other than a facility authorized by Dynex
to service the Product
• Products sold as is or with all faults
• Consumables, such as fuses or batteries
• Products where the factory applied serial number has been altered or
removed
REPAIR REPLACEMENT AS PROVIDED UNDER THIS WARRANTY IS YOUR
EXCLUSIVE REMEDY. DYNEX SHALL NOT BE LIABLE FOR ANY INCIDENTAL OR
CONSEQUENTIAL DAMAGES FOR THE BREACH OF ANY EXPRESS OR IMPLIED
WARRANTY ON THIS PRODUCT, INCLUDING, BUT NOT LIMITED TO, LOST
DATA, LOSS OF USE OF YOUR PRODUCT, LOST BUSINESS OR LOST PROFITS.
DYNEX PRODUCTS MAKES NO OTHER EXPRESS WARRANTIES WITH RESPECT
TO THE PRODUCT, ALL EXPRESS AND IMPLIED WARRANTIES FOR THE
PRODUCT, INCLUDING, BUT NOT LIMITED TO, ANY IMPLIED WARRANTIES OF
AND CONDITIONS OF MERCHANTABILITY AND FITNESS FOR A PARTICULAR
PURPOSE, ARE LIMITED IN DURATION TO THE WARRANTY PERIOD SET
FORTH ABOVE AND NO WARRANTIES, WHETHER EXPRESS OR IMPLIED,
WILL APPLY AFTER THE WARRANTY PERIOD. SOME STATES, PROVINCES
AND JURISDICTIONS DO NOT ALLOW LIMITATIONS ON HOW LONG AN
IMPLIED WARRANTY LASTS, SO THE ABOVE LIMITATION MAY NOT APPLY TO
YOU. THIS WARRANTY GIVES YOU SPECIFIC LEGAL RIGHTS, AND YOU MAY
ALSO HAVE OTHER RIGHTS, WHICH VARY FROM STATE TO STATE OR
PROVINCE TO PROVINCE.
Contact Dynex:
For customer service please call 1-800-305-2204
www.dynexproducts.com
Distributed by Best Buy Purchasing, LLC
7601 Penn Avenue South, Richfield, Minnesota, U.S.A. 55423-3645
© 2009 Best Buy Enterprise Services, Inc.
All rights reserved. DYNEX is a trademark of Best Buy Enterprise Services, Inc.
Registered in some countries. All other products and brand names are trademarks
of their respective owners.
DX-PCIGB English.fm Page 18 Thursday, September 24, 2009 9:07 AM
18
Legal notices
DX-PCIGB English.fm Page 19 Thursday, September 24, 2009 9:07 AM
Legal notices
19
DX-PCIGB English.fm Page 20 Thursday, September 24, 2009 9:07 AM
www.dynexproducts.com (800) 305-2204
Distributed by Best Buy Purchasing, LLC
7601 Penn Ave. South, Richfield, MN 55423 U.S.A.
© 2009 Best Buy Enterprise Services, Inc. All rights reserved.
DYNEX is a trademark of Best Buy Enterprise Services, Inc. Registered in
some countries. All other products and brand names are trademarks of their
respective owners.
ENGLISH
09-0762