1
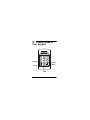
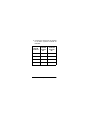
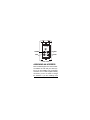
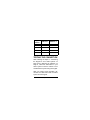
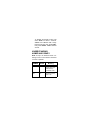
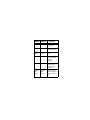
Please read before using this equipment. Owner’s Manual Extra Keypad for Alarm System Contents Features .............................................. 4 Read This First ................................. 5 A Quick Look at Your Keypad ........... 8 Preparation ......................................... 9 Connecting the Keypad to Your Alarm System ................................... 9 Assigning an Address .................... 11 Testing the Connection .................. 13 Installing the Keypad ...................... 14 Operation .......................................... 16 Setting the Security Code .............. 16 Arming/Disarming the Alarm .......... 18 Using Annunciate Mode ................. 19 Understanding ARMED and READY ........................................... 20 © 2000 RadioShack Corporation. All Rights Reserved. RadioShack and RadioShack.com are trademarks used by RadioShack Corporation. 2 Contents Triggering a Panic Alarm ............... 22 Testing the System ........................ 23 Troubleshooting ............................... 24 Care ................................................... 24 Specifications .................................. 26 Contents 3 Features Your RadioShack Digital Keypad is a high quality, UL-listed security keypad that connects to the following RadioShack security systems. • 4–16 Zone Security System — Cat. No. 49-459 • 2-Zone Security System — Cat. No. 49-454 You can mount the keypad almost anywhere in your home, providing additional remote locations for disarming and arming the system and for programming access code numbers. This keypad’s features include: Armed and Ready Indicators — show the alarm system’s status. 4 Features Panic Circuit — lets you quickly trigger the alarm from the keypad. Supervised Keypad Circuit — communicates with the main panel and sounds an alarm if someone tries to remove the keypad. Selectable Keypad Address — lets you add up to 3 additional keypads for extra convenience. This product is UL listed under Standard Number 1023, “Household Burglar-Alarm System Units.” Use only with UL-listed security devices. READ THIS FIRST Properly connecting and installing the keypad requires careful planning before you begin. Read this entire manual and plan your installation before continuing. Features 5 This manual includes instructions for use with both the 49-454 and 49-459 RadioShack security systems. Check your security system’s owner’s manual for specific instructions on how to use this keypad with each particular system. Here are some important points to consider when planning your installation: • Where will you mount the keypad? The keypad is designed only for indoor installation. It should be readily accessible to those who will use it, but should not be easily seen by an intruder and should be mounted away from dust, dirt, and temperature or humidity extremes. • What other hardware and tools do you need? You should mount the keypad in a standard single-gang 6 Features electrical box (the kind used for single wall switches and AC outlets). Once you install this box, you will need four-conductor cable and a screwdriver to connect the keypad to your alarm system. Note: You can mount the keypad directly on wood or plasterboard walls without an electrical box. However, the electrical box gives added stability and protects the keypad from tampering. Features 7 A Quick Look at Your Keypad CANCEL ENTER ANNC SET UP ARM 8 A Quick Look at Your Keypad Preparation This section gives basic guidelines for connecting the wires from your alarm system to the keypad and for assigning an address to the keypad. CONNECTING THE KEYPAD TO YOUR ALARM SYSTEM 1. Route four-conductor cable (not supplied, available at your local RadioShack store) from the alarm system to the location where you will install the keypad. 2. Secure the wires to the keypad by stripping about 1/2 inch of insulation from the end of each wire, loosening the terminal screw, placing the bare end of the wire under the terminal clamp, and tightening the screw. Preparation 9 3. Connect the wires from the keypad to the alarm system’s terminals as indicated: Keypad Terminal To 49-459 Terminal No. To 49-454 Terminal No. POWER 41 9 GND 44 7 DATA1 43 10 DATA2 42 8 10 Preparation POWER DATA1 GND DATA2 ASSIGNING AN ADDRESS Each installed keypad must have a different address to work with your alarm system. If you are installing only one keypad, and there are no other keypads already connected, you do not need to change the address. If you are installing more Preparation 11 than one keypad, or there is already a keypad installed, follow these steps to change the keypad address. 1. If there are other keypads installed (including the keypad supplied with the system), remove the installed keypads and note the position of the two DIP switches on their back panels. DIP Switches 2. Use a sharp object (such as the tip of a pen) to set the DIP switches on each new keypad so no two keypads have the same setting. There are four possible settings for each keypad, as shown in the following chart. 12 Preparation Keypad Number Address 1 Address 2 1 Off Off 2 On Off 3 Off On 4 On On TESTING THE CONNECTION After following the steps in “Connecting the Keypad to Your Alarm System” on Page 9 and “Assigning an Address” on Page 11, follow the instructions in your alarm system’s owner’s manual to arm and disarm the system using the keypad. After you confirm proper operation, disconnect the cable from both the alarm system and the keypad. Preparation 13 INSTALLING THE KEYPAD Note: Install the keypad indoors away from dust, dirt, and temperature or humidity extremes. 1. Select a location on the wall that is not directly over a wall stud. An electronic wall stud finder is available at your local RadioShack store. 2. Using a single-gang electrical box as a template, cut a hole in the wall the same size as the box. 3. Route connection wires from the alarm system to the hole (through the attic, walls, and so on) and through the knock-out plug in the electrical box. Leave at least 6 inches of extra wire for connection to the keypad. 14 Preparation 4. Insert the box into the hole and nail it to the wall stud or use metal strips designed for mounting an electrical box in wallboard. The box should be recessed slightly behind the surface of the wall. 5. Connect the wires to the keypad and the alarm system terminals according to the chart in “Connecting the Keypad to Your Alarm System” on Page 9. 6. Press the button on the bottom of the keypad, then remove the keypad’s front cover. 7. Secure the keypad to the box using the supplied screws. Then replace the keypad’s front cover. Preparation 15 Operation SETTING THE SECURITY CODE The 49-454 or 49-459 security system lets you store one security code. 1. If the alarm system is armed, disarm it by entering the current four-digit personal security code. (If this is the first time you have turned on the system, the security code is the system’s default code.) ARMED on the keypad turns off. 2. Hold down SETUP for 2 seconds. Both ARMED and READY flash slowly. 3. Enter the current security code. Both ARMED and READY flash rapidly. 16 Operation 4. Enter a new security code. Both ARMED and READY turn off. 5. Enter the new security code again to confirm. If you entered the correct code, READY flashes three times and the system returns to standby mode. If you entered the wrong code, ARMED flashes three times and the system returns to standby mode. Start again from Step 1. Notes: • If you take longer than 30 seconds to complete Step 3, 4, or 5, the keypad automatically resets to the old code. Begin again from Step 2. • If other keypads are installed, the alarm system does not respond to Operation 17 any keys from those keypads for 10 seconds after the last keypress on the new keypad. • While entering the security code, if you enter an incorrect digit before entering the last digit, press CANCEL to cancel the previous entries, then enter the security code again. ARMING/DISARMING THE ALARM To arm the system, enter the security code then press ARM. Or, press ARM twice. ARMED lights. To disarm the system, enter the security code. ARMED turns off. Note: If you enter the wrong security code three times in a row, the alarm system locks out all keypads for about 5 minutes. 18 Operation USING ANNUNCIATE MODE Annunciate mode lets you set the alarm system so it sounds a brief pre-alarm if it detects any change in the assigned zone. 1. If the system is disarmed and no zone is violated, hold down SETUP for about 2 seconds. ARMED and READY flash slowly. 2. Enter the current security code within 30 seconds. ARMED and READY flash rapidly. 3. Press ANNC (annunciate) once. ARMED and READY turn off. 4. To enable annunciate mode, press ENTER. READY flashes 3 times. If the alarm system detects any change in the assigned zone, it sounds a brief pre-alarm. Operation 19 To disable annunciate mode, hold down SETUP for about 2 seconds. ARMED and READY flash slowly. Enter the security code, press ANNC, then press CANCEL. READY flashes 3 times. UNDERSTANDING ARMED AND READY Note: A loop is an electrical circuit consisting of one or more sensors connected in series or parallel. ARMED READY Off Off 1. System is disarmed, loop is violated (broken). 2. SETUP mode. On On System is armed, loop is OK. 20 Meaning Operation ARMED READY Meaning On Flashing Exit or entry delay is counting. Off On System is disarmed, loop is OK. Flashing slowly Flashing slowly System is in setup mode. Flashing Off Loop is violated in armed mode and the alarm sounded. Flashing On Loop is violated in armed mode or the panic alarm sounded. Flashing alternately Flashing alternately Communication between the alarm and keypad is broken. Operation 21 Note: If the alarm sounded while you were away, ARMED flashes. Enter the security code then press CANCEL to stop the flashing. See your security system’s owner’s manual for further information. TRIGGERING A PANIC ALARM You can trigger a panic alarm at any time by pressing ENTER and CANCEL at the same time. The system does not have to be armed to sound the panic alarm. TESTING THE SYSTEM Check the system once a week to be sure it is operating properly. Refer to the main control unit’s operating instructions for proper test procedures. 22 Operation Important: To prevent false alarms when testing your system, be sure to disconnect security dialers or any other devices that send a message to a remote location. Because the alarm system sounds during these tests, be sure to notify your neighbors and any proper authorities of the test. Operation 23 Troubleshooting If your keypad does not arm or disarm your system, be sure that all connections are correct. Additionally, the security code might have reset to the factory default if the security system loses AC power. Try the default security code. If you cannot remember the code, refer to your security system’s owner’s manual for instructions on how to reset the factory default code. Care Keep the keypad dry; if it gets wet, wipe it dry immediately. Use and store the keypad only in normal temperature environments. Handle the keypad carefully; do 24 Troubleshooting not drop it. Keep the keypad away from dust and dirt, and wipe it with a damp cloth occasionally to keep it looking new. Modifying or tampering with the keypad’s internal components can cause a malfunction and might invalidate its warranty. If your keypad is not performing as it should, take it to your local RadioShack store for assistance. Care 25 Specifications Operating Voltage..........................10–18 VDC Current Draw ......15 mA @ 12 VDC (no LEDs) 25 mA @ 12 VDC (one LED) Operating Range ........................... 32 to 122°F (0 to 50°C) Storage Temp........................... –40 to 149°F (–40° to 65°C) Dimensions ........... 19/20 × 219/20 × 41/2 inches (37 × 72 × 115 mm) Weight ................................................... 105 g (3.7 oz.) Specifications are typical; individual units might vary. Specifications are subject to change and improvement without notice. 26 Specifications Limited Ninety-Day Warranty This product is warranted by RadioShack against manufacturing defects in material and workmanship under normal use for ninety (90) days from the date of purchase from RadioShack company-owned stores and authorized RadioShack franchisees and dealers. EXCEPT AS PROVIDED HEREIN, RadioShack MAKES NO EXPRESS WARRANTIES AND ANY IMPLIED WARRANTIES, INCLUDING THOSE OF MERCHANTABILITY AND FITNESS FOR A PARTICULAR PURPOSE, ARE LIMITED IN DURATION TO THE DURATION OF THE WRITTEN LIMITED WARRANTIES CONTAINED HEREIN. EXCEPT AS PROVIDED HEREIN, RadioShack SHALL HAVE NO LIABILITY OR RESPONSIBILITY TO CUSTOMER OR ANY OTHER PERSON OR ENTITY WITH RESPECT TO ANY LIABILITY, LOSS OR DAMAGE CAUSED DIRECTLY OR INDIRECTLY BY USE OR PERFORMANCE OF THE PRODUCT OR ARISING OUT OF ANY BREACH OF THIS WARRANTY, INCLUDING, BUT NOT LIMITED TO, ANY DAMAGES RESULTING FROM INCONVENIENCE, LOSS OF TIME, DATA, PROPERTY, REVENUE, OR PROFIT OR ANY INDIRECT, SPECIAL, INCIDENTAL, OR CONSEQUENTIAL DAMAGES, EVEN IF RadioShack HAS BEEN ADVISED OF THE POSSIBILITY OF SUCH DAMAGES. Some states do not allow limitations on how long an implied warranty lasts or the exclusion or limitation of incidental or consequential damages, so the above limitations or exclusions may not apply to you. In the event of a product defect during the warranty period, take the product and the RadioShack sales receipt as proof of purchase date to any RadioShack store. RadioShack will, at its option, unless otherwise provided by law: (a) correct the defect by product repair without charge for parts and labor; (b) replace the product with one of the same or similar (continued) Specifications 27 (continued) design; or (c) refund the purchase price. All replaced parts and products, and products on which a refund is made, become the property of RadioShack. New or reconditioned parts and products may be used in the performance of warranty service. Repaired or replaced parts and products are warranted for the remainder of the original warranty period. You will be charged for repair or replacement of the product made after the expiration of the warranty period. This warranty does not cover: (a) damage or failure caused by or attributable to acts of God, abuse, accident, misuse, improper or abnormal usage, failure to follow instructions, improper installation or maintenance, alteration, lightning or other incidence of excess voltage or current; (b) any repairs other than those provided by a RadioShack Authorized Service Facility; (c) consumables such as fuses or batteries; (d) cosmetic damage; (e) transportation, shipping or insurance costs; or (f) costs of product removal, installation, set-up service adjustment or reinstallation. This warranty gives you specific legal rights, and you may also have other rights which vary from state to state. RadioShack Customer Relations, 200 Taylor Street, 6th Floor, Fort Worth, TX 76102 We Service What We Sell RadioShack Corporation Fort Worth, Texas 76102 12/99 49-462 AO0038AAA1 10A00 Printed in China