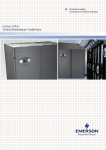
1
Marathon Electric offers a full line of motors for the pool, spa and bath
markets. For quick installation, long life and easy serviceability, poolside
contractors prefer our pool and spa motors.
Marathon designs motors for a variety of pool and spa applications:
above-ground pool, in-ground pool, commercial pool, variable-speed,
heat pumps and all other standard applications.
Our variable speed products consume up to 64% fewer watts than standard PSC
induction motors. This not only saves the Earth's precious resources, but also
saves the consumer hundreds of dollars per year in energy costs.
Why Choose Us?
Our fast response to customer questions, unmatched engineering expertise
and the delivery speed that comes with maintaining a large inventory makes
Marathon Electric ideally suited to meeting our customers' needs. In addition
Marathon's focus on innovation keeps our customers on the leading edge of
technology.
100 East Randolph St.
Wausau, WI 54402
800-683-9144
imPower™ Installation Guide
© Copyright 2010
Regal Beloit Corporation
The information in this document is subject to change without notice.
Rev 1.0 05/10
2
Marathon Electric is a Regal Beloit Company.
www.imPowerDealer.com
Table of Contents
Safety Considerations 4
Introduction
5
Removing the Existing Motor from Pump
6
Single Speed Connection with Timer
7
Two Speed Connections with Timer 9
Automation Controller Signal Line Connection 11
Changing Default Low Speed 14
imPower Motor Connection Diagramm
15
Please read the entire instruction manual before
starting the installation.
www.imPowerDealer.com
3
The following definitions are used as safety considerations on the
Evergreen IM motor and in this manual. Please read and observe all
of these safety concerns.
Safety Considerations
SAFETY
The
followingConsiderations
definitions are used as safety considerations on the
Safety
SYMBOLS
Evergreen IM motor and in this manual. Please read and observe all
of these safety concerns.
The following
definitions are used as safety considerations on the
Safety
Considerations
Evergreen IM
andofinthis
thismotor
manual.
Please
read and observe
Installation
andmotor
service
should
be attempted
only by all
SAFETY
The
following
definitions
are used as safety considerations on the imPower pool
of these
safety
concerns.
trained
service
technicians
familiar with the Evergreen instructions
filter
pump motor. Please read and observe all of these safety concerns.
SYMBOLS
and training manual.
SAFETY
Please
abide by all health and safety regulations governing pools by the state
SafetyConsiderations
Considerations
Safety
This
motor should be installed in accordance with accepted practices
SYMBOLS
and
local departments governing pool health and safety.
Installation
and instructions,
service of thisand
motor
should be attempted
only byand
and
installation
in compliance
with all national
trained
service
technicians
familiar
with
the
Evergreen
instructions
local
codes. areare
The
following
definitions
used
safety
considerations
he
following
definitions
used
as as
safety
considerations
on on
thethe
training
manual.
Evergreen
IM
motor
and
in
this
manual.
Please
read
and
observe
vergreen
IMand
motor
and
in
this
manual.
Please
read
and
observe
all all only by
Installation and service of this motor should be attempted
these
safety
concerns.
f of
these
safety
concerns.
trained
service
technicians
familiar
with
the
Evergreen
instructions
SAFETY
SYMBOLS
This motor
should be installed in accordance with accepted practices
and training manual.
and installation instructions, and in compliance with all national and
SAFETY local codes.
AFETY
SYMBOLS This motor should be installed in accordance with accepted practices
YMBOLS
and installation instructions, and in compliance with all national and
local codes.
Installation
and
service
this
motor
should
attempted
only
nstallation
and
service
of of
this
motor
should
be be
attempted
only
by by
trained
service
technicians
familiar
with
Evergreen
instructions
ained
service
technicians
familiar
with
thethe
Evergreen
instructions
and
training
manual.
nd
training
manual.
Ground
the motor in accordance with local and national electrical codes.
Disconnect main power and wait 30 seconds prior to servicing motor. Topside
This
motor
should
installed
in
accordance
with
accepted
practices
his
motor
should
be be
installed
in
accordance
with
accepted
practices
interface
enclosure
must
be securely
fastened
for safe
operation.
and
installation
instructions,
and
compliance
with
national
and
nd
installation
instructions,
and
in in
compliance
with
all all
national
and
local
codes.
cal
codes.
Motor not intended for disassembly. Attempting to do so may result in pinching
injury from strong rotor magnets.
Keep fingers and objects away from openings and rotating parts.
-1-
REG7232_EvergreenIM_Reprint.indd 1
4/28/10 2:05:19 PM
-1-
4
www.imPowerDealer.com
REG7232_EvergreenIM_Reprint.indd 1
REG7232_EvergreenIM_Reprint.indd 1
-1-
4/28/10 2:05:19 PM
4/28/10 2:05:19 PM
Introduction
The imPower motor is a permanent magnet alternating current (PMAC)
electronically commutated motor (ECM), leveraging over 20 years of ECM
technical and manufacturing experience. The motor can save up to 85% of
electrical consumption due to this innovative motor design. This imPower motor
is designed to replace existing fulll-rated pool filter pump motors rated at 3/4 HP
1.65 SF or up-rated motor at 1.0HP 1.25 SF.
This motor also features three selectable speeds either through the use of the
patent pending auto speed switch feature, top panel push buttons, external
multi-speed timers, or through external automation controls.
RB003
Model Number 5SME29DFT001
Voltage208-230V (±10%)
FlangeSquare
HP1.0
Service Factor1.25
High Speed3450 RPM
Medium Speed2600 RPM
Low Speed 1725 RPM
Weight11 lbs
RB053
Model Number 5SME29DFT002
Voltage208-230V (±10%)
FlangeRound/C-Face
HP 1.0
Service Factor 1.0
High Speed3450 RPM
Medium Speed2600 RPM
Low Speed1725 RPM
Weight11 lbs
The installation manual enables a technician, certified by their local/state agency/
board, to install, service, repair, and maintain the imPower motor.
www.imPowerDealer.com
5
Installation and service of this motor should be attempted only by
trained service technicians familiar with the Evergreen instructions
and training manual.
This motor should be installed in accordance with accepted practices
and installation instructions, and in compliance with all national and
local codes.
Remove
the Existing Motor from Pump
When servicing the pool pump filter motor, always disconnect the main
power from the unit. It is also good practice to confirm that the power is
off with a meter.
Step 1: Loosen and remove the scews holding the seal plate to the pump
housing. Pull the seal plate/motor assembly from the pump housing.
Step 2: Remove the screws holding the diffuser to the seal plate and remove it.
Step 3: After confirming that the power has been shut off, remove the electrical
connections from the existing motor. Remove the conduit and connector from
the motor. Note: the conduit and connector will be re-used.
Step 4: To remove the impellor, lock the shaft by placing a wrench or a flathead
screwdriver at the opening in the rear. Note: Do not reuse the seal from the
existing motor when installing the imPower motor. Remove the screw holding
the seal plate onto the motor.
Step 5: Remove the pump motor by removing the four bolts holding the motor
to the seal plate of the pump. Also remove the stationary portion of the seal from
the seal plate.
-1-
REG7232_EvergreenIM_Reprint.indd 1
6
www.imPowerDealer.com
4/28/10 2:05:19 PM
Installation and service of this motor should be attempted only by
trained service technicians familiar with the Evergreen instructions
and training manual.
This motor should be installed in accordance with accepted practices
and installation instructions, and in compliance with all national and
local codes.
Single Speed Connection with Timer
When servicing the pool pump filter motor, always disconnect the main
power from the unit. It is also good practice to confirm that the power is
off with a meter.
These steps as outlined below are for connection of the imPower motor to a
single speed timer.
Step 1: Remove the three screws holding the top control enclosure onto the
motor. Carefully lift the top panel and turn it over to expose the inside of the
terminal box.
Step 2: Run the L1, L2, and GROUND wires from the conduit cable through the
½-14 NPSM threaded opening on the right side of the motor (shaft facing away
from you).
Step 3: Connect the L1 to the opening directly across from the ORANGE wire on
the terminal block.
Step 4: Connect the L2 to the opening directly across from the WHITE wire on
the terminal block.
Step 5: Connect the GROUND to the opening directly across from the
GREEN/YELLOW wire on the terminal block.
Step 6: Screw in the conduit connector into the terminal box on the right side of
the terminal box (shaft facing away from- 1you).
Step 7: Carefully fold the extra wires inside the terminal box and place the top
4/28/10
control panel back on top of the terminal box.
REG7232_EvergreenIM_Reprint.indd 1
Step 8: Tighten the three screws into the terminal box while applying light
pressure to the top control enclosure.
Step 9: Replace and tighten the screws to mount the seal plate onto the motor.
Step 10: Put a NEW pump seal into the seal plate and onto the motor shaft.
Handle and lubricate seal per manufacturer’s specifications.
www.imPowerDealer.com
7
2:05:19 PM
Step 11: Replace the impellor. Make sure that the impellor can spin freely in the
housing.
Step 12. Replace the diffuser.
Step 13: Replace and tighten the bolts that retain the motor/seal plate assembly
to the pump.
Step 14: Prime the pump.
Step 15: Reapply power to the motor.
Note that with this type of connection, the motor will operate on the high speed
for 2 hours, and then the motor will automatically switch to the low speed. Note,
in the installation manual, there is a section that will show you how to change the
default low speed setting.
The total timer on time should be selected so that the pool can meet the total
number of turns as required by local/state regulations.
The user can also override the operational speed currently running via the
buttons on the top control panel. The override will continue until the motor is
powered off by the single speed timer. A new speed can also be selected while in
override mode.
8
www.imPowerDealer.com
Installation and service of this motor should be attempted only by
trained service technicians familiar with the Evergreen instructions
and training manual.
This motor should be installed in accordance with accepted practices
and installation instructions, and in compliance with all national and
local Speed
codes. Connections with Timer
Two
When servicing the pool pump filter motor, always disconnect the main
power from the unit. It is also good practice to confirm that the power is off
with a meter.
If you had a single speed motor prior to this installation, you will need to run new
conduit with 4 wires (High Speed, Low Speed, Neutral, and Ground) to properly
operate with the two speed timer.
Step 1: Remove the three screws holding the top control enclosure onto the
motor. Carefully lift the top panel and turn it over to expose the inside of the
terminal box.
Step 2: Run the HIGH Speed, LOW Speed, L2, and GROUND wires from the
conduit cable through the open on the right side of the motor (shaft facing
away from you).
Step 3: Connect the wire for the HIGH Speed from the timer to the opening
directly across from the BLACK wire on the terminal block.
Step 4: Connect the wire for the LOW Speed from the timer to the opening
directly across from the RED wire on the terminal block.
Step 5: Connect the L2 to the opening directly across from the WHITE wire
on the terminal block.
Step 6: Connect the GROUND to the opening
directly across from the
-1GREEN/YELLOW wire on the terminal block.
REG7232_EvergreenIM_Reprint.indd 1
4/28/10
Step 7: Screw in the conduit connector into the terminal box on the right side
of
the terminal box (shaft facing away from you).
Step 8: Carefully fold the extra wires inside the terminal box and place the
top control panel back on top of the terminal box.
Step 9: Tighten the three screws into the terminal box while applying light
pressure to the top control enclosure.
www.imPowerDealer.com
9
2:05:19 PM
Step 10: Replace and tighten the screws to mount the seal plate onto the motor.
Step 11: Put a NEW pump seal into the seal plate and onto the motor shaft.
Handle and lubricate seal per manufacturer’s specifications
Step 12: Replace the impellor. Make sure that the impellor can spin freely in
the housing.
Step 13: Replace the diffuser.
Step 14: Replace and tighten the bolts that retain the motor/seal plate assembly
to the pump.
Step 15: Prime the pump.
Step 16: Reapply power to the motor.
This connection allows the high speed and low speed to be operated at any duration set by the multi-speed timer. At no point will the motor automatically do
down to the default low speed. The timer should be set so that the pool can meet
the total number of turns as required by local/state regulations.
The user can also override the operational speed currently being set by the multispeed timer via the buttons on the top control panel. The override will continue
until the motor is either powered off by the multi-speed timer or a new speed
is requested by the multi-speed timer. At anytime, another speed can also be
selected via the top side control panel buttons.
10
www.imPowerDealer.com
Installation and service of this motor should be attempted only by
trained service technicians familiar with the Evergreen instructions
and training manual.
This motor should be installed in accordance with accepted practices
and installation instructions, and in compliance with all national and
Automation
local codes. Controller Signal Line Connection
When servicing the pool pump filter motor, always disconnect the main
power from the unit. It is also good practice to confirm that the power is off
with a meter.
These steps as outlined below are for connection of the imPower motor to an
automation controller. You will need the optional low voltage cable connection
kit P/N 391-200-01 (15' cord) or P/N 391-200-02 (25' cord).
Step 1: Remove the three screws holding the top control enclosure onto the
terminal box. Carefully lift the top panel and turn it over to expose the inside of
the terminal box.
Step 2: Run the L1, L2, and GROUND wires from the conduit cable through the
open on the right side of the motor (shaft facing away from you).
Step 3: Connect L1 from the automation controller to the opening directly across
from the BLACK wire on the terminal block.
Step 4: Connect the L2 to the opening directly across from the WHITE wire on
the terminal block.
Step 5: Connect the GROUND to the opening directly across from the
GREEN/YELLOW wire on the terminal block.
Step 6: Screw in the conduit connector into the terminal box on the right side of
the terminal box (shaft facing away from- 1you).
Step 7: On the rear of the terminal box, remove the small black plug.
REG7232_EvergreenIM_Reprint.indd 1
4/28/10 2:05:19 PM
Step 8: Plug the connector end of the low voltage cable (P/N 391-200-01 or
P/N 391-200-02) into the connector on the underside of the top control panel.
Step 9: Screw in the low voltage conduit onto the rear of the terminal box.
Run the low voltage cable to the automation control box.
www.imPowerDealer.com
11
Step 10: Carefully fold the extra wires inside the terminal box and place the top
control panel back on top of the terminal box.
Step 11: The connection of the low voltage wires should be to the HOT Side (red
and black wire on the top side of the relay). Depending on the manufacturer
of the automation controller, you may need to remove the cover plate on these
relays to gain access to the terminals.
Step 12: Wire the low voltage wires for the following speeds to be controlled:
High Speed
BLACK (+)
WHITE (-)
Medium Speed
BROWN (+)
BLUE (-)
Low Speed
RED (+)
GREEN (-)
Step 13: Tighten three screws holding down the top control panel.
Step 14: Replace and tighten the screws to mount the seal plate onto the motor.
Step 15: Put a NEW pump seal into the seal plate and onto the motor shaft.
Handle and lubricate seal per manufacturer’s specifications.
Step 16: Replace the impellor. Make sure that the impellor can spin freely
in the housing.
Step 17: Replace the diffuser.
Step 18: Replace and tighten the bolts that mounts the motor/seal plate to
the pump.
Step 19: Prime the pump.
Step 20: Reapply power to the motor.
The automation controller allows for all three speeds to be selected and operated
at any length of time. Note that the currently selected and operating speed must
be turned OFF prior to the selection of a new speed. The on time and speeds
should be set so that the pool can meet the total number of turns as required by
local/state regulations.
12
www.imPowerDealer.com
The user can also override the operational speed currently being set by the
automation controller via the buttons on the top control panel. The override will
continue until the motor is either powered off by the automation controller or a
new speed is requested by the automation controller. At anytime, another speed
can also be selected via the top side control panel buttons.
www.imPowerDealer.com
13
Changing Default Low Speed
The default low speed can be selected to operate at the medium speed. Please
follow all local/state regulations regarding pool motor and timer speed settings.
Step 1: Turn the motor on. Please ensure that the motor is mated to a pump as
well as having the pump primed. For a multi-speed timer, please ensure that the
HIGH speed is being commanded.
Step 2: After allowing the motor to come to full speed, press and hold the high
and medium buttons simultaneously for five seconds. This button selection
should be completed within the first two minutes of operation.
The low speed LED will blink for three seconds, followed by 15 blinks of the
medium speed LED. The low speed LED blinks for three seconds to identify that
the motor is ready for a modification of the default speed, whereas the 15 blinks of
the medium speed LED indicates that the default speed has successfully changed
to medium speed.
For a single speed timer, the motor will then return to high speed for the duration
of the initial two hour high speed operational period, converting the changed
default speed after the two hour period.
For a multi-speed timer, the motor will then return to the high speed. The
medium speed will then be the second speed selection.
Note: To revert back to low speed default, simply repeat steps 1-4.
14
www.imPowerDealer.com
imPower Motor Connection Diagram
Accessories:
Description
15 ft Low Voltage Cable
25 ft Low Voltage Cable
P/N
391-200-01
391-200-02
www.imPowerDealer.com
15
Need Additional imPower Help?
Contractor Hotline:
800-683-9144
imPower Website:
www.imPowerDealer.com