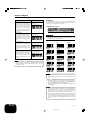
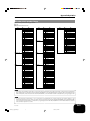
Download Casio AL-100R User`s guide

Transcript
ES
USER’S GUIDE
GUÍA DEL USUARIO
Please keep all information for future reference.
Guarde toda información para tener como referencia futura.
Safety Precautions
Before trying to use the digital piano, be
sure to read the separate “Safety
Precautions”.
Precauciones de seguridad
Antes de intentar usar el piano digital,
asegúrese de leer las “Precauciones de
seguridad” separadas.
AP80R-ES-1
AP80R_es_cover.p65
1
04.8.26, 3:44 PM
TO REDUCE THE RISK OF FIRE OR ELECTRIC SHOCK, REFER SERVICING TO QUALIFIED SERVICE PERSONNEL.
IMPORTANT SAFETY INSTRUCTIONS
1.
2.
3.
4.
5.
6.
7.
8.
9.
10.
11.
12.
Read these instructions.
Keep these instructions.
Heed all warnings.
Follow all instructions.
Do not use this apparatus near water.
Clean only with dry cloth.
Do not block any ventilation openings. Install in accordance with the manufacturer’s instructions.
Do not install near any heat sources such as radiators, heat registers, stoves, or other apparatus (including
amplifiers) that produce heat.
Do not defeat the safety purpose of the polarized or grounding-type plug. A polarized plug has two blades with
one wider than the other. A grounding type plug has two blades and a third grounding prong. The wide blade or
the third prong are provided for your safety. If the provided plug does not fit into your outlet, consult an electrician
for replacement of the obsolete outlet.
Protect the power cord from being walked on or pinched particularly at plugs, convenience receptacles, and the
point where they exit from the apparatus.
Only use attachments/accessories specified by the manufacturer.
Use only with the cart, stand, tripod, bracket, or table specified by the manufacturer, or
sold with the apparatus. When a cart is used, use caution when moving the cart/apparatus
combination to avoid injury from tip-over.
13. Unplug this apparatus during lightning storms or when unused for long periods of time.
14. Refer all servicing to qualified service personnel. Servicing is required when the apparatus has been damaged in
any way, such as power-supply cord or plug is damaged, liquid has been spilled or objects have fallen into the
apparatus, the apparatus has been exposed to rain or moisture, does not operate normally, or has been dropped.
The apparatus shall not be exposed to dripping or splashing and that no objects filled with liquids, such as vases,
shall be placed on the apparatus.
CAUTION
RISK OF ELECTRIC SHOCK
DO NOT OPEN
CAUTION: TO REDUCE THE RISK OF ELECTRIC
SHOCK, DO NOT REMOVE COVER (OR BACK). NO USER
-SERVICEABLE PARTS INSIDE. REFER SERVICING TO
QUALIFIED SERVICE PERSONNEL.
The lightning flash with arrowhead symbol, within an equilateral triangle, is
intended to alert the user to the presence of uninsulated “dangerous voltage” within
the product’s enclosure that may be of sufficient magnitude to constitute a risk of
electric shock to persons.
The exclamation point within an equilateral triangle is intended to alert the user to
the presence of important operating and maintenance (servicing) instructions in the
literature accompanying the product.
429A-E-002A
AP80R_e_00.p65
2
04.8.26, 3:44 PM
Contents
General Guide .......................................... E-2
Other Settings ....................................... E-26
Keyboard Touch ........................................................... E-26
Connections ............................................ E-4
Keyboard Tuning ......................................................... E-26
Connecting Headphones ............................................... E-4
Layer Tone Volume ...................................................... E-26
Connecting an audio or musical instrument amplifier ... E-4
Display Contrast .......................................................... E-26
Using MIDI ................................................................... E-27
Selecting and Using Built-in Tones ....... E-6
Connecting to a Computer .......................................... E-27
Tone Type ...................................................................... E-6
USB Mode and MIDI Mode ......................................... E-28
Selecting a Tone ............................................................ E-6
Expanding the Number of Built-in Tunes .................... E-28
Using Tone Effects ......................................................... E-7
Layering Two Tones ....................................................... E-7
Using a Memory Card ........................... E-29
Splitting the Keyboard between Two Tones .................. E-8
Using a Memory Card ................................................. E-29
Using Layer and Split Together ..................................... E-8
Saving Files to a Memory Card ................................... E-30
Using the Pedals ........................................................... E-9
Loading a File from a Memory .................................... E-31
Using the Metronome .................................................... E-9
Renaming a Memory Card File ................................... E-32
Deleting a Memory Card File ...................................... E-32
Playing a Rhythm .................................. E-10
Formatting a Memory Card ......................................... E-33
Playing a Rhythm ........................................................ E-10
Supported Input Characters ........................................ E-33
Using Auto Accompaniment ........................................ E-11
Memory Card Error Messages .................................... E-34
Adjusting the Volume of Accompaniment, Tune,
and Memory Card Playback ........................................ E-13
Troubleshooting .................................... E-35
Using Auto Harmonize ................................................. E-13
Using One-Touch Preset ............................................. E-14
Using Registration Memory ................. E-15
What is registration memory? ..................................... E-15
Playing Back Built-in Tunes ................. E-17
Playing Back a Piano Group Tune .............................. E-17
Playing Back a Song Group Tune ............................... E-17
Adjusting Playback Tempo .......................................... E-17
Pausing Playback ........................................................ E-18
Skipping Back through a Tune .................................... E-18
Assembly Instructions.......................... E-37
Attachment of the Score Stand ................................... E-40
Specifications ........................................ E-41
Appendix ................................................. A-1
Tone List ........................................................................ A-1
Rhythm List .................................................................... A-3
Song List ........................................................................ A-4
Drum Assignment List ................................................... A-5
Fingered Chord Chart .................................................... A-6
Skipping Forward through a Tune ............................... E-18
Looping a Musical Phrase ........................................... E-18
Changing the Melody Tone of a Tune ......................... E-18
Playing All of the Built-in Tunes ................................... E-19
Playing Tunes You Download from the Internet .......... E-19
Operational Precautions ....................... A-7
Locating the Unit ............................................................ A-7
Care of the Unit ............................................................. A-7
Memory Protection ........................................................ A-7
Playing Music Data from a Memory Card ................... E-19
Practicing a Built-in Tune ............................................ E-19
MIDI Implementation Chart
Using a Microphone for Sing Along .... E-20
Using Transpose .......................................................... E-21
Recording Your Keyboard Play ........... E-22
Recordable Data, Parts, and Tracks ........................... E-22
Recording Your Practice (Song Recording) ................ E-23
Recording a Performance (Free Recording) ............... E-23
Playing Back a Free Recording ................................... E-24
Overdubbing a Free Recording ................................... E-25
Deleting a Specific Part/Track ..................................... E-25
Company and product names used in this manual may be
registered trademarks of others.
E-1
429A-E-003A
AP80R_e_01-16.p65
1
04.8.26, 3:44 PM
General Guide
2
1
3
5
4
6
8
7
N
D
E
F
G
9
H
I
0
J
A
B
K
L
C
M
O
P
Q
R
S
U
V W
T
Y
X
Z
[
\
]
^
a
c
Front
IMPORTANT!
• Make sure the power indicator is
completely turned off before
unplugging the power cord from the
power outlet. Be sure to read and
observe all of the safety precautions
concerning power supply.
b
d
g
Bottom
h
*
e
f
i
Headphones
* With the AP-80R, the power cord is hard-wired to the bottom of the instrument.
E-2
AP80R_e_01-16.p65
429A-E-004A
2
04.8.26, 3:44 PM
General Guide
CAUTION
Make sure that the cover of the digital piano is fully open whenever you are playing on the keyboard. A partially open cover can
suddenly close unexpectedly and pinch your fingers.
1 MAIN VOLUME knob
P CHORD root name
2 MIC VOLUME knob
Q Percussion instrument list
3 ECHO button
R Dial
4 SING ALONG button
S CARD FUNCTION button
5 TRANSPOSE/KEY CONTROL buttons
T EXECUTE button
6 <PLAY/STOP> button
U Card slot
7 MODE button
V [왗] cursor/NO button
8 RHYTHM buttons
W [왘] cursor/YES button
9 ONE TOUCH PRESET button
X TONE buttons
0 METRONOME button
Y BANK button
A SONG MEMORY button
Z REGISTRATION buttons
B ACCOMP/SONG VOLUME button
[ STORE button
C CARD button
\ SPLIT button
D INTRO, REPEAT button
] LAYER button
E NORMAL/FILL-IN, REW button
_ REVERB CHORUS button
F VARIATION/FILL-IN, FF button
a SETTING button
G SYNCHRO/ENDING, PAUSE button
H START/STOP, PLAY/STOP button
[Front]
b Power Indicator
I TEMPO buttons
J AUTO HARMONIZE button
[Bottom]
K TRACK 1/L 2/R button
c USB port
d MIC IN jack
● MUSIC LIBRARY
e LINE OUT R, L/MONO jacks
L PIANO button
f MIDI OUT/IN terminals
M SONG/USER button
N POWER button
g PHONES jacks
h AC Power jack
O Display screen
i Pedal Connector
NOTE
• Key, button, and other names are indicated in the text of this manual using bold type.
• See page E-37 for details on the stand.
• This digital piano has two PLAY/STOP buttons. In this manual, the PLAY/STOP button that is located under the SING ALONG
button is indicated as <PLAY/STOP>.
MODE
• Each chapter of this manual starts with an illustration of the
digital piano’s console, which shows the buttons and other
controllers you need to operate.
START/STOP
Memory Protection
Certain settings and memory contents are retained even when the digital piano is turned off. This means that the data and settings will still
be available when you turn the digital piano back on again.
This following is a list of the major settings and memory contents that are retained.
•
•
•
•
•
Song Memory Data
Registration Memory Contents
User Songs
Display Contrast Setting
Music Library Song Numbers
E-3
429A-E-005A
AP80R_e_01-16.p65
3
04.8.26, 3:44 PM
Connections
IMPORTANT!
• Whenever connecting external equipment, first set the MAIN
VOLUME knob of the digital piano and the volume controller
of the external equipment to relatively low volume settings. You
can later adjust volume to the level you want after connections
are complete.
Connecting Headphones
Connect commercially available headphones to the digital piano’s
PHONES jacks. This cuts off the built-in speakers, which means
you can practice even late at night without disturbing others. To
protect your hearing, make sure that you do not set the volume
level too high when using headphones.
Connecting an audio or musical
instrument amplifier
Connecting to an audio or musical instrument amplifier provides
even clearer, more powerful sound through external speakers.
IMPORTANT!
• The digital piano automatically adjusts sound output to optimize
for headphone output (when headphones are connected) or builtin speaker output (when headphones are not connected). Note
that this feature also affects the sound output from the LINE
OUT R and L/MONO jacks.
[Bottom]
Audio amplifier AUX IN, etc.
[Bottom]
PHONES jacks
Headphones
PIN plugs
RIGHT
(Red)
LEFT
(White)
Standard jacks
INPUT 1
NOTE
• Be sure to push the headphones plug into the PHONES jack
as far as it will go. If you don’t, you may hear sound from
only one side of the headphones.
Standard plug
INPUT 2
Guitar amplifier,
keyboard amplifier, etc.
NOTICE
This equipment has been tested and found to comply with the limits for a Class B digital device, pursuant to Part 15 of
the FCC Rules. These limits are designed to provide reasonable protection against harmful interference in a residential
installation. This equipment generates, uses and can radiate radio frequency energy and, if not installed and used in
accordance with the instructions, may cause harmful interference to radio communications. However, there is no guarantee
that interference will not occur in a particular installation. If this equipment does cause harmful interference to radio or
television reception, which can be determined by turning the equipment off and on, the user is encouraged to try to
correct the interference by one or more of the following measures:
• Reorient or relocate the receiving antenna.
• Increase the separation between the equipment and receiver.
• Connect the equipment into an outlet on a circuit different from that to which the receiver is connected.
• Consult the dealer or an experienced radio/TV technician for help.
FCC WARNING
Changes or modifications not expressly approved by the party responsible for compliance could void the user’s authority to operate the equipment.
CASIO Europe GmbH
Bornbarch 10, 22848 Norderstedt, Germany
This mark applies to the AP-80RV only.
Please keep all information for future reference.
E-4
AP80R_e_01-16.p65
429A-E-006A
4
04.8.26, 3:44 PM
Connections
Connecting to Audio Equipment 1
Use commercially available cables to connect the external audio
equipment to the digital piano’s LINE OUT jacks as shown in
Figure 1. R jack output is right channel sound, while L/MONO
jack output is left channel sound. It is up to you to purchase
connecting cables like the ones shown in the illustration for
connection of audio equipment. Normally in this configuration you
must set the audio equipment’s input selector to the setting that
specifies the terminal (such as AUX IN) to which the digital piano
is connected. Use the digital piano’s MAIN VOLUME knob to
adjust the volume level.
Connecting to a Musical Instrument
Amplifier 2
Use commercially available cables to connect the amplifier to the
digital piano’s LINE OUT jacks as shown in Figure 2. R jack output
is right channel sound, while L/MONO jack output is left channel
sound. Connecting to the L/MONO jack only outputs a mixture of
both channels. It is up to you to purchase connecting cable like the
one shown in the illustration for connection of the amplifier. Use
the digital piano’s MAIN VOLUME knob to adjust the volume
level.
Accessories and Options
Use only the accessories and options specified for this digital piano.
Use of non-authorized items creates the danger of fire, electric
shock, and personal injury.
E-5
429A-E-007A
AP80R_e_01-16.p65
5
04.8.26, 3:44 PM
Selecting and Using Built-in Tones
3
Tone Type
• For information about each tone group, see the tone list
on page A-1.
Example: ORGAN
Your digital piano has the following types of tones built in.
Panel Tones
120
GM Tones
128
Drum Sets
10
Press one of the 12 TONE buttons to select the tone
group you want.
• See the Tone List on page A-1 for more information.
Selecting a Tone
• Pressing a TONE button causes its indicator lamp to light.
Panel tones are divided into 12 groups. You can select a group by
pressing its TONE button on the digital piano control panel.
[
4
1
Or
g
1]
Rotate the dial to select a tone in the current selected
tone group.
• Rotating the dial scrolls through the names of the available
tones on the display. Display the name of the tone you
want to use.
Example: Jazz Organ
Press the POWER button.
POWER button
2
000 : Dr awba r
Pop01
[ 006 : 0 J a z z 0Or
0Pop01
g
Dial
TONE
an
]
0
Use the MAIN VOLUME knob to adjust the volume
level.
• Before playing, it is a good idea to set the volume to a
relatively low level.
METRONOME
POWER
MAIN VOLUME
SPLIT
LAYER
REVERB CHORUS
TEMPO
E-6
AP80R_e_01-16.p65
429A-E-008A
6
04.8.26, 3:44 PM
Selecting and Using Built-in Tones
Using Tone Effects
Reverb: Makes your notes resonate
Chorus: Adds more breadth to your notes
1
Press the REVERB CHORUS button to cycle through
the effect settings as shown below.
Layering Two Tones
Use the following procedure to layer two tones, so they sound at
the same time.
1
• You can find out the current effect setting by looking at
the REVERB and CHORUS indicator lamps.
Use the procedure under “Selecting a Tone” on page
E-6 to select the main tone.
Example: To select Grand Piano, press the PIANO button,
and then rotate the dial until “Grand Piano” is
displayed as the tone name.
On
Both on
Off
Both off
2
3
Select the layered tone.
Example: To select “Strings”
[ 000 : 0S t r i n
0Pops01
On
Reverb on
Chorus on
After turning on the effect you want, use the dial to
select the effect type you want.
• Note that you need to select an effect type with the dial
within a few seconds after turning on an effect. If you don’t,
the display will exit the setting screen.
Effect List
Reverb
Chorus
Room 1
Room 2
Hall 1
Hall 2
Chorus 1
Chorus 2
Chorus 3
Chorus 4
g
s
]
• This will cause the indicator lamp of the layered tone (the
second one you selected) to light.
• Now you can play using your layered tones.
On
2
Press the LAYER button.
• This causes the LAYER indicator lamp to light.
Grand Piano
Strings
4
After you are finished using the layered tones, press the
LAYER button again to unlayer them.
Adjusting the Volume of the Layered Tone
You can independently adjust the volume of the layered tone (the
second one you select). See page E-26 for more information.
Reve r b Type :
[ Ro om0 1 ] 0 0 0 0 0 0 0 0 0 0 0 0 0 0
Cho r us Type :
[Cho r u s 01 ] 000000000000
E-7
429A-E-009A
AP80R_e_01-16.p65
7
04.8.26, 3:44 PM
Selecting and Using Built-in Tones
Splitting the Keyboard between
Two Tones
You can assign different tones to keys on the left side and the right
side of the keyboard.
Using Layer and Split Together
You can use the following procedure to layer two tones on the left
side of the keyboard (left main tone + left layered tone), and two
other tones on the right side (right main tone + right layered tone).
Split point
Split Point
Strings
1
Use the procedure under “Selecting a Tone” to select
the tone you want to assign to the right side of the
keyboard.
Example: To select Grand Piano, press the PIANO button,
and then rotate the dial until “Grand Piano” is
displayed as the tone name.
2
3
Split Tone
+
Layered Split Tone
Grand Piano
1
Use the procedure under “Selecting a Tone” to select
the right main tone.
2
Use the procedure under “Splitting the Keyboard
between Two Tones” to select the left main tone.
3
Press the SPLIT button to temporarily turn off split (SPLIT
indicator lamp unlit).
4
Use the procedure under “Layering Two Tones” to select
the left layered tone.
5
Press the LAYER and SPLIT buttons as required so the
indicators of both buttons are lit.
6
Use the procedure under “Layering Two Tones” to select
the right layered tone.
7
Use the procedure under “To specify the keyboard split
point” to specify the split point.
8
Now you can play using your layered tones and split
keyboard.
Press the SPLIT button.
• This causes the SPLIT indicator lamp to light.
Select the tone you want to assign to the left side of the
keyboard.
Example: Strings
• Now you can play using the two tones.
4
Main Tone
+
Layered Tone
After you are finished using the split keyboard, press
the SPLIT button again to unsplit it.
• This causes the SPLIT indicator lamp to go out.
To specify the keyboard split point
1
While holding down the SPLIT button, press the
keyboard key where you want the left limit of the high
range (right) tone to be.
Left limit of the high range
Low range High range
• A note does not sound when you press a keyboard key at
this time.
Sp l i t 0Po i n t : 00000
F#30000000000000000000
• After you are finished using layer and split, press the
LAYER button to unlayer it and the SPLIT button to
unsplit it.
NOTE
• The split point is the boundary between the Auto
Accompaniment area (pages E-11, E-12) and the melody area
of the keyboard. You can change the location of the split point,
which also changes the sizes of the keyboard areas.
E-8
AP80R_e_01-16.p65
429A-E-010A
8
04.8.26, 3:44 PM
Selecting and Using Built-in Tones
Using the Pedals
Using the Metronome
The AP-80R comes equipped with the three pedals shown in the
illustration below.
1
2
Press the METRONOME button.
• This starts the metronome.
Rotate the dial to select the number of beats per
measure.
• Note that you need to select the number of beats per
measure with the dial within a few seconds after turning
on the metronome. If you don’t, the display will exit the
setting screen.
Soft pedal
Me t r o n ome 0Be a t : 0 0 0 0 0
[
0]00000000000000
Damper pedal
Sostenuto pedal
• You can select a value in the range of 2 through 6. With
each setting, a chime sounds as the first beat of each
measure, and the remaining beats sound as clicks.
Specifying 0 as the setting plays a straight click, without
any chime. This setting lets you practice with a steady beat.
Pedal functions
● Damper pedal
Pressing this pedal causes notes to reverberate and to sustain
longer.
● Soft pedal
Pressing this pedal dampens notes and slightly reduces their
volume. Only notes played after the pedal is depressed are
affected, and any notes played before the pedal is pressed sound
at their normal volume.
● Sostenuto pedal
Like the damper pedal, this pedal causes notes to reverberate
and to sustain longer. The difference between the two pedals is
the timing when they are pressed. With the sostenuto pedal, you
press the pedal after depressing the notes you want to sustain.
Only the notes whose keyboard keys are depressed when the
sostenuto pedal is pressed are affected.
3
Use the TEMPO buttons to adjust the tempo.
Slower
NOTE
• You can also use the dial to change the tempo setting while
the current setting is indicated by a value in brackets ([ ]) on
the display.
Example: [T=120]
• The value indicates the number of beats per minutes.
• To return the tempo to its initial default setting, press the
TEMPO
and
buttons at the same time.
4
To stop the metronome, press the METRONOME button
again.
E-9
429A-E-011A
AP80R_e_01-16.p65
Faster
9
04.8.26, 3:44 PM
Playing a Rhythm
Playing a Rhythm
You can select from among 120 built-in rhythms. See the Rhythm
List on page A-3 for more information.
NOTE
• FOR PIANO group rhythms 10 through 19 consist of chord
accompaniments only, without any drums or other percussion
instruments. These rhythms do not sound unless CASIO
CHORD, FINGERED, or FULL RANGE CHORD is selected
as the accompaniment mode. With such rhythms, make sure
that CASIO CHORD, FINGERED, or FULL RANGE CHORD
is selected before you try playing chords.
• Note that there are two different patterns for each rhythm,
named “normal” and “variation”. Buttons are available for
selecting either the normal pattern or variation pattern.
3
Press the START/STOP button to start play of the selected
rhythm’s normal pattern.
4
If you want to change to the variation rhythm pattern,
press the VARIATION/FILL-IN button.
• To return to the normal rhythm pattern, press the
NORMAL/FILL-IN button.
5
NOTE
• You can also start rhythm play by pressing the NORMAL/
FILL-IN button (plays the normal pattern) or VARIATION/
FILL-IN button (plays the variation pattern).
Rhythms are divided into 8 groups. You can select a group by
pressing its RHYTHM button on the digital piano control panel.
To adjust the tempo of rhythm play
1
1
To stop the rhythm, press the START/STOP button again.
Use the TEMPO buttons to adjust the tempo of rhythm
play.
Slower
Press one of the eight RHYTHM buttons to select the
rhythm group you want.
Faster
• For a complete list of the rhythms available in each group,
see the Rhythm List on page A-3.
Example: JAZZ
• This causes the indicator lamp of the button to light.
[
2
Gr and0P i ano
00 : B i g0Band01
]
T=120
NOTE
• You can also use the dial to change the tempo setting while
the current setting is indicated by a value in brackets ([ ]) on
the display.
Example: [T=120]
• The value indicates the number of beats per minutes.
• To return the selected rhythm to its standard tempo setting,
press the TEMPO
and
buttons at the same time.
Rotate the dial to select a rhythm in the current selected
rhythm group.
• Rotating the dial scrolls through the names of the available
rhythms on the display. Display the name of the rhythm
you want to use.
Example: Swing
[
Gr and0P i ano
0 3 : 0Sw i n g
MODE
RHYTHM
INTRO
NORMAL/FILL-IN
VARIATION/FILL-IN
]
T=120
ONE TOUCH PRESET
AUTO HARMONIZE
ACCOMP/SONG VOLUME
TEMPO
START/STOP
SYNCHRO/ENDING
Dial
E-10
AP80R_e_01-16.p65
429A-E-012A
10
04.8.26, 3:44 PM
Playing a Rhythm
Using Auto Accompaniment
4
Use a CASIO CHORD fingering to play the first chord
within the accompaniment keyboard range.
• See “How to Play Chords” on this page for information
about how to finger chords with the different chord modes.
• Playing a chord will cause the intro pattern for the selected
rhythm to play, followed by the Auto Accompaniment
rhythm and chord pattern.
With Auto Accompaniment, the digital piano automatically plays
rhythm, bass, and chord parts in accordance with chords you select
using simplified keyboard fingerings, or chords you play. Auto
Accompaniment makes it feel like you have your own private
backup group with you all the time.
5
6
Use CASIO CHORD fingerings to play other chords.
• You can insert a fill-in pattern while an Auto
Accompaniment is playing by pressing the NORMAL/
FILL-IN button. A fill-in helps to change the mood of the
Auto Accompaniment pattern.
• If you want to change to the variation rhythm pattern, press
the VARIATION/FILL-IN button. To return to the normal
rhythm pattern, press the NORMAL/FILL-IN button.
To stop Auto Accompaniment play, press the
SYNCHRO/ENDING button.
• This will play an ending pattern for the selected rhythm
before stopping Auto Accompaniment play.
Using the MODE Button
You can use the MODE button to select the accompaniment mode
you want to use. You can also use it to turn off Auto
Accompaniment. Each press of the MODE button cycles through
accompaniment modes in the sequence shown below.
NOTE
• You can start or stop auto accompaniment play without an
intro or ending pattern by pressing the START/STOP button
in steps 3 and 6.
NORMAL (Auto Accompaniment off)
FULL RANGE CHORD
FINGERED
CASIO CHORD
• In the NORMAL mode (no indicator lamp lit), only rhythm
accompaniment plays.
• The FULL RANGE CHORD, FINGERED, and CASIO CHORD
modes all play Auto Accompaniment patterns. See page E-11
for details about each of these different modes.
To play with Auto Accompaniment
Getting Ready
• Use the procedures under “Playing a Rhythm” to select the
rhythm you want to use and adjust the tempo.
1
Use the MODE button to select CASIO CHORD,
FINGERED, or FULL RANGE CHORD as the
accompaniment mode.
• Here we will select the CASIO CHORD mode.
• See page E-11 for information about selecting the
accompaniment mode.
2
3
How to Play Chords
The way you finger chords depends on the current chord mode.
■ NORMAL
In this mode, Auto Accompaniment is turned off, so you can play
chords as you would normally do on a piano keyboard.
■ CASIO CHORD
Even if you do not know how to play chords normally, this mode
lets you play four different types of chords using simplified
fingerings in the accompaniment area of the keyboard. The
following shows where the accompaniment area is located, and
explains how to finger chords in the CASIO CHORD mode.
CASIO CHORD Mode Keyboard
Accompaniment Area
IMPORTANT!
• In the CASIO CHORD mode, the keys in the accompaniment
area of the keyboard operate as “chord switches” only. You
cannot use the keys in this area to play notes.
Press the SYNCHRO/ENDING button.
• This configures the digital piano so rhythm and chord
accompaniment will start automatically when you press
any keys within the accompaniment keyboard range.
Press the INTRO button.
E-11
429A-E-013A
AP80R_e_01-16.p65
Melody Area
11
04.8.26, 3:44 PM
Playing a Rhythm
Example
Chord Type
Major Chords
Pressing a single accompaniment
area key in the CASIO CHORD
mode will play the major chord
whose name is marked above the
key. All of the accompaniment
area keys that are marked with the
same chord name play exactly the
same chord.
Minor Chords
To play a minor chord, press the
accompaniment area key that
corresponds to the major chord,
while also pressing one other
accompaniment area key to the
right.
Seventh Chords
To play a seventh chord, press the
accompaniment area key that
corresponds to the major chord,
while also pressing two other
accompaniment area keys to the
right.
Minor Seventh Chords
To play a minor seventh chord,
press the accompaniment area key
that corresponds to the major
chord, while also pressing three
other accompaniment area keys to
the right.
C (C major)
■ FINGERED
In the FINGERED mode, you play standard chord fingerings in
the accompaniment area to play chords. To finger a C chord, for
example, you would press the C-E-G keys.
C C#DE E F F#GA A B B C C#DE E F
FINGERED Mode Keyboard
Accompaniment Area
Melody Area
Cm (C minor)
C C#DE E F F#GA A B B C C#DE E F
C7 (C 7th)
IMPORTANT!
• In the FINGERED mode, the keys in the accompaniment area of
the keyboard operate as “chord switches” only. You cannot use
the keys in this area to play notes.
C
Cm
Cdim
Caug *1
Csus4
C7 *2
Cm7 *2
Cmaj7 *2
Cm7 5
C7 5 *1
C7sus4
Cadd9
Cmadd9
CmM7 *2
Cdim7 *1
C C#DE E F F#GA A B B C C#DE E F
Cm7 (C minor 7th)
C C#DE E F F#GA A B B C C#DE E F
NOTE
• When playing a minor, seventh, or minor seventh chord, it
makes no different whether the additional keys you press
are black or white.
NOTE
• See the “Fingered Chord Chart” on page A-6 for information
about fingering chords with other roots in the accompaniment
area.
*1: Inverted fingerings are not supported for these chords. The
lowest note fingered is used as the root. See the NOTE below
for more information about inverted chords.
*2: For these chords, the same chord is specified even if the G fifth
is not fingered.
NOTE
• Except for the chords whose names have *1 after them in the
above examples, you can also use inverted fingerings for
chords. This means, for example, that you could use the
fingering E-G-C or G-C-E instead of C-E-G for C major.
• Except for the chords whose names have *2 after them in the
above examples, you need to press all of the indicated keys
in order to finger a chord. Failure to include even a single
note may produce a chord that is different from the one you
want.
E-12
AP80R_e_01-16.p65
429A-E-014A
12
04.8.26, 3:44 PM
Playing a Rhythm
■ FULL RANGE CHORD
The FULL RANGE CHORD mode lets you play a total of 38
different types of chords (the same chords available in the
FINGERED mode plus 23 more). FULL RANGE CHORD
recognizes the pressing of three or more keyboard keys anywhere
on the keyboard as a chord fingering. Anything else (pressing one
or two keys, or playing any group of notes that does not form a
chord fingering that is recognized by the keyboard) is treated as
melody notes.
Adjusting the Volume of Accompaniment,
Tune, and Memory Card Playback
Use the procedures below to adjust the volume of the
accompaniment, built-in tune playback, and memory card tune
playback. These settings are independent of the volume setting
for the notes you play on the keyboard. You can specify volume
levels in the range of 000 (minimum) to 127 (maximum).
1
FULL RANGE CHORD Mode Keyboard
Press the ACCOMP/SONG VOLUME button.
If the RHYTHM button indicator lamp is lit
A c c omp 0Vo l ume :
[ 127 ] 00000000000000000
Accompaniment and Melody
Recognized Chords
Pattern Type
Number of Chord Variations
FINGERED
The 15 chord patterns shown under
“FINGERED” on page E-12.
23 standard chord fingerings. The
following are examples of the 23 chords
available with C as the bass note.
Standard Fingerings
C6 • Cm6 • C69
D D
E
F
G
A
B
•
•
•
•
•
•
C C
C
C
C
C
C
B D m Dm Fm Gm Am B m
•
•
•
•
•
•
C
C
C C
C
C
C
Ddim A 7 F7 Fm7 Gm7 A add9
•
•
•
•
•
C
C
C C
C
C
C
Example: To play the chord C major and E .
So n g 0Vo l ume :
[ 127 ] 00000000000000000
2
Using Auto Harmonize
When you turn on Auto Harmonize in the FINGERED or CASIO
CHORD accompaniment mode, the keyboard automatically adds
one of the notes that make up the current chord to each melody
note you play. This adds more depth to your melody line.
C
1
E
G
2
Use the dial to adjust the volume level.
To play with Auto Harmonize
1
E G
If the PIANO, SONG/USER, or CARD button indicator lamp
is lit
C
1 ..... Chord C
2 ..... Chord CC
E
NOTE
• When there are at least six semitones between the lowest note
and the next note to the right, the lowest note is assumed to
be the bass note.
• Note that the digital piano’s built-in tunes (Piano Group tunes
and Song Group Tunes) use rhythms, accompaniments,
and effects that are not available with Auto Accompaniment.
Because of this, you may not be able to perform a piece exactly
like a built-in tune when using Auto Accompaniment.
2
3
Use the MODE button to select the CASIO CHORD or
FINGERED mode. This turns on Auto Accompaniment.
Press the AUTO HARMONIZE button.
• This causes the AUTO HARMONIZE indicator lamp to
light, indicating that Auto Harmonize is turned on.
Use the dial to select the Auto Harmonize type you
want to use.
• Note that you need to select the Auto Harmonize type with
the dial within a few seconds after turning on the Auto
Harmonize. If you don’t, the display will exit the setting
screen.
• See “Auto Harmonize Types” on page E-14 for more
information about Auto Harmonize types.
Au t o 0Ha r mo n i z e 0 T y p e :
[Due t 1 ] 000000000000000
4
Start Auto Accompaniment play, and play something
in the melody area of the keyboard.
• Harmonize notes are added automatically to the melody
notes you play.
5
To turn off Auto Harmonize, press the AUTO
HARMONIZE button again.
• This causes the AUTO HARMONIZE indicator lamp to
go out.
E-13
429A-E-015A
AP80R_e_01-16.p65
13
04.8.26, 3:44 PM
Playing a Rhythm
NOTE
• Auto Harmonize is available in the FINGERED and CASIO
CHORD accompaniment modes only.
• Auto Harmonize is disabled and cannot be used while
playing back a tune from the Music Library or a memory card.
Auto Harmonize Types
Auto Harmonize lets you select from among the following 12 Auto
Harmonize types.
Type
Effect
Duet1
Adds close (separated by 3 to 5 degrees) 1-note
harmony below the melody note.
Duet2
Adds open (separated by more than 4 to 7
degrees) 1-note harmony below the melody note.
Duet2 harmony is more open than Duet1.
Country
Adds country style harmony.
Octave
Adds the note from the next lower octave.
5th
Adds the fifth degree note.
3-Way Open
Adds 2-note open harmony, for a total of three
notes.
3-Way Close
Adds 2-note close harmony, for a total of three
notes.
Strings
Adds harmony that is optimal for strings.
4-Way Open
Adds 3-note open harmony, for a total of four
notes.
4-Way Close
Adds 3-note close harmony, for a total of four
notes.
Block
Adds block chord notes.
Big Band
Adds big band style harmony.
Using One-Touch Preset
With One-Touch Preset, the digital piano automatically configures
optimal tone, tempo, and other settings in accordance with the
rhythm pattern you select.
The following are the One-Touch Preset settings that are configured
for each rhythm pattern.
• Keyboard tone and volume level
• Layer and split on/off settings
• Layer and split tone and volume settings (when layer and split
are turned on)
• Tempo setting
• Effect settings
• Auto Harmonize (type, on/off settings)
To apply One-Touch Preset settings
1
Select the rhythm you want to use.
2
Use the MODE button to select the accompaniment
mode you want to use.
3
4
Press the ONE TOUCH PRESET button.
• This will automatically apply the One-Touch Preset
settings in accordance with the rhythm pattern you
selected, and enter synchro standby.
Play a chord within the accompaniment keyboard
range.
• When you do, the rhythm and Auto Accompaniment will
start to play.
• The notes will sound in accordance with the settings of
the One-Touch Preset.
E-14
AP80R_e_01-16.p65
429A-E-016A
14
04.8.26, 3:44 PM
Using Registration Memory
What is registration memory?
Registration memory lets you save up to 16 (4 areas × 4 banks)
digital piano setups (tone, rhythm, tempo, etc.) for instant recall
whenever you need them.
How registration memory organizes its
data
Registration memory has four banks, and each bank contains four
areas. Use the BANK button to select a bank, and the
REGISTRATION buttons to select an area.
Registration Memory Setup Data
The following are the settings that can be saved for each registration
memory setup.
•
•
•
•
•
•
•
•
•
Tone
Rhythm
Tempo
Layer Setting
Split Setting
Split point
Auto Harmonize Setting
Effect setting
MODE button setting
NOTE
• All of the registration memory banks are preset with default
data.
• You cannot recall data from registration memory while
playing back a tune from Music Library or a memory card.
1
2
1
2
3
4
Bank 1
1-1
1-2
1-3
1-4
Bank 2
2-1
2-2
2-3
2-4
Bank 3
3-1
3-2
3-3
3-4
Bank 4
4-1
4-2
4-3
4-4
1 Each press of the BANK button cycles through the bank
numbers, from 1 to 4.
2 Pressing a REGISTRATION button (1 to 4) selects the
corresponding area in the currently selected bank.
NOTE
• Storing a new setup to a registration memory area replaces
the setup that was previous stored there.
• You can save registration memory setup data to a memory
card, if you want. See “Using a Memory Card” on page E-29
for more information.
REGISTRATION
BANK
E-15
429A-E-017A
AP80R_e_01-16.p65
STORE
15
04.8.26, 3:44 PM
Using Registration Memory
To store a setup in registration memory
1
On the digital piano, configure the tone, rhythm, and
other settings you want to save as your setup.
To recall a setup from registration memory
1
• See “Registration Memory Setup Data” (page E-15) for
more information.
2
Bank
1
WARNING
• The following step will replace the setup currently in the area
you select with the new setup. Make sure you do not need the
current setup before performing the next step.
3
• This causes the number of the selected bank to appear on
the display for about five seconds. If you do not perform
the following step within that time, the bank selection
screen will disappear.
Use the BANK button to select the registration memory
bank where you want to save the setup.
• This causes the number of the selected bank to appear on
the display for about five seconds. If you do not perform
the following step within that time, the bank selection
screen will disappear.
Example: Bank 1 selected
While holding down the STORE button, press the
REGISTRATION button (1 to 4) that corresponds to the
area where you want to store the setup.
• You can also change the bank selection at this time by
pressing the BANK button while holding down the
STORE button.
Example: After button 2 is pressed
Use the BANK button to select the registration memory
bank that contains the setup you want to recall.
Bank
1
2
Press the REGISTRATION button (1 to 4) for the area
that contains setup you want to recall.
• This displays the number of the area you selected along
with the message “Recall”. After that, the tone or rhythm
screen reappears.
R e c a l l0 0 0 0 0 0 0 0 B a n k 0 0 0 A r e a
000000000000000100-002
NOTE
• If you press a REGISTRATION button without selecting a
bank first, the digital piano will recall the setup from the
applicable area in the bank you previously last selected.
Registration memory contents are retained even when you
turn off digital piano power (page E-3, A-7).
S t o r e00000000Bank000Ar ea
000000000000000100-002
4
Release the REGISTRATION and STORE buttons.
E-16
AP80R_e_01-16.p65
429A-E-018A
16
04.8.26, 3:44 PM
Playing Back Built-in Tunes
Your digital piano comes with a total of 80 tunes built in. You can
play back built-in tunes for your own listening pleasure, or you
can use them for practice and even sing-along.
Built-in tunes are divided between the two groups described below.
• Piano Group: 50 tunes
The tunes in this group are piano tunes.
• Song Group: 30 tunes
The tunes in this group are Auto Accompaniment tunes. You
can connect a microphone to the digital piano and use the sing
along mode to sing along with the built-in tunes.
In addition to the built-in tunes, you can also sing along with tunes
you download over the Internet, and SMF data tunes (page E-19)
on memory cards.
Playing Back a Song Group Tune
Page A-4 shows a Song Group List, which lists all of the tunes
included in the Song Group.
Getting Ready
• Use the ACCOMP/SONG VOLUME button (page E-13) to adjust
the volume level.
1
2
Playing Back a Piano Group Tune
Press the SONG/USER button to enter the song mode.
• This causes the SONG/USER button indicator lamp to
light.
Rotate the dial to select the tune you want.
Example: 28 Sakura Sakura
[
Page A-4 shows a Piano Group List, which lists all of the tunes
included in the Piano Group.
Getting Ready
• Use the ACCOMP/SONG VOLUME button (page E-13) to adjust
the volume level.
1
Press the PIANO button to select the Piano Group.
2
3
Press the PLAY/STOP button to start Auto
Accompaniment.
4
When you want to stop Auto Accompaniment play,
press the PLAY/STOP button again.
• This causes the PIANO button indicator lamp to light.
NOTE
• Pressing the PIANO button automatically turns off layer and
split.
Rotate the dial to select the tune you want.
Example: 46 Amazing Grace
[
GM S y n - V o i c e
T=074
28 : Saku r aSaku r a]
• The same tune plays repeatedly until you stop it.
Adjusting Playback Tempo
1
Use the TEMPO buttons to adjust the tempo.
Slower
Faster
Grand Pi ano
T=064
4 6 : Ama z i n gG r a c e ]
3
Press the PLAY/STOP button to start playback of the
tune.
4
When you want to stop playback, press the PLAY/STOP
button again.
• The same tune plays repeatedly until you stop it.
TRACK 1/L TRACK 2/R
TEMPO
REPEAT
REW
FF
PLAY/STOP
PAUSE
ACCOMP/SONG VOLUME
CARD
Dial
SONG/USER
PIANO
E-17
429A-E-019A
AP80R_e_17-28.p65
TONE
17
04.8.26, 3:44 PM
Playing Back Built-in Tunes
NOTE
• You can also use the dial to change the tempo setting while
the current setting is indicated by a value in brackets ([ ]) on
the display.
Example: [T=120]
• The value indicates the number of beats per minutes.
• To return the tempo to its initial default setting, press the
TEMPO
and
buttons at the same time.
• At their initial default tempo setting, some Piano Group tunes
may change tempo part way through. After you change the
tempo setting for such a tune, playback will proceed at the
tempo you selected, from the beginning of the tune to the
end.
Skipping Forward through a Tune
1
While playback is in progress, hold down the FF button.
• This skips forward through the tune measure-by-measure.
• The measure number and beat number appear on the
display while you are skipping forward.
003 : 1
Measure number
2
Beat number
When you reach the point you want, release the FF
button to resume playback.
Pausing Playback
1
2
While a tune is playing, press the PAUSE button.
Looping a Musical Phrase
You can select one or more measures and “loop” them, which means
that they play again and again until you stop playback.
• This pauses playback.
Press the PAUSE button again to restart playback from
the location where it was paused.
1
While the tune is playing, press the REPEAT button while
the measure you want the phrase to start from is playing.
• This causes the REPEAT indicator lamp to flash.
Skipping Back through a Tune
1
2
While playback is in progress, hold down the REW
button.
• This starts repeat play of the loop.
• To cancel repeat play of a loop, press the REPEAT button
again so its indicator goes out.
• This skips back through the tune measure-by-measure.
• The measure number and beat number appear on the
display while you are skipping back.
006 : 1
Measure number
2
Beat number
When you reach the point you want, release the REW
button to resume playback.
NOTE
• Depending on what is being played when you press the REW
button, the skip back operation may not start right away when
you press it.
When playback reaches the measure you want to
specify as the end of the loop, press the REPEAT button
again.
Changing the Melody Tone of a
Tune
You can select any one of the digital piano’s 248 built-in tones as
the melody tone of a built-in tune. You can even change the melody
tone setting while playback is in progress.
1
Press a TONE button.
2
Use the dial to select the tone you want.
NOTE
• You can return a tune to its preset default tone by selecting
the tune again.
E-18
AP80R_e_17-28.p65
429A-E-020A
18
04.8.26, 3:44 PM
Playing Back Built-in Tunes
Playing All of the Built-in Tunes
You can use the following procedure to play through all of the
digital piano’s 80 built-in tunes in tune number sequence.
1
Press the PIANO button and SONG/USER button at the
same time.
• This starts playback of the built-in tunes in tune number
sequence, starting from Piano Group tune number 00.
2
To stop playback, press the PLAY/STOP button.
NOTE
• During playback of all the built-in tunes, you can use the dial
to select a specific song for playback.
Playing Tunes You Download
from the Internet
You can save music data for up to 10 tunes you download from the
Internet to the digital piano’s user song area (Song Group tunes 30
through 39). Once you store a song in digital piano memory, you
can play it back using the same procedure as the one for playing
built-in tunes.
1
2
3
Press the SONG/USER button.
• This causes the SONG/USER button indicator lamp to
light.
Rotate the dial to select the tune you want.
Press the PLAY/STOP button.
• This starts playback of the tune you selected.
• Press the PLAY/STOP button again to stop playback.
Playing Music Data from a
Memory Card
You can play back SMF* data from a memory card loaded in the
digital piano’s card slot for your listening enjoyment or sing along
fun. For more information about using memory cards, see “Using
a Memory Card” on page E-29.
* Standard MIDI File
SMF is a file format for storing MIDI data and other data used by a
MIDI device to play back music. When music data is saved to a
card in SMF format by a computer running commercially available
music software, the data can be read and played by this digital piano.
IMPORTANT!
• Before performing the procedure below, read “Using a Memory
Card” on page E-29, and make sure you observe all precautions
concerning use of the card slot and memory cards.
Getting Ready
• Insert the memory card that contains the SMF data you want to
play into the digital piano’s card slot.
1
2
3
Press the CARD button.
• This causes CARD button indicator lamp to light.
Rotate the dial to select the tune you want.
Press the PLAY/STOP button.
• This starts playback of the tune you selected.
• To stop playback, press the PLAY/STOP button again.
NOTE
• If there is not enough memory available to perform the above
operation, pressing the PLAY/STOP button will cause a data
delete confirmation message to appear (Memory Full: Data
Delete? No/Yes). Pressing the YES button will delete all of
the data currently stored in the user area (No.30 to 39) of the
Song Group. If you do not want to delete the user area data,
press the NO button instead.
Practicing a Built-in Tune
You can turn off the left hand part or right hand part of a built-in
tune, user song, or SMF data* and play along on the digital piano.
* With SMF data, the left-hand part is assigned to Channel 3, while
the right-hand part is assigned to Channel 4.
Getting Ready
• Select the tune you want to practice and adjust the tempo. If you
are playing a tune for the first time, a slow tempo is probably best.
1
Use the TRACK button to turn the parts on or off.
• Each press of the TRACK button toggles its indicator lamp
on (part turned on) and off (part turned off).
• To practice the left hand part, the TRACK 1/L indicator
lamp should be off.
• To practice the right hand part, the TRACK 2/R indicator
lamp should be off.
NOTE
• With Song Group tunes (30 through 39), you cannot turn off
the left hand part.
2
Press the PLAY/STOP button.
• This starts playback of the tune, without the part you
selected in step 1.
3
Play the missing part on the digital piano.
4
To stop playback, press the PLAY/STOP button again.
E-19
429A-E-021A
AP80R_e_17-28.p65
19
04.8.26, 3:44 PM
Using a Microphone for Sing Along
You can connect a microphone to the digital piano to sing along
with built-in tunes, or with playback of SMF data from a memory
card.
Using the Microphone Jack
You can connect a commercially available microphone to the digital
piano’s microphone jack. Before connecting a microphone, set the
MIC VOLUME knob to a relatively low setting. Next, adjust the
volume to the desired level after connecting the microphone.
● Feedback
Any of the following conditions can result in feedback, which
causes a howling sound to be produced through the speakers.
• Cupping the head of the microphone with your hands.
• Positioning the microphone to close to the speakers.
If howling occurs, hold the microphone by the barrel (not the
head) and move it away from the speakers.
● Noise
Fluorescent lighting near the microphone can cause noise. If
this happens, move the microphone away from the fluorescent
lighting causing the noise.
1
Set the MIC VOLUME knob to the “MIN” setting.
2
Use the microphone’s switch to turn it on.
3
Use the MIC VOLUME knob to adjust the microphone
volume level.
To sing along with playback
Getting Ready
• Adjust the MAIN VOLUME (page E-6), ACCOMP/SONG
VOLUME button (page E-13), and MIC VOLUME (page E-20)
to appropriate levels.
[Bottom]
MIC VOLUME Knob
Lower
● Recommended Microphone Type
Dynamic microphone (standard plug)
Higher
1
Find the tune you want in the Song Group List, and
note its number.
• See page A-4 for the Song Group List.
Microphone on/off switch
2
Press the SING ALONG button to enter the sing along
mode.
• This causes the SING ALONG button indicator lamp to
light.
Microphone
IMPORTANT!
• You may get static noise in the microphone output if there is an
external device connected to the digital piano’s MIDI terminal.
• Be sure to unplug the microphone from the digital piano when
you are not using it.
3
<Built-in Tune>
Press the SONG/USER button so its indicator lamp is lit.
This is the sing along song mode.
<Memory Card Tune>
Press the CARD button so its indicator lamp is lit. This is
the sing along card mode.
4
MIC VOLUME
ECHO
SING ALONG
RHYTHM
<PLAY/STOP>
TRANSPOSE/KEY CONTROL
MAIN VOLUME
Select the sing along source.
Rotate the dial to select the tune you want.
ACCOMP/SONG VOLUME
Dial
SONG/USER
E-20
AP80R_e_17-28.p65
429A-E-022A
20
04.8.26, 3:44 PM
Using a Microphone for Sing Along
5
6
Press the <PLAY/STOP> button to start playback.
• If the song you selected includes lyric data, the lyrics
appear on the digital piano’s display.
• Use the microphone to sing along with the playback.
• When you pressing the SING ALONG button and enter
the Sing Along mode, the digital piano will automatically
reduce the volume of the melody part of the tune. It will
also change the tone setting to make sing along easier.
You can use the TRANSPOSE/KEY CONTROL
buttons to change the key of the song.
To do this:
Using Transpose
The transpose feature lets you transpose the overall pitch of the
keyboard in semitone steps. This means you can adjust digital piano
tuning to make it easier to sing to a particular tune.
1
and
Press this button:
Raises the key by one semitone.
Lower the key by one semitone.
2
Press the RHYTHM button to enter the rhythm mode.
• Note that you cannot use the transpose feature in the song
mode and piano mode.
Use the TRANSPOSE/KEY CONTROL and
to change the key of the digital piano.
To do this:
buttons
Press this button:
Raises the pitch by one semitone.
Lower the pitch by one semitone.
Key0Con t r o l : 00000000000
[ - 12 ] 00000000000000000
7
When you want to stop playback, press the <PLAY/
STOP> button again.
• The same tune plays repeatedly until you stop it.
• To exit the Sing Along mode, press the SING ALONG
button so its indicator lamp goes out.
NOTE
• To return the tune to its default key “00”, press both of the
TRANSPOSE/KEY CONTROL buttons ( and ) at the
same time in step 6 of the above procedure.
Using Microphone Echo
You can turn microphone echo on or off as required.
1
Example: When the digital piano pitch is raised by five
semitones
Transpose :
[ +05 ] 00000000000000000
• You can also change the setting by rotating the dial.
NOTE
• The transpose setting range is –12 (1 octave down) to +12
(1 octave up).
• The power on default setting is “00”.
• The transpose screen disappears from the display
automatically if you do not perform any button operation
for about five seconds.
• The transpose setting is also reflected in memory tune and
Auto Accompaniment play.
• To return the digital piano to its default pitch “00”, press both
of the TRANSPOSE/KEY CONTROL buttons ( and ) at
the same time in step 2 of the above procedure.
Press the ECHO button to toggle the microphone echo
on and off.
• The ECHO button indicator lamp disappears when the
microphone echo is turned off.
NOTE
• The microphone echo is turned on automatically whenever
you turn on digital piano power.
E-21
429A-E-023A
AP80R_e_17-28.p65
21
04.8.26, 3:44 PM
Recording Your Keyboard Play
You can record your practice sessions while playing along with a
Song Memory tune (Song Recording), or you can record your
keyboard play along with the Auto Accompaniment you are using
(Free Recording).
Selecting Parts and Tracks
You can determine the current status of each part/track by checking
indicator lamps above the TRACK button.
● During Playback Standby
Each press of the TRACK button toggles Left-hand part/Track
1 and Right-hand part/Track 2 between playback and nonplayback.
Recordable Data, Parts, and
Tracks
The type of data that is recorded into Song Memory depends on
whether you are performing song recording or free recording.
Playback (lit)
Non-playback (unlit)
Song Recording: Right-hand part or left-hand part
Free Recording: One tune, consisting of two tracks as shown in
the illustration below
Start
End
Auto Accompaniment
(rhythm, bass, chords), melody
Track 1
Melody
Track 2
● During Record Standby
Each press of the TRACK button toggles Left-hand part/Track
1 and Right-hand part/Track 2 between record standby and
playback.
Playback track (lit)
Record track (flashing)
Data recorded in track
• Since each track is independent of the other, you can edit a
recording by re-recording only one of the tracks.
Using the SONG MEMORY Button
Song Memory Capacity
Each press of the SONG MEMORY button cycles through the song
memory options in the sequence shown below.
Playback
Standby
Record
Standby
Normal
Lit
Flashing
Unlit
Song Memory can hold a total of approximately 5,300 notes, which
can be divided between a song recording and a free recording. Note
that you can use all 5,300 notes for a single recording, if you want.
If you do, you will not be able to store a second recording.
• Recording will stop automatically if Song Memory becomes full.
If you are using Auto Accompaniment or a rhythm, they will
also stop playing at this time.
Recorded Data Storage
• Starting a new recording deletes any data that was previously
recorded in memory.
• Should power fail during recording, all of the data in the track
you are recording will be deleted.
• A built-in lithium battery supplies the power required to retain
digital piano memory contents when power is turned off. Should
the lithium battery go dead, memory contents will be lost
whenever you turn off digital piano power. For more
information, see “Memory Protection” on page A-7.
RHYTHM
INTRO
SYNCHRO/ENDING
START/STOP
SONG MEMORY
PIANO
SONG/USER
NO
TRACK
TEMPO
E-22
AP80R_e_17-28.p65
YES
429A-E-024A
22
04.8.26, 3:44 PM
Recording Your Keyboard Play
Recording Your Practice
(Song Recording)
You can use the procedure below to record your play during
practice with one of the digital piano’s built-in tunes.
You can specify which parts you want to practice, and the keyboard
plays the remaining parts as accompaniment.
Getting Ready
• Press the SONG/USER button or PIANO button to select the
mode that contains the tune you want to use for recording.
1
Recording a Performance
(Free Recording)
Use this procedure when you want to record accompaniments and
keyboard play in real time.
Getting Ready
• Press the RHYTHM button to enter the rhythm mode.
1
• This causes the SONG MEMORY button indicator lamp
to flash.
Press the SONG MEMORY button to enter record
standby.
• This causes the SONG MEMORY button indicator lamp
to flash.
Press the SONG MEMORY button to enter record
standby.
2
Use the TRACK button to select Track 1.
Flashing
2
Select the tune you want to use for recording.
3
Use the TRACK button to select the part you want to
record.
4
Configure the following settings as required.
3
• Tone (page E-6)
• Tempo (page E-17)
5
Press the START/STOP button to start recording.
* Use a slower tempo if you feel you might have trouble
playing properly at a faster tempo (page E-17).
6
Play the required notes on the keyboard.
7
4
To stop recording, press the START/STOP button again.
• This will stop the recording operation.
5
* If you want to immediately hear what you recorded,
press the START/STOP button again.
Song Recording Data
In addition to your keyboard play and chord accompaniment, the
following data is also stored by a song recording operation.
•
•
•
•
•
•
•
Configure the following settings as required.
• Tone (page E-6)
• Rhythm (page E-10)
• Accompaniment mode (page E-11)
Tone setting
Tempo setting
Tune name
Recording part
Pedal operations
Layer and split settings
Reverb and chorus settings
6
Press the START/STOP button.
• This starts recording.
Play the required notes on the keyboard.
• Any chords you play on the keyboard are recorded, along
with their Auto Accompaniment patterns. Melody notes
you play are also recorded.
• Any pedal operations you perform while playing are also
recorded.
To stop recording, press the START/STOP button again.
* If you make a mistake, you need to go back and
re-record from step 1.
* If you want to immediately hear what you recorded,
press the START/STOP button again.
NOTE
• Recording a performance to a track that already contains data
causes the existing data to be replaced by your new
performance.
Playing Back a Song Recording
Getting Ready
• Press the SONG MEMORY button to enter playback standby.
1
2
Press the START/STOP button.
• This starts playback of Song Memory contents.
• Use the TEMPO buttons to adjust the tempo.
To stop playback, press the START/STOP button again.
E-23
429A-E-025A
AP80R_e_17-28.p65
23
04.8.26, 3:44 PM
Recording Your Keyboard Play
Free Recording Track 1 Data
In addition to notes played on the keyboard and chord
accompaniments, the following data is also stored in Track 1 during
performance recording.
•
•
•
•
•
•
•
•
•
•
•
Tone number
Rhythm number
Rhythm controller operations
Pedal operations
Layer and split settings
Split point
Tempo setting
Reverb and chorus settings
Auto Harmonize setting
Registration Memory Contents
One Touch Preset setting
Playing Back a Free Recording
Use the procedure below to playback what you have recorded with
free recording.
Getting Ready
• Press the RHYTHM button to enter the rhythm mode.
• Press the SONG MEMORY button to enter playback standby.
1
2
Track 1 Free Recording Variations
● To record without rhythm
Skip step 4 of the above procedure.
• Recording without rhythm starts as soon as you press a
keyboard key.
● To start recording with synchro start
In place of step 4 of the above procedure, press the SYNCHRO/
ENDING button.
• Now Auto Accompaniment and recording will start when you
play a chord within the accompaniment keyboard range.
Press the START/STOP button.
• This starts playback of Song Memory contents. During
Song Memory playback, you can use the TRACK button
to mute either track and listen to the contents of the other
track only.
• Use the TEMPO buttons to adjust the tempo.
To stop playback, press the START/STOP button again.
NOTE
• During Song Memory playback, the entire range of the
keyboard operates as a melody keyboard, regardless of the
MODE button setting. You can play along with Song Memory
playback, if you want. You could use layer and split (page
E-7, E-8) at this time to assign multiple tones to the keyboard,
if you want.
• Note that pause, skip forward, and skip back operations
cannot be performed during Song Memory playback.
● To start recording with an intro using synchro start
In place of step 4 of the above procedure, press the SYNCHRO/
ENDING button and then the INTRO button.
• Now Auto Accompaniment and recording will start with an
intro pattern when you play a chord within the
accompaniment keyboard range.
● To start Auto Accompaniment part way into a recording
In place of step 4 of the above procedure, press the SYNCHRO/
ENDING button, and then play something within the melody
range of the keyboard.
• This records the melody without any accompaniment. Auto
Accompaniment will start when you play a chord within the
accompaniment keyboard range.
● To insert an ending or fill-in into a recording
During recording, use the SYNCHRO/ENDING button,
NORMAL/FILL-IN button and VARIATION/FILL-IN button.
E-24
AP80R_e_17-28.p65
429A-E-026A
24
04.8.26, 3:44 PM
Recording Your Keyboard Play
Overdubbing a Free Recording
You can use the following procedure to record a melody in Track
2 that combines something else that you previously recorded in
Track 1.
Getting Ready
• Press the RHYTHM button to enter the rhythm mode.
• Press the SONG MEMORY button to enter record standby.
1
Use TRACK button to select Track 2.
Flashing
2
Configure the following setting as required.
• Tone number
Deleting a Specific Part/Track
You can use the following procedure to delete a specific part/track
from a song recording or free recording.
Getting Ready
<When deleting a song recording part>
• Press the SONG/USER button or PIANO button.
<When deleting a free recording part>
• Press the RHYTHM button.
1
Press the SONG MEMORY button to enter record
standby.
2
Use the TRACK button to select the part/track you want
to delete.
3
Hold down the SONG MEMORY button until a
confirmation message appears on the display.
* Use a slower tempo if you feel you might have trouble
playing properly at a faster tempo (page E-17).
3
Press the START/STOP button.
• This starts playback from Track 1 and recording to Track 2.
4
Play the melody notes you want as you listen to the
playback from Track 1.
5
To stop recording, press the START/STOP button again.
* If you make a mistake, you need to go back and
re-record from step 1.
* If you want to immediately hear what you recorded,
press the START/STOP button again.
• To cancel the delete operation, press the NO button.
4
Press the YES button to delete the data.
• This causes the digital piano to return to Song Memory
playback standby.
NOTE
• Pressing the SONG MEMORY button while the part/track
delete screen is on the display returns to record standby.
Song Memory contents are retained even when you turn
off digital piano power (page E-3, E-22, A-7).
NOTE
• Track 2 is a melody-only track, which means that chord
accompaniment cannot be recorded there. Because of this,
the entire range of the keyboard becomes a melody keyboard
when recording the Track 2, regardless of the current MODE
button setting.
• If you want to record without playback from a recorded track,
enter playback standby, deselect the playback track, and then
enter record standby. Note, however, that you cannot turn
off rhythm and Auto Accompaniment.
Free Recording Track 2 Data
In addition to notes played on the keyboard, the following data is
also recorded to Track 2.
• Tone number
• Pedal operations
E-25
429A-E-027A
AP80R_e_17-28.p65
25
04.8.26, 3:44 PM
Other Settings
Use the procedure provided below to change the following settings.
Keyboard Touch
Display Contrast
Use this setting to adjust the contrast of the display screen (00 to
16).
This setting changes the relative touch of the keyboard keys.
: Off
: Weak (Strong sound is produced even when
relatively light pressure is applied.)
Normal : Normal
Heavy : Strong (Normal sound is produced even when
relatively strong pressure is applied.)
Con t r as t :
[ 16 ] 00
off
Light
Touch0Se l ec t : 000000
[ No r ma l ] 0 0 0 0 0 0 0 0 0
Keyboard Tuning
Use this setting to raise or lower the overall pitch of the digital
piano to match another instrument. The setting range is plus or
minus 50 cents (100 cents = 1 semitone) from the standard pitch of
A4 = 440.0Hz.
Tun i ng : 000000000000
[ - 50 ] 000000000000000
To configure other settings
1
Press the SETTING button.
2
Use the [왗] and [왘] cursor buttons to display the setting
screen for the parameter whose setting you want to
change.
3
Use the dial to change the currently displayed setting.
4
After all the settings are the way you want, press the
SETTING button.
NOTE
• Though a pedal setting screen will appear when you perform
the above procedure, note that this model does not support
pedal setting operations.
Layer Tone Volume
You can specify a volume value in the range of –24 to 00 to +24 for
the layered tone when using the layer feature (page E-7).
Laye r 0Ba l ance :
[ 00 ]
Dial
[왗] / NO
[왘] / YES
SETTING
SONG/USER
E-26
AP80R_e_17-28.p65
429A-E-028A
26
04.8.26, 3:44 PM
Other Settings
To configure MIDI settings
Using MIDI
What is MIDI?
MIDI is a standard for digital signals and connectors that allows
musical instruments, computers, and other devices, regardless of
manufacturer, to exchange data with each other.
MIDI Connections
Connecting your computer or other external MIDI device to the
digital piano’s MIDI IN/OUT terminals makes it possible for them
to exchange MIDI messages and record and playback keyboard
notes on the connected device.
1
Press the SETTING button.
2
Use the [왗] and [왘] cursor buttons to display the screen
for the MIDI setting you want to change.
3
Use the dial to change the currently displayed setting.
4
After all the settings are the way you want, press the
SETTING button.
Connecting to a Computer
MIDI cable: MK-5
You can use the digital piano’s USB Port to connect to a computer.
[Bottom]
Using the USB Port
MIDI OUT
MIDI IN
Note that you need to purchase a commercially available USB cable
to connect to a computer using the USB port.
To connect to a computer using the USB
port
1
Configuring MIDI Settings
● Send Channel
Use this setting to specify one of the MIDI channels (1 through 16)
as the Send Channel, which is used for sending MIDI messages to
an external device.
Keyboa r d0Channe l :
[ 16 ] 00000000000000
On the computer to which you plan to connect, install
the USB driver that on the CD-ROM that comes bundled
with the digital piano.
• See the readme.txt file on the CD-ROM for details about
how to install the driver.
2
Use a commercially available USB cable to connect
the digital piano to the computer.
Computer
USB port
● Local Control
When Local Control is turned on, pressing the keyboard’s keys
plays the notes using the currently selected built-in tone, and also
sends the applicable MIDI messages out the MIDI OUT terminal.
Turning off Local Control causes MIDI messages to be sent out the
MIDI OUT terminal, but nothing is played by the digital piano’s
sound source when keys are pressed. This comes in handy when
you want to turn off the digital piano’s keyboard and use its auto
accompaniment feature to accompany an external sequencer or
other device.
USB cable
USB connector
[Bottom]
Digital piano USB port
Loca l 0Con t r o l :
[O f f ]
● Accomp MIDI Out
This setting controls whether or not MIDI messages for the digital
piano’s Auto Accompaniment should be sent.
A c c omp 0Ou t :
[O f f ]
E-27
429A-E-029A
AP80R_e_17-28.p65
27
04.8.26, 3:44 PM
Other Settings
USB Mode and MIDI Mode
Your digital piano has two data communication modes: a USB mode
and a MIDI mode.
The USB mode is used when sending and receiving data via the
digital piano’s the USB port, while the MIDI mode is used for data
send and receive via its MIDI terminals.
USB Mode/MIDI Mode Switching
The digital piano will enter the USB mode automatically whenever
a connection is established between it and the USB driver running
on a connected computer. Any other time (when there is no USB
connection between the digital piano and a computer), the digital
piano is in the MIDI mode.
USB Mode
Ac t i ve Po r t :
0
USB0 0 0 0 0 0 0 0
• If you connect to a computer via the USB port before turning on
power, the screen will show “USB” when you turn on power.
Note that the screen also will show “USB” and the digital piano
will enter the USB mode if you turn on power while there are
connections to both the USB port and the MIDI terminals.
• The “USB” indicator will appear for about one second to indicate
the USB mode whenever you connect to a computer via the USB
port while the digital piano is turned on.
Expanding the Number of Built-in
Tunes
You can transfer song data for up to 10 tunes (approximately 132
kilobytes) to digital piano memory and store it as Song Group tunes
number 30 through 39.
You can obtain a copy of the special CASIO conversion software
by downloading it at the Web page shown below. After
downloading, install the software on your computer.
CASIO MUSIC SITE
http://music.casio.com/
* In addition to the software itself, the CASIO MUSIC SITE
will also provide you with information about its
installation and use. You can also find out about how to
connect your computer and digital piano, the latest news
about your digital piano and other CASIO musical
instruments, and much more.
Deleting a User Song
Use the following procedure to delete a user song you have loaded
to digital piano memory from your computer.
1
Hold down the SONG/USER button until a user song
selection screen appears.
MIDI Mode
ML Us e r So n g De l e t e ?
[ 30 : x x x x x x x ]
x x x KB
A c t i v e P o r t : M I D I0 0 0 0 0 0 0 0
0
• If you connect another device to the digital piano’s MIDI
terminals (only) before turning on power, the screen will show
“MIDI” when you turn on power.
• Disconnecting from the digital piano’s USB port while the digital
piano is turned on will cause the “MIDI” indicator to appear for
about one second to indicate the MIDI mode.
• To exit the selection screen, press the NO button.
2
3
Use the dial to select the song you want to delete.
Press the YES button to delete the song.
• The display should now show 0 kilobytes.
E-28
AP80R_e_17-28.p65
429A-E-030A
28
04.8.26, 3:44 PM
Using a Memory Card
In addition to the digital piano’s memory, you can also use a
SmartMedia memory card to store digital piano data or data loaded
from your computer. The following table shows the types of data
you can save to a memory card.
<Savable File Types>
Type
Display Indicator
File Name Extension
M.L. Song
.CM2
MemorySong
Song Recording: .CSM
Free Recording: .CSR
Registration
.CR3
Music Library
tunes
Song Memory
Data
Registration
Memory Setups
Using a Memory Card
The digital piano has a card slot that accepts SmartMediaTM memory
cards. This provides you with the means to store virtually unlimited
amounts of user song and other data from digital piano memory.
SmartMedia memory cards are available in capacities ranging from
8MB up to 128MB. The cost of a card varies according to its capacity.
Note also that SmartMedia memory cards are available for two
different voltages: 3.3V and 5V. This digital piano supports the use
of 3.3V cards.
Though a SmartMedia memory card is about the size of a postage
stamp, it has anywhere from eight times to 100 times the storage
capacity of a floppy diskette, and it provides very high-speed
access. SmartMedia memory cards are available from household
appliance stores, computer shops, etc.
* SmartMediaTM is a trademark of Toshiba Corporation.
NOTE
• The term “memory card” in this manual refers to the
SmartMedia memory card.
Memory Cards
IMPORTANT!
• Be sure to use only a 3.3V SmartMedia memory card that has
one of the following capacities.
8MB, 16MB, 32MB, 64MB, 128MB
WARNING
• Use of 5V SmartMedia memory cards is not supported.
• Note that you will not be able store data to, delete data from, or
rename files on a memory card that has a write protect sticker in
the write protect area.
Contacts
Write protect area
Memory Card and Card Slot Handling
Precautions
IMPORTANT!
• When using a memory card, make sure you observe all of the
precautions in the instructions that come with it.
• Avoid using a memory card in the following types of areas. Such
conditions can corrupt data stored on the memory card.
• Areas subjected to high temperature, high humidity, and
corrosive gas
• Areas subjected to strong electrostatic charge and digital noise
• Never touch the contacts of a memory card when loading it or
removing it from the digital piano.
• Never remove the memory card from the card slot or turn off
the digital piano while any data access operation (save, read,
delete) is in progress. Doing so can corrupt the data on the
memory card and damage the card slot.
• Never insert anything besides a memory card into the card slot.
Doing so creates the risk of malfunction.
• Inserting a memory card that carries an electrostatic charge into
the card slot can cause malfunction of the digital piano. If this
happens, turn digital piano power off and then back on again.
• A memory card can become quite warm after very long use in
the card slot. This is normal and does not indicate malfunction.
• A memory card has a limited service life. If you start to experience
problems with storing, reading, or deleting data from a memory
card you have been using for a long time, it may mean that the
card has reached the end of its service life. When this happens,
you need to purchase a new card.
Note that CASIO COMPUTER CO., LTD. shall not be held
liable for any loss of data stored on a memory card.
Dial
CARD
FUNCTION
[왗] / NO
[왘] / YES
EXECUTE
E-29
429A-E-031A
AP80R_e_29-41.p65
29
04.8.26, 3:44 PM
Using a Memory Card
Loading a Memory Card into the Card Slot
With the label side of the memory card facing downwards, carefully
insert it into the card slot. Carefully slide the memory card straight
into the slot, as far as it will go.
NOTE
• When inserting a SmartMedia card into the card slot, make
sure you carefully orient the card correctly so it slides correctly
straight into the slot.
Removing a Memory Card from the Card Slot
After making sure that the memory card is not being accessed*,
pull it out of the card slot.
* The memory card is being accessed when the CARD button or
CARD FUNCTION indicator lamp is lit. Make sure that both of
these indicator lamps are not lit.
IMPORTANT!
• Never remove the memory card from the card slot or turn off
the digital piano while any data access operation (save, read,
delete) is in progress. Doing so can corrupt the data on the
memory card and damage the card slot.
To save a file to a memory card
1
2
Use the dial to display the “Save” screen.
3
Press the [왘] cursor button to advance to the file type
selection screen.
4
Use the dial to select the file type.
5
Press the [왘] cursor button to advance to the next
screen.
6
Use the dial to select the file you want to save.
To save this type of file:
Select this:
Music Library playback tune
User song number/name
Song Memory data
Free Recording tune
(Rythm Mem),
Song Recording tune
(ML MEM)
Registration memory setup
Bank number
7
8
Saving Files to a Memory Card
See “Savable File Types” on page E-29 for information about the
type of data you can save.
9
Getting Ready
• Insert a properly formatted memory card into the digital piano’s
card slot. Make sure that the sticker is removed from the card’s
write area, which enables writing.
NOTE
• Depending on the type and the amount of data involved, a
memory card data save or load operation can take anywhere
from a few minutes to more than 10 minutes to complete.
The message “Please Wait” will remain on the display to
indicate that a data save or load operation is being performed.
IMPORTANT!
• Never try to perform any operation while “Please Wait” is
displayed. Performing any operation can cause digital piano’s
built in memory data or the memory card data to be deleted, or
damage data and make it impossible to read.
Press the CARD FUNCTION button.
• This causes the indicator lamp above the button to light.
10
11
After selecting a file, press the [왘] cursor button to
advance to the next screen.
Input the file name you want to use.
• Use the dial to scroll through letters at the current cursor
location. For details about the characters you can input,
see “Supported Input Characters” on page E-33.
• Use the [왗] and [왘] cursor buttons to move the cursor left
and right.
After inputting the file name, press the EXECUTE button.
• This will display a confirmation message asking whether
you really want to save the data. If the memory card
already contains a file with the same name, a confirmation
message appears asking if you want to overwrite the
existing file with a new one.
To save the data, press the YES button.
• The message “Please Wait” will remain on the display
while the save operation is being performed. Never try to
perform any other operation on the digital piano while
the card is being accessed. The screen in step 2 will
reappear after the save operation is complete.
• If you do not want to continue with the save operation, press
the NO button. This will return to the screen in step 8.
After you are finished saving the data, press the CARD
FUNCTION button so its indicator lamp goes out.
E-30
AP80R_e_29-41.p65
429A-E-032A
30
04.8.26, 3:44 PM
Using a Memory Card
Loading a File from a Memory
Use the procedure below to load data from a memory card into the
digital piano memory.
IMPORTANT!
• Before you can use a SmartMedia card with this digital piano,
you need to perform the procedure below to format it. After
formatting the card, transfer SMF data from your computer to
the card.
• Formatting a SmartMedia card with this digital piano
automatically creates a folder named “CASIO_MD” on the
card. When transferring SMF data from your computer to the
card for use by the digital piano, be sure to store it in the
“CASIO_MD” folder.
Getting Ready
• Insert the SmartMedia card that contains the data you want to
recall into the digital piano’s card slot.
8
Use the dial to select the destination of the file you are
loading.
To load this type of file:
Select this destination:
Music Library playback tune
User song number/name
Song Memory data
Free Recording tune
(Rythm Mem),
Song Recording tune
(ML MEM)
Registration memory setup
Bank number
9
After selecting the destination, press the EXECUTE
button.
• This will display a confirmation message asking whether
you really want to load the data.
10
NOTE
• Depending on the type and the amount of data involved, a
memory card data save or load operation can take anywhere
from a few minutes to more than 10 minutes to complete.
The message “Please Wait” will remain on the display to
indicate that a data save or load operation is being performed.
11
Press the YES button to load the data.
• The message “Please Wait” will remain on the display
while the load operation is being performed. Never try to
perform any other operation on the digital piano while
the card is being accessed. The screen in step 2 will
reappear after the load operation is complete.
• If you do not want to continue with the load operation, press
the NO button. This will return to the screen in step 8.
After you are finished loading the data, press the CARD
FUNCTION button so its indicator lamp goes out.
IMPORTANT!
• Never try to perform any operation while “Please Wait” is
displayed. Performing any operation can cause digital piano’s
built in memory data or the memory card data to be deleted, or
damage data and make it impossible to read.
To load file data from a memory card
1
Press the CARD FUNCTION button.
• This causes the indicator lamp above the button to light.
2
Use the dial to display the “Load” screen.
3
Press the [왘] cursor button to advance to the file type
selection screen.
4
Use the dial to select the type of file you want to load.
5
Press the [왘] cursor button to display the file name
selection screen.
6
Use the dial to select the name of the file you want to
load.
7
Press the [왘] cursor button to advance to the next
screen.
E-31
429A-E-033A
AP80R_e_29-41.p65
31
04.8.26, 3:44 PM
Using a Memory Card
Renaming a Memory Card File
You can use the procedure below to change the name of a file that
you previously saved to a memory card.
Getting Ready
• Insert the memory card that contains the file you want to rename
into the card slot. Make sure that the sticker is removed from
the card’s write protect area, which enables writing.
To rename a file on a memory card
1
Press the CARD FUNCTION button.
Deleting a Memory Card File
Use the procedure below to delete a file from a memory card.
IMPORTANT!
• Note that the file delete operation cannot be undone. Make sure
that you no longer need data before you delete it.
Getting Ready
• Insert the memory card that contains the file you want to delete
into the digital piano’s card slot. Make sure that the sticker is
removed from the card’s write protect area, which enables
writing.
• This causes the indicator lamp above the button to light.
To delete a file from a memory card
2
Use the dial to display the “Rename” screen.
1
3
Press the [왘] cursor button to advance to the file type
selection screen.
4
Use the dial to select the type of the file you want to
rename.
5
Press the [왘] cursor button to advance to the file name
selection screen.
6
Use the dial to select the name of the file you want to
rename.
7
Press the [왘] cursor button to advance to the file name
input screen.
• Use the dial to scroll through letters at the current cursor
location. For details about the characters you can input,
see “Supported Input Characters” on page E-33.
• Use the [왗] and [왘] cursor buttons to move the cursor left
and right.
8
9
10
2
Use the dial to display the “Delete” screen.
3
Press the [왘] cursor button to advance to the file type
selection screen.
4
Use the dial to select the type of the file you want to
delete.
5
Press the [왘] cursor button to advance to the file name
selection screen.
6
Use the dial to select the name of the file you want to
delete.
7
After selecting the file to be deleted, press the EXECUTE
button.
• This will display a confirmation message asking whether
you really want to delete the file.
After inputting the file name, press the EXECUTE button.
• This will display a confirmation message asking whether
you really want to change the name.
8
Press the YES button to change the file name.
• The message “Please Wait” will remain on the display
while the rename operation is being performed. Never try
to perform any other operation on the digital piano while
the card is being accessed. The screen in step 2 will
reappear after the rename operation is complete.
• If you do not want to continue with the rename operation,
press the NO button. This will return to the screen in step 7.
Press the CARD FUNCTION button.
• This causes the indicator lamp above the button to light.
9
Press the YES button to delete the file.
• The message “Please Wait” will remain on the display
while the delete operation is being performed. Never try
to perform any other operation on the digital piano while
the card is being accessed. The screen in step 2 will
reappear after the delete operation is complete.
• If you do not want to continue with the delete operation,
press the NO button. This will return to the screen in step 5.
After you are finished deleting the file, press the CARD
FUNCTION button so its indicator lamp goes out.
After you are finished renaming the file, press the CARD
FUNCTION button so its indicator lamp goes out.
E-32
AP80R_e_29-41.p65
429A-E-034A
32
04.8.26, 3:44 PM
Using a Memory Card
Formatting a Memory Card
Use the procedure below to format a memory card.
Supported Input Characters
The following shows the characters you can input when inputting
the name of a file being saved to a memory card.
IMPORTANT!
• Note that formatting a memory card that already contains data
causes all of that data to be deleted. Data deleted by the format
operation cannot be recovered. Before performing the procedure
below, check to make sure that the memory card does not contain
any data you might need.
Getting Ready
• Insert the memory card you want to format into the digital
piano’s card slot. Make sure that the sticker is removed from the
card’s write protect area, which enables writing.
To format a memory card
1
2
3
4
5
Press the CARD FUNCTION button.
• This causes the indicator lamp above the button to light.
Use the dial to display the “Format” screen.
Press the EXECUTE button.
• This will display a confirmation message asking whether
you really want to format the memory card.
Press the YES button to start formatting.
• The message “Please Wait” will remain on the display
while the format operation is being performed. Never try
to perform any other operation on the digital piano while
the card is being accessed. The screen in step 2 will
reappear after the format operation is complete.
• If you do not want to continue with the formatting
operation, press the NO button. This will return to the
screen in step 2.
After you are finished formatting the memory card, press
the CARD FUNCTION button so its indicator lamp goes
out.
E-33
429A-E-035A
AP80R_e_29-41.p65
33
04.8.26, 3:44 PM
Using a Memory Card
Memory Card Error Messages
Display Message
Cause
Action
Err Card R/W
There is something wrong with the memory card.
Use a different card.
Err CardFull
The memory card is full.
1. Use a different card.
2. Delete files you no longer need from the card (page
E- 32).
Err No Card
1. The memory card is not set correctly in the card slot.
1. Remove the card and reinsert it correctly (page
E-30).
2. Insert a card into the card slot. Never remove a card
from the card slot while a card access operation is
in progress.
2. There is no memory card in the card slot or the card
was removed part way through a card access
operation.
1. A file with the same name as the one you are trying
to use already exists on the memory card.
2. You are trying to use a file name that is not allowed
by MS-DOS.
1. Use a different file name (page E-32).
Err ReadOnly
You are trying to use a file name that is already used
for a read-only file on the memory card.
Use a different card or use a different name.
Err Format
1. The format of the memory card in the card slot is
not supported by this digital piano.
2. The memory card in the card slot is not formatted.
3. There is something wrong with the memory card.
1. Use a card that has the supported format (page
E-29).
2. Format the card (page E-33).
3. Use a different card.
Err Mem Full
There is not enough digital piano memory available
to hold the data you are trying to load.
1. Delete data you no longer need from the load
destination where you are trying to store it.
2. If you are loading data to Song Memory, delete song
data you no longer need (page E-25).
Err Not SMF0
You are attempting to load SMF (Standard MIDI File)
data that is not Format 0.
Use only Format 0 SMF data.
Err No File
You are trying to load data from a card that does not
contain any data that is supported by this digital piano.
Change to a memory card that contains data saved by
or supported by this digital piano.
Err Protect
You are trying to save data to a memory card that is
write-protected.
1. Use a different card.
2. If you want to write to the current memory card,
remove it from the card slot and remove the write
protect sticker (page E-29).
Err WrongDat
There is a problem with the data on the memory card
or the data is corrupted.
Use different data or a different card.
Err SizeOver
The data file size is greater than 132 kilobytes.
Select a data that is 132 kilobytes in size or smaller.
Err No Data
You are attempting to save a user song that does not
contain any data.
Select a user song that contains data.
Err FileName
2. Name files using the allowable characters (page
E-33).
E-34
AP80R_e_29-41.p65
429A-E-036A
34
04.8.26, 3:44 PM
Troubleshooting
Problem
Cause
Action
No sound is produced when I press a
digital piano key.
1. The MAIN VOLUME knob is set to
“MIN”.
2. Headphones are connected to the
digital piano.
3. MIDI Local Control is turned off.
4. Check the current accompaniment
mode setting. Normally, the
accompaniment keyboard will not
produce any note while CASIO
CHORD or FINGERED is selected
as the accompaniment mode.
1. Rotate the MAIN VOLUME knob
more towards “MAX”.
2. Unplug the headphones from the
digital piano.
3. Turn on the Local Control setting.
4. Change the accompaniment mode
setting to NORMAL.
E-6
1. The digital piano’s key setting is
something other than “C”.
1. Change the key setting to “C”, or
turn digital piano power off and
then back on again.
2. Adjust digital piano tuning, or turn
digital piano power off and then
back on again.
E-21
1. The MAIN VOLUME knob is set to
“MIN”.
2. Headphones are connected to the
digital piano.
1. Rotate the MAIN VOLUME knob
more towards “MAX”.
2. Unplug the headphones from the
digital piano.
E-6
Digital piano memory contents seem
to disappear.
The lithium battery used for memory
backup is dead.
Contact your nearest CASIO service
center to have the lithium battery
replaced.
A-7
When I play something on the digital
piano, my connected external MIDI
sound source does not sound.
1. This digital piano’s send channel
does not match the send channel of
the external MIDI sound source.
2. The volume or expression setting of
the external sound source is “0”.
1. Configure the digital piano and the
external MIDI sound source to their
send channels match.
2. Adjust the volume and expression
settings of the external sound
source.
E-27
Auto Accompaniment does not sound.
The accompaniment volume setting is
“000”.
Use the ACCOMP/SONG VOLUME
button to increase accompaniment
volume.
E-13
The sound output by the digital piano
does not change regardless of how
much keyboard pressure I use.
Touch Response is turned off.
Use the SETTING button to turn on
Touch Response.
E-26
When playing together with another
MIDI instrument, keys and tunings do
not match.
The Tuning or Transpose setting of the
digital piano is something other than
“00”.
Use
the
TRANSPOSE/KEY
CONTROL button or the SETTING
button to change the transpose and
tuning settings to “00”.
E-21, 26
I am not able to record Auto
Accompaniment or rhythm patterns.
Track 2 (melody-only track), is
specified as the recording track.
In record standby, use the TRACK
button to select Track 1.
E-22
When connected to a computer over a
MIDI connection, playing on the
keyboard produces unnatural sounds.
The computer’s MIDI THRU function
is turned on.
Turn off MIDI THRU on the computer,
or use the digital piano’s CONTROL
button to turn off Local Control.
E-27
I can’t record chord accompaniment
data on my computer.
Accomp MIDI OUT is turned off.
Use the SETTING button to turn on
Accomp MIDI OUT.
E-27
The microphone does not work.
1. The microphone volume setting is
too low.
2. The microphone’s switch is turned
off.
1. Increase microphone volume.
E-20
2. Turn on the microphone’s switch.
E-20
Nearby fluorescent lighting or other
digital noise source.
Move the microphone away from the
source of the noise.
E-20
The pitch of the digital piano is off.
2. The digital piano tuning is incorrect.
Demo play seems to start, but I can’t
hear anything.
There is noise in the microphone
output.
E-4
E-27
E-11
E-26
E-4
External sound
source user’s
guide
E-35
429A-E-037A
AP80R_e_29-41.p65
See Page
35
04.8.26, 3:44 PM
Troubleshooting
Problem
Cause
I can’t store data on a memory card.
1. The card is write-protected.
2. The card is not inserted correctly
into the card slot.
3. There is not enough room available
on the card.
4. The card has voltage specifications
or a capacity that is not supported
by this digital piano.
5. There is something wrong with the
card.
I can’t load data from a memory card.
I can hear sound through only one side
of my headphones.
Action
1. Remove the write protect sticker
from the card.
2. Correctly insert the card into the
slot.
3. Use a different card or delete files
you no longer need.
4. Use a card of the specified voltage
specifications and capacity.
E-29
E-30
E-32
E-29
5. Use a different card.
1. The card is not inserted correctly
into the card slot.
2. There is not enough room in the area
into which you are trying to load the
data.
3. The card has voltage specifications
or a capacity that is not supported
by this digital piano.
4. There is something wrong with the
card.
1. Correctly insert the card into the
slot.
2. Make more room in digital piano
memory by deleting downloaded
songs, and/or Song Memory data.
3. Use a card of the specified voltage
specifications and capacity.
The headphones plug is not inserted
all the way into the PHONES jack.
Push the headphones plug into the jack
as far as it will go.
E-29
E-25, 28
E-29
4. Use a different card.
E-36
AP80R_e_29-41.p65
See Page
E-4
429A-E-038A
36
04.8.26, 3:44 PM
Assembly Instructions
CAUTION
• Take particular care to avoid injury when installing legs and
pedals, and when mounting the keyboard onto the stand.
• When assembling, make sure that the sliding keyboard cover of
the digital piano body is completely closed. If the cover is left
open during assembly, it may close suddenly causing the fingers
to be pinched between the digital piano body and cover.
1 Assembling the stand
Refer to Figures 3, 4 and 5 as you assemble the stand according to
the following procedure.
Figure 3
E
IMPORTANT!
• Be sure to assemble the stand on a flat surface.
• This stand does not include any of the tools required to assemble
it. You should have a large Phillips head (+) screwdriver on hand
for assembly.
I
C
I
E
A
I
Figure 1
D
×4
C
A
×6
×1
×2
B
×4
E
F
G
H
I
E
Side upright
3
B
Crosspiece
2
D
1
• Check the items that come with the unit to make sure that
everything shown in Figure 1 (A through I) is included.
All screws are in a plastic bag inside of the packing cardboard.
Figure 2
1
Attach side uprights A and B to crosspiece D using
the four E screws (Figure 3).
• When joining the two pieces marked 2, the metal pieces
3 on the insides of side uprights A and B should fit into
the slots at the ends of crosspiece D. Make sure the metal
pieces are pushed into the slots as far as they will go. If
they are not, the metal pieces 3 and the screws E will not
match up correctly, which can cause stripping of the
screws.
• Before starting actual assembly of the stand, undo the clip at
location 1 (Figure 2) where the pedal cable comes out the back
of crosspiece D.
E-37
429A-E-039A
AP80R_e_29-41.p65
37
04.8.26, 3:44 PM
Assembly Instructions
Figure 4
Figure 5
F
B
G
(Back)
A
C
I
7
5
G
3
F
I
4
Rotate height adjustment screw 7 until it supports
crosspiece D, preventing the crosspiece from bending
when you press the pedals (Figure 5).
IMPORTANT!
• Be sure to rotate adjustment screw 7 and perform the adjustment
procedure described above before depressing the pedals. Failure
to do so can result in damage to crosspiece D.
I
6
2
Attach back panel C to the 4 brackets and crosspiece
D. Note that the back panel C should be installed so it
is in front of the 4 brackets (Figure 4). Use the four I
screws, six F screws to secure the back panel in place
(Figures 3 and 4). Note that you must also install the G
clip at this time as shown in the illustration.
• First, install the topmost I screws on the left and right
sides of the back panel C. Note that you should slip the
G clip onto the F screw at point 5 before you screw in
the F screw.
• The back panel C should rest on the feet of side uprights
A and B as indicated by 6 in the illustration. Press the
back panel C against crosspiece D while installing the I
screws.
E-38
AP80R_e_29-41.p65
429A-E-040A
38
04.8.26, 3:44 PM
Assembly Instructions
2 Installing the Keyboard onto the Stand
CAUTION
• Take care that you do not pinch your fingers between the
keyboard and stand!
3 Connecting the Pedal
Figure 8
Clip
Figure 6
Pedal plug
8
8
H
Position the pedal plug as shown in Figure 8 and insert it into the
pedal connector on the bottom of the digital piano. Secure the pedal
cable to the upright of the stand using the clips (Figure 8).
H
Be sure that you securely anchor the keyboard to the stand using
the H butterfly bolts (Figure 6).
• Slide the screws on the bottom of the keyboard into the slots in
the two angle brackets 8. Next, secure the keyboard to the stand
with two butterfly bolts H (Figure 7).
Figure 7
8
Back
H
Front
• The butterfly bolts keep the keyboard from falling from the stand.
Be sure that you always secure the keyboard with the butterfly
bolts.
E-39
429A-E-041A
AP80R_e_29-41.p65
39
04.8.26, 3:44 PM
Assembly Instructions
4 Connecting to a Power Supply
Attachment of the Score Stand
Install the music stand by inserting its pegs into the holes in the
top of the piano.
Figure 9
Power cord
Household
wall outlet
1
Check to make sure that the digital piano’s POWER
button is in the OFF position. If it is ON, press the button
to switch it OFF.
2
Attach the power cord that comes with the digital piano
to the bottom of the digital piano.*
3
Plug the digital piano’s power cord into a wall outlet
(Figure 9).
* applies to the AP-80RV.
IMPORTANT!
• The shapes of the digital piano’s power cord and wall outlet
should be different according to countries or regions. The
illustrations are examples.
• With the AP-80R, the power cord is hard-wired to the bottom of
the instrument.
CAUTION
• The screws that you use to assemble the stand may
become loose after a long period due to changes in
temperature and humidity, or vibration caused by normal use,
etc. Periodically check the screws used to fasten the stand and
the butterfly bolts used to fasten the stand and the digital piano,
and tighten them whenever necessary.
Power Outlet
• To power the digital piano, use a power outlet that allows easy
access when plugging in or unplugging the power cord.
E-40
AP80R_e_29-41.p65
429A-E-042A
40
04.8.26, 3:44 PM
Specifications
All of the items in these specifications apply to the AP-80R and AP-80RV, unless specifically noted otherwise.
Models:
AP-80R/AP-80RV
Keyboard:
88 piano keys (with touch response)
Polyphony:
32 notes, maximum
Tones:
120 panel tones + 128 GM tones + 10 drum sets; with layer and split
Digital Effects:
Reverb (4 types), Chorus (4 types)
• Time Signatures: 0, 2, 3, 4, 5, 6
Metronome:
• Tempo Range: 20 to 255
Auto Accompaniment:
• Number of Rhythms: 120
• Tempo Range: 20 to 255
• Modes: Normal; CASIO CHORD; FINGERED; FULL RANGE CHORD
• Accompaniment Volume: Adjustable
• One Touch Presets: Optimal tone, tempo, layer/auto harmonize on/off settings to match
rhythm
• Auto Harmonize:
12 types; adds harmony notes to melody in accordance with auto
accompaniment chord fingerings.
• Number of Tunes: Piano Group 50 + Song Group 30
+ 10 loaded song data (Approximately 132 kilobytes )
Built-in Tunes:
• Tempo: 20 to 255
• Demo: Sequential looping of all 80 preset tunes
• Song Volume: Adjustable
Lesson Function:
Lesson Part: Left hand, right hand
Song Memory:
• Number of Songs: Two (1 Song Recording, 1 Free Recording)
• Recorded Data: Song Recording: Right-hand part, left-hand part, both-hand parts
Free Recording: Track 1 (chord accompaniment), Track 2 (melody)
• Recording Method: Real-time
• Memory Capacity: Approximately 5,300 notes (two songs)
Pedals:
Damper, Soft, Sostenuto
Registration Memory:
Number of Memory Areas: 16 (4 sets × 4 banks)
Card Slot:
3.3V SmartMediaTM
Other Functions:
• Touch: 3 types, off
• Transpose: 1 octave (F to C to F)
• Tuning: A4 = 440.0Hz ±50 cents (adjustable)
• Display Contrast: Adjustable
MIDI:
16 multi-timbre receive, GM Level 1 standard
Input/Output:
• Headphones: Stereo standard jacks × 2
Output Impedance : 170Ω
Output Voltage : 1.1V (RMS) MAX
• LINE OUT (R)(L/MONO): Standard jacks × 2
Output impedance: 2.3kΩ
Output voltage: 1.0V (RMS) MAX
• MIC IN:
Standard jack
Input impedance: 3.3kΩ
Input voltage: 10mV
• MIDI (OUT) (IN)
• USB port
φ16 cm × 2 + φ5 cm × 2 (Output: 20W + 20W)
Speakers:
AP-80R: 120V
Power Supply:
AP-80RV: 220-240V
AP-80R: 60W
Power Consumption:
AP-80RV: 60W
• Digital Piano (without stand): 138.0 ҂ 47.6 ҂ 24.4 cm (54 3/8 ҂ 18 3/4 ҂ 9 5/8 inch)
Dimensions:
• Digital Piano: 138.1 ҂ 47.7 ҂ 84.6 cm (54 7/16 ҂ 18 13/16 ҂ 33 5/16 inch)
• Digital Piano (without stand): approximately 41.6 kg (91.7 lbs)
Weight:
• Digital Piano: Approximately 54.0 kg (119.0 lbs)
• Design and specifications are subject to change without notice.
• AP-80R has hardwired power cords.
• AP-80RV has detachable power cords.
E-41
429A-E-043A
AP80R_e_29-41.p65
41
04.8.26, 3:44 PM
Appendix/Apéndice
Tone List/Lista de sonidos
1 Tone Group Name/Nombre de grupo de sonido
2 No./Nº
3 Tone Name/Nombre de sonidos
4 Program Change/Cambio de programa
5 Bank Select MSB/MSB de selección de banco
6 Maximum Polyphony/Polidonía máxima
Panel Tones/Sonidos de panel
1
PIANO
2
000
001
002
003
004
005
006
007
008
009
E.PIANO/CHROMATIC 000
001
002
003
004
005
006
007
008
009
010
011
012
013
ORGAN
000
001
002
003
004
005
006
007
008
009
010
011
012
013
GUITAR
000
001
002
003
004
005
006
007
008
009
010
BASS
000
001
002
003
004
005
006
007
STRINGS/ENSEMBLE 000
001
002
003
004
005
3
STEREO PIANO
GRAND PIANO
MELLOW PIANO
ROCK PIANO
DANCE PIANO
HONKY-TONK
OCTAVE PIANO
PIANO PAD
HARPSICHORD
COUPLED HARPSICHOR
ELEC.PIANO 1
ELEC.PIANO 2
DYNO ELEC.PIANO
FM ELEC.PIANO
60’S E.PIANO
CHORUSED EP
E.PIANO PAD
ELEC.GRAND PIANO
MODERN E.G.PIANO
CLAVI
VIBRAPHONE
MARIMBA
CELESTA
GLOCKENSPIEL
DRAWBAR ORGAN 1
DRAWBAR ORGAN 2
PERC.ORGAN 1
PERC.ORGAN 2
ELEC.ORGAN 1
ELEC.ORGAN 2
JAZZ ORGAN
ROCK ORGAN
CHURCH ORGAN
CHAPEL ORGAN
ACCORDION
OCTAVE ACCORDION
BANDONEON
HARMONICA
NYLON STR.GUITAR
STEEL STR.GUITAR
12 STR.GUITAR
JAZZ GUITAR
OCT JAZZ GUITAR
CLEAN GUITAR
ELEC.GUITAR
MUTE GUITAR
OVERDRIVE GT
DISTORTION GT
FEEDBACK GT
ACOUSTIC BASS
RIDE BASS
FINGERED BASS
PICKED BASS
FRETLESS BASS
SLAP BASS
SAW.SYNTH-BASS
SQR SYNTH-BASS
STRINGS
SLOW STRINGS
CHAMBER
SYNTH-STRINGS 1
SYNTH-STRINGS 2
CHOIR AAHS
4
5
6
0
0
0
1
1
3
3
0
6
6
4
4
4
5
4
4
5
2
2
7
11
12
8
9
16
16
17
17
16
16
17
18
19
19
21
21
23
22
24
25
25
26
26
27
27
28
29
30
31
32
32
33
34
35
37
38
39
48
49
48
50
51
52
2
1
3
2
1
2
8
8
2
8
2
1
3
2
4
9
8
2
3
2
2
2
2
2
2
1
2
3
8
4
4
2
2
8
2
8
2
2
2
2
8
2
8
2
1
2
2
2
8
2
32
2
2
2
2
2
2
2
2
3
2
2
2
16
32
16
16
16
16
16
16
16
16
32
16
32
16
32
16
16
32
16
32
32
32
32
32
32
16
16
16
16
16
16
16
32
32
16
16
16
32
32
32
16
32
16
32
16
32
32
32
16
32
16
32
32
32
32
32
32
32
32
16
32
32
32
1
2
STRINGS/ENSEMBLE 006
007
008
009
010
011
012
013
BRASS
000
001
002
003
004
005
006
007
008
009
010
REED
000
001
002
003
004
005
006
007
008
009
010
PIPE
000
001
002
003
004
005
006
SYNTH-LEAD
000
001
002
003
004
005
006
SYNTH-PAD
000
001
002
003
004
005
006
007
008
009
010
011
012
GM TONES
000
001
002
003
004
005
3
CHOIRS
VOICE DOO
SYNTH-VOICE
SYNTH-VOICE PAD
VIOLIN
CELLO
PIZZICATO STRINGS
HARP
TRUMPET
TROMBONE
TUBA
MUTE TRUMPET
FRENCH HORN
BRASS
BRASS SECTION
BRASS SFZ
ANALOG SYNTH-BRASS
SYNTH-BRASS 1
SYNTH-BRASS 2
ALTO SAX 1
ALTO SAX 2
BREATHY A.SAX
TENOR SAX 1
TENOR SAX 2
BREATHY T.SAX
T.SAXYS
SOPRANO SAX
BARITONE SAX
OBOE
CLARINET
FLUTE 1
FLUTE 2
MELLOW FLUTE
PICCOLO
RECORDER
PAN FLUTE
WHISTLE
SQUARE LEAD
SAWTOOTH LEAD
MELLOW SAW LEAD
SINE LEAD
CALLIOPE
VOICE LEAD
BASS+LEAD
FANTASY
WARM PAD
WARM VOX
POLYSYNTH
POLY SAW
BOWED PAD
HALO PAD
ATMOSPHERE
BRIGHTNESS
ECHO PAD
STAR THEME
SPACE PAD
NEW AGE
GM PIANO 1
GM PIANO 2
GM PIANO 3
GM HONKY-TONK
GM E.PIANO 1
GM E.PIANO 2
5
6
8
2
2
8
2
2
2
2
2
2
2
2
2
2
3
8
8
2
2
1
2
8
1
2
8
9
2
2
2
2
2
1
8
2
2
2
2
2
2
8
8
2
2
2
2
2
8
2
8
2
2
2
2
2
2
8
1
0
0
0
0
0
0
32
32
32
16
32
32
32
32
32
32
32
32
16
32
16
16
16
16
16
16
32
16
16
32
16
16
32
32
32
32
32
16
16
32
30
32
32
16
16
16
32
16
16
16
16
16
16
16
16
16
16
16
16
16
16
16
16
32
32
32
16
32
16
A-1
429A-E-087A
AP80R_es_Appendix.p65
4
52
53
54
54
40
42
45
46
56
57
58
59
60
61
61
61
62
62
63
65
65
65
66
66
66
66
64
67
68
71
73
73
73
72
74
75
78
80
81
81
80
82
85
87
88
89
89
90
90
92
94
99
100
102
103
103
88
0
1
2
3
4
5
1
04.8.26, 3:44 PM
Appendix/Apéndice
1 Tone Group Name/Nombre de grupo de sonido 3 Tone Name/Nombre de sonidos
4 Program Change/Cambio de programa
2 No./Nº
GM Tones/Drum Sets
1
GM TONES
Sonidos GM/Ajustes de batería
2
006
007
008
009
010
011
012
013
014
015
016
017
018
019
020
021
022
023
024
025
026
027
028
029
030
031
032
033
034
035
036
037
038
039
040
041
042
043
044
045
046
047
048
049
050
051
052
053
054
055
056
057
058
059
060
061
062
063
064
065
066
067
068
069
070
071
5 Bank Select MSB/MSB de selección de banco
6 Maximum Polyphony/Polidonía máxima
3
GM HARPSICHORD
GM CLAVI
GM CELESTA
GM GLOCKENSPIEL
GM MUSIC BOX
GM VIBRAPHONE
GM MARIMBA
GM XYLOPHONE
GM TUBULAR BELL
GM DULCIMER
GM ORGAN 1
GM ORGAN 2
GM ORGAN 3
GM PIPE ORGAN
GM REED ORGAN
GM ACCORDION
GM HARMONICA
GM BANDONEON
GM NYLON STR.GUITAR
GM STEEL STR.GUITAR
GM JAZZ GUITAR
GM CLEAN GUITAR
GM MUTE GUITAR
GM OVERDRIVE GT
GM DISTORTION GT
GM GT HARMONICS
GM ACOUSTIC BASS
GM FINGERED BASS
GM PICKED BASS
GM FRETLESS BASS
GM SLAP BASS 1
GM SLAP BASS 2
GM SYNTH-BASS 1
GM SYNTH-BASS 2
GM VIOLIN
GM VIOLA
GM CELLO
GM CONTRABASS
GM TREMOLO STRINGS
GM PIZZICATO
GM HARP
GM TIMPANI
GM STRINGS 1
GM STRINGS 2
GM SYNTH-STRINGS 1
GM SYNTH-STRINGS 2
GM CHOIR AAHS
GM VOICE DOO
GM SYNTH-VOICE
GM ORCHESTRA HIT
GM TRUMPET
GM TROMBONE
GM TUBA
GM MUTE TRUMPET
GM FRENCH HORN
GM BRASS
GM SYNTH-BRASS 1
GM SYNTH-BRASS 2
GM SOPRANO SAX
GM ALTO SAX
GM TENOR SAX
GM BARITONE SAX
GM OBOE
GM ENGLISH HORN
GM BASSOON
GM CLARINET
4
5
6
1
6
7
8
9
10
11
12
13
14
15
16
17
18
19
20
21
22
23
24
25
26
27
28
29
30
31
32
33
34
35
36
37
38
39
40
41
42
43
44
45
46
47
48
49
50
51
52
53
54
55
56
57
58
59
60
61
62
63
64
65
66
67
68
69
70
71
0
0
0
0
0
0
0
0
0
0
0
0
0
0
0
0
0
0
0
0
0
0
0
0
0
0
0
0
0
0
0
0
0
0
0
0
0
0
0
0
0
0
0
0
0
0
0
0
0
0
0
0
0
0
0
0
0
0
0
0
0
0
0
0
0
0
32
32
32
32
16
32
32
32
32
16
16
16
16
16
32
16
32
16
32
32
32
32
32
32
32
32
32
32
32
32
32
32
32
32
32
32
32
32
32
32
32
32
32
32
32
32
32
32
32
16
32
32
32
32
16
32
32
16
32
32
32
32
32
32
32
32
GM TONES
DRUM SETS
2
072
073
074
075
076
077
078
079
080
081
082
083
084
085
086
087
088
089
090
091
092
093
094
095
096
097
098
099
100
101
102
103
104
105
106
107
108
109
110
111
112
113
114
115
116
117
118
119
120
121
122
123
124
125
126
127
128
129
130
131
132
133
134
135
136
137
3
GM PICCOLO
GM FLUTE
GM RECORDER
GM PAN FLUTE
GM BOTTLE BLOW
GM SHAKUHACHI
GM WHISTLE
GM OCARINA
GM SQUARE LEAD
GM SAWTOOTH LEAD
GM CALLIOPE
GM CHIFF LEAD
GM CHARANG
GM VOICE LEAD
GM FIFTH LEAD
GM BASS+LEAD
GM FANTASY
GM WARM PAD
GM POLYSYNTH
GM SPACE CHOIR
GM BOWED GLASS
GM METAL PAD
GM HALO PAD
GM SWEEP PAD
GM RAIN DROP
GM SOUND TRACK
GM CRYSTAL
GM ATMOSPHERE
GM BRIGHTNESS
GM GOBLINS
GM ECHOES
GM SF
GM SITAR
GM BANJO
GM SHAMISEN
GM KOTO
GM THUMB PIANO
GM BAGPIPE
GM FIDDLE
GM SHANAI
GM TINKLE BELL
GM AGOGO
GM STEEL DRUMS
GM WOOD BLOCK
GM TAIKO
GM MELODIC TOM
GM SYNTH-DRUM
GM REVERSE CYMBAL
GM GT FRET NOISE
GM BREATH NOISE
GM SEASHORE
GM BIRD
GM TELEPHONE
GM HELICOPTER
GM APPLAUSE
GM GUNSHOT
STANDARD SET 1
STANDARD SET 2
ROOM SET
POWER SET
ELECTRONIC SET
SYNTH SET 1
SYNTH SET 2
JAZZ SET
BRUSH SET
ORCHESTRA SET
A-2
AP80R_es_Appendix.p65
4
5
6
72
73
74
75
76
77
78
79
80
81
82
83
84
85
86
87
88
89
90
91
92
93
94
95
96
97
98
99
100
101
102
103
104
105
106
107
108
109
110
111
112
113
114
115
116
117
118
119
120
121
122
123
124
125
126
127
0
1
8
16
24
25
30
32
40
48
0
0
0
0
0
0
0
0
0
0
0
0
0
0
0
0
0
0
0
0
0
0
0
0
0
0
0
0
0
0
0
0
0
0
0
0
0
0
0
0
0
0
0
0
0
0
0
0
0
0
0
0
0
0
0
0
120
120
120
120
120
120
120
120
120
120
32
32
32
32
16
16
32
32
16
16
16
16
16
16
16
16
16
16
16
16
16
16
16
16
16
16
16
16
16
16
16
16
16
32
32
32
32
16
32
32
32
32
16
32
32
32
32
32
32
32
16
16
32
32
16
32
429A-E-088A
2
04.8.26, 3:44 PM
Appendix/Apéndice
Rhythm List/Lista de ritmos
1 Rhythm Group Name/Nombre de grupo de ritmo
2 No./Nº
3 Rhythm Name/Nombre de ritmo
1
POPS
DANCE/FUNK
ROCK
2
00
01
02
03
04
05
06
07
08
09
10
11
12
13
14
15
16
17
18
19
00
01
02
03
04
05
06
07
08
09
00
01
02
03
04
05
06
07
08
09
10
11
12
13
14
15
16
17
18
19
3
POP 1
WORLD POP
8 BEAT POP
SOUL BALLAD 1
POP SHUFFLE 1
8 BEAT DANCE
POP BALLAD 1
POP BALLAD 2
BALLAD
FUSION SHUFFLE
SOUL BALLAD 2
16 BEAT 1
16 BEAT 2
8 BEAT 1
8 BEAT 2
8 BEAT 3
DANCE POP 1
POP FUSION
POP 2
POP WALTZ
DANCE
DISCO 1
DISCO 2
EURO BEAT
DANCE POP 2
GROOVE SOUL
TECHNO
TRANCE
HIP-HOP
FUNK
POP ROCK 1
POP ROCK 2
POP ROCK 3
FOLKIE POP
POP SHUFFLE 2
ROCK BALLAD
SOFT ROCK
ROCK 1
ROCK 2
HEAVY METAL
60’S SOUL
60’S ROCK
SLOW ROCK
SHUFFLE ROCK
50’S ROCK
BLUES
NEW ORLNS R&R
TWIST
R&B
ROCK WALTZ
1
JAZZ
EUROPEAN
LATIN
VARIOUS
2
00
01
02
03
04
05
06
07
08
09
00
01
02
03
04
05
06
07
08
09
00
01
02
03
04
05
06
07
08
09
00
01
02
03
04
05
06
07
08
09
10
11
12
13
14
15
16
17
18
19
3
BIG BAND 1
BIG BAND 2
BIG BAND 3
SWING
SLOW SWING
FOX TROT
JAZZ COMBO 1
JAZZ VOICES
ACID JAZZ
JAZZ WALTZ
POLKA
POP POLKA
MARCH 1
MARCH 2
WALTZ 1
SLOW WALTZ
VIENNESE WALTZ
FRENCH WALTZ
SERENADE
TANGO
BOSSA NOVA 1
BOSSA NOVA 2
SAMBA 1
SAMBA 2
MAMBO
RHUMBA
CHA-CHA-CHA
MERENGUE
BOLERO
SALSA
REGGAE
PUNTA
CUMBIA
PASODOBLE
SKA
BLUEGRASS
DIXIE
TEX-MEX
COUNTRY 1
COUNTRY 2
FOLKLORE
JIVE
FAST GOSPEL
SLOW GOSPEL
SIRTAKI
HAWAIIAN
ADANI
BALADI
ENKA
STR QUARTET
1
FOR PIANO
2
00
01
02
03
04
05
06
07
08
09
10
11
12
13
14
15
16
17
18
19
3
PIANO BALLAD 1
PIANO BALLAD 2
PIANO BALLAD 3
EP BALLAD 1
EP BALLAD 2
BLUES BALLAD
MELLOW JAZZ
JAZZ COMBO 2
RAGTIME
BOOGIE-WOOGIE
ARPEGGIO 1
ARPEGGIO 2
ARPEGGIO 3
PIANO BALLAD 4
6/8 MARCH
MARCH 3
2 BEAT
WALTZ 2
WALTZ 3
WALTZ 4
NOTE
• FOR PIANO group rhythms 10 through 19 consist of chord accompaniments only, without any drums or other percussion instruments.
These rhythms do not sound unless CASIO CHORD, FINGERED, or FULL RANGE CHORD is selected as the accompaniment mode.
With such rhythms, make sure that CASIO CHORD, FINGERED, or FULL RANGE CHORD is selected before you try playing chords.
NOTA
• Los ritmos del grupo FOR PIANO 10 al 19, consisten de acompañamientos de acordes solamente, sin ninguna batería u otros
instrumentos de percusión. Estos ritmos no suenan a menos que se seleccionen CASIO CHORD, FINGERED o FULL RANGE CHORD
como el modo de acompañamiento. Con tales ritmos, asegúrese que CASIO CHORD, FINGERED o FULL RANGE CHORD se seleccione
antes de intentar ejecutar los acordes.
.
A-3
429A-E-089A
AP80R_es_Appendix.p65
3
04.8.26, 3:44 PM
Appendix/Apéndice
Song List/Lista de canciones
Piano Group List/Lista del grupo de piano
No./Nº
Song name/Nombre de canción
Song Group List/Lista del grupo de sonido
No./Nº
Song name/Nombre de canción
00
Winter Games
00
Sara
01
Someday My Prince Will Come
01
Greensleeves
02
Hills
02
Little Brown Jug
03
Frosted Glass
03
We Wish You A Merry Christmas
04
Hot Feel
04
Jingle Bells
05
Let It Be
05
Silent Night
06
Over The Rainbow
06
Joy To The World
07
The Entertainer
07
O Christmas Tree
08
Maple Leaf Rag
08
When The Saints Go Marching In
09
Fantaisie-Impromptu Op.66
09
Auld Lang Syne
10
Nocturne Op.9-2
10
Under The Spreading Chestnut Tree
11
Etude Op.10-3 “Chanson de l’adieu”
11
Come Birds
12
Etude Op.25-9
12
Did You Ever See A Lassie?
13
Prelude Op.28-7
13
Sippin’ Cider Through A Straw
14
Valse Op.64-1 “Petit Chien”
14
Michael Row The Boat Ashore
15
Fröhlicher Landmann
15
I’ve Been Working On The Railroad
16
Von fremden Ländern und Menschen [Kinderszenen]
16
Aura Lee
17
Träumerei [Kinderszenen]
17
If You’re Happy And You Know It, Clap Your Hands
18
Arabesque
18
My Darling Clementine
19
La Chevaleresque
19
Annie Laurie
20
La Prière d’une Vierge
20
My Bonnie
21
Csikos Post
21
Swanee River (Old Folks At Home)
22
Humoreske
22
Oh! Susanna
23
La Fille aux Cheveux de Lin
23
Camptown Races
24
Arabesque 1
24
Yankee Doodle
25
Gymnopédies 1
25
My Old Kentucky Home
26
Canon in D Major
26
Turkey In The Straw
27
Menuet [Klavierbüchlein für Anna Magdalena Bach]
27
Jamaica Farewell
28
Invention 1
28
Sakura Sakura
29
Invention 13
29
Waltzing Matilda
30
Jesus Bleibet Meine Freude
31
Variations on “Ah, Vous Dirai-je, Maman” K.265
32
Sonata K.331 1st Mov. Theme
33
Sonata K.331 3rd Mov. “Turkish March”
34
Serenade [Eine Kleine Nachtmusik]
35
Sonatina Op.36-1 1st Mov.
36
Ode To Joy
37
Sonata Op.13 “Pathétique” 2nd Mov.
38
Sonata Op.27-2 “Moonlight” 1st Mov.
39
Marcia alla turca
40
Für Elise
41
Moments Musicaux Op.94-3
42
Impromptu Op.142-3 “Thema”
43
Chopsticks
44
Neko Funjyatta
45
Danny Boy
46
Amazing Grace
47
Grandfather’s Clock
48
Long Long Ago
49
Home On The Range
30 - 39
Loaded songs (user songs)/
Canciones cargadas (canciones del usuario)
A-4
AP80R_es_Appendix.p65
429A-E-090A
4
04.8.26, 3:44 PM
5
04.8.26, 3:44 PM
“
41
53
65
77
54
E6 87
C6 85
B5 82
A5 80
F5 78
E5 75
C5 73
B4 70
A4 68
F4 66
E4 63
C4 61
B3 58
A3 56
STANDARD SET 1
High Q
Slap
Scratch Push
Scratch Pull
Sticks
Square Click
Metronome Click
Metronome Bell
Standard1 Kick 2
Standard1 Kick 1
Side Stick
Standard1 Snare 1
Hand Clap 1
Standard1 Snare 2
Low Tom 2
Closed Hi-Hat
Low Tom 1
Pedal Hi-Hat
Mid Tom 2
Open Hi-Hat
Mid Tom 1
High Tom 2
Crash Cymbal 1
High Tom 1
Ride Cymbal 1
Chinese Cymbal
Ride Bell
Tambourine
Splash Cymbal
Cowbell
Crash Cymbal 2
Vibraslap
Ride Cymbal 2
High Bongo
Low Bongo
Mute High Conga
Open High Conga
Open Low Conga
High Timbale
Low Timbale
High Agogo
Low Agogo
Cabasa
Maracas
Short High Whistle
Long Low Whistle
Short Guiro
Long Guiro
Claves
High Wood Block
Low Wood Block
Mute Cuica
Open Cuica
Mute Triangle
Open Triangle
Shaker
Jingle Bell
Bell Tree
Castanets
Mute Surdo
Open Surdo
Applause
STANDARD SET 2
,
,
,
,
,
,
,
,
Standard2 Kick 2
Standard2 Kick 1
,
Standard2 Snare 1
Hand Clap 2
Standard2 Snare 2
,
,
,
,
,
,
,
,
,
,
,
,
,
,
,
,
,
,
,
,
,
,
,
,
,
,
,
,
,
,
,
,
,
,
,
,
,
,
,
,
,
,
,
,
,
,
,
,
ROOM SET
,
,
,
,
,
,
,
,
Room Kick 2
Room Kick 1
,
Room Snare 1
,
Room Snare 2
Room Low Tom 2
,
Room Low Tom 1
,
Room Mid Tom 2
,
Room Mid Tom 1
Room High Tom 2
,
Room High Tom 1
,
,
,
,
,
,
,
,
,
,
,
,
,
,
,
,
,
,
,
,
,
,
,
,
,
,
,
,
,
,
,
,
,
,
,
,
,
,
” indicates the same sound as STANDARD SET 1. / “
E6 88
D6 86
C6 84
B5 83
A5 81
G5 79
F5
E5 76
D5 74
C5 72
B4 71
A4 69
G4 67
F4
E4 64
D4 62
C4 60
B3 59
A3 57
G3 55
F3
F3
E3 51
E3 52
C3 49
C3 48
B2 46
A2 44
F2 42
E2 39
C2 37
B1 34
A1 32
F1 30
E1 27
D3 50
B2 47
A2 45
G2 43
F2
E2 40
D2 38
C2 36
B1 35
A1 33
G1 31
29
E1 28
F1
➝
429A-E-091A
➝
AP80R_es_Appendix.p65
Key/Note Number
ELECTRONIC SET
,
,
,
,
,
,
,
,
Electric Kick 2
Electric Kick 1
,
Electric Snare 1
,
Electric Snare 2
Electric Low Tom 2
,
Electric Low Tom 1
,
Electric Mid Tom 2
,
Electric Mid Tom 1
Electric High Tom 2
,
Electric High Tom 1
,
Reverse Cymbal
,
,
,
,
,
,
,
,
,
,
,
,
,
,
,
,
,
,
,
,
,
,
,
,
,
,
,
,
,
,
,
,
,
,
,
,
SYNTH SET 1
,
,
,
,
,
,
,
,
Synth1 Kick 2
Synth1 Kick 1
Synth1 Rim Shot
Synth1 Snare 1
Hand Clap 2
Synth1 Snare 2
Synth1 Low Tom 2
Synth1 Closed HH 1
Synth1 Low Tom 1
Synth1 Closed HH 2
Synth1 Mid Tom 2
Synth1 Open HH
Synth1 Mid Tom 1
Synth1 High Tom 2
Synth1 Crash Cymbal
Synth1 High Tom 1
Synth1 Ride Cymbal
,
,
Synth1 Tambourine
,
Synth1 Cowbell
,
,
,
Synth1 High Bongo
Synth1 Low Bongo
Synth1 Mute Hi Conga
Synth1 Open Hi Conga
Synth1 Open Low Conga
,
,
,
,
,
Synth1 Maracas
,
,
,
,
Synth1 Claves
,
,
,
,
,
,
,
,
,
,
,
,
,
” indica el mismo sonido que STANDARD SET 1.
,
,
,
,
,
,
,
,
Power Kick 2
Power Kick 1
,
Power Snare 1
,
Power Snare 2
Power Low Tom 2
,
Power Low Tom 1
,
Power Mid Tom 2
,
Power Mid Tom 1
Power High Tom 2
,
Power High Tom 1
,
,
,
,
,
,
,
,
,
,
,
,
,
,
,
,
,
,
,
,
,
,
,
,
,
,
,
,
,
,
,
,
,
,
,
,
,
,
POWER SET
Drum Assignment List/Lista de sonidos de batería
SYNTH SET 2
,
,
,
,
,
,
,
,
Synth2 Kick 2
Synth2 Kick 1
,
Synth2 Snare 1
,
Synth2 Snare 2
,
,
,
,
,
,
,
,
,
,
,
,
,
,
,
Synth1 Cowbell
,
,
,
,
,
,
,
,
,
,
,
,
,
Synth1 Maracas
,
,
,
,
Synth1 Claves
,
,
,
,
,
,
,
,
,
,
,
,
,
JAZZ SET
,
,
,
,
,
,
,
,
Jazz Kick 2
Jazz Kick 1
,
Jazz Snare 1
,
Jazz Snare 2
,
,
,
,
,
,
,
,
,
,
,
,
,
,
,
,
,
,
,
,
,
,
,
,
,
,
,
,
,
,
,
,
,
,
,
,
,
,
,
,
,
,
,
,
,
,
,
,
BRUSH SET
,
,
,
,
,
,
,
,
Jazz Kick 2
Jazz Kick 1
,
Brush Snare 1
Brush Slap
Brush Snare 2
,
,
,
,
,
,
,
,
,
,
,
,
,
,
,
,
,
,
,
,
,
,
,
,
,
,
,
,
,
,
,
,
,
,
,
,
,
,
,
,
,
,
,
,
,
,
,
,
ORCHESTRA SET
Timpani e
Timpani f
,
,
,
Concert Cymbal 2
,
Concert Cymbal 1
,
,
,
,
,
,
,
,
,
,
,
,
,
,
,
,
,
,
,
,
,
,
,
,
,
,
,
,
,
Timpani A
Timpani A
Timpani B
Timpani c
Timpani c
Timpani d
Timpani d
Closed Hi-Hat
Pedal Hi-Hat
Open Hi-Hat
Ride Cymbal 1
,
,
,
,
Jazz Kick 1
Concert BD 1
,
Concert SD
Castanets
Concert SD
Timpani F
Timpani F
Timpani G
Timpani G
Appendix/Apéndice
A-5
AP80R_es_Appendix.p65
F
F /(G )
G
(G )/A
A
(A )/B B
F /(G )
G
(G )/A
A
(A )/B B
Chord
Type
F
Root
E
m7 5
E
dim
(D )/E M7
(D )/E dim7
D
m7
D
7
C /(D )
m
C /(D )
M
C
Chord
Type
C
Root
Fingered Chord Chart/Cuadro de acordes digitados (Fingered)
aug
sus4
7sus4
m add9
mM7
75
add9
Appendix/Apéndice
A-6
429A-E-092A
6
04.8.26, 3:44 PM
Operational Precautions
Locating the Unit
Avoid the following locations.
• Areas exposed to direct sunlight and high humidity
• Areas subjected to very low temperatures
• Near a radio, TV, video deck, or tuner (unit can cause interference
with audio or video signals)
Care of the Unit
• Never use benzene, alcohol, thinner or other such chemicals to
clean the exterior of the unit.
• To clean the keyboard, use a soft cloth dampened with a weak
solution of a mild neutral detergent and water. Wring out all
excess moisture from the cloth before wiping.
Memory Protection
• Note that CASIO COMPUTER CO., LTD. shall not be held liable
for any damages or losses or any claims by third parties arising
from corruption or loss of data caused by malfunction or repair
of the unit, or from battery replacement.
You may notice lines in the finish of the case of this product.
These lines are the result of the molding process used to
shape the plastic of the case. They are not cracks or breaks
in the plastic, and are no cause for concern.
NOTE
• Unauthorized reproduction of this manual in its entirety or
in part is expressly forbidden. All rights reserved.
• CASIO COMPUTER CO., LTD. shall not be held liable for
any damages or losses or any claims by third parties arising
from use of this product or this manual.
• The contents of this manual are subject to change without
notice.
A built-in lithium battery supplies the power required to retain
digital piano settings and memory contents when power is turned
off. Should the lithium battery go dead, settings and memory
contents (Song Memory data, registration memory data, user songs,
display contrast setting, etc.) will be lost whenever you turn off
digital piano power. Note that the original built-in lithium battery
has a life of about five years from the date the digital piano was
manufactured. Be sure to periodically contact your retailer or
authorized service provider to have the lithium battery replaced.
Note that you will be charged separately for lithium battery
replacement.
Precauciones durante la operación
Ubicación de la unidad
Evite las siguientes ubicaciones.
• Las áreas expuestas directamente a la luz del sol y alta humedad.
• Areas sujetas a temperaturas muy bajas.
• Cerca de una radio, TV, platina de video o sintonizador (la unidad
puede ocasionar interferencias con las señales de audio o video).
Cuidado de la unidad
• No utilice benceno, alcohol, diluyentes u otros agentes químicos
para limpiar el exterior de la unidad.
• Para limpiar el teclado, utilice un paño suave humedecido con
una solución débil de un detergente neutro suave y agua.
Exprima todo exceso de humedad del paño antes de limpiar.
Protección de memoria
Una pila de litio incorporada proporciona la energía necesaria para
retener los ajustes del piano digital y contenidos de la memoria,
cuando la alimentación está desactivada. En caso de que la pila se
agote, los ajustes y contenidos de la memoria (datos de la memoria
de canción, datos de la memoria de registro, canciones del usuario,
ajuste de contraste del display, etc.) se perderán siempre que
desactiva la alimentación del piano digital. Tenga en cuenta que la
pila de litio incorporada original tiene una duración de cinco años
desde la fecha en que se ha fabricado el piano. Asegúrese de
comunicarse periódicamente con su vendedor o agente de servicio
autorizado para que reemplacen la pila. Tenga en cuenta que el
reemplazo de la pila de litio deberá ser abonado separadamente.
• Tenga en cuenta que CASIO COMPUTER CO., LTD. no asume
ninguna responsabilidad ante ningún daño o pérdida, ni
tampoco de reclamos hechos por terceras partes que resulten de
la alteración o pérdidas de datos de la unidad, debido a una
falla de funcionamiento, reparación de la unidad o a un cambio
de pila.
Se pueden observar líneas en el acabado de la caja de este
producto. Estas líneas son un resultado de un proceso de
moldeo usado para dar forma al plástico de la caja. No son
grietas ni fisuras en el plástico, por lo tanto no deben ser
motivos de preocupación.
NOTA
• Se prohíbe la reproducción de este manual ya sea en forma
parcial o completa, sin la autorización expresa
correspondiente. Todos los derechos se encuentran
reservados.
• CASIO COMPUTER CO., LTD. no asume ninguna
responsabilidad ante ningún daño o pérdida, ni tampoco de
reclamos hechos por terceras partes que resulten del uso de
este producto o de este manual.
• Los contenidos de este manual están sujetos a cambios sin
previo aviso.
A-7
429A-E-093A
AP80R_es_Appendix.p65
7
04.8.26, 3:44 PM
429A-E-094A
AP80R_es_Appendix.p65
8
04.8.26, 3:44 PM
MIDI Implementation Chart
Model AP-80R
Function ...
Transmitted
Recognized
Basic
Channel
Default
Changed
1
1-16
1-16
1-16
Mode
Default
Messages
Altered
Mode 3
X
❊❊❊❊❊❊❊❊❊❊❊❊❊❊
Mode 3
X
True voice
21-108
❊❊❊❊❊❊❊❊❊❊❊❊❊❊
0-127
0-127
Velocity
Note ON
Note OFF
O 9nH V = 1-127
X 8nH V = 64
O 9nH V = 1-127
X 9nH V = 0, 8nH V = XX
After
Touch
Key’s
Ch’s
X
X
X
O
X
O
O
X
O*1
O
O
O
O
O
O
O
O
O
O
O
O
O
O*1
O
O
O
O
O
O
O
O
O
O
O
Note
Number
Pitch Bender
0, 32
1
6, 38
7
10
11
64
66
67
91
93
100, 101
120
121
Control
Change
Program
Change
:True #
O 0-127
❊❊❊❊❊❊❊❊❊❊❊❊❊❊
O*2
O*2*3
System
Common
: Song Pos
: Song Sel
: Tune
X
X
X
X
X
X
System
Real Time
: Clock
: Commands
O
O
X
X
Aux
: Local ON/OFF
: All notes OFF
: Active Sense
: Reset
X
O
X
X
X
O
O
X
*1
*1
*2
Remarks
*2
*3
*3
Mode 1 : OMNI ON, POLY
Mode 3 : OMNI OFF, POLY
1
XX: no relation
XX: sin relación
Bank select
Modulation
Data entry
Volume
Pan
Expression
Damper
Sostenuto
Soft
Reverb send
Chorus send
RPN LSB, MSB
All sound off
Reset all controller
Fine tune and coarse tune send/receive, RPN Null, and pitch bend sense receives
Afinación fina y envío/recepción de afinación gruesa, RPN nulo y recepción de captación de inflexión de altura tonal.
• Reverb type [F0][7F][7F][04][05][01][01][01][01][01][00][vv][F7] vv=00: Room1, 01: Room2, 04: Hall1, 03: Hall2
• Chorus type [F0][7F][7F][04][05][01][01][01][01][02][00][vv][F7] vv=00: Chorus1, 01: Chorus2, 02: Chorus3, 03: Chorus4
• Tipo de reverberación [F0][7F][7F][04][05][01][01][01][01][01][00][vv][F7] vv=00: Room1, 01: Room2, 04: Hall1, 03: Hall2
• Tipo de chorus [F0][7F][7F][04][05][01][01][01][01][02][00][vv][F7] vv=00: Chorus1, 01: Chorus2, 02: Chorus3, 03: Chorus4
GM on/off
GM on = MIDI In Chord Judge off/GM off = MIDI In Chord Judge on
Activación/desactivación de GM
Activación de GM = Análisis de acordes de entrada MIDI desactivado
Desactivación de GM = Análisis de acordes de entrada MIDI activado
O : Yes
X : No
Mode 2 : OMNI ON, MONO
Mode 4 : OMNI OFF, MONO
429A-E-095A
AP80R_es_MIDI Chart.p65
Remarks
O 0-127
❊❊❊❊❊❊❊❊❊❊❊❊❊❊
System Exclusive
Messages
Version: 1.0
04.8.26, 3:44 PM
This recycle mark indicates that the packaging conforms to
the environmental protection legislation in Germany.
Esta marca de reciclaje indica que el empaquetado se
ajusta a la legislación de protección ambiental en Alemania.
CASIO COMPUTER CO.,LTD.
6-2, Hon-machi 1-chome
Shibuya-ku, Tokyo 151-8543, Japan
AP80R_es_cover.p65
2
P
04.8.26, 3:44 PM
MA0408-A Printed in China
AP80R-ES-1