1
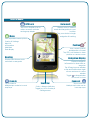
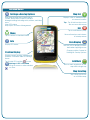
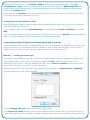
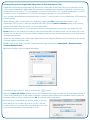
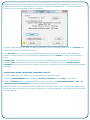
“Very easy to use
with amazingly fast
screen compared
to others.”
Graham Thompson,
Trail Magazine
User Guide
USER GUIDE
Introduction
Welcome to the Adventurer 3500. This manual is designed to walk you through the features of the
Adventurer 3500 and how to get the most from your new GPS.
If you want to get using your GPS straight away please take a few moments to read through the Quick Start
guide to familiarise yourself with the GPS and how it operates.
When you are ready, this manual will walk you through the advanced features of the GPS, including how to
download routes and maps from your PC to the Adventurer 3500.
Contents
Adventurer 3500
Quick Start Guide
Icons & Menus
Extended Menus
Using Adventurer 3500
Viewing Maps
Viewing GPS Position
Routes, Marks & Tracks
Find Places
Menu Options
Device Settings
Power & Battery Settings
Using Adventurer 3500 with Memory-Map on your PC
Connecting to PC
Transferring routes, tracks & marks to/from Adventurer
Sending standard maps to Adventurer
Sending Digital Map Shop maps to Adventurer
Setting up additional microSD cards Support
www.memory-map.co.uk
Page 3
Page 4
Page 5
Page 6
Page 6
Page 6
Page 7
Page 9
Page 9
Page 10
Page 10
Page 11
Page 11
Page 11
Page 12
Page 14
Page 16
Page 17
USER GUIDE
Quick Start Guide
Want to get using your GPS straight away? This quick start guide will quickly familiarise you with the
Adventurer 3500 and its features.
1) Charging the Adventurer 3500
Gently open the flap from the bottom of the GPS and
connect either the supplied mains charger or USB PC cable. A
red light will illuminate on the GPS to indicate it is charging and
then turn green when the battery is fully charged.
2) Turning on the GPS
Hold down the button on the front of the unit and
wait for the unit to start up. When the GPS is ready,
slide the Power On slide button to the right. From the main menu tap the Maps button to put the
GPS in outdoor mode.
3) Viewing your position
The GPS will begin locking onto your position straight away. When a lock has been
acquired the Padlock icon will illuminate. Tap the icon to jump to your current
location and display it on the map. Your position is displayed with the Position
icon.
As your position changes, the map will automatically scroll with you. If you want to
move the map manually drag your finger or stylus across the screen. You can also
use the zoom in and zoom out buttons to make the map larger or smaller.
To view information such as your current speed and heading tap the Menu
button then the Settings & Overlays button and then from the drop-down
menu select GPS > Position. The window can be moved and resized and closed
using the X in the top right corner.
4) Viewing your track
Padlock icon
Position Icon
Zoom In
Zoom Out
Extended Menu
Settings & Overlays
Exit
As you move, the Adventurer 3500 will automatically record where you have
been by drawing a track behind you. You can view information such as how far you have been by tapping and
holding anywhere on this track and then tapping Properties on the menu that appears. You can also view
how far you have travelled by a quick press of the button on the front of the GPS. Press this button again to
return to the map.
5) Shutting down the GPS
When you have finished using the GPS and wish to turn it off, please make sure you close down the MemoryMap software first by tapping the Extended Menu icon followed by the Exit icon. You can then turn the GPS
off by holding down the front button and selecting Power Off.
Alternatively, press the button on the front of the unit and then select Main Menu and then turn the GPS off
by holding down the front button and selecting Power Off.
Icons & Menus
GPS Lock
Go to mark
Displays a list of nearest
marks and waypoints to your
location
Tap to lock Position icon to
centre-screen & activate
moving map display
Tap your choice to begin
navigation & tracking
Menu
View expanded menu options
Overlay & Settings
Map List
Information
Add Mark
Data display
Position
Your current location
and direction of travel
Tap GPS Lock feature to show
position on centre-screen
Heading
Navigation Display
Displays direction arrow to
next mark or waypoint
Zoom in
Tap to zoom in
Multiple taps scales in to next
map layer
Displays navigation
information to next mark or
waypoint
Tap & Drag to move window
or tap and hold bottom right
corner and move to resize
window
Toggle or drag window
off screen to close
Scale Bar
Scale / distance indicator
Toggle on/off in Overlay &
Settings menu
Zoom out
Tap to zoom out
Multiple taps scales out to
next map layer
Extended Menus
Settings & Overlay Options
View map list and place name search.
Create, show, hide or search overlays
Manage settings including units, alarms, and time
zone
View GPS status
Help topics & Licence Management
Menu
Tap to return to standard menu
Info
Display GPS status
Position Display
Map List
Displays a list of available maps
at current location
Tip : Tap & Hold on the screen
also accesses this menu
Exit
Tap to exit Memory-Map
Saves all overlays and returns
to startup menu
Data Display
Turn on/off to display position
data when tapping screen
Change position format in
Settings & Overlay Options
Displays speed, bearing, altitude and
position. Customise units in Settings
menu
Tap & Hold GPS position
or use
Settings > GPS > Position
Tap & Drag to move or resize window
to close
Add Mark
Place a mark anywhere on the
map with a single tap
Map Scrolling
Tap & Drag on screen
to scroll the map
Using the Adventurer 3500
Turning the GPS on and entering Map mode
To turn the GPS on press and hold the button on the front of the unit and then slide the Power On slide
button to the right. The Adventurer 3500 will present you with the main menu.
Tap the Maps button to put the GPS into Map mode. This is the principal mode for the Adventurer
3500 and will display the last used map.
Moving around the map
You can quickly move around the map by tapping and sliding the included stylus,
or your fingernail, across the screen. You can zoom into or out of the map using
the Zoom In and Out buttons.
Opening a map
To open a map tap the Extended Menu icon to display the full row of icons
and then tap Overlay & Settings to display the drop-down menu. From the list,
select Maps to display the Map List. Tap a map name in the list and the map will
open.
Padlock icon
Position Icon
Zoom In
Zoom Out
Extended Menu
Settings & Overlays
Exit
TIP: Another way to open maps based on your current map location is to tap
and hold on the currently open map with the stylus. A menu will appear showing
available maps where you selected, with a tick against the currently open map. To open another map tap on its
name in the list and the map will be displayed
Viewing your GPS Position
As soon as you enter Map mode the GPS will begin acquiring a GPS lock. When a lock has been acquired the
Padlock icon will turn solid. When the button is solid, tap the button and your location will be displayed on the
map with the Position icon. As you move, the position icon will stay in the centre of the screen and the map
will scroll underneath automatically.
To check the current strength of your GPS signal tap the Extended Menu icon followed by the Settings &
Overlay icon to display the drop-down menu. From the menu select GPS > Satellites to display current signal
information. At least three green bars are required for a GPS lock, with more bars providing a more accurate
fix.
In normal use the Adventurer 3500 should be able to obtain a GPS lock within a couple of minutes. If the GPS
is being used for the first time, or has not been used for some time then it may take a little longer to acquire
your position.
Viewing additional GPS information
The Adventurer 3500 also allows you to view additional GPS information such as your current positional
coordinates (in OS grid format or Lat/Lon), your speed, heading, average speed, average heading and altitude.
To display this information tap the Extended Menu icon, follwed by Overlay & Settings and then from the
drop-down menu select GPS > Position.
This window can be moved by tapping and holding on the top blue bar and dragging to the required location,
or resized by tapping and holding in the bottom right-hand corner and dragging to the required size. You
can also customize the data displayed in this window, as well as the units used (mph, kph etc). Please see
Additional Memory-Map Settings on page 9 for details.
Working with routes, marks and tracks
When using the Adventurer 3500 there are three unique forms of navigational data (called Overlays) you can
work with – Routes, Marks and Tracks.
Routes are a sequence of connected waypoints of where you intend to go, for example a walk or ride that
you have created or downloaded and wish to follow.
Creating Routes
Routes can be created in the Memory-Map software on your PC, or downloaded from popular route sharing
websites such as TrailZilla (www.trailzilla.com), and then trasferred to your Adventurer 3500. Please refer
to the help file in the Memory-Map PC software for details on how to create routes in the PC software.
Instructions on how to transfer routes from the Memory-Map PC software to your Adventurer 3500 can be
found on page 11 of this manual.
Although you will find it easier to create routes on your PC and download them to the Adventurer 3500, you
can also create routes on the GPS itself. To do this first position the map where you want the route to begin.
Tap the Extended Menu icon followed by Overlay & Settings. Select Overlay > Create > Route from the
drop-down menu.
Tap on the map where you want the route to begin and then tap the map again where you want the next
waypoint to be, and so on. The GPS will automatically connect the waypoints together to form a route and
join them with a line. When you have finished adding waypoints double tap the screen when placing the last
waypoint and the device will exit route creation mode.
If you have reached the edge of the map and wish to add more waypoints, end the route as described
above and then scroll the map so that you can still see your last waypoint and the map area you wish to add
more waypoints into. Tap and hold on the last waypoint and then from the menu select Add WP After and
continue adding waypoints as required.
You can access more information about the route, view a hill profile, add more waypoints or delete the route
by tapping and holding on any one of the lines between the waypoints to access the Route menu (think of
tapping and holding the same as right-clicking the mouse button on a PC).
Following a Route
When you are following a route the GPS will direct you to each waypoint and provide detailed route
information, such as distance, bearing and time to next waypoint, estimated time of arrival at the end of the
route, distance to the end of the route and more.
To begin following a route, locate the route on screen and then tap and hold on one of the lines between the
waypoints. From the menu that appears, select Follow Route and the two navigation windows will appear.
Provided you have a GPS position, the window on the left will show the direction you need to head to reach
the next waypoint, and the box on the right will show the route information.
As you progress through the route the GPS will automatically select the next waypoint, ensuring you are
always on course and heading in the right direction.
To stop following a route, simply close both of the navigation windows.
Marks are single waypoints that are not part of a route, for example a mark identifying a meeting point, or
the location of a geocache.
Creating Marks
Like routes, marks can either be created on your PC and downloaded to the Adventurer 3500, or created
on the GPS itself. Please refer to the help file in the Memory-Map PC software for details on how to create
marks in the software. Instructions on how to download marks from the Memory-Map PC software to your
Adventurer 3500 can be found on page 11 of this manual.
Creating marks on the GPS itself is easy. Simply move the map to where you would like to drop the mark. Tap
the Extended Menu option followed by the Mark icon (shown above). Now tap on the screen where you
would like the mark and you will see a flag added to the map.
You can edit the properties of the mark, such as changing its name, or fine tuning its grid reference by
tapping and holding on the mark and selecting Properties from the menu. When in the Mark Properties
window you can change the name of the mark by tapping inside the Name box and then tapping the Kbd
button to access the keyboard. You can use the same method to fine tune the position of the mark, or add
notes for the mark, such as the telephone number of a pub. When you are finished editing the mark, tap OK
to save the changes and return to the map.
Goto a Mark
The Adventurer 3500 can direct you to a mark, giving you the direction to head towards and how far you are
from the mark. To use the Goto Mark feature, either locate the mark you would like to head toward, tap and
hold on the mark and select Goto Mark, or tap the Mark button and select the mark you would like to head
to.
Two navigation windows will appear, with the window on the left showing the direction you need to head to
reach the mark, and the box on the right showing navigation information.
To stop navigating to the mark simply close both of the navigation windows.
To delete the mark tap and hold on the mark and select Delete from the menu.
Tracks are essentially a breadcrumb trail of where you have been, as recorded by the GPS. As you move, the
Adventurer 3500 will automatically record the track, showing where you have been.
Tracks are automatically recorded by the GPS when you are moving and are represented by a solid line that will
appear behind your GPS position. The track will automatically record details on how far you have gone, how
long you have been moving, your maximum speed and your average speed.
Tracks can be saved to your PC to review and keep. Please see details on how to do this on page 11.
Viewing track / trip information
To view details on your trip, such as distance covered, maximum speed and total time moving, tap and hold on
the track and select Properties from the menu. You can do this as the track is being recorded to see up-tothe-second details, or once you have finished your journey to get an overview of the trip as a whole.
You can also view trip distance information by pressing the button on the front of the unit. Total distance
travelled will be displayed on the screen, along with brightness controls and options to put the unit into sleep
mode or exit Memory-Map and return to the main menu.
Finding a location by name
If you know the name of a location you can jump straight to it by using the Find Place feature. Enter the
Extended Menu then Overlay & Settings and select Find Place from the drop-down menu.
The Find Place search works on a filter, so the more letters of the place you search for the less results there
will be to look through. For example if you typed “Bir” then the search would return hundreds of places all with
“Bir” in the name. If you searched for “Birmingham”, however, then fewer results will be returned allowing you
to quickly locate the place you were searching for.
To search for a place tap in the Find box and then tap the Kbd button in the bottom corner to bring up the
onscreen keyboard. Now, type in your search and then press the - -> button to perform the search. The results
will be displayed below.
To display the location on the map simply double tap its name in the list. If you want to automatically drop a
mark at the location as well make sure the Create Mark box is ticked first.
Finding a location by grid reference
If you know the grid reference (or Latitude / Longitude) of a location then you can display it using the Find
Place feature. Follow the steps above to enter the Find Place menu and tap in the Coordinates box. Bring up
the keyboard and type in the grid reference you want to locate, e.g. SU 62392 51191. Press the Enter key on
the keyboard and the location will be displayed on the map. If you want to place a mark at the chosen location
make sure the Create Mark box is ticked first.
Additional Memory-Map Options
Tapping the Extended Menu followed by Overlay & Settings brings up the drop-down menu providing
access to additional options and settings.
Map – View all maps installed on the Adventurer 3500 and open the one of your choice. Whenever you send a
new map to the Adventurer 3500, access the map list first and tap Refresh to ensure the map list is updated.
Overlay – Manage the overlays (routes, marks and tracks) on your device. Options include the overlay
manager, which allows you to work with your overlays, creating and deleting overlays and showing and
hiding overlays. You can also open overlays sent from your PC, or save overlays ready for transfer to
your PC. Please see page 11 for more details.
Find Place – Search for a location or grid reference. Please see page 9 for more details.
Settings – change settings for the device, including units of measure (mph, kph) and position format (British
National Grid, Lat / Lon etc). The Settings options also lets you customise the navigation data displayed when
following a route or a mark, and when viewing GPS position information.
GPS – view satellite signal strength and additional GPS information. You can also drop a mark at your current
GPS position from here.
License – allows you to check the status of the map licences on your microSD card.
Help – provides a quick refresher about the information in this manual. Perfect for when you are out and
about.
Exit – saves all overlay data and then exits map mode, returning you to the main menu. Always use this (or
the Exit icon) to exit Memory-Map before turning off the device.
Additional Device Options
Additional options for the Adventurer 3500 can be
accessed from the Settings button on the main screen
when you turn on the GPS. These settings include:
Brightness –Adjust the brightness of the backlight. The
brighter the backlight the easier the unit will be able to be
seen in daylight. A bright backlight setting will consume
more power, however.
Volume –Change the volume level from the internal
speaker. You can also turn off the sound made when
tapping the screen by setting Touch Tone to off.
Language – Change the language of the main menu. The language in Memory-Map itself can be changed
separately, if required.
Touch Calibration – Recalibrate the touch screen if you are finding screen taps have become inaccurate. The
screen will be calibrated for you initially, so you do not need to do this unless required.
Power Save – Allows you to control whether the backlight or the device turns off after a period of inactivity.
Due to the way Memory-Map records your tracklog when running we strongly recommend setting the Power
Down Time to Always On when using Memory-Map on the device. This feature can be used with other
applications available for the device, such as the Golf software. The Backlight feature can only be used in
other Apps available for the device.
Information – Provides information on the hardware and allows you to update the device as updates are
available.
Charging the device and getting the most from the battery
The Adventurer 3500’s battery can be charged using the included mains charger, car charger or USB charger
when connected to your PC. For the quickest charge we recommend using the mains charger. The light on the
front of the unit will turn red when charging and then turn green when the unit is fully charged.
When using the GPS you can quickly put the unit to sleep by pressing the button on the front of the unit and
then selecting Sleep from the menu. When in Sleep mode the Adventurer 3500 will go into a low power state,
preserving the battery. When you press the button on the front of the unit the 3500 will go straight into map
mode.
Using the Adventurer 3500 with Memory-Map on your PC
Connecting the GPS to Memory-Map on your PC
Unlike Pocket PCs or Garmin GPS units the Adventurer 3500 is seen by your PC as a removable drive. This
means in Memory-Map you do not connect or interact with the device using the options under the GPS menu.
Maps, routes and tracks can be sent to the device using the steps in the following sections.
Transferring routes, tracks and marks to the Adventurer 3500
Routes, tracks or marks can be transferred from Memory-Map on your PC to the Adventurer 3500 by
following the steps below:
1) Exit Memory-Map on the 3500 if it is running by tapping the Exit button (you may need to tap Extended
Menu first) and then connect your Adventurer 3500 to your PC with the supplied USB cable. Tap the Press to
Connect button on the Adventurer 3500 screen and it will be seen by your PC as a removable drive.
2) In Memory-Map on your PC, right-click on the route, track or mark in question and choose the Save As
option.
3) In the Save As window choose the Removable Drive that contains the SD card inside the unit. It can
be easily identified as it will contain a number of Memory-Map folders and a Userdata folder as below
Double-click on the Userdata folder and give the file a name so that you can recognise it on the device and
then click Save.
4) Important – Safely remove the 3500 from your PC by right-clicking on the drive in Computer and
selecting Eject from the menu. If you are using Windows XP you will need to use the Safely Remove
Hardware option in the system tray to remove the device.
5) Unplug the USB cable from the 3500 and then launch Memory-Map. Tap the Extended Menu icon and
followed by Overlay & Settings and then tap Overlay > Open. A list of files will be displayed, select the file
you wish to open and it will be displayed on the map.
Transferring routes, tracks and marks from the Adventurer 3500 to your PC
To save your routes, tracks and marks for viewing in Memory-Map on your PC please follow the steps below:
1) On the 3500 tap the Extended Menu icon and followed by Overlay & Settings and then tap Overlay >
Save As from the menu. Give the file a name using the keyboard button and then tap OK to save.
2) Exit Memory-Map on the 3500 if it is running by tapping the Exit button. Connect your Adventurer 3500
to your PC with the supplied USB cable. Tap the Press to Connect button on the screen and the 3500 will be
seen by your PC as a removable drive.
3) In Memory-Map on your PC click Overlay > Import. In the Open window that appears select GPS
eXchange files (*.gpx) from the drop down file type box and then choose the Removable Drive that
contains the SD card inside the unit. It can be easily identified as it will contain a number of Memory-Map
folders and a Userdata folder.
Double-click on the Userdata folder and then open the file you previously saved on your Adventurer 3500.
The overlay file will now be displayed on your PC.
Sending maps to the Adventurer 3500
Both existing Memory-Map V5 maps and Memory-Map Digital Map Shop maps can be sent to the Adventurer
3500 and stored on the SD card.
To open maps on the GPS tap the Extended Menu icon and followed by Overlay & Settings and then tap
Map…
A list of maps will appear. If you have recently sent a map from your PC tap the Refresh button to update the
map list. To open a map tap once on the name and the map will be displayed.
Sending Memory-Map V5 Maps (not including Digital Map Shop maps)
If you have existing Memory-Map V5 maps provided on CD or DVD, which are not Digital Map Shop maps, then
these can be sent to your Adventurer 3500 in a number of ways. Please note that there is a limit of up to
400MB per map so make sure your maps are below this size when sending to the GPS.
Method 1 – Sending the whole map
If the map is under 400MB in size then you can send the whole map in one go by following the steps below:
1) Exit Memory-Map on the 3500 if it is running by tapping the Exit button and then connect your
Adventurer 3500 to your PC with the supplied USB cable. Tap the Press to Connect button on the screen
and the 3500 will be seen by your PC as a removable drive.
2) In Memory-Map on your PC open the map you wish to send and then click Mobile Device > Send Map…
A window similar to the one below will appear:
Click the Storage card on PC button and then the
button.
In the Browse for Folder window choose the Removable Drive that contains the SD card inside the unit. It
can be easily identified as it will contain a number of Memory-Map folders and a Userdata folder. Double-click
the Maps folder to select it and then click OK to send the map to the device.
3) Important – Safely remove the 3500 from your PC by right-clicking on the drive in Computer and
selecting Eject from the menu. If you are using Windows XP you will need to use the Safely Remove
Hardware option in the system tray to remove the device. Not doing so could corrupt the card data making
it unusable.
Method 2 – Sending the visible map portion on screen
If the map you want to send is over 400MB in size, or you only want to send a portion of it to the GPS then
please follow the steps below.
1) Exit Memory-Map on the 3500 if it is running by tapping the Exit button and then connect your
Adventurer 3500 to your PC with the supplied USB cable. Tap the Press to Connect button on the screen
and the 3500 will be seen by your PC as a removable drive.
2) In Memory-Map on your PC open the map you wish to send and move to the area you require. You can
zoom in or out to adjust the area until you are happy you have the area covered.
3) Click Mobile Device > Send Visible Map Portion…
A window similar to the one below will appear
If you wish to give map a name type this into the Name box.
Click the Storage card on PC button and then the
button.
In the Browse for Folder window choose the Removable Drive that contains the SD card inside the unit. It
can be easily identified as it will contain a number of Memory-Map folders and a Userdata folder. Double-click
the Maps folder to select it and then click OK to send the map to the device.
4) Important – Safely remove the 3500 from your PC by right-clicking on the drive in Computer and
selecting Eject from the menu. If you are using Windows XP you will need to use the Safely Remove
Hardware option in the system tray to remove the device. Not doing so could corrupt the card data making
it unusable.
Method 3 – Sending an enclosed area
To gain more control over the area of map you are sending you can send an area enclosed by a route that you
have drawn. To do this please follow the steps below:
1) Exit Memory-Map on the 3500 if it is running by tapping the Exit icon and then connect your Adventurer
3500 to your PC with the supplied USB cable. Tap the Press to Connect button on the screen and the 3500
will be seen by your PC as a removable drive.
2) In Memory-Map on your PC open the map you wish to send and move to the area you require. Click the
Route button on the toolbar and create a route around the area you wish to send. You can zoom out if you
wish so you can see more of the map. While creating a route you can use the arrow keys on your keyboard to
move the map around.
When you are finishing your route make sure the last waypoint finishes on top of the first one so that you
have made an enclosed route.
3) Right-click on the route you have created and select the menu option Operations > Enclosed Area >
Send to Mobile Device…
A screen similar to the one below will appear:
4) If you wish to give map a name type this into the Name box. Please also make sure that the size of the map
does not exceed 400MB. If it does, click the Cancel button and resize your route
Click the Storage card on PC button and then the
button.
In the Browse for Folder window choose the Removable Drive that contains the SD card inside the unit. It
can be easily identified as it will contain a number of Memory-Map folders and a Userdata folder. Double-click
the Maps folder to select it and then click OK to send the map to the device.
5) Important – Safely remove the 3500 from your PC by right-clicking on the drive in Computer and selecting
Eject from the menu. If you are using Windows XP you will need to use the Safely Remove Hardware
option in the system tray to remove the device. Not doing so could corrupt the card data making it unusable.
Sending Encrypted or Digital Map Shop maps to the Adventurer 3500
Digital Map Shop and encrypted maps are different to older maps in that they have to be unlocked on both
your PC and mobile device. Digital Map Shop products include the same amount of sqkm Map Credit for your
mobile device as for your PC. So, for example if you have 10,000sqkm of OS 1:50,000 Landranger for your PC,
you will also have 10,000sqkm of OS 1:50,000 Landranger mapping for your mobile device.
Once you have downloaded and unlocked a map on your PC you can send it to your Adventurer 3500 using the
following steps:
1) Exit Memory-Map on the 3500 if it is running by tapping the Exit button and then connect your
Adventurer 3500 to your PC with the supplied USB cable. Tap the Press to Connect button on the screen
and the 3500 will be seen by your PC as a removable drive.
2) In Memory-Map on your PC open the map you wish to send and move to the area you require. Click the
Route button on the toolbar and create a route around the area you wish to send. You can zoom out if you
wish so you can see more of the map. While creating a route you can use the arrow keys on your keyboard to
move the map around.
When you are finishing your route please make sure the last waypoint finishes on top of the first one so that
you have made an enclosed route.
3) Right-click on the route you have created and select the menu option Operations > Enclosed Area >
Send to Mobile Device…
4) A screen similar to the one below will appear:
Click the Storage card on PC button and then the
button.
5) In the Browse for Folder window choose the Removable Drive that contains the SD card inside the unit. It
can be easily identified as it will contain a number of Memory-Map folders and a Userdata folder. Double-click
the Maps folder to select it and then click OK to send the map to the device.
6) You may be prompted with a window similar to the one
here asking you to activate the map. If you are, click the
Activate button. This screen will only appear once for each
type of map you send to the Adventurer 3500.
7) Digital Map Shop maps need to be activated on your Adventurer 3500 SD card as well as your PC. The
following screen tells you much credit you have left to activate on a Mobile Device / SD Card and how much
credit the map you are sending to the SD card will use.
If you are happy that this the area you want to send and you have sufficient credit then click Activate and
the map will transfer to your GPS and unlock.
If the Activate button does not appear this will mean that the area you are trying to send exceeds the
amount of credit you have. Check the amounts stated above and click Cancel to resize your route and try
again.
8) Important – Safely remove the 3500 from your PC by right-clicking on the drive in Computer and
selecting Eject from the menu. If you are using Windows XP you will need to use the Safely Remove
Hardware option in the system tray to remove the device.Not doing so could corrupt the card data making it
unusable.
Opening and viewing a Digital Map Shop Map on the GPS
To view a Digital Map Shop map on your 3500 please follow the steps below:
1) Tap the Extended Menu button follwed by Overlay & Settings and then Map… from the list
2) Tap the Refresh button to update the list and then open either the OS GB Route Planner 1:1M or OS
1:250k Great Britain Road Atlas by tapping on their names in the list.
3) Move the map to the area covered by the Digital Map Shop map you just sent. Tap and hold on the screen
where your map will be and select its name from the list of maps that appears. Your Digital Map Shop map will
now be displayed.
Setting up a new SD card to use in the Adventurer 3500
If you wish you can use a larger SD card, up to 16GB, in the 3500 to install your existing disc based maps onto.
Please note that you cannot copy the included full OS 1:50k Great Britain map onto a new SD card, as this map
is locked to the original card for security reasons.
To setup the new SD card with the Adventurer you will need to do the following:
1) Copy the following folders from the original SD card to the new SD card.
2577
ASIMAP
Pictures
Userdata
The best way to do this is to copy the files from the original SD card to a folder on your computer and then
copy the contents of this folder to the new SD card.
2) Licence the new SD card to work with the GPS. To licence the SD card please do the following:
• Insert the new SD card in to the Adventurer 3500 and start Memory-Map on the device. A message will
appear stating “The license for resource GPS Features has not been activated”. Tap OK and then exit the
program by tapping the Extended Menu button and then the Exit button.
• Connect the 3500 to your PC and then tap the Press to Connect button. Open Memory-Map on your PC
and then click Help > Licence Management and then the SD Card… option.
• In the window that appears click GPS Features in the list so that is highlighted and then click Activate. If
you are asked to log in enter your user name and password. You may be asked to give the SD card a name
so that you can recognise it later, so fill in a unique name for the card if prompted.
If you are asked to Register A Serial Number enter the one from the Software Installation Guide in the
Adventurer 3500. Once activated, the status of GPS Features should change to Full, No Expiration.
Your card is now ready to use with your Adventurer 3500!
Please be aware that the serial number included with the Adventurer 3500 will allow you to activate the GPS
functionality on up to two SD cards. If you wish to move the licence from one SD card to another you can do
so by logging into the website below and clicking the Migrate Licence button.
www.memory-map.co.uk/activate
Important - If your Adventurer included an SD card with mapping on, or you have purchased an SD card
with mapping on, then this mapping data cannot be transferred to a new SD card. The map copyright holders
require mapping to be encrypted and locked to the SD card it was purchased on, meaning the map cannot be
moved or copied to a new SD card.
Additional ready-to-use SD cards, which are pre-licensed are available to buy direct from Memory-Map from
www.memory-map.co.uk/adventurer
If you require additional help or support please visit www.memory-map.co.uk/support