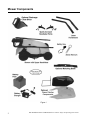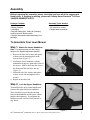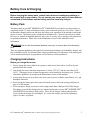
1
And congratulations on your purchase of a new DR®
WHISPER LITE® CORDLESS Electric Mower!
We have done our utmost to ensure that your DR®
WHISPER LITE® will be one of the most trouble-free
and satisfying pieces of equipment you have ever
owned. Please let us know of any questions or
problems you may have. We want to answer or correct
them as quickly as possible. (When you do call or
write, please have your order number handy—it will
speed things up!) We also hope to hear from you on
how much you like your new helper.
And, please tell your friends about your new DR®
WHISPER LITE®! Having DR® Owners spread the
word about our products and our way of doing business
is the best advertising we can have, and the best way to
help us provide even better service in the years to come.
Thanks once again!
for all of us at...
COUNTRY HOME PRODUCTS®
DR® WHISPER LITE® CORDLESS Electric Mower Safety & Operating Instructions
i
Important Safety Instructions
! WARNING: We want you to enjoy years of safe and productive use from your DR® WHISPER
LITE® CORDLESS Electric Mower. We don’t want you to get injured, so please take a few
moments to read the following guidelines for safely operating your new machine.
READ THESE INSTRUCTIONS
Protect those around you
·
Do not allow children, other bystanders or pets in your work area when the mower is being
operated.
·
Only adults and teenagers with a thorough understanding of these instructions should operate the
mower.
Dress Appropriately
·
We recommend using safety glasses. Use a face or dust mask if operating in dusty conditions.
·
Always wear substantial footwear and long pants. Do not wear loose clothing or jewelry. They
can get caught in the moving parts.
Preparation
·
Be thoroughly familiar with the controls and proper use of the DR® WHISPER LITE® before
operating it.
·
Never operate the DR® WHISPER LITE® without the proper guards, safety switches or other
safety and protective devices in place and properly connected. Inspect to determine that these
safety devices are properly installed, in good repair, and operate properly. If the condition or
operation of these devices is questionable, they must be repaired or replaced before using the
mower.
·
Thoroughly inspect the area where the mower is to be used and remove all stones, sticks, wire,
dog bones, pet supplies or lawn toys, and other foreign objects which could be thrown by the
mower blade. Objects struck by the lawn mower blade can cause severe injuries. Also note the
location of holes, stumps and other possible hazards.
·
Mow only in daylight or in good artificial light.
Operation
·
The length of time that a battery pack can hold its charge while mowing a lawn depends upon
lawn conditions; tall, thick, or wet grass make the mower work harder and the battery pack
discharge faster.
·
Before starting the mower, adjust the cutting height to cut 1" to 2" of grass at a time. Cut thicker
grass at a greater cutting height, or cut a narrower swath. Do not force the lawn mower forward
ii
DR® WHISPER LITE® CORDLESS Electric Mower Safety & Operating Instructions
in thick grass. DR® WHISPER LITE® CORDLESS Electric Mower will do a better and safer job
when cutting at a steady rate.
·
Your mower can operate as a mulcher or bagger. Learn how to use the proper cutting blade, and
how to use the grass catcher or discharge chute block for the right application.
·
Do not insert the SAFETY KEY into the mower until you are ready to operate the mower. Store
the safety key away from children and people not authorized to use the mower.
·
The cutting blade turns when the motor is running (there is no clutch to allow the blade to stop
while the motor is running). Learn how to quickly stop the mower's motor and note that the
blade will continue to rotate for up to three seconds after the motor has stopped.
·
Stop the blade and remove the safety key whenever you leave the operating position (behind the
handlebar) for any reason, including clearing grass and making any inspections, adjustments or
repairs to the mower.
·
Do not put your hands and feet near or under rotating parts or when the safety key is still inserted.
Keep clear of the discharge area while the motor is running.
·
Before cleaning, repairing, inspecting, adjusting the height of the cut, or exchanging the
discharge chute block and grass catcher, be sure the motor is off, remove the safety key and make
certain the blade has stopped rotating.
·
Do not operate the mower in the rain or when the grass is wet.
·
Never cut grass by pulling the mower towards you. It is designed to be pushed forward while
cutting only.
·
USE EXTREME CAUTION when maneuvering backwards. Always look first to check your
footing and release the operator presence bar before moving backwards.
·
Mow across slopes, never up and down. Exercise caution when changing directions on slopes.
Do not mow steep slopes or other areas where stability or traction is in doubt.
·
Stop the motor when crossing over loose materials such as gravel drives, walks or roads. Objects
discharged by the mower can be hazardous.
·
After striking a foreign object or if the mower vibrates abnormally, stop the motor and remove
the safety key. Inspect the mower for any damage and repair the damage before restarting and
operating the lawn mower. Vibration is generally a sign of trouble.
·
Stay alert and watch what you are doing. Do not operate the lawn mower when you are tired or
under the influence of drugs or alcohol.
·
Remove the safety key when the mower is not in use.
·
Allow the motor to cool for at least 5 minutes before storing the mower in any type of tight space
or enclosure.
·
Do not use the DR® WHISPER LITE® for any job other than those for which it is intended.
DR® WHISPER LITE® CORDLESS Electric Mower Safety & Operating Instructions
iii
Maintenance and Storage
!
WARNING: ALWAYS remove the safety key before performing any adjustments or repairs.
·
Maintain the lawn mower with care—keep cutting edges sharp and clean for the best and safest
performance. Keep all nuts, bolts and screws tight to be sure the mower is in safe operating
condition. Follow the instructions in this manual for changing accessories.
·
Periodically inspect the exposed cords on the charger unit and the handlebar for damage. If
damage occurs, do not use the mower until the cords have been replaced or repaired.
·
Do not operate the mower if it does not start normally or does not stop normally when the
operator presence bar is released.
·
Use identical replacement blades only. Check the blade and motor mounting bolts at frequent
intervals for proper tightness.
·
Keep mower clean and dry. Use a damp cloth when cleaning. Never use water, gasoline,
solvents or other petroleum-based or solvent-based products for cleaning.
·
When not in use, store the lawn mower indoors in a dry place and out of the reach of children.
·
To reduce fire hazard, keep mower free of grass, leaves or excessive grease.
Battery Safety
·
Do not charge the lawn mower battery pack in the rain or in wet locations.
·
Exercise care in handling the battery pack in order not to short circuit it with conducting
materials such as rings, bracelets and keys. When short circuited, the battery or conductor may
overheat and cause burns.
·
Do not attempt to replace individual batteries inside the battery pack. Mixing fresh and
discharged batteries could increase internal cell pressure and rupture the discharged battery.
Improper wiring within the battery pack could result in leakage or explosion.
·
Do not dispose of batteries in a fire, the battery cells may explode. Do not open or mutilate the
batteries. Released electrolyte (battery acid) is corrosive and will cause damage to eyes, skin or
clothes. Battery acid is toxic if swallowed or if the fumes are inhaled.
Battery Disposal
Please dispose of used batteries responsibly, according to your local hazardous
materials regulations.
The Fine Print…
Country Home Products, Inc. reserves the right to discontinue, change and improve its products at
any time without notice or obligation to the purchaser.
The descriptions and specifications contained in this manual were in effect at printing. Equipment
described within this manual may be optional. Some illustrations may not be applicable to your
machine.
iv
DR® WHISPER LITE® CORDLESS Electric Mower Safety & Operating Instructions
Table of Contents
IMPORTANT SAFETY INSTRUCTIONS......................................................................................................................ii
BATTERY DISPOSAL .........................................................................................................................................................iv
THE FINE PRINT… ...........................................................................................................................................................iv
MOWER COMPONENTS ................................................................................................................................................2
ASSEMBLY ........................................................................................................................................................................3
TO ASSEMBLE YOUR LAWN MOWER ................................................................................................................................3
STEP 2. LOCK THE UPPER HANDLEBAR ...........................................................................................................................3
STEP 3. RECHARGE THE MOWER BEFORE FIRST USE .......................................................................................................4
STEP 4. READ THESE SAFETY & OPERATING INSTRUCTIONS BEFORE USING THE MOWER. ................................................4
BATTERY CARE & CHARGING ...................................................................................................................................5
BATTERY PACK ................................................................................................................................................................5
CHARGING INSTRUCTIONS ................................................................................................................................................5
INITIAL CHARGING ............................................................................................................................................................6
RECHARGING AFTER EACH USE OF THE MOWER ..............................................................................................................8
RECHARGING TO A FULL CHARGE FOR OFF-SEASON STORAGE .........................................................................................8
BATTERY DISPOSAL ..........................................................................................................................................................8
CONTROLS & FEATURES .............................................................................................................................................9
OPERATING INSTRUCTIONS .....................................................................................................................................11
PRE-START CHECKS .......................................................................................................................................................11
TO START THE MOTOR AND ENGAGE THE BLADE ...........................................................................................................11
TO STOP THE MOTOR AND THE BLADE ...........................................................................................................................12
ADJUSTING THE CUTTING HEIGHT ..................................................................................................................................12
USING THE DISCHARGE FLAP ..........................................................................................................................................13
USING THE OPTIONAL GRASS CATCHER..........................................................................................................................14
MULCHING......................................................................................................................................................................14
MOWING & LAWN CARE TIPS ..................................................................................................................................15
MAINTENANCE..............................................................................................................................................................16
CLEANING .......................................................................................................................................................................16
REMOVING AND ATTACHING THE BLADE ........................................................................................................................16
TO SHARPEN THE BLADE ................................................................................................................................................17
TO BALANCE THE BLADE ...............................................................................................................................................18
LUBRICATION .................................................................................................................................................................18
REMOVING AND REPLACING THE BATTERY PACK ...........................................................................................................18
STORAGE.........................................................................................................................................................................19
TROUBLESHOOTING ...................................................................................................................................................20
PARTS LIST .....................................................................................................................................................................22
SCHEMATIC DRAWING...............................................................................................................................................24
DR® WHISPER LITE® CORDLESS Electric Mower Safety & Operating Instructions
1
Mower Components
Figure 1
2
DR® WHISPER LITE® CORDLESS Electric Mower Safety & Operating Instructions
Assembly
Before beginning the assembly, please check that you have all of the components
listed below. If anything is missing, please call Country Home Products® Toll-Free
1(800)DR-OWNER(376-9637).
Package Contents:
• Mower
• Battery Charger
• Handlebar
• Bag with Safety Key, Safety & Operating
Instructions and 36mm wrench
• Optional accessories purchased may be in
package.
Assembly Tools Needed:
• enclosed 36mm wrench, or
• 1/2" wrench or socket
• Phillips head screwdriver
To Assemble Your Lawn Mower
Step 1.
Attach the Lower Handlebar
Note: For easier access, set the cutting
height to the highest adjustment position.
1. Remove the bolt, lock washer and square
washer from the mounting hole in the
mower frame (Figure 2).
2. Position the lower handlebar, with the
indentation facing out, against the frame of
the mower. Slide it down into the slots in
the frame until the bolt holes line up
(Figure 3).
3. Mount the bolt, lock washer and square
washer on one side and tighten with a
wrench.
4. Repeat on the other side.
Step 2.
Figure 2
Lock the Upper Handlebar
Turn and lock the quick control handle that
connects the upper and lower handlebar.
There should be several threads showing
between the handlebar and the quick control
handle when tightened. If you tighten the
handle too much it will not lock properly or
may break.
Figure 3
®
®
DR WHISPER LITE CORDLESS Electric Mower Safety & Operating Instructions
3
Step 3.
Recharge the Mower Before First Use
You MUST recharge the battery pack before the first use of the machine, or the battery pack
may suffer permanent damage. Read the section "Initial Charging" on page 6 of this manual before
you operate the mower.
Step 4.
Read these Safety & Operating Instructions Before Using the Mower.
Anyone operating the DR® WHISPER LITE® CORDLESS Electric Mower should be thoroughly
familiar with these instructions.
4
DR® WHISPER LITE® CORDLESS Electric Mower Safety & Operating Instructions
Battery Care & Charging
Before charging the battery pack, read all instructions and cautionary markings in
this manual and on your mower. Do not operate your mower until you have read and
understand all instructions and the battery pack has been fully charged.
Battery Pack
The battery pack in your DR® WHISPER LITE® CORDLESS Electric Mower is composed of two
completely sealed 12V lead acid batteries inside a pack connected serially to a 24V motor. There is
no hazardous chemical which can leak from the battery pack, regardless of the position in which the
mower is stored. The battery pack is completely maintenance free. Water never needs to be added.
However, as with all rechargeable batteries, after years of use they will eventually need replacement
for optimal performance. Please refer to the Maintenance section of this manual for more
information.
!
WARNING! Do not alter the individual batteries in any way, or remove them from the battery
pack.
There are important guidelines with regard to how and when the battery pack should be charged, and
how it should be stored. By following these simple guidelines the life expectancy of the battery pack
will be maximized and your average annual cost for batteries will be minimized.
Charging Instructions
Before you charge the mower:
1. Always charge the mower indoors in a garage or other covered area where it will be dry and
protected from the weather.
2. Only charge the mower when the temperature is at least 32°F (0°C) but not more than 104°F
(40°C). Charging in lower or higher temperatures can be harmful to the battery pack. (Follow
temperature guidelines for storage in the Maintenance section of this manual.)
3. Always keep the mower away from water, heat sources (stoves, radiators, open flames, etc.), and
hazardous chemicals.
4. When storing the battery pack after removal from the mower follow the storage guidelines on
page 19 of this manual.
5. Never attempt to charge your mower with a charger other than a Whisper Lite ES360 charger.
The charger is specifically designed to give optimal performance of your DR® WHISPER LITE®
CORDLESS Electric Mower's battery pack. Never use the charger with any other product.
Never operate the charger if it is damaged. If a cord or the charger unit has been damaged,
replace it or have it repaired.
DR® WHISPER LITE® CORDLESS Electric Mower Safety & Operating Instructions
5
Initial Charging
IMPORTANT! The battery pack in your mower has been charged at the factory.
However, you must recharge the battery pack and make sure it is fully charged
before initial operation of the mower. Failure to do so may cause permanent damage
to the battery pack.
!
WARNING: Make sure the electrical power supply is normal household voltage (110 volts).
Plug the charger directly into an electrical outlet. Do not abuse the cords. Never carry the charger
by the cord. Always disconnect cords from the electrical outlet (wall outlet) and from the charger by
pulling the plug, not the cord.
Note: If an extension cord is used for the charger, use a heavy-duty extension cord of a type
"suitable for outdoor use" (though you should never charge the mower in the open outdoors).
IMPORTANT! ALWAYS connect the charger to the battery pack first, and then plug it into the wall
outlet. When unplugging, ALWAYS unplug the charger from the wall outlet first, and then
disconnect it from the battery pack.
There are two charging methods. Either method is acceptable.
1. Charging with the Battery Pack in the Mower
·
·
·
·
6
With all four wheels on the mower
touching the floor, plug the round plug
from the charger into the charger
receptacle (center hole) in the mower's key
hole (Figure 4). Then plug the charger
into the wall receptacle. The mower
cannot be charged when the safety key is
plugged in since it covers the charging
receptacle. Likewise, the mower's motor
cannot be operated during charging since it
is impossible to have the safety key
plugged in at the same time as the charger.
Figure 4
Charging will take at least 12 hours.
The charger is always warm to the touch during the first approximately 5 hours of a typical 12hour charge cycle. This is normal and not an indication of a problem.
The mower can not be overcharged, and will not be damaged if the charger is left on for a few
days after the battery pack has been fully charged. However, in order to get the maximum life
out of the battery pack it is recommended that you disconnect the charger soon after the battery
pack is fully charged and then periodically recharge it if the mower is not used. See the Storage
section on page 19 for more information.
DR® WHISPER LITE® CORDLESS Electric Mower Safety & Operating Instructions
2. Charging with the Battery Pack Removed from the Mower
·
Remove the battery pack from the mower
to recharge (Figure 5). Connect the
charger plug to the charger receptacle on
the battery pack (Figure 6), then plug the
charger into a wall outlet. A red light on
the battery pack will indicate the battery
pack is being charged.
Note: The red light on the battery pack
only indicates that the charger is plugged
in and the battery is charging—it will not
automatically turn off when charging is
complete.
·
·
Charging will take at least 12 hours.
The charger is always warm to the touch
during the first 5 hours or so of a typical
12-hour charge cycle. This is normal and
not an indication of a problem.
Figure 5
IMPORTANT! Always keep the battery pack
in a dry place.
Disconnecting the Charger
!
WARNING: Always disconnect the
charger from the electrical (wall) outlet
FIRST, and then disconnect the round
charger plug from the mower's charger
receptacle or the battery pack. If the round
charger plug is removed first, the exposed
connector can be accidentally short circuited
by foreign material which may in turn cause a fire.
DR® WHISPER LITE® CORDLESS Electric Mower Safety & Operating Instructions
Figure 6
7
Recharging After Each Use of the Mower
IMPORTANT! Always recharge the mower to a full charge immediately after each use, no
matter how short a time it was used, even if the battery power indicator on the control panel
is still green. This is important in order to maintain maximum mower performance and extend
maximum battery pack life. If the mower is stored with a depleted battery pack, the batteries will
become permanently damaged within a short time.
Recharging to a Full Charge for Off-Season Storage
1. Always recharge the mower to a full charge before putting it away for off-season storage. After
giving the batteries a full charge (at least 12 hours of charging) you may leave the mower in
storage for the entire off-season (up to 6 or 7 months) without adverse effect on the battery pack,
provided the storage temperature is within the acceptable range (see below). The battery pack
used in your DR® WHISPER LITE® CORDLESS Electric Mower has much less self-discharging
during storage than conventional lead acid batteries. Also remember to give the battery pack a
full charge before first using the mower next season.
2. Owners of cordless electric mowers often ask if they may leave the charger on for weeks or
months at a time, or even during the entire off-season of more than six months. The answer is
that while leaving the charger on for several weeks will not damage the mower, leaving it on for
an entire off-season is not as good for the battery pack life as periodic recharging. The
manufacturer of the DR® WHISPER LITE® CORDLESS Electric Mower's battery pack therefore
makes the following recommendation:
The method most likely to contribute to a long battery life is to recharge for at least
12 hours about once every three or four months during off-season storage.
3. Storage temperature range. It is important for good battery performance that the mower is
always stored in an environment between –4°F (–20°C) and +104°F (+40°C). Make sure the
storage temperatures will never be outside these limits. The lower the storage temperature is
within the specified range the better, since the self-discharge is slower at low temperatures.
4. We do not recommend removing the battery pack from the mower during storage.
5. See page 19 for more storage information.
Battery Disposal
Please dispose of used batteries responsibly, according to your local hazardous
materials regulations.
8
DR® WHISPER LITE® CORDLESS Electric Mower Safety & Operating Instructions
Controls & Features
Make yourself, and all other operators, familiar with the controls, parts and operation of the DR®
WHISPER LITE® CORDLESS Electric Mower before using it.
Figure 7
DR® WHISPER LITE® CORDLESS Electric Mower Safety & Operating Instructions
9
Key Hole/Charger Receptacle
The key hole is the receptacle for both the external battery charger and the safety key, which is
inserted to run the motor. The key hole is designed so that you can never connect the external battery
charger and insert the safety key at the same time (Figures7 & 8).
Safety Key
The safety key must be inserted to run the motor. The safety key has a built-in circuit breaker to
protect the motor. When the built-in circuit breaker is tripped, the white button on top of the safety
key will pop up. Before attempting to restart the mower, push the white button all the way down
until it locks in place. Any time the circuit is tripped you'll need to reset the white button on the
safety key. There is no replacement fuse inside the safety key.
The safety key can be inserted either way—
there is no front or back (Figure 8).
Start Button
The start button is used to start the motor.
Operator Presence Control Bar
The operator presence control bar (Figure 7) is
a safety feature. When the bar is engaged the
motor will continue to run and the blade will
spin. When the bar is released, the motor will
shut off and the blade will stop spinning within
three seconds.
Figure 8
Battery Status Light
• When the GREEN light is on, the battery pack is charged enough to use the mower.
• When the RED light on handlebar lights up:
a. A solid red light during normal mowing means the battery is low. Stop mowing and fully
charge the battery for at least 12 hours. You may notice a short period of rest will restore the
light on the handlebar to green, but you should still fully charge battery before continuing to
mow.
b. If, during heavy mowing, a red light comes on and you hear the motor slow down, the mower
is being pushed too hard. Raise the cutting height and slow down your mowing speed. To
avoid damage and extend battery life, always mow at a pace where only the green light is on.
c. If you get a flashing red light and the motor will not run, call Customer Service at 1-800-DROWNER(376-9637) for technical assistance.
Do not operate the mower again until the battery pack is fully charged or it may suffer
permanent damage.
Quick-Connect Handlebar Levers
The quick-connect levers (Figure 7) allow you to easily fold the handlebar over for storage.
Cutting Height Adjustment Lever
The cutting height adjustment lever (Figure 7) allows you to easily adjust how high or low you cut
the grass.
Optional Attachment Control Switch
This switch controls optional attachments to the mower, which are sold separately.
10
DR® WHISPER LITE® CORDLESS Electric Mower Safety & Operating Instructions
Operating Instructions
Pre-Start Checks
If the mower battery pack is not fully charged, or if you are unpacking a new mower for the
first time, read the section on Battery Care & Charging on page 5 before operating the
mower.
!
WARNING! Do not insert the safety key until all pre-start checks have been made and you
have moved to the mowing area.
Þ Check under the mower deck and make sure you are using the correct blade (for mulching or
grass collection), and that the blade is attached properly. Inspect for any visible damage to the
blade or deck, and remove any accumulation of dirt, dust or dried grass clippings.
Þ Select the desired cutting height. See the instructions on Adjusting the Cutting Height on
page 12.
Þ Be sure the Control Switch on the handlebar is in the mowing position, with the
rectangular blade illustration pushed down.
Þ Push the mower to the lawn area to be mowed.
Note: The lawn mower battery pack has been fully charged at the factory.
However, since batteries self-discharge over time, you must recharge the
battery pack to a full charge before using your mower for the first time.
Reminder: The length of time that a battery pack can hold its charge while mowing a lawn depends
upon lawn conditions; tall or thick grass make the mower work harder and cause the battery pack to
discharge faster.
To Start the Motor and Engage the Blade
!
WARNING! Starting, stopping and restarting an electric motor repeatedly within a
few seconds can generate a great deal of heat and damage the motor. To protect the
long life of your DR® Whisper Lite, always wait at least five seconds after stopping,
before restarting the mower.
IMPORTANT! The cutting blade turns when
the motor is running, there is no clutch to
allow the blade to stop rotating while the
motor is running.
1. Do the pre-start checks listed above.
2. Insert the safety key into the key hole
(page 10, Figure 8). The safety key can be
inserted with either side up. The green
light on the LED panel should come on if
the battery pack is sufficiently charged.
3. To start the mower press the start button
first (1), then squeeze the operator
Figure 9
presence control bar (2). Release the start
button when the motor starts and continue to hold the operator presence control bar (Figure 9).
DR® WHISPER LITE® CORDLESS Electric Mower Safety & Operating Instructions
11
4. Continue to hold the operator presence control bar against the handlebar for as long as you want
the motor to run.
Note: Releasing the operator presence control bar will immediately switch off the motor and
the blade will stop spinning within three seconds.
!
WARNING! The operator presence control bar is a safety device. Do not tamper with it.
To Stop the Motor and the Blade
1. To stop the motor and the blade simply release the operator presence control bar (page 9,
Figure 7). The motor will stop, and the blade will stop spinning within three seconds.
CAUTION: The blade will continue to rotate for a few seconds after the motor is shut off.
2. Remove the safety key when the equipment is unattended and the motor is shut off.
3. ALWAYS recharge the battery pack after each use—no mater how short. See page 8.
Adjusting the Cutting Height
!
WARNING: The safety key, with its built-in circuit breaker, should never be inserted during
assembly, adjustments, cleaning, blade replacement, or when the mower is not in use. Removing
the safety key will prevent accidental starting, and help avoid serious personal injury.
Adjust the cutting height to cut 1" to 2" of
grass at a time. The cutting height adjustment
handle is located near the left rear wheel
(Figure 10).
Figure 10
12
DR® WHISPER LITE® CORDLESS Electric Mower Safety & Operating Instructions
The handle may be placed in one of six cutting height positions:
Lever Position
Cutting Height
1
1"
(Lever Highest)
2
1-1/4"
3
1-4/5"
4
2-1/4"
5
2-3/5"
6
3"
(Lever Lowest)
1. Remove the safety key.
2. Make sure all four wheels are level.
3. The height adjustment lever is spring loaded. Squeeze the lever outward (toward the wheel) and
out of its position notch.
4. Move the lever to the desired notch.
Using the Discharge Flap
When you don't want to collect clippings or
mulch, use the discharge flap. This flap
helps clippings discharge properly to the rear
of the mower and prevents clogging.
1. Raise the hinged discharge guard.
2. Position the black discharge flap with the
ribbed bend facing up, flush against the
rear of the discharge guard (Figure 11).
3. Lower the hinged guard so the stud locks
into the hole in the flap.
Figure 11
DR® WHISPER LITE® CORDLESS Electric Mower Safety & Operating Instructions
13
Using the Optional Grass Catcher
To Attach the Grass Catcher
1. Raise the hinged discharge guard on the
rear of the mower. If the optional plastic
discharge chute block is installed, pull it
out by its handle. (The block is seated in
the chute by "press fit" and it may be
necessary to pull quite hard.)
2. While keeping the discharge guard raised,
insert the grass catcher into the holes on
both sides of the mower (Figure 12).
3. Release the discharge guard and press it
into the hole on the top of the grass catcher
to lock the catcher in place
(Figure 12).
4. Lock the grass catcher in place by sliding
the black tab on the handle over the
discharge guard.
Figure 12
To Remove the Grass Catcher
1. Unlock the black tab on the grass catcher
handle.
2. Raise the discharge guard, grab the grass
catcher by its handle and remove it by
lifting it up while pulling out.
3. Release the discharge guard.
Mulching
Figure 13
1. Remove the grass catcher from the mower
(see above) and install the optional discharge
chute block (Figure 13). Be sure to push the
block all the way in until the notch in its
bottom is engaged.
2. Install the optional mulching blade
(Figure 14). Please see the instructions for
Removing and Attaching the Blade on
page 16.
Figure 14
14
DR® WHISPER LITE® CORDLESS Electric Mower Safety & Operating Instructions
Mowing & Lawn Care Tips
·
For best results, mow at a steady pace. If you try to walk too quickly, especially in tall grass, the
quality of the cut may not be uniform.
·
Mow as often as needed so that you are only cutting 1-2" of grass each mowing session. Trying
to cut more than 2" will drastically reduce the charge life of the battery pack.
·
For the healthiest lawn, avoid removing more than one third of the leaf blade during any one
mowing session. When more than one third of the blade is removed, the grass plant produces
less food for itself and therefore becomes weaker and more susceptible to disease and insect
damage.
·
Keep your mower blade sharp! A sharp mower blade cuts the grass quickly and cleanly, using
less of the mower's power, which conserves battery pack life. For best results, inspect the blade
often and have an extra, sharp blade ready to install as a replacement while the dull blade is being
sharpened.
·
Alternate the mowing pattern on your lawn frequently. By changing the pattern and direction of
the cut, you'll improve the health and appearance of your lawn. Following the same mowing
pattern causes soil compaction and turf wear from the mower wheels.
·
Mow across slopes; never up and down.
DR® WHISPER LITE® CORDLESS Electric Mower Safety & Operating Instructions
15
Maintenance
Cleaning
Supplies Needed:
• clean, damp cloth or sponge
• mild soap or detergent (if needed)
• soft nylon brush (if needed)
!
WARNING: ALWAYS remove the safety key before performing any adjustments, maintenance
or repairs.
1. Remove the safety key.
2. Use a damp cloth or sponge, with a mild soap or detergent if necessary, to clean the mower. Do
not use water or solvents for cleaning. Remove any clippings that have accumulated on the
underside of the deck and in the discharge chute. A soft nylon brush or non-metallic scrubbing
pad may be used. Do not use a wire brush.
3. You may use water to clean the grass catcher, but not the mower itself. It is important for proper
grass collection that the grass bag is clean and the mesh holes are not clogged. Allow the grass
catcher to dry thoroughly before use. A wet grass catcher will clog quickly and hamper grass
collection.
Removing and Attaching the Blade
Always check the blade for sharpness, damage and tightness before and after each
use. Replace the blade promptly if it has been bent or damaged.
Tools & Supplies Needed:
• 36mm wrench (supplied with mower)
• 1/2" socket, or adjustable wrench
• gloves or rag to protect your hands
!
WARNING: ALWAYS remove the safety key before performing any adjustments, maintenance
or repairs.
1. Remove the safety key and take out the
battery pack. If you are charging the
battery pack, first disconnect the charger
from the electrical (wall) outlet.
2. Wear heavy gloves to protect your hands.
Turn the mower over on its right side
(when in the operating position) to expose
the blade.
3. Place the 36mm wrench over the steel hex
adapter (Figure 15).
Figure 15
16
DR® WHISPER LITE® CORDLESS Electric Mower Safety & Operating Instructions
4. Loosen the blade nut (Figure 16) with the
socket or adjustable wrench. The blade
nut turns counterclockwise to loosen.
Hold the steel hex adapter steady in one
hand to prevent the motor shaft from
turning, while loosening the blade nut with
the other hand.
5. Remove the blade nut, steel hex adapter,
blade, plastic spacer and steel blade
adapter (Figure 16).
To replace a sharpened blade or to install a
new blade, reverse steps 1 – 4 above. Be sure
to replace all parts exactly as they were
removed as shown in Figure 16. Observe the
correct orientation of the blade, and tighten
the blade nut firmly.
Note The blade has "This Side Up" printed on
the top side.
To Sharpen the Blade
When the blade is dull, cut ends of the grass
will be ragged and usually turn brown soon
after mowing. A dull blade will also cause the
battery pack to discharge more quickly. If the
blade is in otherwise good condition, sharpen
Figure 16
it when the cutting edges become dull. For
best results, we recommend you remove the blade from the mower to sharpen it.
Tools & Supplies Needed:
• fine-tooth file or sharpening stone
• gloves
• safety glasses
!
WARNING: ALWAYS remove the safety key before performing any adjustments, maintenance
or repairs.
To Sharpen the Blade in a Vise
1. Remove the safety key.
2. Turn the mower over on its right side (when in the operating position) to expose the blade.
Remove the blade as instructed on page 16.
3. Secure the blade in a sturdy vise.
4. Wear safety glasses. Carefully file the cutting edges of the blade using even strokes. File both
sides of the blade equally.
5. Check the blade after sharpening to be sure it is still balanced. See page 18.
DR® WHISPER LITE® CORDLESS Electric Mower Safety & Operating Instructions
17
To Sharpen the Blade on the Mower
1. Remove the safety key.
2. Turn the mower over on its right side (when in the operating position) to expose the blade.
3. Wear safety glasses. Hold the blade and carefully file the cutting edges using even strokes. File
both sides of the blade equally.
To Balance the Blade
Because you are removing metal from each side of the blade, make sure to remove an equal amount
from each side to keep the blade balanced. An out of balance blade will cause your machine to
vibrate excessively. Excessive vibration may cause damage to the mower, especially the motor. The
best way to balance a blade is with a blade balancer (usually about $3.00 at your local hardware
store), or with a large screwdriver, nail or bolt.
Tools & Supplies Needed:
• gloves
• blade balancer, or a large screwdriver, nail or bolt
·
·
After sharpening the blade, hang it on the
balancer (Figure 17) and check the level.
If one side of the blade tips lower, sharpen
that side a little at a time until the blade is
balanced.
When sharpening a used blade, be
especially careful to keep it balanced. If in
doubt, replace the blade with a new one.
Lubrication
The DR® WHISPER LITE® mower does not
require any lubrication and should not be
lubricated.
Figure 17
Removing and Replacing the Battery Pack
For best battery performance and maximum battery pack life, always follow the recommendations in
the Battery Care & Charging section beginning on page 5.
Eventually, after several years of normal use, the battery pack will need to be replaced.
Please dispose of used batteries responsibly, according to your local hazardous
materials regulations.
18
DR® WHISPER LITE® CORDLESS Electric Mower Safety & Operating Instructions
Storage
Whether you store the mower for a short or long time, always remember these
important guidelines:
·
Always store the mower with a full battery charge and follow the recharging instructions in the
Battery Care & Charging section.
·
Always store the mower in an environment where the temperature is between –4°F (–20°C) and
+104°F (+40°C). Make sure the storage temperatures will never be outside these limits. For
long-term storage, the lower the storage temperature is within the specified range the better, since
the self-discharge is lowest at low temperatures.
·
Store the mower in a dry environment.
·
Do not store the mower near chemicals such as fertilizers. These products are often highly
corrosive and may cause permanent damage to your mower.
·
Always keep the safety key in a safe place and away from children. It is not recommended that
you remove the battery pack from the mower for separate long-term storage.
·
We recommend storing the mower with the battery pack in it.
If you must store the battery pack outside the mower follow these rules:
·
If the battery pack will be used again, give it a full charge before removing it from the mower.
·
Do not store the battery pack close to a source of heat, sparks or open flames.
·
The ambient temperature range must be within the –4°F (–20°C) and +104°F (+40°C)
temperature range.
·
Do not store the battery pack in proximity to organic solvents.
·
Do not expose the battery pack to abnormal shaking or shocks.
·
Store the battery pack away from children.
·
Do not press or bend or use force on the terminals.
·
Do not apply heat, such as soldering, to the terminals.
·
Store the battery pack in as dry an environment as possible. Do not store it on a floor that may be
subject to accidental flooding, such as a basement.
·
Regularly observe external appearance of the battery pack and keep it clean and dry. Never use a
battery pack that shows cracks, change of shape, leaks, or other obvious damage.
·
Never throw away used batteries. Bring them to a recycling center or dealer.
·
During long-term storage of batteries that are intended for use in the mower again, reinstall them
periodically for recharging as recommended in the Battery Care and Charging section beginning
on page 6.
DR® WHISPER LITE® CORDLESS Electric Mower Safety & Operating Instructions
19
Troubleshooting
!
WARNING: ALWAYS remove the safety key before performing any adjustments, maintenance
or repairs.
Problem
Corrective Action
Motor fails to start when safety key is
inserted, button and operator control
bar are depressed
Þ Check to make sure the safety key is properly inserted.
Þ The blade may be obstructed. Remove the safety key, turn
the mower over and check the blade.
Þ Is the battery pack fully charged? Plug in the charger and
check the lights.
Þ If, when the operator presence control lever is released, the
blade does not stop within three seconds, the red LED will
flash and the audible "beep" signal will come on, followed very
soon by automatic motor shut-off. A relay will need to be
replaced, and for safety reasons, the mower cannot be
restarted after this has occurred. Please call us Toll-Free
1(800)DR-OWNER(376-9637) for information and
replacement parts.
Mower stops while mowing (for reason
other than releasing the operator
presence control bar)
Þ The mower may be overloaded. If all the lights are out, the
circuit breaker inside the safety key has cut off power to
protect the motor. Reinsert the safety key, reset the white
button and restart the mower.
Þ Cutting too much grass. Raise the cutting height and try
again.
Þ The blade, mower deck and/or discharge chute may be
clogged with debris. Remove the safety key, turn the mower
over and check below the deck. Clean if necessary.
Þ The safety button may not be fully engaged. Reset it and try
again.
Þ The battery pack has been completely depleted. Recharge the
battery pack.
Þ The blade may be loose. Remove the safety key, turn the
mower over and check that the blade is tight.
Excessive vibration or noise
Þ The blade may be unbalanced, bent or damaged. Remove the
safety key, turn the mower over, remove the blade and check
the condition of it. Replace if necessary.
Mower runs, but cutting performance is
unsatisfactory, or there is a loss of
power
Þ Was the battery pack fully charged at the start?
Þ The blade may be dull. Remove the safety key, turn the
mower over and check the condition of the blade.
Þ The blade may be bent, loose or damaged. Remove the
safety key, turn the mower over and check the condition of the
blade.
Þ The grass may be too high or too thick for the cutting height.
Raise to a higher cutting height.
20
DR® WHISPER LITE® CORDLESS Electric Mower Safety & Operating Instructions
Mower is hard to push
Þ Mower is trying to cut too much grass. Raise the cutting
height.
Þ The wheels may not be rotating freely. Remove the safety
key, turn the mower over and check the wheels for damage.
Battery pack looses its charge quickly
Þ Was the battery pack fully charged when you began? Charge
the battery pack if necessary.
Þ The grass may be too high or too thick. Try adjusting the
cutting height higher, and/or mowing a narrower swath.
Mower motor will not stop when
operator presence control bar is
released
Þ The motor may have a defective relay. Remove the safety key
to shut off the motor. Call one of our Customer Service
Representatives Toll-Free 1(800)DR-OWNER(376-9637).
Mower does not finish cutting lawn on a
singe charge any more
Þ Was the battery pack fully charged at the start?
Þ After some time, usually at least a couple of years, the battery
pack will need to be replaced.
Þ The blade may be dull. Sharpen it following the instructions on
page 19.
Mower grass catcher is collecting grass
poorly
Þ Grass catcher is full. Empty the grass catcher, and clean it if
necessary.
Þ Grass is too long, or the mower is cutting too low. Raise the
cutting height.
Þ The mower is moving too fast. Slow down.
Þ The discharge chute may be clogged. Remove the safety key,
turn the mower over and clean away any debris from the
discharge chute and below the deck.
Þ Is the correct blade installed? Is the right side of the blade
facing up? Remove the safety key, turn the mower over and
check the blade.
Note: For repairs beyond the minor adjustments listed above, contact one of our Customer
Service Representatives Toll-Free 1(800)DR-OWNER(376-9637).
DR® WHISPER LITE® CORDLESS Electric Mower Safety & Operating Instructions
21
Parts List
Please refer to the schematic drawing on page 24 for reference numbers.
Ref #
A1
A2
A3
A4
A5
A6
A7
A8
A9
A10
A11
A12
A13
A14
A15
A16
A17
A18
A19
B1
B2
B3
B4
B5
B6
B7
B8
B9
B10
B11
B12
B13
B14
B15
C1
C2
C3
22
Part #
A1-18137-00009
A2-28163-00024
A3-26127-00062
A4-24124-00018
A5-24138-00042
A6-48199-00021
A7-28124-00001
A8-26127-00063
A9-26158-00001
A10-26127-00056
A11-16137-00003
A12-46197-00018
A13-26135-00005
A14-28137-00002
A15-46199-00007
A16-28126-00003
A17-46196-00024
A18-16137-00004
A19-16137-00005
B1-18181-00016
B2-28183-00022
B3-26127-00048
B4-46135-00005
B5-28183-00004
B6-26127-00067
B7-26114-00072
B8-48193-00019
B9-18181-00038
B10-28116-00002
B11-46197-00064
B12-28147-00004
B13-46197-00072
B14-14134-00011
B15-46197-00072
C1-18146-00011
C2-14136-00009
C3-46199-00019
Description
Grip Housing Set
Switch Button-Gray
Switch Button Spring
Switch
Switch Cable w/ LED
LED Mounting Plate
Slide
Slide Spring
Start Control Bar
Start Control Bar Spring
Upper Handlebar Steel Frame
Screw
Quick-Connect Hinge
Quick-Connect Locker
Flat Washer
Cord Clip
Screw
Lower Handlebar (L)
Lower Handlebar (R)
Upper Housing Red
LED Cover Black
LED Spring
LED Pin
Discharge Guard Red
Guard Spring
Discharge Guard Hinge
End Tube Ringer
Battery Pack Cover Red
Battery Cover Hinge
Screw
Hinge Fixed Base
Screw
Battery Charger
Screw
Deck
Motor 500W
Motor Mounting Plate
Ref #
C4
C5
C6
C7
C8
C9
C10
C11
C12
C13
C14
C15
C16
C17
C18
C19
C20
C21
C22
C23
C24
C25
C26
C27
C28
C29
D1
D2
D3
D4
D5
D6
D7
D8
D9
D10
D11
Part #
C4-46196-00080
C5-26149-00001
C6-48199-00010
C7-36143-00012
C8-46199-00026
C9-46198-00040
C10-28183-00009
C11-24124-00040
C12-46197-00051
C13-34133-00028
C14-24139-00050
C15-24138-00055
C16-28181-00031
C17-28181-00032
C18-46197-00074
C19-26177-00009
C20-46196-00082
C21-46198-00026
C22-46196-00078
C24-26127-00058
C24-46135-00012
C25-26125-00008
C26-46199-00023
C27-24138-00043
C28-24138-00044
C29-43192-00401
D1-29044-00005
D2-28145-00001
D3-26135-00004
D4-46199-00018
D5-46198-00039
D6-28182-00070
D7-26177-00014
D8-46197-00010
D9-29044-00006
D10-28145-00001
D11-26135-00008
Description
Screw & Washer
Blade Adapter
Plastic Spacer
Cutting Blade
Hex Adapter
Blade Nut w/ Flange
Rear Axle Cap
Security Key Plate
Screw
Circuit Board
Brake Wire
Ground Wire
Circuit Board Upper Cover
Circuit Board Box Base
Screw
CU Connection
Screw & Washer
Nut
Screw, Circuit Board
Lever Spring
Spring Pin
Binding Clip
Flat Washer
Wire, Red
Wire, Black
Foam
Front Wheel Set
Steel Bearing
Rear Axle
Flat Washer
Nut
Front Wheel Cap-Gray
Metal Axle Plate
Screw
Rear Wheel Set
Steel Bearing
Rear Axle
DR® WHISPER LITE® CORDLESS Electric Mower Safety & Operating Instructions
Ref #
D12
D13
D14
D15
D16
D17
D18
D19
D20
D21
D22
F1
F2
F3
F4
F5
F6
F7
F8
F9
Part #
D12-28182-00071
D13-26158-00009
D14-46198-00039
D15-28183-00039
D16-28183-00040
D17-46135-00011
D18-26127-00105
D19-26177-00023
D20-46197-00104
D21-46197-00060
46198-00016
F1-26126-00004
F2-28152-00009
F3-28182-00052
F4-14141-00002
F5-24138-00022
F6-14133-00013
F7-46197-00086
F8-33157-00003
F9-14134-00011
Description
Rear Wheel Cap-Gray
Connecting Link
Nut
Upper Cover
Cap
Cap Hinge
Cap Spring
CU Connection Channel
Screw
Screw
Nut
Battery Strap Snap
Battery Box Black
Battery Box Cover Red
Battery
Cord in Series
Charging Plate
Screw
Velcro
Charger
Ref #
F10
F11
F12
F13
F14
F15
F16
F17
F18
F19
F20
Part #
F10-28177-00018
F11-24124-00006
F12-47659-00001
F13-36143-00011
F14-48193-00156
F15-28126-00001
F16-46197-00024
F17-28181-00009
F18-28181-00011
F19-26116-00006
F20-37673-00001
Description
Discharge Flap
Security Key
Strap
Mulching Blade
Discharge Chute Block
Clip Slide Set
Screw
Catcher Plastic Cover
Catcher Cover Shield
Catcher Steel Frame
Catcher
Assemblies
A1-A19 39037-00003-0102
B5-B8
38183-00001-0102
C13-C15, C29
34133-00030-0101
D1-D8
38135-00003-0101
D9-D14 38135-00004-0101
F11-F12 34124-00001-0101
F15-F18 38181-00001-0101
DR® WHISPER LITE® CORDLESS Electric Mower Safety & Operating Instructions
Handlebar Set
Discharge Guard Set
Circuit Board Set
Front Wheel Assembly
Rear Wheel Assembly
Security Key Set
Catcher Cover Set
23
Schematic Drawing
Figure 18
24
DR® WHISPER LITE® CORDLESS Electric Mower Safety & Operating Instructions
DR® WHISPER LITE® CORDLESS Electric Mower Safety & Operating Instructions
25
Limited One Year Warranty
The DRÒ WHISPER LITEÒ CORDLESS ELECTRIC Mower is warranted for one (1) year against
defects in materials or workmanship when put to personal residential household use.
For the purposes of all the above warranties, “personal residential household use” refers to noncommercial residential use and further excludes misuse, accidents or damage due to inadequate
maintenance.
Country Home Products, Inc. certifies that the DRÒ WHISPER LITEÒ CORDLESS ELECTRIC
Mower is fit for ordinary purposes for which a product of this type is used. Country Home Products,
Inc., however, limits the implied warranties of merchantability and fitness in duration to a period of
one (1) year in personal residential household use.
The Limited 1-Year Warranty on the DRÒ WHISPER LITEÒ CORDLESS ELECTRIC Mower starts
on the date the machine is shipped from our factory. The Limited 1-Year Warranty is applicable
only to the original owner.
The owner is responsible for the performance of all the required maintenance as defined by the
manufacturer's owner's manuals.
The owner is responsible for replacement of normally wearing parts including blades and batteries.
Attachments and accessories to the machine are not covered by this warranty.
During the warranty period the warranty holder is responsible for any and all shipping charges, if
required.
SOME STATES DO NOT ALLOW LIMITATIONS ON THE LENGTH OF IMPLIED
WARRANTIES, SO THE ABOVE LIMITATIONS MAY NOT APPLY TO YOU.
Country Home Products, Inc. shall not be liable under any circumstances for any incidental or
consequential damages or expenses of any kind, including, but not limited to, cost of equipment
rentals, or cost of hiring services to perform tasks normally performed by the DRÒ WHISPER LITEÒ
CORDLESS ELECTRIC Mower.
SOME STATES DO NOT ALLOW THE EXCLUSION OR LIMITATION OF INCIDENTAL OR
CONSEQUENTIAL DAMAGES, SO THE ABOVE LIMITATIONS MAY NOT APPLY TO YOU.
Customer Service Hotline
Country Home Products, Inc.’s objective is to have 100% satisfied customers. For that reason, we
operate a 6-day-a-week Technical Service Department for our Owners. You can access a
Representative by dialing our TOLL-FREE Hotline at 1-800-DR-OWNER (376-9637). The sole job
of our well-trained and friendly folks is to ensure that you get any help you need in a timely fashion.
They are there to answer all your questions including: (1) inquiries on any of the above warranties,
(2) inquiries about replacement parts, or (3) your questions regarding service, maintenance and
operation.
THIS WARRANTY GIVES YOU SPECIFIC LEGAL RIGHTS, AND YOU ALSO HAVE OTHER
RIGHTS WHICH VARY FROM STATE TO STATE.
COUNTRY HOME PRODUCTS, Inc.
Meigs Road, P.O. Box 25, Vergennes, Vermont 05491
1-800-DR-OWNER(376-9637) • www.dr-owner.com
©2001 CHP, Inc. 157761
26
®
®
DR WHISPER LITE CORDLESS Electric Mower Safety & Operating Instructions