1
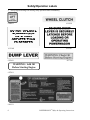
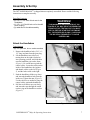
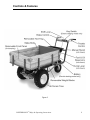
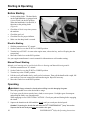
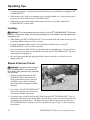
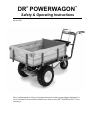
® ™ DR POWERWAGON Safety & Operating Instructions Model: PRO Please read through these Safety & Operating Instructions and the separate Engine Manufacturer's Owner's Manual to become familiar with the basic features of the DR® POWERWAGON™ before operating it. And congratulations on your purchase of a new DR® POWERWAGON™! We have done our utmost to ensure your DR® POWERWAGON™ will be one of the most troublefree and satisfying pieces of equipment you have ever owned. Please let us know of any questions or problems you may have. We want to answer or correct them as quickly as possible. (When you do call or write, please have your serial number and/or order number handy—it will speed things up!) We also hope to hear from you on how much you like your new helper. And, please tell your friends about your new DR® POWERWAGON™! Having DR® Owners spread the word about our products and our way of doing business is the best advertising we can have, and the best way to help us provide even better service in the years to come. Thanks once again! for all of us at... COUNTRY HOME PRODUCTS 2 POWERWAGON™ Safety & Operating Instructions Safety Information We want you to enjoy years of productive use from your DR® POWERWAGON™. We don't want you to get injured, so please take a few moments to read the following guidelines for safely operating your new machine. Dress Appropriately • Wear shoes with non-slip treads when using your DR® POWERWAGON™. If you have safety shoes, we recommend you wear them. Do not use the machine while barefoot or wearing open sandals. • Avoid loose clothing or jewelry, which might get caught in the machine’s moving parts. Preparation • Read these Safety & Operating Instructions as well as the engine manufacturer's owner's manual before you use the DR® POWERWAGON™. Become familiar with the controls, engine and service recommendations to ensure the best performance from your machine. • Check out the area you'll be operating in BEFORE using your DR® POWERWAGON™. Know what kind of terrain you will be moving over, and avoid areas with poor footing. Operating the Machine Safely • Built-in safety features are effective only when maintained and kept in place. DO NOT, under any conditions, remove, cut, bend, weld or change standard parts on any equipment. A change made on your own can make the equipment unsafe and may void your warranty. • ALWAYS shut off the engine and remove the spark plug wire prior to making any adjustments to the machine. • The exhaust area on the engine becomes very hot. Allow the engine to cool before doing maintenance or making adjustments. • Keep combustible substances away from the engine when it is hot. • When operating over uneven terrain and slopes, use EXTREME CAUTION and make sure you're on firm footing at all times. • Operate the DR® POWERWAGON™ only during the daylight hours. • Use extra caution when operating in wet, slippery conditions. • Always operate the DR® POWERWAGON™ from behind the handlebars, never from the side. • While using the DR® POWERWAGON™, don't hurry or take things for granted. When in doubt about the equipment or your surroundings, stop the machine and take the time to look things over. Make sure you have 100% control of the machine at all times. • DO NOT OVERLOAD THE DR® POWERWAGON™. Be careful of top-heavy loads. The higher the load, the more chance the machine may tip over. Also, loads may shift during operation, so secure your loads and even them out when possible to be safe. POWERWAGON™ Safety & Operating Instructions 3 • When shifting to reverse, be careful to avoid tipping as the swivel wheel changes direction. • Do not rev the engine. Excessive speed or tampering with the governor can be dangerous. Operate the engine at the slowest speed that is satisfactory to do the job. • While using the DR® POWERWAGON™, cultivate the habit of not hurrying or taking things for granted. When in doubt about the equipment or surroundings, stop the machine and take time to look things over. Make sure you have 100% control of the machine at all times. • Keep your hands away from the belt and pulleys when the engine is running. • Be particularly careful of small children and pets. Never allow children to operate the DR® POWERWAGON™. Never carry children, adults or pets in the DR® POWERWAGON™. Use caution when another person approaches. • Give complete and undivided attention to the job at hand, and be sure you know how to engage the brake and stop the DR® POWERWAGON™ at a moment's notice before you use your new machine. Safety with Gasoline-Powered Machines • Do not run the engine in an enclosed area or without proper ventilation. • Store all fuel in containers specifically designed for this purpose. Plastic containers are more likely to prevent sediment and condensation problems. • Fill the gasoline tank outdoors with the engine off. Don't handle gasoline if you or anyone nearby is smoking, or if you're near a fire, sparks or anything that could cause the gasoline vapors to ignite or explode. • If gas is spilled, do not attempt to start the engine. Move the machine away from the area of the spill and avoid creating any source of ignition until the gas vapors have dissipated. Wipe up any spilled fuel to prevent a fire hazard, and properly dispose of the waste. • Allow the engine to cool completely before storing in any enclosure. Never store the machine near an open flame or sparks with gas in the tank. • Do not change the engine governor settings or modify the engine speed. Warning to all Californian and Other Users Under California law, and the laws of some other states, you are not permitted to operate an internal combustion engine using hydrocarbon fuels without an engine spark arrester. All DR® POWERWAGONS shipped to California and Washington State are provided with spark arresters. Failure of the owner/operator to maintain this equipment in compliance with state regulations is a misdemeanor under California law and may be in violation of other state and/or federal regulations. Contact your local fire marshal or forest service for specific information in your area. Country Home Products, Inc. reserves the right to discontinue, change and improve its products at any time without notice or obligation to the purchaser. contained in this manual were in effect at. The descriptions and specifications contained in this manual were in effect at printing. Equipment described within this manual may be optional. Some illustrations may not be applicable to your machine. 4 POWERWAGON™ Safety & Operating Instructions Table of Contents DRESS APPROPRIATELY ............................................................................................................................................ 3 PREPARATION ........................................................................................................................................................... 3 OPERATING THE MACHINE SAFELY .......................................................................................................................... 3 WARNING TO ALL CALIFORNIAN AND OTHER USERS................................................................................................ 4 SAFETY/OPERATION LABELS............................................................................................................................. 6 ASSEMBLY & SET UP ............................................................................................................................................. 7 CONTROLS & FEATURES...................................................................................................................................... 9 STARTING & OPERATING .................................................................................................................................. 10 BEFORE STARTING .................................................................................................................................................. 10 OPERATING ............................................................................................................................................................. 10 STOPPING ................................................................................................................................................................ 11 OPERATING TIPS .................................................................................................................................................. 12 LOADING................................................................................................................................................................. 12 SLOPES & UNEVEN TERRAIN .................................................................................................................................. 12 DUMPING ................................................................................................................................................................ 13 GENERAL MAINTENANCE ................................................................................................................................. 14 REGULAR MAINTENANCE CHECK LIST ................................................................................................................... 14 * IF SO EQUIPPED. .................................................................................................................................................. 14 ** THE ENGINE ON YOUR DR® MAY NOT HAVE A PRECLEANER OR OIL FILTER. .................................................... 14 BATTERY CARE ...................................................................................................................................................... 15 CHANGING THE OIL ................................................................................................................................................ 16 TO REPLACE THE BELT ........................................................................................................................................... 16 LUBRICATION ......................................................................................................................................................... 17 TRANSMISSION........................................................................................................................................................ 17 TO REMOVE THE FRONT WHEELS ........................................................................................................................... 18 TO ADJUST THE PARKING BRAKE ........................................................................................................................... 18 BRAKE CABLE ADJUSTMENT .................................................................................................................................. 19 TO CHANGE THE BRAKE PADS ................................................................................................................................ 19 TO ADJUST THE THROTTLE CABLE ......................................................................................................................... 21 TO ADJUST THE SHIFT LEVER ................................................................................................................................. 22 TO REMOVE OR REPLACE THE STAKE BODY OR THE MOLDED BODY ..................................................................... 23 TO REMOVE THE CINDER BLOCKS .......................................................................................................................... 23 END OF SEASON .................................................................................................................................................... 24 BEGINNING OF SEASON...................................................................................................................................... 25 TROUBLESHOOTING ........................................................................................................................................... 26 WARRANTY…………………...……………………………………………………………………………………28 DAILY CHECKLIST FOR THE DR® POWERWAGON™ ................................................................................. 29 POWERWAGON™ Safety & Operating Instructions 5 Safety/Operation Labels • Always replace damaged or missing safety/operation labels immediately. #109831 #136501 #153441 #153431 #153421 #137581 WARNING: Add Oil Before Starting Engine #127811 #161531 6 POWERWAGON™ Safety & Operating Instructions Assembly & Set Up The DR® POWERWAGON™ is shipped almost completely assembled. Please read the following instructions to complete assembly. Parts Bag Contents: • (2) 5/16" x 1-1/2" bolts & lock nuts for the handlebars • (1) 1/4" x 1-1/4" bolt & lock nut for the shift lever coupling • (3) cable ties for the cable assembly WARNING! THIS MACHINE IS SHIPPED WITHOUT OIL! TRACES OF OIL MAY BE IN THE RESERVOIR FROM FACTORY TESTING, BUT YOU MUST ADD OIL BEFORE STARTING THE ENGINE. FILL THE RESERVOIR SLOWLY, CHECKING THE DIPSTICK FREQUENTLY TO AVOID OVERFILLING. Attach the Handlebars Tools Needed: • (2) 1/2" open-end, box or socket wrenches 1. Remove the handlebar bolts (5/16" x 11/2" long) and nuts from the parts bag. 2. Lift the handlebars out of the bed, turning them to the right (clockwise) into operating position, and slide them onto the handlebar pins on the frame (Figure 1). Be careful not to pinch the control cables. Locate the cables on the inside of the handlebars: the ignition and throttle cables on the left (Figure 2), and the brake cable on the right 3. Push the handlebars all the way down and insert the handlebar bolts from the inside out. Tighten the nuts (Figure 2). Use the cable ties as needed to snug the control cables against the handlebars. 4. Pull the recoil/starter rope out slowly and insert the rope through the curled retainer ring on the handlebar crossbar (Figure 2). Figure 1 Cable tie harness to handlebar Figure 2 POWERWAGON™ Safety & Operating Instructions 7 Connect the Shift Lever Coupling Tools Needed: • (2) 7/16" open-end, box or socket wrenches 1. Position the shift lever so the indicator is pointing to neutral on the control panel. 2. Insert the lower end of the shift rod into the shift coupling. Line up the holes on the shift rod and the shift coupling. Insert the bolt, mount the nut and tighten (Figure 3). 3. Sometimes it may be necessary to pull downward on the control panel to make the holes line up in the shift rod and coupler. This provides spring tension to eliminate rattles during operation. Fill the Oil and Fuel Reservoirs Note: You must remove the tool tray to access the oil and fuel reservoirs. 1. Fill oil to the “full” level indicated on the dipstick with SAE 30 HD (High Detergent) oil. Check the dipstick while adding oil to avoid Figure 3 overfilling. 2. Fill the fuel tank with fresh, unleaded gasoline. Leave at least 1/4" from the fuel level to the top to allow for fuel expansion. See your engine manufacturer's owner's manual for detailed fuel and oil information. Connect the Battery Wires Electric-starting model only. Connect the red wires to each other (Figure 4). The black wires are connected at the factory. Check the Tire Pressure The recommended tire pressures are listed below. • Turf Tread Tires 14-28 lbs. • All-Terrain Tires 10-14 lbs. • Swivel Tire 30-50 lbs. • Sulky Tires 22-30 lbs. Figure 4 Note: The heavier the load, the higher the tire pressure should be. Do not go above the maximum recommended load or pressure. 8 POWERWAGON™ Safety & Operating Instructions Controls & Features Figure 5 POWERWAGON™ Safety & Operating Instructions 9 Starting & Operating Before Starting • Set the parking brake. The hand brake on the right handlebar is equipped with a lever to lock it in the ON position. When the hand brake is locked ON, it functions as the parking brake (Figure 6). Check the oil level every time you use the machine Check the gas level. Check the tires for proper inflation. Make sure the dump latch is secured. • • • • Electric-Starting Figure 6 1. Shift the transmission to "N" neutral. 2. Set the Choke lever to the START or CHOKE position. 3. Turn the key to START. As soon as the engine starts, release the key, and it will spring into the run position. 4. Move the Choke lever to the RUN position. See your engine manufacturer's owner's manual for information on cold weather starting. Manual Recoil Starting Manual recoil starting can be used for both Electric-Starting and Manual-Starting models. 1. Shift the transmission to "N" neutral. 2. Set the Choke lever to the START or CHOKE position. 3. Turn the key to the START position. 4. Pull the recoil pull handle slowly, until you feel resistance. Then pull the handle with a rapid, full arm stroke to overcome compression and start the engine. Repeat if necessary. 5. Move the Choke lever to the RUN position. Operating ! WARNING: Always release the throttle when shifting to avoid damaging the gears. 1. Move the gearshift lever to the desired drive range. Use lower gears for slower speeds, heavy loads, or more power. Use higher gears for transport and pulling the Sulky over smooth terrain. When engaging reverse USE EXTRA CAUTION. Check your path and footing before engaging the clutch. 2. Squeeze the throttle on the left handlebar slowly until you reach your desired speed. Caution! Squeezing the throttle fast will make the DR® POWERWAGON™ "jump" into motion. Squeeze the throttle slowly and ease the machine into gear. 10 POWERWAGON™ Safety & Operating Instructions Stopping 1. 2. 3. 4. Release the throttle. Shift to "N" neutral. Set the parking brake by squeezing the brake lever on the right handlebar and setting the lock. Turn the key to the OFF position. Remove the key to prevent misuse. POWERWAGON™ Safety & Operating Instructions 11 Operating Tips • Avoid abrupt start-ups. Always squeeze the throttle slowly to avoid bucking, or tipping the DR® POWERWAGON™. • When using reverse, check to see that there are no obstacles behind you. Practice backing up in an open area with no load in the DR® POWERWAGON™. • When using reverse with the Sulky attached, proceed slowly so you don't jackknife the POWERWAGON™ and the Sulky. Loading WARNING! The recommended maximum load limit for the DR® POWERWAGON™ PRO model is 800 lbs. Placing more weight in the bed may be dangerous to the operator, and can permanently damage the unit. • When loading your DR® POWERWAGON™ keep in mind the bulk and weight of what you will be hauling, and the terrain you will be crossing. • Keep the load balanced and secured. Always distribute the load evenly so your DR® POWERWAGON™ will be as stable as possible. • Don't pile material too high. Divide your load and make several lighter trips. Do not pile heavy loads, such as rocks or gravel, to a height that will make the DR® POWERWAGON™ top-heavy and susceptible to tipping over. • Be careful going downhill and applying the brake. Squeeze the brake very slowly to avoid dumping the load. Slopes & Uneven Terrain WARNING! Use caution when using the DR POWERWAGON™ on uneven terrain. Move slowly if the ground is rough, especially with a full load. ® • We do not recommend using the DR® POWERWAGON™ continuously on a slope greater than 20 degrees. Doing so could deprive the engine of adequate lubrication and the components could be damaged. • Use caution: The DR® POWERWAGON™ may become unstable when moving over ruts, bumps and other depressions. • On a slope, a heavy load will tend to shift. When using your DR® POWERWAGON™, keep in mind that loads tend to shift to the downhill side of the body. Secure your load in the bed to limit the shifting of the load on slopes. The higher and heavier the load, the greater the chance the DR® POWERWAGON™ may tip over. Travel up and down slopes (Figure 7) and avoid going across slopes. 12 Figure 7 POWERWAGON™ Safety & Operating Instructions • Again, be especially careful with full loads. A good rule of thumb: the steeper the hill, the lighter and lower your load should be. • When going downhill, keep a firm grip on the handlebars and push down slightly. Do not apply the brake abruptly when going downhill with a heavy load or the DR® POWERWAGON™ may pitch forward onto its front end. Dumping Note: For safety reasons, the DR® POWERWAGON™ bed is designed NOT to dump automatically once the dump lever is released. You must pull the dump handle back then lift the back of the bed to cause it to tip forward. 1. Remove front panel. 2. Stand at the rear of the bed. 3. Pull the handle on the dump lever (Figure 8), then pull up on the rear of the bed to dump the load (Figure 9). 4. After unloading, push the bed back down into place by hand. Be sure the dump lever latches securely. The bed of the DR® POWERWAGON™ is balanced so you can dump the load with minimal effort. If you are carrying a very heavy load, you may not be able to lift the bed to dump it when you release the latch lever. In this case, you will need to manually remove part of the load from the back of the bed, until the load is light enough to allow the bed to tip forward when you lift up on the back of it. Figure 8 Figure 9 POWERWAGON™ Safety & Operating Instructions 13 General Maintenance *** For Engine Maintenance, Please Refer to the Engine Manufacturer's Owner's Manual. *** Regular Maintenance Check List Regular maintenance is the way to ensure the best performance and long life of your machine. Please refer to this manual and the engine manufacturer's owner's manual for maintenance procedures. Service intervals listed in the checklist below supercede those listed in the engine manufacturer's owner's manual. Note: Service intervals shown are considered maximum under normal operating conditions. Increase frequencies under extremely dirty or dusty conditions. Procedure Check Operator Presence Switch* Check Engine Oil Level Check General Equipment Condition Before Each Use ▲ ▲ ▲ Lubricate Grease Fittings Check Tire Pressure Clean Air Filter & Precleaner** Change Engine Oil & Filter** 1st time 5 hours Every 25 Hours ▲ ▲ ▲ ▲ Check Parking Brake Adjustment Clean Engine Exterior & Cooling Fins Check All Belt Tensions & Condition Replace Spark Plugs Replace Air Filter & Precleaner** * ** 14 Every 50 Hours ▲ ▲ ▲ Every 100 Hours ▲ ▲ If so equipped. The engine on your DR® may not have a precleaner or oil filter. POWERWAGON™ Safety & Operating Instructions Battery Care Electric-Starting Models Proper care can lengthen the life of a battery. Follow these recommendations to ensure your battery's best performance and long life: • Do not allow the battery charge to get too low. If the machine is not used, the battery should be charged every 4 – 6 weeks. • Store an unused battery in a dry area that does not freeze. • Do not charge an already charged battery. In theory, our battery can not be overcharged with a trickle charger; however, when a battery is fully charged and the charger is still on, it generates heat that could be harmful to the battery. A fully charged battery will read 12V-13.2V with a voltmeter. • Do not continue to crank your engine when the battery charge is low. Symptoms of a battery needing a charge: • The machine won’t start with the key, but will start with the recoil starter. • A whirring noise coming from the starter. • A grinding noise and a whirring noise coming from the starter. • No noise at all. Charging the Battery If the battery loses its charge, you'll need to use a trickle charger (like the DR® Battery Charger) to recharge it. The charger should have an output of 12 volts at no more than 6-8 amps. • At 1 amp the battery may need to be charged for as much as 48 hours. • At 2 amps the battery may need to be charged for as much as 24 hours. • At 6-8 amps the battery will be charged in 2 to 3 hours. Caution: At 6-8 amps a battery can overcharge. Note: Using the recoil starter and then running the engine will not recharge a dead battery. 1. On the wiring harness, disconnect the red and black wires from the battery. 2. Attach the red (+) battery charger wire to the red (+) battery tab, and the black (-) battery charger wire to the black (-) battery tab. 3. Plug the battery charger into an outlet. ! CAUTION: When you are finished charging the battery, disconnect the battery charger wires from the battery first, then disconnect the charger from the outlet. If the battery charger wires are left connected to the battery, the battery will discharge itself back into the charger. Note: We have modified the battery wire clips and extension tabs to accommodate different wiring connections. If you need to adapt your charger to your equipment, please call one of our Customer Service Representatives for more information. POWERWAGON™ Safety & Operating Instructions 15 Changing the Oil Change the oil as directed by your engine manufacturer's owner's manual. Tools & Supplies Needed: • 3/8" ratchet and extension • 3/4" socket • adjustable wrench • SAE30 HD motor oil • suitable container for old oil • rag or cloth ! WARNING: Always disconnect the spark plug wire before servicing your machine. 1. Remove the oil drain plug from the bottom of the engine (Figure 10) and drain the oil. 2. Replace the plug and refill the oil to the level indicated on the dipstick. Do not overfill. Figure 10 To Replace the Belt ! WARNING: Always disconnect the spark plug wire before servicing your machine. 1. Position the machine on a level surface. Set the parking brake. 2. Tip the bed forward. 3. Remove the cinder blocks. (Pg. 23) 4. Pull on the idler pulley and spring to lessen the tension on the belt and slide the belt from the idler pulley (Figure 11). 5. Remove the belt from the transmission pulley at the front of the machine (Figure 12). 6. Remove the belt from the clutch pulley under the engine (Figure 10). 7. Install the new belt on the clutch pulley first, then the transmission pulley and then the idler pulley. Make sure the new belt is INSIDE the belt guide near the clutch pulley (Figure 10). 8. Reinstall the cinder blocks and the weight rack block strap to secure them. 16 Figure 11 Figure 12 POWERWAGON™ Safety & Operating Instructions Lubrication Supplies Needed: • #2 lithium grease • FLUID FILM® or similar lubricant ! WARNING: Always disconnect the spark plug wire before servicing your machine. 1. There are two grease fittings on the swivel wheel: one at the top front of the wheel bracket (Figure 13), and one toward the center of the wheel (Figure 14). Occasionally grease these two fittings with #2 lithium grease to keep the wheel spinning freely. 2. Lubricate the brake lever and cable at the operator's end, the throttle lever and cable at both ends, and the key switch, with FLUID FILM® or similar lubricant (Figure 15). Figure 13 Transmission The transaxle is factory sealed. It contains 16 ounces of 90 weight gear oil. No lubrication or other servicing is necessary for the life of the unit unless leakage occurs. Figure 14 Figure 15 POWERWAGON™ Safety & Operating Instructions 17 To Remove the Front Wheels Tool Needed: • Flat-head screwdriver ! WARNING: Always disconnect the spark plug wire before servicing your machine. 1. Block the machine up off the ground. 2. Rotate the tire so the key slot is upward, then pop off the wheel lock ring with the screwdriver (Figure 16) and save it. Remove the washer and slide the wheel off. To Replace the Front Wheels Leave the key in place (if possible) and slide the wheel back on. If the key comes out when you take the wheel off, put the wheel back on and rotate it until the key slots line up. Slide the key back in place and reinstall the washer and wheel lock ring. Figure 16 Note: When replacing the wheel lock ring, make sure the center of the wheel lock ring is opposite the key. To Adjust the Parking Brake If your DR® POWERWAGON™ rolls on slopes when the parking brake is set, or if you can't get the parking brake to set, it needs to be adjusted. Tool Needed: • 1/2" open-end, box or socket wrench ! WARNING: Always disconnect the spark plug wire before servicing your machine. 1. With the machine on a level surface, set the parking brake. 2. Put the transmission in neutral. 3. Test the brake: try to roll the machine. It should not move in either direction with the parking brake set. 4. If it does move, turn the adjustment nut on the transaxle (Figure 18) 1/4 turn clockwise with the 1/2" wrench to tighten the brake. Test the brake as described in Steps 1-3. Repeat the adjustment if necessary. 5. If you can't get the parking brake to release, turn the adjustment nut on the transaxle (Figure 18) 1/4 turn counterclockwise with the 1/2" wrench to loosen the brake. Test the brake, as described in Steps 1-3. Repeat the adjustment if necessary. 18 Figure 17 Figure 18 POWERWAGON™ Safety & Operating Instructions Note: Turn the nut only 1/4 turn at a time, and then test the brake to see if the adjustment worked. If needed, adjust the nut another 1/4 turn and test again. Brake Cable Adjustment The brake cable is factory set (Figure 19). If you think the brake cable needs to be adjusted, you may actually need to replace the brake pads. See below. To Change the Brake Pads If your DR® POWERWAGON™ rolls on slopes when the brake is set, and you have tried adjusting the brake, the brake pads may need to be replaced. Tools and Supplies Needed: • 1/2" wrench or socket • Mat or container for loose parts Figure 19 ! WARNING: Always disconnect the spark plug wire before servicing your machine. Note: You may want to remove the wheel to provide easier access to the brake area (see page 14). 1. Find a level area to work. The parking brake should NOT be engaged. Chock the wheels so the machine cannot move. 2. Locate the brake caliper at the right front of the machine (Figure 20). Remove the two caliper bolts holding the brake caliper with a 1/2" wrench, then carefully remove the caliper. POWERWAGON™ Safety & Operating Instructions Figure 20 19 The caliper contains four small parts: the brake pad, the backing plate, and two small actuator pins (Figures 22 & 23). As you let the caliper hang from its attaching hardware, keep track of these parts as they could fall out. Clean away any debris from these parts and the inside of the caliper. 3. Pull the brake disc off the keyed shaft (Figure 24). Be careful not to lose the shaft key. Remove the old brake pad from behind the disc. Next, replace it with a new brake pad, then reinstall the brake disc. 4. Replace the caliper housing and its parts: two actuator pins, the backing plate, and the second brake pad (Figure 23). Make sure the brake arm assembly is in the upright position and the recessed cutout on the caliper is facing up with the plate to the rear. Reinstall the two caliper bolts and be careful not to over tighten them. 5. Test the brake: With the machine on a level surface, set the parking brake and put the machine in neutral. If the brake does not engage or hold, tighten the brake adjustment nut 1/4 turn with a 1/2" wrench. See “To Adjust the Parking Brake”. Check the parking brake periodically and adjust accordingly. 20 Figure 21 Figure 22 POWERWAGON™ Safety & Operating Instructions To Adjust the Throttle Cable ! WARNING: Always disconnect the spark plug wire before servicing your machine. CAUTION: Adjusting the throttle is a delicate procedure. There is only a few rpm difference between the engine's idle speed and engagement of the centrifugal clutch. The Throttle Cable is set at the factory and generally no service is required. However, when replacing the throttle cable it is important to follow these steps: Tools Needed: • 5/16 wrench or socket. Throttle Clamp Throttle Plate Throttle Cable Return Spring Choke Lever 1. Loosen the screw on the throttle cable clamp (Bowden clamp) with the wrench or socket so the throttle cable can slide below it. It is not necessary to remove the clamp. 2. Remove the throttle from the handlebar. 3. Place the new throttle on the handlebar and fasten. 4. Rout the cable the same as the old cable, being careful not to bend or kink the cable. 5. Place the Z bend end of the throttle cable into the small hole on the throttle plate on the engine. The throttle plate is a black tab that protrudes from the engine below the plastic air filter cover and above the white choke lever. It has two holes, and the cable goes into the smaller hole. Place the throttle cable sheath under the cable clamp. 6. Make sure that the throttle plate is all the way back to the stop. It will normally retract to this position. 7. Make sure the return spring is attached from the zinc plated bracket to the black throttle plate. It attaches to the larger of the two holes. Note: On some models the throttle spring is attached to the Z bend at the end of the cable. If your Powerwagon is like this then it is necessary to disconnect the spring from the cable. Otherwise, it is not necessary to disconnect the spring. CAUTION: Failure to place the throttle return spring on the machine could cause the Powerwagon to creep or lurch forward when placed in gear. 8. Tighten the cable clamp screw (Bowden clamp). The throttle cable should have very little or no tension between the cable clamp and the throttle plate. If the cable is clamped with too much tension between these points the engine will not return to idle properly. 9. Start the engine and check the operation of the machine. The DR® should idle smoothly, but should not move while in idle, and should not jump after being put into gear. POWERWAGON™ Safety & Operating Instructions 21 To Adjust the Shift Lever If you are unable to shift into reverse or 4th gear, the shift lever and tie rod need to be adjusted. Tools Needed: • 1/2" box or socket wrench • 1/2" box or open-end wrench • 9/16” box or open end wrench ! WARNING: Always disconnect the spark plug wire before servicing your machine. 1. Move the shift lever into the reverse position. 2. Loosen and remove the tie rod nut and bolt from the transaxle arm with the wrenches (Figure 27). Remove the tie rod from the transaxle arm. 3. Fully extend the transaxle arm toward the front of the machine; this will put the transmission into reverse gear (Figure 28). 4. Loosen the lock nut on the shift tie rod end with the 9/16 open-end wrench (Figure 28) and turn the tie rod end, clockwise to shorten the tie rod, and counterclockwise to lengthen it. Adjust the tie rod length until the shift indicator points to reverse when the tie rod end is reinstalled onto the transaxle arm. When the adjustment is complete, re-tighten the lock nut. The lock nut tightens against the ball end. Place the tie rod back on the transaxle arm, insert the bolt, and re-tighten the nut. This should enable you to use the full range of gears. Figure 23 Figure 24 22 POWERWAGON™ Safety & Operating Instructions To Remove or Replace the Stake Body or the Molded Body Tool Needed: • (2) 1/2" open-end or box wrenches ! WARNING: Always disconnect the spark plug wire before servicing your machine. 1. Position the machine on a level surface. Set the parking brake. 2. Tip the bed forward. 3. Remove the four sets of nuts and bolts, as shown (Figure 29). 4. Carefully lift and remove the body. 5. Follow these instructions in reverse to attach other body. To Remove the Cinder Blocks Tool Needed: • 7/16" wrench Figure 25 ! WARNING: Always disconnect the spark plug wire before servicing your machine. 1. Position the machine on a level surface. Set the parking brake. 2. Tip the bed forward. 3. Loosen the bolts and lock nuts with the wrench on the front and the rear of the weight rack block strap (Figure 30). Pull the strap up and off and store in a safe place. 4. Remove the three cinder blocks. 5. The cinder blocks must be replaced and secured with the strap for stability when dumping and for traction on slopes with light loads. POWERWAGON™ Safety & Operating Instructions Figure 26 23 End of Season ! WARNING: Always disconnect the spark plug wire before servicing your machine. Note: See your engine manufacturer's owner's manual for care and maintenance of the engine. 24 Run the engine dry to empty the carburetor. Or, if you prefer, add the recommended amount of gasoline stabilizer to the fuel in the tank. Run the engine for 2-3 minutes to allow the stabilizer to reach the carburetor. Pull the starter handle slowly until resistance is felt due to compression, then stop. Release starter tension slowly to prevent the engine from reversing due to compression. This position will close both the intake and exhaust valves to prevent corrosion of the piston and cylinder bore. Change the oil. This will help to eliminate sludge and acids in the engine. Electric-starting models: The battery should be removed and kept in a cool, dry place when the DR® POWERWAGON™ goes into storage. We suggest charging the battery once a month while the DR® is stored and again before you are ready to start the new season. This will help the battery maintain its charge all season. Remove dirt and debris from the carburetor linkage, the cylinder head cooling fins, the blower housing, the rotating screen, and the muffler area. Check to make sure the operator controls are moving freely. Lubricate the throttle lever, brake lever, and key switch with FLUID FILM® or similar lubricant if necessary. POWERWAGON™ Safety & Operating Instructions Beginning of Season Fill the gas tank with fresh, unleaded gas. (See your engine manufacturer's operator's manual for care and maintenance of the engine.) Fill the gas tank completely for an easier start. Note: If you have treated gas with stabilizer in your engine, this step is not necessary. Electric-starting models: Charge and reinstall the battery after winter storage. Clean/replace the air filter. Take out and clean the spark plug. Check the gap and replace the plug if necessary. See your engine manufacturer's operator's manual for care and maintenance of the engine. Check to make sure the operator controls are moving freely. Lubricate the throttle lever, the brake lever, and the key switch with FLUID FILM® or similar lubricant if necessary: POWERWAGON™ Safety & Operating Instructions 25 Troubleshooting ! WARNING: Always disconnect the spark plug wire before servicing your machine. Refer to the engine manufacturer's operator's manual for care and maintenance of the engine. Engine Engine won't start ⇒ ⇒ ⇒ Engine lacks power Engine skips, pops, misses, shakes Engine smokes ⇒ ⇒ ⇒ ⇒ ⇒ ⇒ ⇒ ⇒ ⇒ ⇒ ⇒ ⇒ ⇒ ⇒ Battery Engine won't start with key Alternator isn't recharging the battery 26 Check for adequate, fresh fuel. If the fuel is old or dirty, change it. Use a fuel stabilizer if you keep gas longer than two weeks or so. Check the oil. If it's low or dirty, replace it. Check the spark plug. If it's fouled or cracked, change it. If it's oily, leave it out, hold a rag over the plug hole and pull the recoil cord several times to blow out any oil in the cylinder, then wipe off the plug and reinsert it. Is the air filter clean? If not, clean or replace it. Is the throttle cable attached to the engine moving freely? Clean or replace the air filter if needed. Check the spark plug and replace if needed. Add clean, fresh, unleaded gas. Check the oil level and adjust as needed. Check the spark plug and replace if needed. Clean or replace the air filter if needed. Replace gas with fresh, unleaded fuel. Check the oil level and adjust as needed. You may be operating the machine on too great an incline. Check the air filter and clean or replace if needed. You may be using the wrong oil—too light for the temperature. Refer to your Engine Manufacturer's Owner’s Manual for detailed information. Clean the cooling fins if they’re dirty. ⇒ ⇒ Have you checked items listed above under Engine? If not, do so. ⇒ ⇒ Have you checked the battery cable connections and all electrical connections? Is your battery charged? Check it. If it's low, charge it with a 12-volt, 1 to 2 amp trickle charger. Is the alternator working? If it isn't recharging the battery, have the alternator checked by an Authorized Service Center. Call 1-800-DROWNER(376-9637). POWERWAGON™ Safety & Operating Instructions Shifting Machine is hard to get into reverse or high gears Wheels Lacks traction Wheels won't turn ⇒ ⇒ ⇒ ⇒ ⇒ ⇒ ⇒ ⇒ POWERWAGON™ Safety & Operating Instructions Shift lever may need adjusting. See page 18. Is the load even in the bed? The more weight over the wheels the better the traction. Try a lower gear. If you're working on rough terrain with Turf Tires, you may want to consider the All-Terrain Tires. Call 1-800-DR-OWNER(376-9637)for information. Is the machine in gear? Is the parking brake on? Is the belt loose or off the clutch pulley? Check that belt is on correct side of idler pulley 27 1-Year Limited Warranty Terms and Conditions The DR POWERWAGON™ is warranted for one (1) year against defects in materials or workmanship when put to ordinary and normal consumer use; ninety (90) days for any other use. The engine is warranted separately by the engine manufacturer. For the purposes of all the above warranties, “ordinary and normal consumer use” refers to non-commercial residential use and does not include misuse, accidents or damage due to inadequate maintenance. Country Home Products, Inc. certifies that the DR POWERWAGON™ is fit for ordinary purposes for which a product of this type is used. Country Home Products, Inc. however, limits the implied warranties of merchantability and fitness in duration to a period of one (1) year in consumer use; ninety (90) days for any other use. The 1-Year Limited Warranty on the DR POWERWAGON™ starts from the date the machine ships from our factory. The 1-Year Limited Warranty is applicable only to the original owner. The owner is responsible for the performance of the required maintenance as defined by the manufacturer's owner's manuals. The owner is responsible for replacement of normally wearing parts such as belts, bearings, batteries and brake. Attachments and accessories to the machine are not covered by this warranty. During the warranty period the warranty holder is responsible for any and all shipping and transportation charges, if required. SOME STATES DO NOT ALLOW LIMITATIONS ON THE LENGTH OF IMPLIED WARRANTIES, SO THE ABOVE LIMITATIONS MAY NOT APPLY TO YOU. Country Home Products, Inc. shall not be liable under any circumstances for any incidental or consequential damages or expenses of any kind, including, but not limited to, cost of equipment rentals, loss of profit, or cost of hiring services to perform tasks normally performed by the DR POWERWAGON™. SOME STATES DO NOT ALLOW THE EXCLUSION OR LIMITATION OF INCIDENTAL OR CONSEQUENTIAL DAMAGES, SO THE ABOVE LIMITATIONS MAY NOT APPLY TO YOU. Customer Service Hotline Country Home Products, Inc.’s objective is to have 100% satisfied customers. For that reason, we operate a 6day-a-week Technical Service Department for our Owners. You can access a Representative by dialing our TOLL-FREE Hotline at 1-800-DR-OWNER(376-9637). The sole job of our well-trained and friendly folks is to ensure that you get any help you need in a timely fashion. They are there to answer all your questions including: (1) inquiries on any of the above warranties, (2) inquiries about replacement parts, or (3) your questions regarding service, maintenance and operation. Our Customer Service Representatives will also be happy to answer any of your questions regarding the separate warranties on all engines. However, to obtain service, repair or replacement of any engine within the time period covered by the manufacturer’s limited warranty, follow the instructions and warranty information specifically pertaining to those items provided by their separate manufacturers. THIS WARRANTY GIVES YOU SPECIFIC LEGAL RIGHTS, AND YOU ALSO HAVE OTHERRIGHTS WHICH VARY FROM STATE TO STATE. COUNTRY HOME PRODUCTS, Inc. Meigs Road, P.O. Box 25, Vergennes, Vermont 05491 1-800-DR-OWNER(376-9637) • www.dr-owner.com ©2002 CHP, Inc. Daily Checklist for the DR® POWERWAGON™ OIL: With the machine on a level surface, remove the oil fill cap and check the oil level. Fill the reservoir according to the dipstick with SAE30 HD motor oil. GAS: Fill the gas tank with fresh, unleaded gasoline, making sure the gas valve on the bottom of the tank is open. Always close the gas valve when storing your machine. AIR FILTER: A clean air filter will mean a much easier starting and cooler running engine. Please refer to your engine manufacturer's owner's manual for instructions on cleaning the air filter. ENGINE: It is very important to keep the engine clean. Remove grass and other debris from the engine cooling fins and debris guard. A dirty engine retains heat and can cause damage to internal engine components. TIRES: Check the tires for wear and proper inflation ©2002 CHP, Inc. 164181 POWERWAGON™ Safety & Operating Instructions 29