1
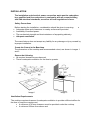
60 cm 4 Zone ( 2 Induction and
2 Ceramic )Touch Control cooktop
AC881
User Manual
CONTENTS
WARNING
DESCRIPTION OF THE COOKTOP AC881
OPERATING INSTRUCTIONS
CABINET INSTALLATION
ELECTRICAL CONNECTION
COOKING AND USAGE TIPS
CLEANING AND MAINTENANCE
TROUBLESHOOTING
WARNING
Please aware and pay attention to the following warnings in order to avoid electric
shock hazard, short circuit, fire hazard and break down of the appliance.
Installation and electrical connection of this cooktop must comply with SAA
Wiring Rules and with local electrical and building regulations.
•
•
•
Do not temper, modify or repair the cooktop by yourself.
Do not bend the cord sharply as it will damage the wire and might cause a short
circuit.
Never leave the cooktop unattended during use as overheated fat and oil may
catch fire.
•
The appliance is not intended for use by children or infirm persons without
supervision.
•
Keep children away from the cooktop during cooking.
•
Always ensure that there is cookware with food or water on the cooking zone
while the cooking element is on.
Do not overfill the cookware. Do not allow the liquid to boil dry.
Do not use the cooktop as storage, benchtop or working space. The cooking
zone controls may be accidentally turned on, resulting in possible fire,
property damage and personal injury.
Don’t wear loose clothing while cooking, as garments may catch cookware
handles. Sufficient space is needed around the cooktop while cooking.
•
•
•
•
Use dry cookware holders. Wet pot holders can build up steam. Do nut use
towels or other large pieces of cloth to pick up cooking cookware.
•
Wipe clean. Do not wash in the sink or allow water ingress into the cooktop,
as it will cause an electric shock, and may damage the appliance.
Do not use cooktop is the glass surface is cracked.
Do not interlay paper or cloth in between the cooktop and cookware in use.
Avoid using toxic and corrosive chemicals on the cooktop.
Avoid touch the glass surface with your hands when the hot surface indicator
is still on
Do not block the air in/out lets. Do not use the cooktop on the plastic sheets,
table cloth or other materials which might block the air circulation which
automatically will activate the power cut off.
•
•
•
•
•
•
Your induction hob generates magnetic fields which may interfere with medical
devices such as pacemakers.
DESCRIPTION OF THE COOKTOP AC881
Induction cooktops are easy and safe to use. Your model has 2 Induction and 2
Ceramic separate heating elements. Combination of 4 separate elements of the two
most popular electric heating methods gives you a choice of power, size of the cooking
zone and cookware type.
Why 2 Induction Cooktops Are Different from 2 Ceramic
Induction cooktops do not heat up like conventional electric elements.
Instead, they create a magnetic field which causes electric currents to circulate in the
bottom of the pan. These currents cause the bottom of the pan to heat up. This is a
much safer and more efficient way to transfer energy.
Advantages:
•
Efficiency: Uses far less energy
•
Comfort: The cooktop surface does not generate heat, keeping temperatures
in the kitchen lower
Control: You are not waiting for an element to heat up or cool down, so you
see the results of a setting change instantly.
Speed: Brings water to the boil faster than any other cooking method.
•
•
•
Safety: The cooktop does not generate heat, so presents much less of a fire or
burning hazard.
Choose The Right Cookware for 2 Induction cooking zones
Cookware that you use must have a base made from a “ferromagnetic ” material (ie a
material that attracts a magnet). Below is a list of appropriate and inappropriate
materials.
Use these types of cookware
• ferromagnetic steel
•
cast iron
•
magnetic stainless steel
clad cookware (magnetic stainless steel on the outside, aluminium or
copper on the inside)
• porcelain coated steel
• Most cookware will state whether it can be used for induction cooking.
Just in case, you should test potential cookware with a fridge magnet to
ensure the base is made from a magnetic material.
•
Do not use these:
• pans that are less than 12 cm in diameter
• non-magnetic stainless steel
• glass, ceramic or pyrex
• aluminium or copper
Note:
Your induction cooktop has an automatic cookware recognition sensor.
If the cookware not compatible for induction cooking, too small or too light
display window will show “E1” error code.
Any cookware suitable for electric heating can be used on 2 Ceramic/infrared
cooking zones
Using The Touch Controls
The touch controls on this cooktop are not only convenient - they also make available to
you a number of advanced functions that give you greater control over cooking
8
When pressing the touch controls, it is most effective if you use the flat part of your
finger, not your finger tip.
OPERATING INSTRUCTION
When power is connected to the appliance, the indicator lights will flash on the display
to indicate Stand By /Ready to use mode. The electric fans will be automatically turned
on with a “beep” sound but if no cooking operation has started after one minute, the unit
will shut off.
Operation of the INDUCTION ( Left ) zones of the cooktop
1.Press “ON/OFF” button to turn on.
2.Control heating levels of the element can be done through selecting Power or
Temperature control modes.
Touch the “MENU” button of the element of your choice.
The screen will light the signs “W” and display “P6”, indicating the default 6th heat level
You can select from 9 heat levels by pressing the + and - buttons. The selected level
of power will show in the display from P1 to P9.
To control the heat thorough temperature adjustments , press “ MENU” button second
time and the signs “C4” will be displayed indicating the default 4th temperature level.
Press the + and – buttons to select a heat setting anywhere from 1 to 9
4.The timer automatically switches an element off after a preset time.
Set the timer by selecting the element and press “MENU” button. The screen will display
‘MIN” use + and – buttons until the timer display shows the required number of
minutes. Maximum setting time is 99 minutes.
While in operation, you will NOT notice any change in the cooking zone. Induction
elements do not glow red.
5.To turn the element off, press the “ON/OFF” button
CAUTION: Even though the elements themselves do not generate heat, the surface
may become hot since it is in contact with a hot cookware.
Operation of the CERAMIC/INFRARED ( Right ) zones of the cooktop
1.Press the “ON/OFF” button to turn on the element of your choice.
The indicator lights will flash on the display to indicate Stand By /Ready to use mode. If
no cooking operation started within one minute it will revert to its previous status
2.Press the “POWER” button to show default set cooking power , 1000W for the small
zone and 1600W for the bigger heating element.
Press the + and – buttons to select alternative cooking zone power settings.
3.Two Ceramic zones equipped with 24 hours cut off timer. The timer automatically
switches an element off after a preset time.
To set up timer:
Select the element and press “TIMER” button. The display screen light with
“ 00:00 ”
for “hours : minutes” to set up. Use + and – buttons to set up minutes and hours. Set
up minutes, with short touch for 1 minute intervals and longer touch is 5 minutes until
the timer display shows the required number of minutes. To set up hours press the
“TIMER” button again and use + and – buttons to set the hours. When complete, the 4
digits display will flash three times to confirm settings done and start count down.
To clear the timer, touch the ”TIMER” button again. The timer will clear and display will
revert to displaying the cooking power level.
4.To prevent accidental turning on by children or if cleaning, touch the “Child-lock”
button to lock the other buttons except “ON/OFF”; to unlock touch it twice.
5.To turn the element off, press the “ON/OFF” button. The “high temperature” lamp will
not go down until the glass surface of the cooktop cools down. Do not touch the heating
zone surface until this light is off
Note:
After the cooktop is switched off but still connected to the power, it will be in
“Stand by” mode. The indicator lights will flash on the digital display to indicate
the appliance is connected to the power supply and in ready to use status.
Safety features of the Ceramic cooking zones
Over heat protection. Operation is automatically stopped if the temperature of the
cooking surface reaches 650 °C
Inner temperature overheat protection. Operation is automatically stopped if the internal
temperature reaches 95 °C. Low/High voltage protection. Operation is automatically
stopped, if supply voltage is outside the range 95-275V
INSTALLATION
The installation and electrical power connection work must be undertaken
by a qualified and licenced person in conformity with all current building
and SAA electrical standards, as well as all local regulations in force.
Safety Precautions
•
•
Before starting the installation, consideration should be given to ensuring:
Adequate space and clearances to nearby surfaces are provided.
Availability of earthed power.
•
•
The mechanical strength and heat resistance of supporting cabinetry.
Adequate ventilation.
The manufacturer does not accept any liability for any damage or injury caused by
improper installation.
Create the Cutout in the Benchtop
The dimensions of the cooktop and recommended cutout, are shown in images 1
and 2
•
•
Ensure the following:
All required clearances are observed.
There is adequate ventilation for the fans to operate.
Image1
image 2
Ventilation Requirements
The cooktop requires clearance for adequate ventilation to provide sufficient airflow for
the fans to keep the cooptop cool.
• A minimum of 90 mm clearance must be provided under the cooktop.
• A minimum 600mm from above and
•
A minimum 50mm on sides (where 1 side wall ), min 100 x 50 mm(in a
corner with 2 sides wall ) clearances of the cooktop must be provided to
allow the air to flow freely
Lay The Sealant and Install The Cooktop
•
•
•
Apply the sealant around perimeter of the top
cutout edges, image 3.
Lower the cooktop into the cutout, so an even seal will be formed, image 4.
Use packing wood where necessary to secure the cooktop into the cabinetry.
image 3
image 4
ELECTRICAL CONNECTION
Before connecting to the mains supply ensure that the mains power
corresponds with the requirements on the cooktop’s rating plate.
The appliance must be adequately earthed .
The cooktop has an earth wire and does not have a plug. It must be connected by
means of a special power cord, which must be correctly earthed.
In particular: The cooktop must be connected to the mains using 3x2.5mm2 power line
via a bipolar switch which has at least 3mm clearance between contacts.
All electrical work must be done by a licensed electrician.
COOKING AND USAGE TIPS
Ideal Heat Settings
•
For general cooking it is recommended to turn the element to its highest
setting till the pot heats up, then reduce the setting to the appropriate heat
level.
•
•
•
8-9 Brings liquid to the boil quickly. When the liquid starts to boil, this setting
is no longer needed. You can reduce the heat setting and still allow boiling to
be maintained.
6-7 Browning meats, heating oil for frying, keep liquid on the boil
3-5 Steaming, or cooking covered foods once boiling temperature is reached
1-3 Melting chocolate or butter. Keeping foods warm.
Saving Energy
Induction cooktops are very energy efficient. However, you can reduce unnecessary
energy wastage even further by following a few common sense cooking methods:
• Once a liquid begins to boil, it is advisable to turn the element down. Rapidly
boiling water does not cook food any faster than water which is boiling just
above a simmer.
• Use a lid while cooking to retain heat inside the pot.
•
Use minimal water or oil to reduce heat up time.
Induction Cooking Cookware Tips
•
•
Induction cooktops work most efficiently when the cookware is close to or exactly
the same size as the cooking zone. The size of the cooking zone is marked by a
white ring etched on the glass. In particular,
The pot should not overhang the zone by more than 25mm.
•
The pot should cover at least 60% of the zone for it to work.
If the element is on with either no pot or a pot which is too small, the
display will flash with the“E1” symbol.
Pans less than 12cm in diameter should not be used.
•
The base of the cookware should be flat so that it sits securely on the heating
zone. It should not be curved up or down.
Heavy gauge stainless steel and cast iron give the best cooking performance.
•
CLEANING AND MAINTENANCE
This cooktop is easy to clean and maintain. The smooth surface of the glass helps
to prevent dirt build up.
To Prevent Cooktop Scratching
•
Make sure the bottom of all cookware is clean and dry before using. Make sure
the cooktop surface is clean and dry before using. Do not allow aluminium foil
(including foil containers) to come into contact with the glass while the unit is on.
Cookware with sharp, damaged or jagged edges may scratch the glassware.
For Normal Cleaning
•
•
•
•
When the cooktop is cool, wipe the glass with a clean damp cloth or nylon pad.
You may also use a fresh solution of dishwashing detergent and warm water.
Do not use a dirty sponge or use the same water used for washing up, as this
may leave a greasy residue which will show up as streaks when the cooktop is
next heated. Wipe away any residual cleaning agent with clean water.
Do not use abrasive sponges or cleaners. Many caustic oven cleaners will
permanently burn the stain onto the glass surface.
When wiping over, remember to turn diamond rings away from the glass to
prevent accidental scratching.
Cleaning Fresh Spillovers
•
It is best to clean a spillover immediately to avoid much more work later on. Turn
the unit off and wipe around the hot zone with a paper towel. Use a protective
glove or mitt to prevent burning.
Important: Melted plastic, or spills involving foods with a high sugar content must be
removed immediately before the cooktop has cooled, or they will become
permanently fused into the glass top. Use a ceramic cooktop scraper to completely
lift the spilled residue and move it to a cool area of the cooktop. Wait till the affected
part of the cooktop has cooled, then clean according to normal cleaning procedures
outlined above.
Cleaning Burnt-On Spillovers
•
When the cooktop surface is cool, use a ceramic cooktop
scraper. Hold it at an angle and scrape off residue. Clean
according to normal cleaning procedures outlined above.
Cleaning Stubborn Stains
•
It is advisable to use commercially available glass cooktop cleaners occasionally,
which are found in the homeware sections of most supermarkets, appliance and
kitchen stores. These not only clean thoroughly, but also leave a protective
coating on the glass surface.
TROUBLESHOOTING
This cooktop equipped with the safety sensors to detect and display on screen of
following functional disorders.
Induction Cooktop
E0
Main Function Control Board (FCB) error
E1
No appropriate cookware or cookware too small on element
E2
Supply voltage too low
E3
Supply voltage too high
E4
Heat sensor open circuit or short circuit
E5
Operational software error
E6
Over current protection
E7
High temperature controller open or short circuit
E8
Top plate overheated
E9
High temperature controller over heated
Ceramic Cooktop
E2
E3
E4
E5
E7
E8
E9
Supply voltage too low
Supply voltage too high
Heat sensor open circuit or short circuit
Heat sensor error
Silicon controller sensor open circuit or short circuit
Top plate overheat
Silicon controller overheat


![Présentation des gammes[3] - Amicale des Hospitaliers de Saint-Malo](http://vs1.manualzilla.com/store/data/006500339_1-36f398170af1935e561ac30700fc19b7-150x150.png)