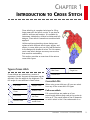
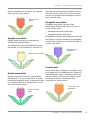
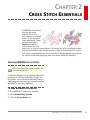
1
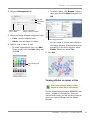
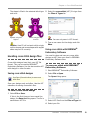
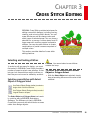
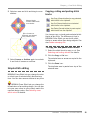
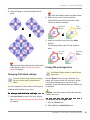
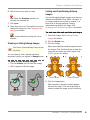
USER MANUAL
BERNINA CrossStitch
COPYRIGHT 1997-2009 BY WILCOM PTY LTD. ALL RIGHTS RESERVED.
No parts of this publication or the accompanying software may be copied or distributed, transmitted,
transcribed, stored in a retrieval system or translated into any human or computer language, in any form or by
any means, electronic, mechanical, magnetic, manual, or otherwise, or disclosed to any third party without the
express written permission of:
Wilcom Pty Ltd. (A.B.N. 43 001 971 919)
146-156 Wyndham Street, Alexandria (Sydney)
New South Wales, 2015, Australia
PO Box 581, Alexandria, 1435
Phone: +61 2 9578 5100
Fax: +61 2 9578 5108
Email: [email protected]
Web: http://www.wilcom.com.au
NOTE
The screen illustrations in this publication are intended to be representations, not exact duplicates of the
screen layouts generated by the software.
PRINTED USER MANUAL
Registered owners of BERNINA® Embroidery Software are permitted to create one (1) copy of the BERNINA®
Embroidery Software User Manual for their personal use. This can be printed with a personal printer or through
a commercial printing company.
LIMITED WARRANTY
BERNINA International AG warrants for a period of 90 days, commencing from the date of delivery of the
software to you, that the products are free from defects in materials and workmanship. Your exclusive remedy
for breach of warranty is to return the products together with proof of purchase to BERNINA or its authorized
dealers within the warranty period, and they will be replaced free of charge. You are responsible for the cost of
shipping and insurance, and bear the risk of loss, damage and misplacement of ‘the products’.
The purchaser relies on their own skill and judgement in selecting the software for their own use and assumes
the entire risk as to the results and performance of the software. Subject to warranties and conditions imposed
by law, BERNINA International AG expressly disclaims all other warranties and conditions, whether express or
implied, including without limitation, warranties and conditions of merchantability, fitness for a particular
purpose, title and non infringement. BERNINA International AG specifically does not warrant that the software
will meet the purchaser’s requirements or run without interruption or error, or appear precisely as described in
the accompanying documentation.
LIMITATIONS OF LIABILITY
To the maximum extent permitted by applicable law, in no event will BERNINA International AG or its
developers, officers, employees or affiliates be liable to you for any consequential, incidental, or indirect
damages (including damages for loss of business profits, business interruption, loss of business information
and the like), whether foreseeable, or unforeseeable, arising out of the use of or inability to use the software or
accompanying security device and cable, and accompanying documentation, regardless of the basis of the
claim and even if BERNINA or an authorized BERNINA representative has been advised of the possibility of
such damages.
Some states or jurisdictions do not allow the exclusion of incidental, consequential or special damages, so the
above limitation or exclusion may not apply to you.
TERMINATION
Your License to use the BERNINA® Embroidery Software is effective as long as you comply with the terms and
conditions of the License Agreement. This License will terminate automatically without notice from BERNINA
International AG if you fail to comply with any of the terms of the License Agreement.
You may terminate this License at any time by returning the BERNINA® Embroidery Software and all copies
thereof, the dongle security device, cable and all accompanying documentation to BERNINA International AG.
CONTACT
If you have any questions, please contact your BERNINA distributor, or
BERNINA International AG
CH-8266 Steckborn/Switzerland
Tel: (41) 52-762 11 11
Fax: (41) 52-762 16 11
Rev 1
May
2009
CHAPTER 1
INTRODUCTION TO CROSS STITCH
Cross stitching is a popular technique for filling
large areas with low stitch counts. It can also be
used for outlines and borders. It is suitable for
homeware, tablecloths, children’s clothes and folk
designs. Cross stitch is sometimes combined with
appliqué.
Unlike machine embroidery where designs are
enhanced with different stitch types, angles, and
effects, in cross stitch you can only add dimension
to the design with shades of colors. For this reason,
most cross stitch designs use many more colors
than machine embroidery.
This section provides an overview of the various
cross stitch types.
Types of cross stitch
Mini Cross
Cross stitches are created on a matrix of
squares or ‘pixels’. Any part of the square can be
stitched, from the edges to the diagonals. The
full range of cross stitches is listed below.
Single Line
French knot
Cross stitch fills
Full Cross
Upright Cross
When using cross stitch as a fill you can select
from any of the cross stitch fill types.
Three-Quarter
Cross
Double Cross
Full cross stitch
Half Cross
Elongated Vertical Cross
Quarter Cross
Elongated Horizontal Cross
Full cross stitches are made up of two
equal-length stitches that cross at the center to
form an X. The overall effect of the fill depends
on which stitch in the X lies underneath or on
BERNINA® Cross Stitch : Onscreen Manual
1
Chapter 1 : Introduction to Cross Stitch
top. You can also mix and match for special
effects.
Full cross stitch
pattern
Half cross stitch
A half stitch is simply a diagonal stitch that looks
like / or like \. Half stitches are usually used for
shadows and background shading. The stitch
can start from any corner. Sometimes two half
stitches of different colors are used to make one
full cross stitch.
Half cross stitch
pattern
Three-quarter cross stitch
A three-quarter stitch is most often created by
stitching a quarter stitch followed by a half
stitch. A different effect is achieved by stitching
the half stitch first and anchoring it with the
quarter stitch.
Three-quarter
cross stitch pattern
Half cross can go in either direction depending
on the effect you want to achieve. For example,
half cross used to represent feathers would
slant in the direction of the feathers themselves.
Quarter cross stitch
Quarter stitches are used to stitch more
intricate patterns.
Quarter cross stitch
pattern
Note The long arm of the three-quarter stitch
can go either / or \ directions.
Frequently a quarter stitch and a three-quarter
stitch of different colors share a single square.
Mix and match their positions to give different
effects.
Mini cross stitch
Mini cross stitches are two equal-length stitches
that cross at the center to form an X but they
only fill quarter of the square. Use mini cross
Mixtures of quarter and a three-quarter stitches
BERNINA® Cross Stitch : Onscreen Manual
2
Chapter 1 : Introduction to Cross Stitch
stitch for details such as eyes or for a denser
look in parts of your design.
Mini cross stitch
pattern
Typically the top thread of the bottom cross is
the stitch which lies at 135º to the horizontal;
and the top thread of the overlapping cross is
the horizontal stitch.
Elongated cross stitch
Elongated cross stitch consists of two
equal-length stitches that cross to form an X.
There are two types:
elongated horizontal cross stitch
elongated vertical cross stitch.
Upright cross stitch
Upright cross stitches are comprised of a
vertical and horizontal stitch.
Elongated horizontal cross stitches are only half
the height of normal cross stitch and elongated
vertical cross stitches are only half the width of
normal cross stitch.
The stitches can be worked diagonally across
the canvas, or in a horizontal or vertical line.
Elongated cross
stitch pattern
Upright cross stitch pattern
French knots
Double cross stitch
Double cross stitch is two full cross stitches
stitched at 90º on top of each other. A double
cross stitch resembles a star. It is generally used
in a scattered fashion or worked into a row to
form a decorative border.
French knots were originally a hand-stitch used
for a raised look for embellishment in Europe. It
was traditionally used in ‘whitework’ with very
exclusive cotton, and fine silk threads. French
knots can be used in combination with
cross-stitch or outline stitch.
French knots cross
stitch pattern
Double cross stitch
pattern
BERNINA® Cross Stitch : Onscreen Manual
3
Chapter 1 : Introduction to Cross Stitch
Use french knots for eyes, door knobs, dots for
flower pistols or in the place of beads used in
hand-work designs, e.g. ornaments on a
Christmas tree, to dot the letter i. Use it as an
outline border. Try it with colorful metallic or
variegated threads. French knots are better
sewn in larger grids.
Cross stitch borders
Cross stitch can be used as an embroidery
outline or border. You can also combine cross
stitching with other stitch types to achieve
special effects.
You can make outlines with Single Line or Full
Cross stitches or a combination of both for a
denser border. A Single Line outline is treated by
the software as a border while a Full Cross
outline is treated as a fill. This is important if you
need to delete a border because a single line can
be deleted as a single object while a full cross
stitch border cannot.
Single line border
the Fill stitch type list. You can change this by
changing the Fill stitch type.
Full cross border
Cross stitch variations
The orientation of fractional cross stitches can
be varied to create different patterning effects.
You do this directly pixel-by-pixel, or by setting
a fill stitch orientation. You can also combine
fractional cross stitches in a variety of ways. See
also Types of cross stitch.
Three-quarter cross stitches
Quarter and three-quarter cross stitches can be
Single Line stitches are only used to create
used to create rounded edges. See also Cross
borders or add details. The single line can be
stitch fills.
placed on any side of the square. Click on the
side you want to place the line. You can place a
single line border on one side or all four sides of
the square. The single line border can be placed
in a square which already has a cross stitch in it.
Half cross stitches
Single line border
Full cross border
Half cross stitches can be used to give objects
an ‘airy’ look. You can also use half cross
stitches to make a full cross stitch with two
colors. See also Combination stitches.
Two half
crosses
Combined to
make two-color
full cross
Full crosses can also be used as a decorative
outline stitch. If you use full cross as a border it
will be the same cross stitch type as selected in
BERNINA® Cross Stitch : Onscreen Manual
4
Chapter 1 : Introduction to Cross Stitch
Quarter cross stitches
Quarter and three-quarter cross stitch can be
used to smooth rounded edges. You can also
use quarter cross stitch to make a full cross
stitch with up to four colors. See also
Combination stitches.
Click here to start
in this corner
multiple colors. You can also combine mini
crosses, elongated vertical or horizontal
crosses and outline stitches.
Combined 1/4, 1/2 and
3/4 crosses
Combined elongated
vertical or horizontal crosses
Combined fractional
and mini crosses
Full cross stitch made up of
four quarter cross stitches
Combined colored outlines
Combined outlines
and crosses
Mini cross stitches
Use mini cross stitch for details such as eyes or
for a denser look in parts of your design.
Four mini
crosses
Combined to
make four mini
full cross
Elongated cross stitches
Vertical and horizontal elongated cross stitches
are made up of two equal-length stitches that
cross to form an X. They fill either the left, right,
top or bottom of the square.
Elongated cross stitch patterns
Combination stitches
Quarter, half and three-quarter cross stitches
can be combined to make crosses comprised of
BERNINA® Cross Stitch : Onscreen Manual
5
CHAPTER 2
CROSS STITCH ESSENTIALS
In BERNINA Cross Stitch
you can add cross
stitches either to an
entire design or selected
areas. Or you can place
them individually. There
are two stitch types,
outline and fill. An
outline stitch can be a
single run, or a line of cross stitches. A fill can be any of the cross stitch types.
You can pre-set stitch type, length and the number of times each stitch is sewn.
This section describes the use of the cross stitch Design Window, techniques
for manual cross stitch digitizing, and cross stitch design file handling.
Opening BERNINA Cross Stitch
Click Cross Stitch (Edit toolbar) to launch the
Cross Stitch application.
Cross stitch design involves a different digitizing
technique to ordinary embroidery design. For
this reason, the cross stitch application has its
own Design Window which you open from within
BERNINA® Embroidery Software.
To open BERNINA Cross Stitch
1 Run BERNINA® Embroidery Software.
2 Select Embroidery Canvas.
3 Click the Cross Stitch icon.
BERNINA® Cross Stitch : Onscreen Manual
6
Chapter 2 : Cross Stitch Essentials
The BERNINA Cross Stitch Design Window
opens.
Title bar
Menu bar
General toolbar
Mode tabs
Picture/Design
toolbar (changes
with selected
mode)
Design Window
Stitch and
Color bar
Status line
Picture and Design modes
Click the Picture tab to load a picture
to be used as a template.
Click the Design tab to edit and add
stitches.
BERNINA Cross Stitch uses two window modes,
Picture mode and Design mode. Use Picture
mode to open or scan a picture to use as a
template for stitching. Edit your picture in
Picture mode, then select Design mode to edit
your stitches or go directly to Design mode to
add stitches without using a template.To see
your design in Artistic mode, open the design in
BERNINA Embroidery Software. See Using cross
stitch with BERNINA® Embroidery Software for
details.
Changing grid settings
Click Grid (General toolbar) to show or hide
the grid. Right-click to open the Grid dialog.
Use the Options > Grid dialog to change grid
settings:
Show or hide the grid
Show major lines (when grid is on)
Set the grid spacing
Change the color of major and minor lines.
To change grid settings
1 Right-click the Grid icon.
BERNINA® Cross Stitch : Onscreen Manual
7
Chapter 2 : Cross Stitch Essentials
The Options > Grid tab opens.
You can show or hide the hoop, change the hoop
size and center the design in the hoop.
To change hoop settings
Select Show Grid
Select Show
Major Lines
1 Right-click the Hoop icon.
The Options > Hoop tab opens.
Enter crosses
to fit in grid
Edit line colors
Select Display
Hoop
2 Select the Show Grid checkbox to show grid
lines.
Select hoop
type
3 Select Show Major Lines to show major
grid lines.
4 Enter the number of crosses to fit between
the major grid lines.
5 Click Edit to change the color of the major
and minor lines.
Select line color
2 Select the Display Hoop checkbox.
3 Select a hoop type from the list.
Note Automatic Centering is always on.
To make a group of stitches sit on one side of
the design, digitize some temporary stitches
on the other side.
4 Click OK.
Changing background colors and
fabrics
6 Select from the available colors or define
your own.
Click Define Custom Colors to mix your
own colors from the color wheel.
In BERNINA Cross Stitch you can change the
background color of the Design Window to
match the color of your fabric. Or you can select
a background fabric for more realistic previews
and presentations.
7 Click OK.
To change the background color or
fabric
Changing hoop settings
1 Select Settings > Options.
Click Hoop (General toolbar) to show or hide
the hoop. Right-click to open the Hoop dialog.
BERNINA® Cross Stitch : Onscreen Manual
8
Chapter 2 : Cross Stitch Essentials
To select a fabric, click Browse. Select a
fabric type from the Open dialog and click
OK.
2 Select the Background tab.
Edit color
Select fabric
pattern
Select background
color or fabric
Center or tile fabric
pattern in Design Window
3 Select the Design Window background type.
Color: uses the selected color.
Fabric: uses an image of a fabric.
4 Select a color or fabric to use.
To select a background color, click Edit.
Select a color from the Color dialog and
click OK.
Select background fabric
You can center or tile the fabric bitmap in
the Design Window. If the bitmap is large
enough to fill the entire window, select
Center. Otherwise, select Tile.
5 Click OK.
Select background
color
Viewing stitches as crosses or tiles
Click Crosses (General toolbar) to show
stitches as colored tiles or cross stitches.
There are two display modes for BERNINA Cross
Stitch – crosses or colored tiles. When you
change to tile mode, you see the same result as
when you import a bitmap into the Design
Window.
BERNINA® Cross Stitch : Onscreen Manual
9
Chapter 2 : Cross Stitch Essentials
To view stitches as crosses or tiles
1 Select Design mode.
2 Click the Crosses icon.
Any digitized areas are shown as crosses (or
lines for line borders).
3 Click again to show stitches as colored
Setting design size and density
In BERNINA Cross Stitch, design size is
controlled by the ‘fabric count’. The more
stitches per inch, for example, the smaller and
more compact the resulting design. You can also
adjust the density of individual cross stitches by
stitching them once, twice or three times.
squares.
Setting the design size
You set cross stitch design size by adjusting the
‘fabric count’. This actually changes the scale of
your finished design. The more stitches per
inch, for example, the smaller and more
compact the resulting design.
Stitches shown as crosses
Cross stitches shown as
colored squares
Caution A common problem with cross stitch
designs is that they ‘pull’, especially with
smaller, closely packed stitches. Cross stitch
designs tend to pull in a uniform way with gaps
usually forming in straight lines. Sometimes
holes appear giving the impression of missing
stitches. See also Setting the stitch density.
To set the design size
1 Select Settings > Fabric Count.
The Fabric Count dialog opens.
Stitches shown as crosses
Fractional stitches shown as
colored squares
Viewing design information
The Status Bar provides design information
such as individual stitch information,
approximate stitch count and thread usage as
well as the zoom factor of the design.
Pointer coordinates
Stitch count Zoom factor
Enter stitches
per inch
Enter stitches
per mm
2 Select a fabric count option, inches or
millimeters:
Number of stitches per inch: The
fewer stitches per inch, the bigger the
resulting design.
BERNINA® Cross Stitch : Onscreen Manual
10
Chapter 2 : Cross Stitch Essentials
Number of millimeters per number of
stitches: Because a cross stitch is bigger
than a millimeter, you can adjust the mm
and stitch settings in relation to each
other. The higher the mm value, or
smaller the stitch value, the bigger the
design.
to single (2 threads) for both fills and outlines.
You can also use a thinner weight thread.
Tip If you cross stitch a design where every
square has a stitch, remember to baste and
stabilize the fabric.
To set the stitch density
Tip By clicking Update, you get an
immediate conversion of any values you
have entered. For example, change the
stitches per inch value, click Update, and
the corresponding stitches per mm value
will be updated.
Select a value from the Threads list.
The value 2 corresponds to a single stitch, 4
is double, while 6 is triple. This is
represented on screen by line thickness.
3 Click OK.
15 stitches per inch
10 stitches per inch
Thread count 2
15 stitches per 25.4 mm
10 stitches per 25.4 mm
Setting the stitch density
Use Threads list (Stitch and Color
bar) to set the stitch density.
You can adjust the density of any cross stitch by
stitching it once, twice or three times. The
number of ‘crossovers’ correspond to the values
2, 4 and 6 in the Threads list. You can change
these values at any time.
If you make a design smaller to fit inside the
hoop, stitches may be stacked on top of each
other and pull the fabric. You can avoid this
problem by reducing the number of crossovers
Thread count 6
Tip When you move your mouse over the
stitch, a tool tip will tell you the type and
color of stitch used.
Selecting cross stitch types
BERNINA Cross Stitch provides the full range of
cross stitch types which you can use to create
outlines and fills of any color. You can also
control the orientation of fractional cross
stitches to create different patterning effects.
Selecting outline stitches
Use Outline (Stitch and Color bar)
for outline stitches.
BERNINA® Cross Stitch : Onscreen Manual
11
Chapter 2 : Cross Stitch Essentials
Select an outline stitch from the Outline Stitch list.
There are two types of outline stitch, Single
Line and Current Cross Stitch. Select a cross
stitch type before selecting Current Cross
Stitch.
To select an outline stitch
1 Click the Outline icon.
Horizontal Cross. See Cross stitch fills for
details.
To select a fill stitch
1 Click the Fill icon.
2 Click or right-click the Fill Stitch button.
Tip If you want the Select Stitch dialog to
remain open, right-click Fill Stitch button.
2 Select a stitch type from the Outline Stitch
list.
New stitches will be digitized as single lines
or crosses. If you are using Current Cross
Stitch, the currently selected cross stitch
type applies. See Selecting fill stitches for
details.
Single line
outline
Cross stitch
outline
Fill Stitch button
The Select Stitch dialog opens.
3 Choose a stitch type.
Stitches will be digitized in that stitch type.
The Select Stitch dialog closes.
4 Depending on the stitch type you select, you
Note Depending on the stitch type you
select, you can set the direction of the stitch.
See Setting cross stitch orientation for
details.
can set the direction of the stitch. See
Setting cross stitch orientation for details.
Selecting fill stitches
Use Fill (Stitch and Color bar) for
fills.
Variety of cross stitch
fill effects
Click Fill Stitch (Stitch and Color
bar) to open the Select Stitch dialog.
Fill stitches are all cross stitches. Choose from
amongst the following types: Full Cross,
Three-quarter Cross, Half Cross, Quarter Cross,
Mini Cross, Upright Cross, Double Cross,
Elongated Vertical Cross, and Elongated
Setting cross stitch orientation
You can control the orientation of fractional
cross stitches to create different patterning
effects. When digitizing individual stitches,
BERNINA® Cross Stitch : Onscreen Manual
12
Chapter 2 : Cross Stitch Essentials
you do this directly pixel by pixel. When
digitizing a fill, you do so via the Select Fill
Style dialog. The method is the same. See
Types of cross stitch for details.
Click in the
quadrant to be
filled
To set cross stitch orientation
To create mini cross stitches, click the corner
where you want your stitch to start.
Click here to
place a stitch in
this corner
To create elongated cross stitches, click the
corner where you want your stitch to start.
Click here to place
stitch on this side
To create three-quarter cross stitches, click
the corner where you want the quarter stitch
to be.
Selecting cross stitch colors
To create half cross stitches, click the corner
where you want your stitch to start.
BERNINA Cross Stitch allows you to set up an
unlimited number of color slots. New objects are
digitized using the currently selected color. You
can change color before or after digitizing.
BERNINA® Embroidery Software also lets you
Click here to make a / stitch
Click here to make a \ stitc manage the thread colors in your Color Chart.
Select from a range of commercial thread
charts. Adjust the exact number of colors in the
To create quarter cross stitches, click the
Color Chart as required. Add extra slots as
corner where you want your stitch to start.
required.
Click here to start
in this corner
Selecting stitch colors
Use Color Palette (Stitch and Color
bar) to select a stitch color.
You can select stitch colors from the Color
Palette before digitizing, or apply a new color
to selected areas.
BERNINA® Cross Stitch : Onscreen Manual
13
Chapter 2 : Cross Stitch Essentials
To select a stitch color
1 Click or right-click the color palette to open
it.
computer simulations are not intended to
exactly match the identified thread color.
To search and assign a thread
1 Select Settings > Thread Colors.
Tip If you want the Select Thread dialog to
remain open, right-click the color palette.
The Thread Colors dialog opens.
2 Select a color.
Select a color from the color palette to
apply to newly digitized areas.
Select a stitch block, then select a color to
change its color.
Select
thread chart
Color palette
Stitches will be digitized in the selected color.
Tip You can drag the Select Thread dialog
and place it anywhere in the Design Window.
Searching and assigning threads
You can search for a thread by code or
description and assign it to a selected design
color slot. The supplied charts represent the
brands of threads that BERNINA Cross Stitch
supports. Each chart has a range of colors
associated with it. The code, brand and
description of each color is displayed so that you
can easily find them in a craft or sewing shop.
You can select colors by shade or by number.
Select the thread chart for the brand of thread
you have at home or just select a chart which
has colors you like.
Code or
description
matched
Enter search
string
Select thread criterion
2 Select a thread chart from the Thread Chart
list.
3 Select the thread criterion to search on –
Code or Description.
Code is the identification number of a thread
color in a brand.
4 In the Search field, enter the first few
characters of the required code or
description.
The system searches for the closest match
and displays them in the thread color list.
5 Select a color slot in the Threads in Design
panel and click Assign.
6 Click OK to close.
Caution The representations of commercial
thread charts are approximate, and the
BERNINA® Cross Stitch : Onscreen Manual
14
Chapter 2 : Cross Stitch Essentials
5 From the Basic colors table, select a color
Note Selected color settings only apply to
the current design and are part of the ‘design
properties’. As such they are saved with the
design.
that closely matches the color you require.
6 Click and drag the cross hairs on the color
spectrum to get the exact color you require.
7 Drag the slider on the right of the color
spectrum to adjust color brightness.
Mixing your own thread colors
You can change the color that displays for a
particular thread, or create new thread colors
using the Color dialog.
The HLS and RGB values appear in the
bottom right-hand corner of the Color
dialog. Enter these values directly to define
exact colors.
8 When you have mixed the required color,
To mix your own thread colors
1 Click Edit in the In the Thread Colors
dialog.
2 The Edit Thread dialog opens.
click Add to Custom Colors.
9 Click OK.
The new color appears in the Color preview
box.
Digitizing with cross stitches
Click to mix colors
3 Click Mix.
The Color dialog opens.
BERNINA Cross Stitch provides techniques for
digitizing single stitches or lines of stitches,
filled and unfilled rectangles or circles, or filled
and unfilled ‘closed’ free-form shapes. You can
also create free-form outlines or borders. The
Area Fill feature lets you fill closed shapes or
‘color blocks’ with stitches.
Digitizing single stitches or lines
Use Pencil (Design toolbar) to draw a single
stitch or line of stitches.
You can digitize a single stitch or line of stitches.
Depending on the stitch type you select, you
must also set the stitch direction. See also
Creating combination stitches.
Click to open color spectrum
To digitize a single stitch or line
1 Click Outline and select an Outline stitch
4 Click Define Custom Colors to open the
type.
color spectrum.
BERNINA® Cross Stitch : Onscreen Manual
15
Chapter 2 : Cross Stitch Essentials
If you are using Full Cross, the currently
selected cross stitch type applies. See also
Selecting fill stitches.
2 Select a color from the color palette. See
Selecting stitch colors for details.
3 Click the Pencil icon.
If you want a perfect circle, press Enter
twice.
If you want an ellipse, mark a third
reference point and press Enter.
The circle or oval is filled or outlined
depending on the stitch type selected.
4 Click a square to make a single stitch, or click
and drag the pencil to make a line.
Note Press Ctrl and drag to draw straight
vertical lines.
Single stitches
and lines
Tip You can also use the Pencil tool to
create combinations of partial crosses
comprised of multiple colors. See also
Creating combination stitches.
Digitizing circles
Use Circle (Design toolbar) to draw and digitize ovals or circles.
The Circle tool provides a quick way to digitize
filled or unfilled circles.
To digitize a circle
1 Click the Circle icon.
2 Select a color from the Color palette. See
Selecting stitch colors for details.
3 Select an Outline or Fill stitch type. See
Selecting cross stitch types for details.
4 Mark the center point then mark a point on
the circumference.
Full cross border
Full cross fill
Three-quarter cross fill
Half cross fill
Digitizing rectangles
Use Rectangle (Design toolbar) to draw and
digitize rectangles or squares.
The Rectangle tool provides a quick way to
digitize filled or unfilled rectangles or squares.
To digitize a rectangle
1 Click the Rectangle icon.
2 Select a color from the Color palette. See
Selecting stitch colors for details.
3 Select an Outline or Fill stitch type. See
Selecting cross stitch types for details.
4 Mark rectangle origin, then rectangle corner.
Press Ctrl and mark corners to digitize a
square. The square or rectangle is filled or
BERNINA® Cross Stitch : Onscreen Manual
16
Chapter 2 : Cross Stitch Essentials
outlined depending on the stitch type
selected.
Note Depending on the stitch type you
select, you can set the direction of the stitch.
See Creating combination stitches for
details.
Single line border
Cross stitch
border
Fill stitches
Digitizing open and closed shapes
Use Closed Curve (Design toolbar) to draw
and digitize closed shapes.
Use Open Curve (Design toolbar) to draw and
digitize open shapes.
You can create freeform outlines or borders
using the Open Curve icon. You can create
freeform filled shapes using the Closed Curve
icon. Select an outline stitch for unfilled shapes
and a fill stitch for filled shapes.
To digitize an open or closed shape
The shape is filled or outlined depending on
the stitch type selected.
Marked
reference
points
Single-line
outline
stitch
with Open
Shape
Full cross
outline
stitch
with Open
Shape
Single-line
outline
stitch
with Closed
Shape
Full cross
fill stitch
with closed
Shape
Area-filling color blocks
Use Area Fill (Design toolbar) to fill a closed
shape or color block with stitches.
Fill closed areas with stitches using Area Fill.
You can also use the tool to change the color and
stitch type of Full Cross outlines.
1 Click Open Curve or Closed Curve.
2 Select a color from the Color palette. See
Selecting stitch colors for details.
3 Select an Outline or Fill stitch type. See
Note The Area Fill tool only works on the cross
stitch layer. It will not work with bitmap images
used as backdrops.
Selecting cross stitch types for details.
4 Mark reference points on your design.
Left-click for sharp corners and right-click for
round corners.
5 Press Enter.
To area-fill a color block
1 Select a color from the Color palette. See
Selecting stitch colors for details.
2 Select a Fill stitch type. See Selecting fill
stitches for details.
3 Click the Area Fill icon.
4 Click within a closed area.
BERNINA® Cross Stitch : Onscreen Manual
17
Chapter 2 : Cross Stitch Essentials
The shape is filled in the selected stitch type
and color.
Digitized using Auto
Digitizer
Colors changed using
Area Fill
2 Select the cross stitch (ART) file type from
the Files of Types list.
Note You can only save in ART format.
3 Type a new name for the design and click
Caution Area Fill will not work within single
outline shapes and some shapes with angled
sides may not fill correctly.
Handling cross stitch design files
Save.
Using cross stitch with BERNINA®
Embroidery Software
You need to close and save any cross stitch
designs as ART then open them in BERNINA
Embroidery Software later.
Cross stitch designs have their own ART file
format. This can be read by BERNINA®
Embroidery Software. You can also combine ART
with designs in other formats.
To use cross stitch with BERNINA®
Embroidery Software
Saving cross stitch designs
2 Select File > Open.
Use Save (General toolbar) to save cross
stitch files.
1 Start BERNINA® Embroidery Software.
The Open dialog opens.
Save your design early and often. Use the ART
extension for saving cross stitch files.
To save a cross stitch design
1 Select File > Save.
If this is the first time you have saved the
design, the Save As dialog opens. The file is
saved as an ART file.
3 Select ART files from the Files of Type list.
4 Select your file.
BERNINA® Cross Stitch : Onscreen Manual
18
Chapter 2 : Cross Stitch Essentials
5 Click Open.
The cross stitches display as they will be
stitched.
BERNINA® Cross Stitch : Onscreen Manual
19
CHAPTER 3
CROSS STITCH EDITING
BERNINA Cross Stitch provides techniques for
editing cross stitch designs, including moving,
rotating, and mirroring stitch blocks. You can
erase stitches as well as change colors and
stitch types of selected areas. You can clone a
selection for re-use as a ‘rubber stamp’ and fill
large areas with motifs or special composite
stitches. You can also edit stitches to create
combinations of partial crosses comprised of
multiple colors.
This section provides details of cross stitch
editing features.
Selecting and locking stitches
In order to edit an area of a design, you must
first select it. BERNINA Cross Stitch provides a
number of ways to select cross stitches. It also
lets you lock cross stitches and/or outlines so
that they are not moved or edited by accident.
Selecting cross stitches with Select
Object or Polygon Select
Caution You cannot select cross stitches
outside the hoop.
To select cross stitches with Select
Object or Polygon Select
With the Select Object tool selected, simply
drag a bounding box around the area to be
selected.
Use Select Object (Design toolbar) to select a
single stitch or block of stitches.
Use Polygon Select (Design toolbar) to select
irregular areas or shapes.
The Select Object and Polygon Select tools work
in a similar way to BERNINA Embroidery
Software. The difference is that in BERNINA
Cross Stitch you work with stitch blocks or areas
rather than design objects.
BERNINA® Cross Stitch : Onscreen Manual
20
Chapter 3 : Cross Stitch Editing
With the Polygon Select tool selected, mark
reference points around the area you want to
select and press Enter.
Only adjoining stitches of that color are
selected.
Tip Hold down Ctrl to select multiple blocks.
Select tool used
Fill stitches deleted
Color block selected
Hold down Ctrl to select
yellow color blocks
Tip You can change the color of the selection
completely by selecting a color from the
palette.
Polygon Select tool used
Fill stitches deleted
Tip Hold down Ctrl to select multiple areas.
Locking stitches
You can lock cross stitches and/or outlines so
that they are not moved by accident.
To lock stitches
Selecting cross stitches with Auto
Select
Use Auto Select (Design toolbar) to select a
single color block or an undigitized area.
1 Select Edit > Crosses or Edit > Outlines.
When Crosses is ticked in the menu, cross
stitches can be moved. Likewise, when
Outlines is ticked, outlines can be moved.
Auto Select is specific to BERNINA Cross Stitch.
It allows you to select a single color block or a
closed undigitized area. Only adjoining stitches
of the same color are selected.
To select cross stitches with Auto
Select
1 Click the Auto Select icon.
2 Click a block of stitches.
BERNINA® Cross Stitch : Onscreen Manual
21
Chapter 3 : Cross Stitch Editing
2 Select an area and click and drag to move
stitches.
Selected design
contains outline and fill
cross stitches
Copying, cutting and pasting stitch
blocks
Use Copy (General toolbar) to copy selected
stitch blocks to the clipboard.
Use Cut (General toolbar) to cut selected
stitch blocks to the clipboard.
Use Paste (General toolbar) to paste copied
stitch blocks from the clipboard.
Edit > Crosses not
selected, area dragged,
only outlines move
You change copy, cut and paste selected stitch
blocks at any time. The difference is that in
BERNINA Cross Stitch you work with stitch
blocks or areas rather than design objects. See
also Rubber stamping fills.
To copy, cut and paste stitch blocks
1 Select the stitch block to copy or cut. See
Selecting and locking stitches for details.
2 Click the Copy or Cut icon.
3 Select Crosses or Outlines again to uncheck
it and lock all crosses or outlines.
Simple stitch editing
The selected area or areas are copied to the
clipboard.
3 Click the Paste icon.
The duplicate area is pasted over top of the
selected area.
BERNINA Cross Stitch lets you change the color
or stitch type of selected stitch blocks at any
time. You can also remove stitches at any time.
Tip BERNINA Cross Stitch lets you change the
thread colors of an existing design. You can also
mix your own colors to more closely match the
required design colors. See Selecting cross
stitch colors for details.
BERNINA® Cross Stitch : Onscreen Manual
22
Chapter 3 : Cross Stitch Editing
4 Click and drag to move the pasted stitch
block.
Tip Hold down Ctrl to select multiple blocks.
2 Select a new color from the palette.
The selected color fills the selection area.
The area remains selected.
Stitch block
selected
Color
change
3 Select a new stitch type from the Stitch
toolbar.
The selected stitch type fills the selection
area.
Full cross
stitches
Tip Duplicate and rotate blocks of stitches to
make patterns. See Transforming stitch
blocks for details.
Changing stitch block settings
Use Auto Select (Design toolbar) to change
the color or stitch type of selected stitch
blocks.
You can change the color and/or stitch type of
selected stitch blocks at any time.
To change stitch block settings
Fractional
cross
stitches
Erasing fills and single lines
Use Eraser (Design toolbar) to erase fills and
single lines.
Use the Eraser tool to remove stitches. The
eraser will remove either fill stitches or single
line borders depending on the stitch type
selected. Cross-stitched borders are treated as
fill stitches.
Caution You cannot select and erase stitches
outside the hoop.
1 Use Auto Select to select the color block/s.
See Selecting cross stitches with Auto Select
for details.
To erase a fill or single line
1 Click the Eraser icon.
2 Select Fill on the Stitch/Color bar.
BERNINA® Cross Stitch : Onscreen Manual
23
Chapter 3 : Cross Stitch Editing
3 Click and drag the cursor across the stitches
to be removed.
Only fill stitches are removed. Any single line
borders remain.
Moving blocks of cross stitches
You can move blocks of cross stitches at any
time.
To move a block of cross stitches
1 Select the stitch block to move. See
Selecting and locking stitches for details.
2 Click and drag them to a new location.
Drag cursor over
stitches to erase
Only fill stitches
erased, single line
borders remain
Area selected
Tip You can also erase cross stitches by
selecting them and pressing the Delete key.
4 Select Outline on the Stitch/Color bar.
5 Click anywhere on a single line.
Area moved
The line is removed. Any cross stitches are
not erased.
Click line to
erase
Rotating blocks of cross stitches
Line erased
Note A single line border is removed in one
click.
Transforming stitch blocks
Use Rotate 90°CW/CCW (Design toolbar) to
rotate selected stitches. Click to rotate clockwise. Right-click to rotate counter-clockwise.
You can rotate blocks of cross stitches in a
clockwise or counter-clockwise direction.
Duplicate and rotate blocks of stitches to make
patterns.
To rotate a block of cross stitches
1 Select the stitch block to rotate. See
BERNINA Cross Stitch lets you perform various
transformations on selected blocks of cross
stitches. You can move them, rotate them in a
clockwise or counter-clockwise direction. You
can also mirror blocks of cross stitches either
horizontally or vertically.
Selecting and locking stitches for details.
BERNINA® Cross Stitch : Onscreen Manual
24
Chapter 3 : Cross Stitch Editing
2 Click the Rotate 90° CW/CCW icon.
Special editing techniques
BERNINA Cross Stitch provides a number of
editing techniques which are especially helpful
for cross stitch digitizing. You can clone a
selection for re-use as a ‘rubber stamp’ and fill
large areas with motifs or special composite
stitches. You can combine fractional cross
stitches in a variety of ways.You can also add a
cross stitch border or a single line border, or
both, to areas of a design.
Rubber stamping fills
Mirroring blocks of cross stitches
Click Mirror Horizontal (Design toolbar) to mirror selected stitches horizontally.
Click Mirror Vertical (Design toolbar) to mirror
selected stitches vertically.
You can mirror blocks of cross stitches either
horizontally or vertically.
Use Rubber Stamp (Design toolbar) to clone
stitches.
Clone a selection for re-use as a ‘rubber stamp’
and fill large areas with motifs or special
composite stitches.
To rubber stamp fills
1 Click the Select Object icon and select the
area to be cloned.
To mirror a block of cross stitches
1 Select the stitch block to mirror. See
Selecting and locking stitches for details.
2 Click the Mirror Horizontal icon.
2 Click the Rubber Stamp icon.
The selected area is copied and attached to
the pointer.
3 Click to place the stamp as many times as
you want.
Rubber Stamp used
Mirrored
vertically
Mirrored
horizontally
Tip To mirror the complete design, select
Arrange > Mirror Horizontal/Mirror Vertical.
Motif created to
make border
4 Press Esc or select another icon to turn off
Rubber Stamp.
BERNINA® Cross Stitch : Onscreen Manual
25
Chapter 3 : Cross Stitch Editing
Creating combination stitches
Use Pencil (Design toolbar) to add combination stitches.
Quarter, half and three-quarter cross stitches
can be combined to make crosses comprised of
multiple colors. You can also combine mini
crosses, elongated vertical or horizontal
crosses and outline stitches. See Cross stitch
variations for details.
To create combination stitches
1 Select Edit > Insert.
Insert is ticked in the menu. With Insert
ticked, you can add more than one stitch to
a square. Otherwise, a new stitch replaces
the existing stitch.
Note If you do not have Insert selected, the
whole stitch will be replaced.
6 Repeat as many times as needed.
Adding borders to selected areas
Add a cross stitch border or a single line border,
or both, to selected areas of a design.
To add borders to a selected area
1 Select the Outline icon.
2 Click the Area Fill icon and click inside an
area.
A line of outline stitches is added around the
edges of the selection.
Tip When Insert is selected, the Status bar
displays Insert. Otherwise, it shows
Overwrite.
2 Select a stitch type. See Selecting fill stitches
for details.
3 Select a color from the color palette. See
Selecting stitch colors for details.
4 Click the Pencil icon.
5 Click where you want the stitch to be
inserted.
Click top left corner to
insert a mini cross
Then click top right corner
to insert a 1/2 cross
Then click bottom right
corner to insert a 1/4 cross
BERNINA® Cross Stitch : Onscreen Manual
26
Chapter 3 : Cross Stitch Editing
Tip Click again in the selection to add
another line of stitches inside the first line.
No border
Single line border
Double cross border
Tip To combine a cross stitch with a line
border, select Full Cross stitch type and Flood
Fill, then select Single Line and Flood Fill
again.
BERNINA® Cross Stitch : Onscreen Manual
27
CHAPTER 4
ADVANCED CROSS STITCHING
The BERNINA Cross Stitch Design
Window also lets you import
pictures to use as backdrops or for
automatic digitizing. You can also
create special cross stitch
lettering.
This section provides details of
advanced cross stitch features
including automatic digitizing and
lettering.
Digitizing with backdrops
Bitmap images can be inserted or scanned into
BERNINA Cross Stitch for use as digitizing
backdrops. You can digitize backdrop images
automatically using Auto Stitch. Use solid color
bitmaps to make suitable color blocks for cross
stitches.
To insert images
1 Click the New icon.
A new file opens.
2 Click Picture mode to open a picture.
3 Click Load Picture.
The Open dialog opens.
Tip If an image needs to be resized or rotated,
it is best to do so during scanning. Scaling
afterwards may distort the image.
Inserting bitmap images
Use Load Picture (Picture toolbar) to open a
picture.
Use Scan Picture (Picture toolbar) to scan
your artwork.
You can insert bitmap images of various formats
for use as digitizing backdrops.
4 Select a folder from the Look In list.
5 Select a file type from the Files of Type list
(e.g. BMP).
BERNINA® Cross Stitch : Onscreen Manual
28
Chapter 4 : Advanced Cross Stitching
6 Select the file you want to insert.
Tip Select the Preview checkbox to
preview the selected file.
7 Click Open.
8 Move the picture so it fits inside the hoop or
change the hoop size. See Changing hoop
settings for details.
Scaling and transforming bitmap
images
You can scale and reshape images once they are
loaded into BERNINA Cross Stitch. However, if
an image needs to be resized or rotated, it is
best to do so during scanning. Scaling
afterwards may distort the image. See
Arranging and Transforming Objects for details.
To scale and transform bitmap images
Note Areas outside the hoop will not be
stitched.
1 Insert the image. See Inserting bitmap
images for details.
2 Click the Select icon.
Viewing or hiding bitmap images
Click Picture (General toolbar) to show or hide
the picture.
You can show or hide a bitmap backdrop
temporarily while you digitize in Design mode.
3 Click the image.
Eight resize selection handles appear around
the image. Click and drag these to scale the
image as you would any other object. See
Scaling objects for details.
To view or hide bitmap images
Click the Picture icon to show the image.
Click it again to hide the image.
Resize handles
Transform handles
4 Click the image again.
Eight transform selection handles appear
around the image. Click and drag these to
rotate or skew the image as you would any
Show picture
Hide picture
BERNINA® Cross Stitch : Onscreen Manual
29
Chapter 4 : Advanced Cross Stitching
other object. See Rotating objects and
Skewing objects using click and drag.
Resize image
2 In Picture mode, load a picture. See
Inserting bitmap images for details.
Transform image
3 In Design mode, click the Auto Stitch icon
Digitizing pictures automatically
Digitize the entire backdrop image
automatically using Auto Stitch. Alternatively,
using Magic Wand, you can create cross stitch
fills from colored sections of a picture.
and click the image.
The Auto Stitch dialog opens.
Select thread chart
Select image
mapping method
Specify maximum colors
Select to omit
background color
Digitizing with Auto Stitch
Use Auto Stitch (Design toolbar) to automatically create cross stitch designs from pictures.
Digitize the entire backdrop image
automatically using Auto Stitch. You can
change the stitch type manually later as
required.
Tip You can also select blocks of color in your
picture to stitch using Magic Wand. See
Digitizing with Magic Wand for details.
To digitize with Auto Stitch
4 Select to map the picture colors to:
Current Palette: Only colors in the
current palette are used.
1 Prepare your image as necessary.
Use a third party paint program to clean up
the image.
BERNINA® Cross Stitch : Onscreen Manual
30
Chapter 4 : Advanced Cross Stitching
Specific Thread Chart: Only colors in a
selected thread chart are used.
Current Palette:
Restricted Colors
Specific Thread
Chart: CSD
The picture is digitized. You may need to
touch up some areas manually.
Specific Thread
Chart: Isacord
40-fashion colors
4 colors selected
5 Specify the maximum number of colors to be
used:
Unlimited: Thread colors will be
allocated according to the number of
colors in the palette selected in the first
dialog.
Restricted: Enter the number of colors
you want to use.
Omit Background: Select to omit the
background color.
The results display in the preview pane.
Unlimited maximum
colors selected
Note Auto Stitch is disabled if no picture is
loaded.
Digitizing with Magic Wand
Use Magic Wand (Design toolbar) to create
cross stitches from a colored area of a picture.
Using Magic Wand, you can create cross stitch
fills from colored sections of a picture. Magic
Wand works with both fill stitches and outlines.
To digitize with Magic Wand
1 Prepare your image as necessary.
Use a third party paint program to clean up
the image.
2 In Picture mode, load a picture. See
Inserting bitmap images for details.
Unlimited maximum
colors selected
Restricted maximum
colors selected
6 Click OK.
BERNINA® Cross Stitch : Onscreen Manual
31
Chapter 4 : Advanced Cross Stitching
3 In Design mode, click Magic Wand.
4 Select a cross stitch type.
To digitize cross stitch letters
5 Select a color from the palette.
1 Right-click the Lettering icon.
6 Click a colored block in your picture.
The Font dialog opens.
All areas of that color are digitized in the
selected color.
Select font,
style, size
from list
Area
selected
Selected area
digitized
Note The Magic Wand selects and digitizes
all blocks of that color from your picture. You
can change the stitch type and color later if
you want.
2 Select a font, style and size from the lists.
3 Click OK.
4 Click the start point in the Design Window.
5 Type the letters and press Enter.
Digitizing cross stitch letters
Use Lettering (Design toolbar) to add letters
to your design. Right-click Lettering to open
the Font dialog.
As with BERNINA Embroidery Software,
BERNINA Cross Stitch lets you add lettering to a
design by typing it directly in the Design
Window. In BERNINA Cross Stitch use the Font
dialog to select font, size and style. Select either
outline or fill to digitize letters. Once typed, you
cannot edit letters. Each letter is treated as a
stitch block.
Letters with fill stitches
Letters with outline stitches
Tip To edit letters, use Auto Select with the
Ctrl key to select. Then change the stitch
type or color as required.
Tip Use Creative Cross to add lettering
objects to your cross stitch design. See
BERNINA Onscreen Manual for details.
BERNINA® Cross Stitch : Onscreen Manual
32
APPENDIX A
BERNINA CROSS STITCH QUICK
REFERENCE GUIDE
This Quick Reference Guide details all menu options and toolbars available in
BERNINA Cross Stitch.
BERNINA Cross Stitch Design
Window
Title bar
Menu bar
General toolbar
Mode tabs
Picture/Design
toolbar (changes
with selected
mode)
Design Window
Stitch and
Color bar
Status line
BERNINA® Cross Stitch : Onscreen Manual
33
Appendix A : BERNINA Cross Stitch Quick Reference Guide
BERNINA Cross Stitch menu bar
Command
Description
The BERNINA Cross Stitch window menu bar
contains the pulldown menus described below.
Some are also available as toolbar buttons.
Insert
insert a fractional cross stitch in the same
square as other fractional stitches as
long as they are not on top of each other.
Lock or unlock outline stitches for editing.
Lock or unlock cross stitches for editing.
Outlines
Crosses
Note Standard Windows Alt key shortcuts
apply. Use the Alt key with the letter underlined
in the menu. To cancel an operation, press Esc
twice.
File menu
Command
Description
New
Open
Close
Save
Save As
Open new empty design.
Open design.
Close current Design Window.
Save current design.
Save current design to with a different
name, location or format.
Design Prop- Add comments about design for printing
erties
on worksheet.
Recent File List most recently used files. Select to
List
open a file.
Exit
Close all open designs and exit BERNINA® Embroidery Software BERNINA
Cross Stitch program.
Edit menu
Command
Undo
Redo
Cut
Description
Cancel last command.
Re-apply cancelled commands.
Delete selection and places it on clipboard.
Copy
Copy selection to clipboard.
Paste
Paste contents of clipboard to Design
Window.
Duplicate
Duplicate selection and place it on current selection.
Delete
Delete selection without placing it on clipboard.
Select All
Select all objects in design.
Deselect All Deselect all selected objects in design.
View menu
Command
Description
By Color
Show 1:1
Show All
Zoom Box
Redraw
Grid
Show only selected colors in design.
Show design at correct size.
Show whole design.
Zoom selected area to full window size.
Redraw design.
Show or hide grid and sets grid size and
spacing.
Show stitches as colored tiles or cross
stitches.
Show or hide background picture.
Show or hide hoop and sets hoop size
and position.
Measure design size.
Crosses
Picture
Hoop
Measure
Arrange menu
Command
Description
Center Design
Mirror Horizontal
Mirror Vertical
Move design to the center of the hoop.
Mirror selected object/s horizontally
about center.
Mirror selected object/s vertically
about center.
Settings menu
Command
Description
Thread Colors Assign thread colors for use in design.
Fabric Count
Set number of stitches per inch or
mm.
Fabric Display Select background fabrics and colors.
Options
Adjust settings for display window.
Display Setup Calibrate screen.
Scanner Setup Set scanner options.
BERNINA® Cross Stitch : Onscreen Manual
34
Appendix A : BERNINA Cross Stitch Quick Reference Guide
Window menu
General toolbar
Command
Command
Description
Cascade
Display any open windows in a ‘cascaded’ or stair-stepped fashion.
Tile Horizon- Display any open windows in a horitally
zontally ‘tiled’ (non-overlapping) fashion.
Tile Vertically Display any open windows in a vertically ‘tiled’ (non-overlapping) fashion.
1 (Title of Open Choose from a list of open windows
Window)
titles in the order in which they are
stacked.
Help menu
Command
Description
Help Topics
List online help topics.
Online Manual Open User Guide in Adobe Acrobat
PDF format.
BERNINA Cross Stitch Mode tabs
There are two Mode tabs in the BERNINA Cross
Stitch window. Different modes display different
toolbars.
BERNINA Cross Stitch window
toolbars
Mode menu
Load, edit and save picture as a background for embroidery design.
Embroidery shapes are not shown.
Create and modify embroidery
designs. Show embroidery shapes as
well as pictures.
The BERNINA Cross Stitch window contains the
toolbars described below. Some are shortcuts to
the pulldown menu commands.
Description
New
Same as File > New
Open
Same as File > Open
Save
Same as File > Save
Cut
Same as Edit > Cut
Copy
Same as Edit > Copy
Paste
Same as Edit > Paste
Undo
Same as Edit > Undo
Redo
Same as Edit > Redo
Grid
Same as View > Grid
Hoop
Same as View > Hoop
Picture
Same as View > Picture
Crosses
Same as View > Crosses
Zoom Box
Same as View > Zoom Box
Zoom Out 2X Same as View > Zoom Out 2X
Show All
Same as View > Show All
Show 1:1
Same as View > Show 1:1
Picture toolbar
Command
Select Picture
Description
Select pictures in Design Window.
Load Picture Insert picture in Design Window.
®
Scan Picture Scans picture into BERNINA
Embroidery Software.
BERNINA® Cross Stitch : Onscreen Manual
35
Appendix A : BERNINA Cross Stitch Quick Reference Guide
Command
Dim Picture
Description
Dim or brighten picture to show
stitches more clearly in design
mode.
Save Picture Save picture after editing.
Command
Description
Area Fill
Fill closed shape with stitches.
Rubber
Stamp
Clone selection for re-use as
‘rubber stamp’.
Design toolbar
Command
Select Object
Polygon
Select
Lettering /
Values
Mirror Horizontal
Mirror Vertical
Rotate 90°
CCW / CW
Description
Select a single stitch or block of
stitches.
Select irregular areas or shapes.
Create lettering and change lettering properties.
Same as Arrange > Mirror Horizontal
Same as Arrange > Mirror Vertical
Rotate selected objects in 90°
increments. Click to rotate
counter clockwise. Right-click to
rotate clockwise.
Magic Wand Digitize single shape in design.
Open Curve Draw and digitize open shapes.
Closed Curve Draw and digitize closed shapes.
Circle / Oval
Rectangle
Auto Select
Pencil
Draw and digitize ovals or circles.
Draw and digitize rectangles or
squares.
Select a single color block or an
undigitized area.
Draw single stitch or line of
stitches.
Eraser
Erase cross stitches.
Auto Stitch
Digitize picture automatically.
(This process is different to
BERNINA® Embroidery Software as it converts pixels to
cross stitches.)
BERNINA® Cross Stitch : Onscreen Manual
36
INDEX
A
Area Fill tool 17
ARX file types 18
Auto Select tool 21, 23
Auto Stitch Image dialog 30
Auto Stitch tool 30
B
backdrops, digitizing with 28
bitmap images
reshaping 29
scaling 29
C
Circle tool
cross stitch 16
Closed Curve tool 17
Color dialog 7, 15
Copy tool 22
cross stitch
adding borders 26
area filling 17
Auto Select tool 21
Auto Stitch 30
automatic digitizing 30
borders 4
changing background colors
and fabrics 8
changing stitch color 23
combination stitches 5, 26
copy, cut, paste 22
design files 18
design information 10
design mode 7
digitizing areas 31
digitizing circles 16
digitizing closed shapes 17
digitizing lines 15
digitizing open shapes 17
digitizing pictures
automatically 30
digitizing rectangles 16
double cross 3
editing stitches 20
elongated cross 3
Eraser tool 23
erasing stitches 23
fill stitch 12
fills 1
French knot 3
full cross 1
grid settings 7
half cross 2
hoop settings 8
letters 32
locking stitches 20
Magic Wand 31
mini-cross 2
mirroring stitches 25
moving stitches 24
opening 6
outlines 11
pencil tool 15
picture mode 7
quarter cross 2
rotating stitches 24
rubber stamp 25
Rubber Stamp tool 25
saving designs 18
selecting cross stitch types 11,
13
selecting stitch color 13
selecting stitches 20
selecting stitches with Auto
Select 21
setting orientation 12
setting stitch density 11
showing stitches 9
three-quarter 2
types 1
upright cross 3
using with artista 18
variations 4
Crosses tool 9
Cut tool 22
D
Design mode tab 7
Design Properties dialog
Thread Colors 14
Design toolbar
Area Fill 17
Auto Select 21, 23
Auto Stitch 30
Circle 16
Closed Curve 17
Eraser 23
Lettering 32
Magic Wand 31
Mirror Horizontal 25
Mirror Vertical 25
Open Curve 17
Pencil 26
Pencil tool 15
Polygon Select 20
Rectangle 16
Rotate 90 deg CW/CCW 24
Rubber Stamp 25
Select Object 20
dialogs
Auto Stitch Image 30
Color 7, 15
Design Properties > Thread
Colors 14
Fabric Count 10
Font 32
Open 8, 18, 28
Options 7, 8
Select Fill Style 12
Double cross stitch 3
BERNINA® Cross Stitch : Onscreen Manual
37
Index
E
Load Picture tool 28
Elongated cross stitch 3
Eraser tool 23
M
F
Fabric Count dialog 10
Fill tool 12
fills, cross stitch 1
find threads 14
Font dialog 32
French knot cross stitch 3
Full cross stitch 1
G
General toolbar
Copy 22
Crosses 9
Cut 22
Grid 7
Hoop 8
Paste 22
Picture 29
Save 18
Grid tool 7
H
bitmap images 29
Scan Picture tool 28
searching, for threads 14
Select Fill Style dialog 12
Select Object tool 20
Setting cross stitch
orientation 12
Stitch and Color bar
Fill 12
Outline 11
Magic Wand tool 31
Mini cross stitch 2
Mirror
Horizontal tool 25
Vertical tool 25
mixing your own thread
colors 15
T
O
tab
design mode 7
picture mode 7
thread colors
mixing your own 15
threads
finding 14
searching for 14
Three-quarter cross stitch 2
tools
on Stitch and Color bar 36
Open Curve tool 17
Open dialog 8, 18, 28
Options dialog 7, 8
Outline tool 11
P
Paste tool 22
Pencil tool 15, 26
picture mode tab 7
Picture tool 29
Picture toolbar
Load Picture 28
Scan Picture 28
Polygon Select tool 20
U
Upright cross stitch 3
Half cross stitch 2
Hoop tool 8
hoops, automatic centering 8
Q
I
R
images
reshaping 29
scaling 29
inserting
bitmaps images 28
Rectangle tool 16
reshaping, bitmap images 29
Rotate 90 deg CW/CCW tool 24
Rubber Stamp tool 25
L
Lettering tool 32
Quarter cross stitch 2
S
Save tool 18
scaling
BERNINA® Cross Stitch : Onscreen Manual
38


![Présentation des gammes[3] - Amicale des Hospitaliers de Saint-Malo](http://vs1.manualzilla.com/store/data/006500339_1-36f398170af1935e561ac30700fc19b7-150x150.png)