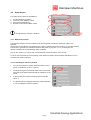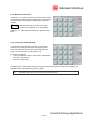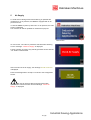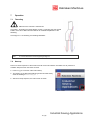
1
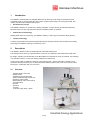
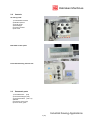
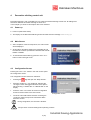
Habraken Machines
HM820 Design seam machine
Author:
Jeannot Dinjens
Date: 19 Jul. 11
Version: 1
Pages: 18
[email protected]
Subject:
Instruction manual
Word in advance
Thank you for choosing a Habraken Machines special product.
This machine was specially designed and constructed to fulfil customer requirements.
Please read this manual before operating this machine.
Contact our support team for any inquiries or questions you might have regarding this machine.
About this manual.
This manual uses the following typography and symbols:
Standard text…
Notes, tips and hints…
Syntax, parameters and reference to information on user interfaces such as displays…
These symbols can be found on the machine and in this manual:
Read the manual.
Warning.
Attention.
Warning; Clamp injury.
Wear eye protection.
Warning; Electricity.
Warning; Laser light.
Support.
E-mail:
[email protected]
Telephone: +31 416 542 884
Please keep this manual for future reference!
IInndduussttrriiaall S
Seew
wiinngg A
Apppplliiccaattiioonnss
Habraken Machines
Content
HM820 – 867 & HM820 – 868 ......................................................................................................................... 1
Word in advance.............................................................................................................................................. 1
About this manual. ....................................................................................................................................... 1
Support. ....................................................................................................................................................... 1
Content ............................................................................................................................................................ 2
1 Introduction ............................................................................................................................................... 3
2 Description ............................................................................................................................................... 3
2.1 Overview ............................................................................................................................................ 3
2.2 Controls .............................................................................................................................................. 4
2.3 Pneumatic parts ................................................................................................................................. 4
3 Safety ....................................................................................................................................................... 5
4 Decorative stitching control unit ............................................................................................................... 6
4.1 Power up ............................................................................................................................................ 6
4.2 Main Screen ....................................................................................................................................... 6
4.3 Configuration Screen ......................................................................................................................... 6
4.4 Setup Screen ..................................................................................................................................... 7
4.4.1
Reference position .................................................................................................................... 7
4.4.2
User Patterns ............................................................................................................................ 8
4.4.3
0 (zero) backtack configuration ................................................................................................. 8
4.5 Decorative stitch selection screen ..................................................................................................... 8
4.5.1
Factory patterns ........................................................................................................................ 9
4.5.2
User patterns ............................................................................................................................ 9
4.5.3
1-needle right ............................................................................................................................ 9
4.5.4
1-needle left .............................................................................................................................. 9
4.5.5
Machine Lock function ............................................................................................................ 10
4.5.6
Turning the needle manually................................................................................................... 10
4.5.7
0 Bt (Zero backtack)................................................................................................................ 11
4.5.8
Temporarily switching off a selected pattern........................................................................... 11
5 Air Supply ............................................................................................................................................... 12
6 USB tool port .......................................................................................................................................... 13
7 Operation ................................................................................................................................................ 14
7.1 Threading ......................................................................................................................................... 14
7.2 Start-up ............................................................................................................................................ 14
7.3 Special Efka DA321 parameters ...................................................................................................... 16
7.4 Specifications ................................................................................................................................... 17
Electrical system .................................................................................................................................... 17
Pneumatic system .................................................................................................................................. 17
Sewing head ........................................................................................................................................... 17
Addendum ..................................................................................................................................................... 18
IInndduussttrriiaall S
Seew
wiinngg A
Apppplliiccaattiioonnss
2 (18)
Habraken Machines
1
Introduction
The HM820 is a development of Habraken-Machines for stitching a wide range of decorative seams.
It is based either on an M-type DA-867 twin-needle, flat-bed, triple transport or an M-type Da-868, twinneedle, post-bed triple transport sewing head.
• Revolutionary concept
The HM820 is based on a revolutionary “rotating needlebar” concept develop by Habraken-Machines.
Because of this concept, high-speed and precise needlebar rotation is achieved.
State-of-the-art technology
•
Utilising state-of-the-art technology, the HM820 is offering a wide range of decorative stitch patterns.
Intuitive technology
•
Combining all benefits of the DA-867 M-type flat-bed triple transport machine with the latest user-friendly
technology, the HM820 is offering a low learning curve.
2
Description
The HM820 is based on either a DA867 flat-bed or DA-868 sewing head.
The sewing head is driven by an EFKA DA321 control unit in combination with an EFKA DC1550 motor.
By design, operation and functionality of the EFKA DA321 is respected as much as possible. This resulting
in a “standard machine” in case the rotating needle bar is switches off.
Control of the rotating needle bar, selection of decorative seams, options and safety in relation to this
decorative stitching is done by the so called Decorative Stitching Control Unit. This unit consist of a Nais
FP0-R plc in combination with a touch screen.
2.1
Overview
7
1) EFKA DA321 control box
2) Main switch
3) DA867 m-type sewing head
4) Decorative Stitching Control Unit
5) Sewing control pedal;
6) Efka sewing motor control panel;
7) Thread stand
8) Stand
9) Drawer.
10) Lamp
11) Power supply lamp + switch
6
3
4
9
11
9
2
1
8
5
IInndduussttrriiaall S
Seew
wiinngg A
Apppplliiccaattiioonnss
3 (18)
Habraken Machines
2.2
Controls
At sewing head:
1) Intermediate backack
2) Needle up/down
3) Center guide
4) Stitchlength
5) Tension release
6) Not used
1 2 3 4 5 6
Efka V820 control panel.
Decorative Stitching Control Unit
2.3
Pneumatic parts
1) Valve Backtack (RA)
2) Valve Stitchlength (STL)
3) Valve Shortstitch (STL FA)
4) Buffer
5) Pressure sensor (PA)
6) Valve center guide
IInndduussttrriiaall S
Seew
wiinngg A
Apppplliiccaattiioonnss
4 (18)
Habraken Machines
3
Safety
Operation of the machine is restricted to authorized personnel only.
Operators and maintenance staff have to be familiar with Dürkopp Adler 867 or 868 sewing
machine and Efka control units. Individual manuals of the DA 868, Da 868 and the Efka
DA321 are integral part of the documentation of the HM820.
Read this and related manuals careful and keep it for future reference!
Detailed information on the DA 867 and Da 868 can be found in the operation instructions
and service manual.
General information on the Efka DA321G5321 can be found in the DA321 instruction manual
and parameter list.
Habraken Machines recommend to wear eye protection when operating the machine.
Habraken Machines recommend to wear ear protection when operating the machine.
Caution Risk of Injury !
When repairing, converting or doing maintenance work turn off the main switch and
disconnect the machine from the pneumatic supply.
Adjustments and function testing on the running machine are to be conducted only by strictest
adherence to all safety measures and extreme caution.
IInndduussttrriiaall S
Seew
wiinngg A
Apppplliiccaattiioonnss
5 (18)
Habraken Machines
4
Decorative stitching control unit
Decorative stitching is fully controlled by the so called Decorative Stitching Control Unit. All settings and
selections related to decorative stitching are done here.
In this chapter you will find a description off the user interface.
4.1
Power up
● Power on (Efka main switch)
● The display on the Decorative Stitching Control Unit will show the message “Now booting up”
4.2
Main Screen
● After completion of the boot-sequence, the “main screen”
will be displayed.
● At this stage, decorative stitching isn’t activated yet and
the machine could be operated as a standard twin-needle
DA867 or DA868.
● To activate decorative stitching, press the “zero / one “
button on the lower right corner.
Main screen
4.3
Configuration Screen
Pressing the “zero / one “ button in the main screen opens
the configuration screen.
The configuration screen offers four selections:
•
Pressing the
•
Selection of either a 1 or 2 needle set. Pressing the
“Change?” button will toggle between the two options
either showing “1 Needle Set” or “2 Needle Set” on the
display.
•
Press the “zero / one” button to exit the Configuration
Screen and return back to the main screen.
•
logo will open the “Setup Screen”.
Configuration screen
Continue to decorative stitch selection. Pressing the
“Continue?” button will open the “Decorative Stitch
Selection” screen.
During configuration, the machine is blocked.
Always check correct threading before pressing continue
IInndduussttrriiaall S
Seew
wiinngg A
Apppplliiccaattiioonnss
6 (18)
Habraken Machines
4.4
Setup Screen
The Setup Screen offers the possibility to:
1.
2.
3.
4.
1
Set the “Reference Position”
Active the “User Patterns” option
Select the 0-backtack type
Exit the screen with the “Back” button
2
3
4
During setup the machine is blocked.
Setup screen
4.4.1 Reference position
The reference position is used to determine all relevant positions related to needle bar rotation and
transport.
After power up, two stitches are needed for the control to determine the exact position. In case the machine
hasn’t been in operation for at least two stitches after power up, the text “not set” is displayed. The
reference position will set automatically within 2 stitches.
Only in rare cases ( e.g.: new plc soft- or hardware) the reference position has to be set.
If you are not sure about the correct setting of the reference position, follow the steps indicated in & 4.5.1.1
Checking the reference position
4.4.1.1 Checking the reference position
•
Turn the hand wheel in forward direction until the current
sector is indicated by a value 1 upto 20,
1
•
Continue turning the hand wheel until the arrow on the lefthand side of the wheel levels with the 60º indication on the
wheel.
•
In this position, the reference position should show the
value “1”
•
If a different value is displayed follow the steps indicated in
& 4.5.1.2 Setting the reference position
Setup screen
IInndduussttrriiaall S
Seew
wiinngg A
Apppplliiccaattiioonnss
7 (18)
Habraken Machines
4.4.1.2 Setting the reference position
•
Turn the machine for 2 stitches in sewing direction.
•
Continue turning the hand wheel until the arrow on the lefthand side of the wheel levels with the 60º indication on the
wheel.
•
Press “Reset” on the display
•
The value “1” will overwrite the current setting..
4.4.2 User Patterns
Standard the HM820 offers a total of 16 different decorative stitching patterns. The HM820 also offers
the possibility to upload custom patterns. To access these patterns, the option “User Patterns” has to be
activated.
Note:
This topic will be explained in more detail in & 4.7
4.4.3 0 (zero) backtack configuration
On top of the standard Efka backtack, the HM820 offers three types of so called 0 backtack options:
•
Cross in place : The total number of backtack stitches, set in the Efka control, will be performed in
cross-stitch and at the same position
•
Short fwd cross: The total number of backtack stitches, set in the Efka control, will be performed
solely in a forward direction and the short stitchlength activated. (cross-stitch)
•
Short rev cross: The total number of backtack stitches, set in the Efka control, will be performed solely
in a backward direction and the short stitchlength activated. (cross stitch)
Note:
4.5
•
•
•
•
Press the “Back” button in the setup Screen to exit and turn back to the Main Screen
Decorative stitch selection screen
This screen offers a selection out of 16 patterns. Standard 16 factory patterns are displayed. In case
the option “user patterns” is selected, only numbers will be displayed on the buttons.
Selection is made by pressing the desired stitch symbol.
The selected patter is immediately activated
On the top left corner, the selected needle set is displayed. (2-needle)
IInndduussttrriiaall S
Seew
wiinngg A
Apppplliiccaattiioonnss
8 (18)
Habraken Machines
4.5.1 Factory patterns
Default 16 factory designed patterns are offered. Switching
between patterns is just a matter of pressing on the symbol of
the desired pattern.
It is possible to select patterns while sewing
4.5.2 User patterns
In case “user patterns” is selected, only numbers will be
displayed.
4.5.3 1-needle right
Related to the selected needle set (2-needle, 1-needle right, 1 needle left), the appropriate patterns are displayed on the
selection buttons.
4.5.4 1-needle left
Related to the selected needle set (2-needle, 1-needle right, 1 needle left), the appropriate patterns are displayed on the
selection buttons
IInndduussttrriiaall S
Seew
wiinngg A
Apppplliiccaattiioonnss
9 (18)
Habraken Machines
4.5.5 Machine Lock function
In case the “Lock” button is pressed, the machine will be locked.
This allowing the operator applying adjustments like threading to
the machine without the danger of activating the machine by
accident.
The text STOP with the motor run-blockage
symbol will be displayed on the V820 display.
Pressing “Lock” again will set the machine to operation mode
again.
4.5.6 Turning the needle manually
For threading and replacement of needles, it sometimes is
needed to turn (swap) the needle set. Pressing the “Swap”
button the needle set will be turned. To avoid damage, this
function is only activated in a safe position to do.
To swap the needle set:
• Turn the handwheel until the “Swap” button is displayed in
white text ( safe position)
• Press the “Swap” button.
Occasionally the needle position might be wrong for the task at hand (start of a new seam, threading). It is
possible to rotate the needle bar by pressing “Swap”.
Note:
Activating Swap more then once can be done without any harm.
IInndduussttrriiaall S
Seew
wiinngg A
Apppplliiccaattiioonnss
10 (18)
Habraken Machines
4.5.7 0 Bt (Zero backtack)
Default at the start and end of a seam, the selected backtack on
the Efka V820 panel is performed :
• No backtack activated
• Single backtack with n1 stitches
• Double backtack with n1 + n2 stitches.
On top of that the HM820 offers 3 additional types of backtack:
• Cross in place
• Short fwd cross
• Short Rev cross
To activate one of those 3 additional backtack types, the “0 Bt“ button should be pressed. The actually
activated backtack type depends on the setting made in the setup screen.
Note:
Check & 4.5.3 for a description of these backtack types
Note:
Check chapter 4.5 how to select the backtack type
4.5.8 Temporarily switching off a selected pattern
Press the “Straight” button to temporarily switch off the selected
decorative stitch pattern. The pattern will be switched off
immediately. Only “straight forward” sewing will be performed.
Press again the “Straight” button to activate the decorative stitch
pattern again.
Speed limits stay in effect.
IInndduussttrriiaall S
Seew
wiinngg A
Apppplliiccaattiioonnss
11 (18)
Habraken Machines
5
Air Supply
To avoid serious damage if decorative stitching is operated with
insufficient or no air pressure, the HM820 is equipped with an air
pressure sensor.
In case the HM820 is power up with low or no air pressure, the main
screen is displayed.
The machine can still be operated for maintenance purpose.
Main screen
As soon as the “1/0” button is pressed to start decorative stitching,
an error message “ Check Air Supply” is displayed.
Further operation is locked. Only selecting the Main Screen with the
“1/0” button is still activated.
After coorection of the air supply, the message “Air OK Continue?”
is displayed.
Press the message field to accept en continue to the Configuration
Screen.
In case air pressure fails during decorative stitch
operation, the machine will lock and the message “Check Air
Supply” is displayed.
IInndduussttrriiaall S
Seew
wiinngg A
Apppplliiccaattiioonnss
12 (18)
Habraken Machines
6
USB tool port
Standard the HM820 is equipped with an USB tool port (just
above the 25p machine interface connector.
This port offers the possibility to upload future program
changes or user patterns.
The machine will be accompanied with a CD containing
software and instructions for uploading new software or user
patterns.
IInndduussttrriiaall S
Seew
wiinngg A
Apppplliiccaattiioonnss
13 (18)
Habraken Machines
7
Operation
7.1
Threading
Make sure the machine is switched off.
Check &6.1 “Threading the needle thread” and &6.7 “Changing the hook-thread
bobbin” of the 867 & 868 Instruction Manual for a detailed explanation of the
threading.
Check figure 7.1 for threading the Rotating Needlebar.
Note:
7.2
It is recommended to use the supplied guiding tool.
Start-up
Perform a visual inspection of the machine and its environment before use. Make sure air pressure is
available. Keep the work area clean and free.
● Power on (§ 2.1 Overview : Efka main switch)
● The display on the Decorative Stitching Control Unit will shortly
show the message “Now booting up”
● After the bootup sequence, the main screen is shown
Main screen
IInndduussttrriiaall S
Seew
wiinngg A
Apppplliiccaattiioonnss
14 (18)
Habraken Machines
•
Press the “1/0” button to proceed to the Configuration screen
•
Press the Change button to select the appropriate needle set
•
Press the Continue button to proceed to the decorative selection
screen
Configuration screen
•
At this stage the control is ready for operation.
•
Pressing the pedal will start decorative stitching with the selected
pattern
•
Check chapter 4 for a description of the options on the righthand
side of the machine.
•
To exit the decorative stitching mode, press the STOP button
IInndduussttrriiaall S
Seew
wiinngg A
Apppplliiccaattiioonnss
15 (18)
Habraken Machines
7.3
Special Efka DA321 parameters
The HM820 mainly uses standard Efka parameter settings for machine classes DA 867 and DA 868.
Parameters set differently are listed below.
P
P
P
P
P
P
P
P
P
P
P
P
P
112
113
117
139
220
241
247
275
289
290
601
602
026
= 400
= 400
= 450
=1
=2
=9
= 26
= 17
= 950
= 41
=0
=0
=4
Start backtacking speed
End backtacking speed
DB2000 max. speed (backtack or 0-stitch active)
Speed in display
Accelerating power
LSP input on A7
In8 = DB3000
In7 = DB2000
DB3000 max. speed (cross-stitch without backtack or 0-stitch)
Mode ‘machine model”
Lift mid-guide during backtack 0 = no, 1 = yes
Lift mid-guide during footlift 0 = no, 1 = yes
Pedal 60 steps progressive
IInndduussttrriiaall S
Seew
wiinngg A
Apppplliiccaattiioonnss
16 (18)
Habraken Machines
7.4
Specifications
Electrical system
Type:
Voltage:
Power consumption:
Fuse maximum:
Single phase
230VAC 50/60Hz
0,5kW
16A
Pneumatic system
Operating pressure:
Air consumption per work cycle:
6 +/- 0,5 bar
0,1 Nl
Sewing head
Maximum number of stitches:
Maximum stitch length:
Maximum pressure foot stroke:
Clearance under the pressure feet:
when sewing:
when raised:
Maximum thread thickness:
Through-feed area:
940 / 450 rmp (Decorative stitching mode, pattern related)
12 mm
7 mm
10 mm
20 mm
10/3 Nm
335x 125 mm
IInndduussttrriiaall S
Seew
wiinngg A
Apppplliiccaattiioonnss
17 (18)
Habraken Machines
Addendum
●
●
●
●
DA 867 / DA 868 Instruction manual
DA 867 / DA 868 Service manual
Efka DA321 Parameter list
FP-0 R PLC software
IInndduussttrriiaall S
Seew
wiinngg A
Apppplliiccaattiioonnss
18 (18)