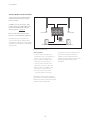
1
BeoVision Avant BeoVision Avant–55 Dear Customer This guide contains additional information about the daily use of your Bang & Olufsen product and connected equipment, and describes the features and functions of your product in more detail. Among other things you can find information about settings, how to operate your product with a Bang & Olufsen remote control, and how to set up a wired or wireless connection. We expect your retailer to deliver, install and set up your product. This guide will be updated on a regular basis to make it reflect, for example, new features and functions introduced with software updates. When your television receives new features and functions, you can also read about them in the NICE TO KNOW menu under SETUP. You can find additional information about your product in the Frequently Asked Questions (FAQ) section on www.bang-olufsen.com/faq. Your Bang & Olufsen retailer is your first stop for all your service queries. To find your nearest retailer, visit our website … www.bang-olufsen.com 2 Contents – Click a headline to move to that section How to use your remote control, 5 See how to use the remote control. You can also use BeoRemote App to operate your television. Understanding the guide, 7 See how to use the illustrated menu operations, how to navigate in menus and understand the indicator light as a help for you to get an optimal experience with your Bang & Olufsen television. Set up your television, 10 How to place and handle your television in a correct way. Maintenance, 12 See how to clean and maintain your products. Connections, 13 Connect your television and expand your setup by connecting additional equipment, such as a set-top box, a PC or a camera to widen your source selection. If needed, you can reset to default settings. Set positions for the television to turn to, 20 Preset positions for a motorised floor stand or wall bracket to turn to in order to optimise the experience for several viewing and listening positions. You can also adjust the tilt of a motorised table stand to avoid reflections. Set up additional equipment, 21 Register connected equipment via the SOURCE LIST menu and download PUC tables to operate non-Bang & Olufsen equipment with your Bang & Olufsen remote control. You can also remove PUC tables you no longer wish to use. Watch television, 23 Watch television, access source related features, and turn the TV to different viewing and listening positions to customise the viewing experience to your preferences. Loudspeaker setup – surround sound, 25 Make your television part of a surround sound system to enjoy a fantastic sound experience. If you want speakers in your setup to be connected wirelessly, associate the speakers to your television to not only enjoy the sound but also the aesthetics of wireless surroundings. You are encouraged to create different speaker groups to optimise the sound experience for different listening positions, and you can set up sound modes to suit different types of programmes or sources. Daily use of sound modes and speaker groups, 29 Switch between different sound modes, such as GAME mode, to optimise sound from your surround sound system for different types of programmes and sources. Switch between speaker groups to optimise the sound experience for different listening positions, for example, one position in an open kitchen for listening to NetRadio and another in an armchair watching the TV source. Each speaker group is customised for a specific listening position. Personalise the TV experience, 33 Save and restore a snapshot of the current source, sound, and picture experience if you would like to easily bring up the same combination at another time. For internal sources also the playing item may be stored. Set up 3D television, 34 Make settings for how 3D television should be activated for you to enjoy the experience of watching 3D television when it suits you. Watch 3D television, 35 Activate 3D television to obtain an extraordinary immersive viewing experience. Choose between modes to match the signal from the programme provider. See two sources at the same time, 37 See two sources at the same time, for example, to watch another source during the commercial break of a movie and at the same time keep track of when the movie starts again. Operate additional equipment, 38 Operate connected equipment, such as settop boxes, DVD players or the like with your Bang & Olufsen remote control, which thereby offers you the opportunity to use only one remote control for all sources in your setup. Adjust sound and picture settings, 30 Make sound and picture settings, such as adjusting bass level or brightness, to suit your preferences, and use picture modes and formats to adapt to different types of programmes and sources. Continues … Version 1.0 3 1404 >> Contents – Click a headline to move to that section NetRadio, 39 Browse, search and play back netradio stations on your television to enjoy music from radío stations worldwide. Power settings, 48 Make settings for power consumption and auto standby and reduce the start-up time of the television. WebMedia, 41 Navigate in web pages and add apps using WebMedia. WebMedia enables you to use Internet features on your television allowing you to easily share web-related content, for example, in the living room with your family. The pin code system, 49 Use the pin code system to make the television useless for people who do not know the pin code, for example, if it has been stolen and thereby been disconnected from the mains for a specific period of time. Spotify, Deezer and YouTube, 43 Access Spotify, Deezer and YouTube through apps to enjoy a world of music and television after your own choice. Software and service update, 50 Update software and find information about modules, for your television or your entire Bang & Olufsen system to continuously be equipped with the newest features and functions. HomeMedia, 44 Browse your photos and play back your music and video files on your television. Enjoy the contents of a storage device in comfortable surroundings in the living room with your friends. You can also stream content from a computer or a smart phone. Sleep Timers, 47 Make your television switch off automatically, for example, if you wish to go to sleep to the sound of music from a source in your setup or if you want the television to switch off at the end of a programme. Network settings, 51 Set up a network and bring up network information. A network connection allows you to access different sources such as NetRadio and WebMedia and take advantage of software updates and other features. Distribute sound with Network Link, 54 Make link connections and integrate your television with another product in order to distribute sound to other rooms in the house and thereby expand the possibilities of your Bang & Olufsen system. 4 Connect and operate an audio system, 56 Connect an audio system to your television and operate an integrated audio/video system to play music from your audio system on your television or to send the sound from your television to your audio system. Two televisions – with Network Link connection, 58 Connect another television to your television and operate an integrated video system to be able to share sound between the two televisions and, for example, listen to an audio or video source from a television placed in another room. Operate two televisions with one remote control, 59 Switch between two televisions and operate both televisions with the same Bang & Olufsen remote control. HDMI Matrix, 60 Enter settings in the HDMI MATRIX menu if you have connected an HDMI Matrix, allowing you to connect a multitude of external sources to a variety of televisions, and operate these sources individually on each television or simultaneously in several rooms. How to use your remote control Your television can be operated with BeoRemote One. TV The display shows you a list of sources or functions when it is switched on TV Display available video sources in the display for you to switch on. Use list* 1 or to step in the MUSIC Display available audio sources in the display for you to switch on. Use list* 1 or to step in the LIST Display extra functions in the display. Use or to step in the list MyButtons. Long press to store the current setup, such as source, sound and picture settings, short press to select it. 0–9 Select channels and enter information in on-screen menus BACK Move backwards through menus and the BeoRemote One list. Long press exits menus completely INFO Bring up help texts and information on a menu or function MENU Bring up the main menu of the active source Arrow buttons left, right, up and down , , BeoRemote One display and . Move in menus and in the Centre button used for selecting and activating, such as source selection and settings Select colour specific functions Start playback of a track or file Search backwards or forwards step by step Step through channels and stations Pause playback of a track or file. Adjust volume. To mute, press the middle of the button Standby *Some sources in the display can be reconfigured during the setup process. For more information, see page 21. 1 For general information about remote control operation, see the guide for your remote control. 5 >> How to use your remote control BeoRemote App iOS Your tablet and your television must be on the same network to use the BeoRemote App. BeoRemote App allows you to operate your television with a tablet and is especially useful for navigating in web pages or applications using WebMedia.* 1 Both your television and tablet must be on the same network and WAKE ON WLAN/WAKE ON LAN must be set to ON, see the television POWER SAVING menu. This allows you to switch on your television from standby mode. Note that the standby power consumption will increase slightly. BeoRemote App integrates with your television. However, it does not support all BeoRemote One LIST functions. Tap on the menu icon ( ) to open the television menu. A free moving cursor works as the BeoRemote One arrow buttons. Tap in the middle to select a setting. Swipe to the list options to activate television functions. To back up through menus, tap . To exit menus, hold . BeoRemote App has a short built-in guide which describes basic functions (found under SETTINGS). 6 Note that first-time setup must be performed using a BeoRemote One. BeoRemote App requires that your television is set up in a network. 1 *BeoRemote App supports tablets with iOS (most recent iOS version). Understanding the guide Quick guide and online guide www Together with your television you have received a printed Quick guide introducing you to the television. The present online guide provides you with a deeper knowledge about the television and its many features and functions. This menu hierarchy illustrates the path into a menu where you can make different settings. Press MENU on your remote control and use the arrow button and the centre button to select and open the menu. When available, you can also press the INFO button on your remote control to bring up help texts. Menu operation MENU SETUP SOUND … Example of menu operation. Remote control operation To activate picture modes directly … Press to bring up PICTURE in the BeoRemote One display LIST PIC TURE Press to select a picture mode 1 – 4 Step between modes Press to remove PICTURE from the display BACK Where relevant, the remote control operation will be shown. – A dark grey button indicates a physical button you must press. – A light grey display text indicates a BeoRemote One display text. Press LIST, TV or MUSIC on BeoRemote One to bring it up. The text appears in the BeoRemote One display. The texts in LIST, TV and MUSIC can be renamed and you can hide texts you have no need for and show texts you need. For more information see your BeoRemote One guide. Example of BeoRemote One operation. 7 –The centre button is symbolised by which is used in the operation sequences when you must press the centre button. >> Understanding the guide How to navigate in menus Navigate in menus and select settings using your remote control. Pressing MENU brings up the main menu, including a menu overlay for the active source. This guide is described with BeoRemote One operation. Display and menus … Select source and settings. Bring up video sources in the BeoRemote One display and select the television source to be switched on Bring up the main menu CHANNEL LIST TV TV MENU CNN 1 TV 2 NEWS 2 DISCOVER 3 CWNBC 4 BBCWORLD 5 … 6 … 7 SUPER CH 8 … Navigate in menus … When a menu is on the screen, you can move between menu options, reveal settings or enter data. 0–9 Bring up a submenu or store a setting Select an option Press to back up through previous menus or press and hold to leave the menu BACK Step between menu pages … Some menus take up more space than available on the television screen. This is indicated by half a menu item at the bottom or top of the screen. To easily step from the top of a list to the bottom, press . Step in pages Scroll through menu items 8 10 CINEMA 11 Wednesday 09 November, 2014 Example of channel list. Selection must be made using the centre button. Highlight a menu or change a setting Enter data 9 CRIME TV >> Understanding the guide Indicator light Select source … You can bring up a source by pressing the TV or MUSIC button and select a source in the remote control display, or you can select a source via the television menu. Bring up the main menu Bring up help texts … You can bring up help texts with explanations of features and functions when available in menus and submenus.* 1 General features and functions are also explained in the NICE TO KNOW menu.*2 MENU Bring up the main menu MENU Standby indicator The standby indicator placed to the right on top of the television screen will provide you with information about the television state. (Solid green) The TV is switched on, but there is no picture on the screen. Select SOURCE LIST Bring up the SETUP menu (Slowly flashing red) The TV has been disconnected from the mains supply and you must enter the pin code. See page 49 for more information on the pin code system. Select a source Select an option Show or hide help texts INFO *For some languages, help texts are only available in English. 1 *Access the NICE TO KNOW menu from the SETUP menu. You can read about basic features and functions. When your television receives software updates (requires Internet connection), new features and functions will be explained here. 2 9 (Quickly flashing red) Do not disconnect the TV from the mains supply. Could be due to new software being activated or too many failed pin code attempts. Set up your television The television must be set up by qualified service personnel according to the guide for the stand or bracket. The television has several placement options. Guidelines for placement and connection must be followed. To ensure proper ventilation, allow enough space around the screen. At overheating (flashing standby indicator and an on-screen warning), switch the TV to standby, not disconnected from the mains, in order for the TV to cool down. You cannot operate the TV during this time. WARNING! Do not lift or otherwise move your television physically when it is mounted on the floor stand. It could cause the television screen to break. Contact your retailer. Placement options Handling The TV has several placement options. Refer to www.bang-olufsen.com for available stands and wall brackets or contact your Bang & Olufsen retailer. Depending on your television size different stands are available. Due to the weight of the TV, any moving or lifting of the TV should be performed by qualified personnel – using the proper equipment. The TV is not designed to stand on its own. It must be supported until mounted. To prevent injury, use Bang & Olufsen approved brackets or stands only! If your television is mounted on the table stand, make sure it is placed on a table that can handle the heavy weight of the television and the table stand. Wall bracket and stands Set the maximum angle the TV will turn on the motorised floor stand or wall bracket. Remember to leave enough space around the TV to allow it to turn freely. If your television is mounted on the motorised table stand, it can be slightly tilted to avoid disturbing reflections. For more information, see page 20. 10 If the television is to be moved when mounted on the floor stand, it must be dismounted. Also, it is important that the stand is set in TRANSPORT mode. When placed in a new position, the stand must be set up again. Bring up SETUP then STAND to set it up again. >> Set up your television Overview Locate the connection panel and other important items: 1 Holes for mounting of a wall bracket. 2 Holes for mounting of a stand. 3 Covers for the main connection panel. Slide the covers to the sides to reveal the connection panel. 4 Easy access panel. 5 Standby indicator and room lights indicator. 5 4 2 3 3 Depending on your setup, different stand or wall bracket covers may be used. See the guide for your stand or wall bracket for information on how to mount such covers. 2 Run cables Gather the cables from the upper and lower part of the panel, fasten them with cable ties and run them upwards or downwards behind the cable holders depending on wall bracket or stand placement. See the illustrated example. If you have a motorised stand or wall bracket, make sure that there is enough slack in the cables to allow the TV to turn to either side or tilt before you fasten the cables with cable ties to make a neat bundle. 11 Maintenance Regular maintenance, such as cleaning, is the responsibility of the user. Screen Use a mild window cleaning fluid and lightly clean the screen without leaving streaks or traces. Some micro-fibre cloths may harm the optical coating due to their strong abrasive effect. Cabinet Wipe dust off the surfaces using a dry, soft cloth. To remove stains or dirt, use a soft, damp cloth and a solution of water and mild detergent, such as washing-up liquid. Never use alcohol or other solvents to clean any parts of the TV. 12 Connections The connection panel on your television allows you to connect a variety of extra equipment, such as a DVD player or a music system. Equipment you connect to these sockets can be registered in the SOURCE LIST menu when you press the red button. If the equipment is not in the SOURCE LIST, you must press the green button to add it to the SOURCE LIST first. For more information, see page 21. Before you connect any equipment to your television, remember to disconnect the television from the mains. Except when connecting a source to the HDMI IN or USB socket. Depending on the type of equipment you connect to the television, different cables and maybe also adaptors are needed. Cables and adaptors are available from your Bang & Olufsen retailer. PL 1–5 Loudspeakers Use Bang & Olufsen BeoLab speakers. Cables are available from your Bang & Olufsen retailer. You can also connect up to eight speakers wirelessly. See page 25 for more information. To obtain the best possible wireless connection, it is recommended to place all wireless speakers within a range of approximately 9 metres (29.5 ft) from the television. Do not place any obstacles in front of the television or wireless speakers, as this may interfere with the wireless connection. The wireless speakers should be placed in one room and be visible from the television. See the guide for your speaker for information about whether or not your speaker can be connected wirelessly. If you need to reset your television to default settings, then bring up the REGIONAL SETTINGS menu and select another country. You will be asked to confirm the reset. All settings will be deleted and you must go through first-time setup, follow the onscreen instructions. 13 Equipment with HDMI™ output Equipment with HDMI output such as a settop box can be connected to any available HDMI socket in the television. However, HDMI 1 is recommended for UHD (Ultra High Definition) sources. For more information on how to set up connected equipment, see page 21. A configured source can be selected on the BeoRemote One or in the SOURCE LIST. If the television detects an unconfigured source, you are asked to choose between doing nothing, showing the source or configuring it. Connected equipment can be operated with its own remote control or you may download a Peripheral Unit Controller (PUC) table, if available, to use the Bang & Olufsen remote control, see page 38. >> Connections Connection panels PL 5 PL 4 MONITOR PUC 2 CONTROL A+B PUC 1 A+B EXT. IR AV IN 5 PL 3 PL 2 PL1 PUC 3 A+B CTRL 2 CTRL 3 Equipment you connect permanently to the main connection panel must be registered in the SOURCE LIST menu by pressing the green button and then for each source the red button. Equipment connected to the easy access socket panel can be registered in the SOURCE LIST menu if you press the green button, highlight a source and press the red button. If a source is already configured, you can simply highlight it in the SOURCE LIST and press the red button to change settings. For more information, see page 21. We recommend that you connect the television to the Internet to be able to receive software updates and to download Peripheral Unit Controller (PUC) tables. PUC tables enable you to operate connected non-Bang & Olufsen products with your Bang & Olufsen remote control. 4 3 2 S/P-DIF IN STAND 1 CTRL 1 ~ Mains supply Connection to the mains supply. PL 1–5 (Power Link) For connection of external speakers in a surround sound setup. See page 19 for more information. MONITOR CONTROL For future use. PUC 1–3 A+B For IR control signals to external equipment connected to an HDMI IN or AV IN socket. Allows you to control non-Bang & Olufsen equipment with your Bang & Olufsen remote control. EXT. IR For future use. HDMI IN (1–5) The High Definition Multimedia Interface allows you to connect many different sources, such as set-top boxes, multimedia players, Blu-ray players, or a PC. HDMI 1 is recommended for UHD (Ultra High Definition) sources. AV IN For connection of analogue video or audio equipment. Different adaptors are needed. Adaptors are available from your Bang & Olufsen retailer. S/P-DIF IN Digital audio input socket, for example, for a PC. CTRL (1–2) For future use. USB ( ) For connection of a USB device to browse digital photos, video or music files. Connect the ~ socket on the main connection panel of your TV to the wall outlet. The TV is in standby mode and ready to be used. The supplied plug and mains cord are specially designed for the product. Do not change the plug, and if the mains cord is damaged, you must buy a new one from your Bang & Olufsen retailer. 14 >> Connections Ethernet For connection to the Internet. For software updates, access to WebMedia, NetRadio and PUC downloads. Make sure the cable connection between the product and the router does not exit the building to avoid contact with high voltage. It is strongly recommended that you set your television to update system software automatically, see page 50. STAND For connection of a motorised stand or wall bracket. See page 20 for calibration of floor stand or wall bracket. Easy access socket panel 6 HDMI IN (6) HDMI IN connection of additional equipment. You can also connect a camera or a game console. MIC For connection of a calibration microphone, to be able to calibrate connected speakers automatically. USB ( ) For connection of a USB device to browse digital photos, video or music files via your media browser (HomeMedia). 15 MIC Easily access the HDMI IN, microphone and USB sockets. >> Connections Connect digital sources Connect up to six external HDMI sources, such as a set-top box, computer or game console. All equipment connected to the television can be configured, see page 21. HDMI 6 is a socket for temporary connection, see page 15. Game console PUC 2 A+B Depending on the equipment you connect to the television, different cables and maybe also adaptors are needed. If you have more than two types of equipment that need a PUC socket, you must buy an extra PUC cable. Cables and adaptors are available from your Bang & Olufsen retailer. PUC 1 A+B Camera Computer EXT. IR AV IN 5 4 3 2 S/P-DIF IN 1 PUC 3 A+B CTRL 3 DVD/Blu-ray player Set-top box Example of connected digital sources. Connect a set-top box > Connect the cable to the appropriate socket on the set-top box. > Run the cable to an HDMI IN socket on the television. > To enable operation of the set-top box with your Bang & Olufsen remote control, connect an IR-transmitter to one of the PUC sockets and attach it to the IRreceiver of the set-top box. See page 18 for more information on IR-transmitters. > Follow on-screen instructions to configure the source. Connect a game console > Connect the cable to the appropriate socket on the game console. > Run the cable to an HDMI IN socket on the television.* 1 > To enable operation of the game console with your Bang & Olufsen remote control, connect an IR-transmitter to one of the PUC sockets and attach it to the IRreceiver of the game console. See page 18 for more information on IR-transmitters. > Follow on-screen instructions to configure the source.*2 Connect a DVD/Blu-ray player > Connect the cable to the appropriate socket on the DVD/Blu-ray player. > Run the cable to an HDMI IN socket on the television. > To enable operation of the DVD/Blu-ray player with your Bang & Olufsen remote control, connect an IR-transmitter to one of the PUC sockets and attach it to the IRreceiver of the DVD/Blu-ray player. See page 18 for more information on IRtransmitters. > Follow on-screen instructions to configure the source. Connect a camera > Connect the cable to the appropriate socket on the camera. > Run the cable to an HDMI IN socket on the television.* 1 > Follow on-screen instructions to configure the source. *You can also use HDMI IN 6 to connect temporary sources. See page 15 for placement of temporary sockets. 2 *When selecting GAME CONSOLE as source, the picture mode GAME is activated as default setting. You can change this setting temporarily in the PICTURE menu, see page 31. 1 16 >> Connections Connect a computer Before you connect a computer, you must disconnect the television, the computer and all connected equipment from the mains supply. Connect a computer > Using the appropriate type of cable, connect one end to the DVI or HDMI output socket on your computer, and the other end to an HDMI IN socket on the television. > If you use the DVI output socket on the computer, use the appropriate cable and connect the digital sound output on the computer to the S/P-DIF IN socket on the television to hear sound from the computer in the speakers connected to the television. > Reconnect the television, the computer, and all connected equipment to the mains. Remember, the computer must be connected to a grounded wall outlet as specified in its setting-up instructions. Connect an analogue source You can connect one analogue source, such as a game console or video tape recorder. To configure equipment connected to the television, see page 21. Disconnect all systems from the mains before you connect additional equipment. Connect an analogue source > Connect the cable to the appropriate socket on the equipment you wish to connect. > Run the cable to the AV IN socket on the television. > Reconnect the television and the connected equipment to the mains. > To enable remote control operation of the analogue source, connect an IRtransmitter to one of the PUC sockets and attach it to the IR-receiver of the analogue source. See page 18 for more information on IR-transmitters. > Follow on-screen instructions to configure the source. 17 Different adaptors and possibly also cables are needed. Cables and adaptors are available from your Bang & Olufsen retailer. >> Connections IR-transmitters To operate non-Bang & Olufsen products with a BeoRemote One or the BeoRemote App, attach a Bang & Olufsen IR-transmitter on your non-Bang & Olufsen product and then connect it to one of the sockets marked PUC on the connection panel. Attach the transmitter near the IR-receiver on the connected equipment to ensure remote control operation. Before attaching the transmitter permanently, check that you can operate the equipment menus on the television screen using BeoRemote One or BeoRemote App. When you set up the transmitter to a selected PUC socket in the SOURCE LIST menu, settings for the IR-transmitter are made automatically. However, it is possible to perform a manual setup of the socket if alternative settings are required. For an extra PUC cable, contact your Bang & Olufsen retailer. For information about download of Peripheral Unit Controller (PUC) tables for set-top boxes, see page 21. 18 >> Connections Connect speakers to the television You can connect up to ten wired speakers and subwoofers to the television using Power Link cables. In addition, you can connect up to eight speakers wirelessly, including subwoofers. For more information about setting up wireless speakers, see page 25. PL 5 PL 4 PL 3 PL 2 MONITOR PUC 2 CONTROL A+B Front speaker Disconnect all systems from the mains before you connect additional equipment. Depending on the type of speakers you connect to the television, different cables and maybe also adaptors are needed. Cables and adaptors are available from your Bang & Olufsen retailer. PUC 1 A+B EXT. IR Front speaker PL1 PUC 3 A+B CTRL 2 CTRL 3 5 CTRL 1 Subwoofer Rear speaker Rear speaker Example of a speaker setup. Connect speakers > Connect a Power Link cable to the appropriate socket on the speakers you wish to connect to the television.* 1 > Run the cables to available sockets marked PL 1–5 on the television. > Connect a Power Link cable to the appropriate sockets on a subwoofer. > Run the cable to an available socket marked PL 1–5 on the television. > Reconnect the television and the connected speakers to the mains. *Remember to set the switch for left and right position on the speakers depending on whether your speaker is positioned to the left or right of your listening position. 1 19 If you want to connect two speakers to one PL socket on the television and it is not possible to loop the cable between the speakers, an extra splitter is needed, contact your Bang & Olufsen retailer for more information. 4 3 2 1 Set positions for the television to turn to If your television is equipped with the optional motorised floor stand or wall bracket, you can turn it using the remote control. Furthermore, you can set the television to turn automatically to face your favourite viewing position when you switch on the television. It can turn to a different position when you listen to, for example, a connected radio, and turn away to a standby position when you switch it off. You can also set up other stand positions for other listening or viewing positions. If your television is equipped with the optional motorised table stand, you can set it to tilt slightly in the STAND ADJUSTMENT menu, for example, to avoid disturbing reflections. Preset standby positions If your television is equipped with a motorised floor stand or wall bracket, choose one position for video mode, one for audio mode, and one for standby. You can also preset stand positions of your own choice, for example, when you sit in an armchair reading or when you sit at the dining table. MENU SETUP STAND STAND POSITIONS … If you wish to store the current stand position in an empty stand position field, you just press the centre button when you have selected the field. Then you can name the stand position. You cannot rename or delete the STANDBY, VIDEO and AUDIO stand positions. Also you cannot name fields where no stand positions are set. Empty fields are shown by <…>. In some languages, you must choose between predefined names. Bring up the STAND POSITIONS menu to store, name or delete a stand position. Calibrate the motorised movement If your setup includes a motorised floor stand or wall bracket, you will during firsttime setup be prompted to calibrate the outer positions of the motorised movement. For the floor stand this is done by entering the distance from the stand to the wall, follow on-screen instructions. The motorised movement of the television will not work until the calibration process has been completed. If the television is placed differently later on, for example, in a corner, it is necessary to calibrate the motorised movement again. See page 10 for information about moving your television. MENU SETUP STAND STAND ADJUSTMENT Depending on your setup, you can bring up a menu for stand positions or wall bracket positions. 20 The calibration process allows you to set the maximum angle the television will turn – left and right. Set up additional equipment If you connect additional video equipment to your television, you can set up the equipment in the SOURCE LIST menu when you find the source and press the red button.*1 When the television is switched on and you connect additional equipment to an HDMI IN socket, the television will detect an unconfigured source. A message appears on the screen and you can follow on-screen instructions to configure the source. Sources have default settings, for example, sound and picture that suit most situations but you can change these settings if you wish. Select the source, press the red button and select the ADVANCED SETTINGS menu.* 1 Here, you can also set a speaker group to be activated when you select the source. What is connected? Download or remove PUC tables Registering the equipment connected to the television enables you to operate it with your BeoRemote One. With an Internet connection you can download Peripheral Unit Controller (PUC) tables enabling you to operate connected equipment, such as a set-top box, with BeoRemote One. MENU SOURCE LIST … PUC tables are available for many other brand products, such as projectors, DVD players, set-top boxes, and game consoles. The list of PUC tables on the Internet is updated and expanded on a regular basis. Highlight a source and press the red button to set it up.* 1 Here, you can also name the source.*2 You can also set a source to be activated directly from standby with the TV or MUSIC button on BeoRemote One. You can now operate the source. * For information about naming the source in the BeoRemote One display, see the guide for BeoRemote One. 2 *If the source is not in the SOURCE LIST, it is not in use, and you must press the green button first to bring up a complete list of sources. 1 Download a PUC table During the configuration procedure, you are asked if you want to be able to control the connected equipment with your BeoRemote One. Follow on-screen instructions to download a Peripheral Unit Controller (PUC) table if available. The television must be connected to the Internet. If your connected equipment is not in the download list, there is currently no control solution for it and you must select UNSUPPORTED SOURCE. You will not be able to operate your equipment with your BeoRemote One. You can contact your Bang & Olufsen retailer to request a PUC table for an unsupported source. Continues … 21 >> Set up additional equipment You can download PUC tables at any time. MENU SETUP SERVICE PUC MANAGEMENT PUC DOWNLOAD PUC CLEAN-UP PUC UPDATES You can search with latin characters and numbers. For equipment names with nonlatin characters you can search for a part of the name that includes latin characters. You can also use the browse functions to locate the correct PUC table. If you need more information about PUC tables in general, contact your Bang & Olufsen retailer. Update PUC table software In the PUC UPDATES menu, you can select a PUC table and press the centre button to update software for the table if new software is available for update. You can press the green button to check for updates, the red button to see details about a table, and the yellow button to see the history of a table. Unconfigure a source If you have connected and configured a source to a specific socket on the television and then disconnect the source permanently, you must reset the source settings. Highlight the source in the SOURCE LIST menu, press the red button and select RESET TO DEFAULT. When you select YES, the source is no longer configured to this socket. Next time you connect a source to the socket, you are asked to configure the source. You can also select RESET TO DEFAULT in the ADVANCED SETTINGS menu to reset to default values only for this menu. Remove a PUC table To remove downloaded, unused PUC tables, bring up the PUC CLEAN-UP menu. Note that you must unconfigure the connected product belonging to a PUC table, before you can remove the table. 22 Watch television Watch television channels, access source related functions, and turn the television. To bring up a favourite source quickly, you can save the source on one of the MyButtons on BeoRemote One. For more information, see page 33. Select a source … Bring up and select the television source in the BeoRemote One display MAIN MENU TV SOURCE LIST SETUP TV GUIDE GUIDE LAST LAST or Bring up the main menu MENU Select SOURCE LIST TV function CH+ CHINFO 1 MENU MENU 2 MY DVR MY DVR 3 ONDEM ON DEMAND 4 REC 5 INFO Remote control button Select the television source* 1 Example of a menu overlay. Select a channel … Press to select a channel Turn the television mounted on a floor stand … Press to bring up STAND in the BeoRemote One display or 0–9 Select the previous channel Bring up and use the menu overlay … Bring up the main menu STAND 0 Turn the television by the pipe of the floor stand MENU Turn the television by the base of the floor stand 1–9 Activate a function*2 LIST or or Select a position for the television to turn to 0–9 1 *You can set a set-top box to be activated directly with the BeoRemote One TV button from standby. Highlight the source of the settop box in SOURCE LIST, press the red button, highlight FROM STANDBY and press or to bring up TV, then press the centre button. If the source is not in the SOURCE LIST, press the green button to find the source first. Continues … *You can also activate coloured functions without pressing MENU first. 2 23 >> Watch television Turn the television mounted on a wall bracket … LIST Press to bring up STAND in the BeoRemote One display Tilt the television mounted on a table stand … Press to bring up STAND in the BeoRemote One display STAND Turn the television STAND Tilt the television or Select a position for the television to turn to LIST 0–9 To use the motorised floor stand or wall bracket function, you have to calibrate the floor stand or wall bracket first. To preset positions for the TV to turn to, see page 20. 24 Loudspeaker setup – surround sound Add BeoLab speakers and BeoLab subwoofers to your television wired or wirelessly and you can have a surround sound system which fits easily into your living room. You get the best sound experience in the area bounded by the speakers. You can also create speaker groups to customise the speaker setup for listening positions other than the one in front of the television, for example, at the dining table or in an armchair. This guide describes how to make a basic loudspeaker setup. For more advanced sound settings and adjustments, see the Technical Sound Guide on www.bang-olufsen.com/guides. For information about daily use of speaker groups, see page 29. Your content provider may have prohibited distribution of digital wireless sound to your speakers. You must then use wired Power Link connected speakers instead. Set up the speakers Set up both wired and wireless speakers in the television. MENU SETUP SOUND SPEAKER CONNECTIONS … Wired speakers When setting up wired speakers, you must select which speakers you have connected to each Power Link socket in the SPEAKER CONNECTIONS menu.* 1 *If all Power Link sockets with connected speakers are not shown in the SPEAKER CONNECTIONS menu, you can press the green button to show all Power Link sockets. 1 Important! If you select LINE as speaker type in the SPEAKER CONNECTIONS list, the volume will be very loud and you cannot adjust volume with your BeoRemote One. You must use the product’s own remote control. LINE is used for, for example, nonBang & Olufsen amplifiers. Wireless speakers If you have wireless speakers in your setup, the television automatically scans for wireless speakers and associate the detected speakers with wireless Power Link channels during first-time setup. However, you can also scan for wireless speakers and associate the detected speakers with the television’s wireless Power Link channels manually in the SPEAKER CONNECTIONS menu. Scan for and associate wireless speakers … In the SPEAKER CONNECTIONS menu press to rescan When the scanning is completed, press to associate the detected speakers with the television Disassociate a speaker from the television … Select a speaker in the SPEAKER CONNECTIONS menu Press once to be able to disassociate the speaker. Press again to confirm disassociation If the state of a speaker is MISSING in the SPEAKER CONNECTIONS menu, the speaker has been associated with a wireless channel, and will automatically be detected again when possible. Continues … 25 >> Loudspeaker setup – surround sound Reset sound settings If you for some reason need to reset sound settings to default values, for example, if you change your sound setup, you can do so in the SOUND menu. Resetting to default values deletes speaker type and speaker group settings and disassociates all the registered wireless speakers. MENU SETUP SOUND RESET TO DEFAULT … When you select RESET TO DEFAULT, you are asked for a confirmation, after which firsttime setup of sound settings is initiated. To be able to reconfigure disassociated wireless speakers, remember to reset the speakers. See the guide for the speakers. Create speaker groups MENU SETUP SOUND SPEAKER GROUPS … H A You can make different speaker groups for different listening positions or loudspeaker combinations. For each group you must assign roles to the speakers, set the distance between the speakers and your listening position and calibrate the speaker level. It is possible to set distances and speaker levels for each speaker group either manually via the SPEAKER GROUPS menu or automatically through a setup wizard if you connect the enclosed calibration microphone and external speakers. You can also perform a speaker adjustment with just the calibration microphone where distances and levels are set automatically. You can also name the speaker groups or delete groups you do not want to keep. The TV speaker group has a predefined name and you can set up the group for when you sit in front of the television. Assigning roles to the connected loudspeakers allows you to specify the speakers’ function in a surround sound system and the number of speakers to be used. G B C F D E Example of TV viewing illustrated … Speaker A: Left front Speaker B: Subwoofer Speaker C: Centre Speaker D: Right front Speaker E: Right surround Speaker F: Right back Speaker G: Left back Speaker H: Left surround Press the red button to activate the speaker group if you have highlighted TV or an existing group. You cannot rename or delete the TV speaker group. See page 29 on daily use of speaker groups. To make more advanced settings for a speaker group setup, see the Technical Sound Guide on www.bang-olufsen.com/ guides. Continues … 26 >> Loudspeaker setup – surround sound Adjust distances and levels automatically … Place the connected microphone in the primary listening position for the current speaker group Upon auto detection of the microphone, select MICROPHONE CALIBRATION* 1 Set distances and levels through a setup wizard … Place the connected microphone in the primary listening position for the current speaker group Select a speaker group in the SPEAKER GROUPS menu and bring it up Press to begin the calibration Select YES, if you wish to measure for an additional listening position for the speaker group and repeat the procedure 1 *In the pop-up menu, you can also choose to create a new speaker group, optimise another speaker group than the current, configure speaker connections or do nothing. Follow on-screen instructions. You can also access the MICROPHONE CALIBRATION menu if you press MENU and select SETUP, SOUND, SPEAKER GROUP and then select a speaker group. Select SETUP WIZARD and bring up the wizard function A confirmation message is shown. Select YES and start automatic setting of distances and levels, or NO to cancel the wizard function. You can repeat the measuring for an additional listening position for the speaker group if desired Press when the calibration has completed Also roles for internal speakers and a subwoofer are set up through the setup wizard. It is recommended that background noise is kept to a minimum during calibration. 27 When you confirm a calibration or a setup wizard procedure, any previous settings for a speaker group are deleted. For information about connection of the calibration microphone, see page 15. >> Loudspeaker setup – surround sound Set up sound modes The television has several sound modes optimised for different types of programmes and sources. However, if you wish, you can adjust the values in the sound modes to your liking. The sound modes have predefined names. For example, use MOVIE when watching from a DVD or Bluray or use GAME to enhance the sound when using a game console. The CUSTOM sound mode can be set up if you wish to define a new type of use and settings. It is the only mode you can rename. The ADAPTIVE sound mode is not a mode in itself but adapts to the selected source or the content by selecting between the other sound modes. For more details or to make more advanced settings for sound modes, see the Technical Sound Guide on www.bang-olufsen.com/ guides. MENU SETUP SOUND SOUND MODES … If you wish to reset a sound mode to default values, you must select RESET TO DEFAULT in the specific sound mode’s setup menu and confirm that you wish to reset the values. You can bring up a list of sound modes on the television screen by finding SOUND in the BeoRemote One LIST menu and pressing the centre button. From here, you can select a sound mode with the number buttons See page 29 on daily use of sound modes. 28 Daily use of sound modes and speaker groups You can extend your television into a surround sound system by adding BeoLab loudspeakers and subwoofers. When you switch on one of the sources, the television automatically selects the appropriate sound mode for the source you are using. However, you can select another sound mode at any time. Also when you switch on the television, the TV speaker group is selected automatically. However, you can always select another group of activated speakers if you want to listen to music without having to sit in front of the television, for example, when you sit at the dining table or in an armchair. Select a sound mode Select a speaker group You can select the sound mode that suits the source you are using. Select the speaker group that suits your listening position. To select a sound mode … Press to bring up SOUND in the BeoRemote One display To select a speaker group … Press to bring up SPEAKER in the BeoRemote One display LIST SOUND Press to select the sound mode you want 1–9 LIST SPEAKER Press to select the speaker group you want. The selected speakers cut in automatically 1–9 Step between modes Step between groups Press to remove SOUND from the display BACK Press to remove SPEAKER from the display BACK When you configure a source, you can set both a sound mode and a speaker group to be selected automatically each time you switch on the source. The settings are made in the ADVANCED SETTINGS menu which is found when you highlight a source and press the red button in the SOURCE LIST menu. If the source is not in the SOURCE LIST, press the green button to find the source first. You can adjust the settings of the sound modes and set up speaker groups. For information about setting up sound modes and creating speaker groups, see pages 26–28. 29 Adjust sound and picture settings Sound and picture settings are preset from the factory to neutral values which suit most types of programmes. However, if you wish, you can adjust these settings to your liking. Adjust sound settings such as volume, bass and treble and, for wired speakers, enable eco mode. Picture settings include, for example, contrast, brightness, colour, and viewing distance. Adjust sound settings Adjust sound settings via the SOUND menu. Temporary settings are cancelled when you switch off the television. If you choose to enable eco mode, all wired speakers in a speaker group that do not receive a signal will switch off and save power. MENU SETUP SOUND SOUND ADJUSTMENT … In the AUDIO DESCRIPTION menu, you can set the television to describe what happens on the television screen by means of sound. Remember to enable the VISUALLY IMPAIRED menu field in the LANGUAGES menu under REGIONAL SETTINGS. Change your sound and picture settings temporarily – until your television is switched off – or store them permanently. Activate different picture modes, for example, game mode if you connect a game console to your television. For information about how to change the picture format, see page 32. Adjust picture settings Adjust the picture settings via the PICTURE menu. Temporary settings are cancelled when you switch off the television. MENU SETUP PICTURE PICTURE ADJUSTMENT … 30 In the PICTURE ADJUSTMENT menu, you can bring up an ADVANCED SETTINGS menu where you can make different settings for the selected source. For example, you can reset picture settings. Press INFO to bring up help texts for the menus. To temporarily remove the picture from the screen, press LIST then or to bring up PICTURE OFF in the BeoRemote One display and press the centre button. To restore the picture, press TV. >> Adjust sound and picture settings Picture modes You can activate different picture modes to use for different types of programmes. If you, for example, connect a game console or play a PC game using the television as a monitor, you can activate GAME mode. GAME mode minimises the delay caused by signal processing. Other available picture modes are MOVIE, MONITOR and ADAPTIVE. When you select a picture mode for a source through the PICTURE menu, it is only saved until you switch off the television or switch to a different source. To activate picture modes directly … Press to bring up PICTURE in the BeoRemote One display To select picture modes via the television menu … LIST PIC TURE Press to select a picture mode 1 – 4 Step between modes Press to remove PICTURE from the display When you configure a source, you can set a picture mode to be selected automatically each time you switch on the source. The setting is made in the ADVANCED SETTINGS menu which is found by highlighting the desired source and pressing the red button in the SOURCE LIST menu. For information about setting up additional equipment, see page 21. 31 BACK MENU SETUP PICTURE PICTURE MODES >> Adjust sound and picture settings Picture format In the SOURCE LIST menu, you can, for each source, press the red button and set up a picture format to be used each time you activate this source. You can also select a different picture format temporarily. To activate picture formats directly … Press to bring up FORMAT in the BeoRemote One display For information about setting up additional equipment, see page 21. LIST FORMAT or Press to select a picture format 1 – 6 Step between formats Move the picture, if possible Press to remove FORMAT from the display BACK Note that you cannot change picture format when a source shows a UHD signal. 32 Personalise the TV experience You can save a “snapshot” of a current viewing or playback experience and thereby personalise that experience to be able to restore it quickly with just one touch of a button. A snapshot includes the stand position, the selected source and the selected settings for speaker group, sound and picture adjustment, and sound and picture mode. For internal sources, which could be NetRadio, the playing item, such as station, may also be saved. Save a snapshot Use a snapshot You can save up to three snapshots which can be activated by three dedicated remote control buttons. The television must be switched on and a source must be selected. Use a desired snapshot when you watch television. To save a snapshot … Press and hold one of the MyButtons to save the current viewing or playback experience If you save a snapshot with a button with which a snapshot has already been saved, the existing snapshot will be replaced by the new snapshot. . To use a snapshot … Press the button dedicated for the desired snapshot When you restore a saved snapshot, the settings are temporary and will be in effect until you adjust the settings, select another source, or switch the television to standby. If the item to play as saved in a snapshot is no longer available, the snapshot will still be restored, but the item played will follow normal source behaviour for the selected source. For example, if a station saved in the restored snapshot is no longer available, the last played station will be played instead when the NetRadio source is selected. If you try to use a snapshot with a button where no snapshot has been saved, the PERSONALISATION feature is opened in the NICE TO KNOW menu. 33 Set up 3D television You can set up preferences for watching 3D television. Select if the television should switch to 3D mode automatically, when automatic 3D signalling is available. Activate 3D and adjust settings You can select if the television should activate 3D mode automatically, manually or by prompt, when it detects 3D signalling the first time after source or channel change. The default setting is PROMPT. MENU SETUP PICTURE 3D DISPLAY 3D SETTINGS ACTIVATE 3D To activate 3D, bring up the ACTIVATE 3D menu and follow on-screen instructions. 34 When 3D signalling is available, and ACTIVATE 3D is set to AUTO, the television switches to 3D mode automatically. If it is set to PROMPT, you must select between VIEW IN 3D and VIEW IN 2D. If it is set to MANUAL, you must enter the menu and switch to 3D mode manually. Watch 3D television You can enhance the experience of watching television with 3D technology, for example, when you want to watch movies, sports or nature films. Important health and safety information for 3D pictures Some viewers may experience discomfort while watching 3D TV such as dizziness, nausea and headaches. If you experience such symptoms, stop watching 3D TV, remove the 3D glasses and rest. Watching 3D TV for an extended period of time may cause eye strain. If you feel eye strain, stop watching 3D TV, remove the 3D glasses and rest. If you use eye glasses or contact lenses, wear the 3D glasses over them. Do not use the 3D glasses for other purposes. Adults should supervise children watching 3D TV and ensure that they do not experience any discomfort as mentioned above. It is recommended that children under 3 years do not watch 3D TV. If two sources are brought up on the screen at the same time or if teletext is brought up on one side and a source on the other, the TV will always display a 2D mode. Subtitles may not always be supported. Viewing conditions Place yourself in front of the screen, a little closer than when you normally watch 2D TV, and use the 3D glasses. The recommended distance between your viewing position and the screen depends on the size of the screen and the picture resolution. If you move too far to the left or right of the centre of the screen, or if you move too far up or down, the quality of 3D TV decreases. You will get the best 3D experience if you darken the room, for example, switch off the lights and draw the curtains. Especially lights behind and around the screen can cause an irritating effect. We recommend not to watch 3D TV in direct sunlight or bright surroundings. Activate 3D or 2D television To watch films or other programmes suited for 3D, you must activate the 3D function and put on the activated 3D glasses that are available from your retailer. Switch to 2D mode again to watch TV that is not suited for 3D, for example, the news. MENU SETUP PICTURE 3D DISPLAY In the 3D DISPLAY menu, you can select 3D or 2D and press the centre button to activate 3D or 2D television or select a mode. If 3D signalling is available, the TV automatically switches to 3D when you select 3D and to 2D when you select 2D. If 3D signalling is not available, a menu for 3D or 2D mode selection appears on the screen. See page 36 for information about modes. You can also activate 2D and 3D television via the LIST button if you add 2D and 3D to the BeoRemote One display. See the guide for BeoRemote One for information on how to add functions. 35 >> Watch 3D television 3D modes 2D modes Select the 3D mode that matches the signal sent out by the programme provider. Select the 2D mode that matches the signal sent out by the programme provider. SIDE BY SIDE 3D STANDARD 2D Converts side-by-side 3D signal into full screen 3D representation by scaling two pictures horizontally. Shows an ordinary 2D TV picture without any conversion. TOP/BOTTOM 3D SIDE BY SIDE 2D Converts top/bottom 3D signal into full screen 3D representation by scaling two pictures vertically. Converts side-by-side 3D signal into full screen 2D representation by scaling one picture horizontally. TOP/BOTTOM 2D Converts top/bottom 3D signal into full screen 2D representation by scaling one picture vertically. 36 If 3D signalling is no longer available, the TV automatically switches to the last used mode for the current source. At channel and source change, the TV switches to STANDARD 2D. See two sources at the same time While watching, for example, a television channel … Press to bring up DUAL PICTURE Your BeoRemote One gives you access to a DUAL PICTURE function for viewing an HDMI source (for example a set-top box or Blu-ray player) and a WebMedia or HomeMedia source at the same time. There are some limitations when using the DUAL PICTURE function since some source combinations may not be possible. For example, you cannot watch two HDMI sources at the same time. When an invalid combination is selected, an on-screen message appears on the television screen. DUAL PICTURE A B If you watch 3D and switch on the DUAL PICTURE function, the television will switch to 2D. Bring up a source list and select HOMEMEDIA the source, for example HOMEMEDIA, to view on the right side of the screen (B) Press to swap the left picture and right picture A When using DUAL PICTURE, you cannot show a source with UHD signal. LIST B Volume adjustment always affects picture A, while other operations, such as selecting channels, affect picture B. Selecting a new source cancels DUAL PICTURE viewing. 37 MENU 0 To leave the DUAL PICTURE function … To leave the function and return to normal viewing of the source on the left side of the screen (A) simply press TV. Operate additional equipment The built-in Peripheral Unit Controller (PUC) acts as an interpreter between connected video equipment, such as a settop box, video recorder or DVD player, and your Bang & Olufsen remote control. Download a Peripheral Unit Controller (PUC ) table and use the Bang & Olufsen remote control to gain access to the functions offered by your nonBang & Olufsen equipment. See page 21 for information on how to download a PUC table. When you switch on the equipment, the functions are available via a menu-overlay on the television screen. For instruction in the various functions offered by your equipment, see the product’s own guide. Operate other equipment with BeoRemote One Some functions are available directly via BeoRemote One when you switch on the equipment. Additional functions are available through a menu overlay that you bring up on the screen. In this menu, you can see which BeoRemote One buttons activate specific services or functions. Bring up sources in the BeoRemote One display and select the source name configured for a connected product to switch it on, for example, HDMI 1 TV MENU Press to activate the function you want 1–9 or To bring up a favourite source quickly, you can save the source on one of the MyButtons on BeoRemote One. For more information, see page 33. 38 SOURCE LIST SETUP GUIDE GUIDE LAST LAST TV function CH+ CHINFO 1 MENU MENU 2 MY DVR MY DVR 3 ONDEM ON DEMAND 4 REC 5 INFO Remote control button HDMI 1 Press to bring up the main menu including source related functions Some features and functions of the television may not be available when nonBang & Olufsen equipment is connected. Not all connected video equipment is supported by Bang & Olufsen. For more information about supported equipment, contact your Bang & Olufsen retailer. MAIN MENU Example of a menu overlay. The BeoRemote One buttons are shown to the right on the menu, and the functions they control, including available icons, are shown to the left. The menu may also list buttons on the remote control included with your connected equipment. Direct BeoRemote One operation If you know which coloured BeoRemote One button activates the function you want, you can activate the function without bringing up the menu overlay first. While your equipment is on … Press to activate a function Press to bring up the Programme Guide or the ‘Now/ Next’ banner on the screen if you are using equipment that supports these functions GUIDE Press to activate the function you want MENU or INFO 1–9 NetRadio With NetRadio you have access to radio stations worldwide. NetRadio stations are downloaded via BeoPortal, consequently, the television must be connected to the internet when downloading and playing stations. When you select the NetRadio source, the last played radio station will always attempt playing. If you cannot find a specific station, it may no longer be available in the list received from BeoPortal. The list of stations available may change over time, since new stations can be added and existing stations can be removed in the list from BeoPortal. To bring up NetRadio quickly, you can save the source on one of the MyButtons on BeoRemote One. For more information, see page 33. The NetRadio source is activated by default, when you press the MUSIC button to switch on the television from standby. Listen to internet radio Bring up sources in the BeoRemote One display and select the source dedicated to NetRadio, for example, NETRADIO* 1 MUSIC NETRADIO GENRES NETR ADIO LANGUAGES COUNTRIES NAMES ‘A’ NET STATION SEARCH Browse through stations … FAVOURITES You can browse through stations in different ‘A’ NET STATION Blues Grant, United States 901 ROX views: GENRES, LANGUAGES, COUNTRIES, Wednesday 15 January, 2014 NAMES. Some views have more levels. add favourites info select 13:27 During playback of a station … Press to bring up the NOW PLAYING STATION view Browse your views and stations item by item Browse your views and stations page by page. Hold to jump between letters in alphabetical lists Press to stop playback Press to start playback again Press to open the next level or start playback of a station Press to go to the previous or next station or Return to the previous view BACK Search for a station … Select SEARCH and press the centre button to bring up an on screen keyboard and be able to search for a station*2 Use the arrow buttons, number buttons and the centre button to enter a search string for the station you wish to find*3 Enter the position number of a favourites list station you wish to listen to 0–9 Press to be able to search for a station and follow on-screen information 0–9 Press to bring up the favourites list Press to bring up information on a highlighted station. Press any key to remove the information Highlight the on-screen SEARCH button and go to a list of search results INFO *You can also bring up the main menu, select SOURCE LIST, highlight NETRADIO, and press the centre button to activate the source. 1 Move station by station or page by page in the list and press the centre button to start playback of a station or Press to return to the previous screen where you can enter a new search string BACK *You can also bring up the SEARCH menu by pressing the green button. You can only use latin characters for entering a search string. 2 *You can also enter a search string with BeoRemote App. 3 39 >> NetRadio Favourites list You can store up to 99 stations in your favourites list. Add to your favourites list … When browsing through station lists for GENRES, LANGUAGES, COUNTRIES, NAMES, SEARCH RESULTS and recently played stations, press to add a highlighted station to your favourites list Edit the favourites list … You can move a station to another position, delete a station or clear the favourites list completely. Bring up the favourites list Press to bring up the EDIT FAVOURITES menu Select a station Press to play back a station Select a station you want to move or delete or 0–9 If the favourites list is full, you cannot add anymore stations and the help text for the green button is not shown. Select a favourite station … Bring up the favourites list Move a selected station out of the list*2 Move the station up or down or to a specific position Browse the list station by station or Move the station back into an empty position in the list Browse the list page by page. Hold to jump between letters in an alphabetical list or to either end of a numerical list* 1 Press to delete a selected station. Press again to confirm 0–9 Press to clear the entire favourites list Press to start playback of a station A confirmation message appears. Select YES to clear the list, or NO to return to the menu 1 *Press the green button to switch between numerical and alphabetical sorting order. Press to store the changes and return to the previous menu You can also select the NetRadio source and use the number buttons to bring up a specific station from your favourites list directly. 2 If the favourites list is empty, FAVOURITES in the start screen will be greyed out. You can also access the EDIT FAVOURITES menu by selecting SETUP in the main menu then FAVOURITES. *If the favourites list is full, you cannot move a station, since there are no empty positions to move to. 40 Clear history … You can clear the history of recently played stations. Press to clear the history of recently played stations 0–9 Move to the position number of a specific station Recently played stations The recently played stations are listed beneath the list of views on the television screen when you activate the NetRadio source, and from here you can select and play a station directly. Press to confirm MENU 1 WebMedia With the built-in WebMedia feature for Smart TV you can search and find movies, YouTube videos, photos and other web related content. WebMedia enables integration of Internet features on your television. You can also add different apps. To use WebMedia, your television must be connected to the Internet, see page 51. The first time you open WebMedia you are asked to accept the terms of use. If you reset your television to default settings, you must accept the terms of use again. If you want to be able to lock selected apps, you can make your own pin code at this point. You can also operate WebMedia with BeoRemote App, see page 6 for more information. WebMedia may not be available on all markets. To bring up WebMedia quickly, you can save the source on one of the MyButtons on BeoRemote One. For more information, see page 33. Activate WebMedia… Bring up sources in the BeoRemote One display and select the source dedicated to WebMedia, for example, WEBMEDIA* 1 TV WEBMEDIA *You can also bring up the main menu, select SOURCE LIST, highlight WEBMEDIA, and press the centre button to activate the source. 1 Add an app … Open the App Gallery Select a country*2 Add the app by following onscreen instructions. Go to the WebMedia home screen to find the added app Lock/unlock an app … You can restrict access to certain apps by locking them with a pin code. While the app is highlighted, press to lock/ unlock it Basic navigation … Press to navigate in the Internet browser, available apps, or on the keypad when available Press to accept or select Press to go back one level, long press will bring up the WebMedia home screen Navigate in an Internet browser … Press to step in web page history Press to move the web page up or down for easy navigation BACK Enter the WebMedia pin code (not the television pin code)*3 0–9 Accept the code *You can add apps from different countries. However, some apps might be blocked by the broadcaster. 3 *If you did not selected a pin code, the first time you activated WebMedia, you are asked to set a pin code before you can lock the app. 2 Continues … 41 >> WebMedia SOURCE LIST SETUP REFRESH 1 BOOKMARK 2 SECURITY INFORMATION 3 WEBMEDIA SETTINGS 4 select While WEBMEDIA is selected as source, press MENU to bring up the WebMedia menu overlay. The remote control buttons are shown to the right on the menu, and the functions they control are shown to the left. Refresh a page … You can refresh a page if it is updated frequently, such as the weather forecast or online newspapers. Add a bookmark … While on a web page, press MENU to bring up a menu overlay. Press 2 to add a bookmark for that specific website. Added bookmarks are stored in the Internet application. Go to the WebMedia home screen and select the Internet app to see the added bookmark. Check page security information … Using the security information menu, you can check the URL of the website and retrieve security information. Change NOW ON TV source … NOW ON TV shows a preview of what is shown on the selected source. For example, if you have selected HDMI 1 as your source and you have a set-top box connected, you will get a preview of the current programme. The source is selected in the WEBMEDIA SETTINGS menu. Note that NOW ON TV cannot show a preview of UHD sources. 42 Spotify, Deezer and YouTube You can access Spotify or Deezer, if you have a required subscription, and search through and stream music for every occasion. You can also access YouTube to watch a variety of different video content, such as movie and TV clips, music videos, short videos and other content uploaded by users. To use Spotify, Deezer and YouTube, your television must be connected to the Internet, see page 51. Activate Spotify Activate YouTube Bring up and activate the Spotify App to find and listen to music of your choice. Bring up and activate the YouTube App to watch a world of different video content. To activate Spotify … MUSIC Bring up sources in the BeoRemote One display and SPOTIFY select the source dedicated to Spotify, for example, SPOTIFY* 1 To activate YouTube … Bring up sources in the BeoRemote One display and select the source dedicated to YouTube, for example, YOUTUBE* 1 Enter user name and password for your Spotify account. Spotify, Deezer and YouTube may not be available on all markets. Activate Deezer Bring up and activate the Deezer App to find and listen to music of your choice. To activate Deezer … Bring up sources in the BeoRemote One display and select the source dedicated to Deezer, for example, DEEZER* 1 MUSIC DEEZER Enter user name and password for your Deezer account. 1 *You can also bring up the main menu, select SOURCE LIST, highlight DEEZER, and press the centre button to activate Deezer. 43 YOUTUBE *You can also bring up the main menu, select SOURCE LIST, highlight YOUTUBE, and press the centre button to activate YouTube. 1 1 *You can also bring up the main menu, select SOURCE LIST, highlight SPOTIFY, and press the centre button to activate Spotify. TV HomeMedia You can play music and video files and browse photos stored either on a storage device or in another product connected via a DLNA/UPnP enabled media server. You get access to the HOMEMEDIA menu when you connect a storage device to your television. If you have music and photos stored, you can start the music and return to the main menu to start a slideshow of your photos. You can then play music and see your photos at the same time. You can also play files via a computer or smart phone. For information about the Digital Media Renderer feature, see page 53. Storage devices include, for example, USB devices and regular hard disks connected via USB or Ethernet. For supported formats, see www.bang-olufsen.com/guides. You cannot show UHD photos. Use HomeMedia During playback of your music, you can see the NOW PLAYING menu with cover and information about artist, title and track, if available. When you browse or play your music, photo and video files, you can press INFO to bring up additional information. HOMEMEDIA NEW VOLUME USB 111110_1586.jpg Hey, Hey Helen Mamma Mia IMG_0548.MOV Listen to music … Connect a storage device with your music RANDOM | REPEAT Tuesday 15 November, 2011 TV Bring up sources in the BeoRemote One display and select the source dedicated to HOMEMEDIA the media browser, for example, HOMEMEDIA* 1 Press to select the storage device with your music and press the centre button info select 08:35 You can also bring up the NOW PLAYING MUSIC by pressing MENU, then the red button. *You can also bring up the main menu, select SOURCE LIST, highlight HOMEMEDIA, and press the centre button to activate HomeMedia. 1 *During photo slideshows you cannot step in tracks or pause music files. 2 If the storage device is a media server, press to highlight the music or folder menu and press the centre button Press to browse your files and folders and press the centre button to open the folder or start playback of the file Continues … Press to step in tracks during playback. Press and hold to cue during playback. Press again to change cue speed*2 Press to pause Press to resume playback Press to back up through previous menus or press and hold to leave the menu 44 BACK >> HomeMedia Browse photos … Connect a storage device with your photos To rotate a photo left or right, press MENU then 2 or 3 or press or . TV Bring up sources in the BeoRemote One display and select the source dedicated to HOMEMEDIA the media browser, for example, HOMEMEDIA* 1 Press to select the storage device with your photos and press the centre button You can also bring up the NOW SHOWING PHOTO by pressing MENU, then the green button. 1 *You can also bring up the main menu, select SOURCE LIST, highlight HOMEMEDIA, and press the centre button to activate HomeMedia. Play back video files … Connect a storage device with your video files TV Bring up sources in the BeoRemote One display and select the source dedicated to HOMEMEDIA the media browser, for example, HOMEMEDIA* 1 Press to select the storage device with your video files and press the centre button If the storage device is a media server, highlight the photo or folder menu and press the centre button If the storage device is a media server, highlight the video or folder menu and press the centre button Press to browse your files and folders and press the centre button to open the folder Press to browse your files and folders and press the centre button to open the folder or start playback of the file Press to open your photo in full screen view. The slideshow starts automatically Press to pause Press to resume playback Press to pause the slideshow Press to step minute by minute. Press and hold the buttons to cue. Press again to change cue speed Press to continue the slideshow Press to step to the previous or next photo, also in pause mode Press to bring up information on the current photo INFO Press to step in files during playback BACK Press to go to a specific point in time in the file 1–9 Press to exit a slideshow and return to browser screen or back up through previous menus or press and hold to leave the menu Press to exit video playback and return to browser screen or back up through previous menus or press and hold to leave the menu BACK You can also bring up the NOW PLAYING VIDEO by pressing MENU, then the yellow button. Continues … 45 >> HomeMedia See a list of recently selected files You can see a short list of the files you have recently selected from the currently connected storage device. TV Bring up sources in the BeoRemote One display and select the source dedicated to HOMEMEDIA the media browser to activate it, for example, HOMEMEDIA.* 1 The recently selected files are listed beneath the list of detected storage devices Press to highlight a file you wish to play back and press the centre button To clear the list of recent selections, press MENU and then 1. Make media settings You can choose to play your music or video files or browse your photos in a random order or repeat playback, or browse when you have been through all photos, music or video files. You can also set a slideshow delay to determine for how long each photo is displayed before the next photo is brought up. To bring up the SETTINGS menu, press MENU and then 4. During rotation of a photo, the slideshow delay timer is reset. You can also find HOMEMEDIA SETTINGS if you bring up the main menu and select the SETUP menu. *You can also bring up the main menu, select SOURCE LIST, highlight HOMEMEDIA, and press the centre button to activate HomeMedia. 1 RANDOM | REPEAT Example of player mode. If you do not operate HomeMedia for approx. 30 seconds, it will go into player mode where only the NOW PLAYING information is shown. Press BACK to bring back the browser list on the screen. You can also activate player mode manually by pressing BACK while the HomeMedia main menu is shown. Play files via a computer or smart phone To play photos, music or video files via an app on a computer or smart phone, the Digital Media Renderer feature must be enabled, and you can name your television for you to easily recognise it on your computer or smart phone. For information about how to enable or disable the Digital Media Renderer feature and name the television, see page 53. 46 Operation of files and on-screen information may differ on a few aspects from otherwise described for HomeMedia, and some apps will not respond to all source control commands. Sleep Timers Your television has a built-in Sleep Timer which means that you can make it switch off after a predefined number of minutes. Set a Sleep Timer You can make the television switch off automatically after a number of minutes. To activate the Sleep Timer … Press to bring up SLEEP in the BeoRemote One display LIST SLEEP Press repeatedly until the requested number of minutes or OFF are shown in the television display. To bring up SLEEP in the BeoRemote One display, you must first add it to the list of functions. See the guide for BeoRemote One for information on how to add functions. 47 Power settings If you want to make your television start up faster, you can set a Quick-Start Timer for one or two specified time periods. This will increase the standby power consumption within these periods compared to when the television is in ordinary standby. On the other hand, you can choose to save power on a number of other functions in the television, such as sound, picture and network. When you set up power saving for the picture, a preview shows you the picture quality for each option which makes it easier for you to select the combination of power consumption and quality that suits you best. In the AUTO STANDBY menu, you can set the television to switch off automatically after some time without operation. Set up the power consumption Set up the power consumption for standby, sound, picture, and network. The television can be set to switch itself to standby after some time without operation. The factory setting is 4 hours. This function only applies in video mode, not in audio mode. When AUTO STANDBY is activated, a message appears on your television screen if the television has not been operated during the time set in the menu. The television then switches to standby if you do not operate it. When no source signal has been detected for 15 minutes, the television switches to standby. MENU SETUP POWER SAVING STANDBY SOUND PICTURE NETWORK … To reduce the start-up time or set up auto standby, bring up the STANDBY menu.* 1 To make power saving settings for sound, bring up the SOUND menu. To make power saving settings for picture, bring up the PICTURE menu. To make power saving settings for network, bring up the NETWORK menu. 48 1*If a Quick-Start Timer is active, your television will switch on within seconds. If you receive your television signal from a connected set-top box, the television start-up time is also affected by the start-up time of the box. Setting a Quick-Start Timer will increase the power consumption within the specified period. The pin code system The pin code system is intended to make normal use of your television impossible for someone who does not know the pin code. You choose whether or not to activate the pin code system. When the pin code system is enabled and the television has been disconnected from the mains for a while, the pin code system is activated. When reconnected and switched on, the television automatically switches itself off after three minutes if you do not enter the pin code. IMPORTANT! If you are prompted for a pin code the first time you switch on your television, enter the pin code provided by your Bang & Olufsen retailer. Activate the pin code system If the pin code system is already activated, you are prompted to enter your pin code when you bring up the PIN CODE menu. You can activate or deactivate your pin code at all times and you can change your pin code. MENU SETUP PIN CODE … If you change your pin code more than five times within a three-hour period, the PIN CODE menu becomes inaccessible for three hours, provided that the television is not disconnected from the mains. Disconnecting the television resets the three-hour period. Should you lose or forget your code, contact your Bang & Olufsen retailer. Your retailer can provide you with a master code, which disables your pin code. If you inadvertently press a wrong button while entering a code, press the yellow button to delete a digit or press the red button to clear an input field. Five incorrect entries will cause the television to shut down for three hours, during which operation is not possible. The standby indicator will flash red quickly. 49 Software and service update We recommend that you enable automatic software update on your television to ensure that your television always has the latest features and functions. If your television is set up in a system with the BeoLink Converter NL/ML it is essential that you enable the automatic system update to ensure that all products in your system are kept up to date and are able to communicate. You can always look up software information and update the TV software manually. Update software To download available software updates, your television must be connected to the Internet. It is recommended that you set the television to update software automatically. You can set the time of day you want automatic software updates to take place to ensure that they do not interfere with the use of your television. MENU SETUP SERVICE SOFTWARE UPDATE CHECK FOR UPDATE AUTO SYSTEM UPDATES You can also download available software updates from www.bang-olufsen.com onto a USB device. Connect the USB device to the USB port on the connection panel. While the television is updating with new software, the standby indicator flashes red and the television should remain connected to the mains. On some markets, it is also possible to update the software via the antenna signal (OAD). When you update via the antenna signal, some updates are required and not possible to cancel. System update … If you have a system setup with a BeoLink Converter NL/ML and several Bang & Olufsen products, the entire system is updated, when you check for updates. You should enable automatic software update of the system in the television menu. Available software updates for all the Bang & Olufsen products in your setup will then be downloaded automatically on a regular basis.* 1 Contact your retailer for more information about software updates *You can only enable or disable automatic software updates on the entire system and not on a single product. 1 See software information You can look up information about the current software version, its release date, and any release notes available. 50 MENU SETUP SERVICE LATEST RELEASE Network settings You can set up your television to a network either with a wired or wireless connection. For the most reliable network connection, Bang & Olufsen recommends making a wired connection. Bang & Olufsen also recommends that you use a separate router and access point – a Network Link router – to ensure the most reliable playback of digital files. For more information about Bang & Olufsen network setup, contact your Bang & Olufsen retailer. On some markets, it is not possible to set up a wireless connection, and you must use a wired connection. INTERNET INTERNET ISP ROUTER NAS NAS B&O RECOMMENDED ROUTER ISP ROUTER Example of simple setup either wired or wireless. Example of recommended network setup either wired or wireless. Make a wired connection Connect one end of the Ethernet cable to the router and the other end to the Ethernet socket ( ) on the television. It is assumed that you have enabled the DHCP service on your network. If LAN settings are set to configure automatically, IP address, subnet mask, gateway and DNS server are assigned automatically. If the settings are set to configure manually, or if the IP address, subnet mask, gateway and DNS server, for some reason, are not assigned automatically, you must enter this information manually. MENU SETUP NETWORK NETWORK SETTINGS > Highlight LAN SETTINGS and press the centre button. > Press the green button to be able to name the LAN connection.* 1 > Press the centre button to store the name and return to the LAN SETTINGS menu. >Press to highlight CONFIGURATION. >Press or to select MANUAL or AUTOMATIC configuration. > Press the centre button to store the setting. If you have selected MANUAL configuration, you must enter a value for the IP ADDRESS, SUBNET MASK, GATEWAY, and DNS. Press the centre button to store the settings. *You can only use latin characters for naming the LAN connection. 1 51 >> Network settings Make a wireless connection If your router has the WPS feature (wireless protected setup), you can make a wireless connection to your network automatically. You can also make the connection manually. It is assumed that you have enabled the DHCP service on your network and that the SSID is not hidden. MENU SETUP NETWORK NETWORK SETTINGS … Connect to a wireless network automatically … > Press the centre button to bring up the WLAN SETTINGS menu and highlight WLAN. > Press the WPS button on your router to activate the WPS feature. >Press or to enable wireless LAN and store the setting. >Press to highlight WLAN PROTECTED SETUP and press the centre button to bring up the menu. Here you can see a status of the wireless connection. When CONNECTED is shown on the screen, your television is configured correctly on your network. > Press the centre button to return to the NETWORK menu. Connect to a wireless network manually … > Press the centre button to bring up the WLAN SETTINGS menu and highlight NETWORK LIST. > Press the centre button to bring up the NETWORK LIST menu. > Press the yellow button if you wish to refresh the list of networks. >Press or to highlight a network router and press the centre button to be able to enter the password. >Use , , and to enter the password to your wireless network and press the centre button to establish a connection. When CONNECTED is shown on the screen, your television is configured correctly on your network. > Press the centre button to return to the NETWORK menu. Check your wireless network signal … > Bring up the NETWORK INFO menu and highlight ADVANCED INFO (WLAN). > Press the centre button to bring up the ADVANCED INFO (WLAN) menu. > Check the signal strength in the LEVEL menu: ***** **** *** ** * Excellent connection Very good connection Good connection Stable connection Unstable connection Note that your television must be connected wirelessly to access this menu. 52 For more information about your router, see the guide for it. Your television supports 2.4 GHz and 5 GHz. For more information, contact your Bang & Olufsen retailer. >> Network settings See network information You can see information on your network connection in the NETWORK INFO menu. MENU SETUP NETWORK NETWORK INFO … Note: A previously well-functioning setup may develop problems over time as surroundings change. Check your Ethernet connection or router. If the problem persists, contact your Bang & Olufsen retailer. Enable or disable the Digital Media Renderer The Digital Media Renderer feature enables you to play photos, music and video files via a computer or a smart phone. The feature is default enabled. If you do not want your television to be used as a monitor for a computer, smart phone or other device, it is possible to disable the feature. For more information, see page 46. MENU SETUP NETWORK DIGITAL MEDIA RENDERER In the DIGITAL MEDIA RENDERER menu press or to enable or disable the renderer feature. 53 If you want your television to be easily recognisable on your computer or smart phone, you can name it via the NETWORK menu by selecting NETWORK INFO then ALIAS or NETWORK SETTINGS, LAN SETTINGS then ALIAS. Distribute sound with Network Link With Network Link you can distribute sound, but not video signals, to other rooms throughout the house. If you connect your television to a Master Link product, you must also use a BeoLink Converter NL/ ML (BLC). For example, you can connect your television in the living room to an audio or video system in another room, thereby making it possible to listen to sound from other rooms. Access sources from another Bang & Olufsen audio product and share speakers easily via the television menu. Some content providers may have blocked distribution of sound. For information about integrating an audio setup, see page 56. For information about distribution of video signals, see page 60. Link connections NAS MASTER LINK ETHERNET B&O RECOMMENDED ROUTER ETHERNET ISP ROUTER BLC INTERNET Example of a link room setup with an audio system with Master Link. The main room television must be connected to the link room system with BeoLink Converter NL/ML if the link room system is an audio or video system with Master Link: > Connect an Ethernet cable to the socket marked on the television. Then run the cable to a router, which is connected to the router connected to the Internet. > Connect one end of an Ethernet cable to the router and the other end to BeoLink Converter NL/ML. > Connect one end of a Master Link cable to BeoLink Converter NL/ML and the other end to the Master Link socket on the audio or video system. 54 A Bang & Olufsen product with Network Link is connected directly to the same network (router) as your television. For more information about network settings, see page 51. >> Distribute sound with Network Link Integrate additional equipment You can integrate external equipment with your television to listen to music from an audio system or another television. You can listen to audio and video sources from another Bang & Olufsen product, if the product is connected to the same network (router) as your television. When connecting to an audio system with Master Link, a BeoLink Converter NL/ML is required to act as a ‘bridge’ between Network Link and Master Link. See also page 54. In the PRODUCT INTEGRATION menu, you can select which products to integrate with. A list of products identified on the home network is shown. To link to sources from a product, such as radio or CD, you must set it up in the CONNECT TO menu. To select the product, it must be switched on for it to show up as a product found in the list. When you have chosen the product once in the CONNECT TO menu, the sources that can be linked to are shown in the SOURCE LIST with a ‘link’ symbol ( ). To see linked sources in the remote control display, see the guide for BeoRemote One. A source can play simultaneously on speakers in different rooms and if the connected product does not have local speakers, it is possible to share speakers in the television also when a source is activated on the connected product. If you want the television speakers to be activated when you switch on a ‘link’ source, you must set it up in the SHARE SPEAKERS menu. 55 MENU SETUP PRODUCT INTEGRATION B&O CONNECT CONNECT TO MENU SETUP PRODUCT INTEGRATION B&O CONNECT SHARE SPEAKERS For information about connecting an audio system or a television for integration with your television, see pages 56 and 58. When the television is part of a system setup, it will automatically set WAKE ON LAN/ WLAN to ON to be able to switch on connected equipment. Note that this will increase the power consumption slightly. When a BeoLink Converter NL/ML is a part of your system, six audio sources are listed as sources you can link to, whether or not equipment is connected to these sources. Sources that are not used can be hidden from the SOURCE LIST in the SOURCE LIST menu. Connect and operate an audio system If you connect a compatible Bang & Olufsen audio system to the television, you obtain the benefits of an integrated audio/ video system. Play music on your audio system using speakers connected to the television, or switch on a TV programme and send the sound to your audio system speakers. Also see page 55 about sharing speakers. Your AV system can be placed together in one room or in two rooms with the television placed in one room and the audio system with a set of speakers placed in another. Not all Bang & Olufsen audio systems support integration with the television. Some content providers may have blocked distribution of sound. Connect your audio system to the television Option setting for the audio system When you have connected your Master Link audio system, you must set the audio system to the correct Option. Point your remote control at the IR-receiver of your audio system. The distance between the remote control and the IR-receiver must be maximum 0.5 metres. BeoRemote One operation … Press to bring up the current product, such as BeoVision, in the BeoRemote One list LIST ... Select the audio system, default Beo4 AUDIO ... Press to bring up Settings LIST Settings Press to bring up Advanced Advanced Press to bring up Product Option Product Option Press to bring up A.OPT. A.OPT. Enter the appropriate number (0, 1, 2 or 4) 0–4 To bring up Beo4 AUDIO in the BeoRemote One display, you must first add it to the list. See the guide for BeoRemote One for information on how to add products. See page 57 for examples of correct Options. 56 Return to your television Return to your television to be able to operate it with your BeoRemote One. To return to the television, press to bring up the current product, such as Beo4 AUDIO, in the BeoRemote One list Select the television, such as BeoVision LIST ... ... >> Connect and operate an audio system Option 1 Option 0 BLC The television and an audio system is set up in one room with all speakers connected to the television: – CONNECT TO: BLC – SHARE SPEAKERS: YES – Audio system: Option 0 For information about the CONNECT TO and SHARE SPEAKERS menus, see page 55. BLC Option 2 BLC The television (with or without additional speakers) and the audio system (with a connected set of speakers) is set up in the same room: – CONNECT TO: BLC – SHARE SPEAKERS: NO – Audio system: Option 1 For information about Option 4, see page 58. For more information, contact your Bang & Olufsen retailer. The audio system is set up in one room, and the television (with or without additional speakers) in another: – CONNECT TO: BLC – SHARE SPEAKERS: NO – Audio system: Option 2 You can join in on a source played on another product if you press TV or MUSIC on BeoRemote One, highlight JOIN and press the centre button until you hear the desired source. Use an audio/video system If you integrate your audio system and your television, you can choose a speaker combination appropriate to the current video or audio programme. See the illustrated examples. BLC BLC LIST LIST BeoVision Beo4 AUDIO Beo4 AUDIO BeoVision TV YOUTUBE To listen to sound from a television source on your audio system speakers without switching on the screen, your audio system must be selected. If it is not already selected, press LIST then to bring up the current product in the BeoRemote One display. Press the centre button, then or to highlight the name of your audio system, such as Beo4 AUDIO, and press the centre button. When the audio system is selected, press TV then or to highlight a desired source, for example YOUTUBE, and press the centre button. 57 MUSIC NET RADIO To listen to audio sound on the speakers connected to the television, your television must be selected. If it is not already selected, press LIST then to bring up the current product in the BeoRemote One display. Press the centre button, then or to highlight the name of your television, such as BeoVision, and press the centre button. When the television is selected, press MUSIC then or to highlight a desired source with a ‘link’ symbol, for example NET RADIO, and press the centre button. Two televisions – with Network Link connection Products with Network Link can borrow source sound from each other. If you connect a compatible Bang & Olufsen television to your television, you obtain the benefits of an integrated video system that enables you to listen to audio and video sources from the other television. If you connect a television with Master Link to your television, a BeoLink Converter NL/ML (BLC) is required for the televisions to borrow source sound from each other. Not all Bang & Olufsen televisions support integration with your television. Some content providers may have blocked distribution of sound. To bring up BeoVision(2) or Beo4 LINK in the BeoRemote One display, you must first add them to the list. See the guide for BeoRemote One for information on how to add products. Two televisions with Network Link BeoVision BeoVision(2) Place yourself in front of the television: – CONNECT TO: the other television, such as BeoVision and BeoVision(2) respectively – SHARE SPEAKERS: NO A television with Network Link and a television with Master Link Beo4 LINK (Option 4) BeoVision BLC Network link television: – CONNECT TO: BLC – SHARE SPEAKERS: NO Master Link television: – Option 4 To listen to audio and video sources on a television, bring up the SOURCE LIST and select the desired source from the other television listed with a ‘link’ symbol ( ) next to it. To see linked sources in the remote control display, see the guide for BeoRemote One. You can join in on a source played on another product if you press TV or MUSIC on BeoRemote One, highlight JOIN and press the centre button until you hear the desired source. MENU SETUP PRODUCT INTEGRATION B&O CONNECT CONNECT TO SHARE SPEAKERS Note that the television must be selected once in the CONNECT TO menu, see page 55. Option setting for the Master Link television … Point your remote control at the IR-receiver of your Master Link television. The distance between the remote control and the IR-receiver must be maximum 0.5 metres. Press to bring up the current product, such as BeoVision, in the BeoRemote One list LIST ... Select the Master Link television, default Beo4 LINK ... Press to bring up Settings LIST Settings Press to bring up Advanced Advanced Press to bring up Product Option Product Option Press to bring up L.OPT. L.OPT. Press 4 4 To return to the Network Link television, see page 56. 58 Operate two televisions with one remote control If you have two Bang & Olufsen televisions, and commands from your remote control can be received by both televisions, you must change between the two televisions via LIST. Connection via a BeoLink Converter NL/ML is required if one of your televisions is equipped with Master Link, see page 54. One remote control for both televisions For your television to function properly, it is essential that the television is set up to a product. See also the guide for your remote control. BeoRemote One – Switch between the two televisions… Normally, you can activate a source, such as TV, by pressing TV or MUSIC and finding the relevant source on your remote control. However, when you have two televisions, you must select a television before you can operate its sources: Press to bring up the current product, such as BeoVision, in the BeoRemote One list Select the desired product, for example, BeoVision(2) for a Network Link television or Beo4 LINK for a Master Link television Press and select a source, such as TV LIST BeoVision BeoVision(2) TV YOUTUBE LIST BeoVision(2) BeoVision TV YOUTUBE LIST ... Example of remote control operation when you switch from one television with Network Link to another. ... TV TV It is also possible to rename the products in the BeoRemote One display, see the guide for your remote control. For information about choice of product, contact your retailer. LIST BeoVision Beo4 LINK TV YOUTUBE LIST Beo4 LINK BeoVision TV YOUTUBE Example of remote control operation when you switch between a television with Network Link and a television with Master Link. . 59 HDMI Matrix The HDMI Matrix itself is a physical product that can be connected allowing you to connect up to 32 external sources to up to 32 televisions in different rooms and access the sources either individually from each TV or simultaneously from several rooms via BeoRemote One. The HDMI Matrix must be connected and set up by your Bang & Olufsen retailer. You cannot connect more than one HDMI Matrix in a setup. Settings in the HDMI MATRIX menu In the HDMI MATRIX menu, you can select settings for your HDMI Matrix. MENU SETUP PRODUCT INTEGRATION B&O CONNECT HDMI MATRIX Connect an HDMI Matrix … Open the HDMI MATRIX menu. > > Highlight MATRIX CONNECTED and press or to open the selection. > Select an HDMI socket and press the centre button twice. > Download a PUC table for the connected HDMI source. Follow on-screen instructions. > Highlight the downloaded PUC table and press the centre button. > Select a PUC socket and press the centre button to store the HDMI Matrix settings.* 1 > Press the centre button to continue. 1 *Settings for the PUC socket are made automatically upon pressing the centre button. However, if you need to set up control type and modulation mode manually, you must press the red button and follow on-screen instructions instead. 60 The HDMI Matrix is now configured. Then you have to configure the sources connected to the HDMI Matrix in the SOURCE LIST menu by pressing the red button for each source. This is done the same way as other connected equipment. For information about setting up additional equipment, see page 21. If you at a later time disable a stored HDMI Matrix configuration by setting the HDMI Matrix field to NO, your settings for INPUTS are still saved. This means that if you enable the HDMI Matrix, the settings reappear. To unconfigure a source see page 22.