1
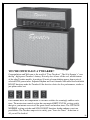
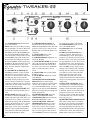
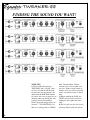
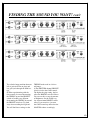
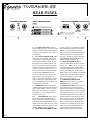
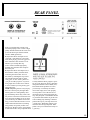
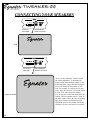
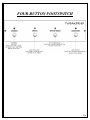
TWEAKER-88
Owner’s Manual
88-watt
Tube Amplifier
TWEAKER-88
Greetings………..
I would like to personally thank you for choosing Egnater as your “Tone Partner”. Our
goal is to provide you with the best tools we can to help you express yourself to the
fullest. Your amplifier is an integral piece in your never ending “Tone Quest”. Our
commitment to helping you achieve that goal is our passion. Our hope is that you will
take advantage of the years of innovative tube amp designs we offer and use it to find
the sound that is “in your head”.
Thank you for putting your trust in Egnater.
Best Regards,
Bruce Egnater
INSIDE THIS OWNER’S MANUAL
Greetings from Bruce Egnater.......................................... 2
Your Officially A Tweaker................................................. 3
Important Information...................................................... 4
Safety Precautions.............................................................. 5
Front Panel Explained....................................................... 6-7
Finding the Sound You Want............................................ 8-9
The Rear Panel Explained................................................. 10-11
Connecting your speakers................................................. 12
Tweaker footswitch............................................................ 13
Tweaker-88 Specifications / Tube Chart.......................... 14
Warranty Information....................................................... 15
Contact Egnater Amplification......................................... 16
2
YOU’RE OFFICIALLY A TWEAKER!!
Congratulations and Welcome to the world of “Tone Tweakers”. The 88 is Egnater’s “over
the top”, high power Tweaker’s fantasy. Not only does it have all the cool, useful features
of the other Tweaker models, it produces 88 watts of room shaking power from a pair of
selected KT88 power tubes. Separate Rhythm and Lead channels with added footswitchable
BOOST functions make the Tweaker 88 the decisive choice for live performance, studio or
just plain rockin’ out.
Each channel has a full complement of Tweaker switches for seemingly endless variations. The master tone control section has our magical BRIT/VX/USA voicing switch
that gives you instant access to all the great classic and modern tones. The VINTAGE/
MODERN voicing switches and SOLO BOOST functions further enhance your tone
possibilities. The Tweaker amps exist to satisfy your “Jones for Tones”. In no time at
all, you will be hooked.
3
TWEAKER-88
IMPORTANT INFORMATION
Please keep this instruction manual for future reference and for the duration of owning this Egnater
Tweaker. Please carefully read and understand the instructions inside this user’s manual before attempting to
operate your new amp. This instruction manual includes essential safety information regarding the use and
maintenance of the Tweaker. Take special care to heed all warning symbols and signs inside this manual and
those printed on the amplifier itself.
WARNING
WHAT’S THE MEANING OF THIS?
The lightning flash with an arrow triangular symbol is intended to alert the user to the presence of non-insulated
“dangerous voltage” within the products enclosure, and
may be of sufficient magnitude to constitute a risk of
electric shock
TO PREVENT FIRE OR SHOCK HAZARD, DO NOT EXPOSE THE AMPLIFIER
TO WATER OR MOISTURE. DO NOT
OPERATE NEAR ANY WATER SOURCE
1. Read these instructions – All the safety and operating
instructions should be read before this product is operated.
2. Keep these instructions – The safety and operating instructions should be retained for future reference.
3. Heed all warnings – All warnings on the appliance and in
the operating instructions should be adhered to.
4. Follow all instructions – All operating and use instructions should be followed.
5. Do not use this apparatus near water – The appliance
should not be used near water or moisture – for example, in a
wet basement or near a swimming pool, and the like.
6. Clean only with dry cloth.
7. Do not block any ventilation openings. Install in accordance with the manufacture’s instructions.
8. Do not install near any heat sources such as radiators, heat
registers, stoves, or other apparatus (including amplifiers) that
produce heat.
9. Do not defeat the safety purpose of grounding plug. A
grounding plug has two blades and a third grounding prong.
The third prong is provided for your safety. If the provided
plug does not fit into your outlet, consult an electrician for
replacement of the obsolete outlet.
10.Protect the power cord from being walked on or pinched
particularly at the plugs, convenience receptacles, and at the
point where they exit from the apparatus.
11.Only use attachments/accessories specified by the manufacturer.
12.Use only with the cart, stand, tripod,
bracket, or table specified by the manufacturer, or sold with the apparatus. When
a cart or rack is used, use caution when
moving the cart/apparatus combination to
avoid injury from tip-over.
13.Unplug the apparatus during lightning storms or when
unused for long periods of time.
14.Refer all servicing to qualified personnel. Servicing is
required when the apparatus has been damaged in any way,
such as power supply cord or plug is damaged, liquid has
been spilled or objects have fallen into the apparatus has been
exposed to rain or moisture, does not operate normally, or has
been dropped.
15.CAUTION: These servicing instructions are for use by
qualified service personnel only. To reduce the risk of electric
4
WHAT’S THE MEANING OF THIS?
!
The exclamation point triangular symbol is intended
to alert the user to the presence of important operating
and maintenance (servicing) instructions in the user
manual accompanying this amplifier
shock, do not perform any servicing other than that contained in the operating instructions unless you are qualified to do so.
16.WARNING: To reduce the risk of fire or electric shock, do not expose this apparatus
to rain or moisture. The apparatus shall not be exposed to dripping or splashing and that
objects filled with liquids, such as vases, shall not be placed on apparatus.
17.WARNING: For the terminals marked with symbol of “ ” may be of sufficient
magnitude to constitute a risk of electric shock. The external wiring connected to the
terminals requires installation by an instructed person or the used of ready-made leads
or cords.
18.WARNING: The mains plug and ac connector is used as disconnect device, the
disconnect device shall remain readily operable
19. This lightning flash with arrowhead symbol within an equilateral triangle is intended
to alert the user to the presence of non-insulated “dangerous voltage” within the product’s enclosure that may be of sufficient magnitude to constitute a risk of electric shock.
- Warning: To reduce the risk of electric shock, do not remove cover (or back) as there
are no user-serviceable parts inside. Refer servicing to qualified personnel.
- The exclamation point within an equilateral triangle is intended to alert the user to the
presence of important operating and maintenance instructions in the literature accompanying the appliance.
Ensure that the ventilation is not impeded by covering the ventilation opening with
items such as newspapers, table-cloths and curtains etc.
WARNING
Handle the power supply cord
with care. Do not damage or deform; it may cause electric shock
or malfunction when used. Hold
plug attachment when removing
from wall outlet. Do not pull on
the power cord.
FOLLOW THESE SAFETY PRECAUTIONS
1. Read Instructions – All the safety
and operating instructions should be read
before this product is operated.
2.Retain Instructions – The safety
and operating instructions should be retained for future reference.
3.Heed Warnings – All warnings on
the amplifier and in the operating instructions should be adhered to.
4.Follow Instructions – All
operating and use instructions should be
followed.
5.Water and Moisture – The amplifier should not be used near water - for
example, a bathtub, washbowl, kitchen sink,
laundry tub, wet basement, or near a swimming pool, and the like.
6.Carts and Stands – The amplifier
should be used only with a cart or stand that
is recommended by the
manufacturer.
An amplifier and cart
combination should be
moved with care. Quick
stops, excessive force, and
uneven surfaces may cause the amplifier
and cart combination to overturn.
7.Wall or Ceiling Mounting
– The product should never be mounted to a
wall or ceiling.
8.Heat – Amplifier should be situated
away from heat sources such as radiators,
heat registers, stoves, or other amplifier
(including amplifiers) that produce heat.
9.Power Sources – This product
should be operated only from the type of
power source indicated on the rating label.
If you are not sure of the type of power
supply to your home, consult your product
dealer or local power company.
10. Grounding or Polarization
– This product may be equipped with a polarized alternation-current line plug (a plug
having one blade wider than the other). This
plug will fit into the power outlet only one
way. This is a safety feature. If you are unable to insert the plug fully into the outlet,
try reversing the plug. If the plug should
still fail to fit, contact your electrician to
replace your obsolete outlet. Do not defeat
the safety purpose of the polarized plug.
11. Power-Cord Protection
– Power-supply cords should be routed so
that they are not likely to be walked on or
pinched by items placed upon or against
them, paying particular attention to the cord
in correspondence of plugs, convenience
receptacles, and the point where they exit
from the amplifier.
12. Cleaning – The amplifier should
be cleaned only as recommended by the
manufacturer. Clean by wiping with a cloth
CAUTION: To reduce the risk of electric shock, do not
remove any cover. No user-serviceable parts inside. Refer
servicing to qualified service personnel only.
The lightning flash with arrowhead symbol within the equilateral triangle is intended to alert the use to the
presence of un-insulated “dangerous voltage” within the product’s enclosure that may be of sufficient
magnitude to constitute a risk of electric shock.
The exclamation point within the equilateral triangle is intended to alert the user to the presence of important
operation and maintenance (servicing) instructions in the literature accompanying this amplifier.
CAUTION
To prevent electric shock, do not use this polarized plug with an extension cord, receptacle or other outlet unless the blades
can be fully inserted to prevent blade exposure.
slightly damp with water. Avoid getting
water inside the amplifier.
14. Non-use Periods – The power
cord of the amplifier should be unplugged
from the outlet when left unused for a long
period of time.
15. Object and Liquid Entry
– Care should be taken so that objects do
not fall and liquids are not spilled into
the enclosure through openings.
16. Damage Requiring Service
– The amplifier should be serviced by
qualified service personnel when:
A. The power-supply cord or the plug
has been damaged; or
B. Objects have fallen, or liquid has been
spilled into the amplifier; or
C. The amplifier has been exposed to
rain; or
D. The amplifier does not appear to
operate normally or exhibits a marked
change in performance; or
E. The amplifier has been dropped, or the
enclosure damaged.
F. The amplifier needs tube replacement
or biasing
17. Servicing – The user should not
attempt any service to the amplifier beyond
that described in the operating instructions.
All other servicing should be referred to
qualified service personnel.
18. Ventilation – Slots and openings
in the cabinet are provided for ventilation and to ensure reliable operation of the
product and to protect it from overheating,
and these openings must not be blocked
or covered. The openings should never be
blocked by placing the product on a bed,
sofa, rug, or other similar surface. This
product should not be placed in a built- in
installation such as a bookcase or rack.
19. Attachments – do not use attachments not recommended by the product
manufacturer as they may cause hazards.
20. Accessories – Do not place this
product on an unstable cart, stand, tripod,
bracket, or table. The product may fall,
causing serious injury to a child or adult,
and serious damage to the product. Use
only with a cart, stand, tripod, bracket, or
table recommended by the manufacturer,
or sold with the product.
21. Lightning – For added protection
for this product before a lightning storm,
or when it is left unattended and unused
for long periods of time, unplug it from
the wall outlet. This will prevent damage
to the product due to lightning and powerline surges.
22. Replacement Parts – When
replacement parts are required, be
sure the service technician has used
replacement parts specified by the manufacturer or have the same characteristics as
the original part. Unauthorized
substitutions may result in fire, electric
shock, or other hazards.
23. Safety Check – Upon completion
of any service or repairs to this product,
ask the service technician to perform
safety checks to determine that the product
is in proper operating condition.
24. FUSES – Always use the correct rating and type of fuse as indicated on the
rear panel. Note the proper rating fuse is
determined by the AC line voltage in the
country this unit is being operated.
25. AC SELECT SWITCH: This switch
must be set to match the AC line voltage
in the country this unit is being operated.
To change the setting, loosen (do not
remove) the two screws above and below
the slide switch. Temporarily move the
protective cover strip and slide the actuator to match the voltage in your country.
Place the protective cover strip back over
the switch and tighten the two screws.
5
TWEAKER-88
1) ON/OFF SWITCH: Turns the main
power On and Off.
NOTE: The correct procedure for turning
ON and turn OFF is as follows. When first
powering the amp on, always have the
STANDBY switch in the STANDBY position. Turn the POWER switch ON. Wait
about 30 seconds or longer before moving
the STANDBY switch to PLAY. Reverse
the procedure when turning the amp off.
Turn the STANDBY off first, followed by
POWER off. By following these steps you
will help extend tube life by not “slamming” the tubes with high voltage while
they are cold.
2) STANDBY/PLAY SWITCH: The
STANDBY switch has a couple of important functions. First, it can help extend
tube life as we described above. The other
is so that your amp can be ready and
warmed up but not producing any sound
until you switch to PLAY. This is great for
set breaks or when the amp may sit idle for
a while and you don’t want to wait for it to
warm back up before playing.
3) COOL BLUE PILOT LIGHT: Tells
you the amp is powered on and ready to
rock.
BOOST MODE (4-9): This section is a
switchable second/boost MASTER for each
channel. The mini toggle switch allows you
to preset one of two “modes” for the boost.
In the CLEAN setting, when the BOOST is
activated, the knob simply acts as a second
MASTER volume for solos etc... In the
GAIN mode, not only is the second MASTER active but, an additional gain boost
is also turned on which adds a little grind
along with the BOOST in volume.
6
4) RHYTHM BOOST MODE: As
described above, this switch presets the
MODE for the BOOST function. The OFF
position is to allow you to still access the
BOOST mode even when the pedal is not
connected.
5) BOOST LED: Tells you the
RHYTHM BOOST is active.
6) RHYTHM BOOST: Adjusts the volume of the BOOST.
7) LEAD BOOST MODE: As described
above, this switch presets the MODE for
the BOOST function. The OFF position
is to allow you to still access the BOOST
mode even when the pedal is not connected.
8) BOOST LED: Tells you the LEAD
BOOST is active.
9) LEAD BOOST: Adjusts the volume
of the BOOST.
10)RHYTHM VINTAGE/MODERN
SWITCH: The two switch settings
modify the power amp circuit from a fairly
“neutral” sort of response (not in a bad
way) in the VINTAGE setting, to a more
aggressive tone and feel in the MODERN
position by boosting the low and high end
just the right amount.
11)RHYTHM MASTER: Adjust the
loudness of the RHYTHM channel.
12)RHYTHM LED: Indicates when the
RHYTHM CHANNEL is active.
13)LEAD CHANNEL VINTAGE/
MODERN SWITCH: The two switch
settings modify the power amp circuit
from a fairly “neutral” sort of response
(not in a bad way) in the VINTAGE setting, to a more aggressive tone and feel
in the MODERN position by boosting the
low and high end just the right amount.
14)LEAD MASTER: Adjust the loudness of the LEAD channel.
15)LEAD LED: Tells you the LEAD
CHANNEL is active.
16)BRIT/AC/USA SWITCH: This is
a really cool feature. Partly where the
TWEAKER got its name. This magical
switch lets you instantly select any one of
the three “classic” tone control circuits that
are quite familiar to all of us. The USA setting duplicates the classic American/California tone so revered in those “Blackface”
amps. The BRIT settings conjures up the
stronger lower midrange girth of the British amps. The AC setting creates a unique
voice that lives in the world of alternate
British amps whose three letter name
begins with V and ends in X. Use this
switch along with the tone control knobs to
create a never ending palette of classic and
unique tones.
17,18,19) TONE CONTROLS: Pretty
self explanatory. The Tweaker 88 features
the familiar passive tone control designs
of many revered classic tube amps. Dial
in beautiful, pristine clean sounds to bold,
powerful overdrive tones. You’ll find a
vast array of stellar sounds. Don’t hesitate
to turn the knobs. Let your ears create the
tones, not your eyes.
20)RHYTHM TIGHT/DEEP SWITCH:
This switch is really effective for tightening the low end, especially when pushing
the GAIN. It works by cutting the deep
bass at the beginning of the preamp. Setting the TIGHT switch to the tight position
will result in a clearer, more defined tone.
DEEP retains a full, big low end that is
QUICK START GUIDE
great for a really robust, fat rhythm sound.
21)RHYTHM HOT/CLEAN SWITCH:
In the CLEAN setting, the gain is reduced
to make is easy to dial in a pristine clean
to moderate crunch with the GAIN knob.
HOT cranks up the gain for high gain rock
or singing solos.
22)RHYTHM BRIGHT/NORMAL
SWITCH: As expected, the BRIGHT
setting boost the high end. Do experiment with different combinations of the
BRIGHT on and TREBLE knob down
compared to the BRIGHT off and the
TREBLE up. You will find that with the
BRIGHT on and the TREBLE down, the
tone will be a little less midrangy compared to the BRIGHT off and the TREBLE
turned up.
23) RHYTHM MID CUT SWITCH:
In the NORMAL setting, the midrange
is, well, normal. The MID CUT on opens
a whole new range of tones to further
expand your “tonal palette”. Try using the MID CUT with your clean sound to
create a pristine, almost acoustic tone or
to take some of the “honk” out of your
humbucking pickups. Try it on your
high gain settings to get some serious “metal-ish” chunk.
24) RHYTHM GAIN: This controls the
amount of “drive” in the preamp. Low
settings of the GAIN knob (with higher
settings of the VOLUME knob) will keep
the sound big, full and beautiful. You can also use higher settings of the GAIN
knob to push the channel into overdrive to
get some really raucous rock & roll crunch
tones.
25) RHYTHM CHANNEL ON LED:
Tells you the Rhythm channel is active.
26) LEAD TIGHT/DEEP SWITCH:
This switch is really effective for tightening the low end, especially when pushing
the GAIN. It works by cutting the deep
bass at the beginning of the preamp. Setting the TIGHT switch to the tight position
will result in a cleaner, more defined tone.
The DEEP setting retains a full, big low end that is great for a really robust, fat
rhythm sound.
27) LEAD HOT/CLEAN SWITCH: In
the CLEAN setting, the gain is reduced to
make is easy to dial in a great rock and roll
clean to moderate crunch with the GAIN
knob. HOT unleashes the fury for high
gain rock or singing solos.
28) LEAD BRIGHT/NORMAL
SWITCH: As expected, the BRIGHT setting boosts the high end. Experiment with
different combinations of the BRIGHT
on and TREBLE knob down compared
to the BRIGHT off and the TREBLE up.
You will find with the BRIGHT on and the
TREBLE down, the tone will be a little less
midrangy compared to the BRIGHT off
and the TREBLE turned up. This channel
is inherently a little darker than the rhythm
channel. It is ideal for higher gain rhythms
and singing leads.
29) LEAD MID CUT SWITCH: In the
NORMAL setting, the midrange is well…
normal. The MID CUT on opens a whole
new range of tones to further expand your
“tonal palette”. Try using the MID CUT
with your cleaner sound to create a pristine, almost acoustic tone or to take some
of the “honk” out of your humbucking
pickups. Try it on your high gain settings
to get some serious “metal-ish” chunk.
30) LEAD GAIN: This controls the
amount a “drive” in the preamp. Low
settings of the GAIN knob (with higher
settings of the VOLUME knob) will keep
the sound cleaner. You can also use higher
settings of the GAIN knob to push the
channel into overdrive to get some really
raucous rock & roll crunch tones. Unlike
the RHYTHM channel, the LEAD channel
can take to into extreme high gain territory.
31) LEAD CHANNEL ON LED: Tells
you the LEAD CHANNEL is active.
32) CHANNEL SELECT: This pushbutton selects the RHYTHM or LEAD
CHANNEL.
NOTE: This button is disabled when the
footswitch in plugged in.
33)GUITAR INPUT: Plug your guitar in
here using a high quality, shielded instrument cable.
34)TWEAKER-88 LOGO: To remind
you of why you are here. You are a “Tone
Tweaker” and, as such, have certain obligations. First you must relentlessly carry
on the “Tone Quest”. Next, you must never
be fearful of turning knobs. You will never
discover the potential if you don’t. There
are no “correct” settings. What sounds
great to you ARE the correct settings. (We
do try to guide you a bit in the “Finding
Your Sound” section). Take advantage of
all the “Tone” possibilities sitting before
you right now. Use the Tweaker to create
those sounds “in your head” that are yearning to be released to the world.
7
TWEAKER-88
FINDING THE SOUND YOU WANT!
TONE TIPS
1) The Tweaker 88 has both a
“RHYTHM” and a “LEAD” channel. You will find the LEAD channel has more gain and sounds a bit
darker than the RHYTHM channel.
Of course, this is not to imply we are
dictating what you should play. Just
giving you more Tweakability.
2) The suggested settings above are
just that.......SUGGESTIONS. Use
these as a starting point to TWEAK
8
from. Turn the knobs. Flip the
switches. Get a feel for what each
one does. Think of each control as
another color. You will be rewarded
with a vast pallet of tones to choose
from.
3) When cranking the GAIN, the
TIGHT switch is really useful for
making the bass tighter and more
solid.
4) The less gain you use, the clearer
and more defined your tone will be.
FINDING THE SOUND YOU WANT! con’t
Try to find a happy medium between
lots of gain (more fun to play) and
less gain (cuts through the band better).
5) When experimenting with the
tone controls, be aware that turning
the TREBLE up and the BRIGHT
switch off sounds very different
from turning the TREBLE down and
the BRIGHT switch on. Try both
ways when tweaking the high end.
You will find lower settings on the
TREBLE knob result in a bit less
mid range.
6) The RHYTHM channel BRIGHT
switch is tied to the GAIN control.
The higher the gain setting, the less
effect the BRIGHT switch will have.
You can use this to vary the amount
of Brightness. Set the GAIN very
low for maximum BRIGHT switch
effect. If you want less, just turn
the GAIN control up and reduce the
MASTER volume accordingly.
9
TWEAKER-88
REAR PANEL
1) AC INLET and FUSE: Connect a
universal IEC type power cord. Be sure the
proper value fuse is installed that matches
the ratings as indicated for your country on
the rear panel.
2) AC VOLTAGE SELECTOR: Makes
the Tweaker-88 compatible with the line
voltage in any country. Proper setting of
this switch is absolutely critical. Be sure
the switch position matches the line voltage in your country. Severe damage will
result from improperly setting this switch
and will void your warranty, as well as
destroy your amp. To change the setting,
loosen (DO NOT REMOVE) the two
screws securing the plastic safety cover
strip over the switch. Swing the cover
aside. Using a small screwdriver, slide the
switch to the proper setting. Replace the
cover and retighten the screws. Be sure to
install the proper value fuse.
3) TUBE FUSE: This fuse is directly
connected to the power tubes high voltage
supply. In the unlikely event of a power
tube failure/short, this fuse will open. If
this happens, it is a sure indication of a
defective power tube.
4-5) FOOTSWITCH: The Tweaker
88 footswitch has four pushbuttons for
control of channel switching, the effects
loop and the individual BOOSTS for each
channel. The cable splits into two ¼” plugs
at the amplifier end. These cables are color
coded to match the jacks on the amp.
6) EXTENSION SPEAKER OUTPUT:
10
Used to connect a second speaker cabinet.
Since the MAIN speaker is labeled USE
FIRST, it would reasonable to assume
this jack could be labeled USE SECOND,
which would be correct. See the section
later in this manual for proper connection
and IMPEDANCE SWITCH settings for
different speaker arrangements.
7) MAIN SPEAKER OUTPUT:
Labeled “USE FIRST” because you must
use this jack….FIRST. There is a special
circuit inside the Tweaker-88 that helps
protect the amplifier from damage in case
you forget to plug in the speakers and attempt to play. As we all know, you NEVER
operate a tube amplifier without a proper
speaker load connected…but we didn’t
have to tell you that, did we ?
8) IMPEDANCE SELECTOR
SWITCH: Set this switch to match the
IMPEDANCE of your speakers.
9) EFFECTS LOOP: Basically a series
insert patch point between the preamp
and power amp. When an external effects
gadget is patched into these jacks, the path
is interrupted and 100% of your signal is
routed through the effects. This puts some
special demands on the effects unit. First,
the effects unit must be essentially transparent, meaning it can’t mess with your
tone. Second, the input and output levels
(if there are any) must be properly set for
lowest noise and maximum headroom.
Proper setting of these controls can be
achieved using the following method:
REAR PANEL
a) Set your amp/preamp volume levels
for normal playing levels. Connect a high
quality shielded cable from the series send
jack to the effect input. Set the LEVEL
switch to LINE (pushed in).
b) Adjust the effects unit input level to
“just peak”, if the effect has a level indicator, while playing your most aggressive
licks. If the effect does not have a level
indicator, you can skip this step.
c) Now connect another high quality
shielded cable from the effect output to
the return jack.
d) Adjust the effects unit output level to
the match the volume you heard before
connecting the return cable. You can
check this by switching the loop in and
out from the footpedal. This is called
“unity gain”. A cool “techie” phrase for
“you get out what you put in”. If your effects gadget does not have level controls,
it can be assumed you will get unity gain
when plugged in.
NOTE: Depending on how loud you play,
the level at the loop may be higher than
normal guitar level. Though many floor
type and tabletop effects may work, some
may tend to overload. You will know an effect is not made for higher levels if, when
you turn the loop on with the effect in the
loop, you notice distortion and/or a loss of
volume. Most modern effects (including
many pedals) can operate just fine in an
effects loop. We have gone to great lengths
to make the Tweaker loop compatible with
as many different effects gadgets as possible. If you do find your effect is distorting,
change the LEVEL switch to INST (out).
This should fix the problem. Of course,
you still may occasionally encounter a
device that simply won’t work properly
in a loop. This is one of the reasons we
discourage players from using pedals in a
loop. You just spent a considerable amount
of your hard earned dollars to get this awesome sounding amp. Sticking a mediocre
pedal in the loop of your amp seems to be
“counter-tone”. Remember what we said
about the effect being transparent. Most
pedals color your sound and not always in
a good way.
11
TWEAKER-88
CONNECTING YOUR SPEAKERS
To 8 ohm
mono input
Set impedance
switch to 8 ohms
212X
To 16 ohm
input jack
Egnater 4x12A/B
12
Set Impedance
switch to 16 ohms
Always set the impedance switch to match
the cabinet impedance. To determine the
proper setting using multiple cabinets of the
same impedance, simply take the impedance
of one cab divided by the number of cabinets. For example, if you have two 16 ohm
cabs, simply divide 16 by 2 for a total load of
8 ohms. Also, when using two cabinets,
you can connect a cable from the head to one
cabinet. Then use another cable to “jump“ to
the other cabinet. This is the same as running
two cables from the head MAIN and EXTENSION jacks to each cabinet indvidually.
Whichever is more convenient is acceptable.
FOUR-BUTTON FOOTSWITCH
13
TWEAKER-88
FEATURES AND SPECIFICATIONS
GLOBAL FUNCTIONS
•
•
•
•
•
•
•
•
4/8/16 ohm Impedance Selector Switch
Master Treble, Middle, Bass controls
Master BRIT/AC/USA EQ switch
Two Footswitchable Channels with
Boost Masters
Buffered Series Effects Loop with Level
Switch (Instrument orPREAMP
Line)
International Voltage Selector
Four Button Footpedal for
V1 Channel,
Loop, Rhythm Boost and Lead Boost
Front Panel Channel Select Pushbutton
Specifications:
LOOP
P.I.
V2
V3
CHANNEL FUNCTIONS:
• Separate Gain and Master Volume Controls for Each Channel
• Deep/Tight, Normal/Bright, Clean/Hot
and Normal/Mid Cut Switches
• Modern/Vintage Voicing Switch
• Boost Master with Clean or Gain setting
for Each Channel
OUTPUT POWER: 88 watts RMS @5%THD (CLASS A/B)
TUBES: Matched Pair Premium Selected KT88
Four premium selected 12AX7
INPUT IMPEDANCE:
1meg ohm
V1, 2 & 3 12AX7/ECC83
6L6GC
EFFECTS LOOP SEND IMPEDANCE: 6L6GC
100 ohms
TWEAKER
40 IMPEDANCE: 330K ohms
EFFECTS LOOP
RETURN
SWITCHES:
TUBE LAYOUT
VINTAGE/MODERN:
+5dB @ 120Hz & +4dB @ 3.6KHz
BRIT/AC/USA:
Selects British, AC or American Tone Stack
CLEAN/HOT :
+9dB Gain Boost
DEEP/TIGHT:
-6dB @ 180Hz
NORMAL/BRIGHT:
+8dB @ 4KHz MAX
NORMAL/MID CUT
-6dB @ 400Hz
BOOST/GAIN
+6dB Gain Boost
Dimensions:
Tweaker-88
598mm (W) x 203mm (H) x 209mm (D)
V1
LOOP
P.I.
V3
V4
V1,2,3&4 12AX7/ECC83
TWEAKER 88
TUBE LAYOUT
14
PREAMP
V2
KT88
KT88
Egnater Amplification is dedicated to product excellence and therefore continuously attempts to improve each and every model we
manufacture. This ongoing process includes refinements in design, materials and workmanship which may result in products which
differ than those described in our literature. All features, specifications, prices and terms are subject to change without notice.
PERSONALIZE YOUR SETTINGS
15
TWEAKER-88
LIMITED WARRANTY
Thank you for choosing Egnater. Egnater manufactures
some of the world’s most innovative all-tube amplifier,
combos and speaker cabinets. Egnater takes great pride in
thoroughly testing each product prior to shipment.
AMPLIFIERS, COMBOS AND SPEAKER
CABINETS: Egnater offers a three (3) year warranty
to the original purchaser that an Egnater product will be
free from defects in material and workmanship. A dated
sales receipt will establish coverage under this warranty.
This warranty does not cover service or parts to repair
damage caused by accident, neglect, abuse, normal &
wear, disaster, misuse, abuse, over-powering, negligence,
inadequate packing or shipping procedures and service,
repair or modifications to the product which have not
been authorized or approved by Egnater. If this product
is defective in materials or workmanship as warranted
above, your sole remedy shall be repair or replacement as
provided below.
TUBES: Egnater warrants the original purchaser that the
tubes used in an Egnater amplifier/combo will be free
from defects in material and workmanship for a period of
90 days from the original date of purchase. A dated sales
receipt will establish coverage under this warranty. This
warranty will automatically terminate 90 days after the
original retail sales date. This warranty is in lieu of all
other expressed warranties. If tubes fail within the 90 day
warrant period your sole remedy shall be replacement of
tubes as provided below.
RETURN PROCEDURES: In the unlikely event that a
defect should occur, follow the procedure outlined below.
Defective products must be shipped, together with proof
of purchase, freight pre-paid and insured to the Authorized Egnater Service Center or directly to Egnater. If a
product must be returned to Egnater for warranty replacement/repair, a Return Authorization Number must be
obtained from our Customer Service Department prior to
shipping the product.
Please contact our Customer Service Department for the
Authorized Egnater Service Center nearest you. Products
must be shipped in their original packaging or its equivalent; in any case, the risk of loss or damage in transit is
to be borne by the purchaser. The Return Authorization
Number must appear in large print directly below the
shipping address. Always include a brief description of
the defect, along with your correct return address and
telephone number.
When calling to inquire about a returned product, always
refer to the Return Authorization Number. If Egnater determines that the unit was defective in materials or workmanship at any time during the warranty period, Egnater
has the option of repairing or replacing the product at no
additional charge, except as set forth below. All replaced
parts become a property of Egnater. Products replaced or
repaired under this warranty will be returned via ground
shipping within the United States-freight prepaid. Egnater
is not responsible for costs associated with expedited
shipping, either to Egnater or the return of the product to
the customer.
INCIDENTAL OR CONSEQUENTIAL DAMAGE:
In no event will Egnater be liable for any incidental or
consequential damages arising out of the use or inability
to use of any Egnater product, even if an Egnater dealer
has been advised of the possibility of such damages, or
any other claim by any other party. Some states do not allow the exclusion or limitation of consequential damages,
so the above limitation and exclusion may not apply to
you. This warranty gives you specific legal rights and you
may also have other rights which may vary from state to
state.
FOR YOUR PROTECTION: Please complete and mail
the Purchase Information Card within (10) ten days of the
date of purchase so that we may contact you directly in
the event a safety notification issued in accordance with
the 1972 Consumer Product Safety Act.
CUSTOMER SUPPORT: Our dedicated staff is ready
to help you with any warranty or product questions you
may have. Please call 1-877-EGNATER (9:00AM to
4:00PM Pacific Standard Time).
Egnater Custom Amplification
Boutique Amps Distribution
3383 Gage Ave, Huntington Park, CA 90255
Phone: 877-Egnater - Fax: 323-277-4110
www.EgnaterAmps.com