1
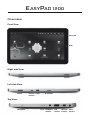
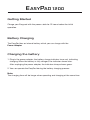
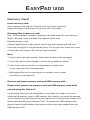
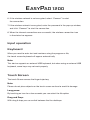
User Guide
Congratulations on your new EasyPad 1200.
Please follow the instructions in this manual
carefully.
Statement: If the final version of this product has any differences from
the description of the user guide, please subject to the final product, as we
are eager to provide you the newest software updates. Thank you!
Safety Precautions
1.Always disconnect the device from the power adaptor before cleaning.
Wipe the touch screen using only a clean cellulose sponge or chamois cloth. Do not use chemicals or abrasive cleaning agents.
2.DO NOT leave the device on your lap or any part of the body for prolonged periods of time as the unit may become warm during use.
3.DO NOT use excessive force on the touch screen and do not use devices
that may cause damage to the screen.
4.DO NOT expose to strong magnetic or electrical fields.
5.DO NOT expose to or use near liquids, rain, or excessive moisture.
6.SAFE TEMP: This device should only be used in environments with ambient temperatures between 5° and 40°.
7. ONLY USE the power adaptor provided with this device
Transportation Precautions
When travelling with your EasyPad always switch off the unit and place it into the
protective bag provided. If packing your EasyPad along with other items always
ensure that it is packed away from anything that could cause damage to it, sharp
edges, liquids etc.
Airplane Precautions
Please refer to specific Airline guidance and instruction before using this device
onboard any aircraft.
Overview
Front View
Power LED
Home
Right side View:
Speaker
Speaker
Left side View:
Volume
Ethernet Power
interface
TF card slot
Top View:
Microphone
Reset Headphone USB
Mini-USB Power
interface
interface interface interface
Getting Started
Charge your Easypad with the power cable for 12 hours before the initial
operation.
Battery Charging
The EasyPad has an internal battery which you can charge with the
Power Adapter
Charging the battery
1.Plug in the power adapter, the battery charge indicator turns red, indicating charging. When the battery is fully charged, the indicator shows blue.
After unpluging the power adapter, the indicator always shows green.
2.You can operate the EasyPad during the battery charging process.
Note:
The charging time will be longer when operating and charging at the same time.
Memory Card
Insert memory card:
Insert memory card into the Card slot until it is locked into place.
Upper left corner of the screen will prompt: SD cards ready.
Browsing files in memory card:
Run “OI File manager” program, showing all the files under the root directory.
Select “SD card” open to browse the contents of the card.
Remove memory card:
Close all applications or documents which have been opened with the card.
Press the card lightly. It will be ejected partly. Pull the card out. Upper left corner
of the screen will prompt “SD card has been removed”.
Note:
1. Insert card in the right position. Otherwise the card will be damaged.
2. Once the card has been locked, it cannot be formatted or written.
3.Don’t insert and remove the card repeatedly in a short time.
It may cause the card to be damaged.
4. We suggest the use of major brands of memory cards in order
to avoid any incompatibility.
Remove and insert memory card and USB memory stick
Please don’t remove the memory card and USB memory stick while
you are using the files on it.
For example, when you are viewing files in my photo, my video or my music,
removing the memory card or USB memory stick directly may cause its damage
and the device may exit automatically for protection. To remove the memory card
please refer to“How to use Memory Card”. To remove the USB memory stick,
please close all applications or documents which have been opened from the
USB memory stick.
Storage Space
The device has three storage spaces: internal device storage, USB memory stick
and memory card. The internal device storage is named “nand”; the memory card
is named “SDcard”; and the external USB memory stick is named “Udisk”. The
user can use the storage space in the local disk of 2G. The USB memory stick and
memory card storage space depends on their specific capacity – the maximum
storage space supported is 32G memory.
Orientation of Display
The system interface switches the screen automatically according
to the direction of the device.
Internet Connection
Connecting to the internet by Ethernet:
Connect the Ethernet adapter to the Ethernet port and then plug the network cable into the Ethernet adapter. In the upper right corner of the screen the Ethernet
symbol appears. The Easypad automatically obtains an IP address via DHCP to
connect the network.
Connecting to the internet by Wi-Fi:
1. Click MENU key to pop-up the menu, and then select “Settings”;
2. Select “Wireless Control” in the settings menu;
3. Open Wi-Fi Settings;
4. All wireless networks in the vicinity will be listed,
click to select the name you want to connect to wireless networks;
5. If the connection is successful, the wireless network information will be saved in the pop-up window. “Connect” starts to connect, choose “forget” to remove wireless network information.
6. If the wireless network is not encrypted, select “Connect” to start
the connection.
7. If the wireless network is encrypted, enter the password in the pop-up window, and click “Connect” to start the connection.
8. When the internet connections are successful, the wireless connection icon
in the status bar appears.
Input operation
Keyboard
When you need to enter text and numbers using the program or file,
the touch screen keyboard will appear automatically.
Note:
This device supports an external USB keyboard, but when using an external USB
keyboard, some keys may not work properly.
Touch Screen
The touch Screen senses the finger trajectory.
Note:
Please do not place objects on the touch screen surface to avoid its damage
Long press:
By touching an icon for a few seconds you can select the file option
Drag and Drop:
With drag & drop you can switch between the five desktops.
On-Screen Icon Guide
New
Message
Upload/
Download
New Instant
Messaging
Download
Complete
Play Music
WiFi service is
connected, the
network is
available
Flight mode
Charging
General
Notice
Silent Mode
More
Alarm Clock
Open
Basic Settings
Basic Settings
Internet Connection
Wi-Fi Settings
1.In the home desktop, press the “menu” button for the popup menu.
2.Click “Settings”.
3.Click “Wireless controls”
4.Click “Turn on Wi-Fi” .
5.Click “Wi-Fi Settings”.
The device will automatically scan for available Wi-Fi wireless networks.
6.Select the desired Wi-Fi network to connect. For encryption, a password
window will pop up, enter the appropriate password.
7. Click “connect”.
Basic Settings
Sound and Display
Media Volume Setting
1. In the home desktop, press the “menu” button for the popup menu.
2. Click Settings.
3. Click on sound and display.
4. Click on the media volume to adjust the volume of music and video.
5. Bring up the volume settings panel, drag the progress bar to increase
or decrease the volume.
Adjust Screen Brightness
1. In the home desktop, press the “menu” button for the popup menu.
2. Click Settings.
3. Click on sound and display.
4. Scroll down the screen, click on brightness.
5. The brightness panel will appear on screen.
6. Adjust brightness by sliding between darker and brighter until desired
level is achieved.
7. Click OK.
Adjust the Screen Timeout
1. In the home desktop, press the “menu” button for the popup menu.
2. Click Settings.
3. Click on the sound and display.
4. Scroll down the screen, then click on “Screen timeout”.
5. Select the shutdown time.
Basic Settings
Unlock
When not working for a while on your Easypad, it will automatically go into
LOCK Mode. For unlocking your pad please click the lock button of the right hand
side of the screen and move upward till the middle.
Restore factory settings
If your device encounters a serious error or you forget your unlock password,
you can reset your device back to the original factory settings. Restore factory
settings means the deletion of downloaded applications and other user settings,
so all data will be lost. Remember to back up your data.
1.In the home desktop, press the “menu” button for the popup menu.
2.Click Settings.
3.Click to restore factory settings
4.The system will enter the erase data function.
The screen will be blank and the display black.
After all data is deleted the system will automatically reboot.
Basic Settings
Date and Time
The system will automatically use the network to provide the date,
time zone and time.
Note:
If you use the automatic function to set the time and date, you cannot set your
own date, time and time zone.
Adjusting the Time and Date
1.In the home desktop, press the “menu” button for the popup menu.
2.Click Settings.
3.Scroll down the screen, then click on the date and time settings.
4.Clear the Automatic check box.
5.Click the choose time zone, and then select the list of time zones.
Scroll down the list to see more time area, then click on Settings
6.Click to set the time. Then click the up or down buttons to adjust the hours and minutes. Select AM or PM to change the morning or afternoon.
Click set to complete.
7. Select the check box to use 24-hour format.
8.Click Select a date format
Set language
1.In the home desktop, press the “menu” button for the popup menu.
2.Click Settings.
3.Click on the region and text.
4.Click Select, and select the language you require.
Scroll down the list to see more languages.
Troubleshooting
Device cannot connect to a selected WIFI Network
1.Ensure your wireless router is turned on and working.
2.Ensure the device and the wireless router are within a valid distance,
and there are no walls or other obstructions between them.
3.Ensure your user name and password are correct
System freezes and doesn’t work correctly after installation
of applications
Installation of some applications may cause the system not to work correctly.
You can press the reset button (next to power port) to reset the system.
Unable to set up E-Mail Account
1.Ensure that the network is connected and that you can connect to the Internet.
2.Ensure your E-mail settings and passwords are correct.
3.Make sure your system time and local time are consistent.
The crossed out wheel bin symbol on this item indicates that this appliance
needs to be disposed of in an environmentally friendly way when it becomes of
no further use or has worn out. Contact your local authority for details of where to
take the item for re-cycling.
Open Source Code:
http://www.easypix.info/download/easypad1200/zt_source_code.zip
GNU General Public License:
http://www.gnu.org/licenses/gpl-2.0.html