1
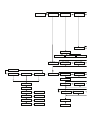
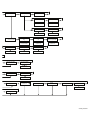
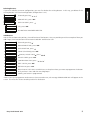
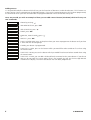
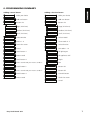
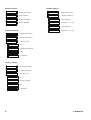
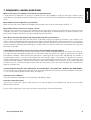
EASY TOUCH PANEL 10™
USER MANUAL
1
GEBRAUCHSANLEITUNG
11
GUIDE UTILISATEUR
21
MODO DE EMPLEO
31
MANUALE D’ISTRUZIONE
41
GEBRUIKSAANWIJZING
51
20267/20080916 • EasyTouch Panel 10™
ALL RIGHTS RESERVED MARMITEK ©
SELECT USING
ADD NEW BUTTON?
REMOVE BUTTON?
REMOVE ALL?
ARE YOU SURE?
TOUCH BUTTON NOW
BUTTON REMOVED
BUTTON SIZE…>
NO BUTTON FOUND
CANCELLED
LARGE (25X25MM)
SMALL (15X15MM)
HOUSE CODE: A
HOUSE CODE: B - O
QUIT NO CHANGES
MACRO 4
MACRO 2 - 3
MACRO 1
<-MACRO, HOUSE->
SET FUNCTION
UNIT 1
TOUCH SCREEN NOW
UNIT 2 - 15
STORED
TOUCH KEY:1 NOW
MACRO STORED
TOUCH KEY:2 NOW
MACRO STORED
TOUCH KEY:3 NOW
MACRO STORED
TOUCH KEY:4 NOW
MACRO STORED
BUTTON: ON
TOUCH SCREEN NOW
STORED
BUTTON: OFF
FACTORY RESET?
CHANGE MEMORY?
QUIT, NO CHANGES
USE MEMORY 1?
QUIT NO CHANGES
< MEMORY 1 >
CANCELLED
USE MEMORY 2?
< MEMORY 2 >
ARE YOU SURE?
YES
ALL REMOVED
MEDIUM (25X15MM)
QUIT NO CHANGES
CANCELLED
YES
NO
QUIT NO CHANGES
FACTORY RESET
CANCELLED
CANCELLED
NO
QUIT NO CHANGES
CANCELLED
CANCELLED
QUIT NO CHANGES
CANCELLED
HOUSE CODE: P
QUIT NO CHANGES
CANCELLED
UNIT 16
ALL LIGHTS ON
ALL UNITS OFF
DIM UP
DIM DOWN
QUIT NO CHANGES
CANCELLED
BUTTON: TOGGLE
20298_20090227
SAFETY WARNINGS
• To prevent short circuits, this product should only be used inside and only in dry spaces. Do not expose the components
to rain or moisture. Do not use the product close to a bath, swimming pool etc.
• Do not expose the components of your systems to extremely high temperatures or bright light sources.
• In case of improper usage or if you have altered and repaired the product yourself, all guarantees expire. Marmitek
does not accept responsibility in the case of improper usage of the product or when the product is used for purposes
other than specified. Marmitek does not accept responsibility for additional damage other than covered by the legal
product responsibility.
• This product is not a toy. Keep out of reach of children.
• The product should only be repaired or serviced by a qualified expert.
• Keep batteries out of the reach of children. Dispose of batteries as chemical waste. Never use old and new batteries
or different types of batteries together. Remove the batteries when you are not using the system for a longer period
of time. Check the polarity (+/-) of the batteries when inserting them in the product. Wrong positioning can cause an
explosion.
• Automatic switching devices provide comfort, but can also be dangerous. They can surprise people or can ignite
clothing hanging over an electric heat source. Please be careful and take appropriate measures to avoid accidents.
• In order to prevent damage (e.g. scratches) do not use any sharp objects for operating this product.
TABLE OF CONTENTS
HOW DOES MARMITEK X-10 WORK? ________________________________________________________________ 1
ADRESSES _____________________________________________________________________________________ 1
SIGNAL RANGE ________________________________________________________________________________ 2
INTRODUCTION___________________________________________________________________________________ 2
HOW DOES THE EASYTOUCH PANEL 10 WORK? ______________________________________________________ 3
INSTALLATION (factory settings) _____________________________________________________________________ 3
PERSONALISING YOUR EASYTOUCH PANEL 10 ________________________________________________________ 4
BACKGROUND ___________________________________________________________________________________ 4
PROGRAMMING SUMMARY ________________________________________________________________________ 7
FREQENTLY ASKED QUESTIONS _____________________________________________________________________ 9
TECHNICAL DATA ________________________________________________________________________________ 10
HOW DOES MARMITEK X-10 WORK?
Marmitek X-10 components use the existing mains wiring to communicate (using Marmitek X-10 signals). You can build
a complete system using the three different kind of components of the Marmitek X-10 System:
1. Modules:
These components will receive Marmitek X-10 signals and will switch or dim the attached lamp or
appliance. Examples of these modules are lamp modules and appliance modules. These are available
as build-in, micro, DIN rail and plug-in modules.
2. Controllers: These components will transmit Marmitek X-10 signals and thus will control the Modules.
3. Transmitters: Wireless components like remotes. The signals of these components will be received by a controller
with transceiver functionality (IRRF 7243, TM13 or CM15Pro). The Transceiver will translate the signals
into Marmitek X-10 signals on the power line.
ADRESSES
Up to a maximum of 256 different addresses can be preset. These are subdivided into a so-called HouseCode (A to
P incl.) and a UnitCode (1 to 16 incl.). The HouseCode can also be set on the controllers, so that the controllers and
modules become part of the same system. The address can be set either using code dials or by pressing buttons,
depending on the type of module.
The Marmitek X-10 System uses standard commands, which control all units with the same HouseCode at the same time
(e.g. all lights on, all off, etc.).
Easy Touch Panel 10™
1
SIGNAL RANGE
Range of Marmitek X-10 signals over the Power Line and how to increase the range.
The Marmitek X-10 System is based on power line communication. The range of the Marmitek X-10 signals very much
depends on the local circumstances. On average the range is a cable length of 80 meters.
If you have difficulties with the range of your Marmitek X-10 signals, please pay attention to the following facts:
1. When more than one phase is used for your electrical system, it is necessary to couple these phases for the Marmitek
X-10 signals. For coupling you can use FD10 Phase Couplers/Filters. You only need to install a Phase Coupler/Filter when
your wall outlets and light switches are divided over more than one phase (more than one group is no problem). For bigger
buildings or longer distances we advice you to use an active repeater instead of passive FD10’s.
2. It is possible that Marmitek X-10 signals are attenuated by devices and lights which are connected to the power line.
In a normal home situation this effect is negligible (the Marmitek X-10 system is using active gain control to eliminate the
effects). However, it is possible that a particular device in your house is attenuating the signals so much that the range of
Marmitek X-10 signals is decreased significantly. When you have range problems, it is wise to try to locate the device which
is attenuating the signals simply by unplugging devices from the power line, and testing the differences in range for your
Marmitek system. When e.g. your conclusion is that e.g. your computer monitor is attenuating the signal, you can use a
FM10 Plug-in Filter between the power line and the monitor to eliminate the effects.
Known devices which can cause attenuation are:
PC Monitors
PCs with heavy internal power supplies
Old Televisions
Copiers
Fluorescent Lights
Gas Discharge Lamps (Energy Saving Lamps)
3. Some (old) devices are able to disturb the signal by transmitting noise on the power line. Because the Marmitek X-10
signals are transmitted on 120 kHz, only noise on or near this frequency will have influence on the range. When you use a
FM10 Filter to connect this device to the power line, the noise will be filtered.
4. The Marmitek X-10 protocol has several mechanism to avoid modules to be switched on or off by other sources than
your Marmitek X-10 Controllers. However, it is possible that the Marmitek X-10 signals are disturbed by e.g. baby phones
which are in TALK mode (continuous transmission). When these kind of signals are present on the power line it is possible
that the Marmitek X-10 signals will not come through.
5. The mains do not stop at the front door of your home. Everything that is attached to mains nearby your home can have
influence on Marmitek X-10 signals (e.g. heavy machinery). If you think that your system is influenced by devices out of
your house, it is advisable to install FD10 Phase Coupler/Filter on each phase entering the house. These filters will block
signals coming into or going out of your house, but will also match the impedance for the mains. Hereby make your house
Marmitek X-10 compatible for these units. The FD10’s will not only filter but will also couple the phases (please see 1).
1. INTRODUCTION
Congratulations on the purchase of the Marmitek EasyTouch Panel 10! You can use this touch-screen control panel to easily
operate all your Marmitek X-10 modules. You can use the background supplied to immediately try out the EasyTouch Panel
10’s standard functions. If preferred, this background can be replaced by a photograph or image of your choice. You can
then install the panel in or on the wall. In this way, the control panel becomes personalised and the Marmitek EasyTouch
Panel 10 is suitable for every interior! You do not need a computer to programme the EasyTouch Panel 10.
2
© MARMITEK
Marmitek products are manufactured with great care and are of the highest quality. Please read this manual carefully
and follow the instructions to ensure you make the most of the opportunities offered by this product.
2. HOW DOES THE EASYTOUCH PANEL 10 WORK?
The way the EasyTouch Panel 10 works can be compared to an X-10 remote control. With this product, however, instead
of the fixed keys on a remote control, you can easily choose and define the position, size and role of each button yourself.
The EasyTouch Panel 10 wirelessly sends the Marmitek X-10 commands (RF) to your Marmitek X-10 transceiver, which
then places this on the power line. The installed Marmitek X-10 modules receive these commands and switch on or dim
the connected lights and appliances.
3. INSTALLATION (FACTORY SETTINGS)
Remove the lip in the middle of the back of the panel, by the battery holder by pulling it, so that the EasyTouch Panel 10
can be connected to a power source. The factory settings are now immediately active and you can test the functions.
Ensure that you have placed the Marmitek X-10 transceiver within the range of the control panel and that this is set
to the house code(s) to be used. This ensures that the RF signals from the EasyTouch Panel are converted into X-10
signals and are put onto the powerline. If you use a TM13 as transceiver, this will transfer all house codes if it is set
to house code P.
Memory (factory settings)
The EasyTouch Panel 10 has a built in memory for 2 configurations (MEMORY 1 and MEMORY 2). The factory settings
are saved in configuration 1. Configuration 2 is empty. You can programme both configurations 1 and 2 as you wish (see
Chapter 4. PERSONALISING YOUR EASYTOUCH PANEL 10).
Operating (factory settings)
The following diagram shows the commands that are pre-programmed as factory settings in EasyTouch Panel 10’s
MEMORY 1:
If you press on the first button, then address A1 ON will be sent. The appliances and/or lights that are at the address (A1)
will, therefore, go ON. And so on.
You can use the BRIGHT and DIM buttons to brighten or dim the light that you last operated.
Note: this only applies if a light (module) is installed at this address.
Easy Touch Panel 10™
3
Below, there are three examples of so-called macro buttons. A macro carries out the commands of between 1 and 4 other
buttons. By pressing on the macro button, bottom left, you can send A1 ON, A2 ON, A3 ON and A4 ON successively.
The 2nd macro button will switch on modules A5 to A8 one by one. The 3rd macro will switch off modules A5 to A8 one
by one. The button on the far right sends the ‘ALL UNITS OF’” command and all units on house code A will be switched
off as a result.
If you are using a TM13 transceiver and this is set to house code A, you can test the panel by using the first 2 buttons (A1
ON, A1 OFF) to switch the light or appliance that is controlled in the TM 13 on and off. TM 13’s unit code is always 1.
4. PERSONALISING YOUR EASYTOUCH PANEL 10
The factory settings are handy for a short demonstration or test. However, in order to get the most from the options
offered by the EasyTouch Panel 10, you can set it to suit you. This is very easy to do, on the back of the panel. You do not
need a computer for this. You are free to choose the position, size and function of the buttons.
Configurations
You can configure MEMORY 1 as well as MEMORY 2 as you wish and, if required, easily switch between the 2 configurations.
If you carry out a FACTORY RESET, configuration 1 will revert to factory settings. Configuration 2 will then be empty.
Buttons
You can programme a maximum of 30 buttons per configuration. You can choose from 3 dimensions:
Small (15x15mm)
Medium (25x15mm)
Large (25x25mm).
Don’t forget that there must be around half a centimetre between the buttons.
Functions and addresses
You can use all functions, house and unit codes with one another in 1 configuration.
5. BACKGROUND
Creating
You can place the desired background in the panel. You may wish to use a photo of your family, a map of your home or
any other image, photo or diagram. More information can be found at www.marmitek.com.
Changing
Place the EasyTouch Panel 10 on a table with the touch screen facing downwards. Turn the two catches towards the centre
of the panel. You can now carefully open the panel and replace the background with your own. Close the panel and turn
the two catches back again.
PROGRAMMING
Place the EasyTouch Panel 10 on a table with the touch screen facing downwards.
On the right hand side you can see an LCD display with 3 buttons underneath:
and the ‘OK’ button.
Press a random button. The display will show the text and you hear a short beep to
confirm that you have pressed a button.
Use the ‘
’ to browse through the menu. A summary of the menus can be found
on the first page of this manual.
4
© MARMITEK
Deleting buttons
If you wish to define your own configuration, you must first delete the existing buttons. In this way, you delete all the
existing buttons in the active configuration (configuration 1 or 2):
SELECT USING ‘>’
choose by pressing ‘ , , ’.
REMOVE ALL?
REMOVE ALL?, press ‘OK’
ARE YOU SURE?
ARE YOU SURE?, press ‘ ’
YES
YES, press ‘OK’
ALL REMOVED
ALL BUTTONS HAVE BEEN DELETED.
Add buttons
You are free to choose the position, size and function of the buttons. Here, we provide you with an example of how you
add a large (25x25mm) button with house/unit code ‘B4’ and function ‘ON’
SELECT USING ‘>’
choose by pressing ‘ ’.
ADD NEW BUTTON?
ADD NEW BUTTON?, press ‘OK’
BUTTON SIZE...
SIZE OF BUTTON, press ‘ ’
LARGE (25 X 25MM)
LARGE (25x25MM), press ‘OK’
<MACRO, HOUSE>
MACRO, HOUSE CODE , press ‘ ,
’
HOUSE CODE: B
HOUSE CODE B, press ‘OK’
SET FUNCTION
CONFIRM FUNCTION, press ‘ , , , ’
UNIT 4
UNIT CODE 4, press ‘OK’
BUTTON:ON
BUTTON ON, press ‘OK’
TOUCH SCREEN NOW
NOW TOUCH THE TOUCH SCREEN Press on the place where you want to programme the button
until you hear 5 short and then one long beep.*
SAVED, your button is programmed.
STORED
*Note: If you try to programme one button too close to another one, the message ‘ERROR OVERLAP!’ will appear on the
screen. You must then choose another position for the button.
Easy Touch Panel 10™
5
Adding macros
It is also possible to define a button which will carry out the functions of between 1 and 4 other buttons. This is known as a
macro function. You first programme the individual buttons. If you use the macro button once this has been programmed,
the commands which you have selected under the programmed button will be carried out one by one.
Here, we provide you with an example of how you can add a macro button (25x25mm) which will carry out
two commands:
SELECT USING ‘>’
choose by pressing ‘ ’.
ADD NEW BUTTON?
ADD NEW BUTTON?, press ‘OK’
BUTTON SIZE...
SIZE OF BUTTON, press ‘ ’
LARGE (25 X 25MM)
LARGE, press ‘OK’
<MACRO, HOUSE>
MACRO 1
MACRO 1, press ‘OK’
TOUCH SCREEN NOW
TOUCH SCREEN NOW, press on the place where you want to programme the button until you hear
5 short and then one long beep.
STORED
TOUCH KEY: 1 NOW
TOUCH KEY: 2 NOW
TOUCH KEY: 3 NOW
MACRO STORED
6
MACRO, HOUSE CODE , press ‘ ’
STORED, your button is programmed.
TOUCH KEY 1 NOW, press on the button which you would like to be carried out first when using
the macro button.
TOUCH KEY 2 NOW, press on the button which you would like to be carried out second when using
the macro button.
TOUCH KEY 3 NOW, you can add a third and fourth command to the macro button. If you do not
want to, do not touch the screen again. After a few seconds you will see the message MACRO
STORED on the display. The new macro button has now been programmed.
© MARMITEK
6. PROGRAMMING SUMMARY
Adding a macro button
Adding a function button
SELECT USING ‘>’
Make your choice
SELECT USING ‘>’
Make your choice
ADD NEW BUTTON?
Add new button
ADD NEW BUTTON?
Add new button
BUTTON SIZE...
Button size
BUTTON SIZE...
Button size
LARGE (25 X 25MM) Large (25x25mm)
LARGE (25 X 25MM)
Large (25x25mm)
MEDIUM (25 x 15 MM Medium (25x15mm)
MEDIUM (25 x 15 MM
Medium (25x15mm)
SMALL (15 X 15MM) Small (15x15mm)
SMALL (15 X 15MM)
Small (15x15mm)
<MACRO, HOUSE>
Select MACRO
<MACRO, HOUSE>
Select HOUSE
MACRO 1....4
Macro 1...4
HOUSE CODE: A....P
House code A...P
TOUCH SCREEN NOW
Touch the screen
SET FUNCTION
Select function
STORED
Saved
UNIT 1.....16
Unit code 1...16
TOUCH KEY: 1 NOW
Touch button 1
ALL LIGHTS ON
All lighting on
MACRO STORED
Macro saved
ALL UNITS OFF
All appliances OFF
TOUCH KEY: 2 NOW
Touch button 2
DIM UP
Bright
MACRO STORED
Wait 5 seconds and your macro is saved or...
DIM DOWN
Dim
TOUCH KEY: 3 NOW
touch button 3
BUTTON:ON
Button ON
MACRO STORED
Wait 5 seconds and your macro is saved or...
BUTTON:OFF
Button OFF
TOUCH KEY: 4 NOW
touch button 4
BUTTON:TOGGLE
TOGGLE button
MACRO STORED
Macro saved
TOUCH SCREEN NOW
Touch the screen
STORED
Saved
Easy Touch Panel 10™
7
Delete a button
Change memory
SELECT USING ‘>’
Make your choice
SELECT USING ‘>’
Make your choice
REMOVE BUTTON?
Delete button
CHANGE MEMORY?
Change memory?
TOUCH BUTTON NOW
Touch the button
BUTTON REMOVED
Button deleted
USE MEMORY 1?
< MEMORY 1 >
USE MEMORY 2
< MEMORY 2 >
Delete all buttons
SELECT USING ‘>’
Make your choice
REMOVE ALL?
Delete all buttons?
ARE YOU SURE?
Are you sure?
YES
YES
ALL REMOVED
All buttons deleted
NO
NO
CANCELLED
Cancelled
Use memory 1
Memory 1 is in use
Use memory 2
Memory 2 is in use
Factory settings
8
SELECT USING ‘>’
Make your choice
FACTORY RESET?
Factory settings?
ARE YOU SURE?
Are you sure?
YES
YES
FACTORY RESET
Factory settings
NO
NO
CANCELLED
Cancelled
© MARMITEK
7. FREQUENTLY ASKED QUESTIONS
What is the reason for modules to switch on/off spontaneously?
It is possible that a Marmitek X-10 System is installed at one of your neighbours using the same House Code. To solve
this problem try to change the House Code of your system, or have FD10 Phase Coupler/Filter installed at your incoming
mains.
My modules will not respond to my controller.
Make sure that the House Code on all Modules and Controllers are set to the same House Code (A .. P).
My modules will not react to my remote / sensor.
When you use a remote or sensor, you should have at least one TM13 Transceiver or Marmitek X-10 Security Console
installed in your house. These components will translate the radio signals to the Marmitek X-10 signal on the power line.
Using several remotes and sensors, you only need one central transceiver.
Am I able to increase the range of my remotes by using more Transceivers?
Yes, you can use more than one TM13 Transceiver in your home when the range of your remotes is not sufficient. The
TM13 is using so called collision detection to prevent signals to be disturbed when more than one TM13 is transmitting.
TM13’s will wait for a quite power line before transmitting their data. To prevent your Marmitek X-10 System to become
slow or to prevent dimming from becoming less smooth, make sure that the TM13 units are placed as far away from
each other as possible.
I have defined a button but if I press this I hear a short beep but nothing happens.
The EasyTouch Panel 10 ensures that, after touching the screen, the corresponding Marmitek X-10 code is sent wirelessly.
This signal must be received by a Marmitek X-10 transceiver which then places this signal on the power line and can
then operate a module. Check whether your transceiver is receiving this by using a TM13 and defining, for example, a
TOGGLE button which is set to the house code of the TM13 and unit code 1. If you touch this button on the screen,
leaving a slight pause of 1 second between each touch, you should be able to hear the TM13 switch. If you have used
several house codes together, ensure that you also use several TM13 modules, each of which is set to a house code that
has been used. Or set the house code of your TM13 to house code P. Then, the TM13 will place ALL received house
codes on the power line.
I cannot find the selections ‘ALL LIGHTS ON’, ‘ALL LIGHTS OFF’, ‘ALL UNITS OFF’, ‘DIM UP’ and ‘DIM DOWN’.
These functions are not bound to a unit code. If you wish to programme these functions, browse through the unit codes
(1...16). You will find the above functions after unit code 16.
How can I move a button?
You move a button by deleting the existing button and adding it again.
How can I clean the screen?
You can use a clean, soft, lint-free cloth which you can moisten slightly with distilled water. Do not spray any fluids
directly onto the screen.
Do you still have questions? Please check out www.marmitek.com for more information.
Easy Touch Panel 10™
9
8. TECHNICAL DATA
Touch screen and frame
Power:
Material frame:
Photo size:
Visible photo size:
Dimensions:
2 x AAA batteries
Brushed aluminium
218x165mm
210x154mm
260x205x20mm
Transmitter
Transmitter:
Antenna:
Range:
Protocol:
Incorporated Marmitek X-10/RF transmitter
Integrated antenna
Up to 30 free field, up to 20m through floors and walls
Marmitek X-10 RF protocol
Controller
Number of configurations:
Number of buttons:
Button size:
Minimum room between buttons:
Screen resolution:
Memory:
Functions:
Ambient temperature:
Maximum 2
Maximum 30 per configuration
Small (15x15mm)
Medium (25x15mm)
Big (25x25mm)
4mm
255x255 points
X resolution 0.9mm
Y resolution 0.7mm
Settings are saved after loss of power
Set house/unit code, Unit ON, Unit OFF, ON, CHANGE (toggle),
ALL UNITS OFF, ALL LIGHTING ON DIM+, DIM3 macros each with 4 functions
2 memories for buttons and settings
a. Mem 1: with factory settings
b. Mem 2: empty
Factory reset
-10º ~ +60º C (in operation)
Specifications may be modified without prior notice.
Environmental Information for Customers in the European Union
European Directive 2002/96/EC requires that the equipment bearing this symbol on the product and/or its packaging must not be disposed of with
unsorted municipal waste. The symbol indicates that this product should be disposed of separately from regular household waste streams. It is your
responsibility to dispose of this and other electric and electronic equipment via designated collection facilities appointed by the government or local authorities.
Correct disposal and recycling will help prevent potential negative consequences to the environment and human health. For more detailed information about the
disposal of your old equipment, please contact your local authorities, waste disposal service, or the shop where you purchased the product.
10
© MARMITEK
SICHERHEITSHINWEISE
• Um Kurzschluss vorzubeugen, dieses Produkt bitte ausschließlich innerhalb des Hauses und nur in trockenen Räumen
nutzen. Setzen Sie die Komponenten nicht Regen oder Feuchtigkeit aus. Nicht neben oder nahe eines Bades,
Schwimmbades usw. verwenden.
• Setzen Sie die Komponente Ihres Systems nicht extrem hohen Temperaturen oder starken Lichtquellen aus.
• Bei einer zweckwidrigen Verwendung, selbst angebrachten Veränderungen oder selbst ausgeführten Reparaturen
verfallen alle Garantiebestimmungen. Marmitek übernimmt bei einer falschen Verwendung des Produkts oder bei
einer anderen Verwendung des Produktes als für den vorgesehenen Zweck keinerlei Produkthaftung. Marmitek
übernimmt für Folgeschäden keine andere Haftung als die gesetzliche Produkthaftung.
• Dieses Produkt ist kein Spielzeug. Außer Reichweite von Kindern halten.
• Überlassen Sie Reparaturen oder Wartung nur Fachleuten.
• Halten Sie die Batterien außerhalb der Reichweite von Kindern. Liefern Sie die Batterien als chemischen Kleinabfall
ein. Verwenden Sie niemals alte und neue oder unterschiedliche Typen von Batterien durcheinander. Wenn Sie das
System längere Zeit nicht benutzen, entfernen Sie die Batterien. Achten Sie beim Einlegen der Batterien auf die
Polarität (+ / -): Ein falsches Einlegen kann zu Explosionsgefahr führen.
• Automatisches Schalten ist nicht nur bequem, sondern kann auch Gefahr bedeuten. So können Personen überrascht
werden, oder kann Kleidung, die über eine elektrische Wärmequelle hängt in Brand geraten. Passen Sie immer auf
und treffen Sie Maßnahmen um dies zu verhindern.
• Verwenden Sie keine scharfen Gegenstände zur Bedienung dieses Produkt um Beschädigungen (z.B. Kratzern) zu
begegnen.
INHALTSANGABE
WIE FUNKTIONIERT MARMITEK X-10? _______________________________________________________________
ADRESSIERUNG _______________________________________________________________________________
REICHWEITE VON SIGNALEN ____________________________________________________________________
EINFÜHRUNG ____________________________________________________________________________________
WIE FUNKTIONIERT DAS EASYTOUCH PANEL 10? _____________________________________________________
INSTALLATION (Einstellung ab Werk) ________________________________________________________________
IHR EASYTOUCH PANEL 10 INDIVIDUALISIEREN ______________________________________________________
HINTERGRUND __________________________________________________________________________________
PROGRAMMIERÜBERSICHT ________________________________________________________________________
HÄUFIG GESTELLTE FRAGEN _______________________________________________________________________
TECHNISCHE DATEN ______________________________________________________________________________
11
12
12
13
13
13
14
14
17
19
20
WIE FUNKTIONIERT MARMITEK X-10?
Die Komponenten aus dem Marmitek X-10 Sortiment kommunizieren mit einander über das bestehende Lichtnetz
(mittels Marmitek X-10 Signalen). Das Sortiment besteht aus drei Teilen:
1. Module:
Diese empfangen die Marmitek X-10 Signale und schalten oder dimmen die angeschlossene
Belastung. Modulbeispiele sind die Lampen- und Gerätemodule. Diese sind in den Modellen Einbau,
Mikro, Din-Rail und Steckanschluss erhältlich.
2. Empfänger:
Diese senden die Marmitek X-10 Signale und steuern somit die Module.
3. Sender:
Dies sind drahtlose Komponenten wie z.B. Fernbedienungen. Die Signale der Sender werden von
einem Empfänger mit Transceiver-funktion (IRRF 7243, TM13 oder CM15Pro) empfangen. Die
Signale werden von dem Transceiver auf das Lichtnetz gesetzt.
Easy Touch Panel 10™
11
ADRESSIERUNG
Sie können maximal bis zu 256 verschiedene Adressen einstellen. Diese sind aufgegliedert in einen so genannten HausCode
(A bis einschl. P) und einen UnitCode (1 bis einschl. 16). Der HausCode kann auch an den Reglern eingestellt werden,
sodass Regler und Module zum selben System gehören werden. Die Adresse kann mithilfe von Kodierscheiben oder durch
Tastenbedienung eingestellt werden. Dies hängt vom Modultyp ab.
Das Marmitek X-10 System beinhaltet standardmäßige Befehle, wobei alle Units innerhalb desselben HausCodes zugleich
gesteuert werden (z.B. sämtliche Lampen einschalten, alles ausschalten usw.).
REICHWEITE VON SIGNALEN
Reichweite von Marmitek X-10 Signalen über das Lichtnetz und diese Reichweite vergrössern.
Das Marmitek X-10 System basiert auf der Kommunikation über das bestehende Lichtnetz. Die Reichweite von Signalen
über das Lichtnetz ist sehr von der örtlichen Situation abhängig. Ein guter Durchschnitt der Reichweite ist jedoch eine
Kabellänge von 80 Metern.
Bei Problemen mit der Reichweite von Marmitek X-10 Signalen sind folgende Faktoren wichtig:
1. Werden mehrere Phasen im Haus verwendet, kann es notwendig sein, um diese Phasen für Marmitek X-10 Signale
zu koppeln. Dieses Koppeln kann geschehen, indem Sie einen FD10 Phasekoppler verwenden und wird benötigt, wenn
Steckdosen und Lampenanschlüsse tatsächlich über mehrere Phasen verteilt sind (mehrere Gruppen sind kein Problem für
die Marmitek X-10 Signale). Für größere Gebäude advisieren wir die Verwendung eines aktiven 3 Phasen Verstärkers statt
eines Koppelfilters.
2. Marmitek X-10 Signale können durch Geräte und Lampen vermindert werden, die auf das Lichtnetz angeschlossen
sind. In normalen Hausanlagen ist dieser Effekt normalerweise zu verwahrlosen (das Marmitek X-10 System verwendet
u.a. eine aktive Verstärker um diesen Effekt zu eliminieren). Doch kann es sein, dass ein einzelnes Gerät in Ihrer Wohnung
stört. Wenn Sie feststellen, dass Signale nicht immer gut durchkommen, dann können Sie ein solches Gerät relativ einfach
aufspüren, indem Sie die Stecker der verdächtigen Geräte aus der Steckdose ziehen und erneut einen Test durchführen.
Stellen Sie fest, dass Ihr Problem gelöst ist, durch z.B. den Stecker Ihres PC’s aus der Steckdose zu ziehen, dann können Sie
das Problem lösen, durch diesen PC-Monitor mit einem FM10 Steckerfilter zu versehen. Dieser Steckerfilter sorgt dafür, dass
die Signale nicht länger durch das betreffende Gerät vermindert werden.
Wir empfehlen um folgende Geräte zu kontrollieren:
PC Monitore
PC’s mit relativ hoher Leistung
Alte TV-Geräte
Kopiermaschinen
Ein Raum mit vielen Neonlampen
3. Einige (alte) Geräte können Störsignale auf das Lichtnetz bringen, wodurch die Marmitek X-10 Kommunikation gestört
wird. Es handelt sich dabei um Geräte, die auf einer Frequenz von 120 kHz stören. Diese 120 kHz werden vom Marmitek
X-10 System als Sendefrequenz verwendet um digitale Information über das Lichtnetz zu schicken. Geräte, die diese Art
Signale senden, können mit einem FM10 Steckerfilter versehen werden. Hierdurch werden Störsignale das Lichtnetz nicht
mehr erreichen.
4. Durch den Aufbau der Signale können andere (Stör)quellen die Module des Marmitek X-10 Systems niemals aktivieren
oder ausschalten. Wohl kann das Signal durch z.B. Babyüberwachungsgeräte, die dauernd im ‘Sprechmodus’ stehen, gestört
werden. Durch die Anwesendheit von diesen Signalen ist es möglich, dass das Marmitek X-10 Signal nicht durchkommt.
5. Das Lichtnetz Ihrer Wohnung endet nicht bei der Haustüre. Alles was außerhalb (in der Nähe) Ihrer Wohnung auf dem
Lichtnetz angeschlossen ist, kann die Marmitek X-10 Signale beeinflussen. Vor allem wenn Ihre Wohnung an eine Fabrikhalle
mit schweren Maschinen grenzt ist es nützlich, um einkommende Phasen mit einem FD10 Phasenfilter zu versehen. Diese
Filter formen eine Blockade für alle Signale, die in Ihre Wohnung wollen oder diese verlassen wollen, sorgen jedoch auch
für eine perfekte ‘Impedanzanpassung’ des Lichtnetzes Ihrer Wohnung. Sie bereiten Ihre Wohnung auf Marmitek X-10 vor,
indem Sie diese Module plazieren. Hierdurch kuppeln Sie auch gleichzeitig die Phasen (siehe Punkt 1).
12
© MARMITEK
1. EINFÜHRUNG
Herzlichen Glückwunsch zum Erwerb des Marmitek EasyTouch Panel 10! Diese Touchscreen Bedienungseinheit ermöglicht
es Ihnen, Ihre gesamten Marmitek X-10 Module einfach zu bedienen. Mit dem mitgelieferten Hintergrund können Sie
direkt die regulären Funktionen Ihres EasyTouch Panel 10 ausprobieren. Sie können den Hintergrund ganz nach Belieben
mit jeder willkürlichen Abbildung auswechseln. Daraufhin können Sie die Einheit sowohl in als an der Wand befestigen.
Somit wird die Bedienungseinheit Ihres Marmitek Easy Touch Panel 10 gänzlich auf Ihre persönlichen Wünsche und
Interieur abgestimmt. Sie benötigen keinen Computer, um das EasyTouch Panel 10 zu programmieren.
Die Produkte Marmiteks werden mit großer Sorgfalt hergestellt und sind von hoher Qualität. Lesen Sie diese Anleitung bitte
sorgfältig durch und befolgen Sie die Anweisungen, um die Möglichkeiten dieses Produkts optimal nutzen zu können.
2. WIE FUNKTIONIERT DAS EASYTOUCH PANEL 10?
Der Betrieb des Easy Touch Panel 10 ist mit einer X-10 Fernbedienung zu vergleichen. Mit diesem Produkt können Sie
nun jedoch anstelle der regulären Tasten auf der Fernbedienung nun selbst einfach die Position, Größe und Funktion der
Drucktasten wählen und definieren. Das EasyTouch Panel 10 sendet die Marmitek X-10 Befehle drahtlos (RF) zu Ihrem
Marmitek X-10 Transceiver, der diese dann in Ihr Stromnetz stellt. Die installierten Marmitek X-10 Module empfangen
diese Befehle und schalten oder dimmen die angeschlossenen Lampen und Geräte.
3. INSTALLATION (EINSTELLUNG AB WERK)
Entfernen Sie die Lasche mittig der Rückseite der Einheit durch Ziehen, sodass das EasyTouch Panel 10 mit Strom gespeist
wird. Die Einstellungen ab Werk sind nun sofort aktiv und Sie können den Betrieb testen.
Achten Sie dabei darauf, dass Sie einen Marmitek X-10 Transceiver in Reichweite der Bedienungseinheit aufgestellt
haben und dieser auf den/die gewünschten Hauscode(s) eingestellt ist. Dieser bewirkt, dass die RF Signale des EasyTouch
Panel in X-10 Signale umgewandelt und ins Stromnetz gestellt werden. Wenn Sie ein TM13 als Transceiver verwenden,
wird dieser sämtliche Hauscodes weitersenden, wenn er auf Hauscode P eingestellt ist.
SPEICHERPLATZ (Einstellung ab Werk)
Das EasyTouch Panel 10 besitzt einen eingebauten Speicherplatz für 2 Konfigurationen (MEMORY 1 und MEMORY 2).
In Konfiguration 1 sind die Einstellungen ab Werk gespeichert. Konfiguration 2 ist leer. Sie können ganz nach Wunsch
sowohl Konfiguration 1 wie 2 programmieren. (sehen Sie Kapitel 4. IHR EASYTOUCH PANEL 10 INDIVIDUALISIEREN)
Bedienung (Einstellung ab Werk)
In nachstehender Abbildung sehen Sie die Befehle, die im MEMORY 1 des EasyTouch Panel 10 ab Werk vorprogrammiert sind:
Easy Touch Panel 10™
13
Wenn Sie auf die erste Taste drücken, so wird also die Adresse A1 EIN, versendet werden. Alle bei dieser Adresse (A1)
angemeldeten Geräte und Lampen werden also EINgeschaltet werden. Und so weiter.
Mit der BRIGHT und DIM- Taste können Sie die zuletzt bediente Lampe dimmen oder heller einstellen.
Achtung: Selbstverständlich nur, wenn eine Lampe (Beleuchtungsmodul) auf dieser Adresse installiert ist.
Unten in der Abbildung sehen Sie 3 Beispiele so genannter Makro Drucktasten. Ein Makro führt die Funktion von einer bis
zu 4 anderen Drucktasten durch. So versenden Sie, wenn Sie auf die Makrodrucktaste links unten drücken, nacheinander
A1 EIN, A2 EIN, A3 EIN und A4 EIN.
Die zweite Makrodrucktaste wird die Module A5 bis einschl. A8 Stück für Stück einschalten. Die dritte Makrodrucktaste
wird die Module A5 bis einschl. A8 Stück für Stück ausschalten. Die ganz rechts befindliche Drucktaste versendet den “ALL
UNITS OFF” Befehl, womit alle auf Hauscode A eingestellten Einheiten ausgeschaltet werden.
Wenn Sie einen TM13 als Transceiver verwenden und dieser auf HausCode A eingestellt ist, können Sie die Einheit direkt
testen, indem Sie mit den ersten zwei Drucktasten A1 ON, A1 OFF) die Lampe oder das an das TM13 angeschlossene Gerät
ein- und ausschalten. Der UnitCode des TM13 ist nämlich immer die 1.
4. IHR EASYTOUCH PANEL 10 INDIVIDUALISIEREN
Die Einstellungen ab Werk sind sehr praktisch, da sie sich gut für kurze Demonstrationen oder Tests eignen. Um jedoch alle
Möglichkeiten, die das EasyTouch Panel10 bietet zu nutzen, können Sie es völlig auf Ihre eigenen Wünsche zugeschnitten
einstellen. Dazu benötigen Sie keinen Computer, sondern nehmen die Einstellung auf der Rückseite des Panels vor. Es ist
Ihnen überlassen, die Position, Größe und Funktion der Drucktasten zu bestimmen.
Konfigurationen
Sie können ganz nach Wunsch sowohl MEMORY 1 wie auch MEMORY 2 konfigurieren und bei Bedarf zwischen den 2
Konfigurationen wechseln. Wenn Sie das Reset ab Werk (FACTORY RESET) durchführen, wird Konfiguration 1 wieder die
Einstellung ab Werk beinhalten. Konfiguration 2 ist dann leer.
Drucktasten
Sie können pro Konfiguration maximal 30 Drucktasten programmieren. Dabei können Sie sich für 3 Grö_en entscheiden:
Klein (15 x 15mm)
Mittelmäßig (25x15mm)
Groß (25x25mm)
Berücksichtigen Sie, dass sich zwischen den zu bestimmenden Drucktasten ca. ein halber Zentimeter Raum befinden
muss.
Funktionen und Adressen
Sie können sämtliche Funktionen, Haus- und UnitCodes durcheinander in einer Konfiguration benutzen.
5. HINTERGRUND
Erstellen
Sie können jeden gewünschten Hintergrund in das Panel integrieren. Dazu können Sie ein Foto Ihrer Familie, einen Grundriss
Ihrer Wohnung oder Abbildungen und Zeichnungen jeglicher Art wählen. Weitere Informationen finden Sie auf www.
marmitek.com.
Wechseln
Legen Sie das EasyTouch Panel 10 mit dem Touchscreen nach unten auf den Tisch. Drehen Sie die zwei Verschlussklemmen
zur Mitte des Panels. Sie können das Panel nun vorsichtig öffnen und den Hintergrund durch einen eigenen ersetzen.
Schließen Sie das Panel wieder und drehen Sie die zwei Verschlussklemmen wieder zurück.
14
© MARMITEK