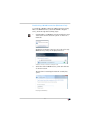
1
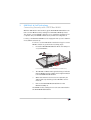
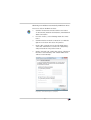
FRITZ!WLAN
USB Stick N
Installation,
Configuration
and Operation
Basis-Template: Handbuch Deckblatt, AVM
FRITZ!Box-Produkte · Stand: 03-2009
Legal Notice
FRITZ!WLAN USB Stick N
This documentation and the software it describes are protected by copyright. AVM grants the
non-exclusive right to use the software, which is supplied exclusively in what is known as object code format. The licensee may create only one copy of the software, which may be used exclusively for backup use.
AVM reserves all rights that are not expressly granted to the licensee. Without previous approval in writing, and except for in cases permitted by law, it is particularly prohibited to
• copy, propagate or in any other manner make this documentation or this software publicly
accessible, or
• process, disassemble, reverse engineer, translate, decompile or in any other manner open
the software and subsequently copy, propagate or make the software publicly accessible in
any other manner.
Please consult the License.txt file on the product CD included in the package for specifics
about the licensing conditions.
This documentation and software have been produced with all due care and checked for correctness in accordance with the best available technology. AVM GmbH disclaims all liability
and warranties, whether express or implied, relating to the AVM product’s quality, performance
or suitability for any given purpose which deviates from the performance specifications contained in the product description. The licensee bears all risk in regard to hazards and impairments of quality which may arise in connection with the use of this product.
AVM will not be liable for damages arising directly or indirectly from the use of the manual or
the software, nor for incidental or consequential damages, except in case of intent or gross
negligence. AVM expressly disclaims all liability for the loss of or damage to hardware or software or data as a result of direct or indirect errors or destruction and for any costs (including
connection charges) related to the documentation and the software and due to incorrect installations not performed by AVM itself.
The information in this documentation and the software are subject to change without notice
for the purpose of technical improvement.
We offer a manufacturer’s warranty for this original product. The conditions of this warranty are
contained in the Warranty.pdf file in the Info folder on the product CD included with delivery.
© AVM GmbH 2007 - 2010. All rights reserved. Documentation release 04/2010
AVM Audiovisuelles Marketing
und Computersysteme GmbH
Alt-Moabit 95
AVM Computersysteme
Vertriebs GmbH
Alt-Moabit 95
D 10559 Berlin
D 10559 Berlin
AVM in the Internet: www.avm.de/en
2
Trademarks: Unless otherwise indicated, all trademarks mentioned are legally protected trademarks owned by AVM GmbH, especially product names and logos. Microsoft, Windows and the
Windows logo are trademarks owned by Microsoft Corporation in the USA and/or other countries.
Bluetooth is a trademark of Bluetooth SIG, Inc. licensed to AVM GmbH. All other product and company names are trademarks of their respective owners.
3
Table of Contents
1
FRITZ!WLAN USB Stick N . . . . . . . . . . . . . . . . . . . . . . . . . . . 8
1.1
1.2
1.3
1.4
Package Contents . . . . . . . . . . . . . . . . . . . . . . . . . . . . . . . . . . . . . . . . . . 8
Operation Requirements . . . . . . . . . . . . . . . . . . . . . . . . . . . . . . . . . . . . 8
LEDs. . . . . . . . . . . . . . . . . . . . . . . . . . . . . . . . . . . . . . . . . . . . . . . . . . . . . 9
Technical Specifications . . . . . . . . . . . . . . . . . . . . . . . . . . . . . . . . . . . 10
2
AVM Stick & Surf Technology . . . . . . . . . . . . . . . . . . . . . . 12
3
Installation. . . . . . . . . . . . . . . . . . . . . . . . . . . . . . . . . . . . . 14
3.1
3.2
3.3
3.4
Installation in Windows 7 / Windows Vista 32-bit Edition. . . . . . . . . 14
Installation in Windows 7 / Windows Vista 64-bit Edition. . . . . . . . . 15
Installation in Windows XP 32-bit Edition. . . . . . . . . . . . . . . . . . . . . . 16
Installation in Windows XP 64-bit Edition. . . . . . . . . . . . . . . . . . . . . . 17
4
The FRITZ!WLAN Control Software . . . . . . . . . . . . . . . . . . 19
4.1
4.2
Operating FRITZ!WLAN . . . . . . . . . . . . . . . . . . . . . . . . . . . . . . . . . . . . . 19
Establishing a WLAN Connection. . . . . . . . . . . . . . . . . . . . . . . . . . . . . 21
5
Microsoft WLAN Service . . . . . . . . . . . . . . . . . . . . . . . . . . 25
6
More about WLAN . . . . . . . . . . . . . . . . . . . . . . . . . . . . . . . 30
6.1
6.2
6.3
6.4
Standards . . . . . . . . . . . . . . . . . . . . . . . . . . . . . . . . . . . . . . . . . . . . . . . 30
Security . . . . . . . . . . . . . . . . . . . . . . . . . . . . . . . . . . . . . . . . . . . . . . . . . 32
Frequency Range. . . . . . . . . . . . . . . . . . . . . . . . . . . . . . . . . . . . . . . . . . 34
WPS (Wi-Fi Protected Setup) . . . . . . . . . . . . . . . . . . . . . . . . . . . . . . . . 36
7
Uninstallation . . . . . . . . . . . . . . . . . . . . . . . . . . . . . . . . . . 38
8
Troubleshooting . . . . . . . . . . . . . . . . . . . . . . . . . . . . . . . . 39
8.1
8.2
8.3
8.4
Errors During Installation . . . . . . . . . . . . . . . . . . . . . . . . . . . . . . . . . . . 39
WLAN Connection Is Not Established . . . . . . . . . . . . . . . . . . . . . . . . . 42
Errors During Data Exchange with Other Devices in the Network . . . 44
Checking the IP Settings . . . . . . . . . . . . . . . . . . . . . . . . . . . . . . . . . . . 47
4
9
Customer Service Guide . . . . . . . . . . . . . . . . . . . . . . . . . . 52
9.1
9.2
9.3
Product Documentation . . . . . . . . . . . . . . . . . . . . . . . . . . . . . . . . . . . . 52
Information in the Internet. . . . . . . . . . . . . . . . . . . . . . . . . . . . . . . . . . 53
Support from the AVM Service Team . . . . . . . . . . . . . . . . . . . . . . . . . . 53
Index . . . . . . . . . . . . . . . . . . . . . . . . . . . . . . . . . . . . . . . . . 55
5
Safety Instructions
When working with the FRITZ!WLAN USB Stick N, follow
the instructions below to protect yourself and the
FRITZ!WLAN USB Stick N from damage.
•
Do not install FRITZ!WLAN USB Stick N during an electrical storm.
•
Unplug the FRITZ!WLAN USB Stick N from the computer during an electrical storm.
•
Never let liquids get inside the FRITZ!WLAN USB
Stick N. Otherwise, electric shocks or short circuits
may result.
•
Protect the FRITZ!WLAN USB Stick N from dust, moisture and steam. Clean the FRITZ!WLAN USB Stick N
with a slightly moist, lint-free cloth. Intensive cleaning products or solvents are not suitable.
•
FRITZ!WLAN USB Stick N is intended for indoor use
only.
•
Do not open the FRITZ!WLAN USB Stick N housing.
The device contains hazardous components and
should only be opened by authorized repair technicians.
Disposal Instructions
The symbol next to this text means that old appliances
and electronic parts must be disposed of separate from
household waste.
In accordance with European regulations and the Electrical and Electronic Equipment Act (ElektroG), the
FRITZ!WLAN USB Stick N, as well as all devices and electronic components contained in the FRITZ!WLAN USB
Stick N package may not be disposed with household
waste. Please bring these to your local collection points
for disposal.
6
Symbols and Highlighting
The following highlighting and icons are used to designate
important information:
This symbol indicates important instructions that must be
observed to avoid malfunctions.
This symbol indicates useful hints to assist you in working
with the FRITZ!WLAN USB Stick N.
The table below explains the highlighting used in this
manual.
Highlighting
Function
Quotation marks Keys
Example
“F1” key
Buttons
“Help”
Settings pages
“Advanced”
Menus
“Edit / Paste”
Commands
“Copy”
File paths
“C:/My Documents”
File names
“Documentation”
Pointed brackets Joker
<MSN>
Bold
Do not click the button...
Emphasis
7
1
FRITZ!WLAN USB Stick N
Overview
FRITZ!WLAN USB Stick N is a WLAN adapter for the Universal Serial Bus
(USB).
With the FRITZ!WLAN USB Stick N, you can connect your computer directly with a WLAN access point, for example, with an AVM
FRITZ!Box WLAN . You can also connect to other WLAN devices, to printers, and to PDAs. This grants you high mobility while allowing you to
work with all of the advantages of wireless connections, high throughput rates and fast connections at maximum security.
1.1
Package Contents
The package contains:
•
one WLAN-Controller FRITZ!WLAN USB Stick N
•
•
one USB docking station
one FRITZ!WLAN USB Stick N CD with
– driver software
– control software with Online Help
– manual in PDF format
•
1.2
one printed quick guide
Operation Requirements
In order to operate FRITZ!WLAN USB Stick N, your computer must meet the following requirements:
•
A free port on your computer for USB devices. A
USB 2.0 port is recommended; USB 1.1 works at a
lower throughput rate.
•
A computer with one of the following operating systems installed:
– Microsoft Windows 7 (32- or 64-bit edition)
– Microsoft Windows Vista (32- or 64-bit edition)
– Windows XP (32- or 64-bit edition)
8
Installation of the latest service packs and updates is
recommended.
•
pentium-class computer or notebook (500 MHz CPU
or better)
•
at least 64 MB RAM and 5 MB free memory on the
hard drive
•
one CD drive
You can install FRITZ!WLAN USB Stick N if your computer
meets all of these requirements.
If you would like to connect additional computers, additional FRITZ!WLAN USB Sticks are required.
1.3
LEDs
During operation, the LEDs on the FRITZ!WLAN USB Stick N
indicate the following:
green:
USB
yellow: WLAN
remains lit as soon as the
FRITZ!WLAN USB Stick N has been detected by the operating system
flashes during data exchange between
WLAN devices
9
1.4
Technical Specifications
LEDs:
2 (connection / activity)
USB port:
USB version 2.0, compatible with
USB 1.1 with reduced data throughput
WLAN module:
Support for radio network in accordance
with
IEEE 802.11n
IEEE 802.11g
IEEE 802.11b and
IEEE 802.11a
Frequency band:
2.4 and 5 GHz
Encryption:
WPA (Wi-Fi Protected Access) / WPA2
(802.11i) / WEP 64-/128-bit (Wired
Equivalent Privacy)
Antennae:
integrated
Operating systems Windows 7 (32-bit or 64-bit edition),
supported:
Windows Vista (32-bit or 64-bit edition),
Windows XP (32-bit or 64-bit edition)
Dimensions
(WxDxH):
approx. 73 x 24.5 x 10.5 mm
Weight:
approx. 13 g
Power supply:
powered by USB, no external power supply required
Maximum power
consumption:
1.65 W (2.4-GHz transfer)
1.82 W (5-GHz transfer)
Transmitter power: max. 76 mW
Receiver sensitivity: min. -104 dBm (2.4 GHz)
min. -92 dBm (5 GHz)
Supported data
throughput rates
(gross):
802.11n up to 300 Mbit/s *
802.11g up to 54 Mbit/s *
802.11b up to 11 Mbit/s *
802.11a up to 54 Mbit/s *
* The user data rate that can actually be
achieved is somewhat below the specified
value (see the table on page 30).
10
Firmware:
can be updated
Channels:
1 through 13 and 36 through 140 (ETSI)
Ambient tempera- -5 to 45°C
ture (during operation):
Ambient
-10 to 70°C
temperature (idle):
Humidity
(idle/operation):
5 to 90%, no-condensation
Certification:
CE
11
2
AVM Stick & Surf Technology
Connecting Securely with a FRITZ!Box WLAN
With the AVM Stick & Surf technology the FRITZ!WLAN USB Stick N can
take over the WLAN security settings from FRITZ!Box WLAN products.
This allows a secure WLAN connection to be established between your
computer and your FRITZ!Box without any additional configuration.
For this, your FRITZ!Box WLAN must be equipped with a port for USB devices (USB host function).
In order to use the AVM Stick & Surf technology for secure
WLAN connections, perform the following steps:
1.
Insert the FRITZ!WLAN USB Stick N into the USB port
on your FRITZ!Box.
automatic security
for wireless surfing
Port for USB devices (here on the FRITZ!Box Fon WLAN 7270)
2.
The FRITZ!Box “INFO” LED begins flashing to indicate
that the WLAN security settings are being transmitted
to the FRITZ!WLAN USB Stick N.
3.
When data transmission has been completed, the
“INFO” LED stops flashing on the FRITZ!Box and remains lit.
4.
Remove the FRITZ!WLAN USB Stick N from the
FRITZ!Box USB port.
The WLAN security settings have now been transmitted to
the FRITZ!WLAN USB Stick N.
12
As soon as you connect the FRITZ!WLAN USB Stick N to
your computer, the security settings of your WLAN are implemented in the FRITZ!WLAN control software and then
deleted from the Stick. The AVM Stick & Surf logo appears
and a WLAN connection to your FRITZ!Box is established
automatically.
If you are using a FRITZ!Box WLAN without a USB port or a
device from a third-party manufacturer as a WLAN access
point, you can still use WPS (Wi-Fi Protected Setup) or enter the network key manually to establish a secure WLAN
connection.
For more information, see the section “WPS (Wi-Fi Protected Setup)” from page 36 and the Help on the FRITZ!WLAN
control software, which is available as soon as your
FRITZ!WLAN USB Stick N has been installed.
13
3
Installation
Installing FRITZ!WLAN USB Stick N
The FRITZ!WLAN USB Stick N can be installed in the operating systems
Windows 7 (32-bit or 64-bit edition), Windows Vista (32-bit or 64-bit
edition) and Windows XP (32-bit or 64-bit edition).
Please install the current Microsoft Service Packs using
Microsoft Windows Update and use a USB 2.0 port for optimum performance of your FRITZ!WLAN USB Stick N.
You can change the display of menus and folders in most
operating systems. The following instructions are based
on the standard installation of each operating system.
If you have a FRITZ!Box WLAN with USB host function, first
use Stick & Surf (see “AVM Stick & Surf Technology” from
page 12) to transmit the WLAN security settings from your
FRITZ!Box WLAN to your computer.
3.1
Installation in Windows 7 / Windows Vista 32-bit Edition
Administrator rights are required to install the
FRITZ!WLAN USB Stick N in Windows 7 or Windows Vista!
Over the course of installation Windows will request the
rights required for installation. Answer every inquiry by
clicking “Yes” (Windows 7) or “Continue” (Windows Vista)
in the dialog.
1.
Switch on the WLAN device you wish to connect to.
2.
Switch on your computer.
3.
Insert the FRITZ!WLAN USB Stick N into the USB port
on your computer.
Windows detects the FRITZ!WLAN USB Stick N automatically. This process may take some time.
4.
In the dialog for running the “FRITZ!WLAN USB
Stick N” CD, click the “FRITZ!WLAN USB Stick N Installation” entry.
14
5.
Then click “Yes” (Windows 7) or “Continue”
(Windows Vista) in the “User Account Control” dialog.
The drivers and the control software for the
FRITZ!WLAN USB Stick N will be installed now.
If you are prompted to do so, insert the
FRITZ!WLAN USB Stick N CD and follow the instructions on the screen.
If an additional Windows dialog asks if you want to
install software not digitally signed by Microsoft,
click “Continue Anyway”. This request depends on
the driver signature options set on your computer.
A progress bar indicates the progress and the conclusion of the installation.
This completes the driver installation for the
FRITZ!WLAN USB Stick N. Continue reading from section
“Information on WLAN Connections” from page 18.
3.2
Installation in Windows 7 / Windows Vista 64-bit Edition
Administrator rights are required to install the
FRITZ!WLAN USB Stick N in Windows 7 64-bit edition or
Windows Vista 64-bit edition!
1.
Switch on the WLAN device you wish to connect to.
2.
Switch on your computer.
3.
Insert the FRITZ!WLAN USB Stick N into the USB port
on your computer.
Windows detects the FRITZ!WLAN USB Stick N automatically. This process may take some time.
4.
In the “Autoplay” dialog, select the “FRITZ!WLAN USB
Stick N installation” option.
5.
Then click “Yes” (Windows 7) or “Continue”
(Windows Vista) in the “User Account Control” dialog.
15
6.
In the “Found New Hardware” window, select “Locate
and install driver software (recommended)”.
If Windows reports that the program may not have
been installed correctly, click “The Program was installed correctly.” or “Cancel”.
7.
Then click “Yes” or “Continue” in the “User Account
Control” dialog.
8.
If Windows asks whether you would like to search for
drivers online, select the “Do not search for drivers
online” option.
9.
Insert the FRITZ!WLAN USB Stick N CD when Windows
prompts you to do so.
The driver software is installed automatically.
This completes the driver installation for the
FRITZ!WLAN USB Stick N. Continue reading from section
“Information on WLAN Connections” from page 18.
3.3
Installation in Windows XP 32-bit Edition
Administrator rights are required to install the
FRITZ!WLAN USB Stick N in Windows XP!
1.
Switch on the WLAN device you wish to connect to.
2.
Switch on your computer.
3.
Insert the FRITZ!WLAN USB Stick N into the USB port
on your computer.
Windows detects the FRITZ!WLAN USB Stick N automatically. This process may take some time.
4.
The drivers and the control software for your
FRITZ!WLAN USB Stick N are installed automatically.
If you are prompted to do so, insert the
FRITZ!WLAN USB Stick N CD and follow the instructions on the screen.
16
If an additional Windows dialog asks if you want to
install software not digitally signed by Microsoft,
click “Continue Anyway”. This request depends on
the driver signature options set on your computer.
A progress bar indicates the progress and the conclusion of the installation.
This completes the driver installation for the
FRITZ!WLAN USB Stick N. Continue reading from section
“Information on WLAN Connections” from page 18.
3.4
Installation in Windows XP 64-bit Edition
Administrator rights are required to install the
FRITZ!WLAN USB Stick N in Windows XP 64-bit Edition!
1.
Switch on the WLAN device you wish to connect to.
2.
Switch on your computer.
3.
Insert the FRITZ!WLAN USB Stick N into the USB port
on your computer.
Windows detects the FRITZ!WLAN USB Stick N automatically. This process may take some time.
4.
When asked whether you would like to connect to
Windows Update, select the option “No, not this
time” and then click “Next”.
The “Add New Hardware Wizard” starts and searches
for drivers.
5.
Insert the FRITZ!WLAN USB Stick N CD and select the
option “Install software automatically (recommended)”. Confirm with “Continue”.
If an additional Windows dialog asks if you want to
install software not digitally signed by Microsoft,
click the “Continue Anyway” button. This request depends on the driver signature options set on your
computer.
17
6.
A message appears: “The Wizard has finished installing the software for this device”. Conclude the installation by clicking “Finish”.
This completes the driver installation for the
FRITZ!WLAN USB Stick N. Continue reading in the next section, “Information on WLAN Connections”.
Information on WLAN Connections
If you performed installation using Stick & Surf, no further
steps are necessary to establish a WLAN connection. Your
FRITZ!Box WLAN will be identified automatically as WLAN
access point. A WLAN connection you can use immediately will be established.
If you performed installation without using Stick & Surf,
you have to select the WLAN remote site (the WLAN access
point) to connect with manually in your WLAN control software. Please see the corresponding chapter of the control
software for more information:
•
If you are using the control software FRITZ!WLAN,
please continue by reading the section “Establishing
a Connection with a WLAN Access Point (Infrastructure Network)” from page 21.
•
If you are using Windows Vista’s Microsoft WLAN Service, continue reading in the section “Establishing a
WLAN Connection (Windows 7)” from page 25, “Establishing a WLAN Connection (Windows Vista)” from
page 27 or “Establishing a WLAN Connection
(Windows XP from Service Pack 2)” from page 28.
18
4
The FRITZ!WLAN Control Software
Establishing and Clearing WLAN Connections
With the FRITZ!WLAN USB Stick N you can establish wireless network
connections (WLANs) with various WLAN devices. The FRITZ!WLAN control software is available to manage all these WLAN connections.
With FRITZ!WLAN you can configure, establish and clear WLAN connections as well as view connection information.
4.1
Operating FRITZ!WLAN
After FRITZ!WLAN USB Stick N is installed, FRITZ!WLAN appears as a program icon in the notification area of the task
bar. You can open the user interface of the control software in two ways:
•
Double-click the FRITZ!WLAN program icon in the notification area of the Windows task bar.
•
Or click the FRITZ!WLAN program icon with the right
mouse button to open the context menu and select
the “Display Connection...” command.
FRITZ!WLAN user interface (connection example)
User Interface
All elements of a WLAN connection are displayed as icons
in the user interface. The user interface window is divided
into three sections.
The left side shows your own WLAN device, the
FRITZ!WLAN USB Stick N, complete with name and IP address.
19
The middle section displays the icon of the WLAN connection as a box with links to the devices on the left and on
the right. The small icons in the box display the connection quality and the encryption used.
The right side shows the WLAN remote site with which you
are currently connected or were connected most recently.
Context Menus
The features of FRITZ!WLAN are available using the context
menu:
1.
Click the device or connection icons in the
FRITZ!WLAN user interface, or the FRITZ!WLAN program icon in the notification area of the task bar.
The corresponding context menu opens.
2.
Select the desired command.
Each icon displays its own selection of commands. You
can search for WLAN devices at your location and configure them as WLAN remote sites, establish or clear WLAN
connections to known remote sites, and have information
displayed on device and connection properties.
For more information, please see the section “Establishing a WLAN Connection” from page 21 or click the “Help”
button in the user interface to open the FRITZ!WLAN Online Help.
Connection Status
The colors of the connection icons in the FRITZ!WLAN user
interface and the FRITZ!WLAN program icon in the notification area of the task bar show the current condition of the
connection:
Icon
Meaning
WLAN connection active
and
WLAN connection is being established or the ad-hoc network you offered is ready to
connect
No WLAN connection
and
20
4.2
Establishing a WLAN Connection
With FRITZ!WLAN you can establish WLAN connections to
WLAN remote sites (access points), which can provide access to DSL, to printers, to mobile telephones, PDAs, and
even to other WLAN clients. Direct connections are also
possible to other FRITZ!WLAN USB Sticks.
No matter which device you want to connect to, connecting with FRITZ!WLAN is always based on the principle:
search, find, and connect.
There are two basic types of WLAN connections:
Infrastructure
Network
When WLAN users connect with a WLAN access point like
the FRITZ!Box WLAN, they establish what is called an infrastructure network. In this network the WLAN access point
manages bandwidth so that each device receives the optimum amount. The access point can be used to establish
connections to a cable-connected network or the Internet.
In the device lists in the FRITZ!WLAN control software, this
type of connection is designated by the infrastructure network icon.
Ad-hoc Network
When WLAN users connect directly with each other without using an access point, they have established an adhoc network. This kind of direct connection is practical
when WLAN users in the immediate vicinity want to exchange data with each other quickly and directly. The adhoc network participants have to share the existing bandwidth.
In the device lists in the FRITZ!WLAN control software, this
type of connection is designated by the ad-hoc connection
icon.
Establishing a Connection with a WLAN Access Point
(Infrastructure Network)
If you performed installation using Stick & Surf, no further
steps are necessary to establish a WLAN connection. Your
FRITZ!Box WLAN will be identified automatically as WLAN
access point. A WLAN connection you can use immediately will be established.
21
If you performed installation without using Stick & Surf,
you have to select the WLAN remote site (the WLAN access
point) to connect with manually. In this case the control
software FRITZ!WLAN automatically searches for WLAN devices at your location. Once a list of the WLAN access
points found is displayed, proceed as follows:
1.
Select the WLAN device to which you would like to establish a connection and confirm your selection by
clicking “Select” or “Connect”.
2.
Enter the network key of the WLAN access point.
On the AVM FRITZ!Box family products, the network
key is printed on the underside of the device.
3.
The WLAN connection is established.
Once the connection is established, the WLAN icon in the
notification area of the Windows task bar turns green.
Click the icon to display connection details.
An active WLAN connection between the FRITZ!WLAN USB
Stick N and a known WLAN remote site that has been
cleared because the computer has been shut down will be
re-established automatically every time the computer is
started whenever the remote site is accessible.
Connecting Two WLAN Users Directly
(Ad-hoc Network)
To establish a direct connection via WLAN, one WLAN party has to offer an ad-hoc network that other ad-hoc parties
may join.
How to Create an Ad-hoc Network
1.
In the FRITZ!WLAN user interface, click the icon of the
WLAN remote site with the right mouse button or
click the FRITZ!WLAN program icon in the notification
area of the task bar and select the command “Create
Ad-hoc Network…”.
The “Ad-hoc Network” window opens.
22
2.
Enter the WLAN key in the “WLAN key” field.
All other WLAN parties of the ad-hoc connection must
also enter this key.
See also the encryption instructions in the section
“Encryption” from page 33.
Confirm the settings configured earlier for the ad-hoc
network. If you would like to change these settings,
click the “Edit” button.
3.
Confirm with “OK”.
The ad-hoc network is now ready for operation and awaits
other WLAN users.
In the FRITZ!WLAN control software, yellow waves in the
ad-hoc network icon indicate that it is ready to establish
ad-hoc connections.
The connection icon in FRITZ!WLAN: ready for ad-hoc connections
How to Join an Ad-hoc Network
1.
Open the FRITZ!WLAN control software on all of the
computers to be connected to the ad-hoc network by
double-clicking the FRITZ!WLAN icon in the notification area of the task bar.
2.
Click the “Find” button to display the WLAN devices
at your location.
Possible ad-hoc parties found at your location are
designated by the ad-hoc icon in the list of accessible WLAN devices.
3.
Select the desired ad-hoc remote site in the list of
WLAN devices found. Then click the “Select” button.
4.
Next, enter the shared WLAN key in the “Ad-hoc Network” window and confirm your entry by clicking
“OK”.
23
See the encryption instructions in the section
“Encryption” from page 33.
The ad-hoc network is displayed on the FRITZ!WLAN console as a known device and the WLAN connection is established.
The process of automatically assigning IP addresses can
take up to 3 minutes and is signaled by a flashing IP traffic
light in the control software.
Connecting to the Internet
There are two different ways for FRITZ!WLAN USB Stick N
to connect to the Internet. In both cases you need account
information from an Internet Service Provider:
Connecting Using the WLAN Access Point
The WLAN access point (FRITZ!Box WLAN, for instance) establishes the connection with the Internet. For this the account information of the Internet Service Provider must be
configured in the WLAN access point. All connected computers can then use this Internet connection at the same
time. It is not necessary to install any additional Internet
access software on the other connected computers. With
this configuration, the WLAN access point can be used as
a router for multiple-workplace operation. Instructions on
how to configure the WLAN access point for multiple-workplace operation are presented in your WLAN access point
manual.
Establishing Connections Using the Computer
The computer to which a FRITZ!WLAN USB Stick N is connected establishes the Internet connections itself. In this
case the WLAN access point works like a DSL modem and
is responsible only for forwarding data. An Internet connection must be configured on the connected computer,
using Internet access software (FRITZ!DSL, for instance)
and the account information from an Internet Service Provider. The Internet access software is also required to
establish Internet connections.
24
5
Microsoft WLAN Service
Establishing and Clearing WLAN Connections
In Windows7, Windows Vista and Windows XP from Service Pack 2, the
Microsoft WLAN service WZC (Wireless Zero Configuration) can be used
to manage wireless devices rather than the FRITZ!WLAN program.
Information on the WLAN Control Software
In your FRITZ!WLAN USB Stick N, FRITZ!WLAN is provided
as the default application for WLAN connections.
If you prefer to work with the Microsoft WLAN Service as
WLAN control software, you can switch to this program as
follows:
1.
Click the WLAN icon in the notification area of the
task bar.
2.
Select the “Microsoft WLAN” entry.
Establishing a WLAN Connection (Windows 7)
To establish a WLAN connection in Windows 7 using Microsoft WLAN Service (“automatic WLAN configuration”),
work through the following steps:
1.
Click the Microsoft WLAN icon in the notification area
of the Windows taskbar with the right mouse button.
All wireless networks found at your location (mostly
WLAN access points) are displayed in a list.
Available wireless networks (example view)
2.
Select the desired WLAN access point and click the
“Connect” button.
The window for entering the network security key
opens:
25
Entering the network key
3.
Enter the network key of the WLAN access point in
the “Security key” field. Click the “OK” button.
On the AVM FRITZ!Box family products the network
key is printed on the underside of the device.
The WLAN connection is established.
Should difficulties arise in establishing a WLAN connection, see the sections “WLAN Connection Is Not Established” from page 42 and “Errors During Installation” on
page 39.
For information on AVM Stick & Surf, see the section “AVM
Stick & Surf Technology” on page 12.
To display all important status information for your WLAN
connection, click the FRITZ!WLAN program icon in the notification area of the task bar.
26
Establishing a WLAN Connection (Windows Vista)
To establish a WLAN connection in Windows Vista using
Microsoft WLAN Service (“automatic WLAN configuration”), work through the following steps:
1.
Click the Microsoft WLAN icon in the notification area
of the task bar and select the option “Connect to a
network”.
All wireless networks found at your location (mostly
WLAN access points) are displayed in a list.
Available wireless networks (example view)
2.
Select the desired WLAN access point and click the
“Connect” button.
The window for entering the network security key
opens:
Entering the WLAN key
27
3.
Enter the WLAN key of the selected WLAN access
point in the “Security key or passphrase” field and
click “Connect”.
On the AVM FRITZ!Box family products the network
key is printed on the underside of the device.
The WLAN connection is established.
Should difficulties arise in establishing a WLAN connection, see the sections “WLAN Connection Is Not Established” from page 42 and “Errors During Installation” from
page 39.
For information on AVM Stick & Surf, see the section “AVM
Stick & Surf Technology” from page 12.
To display all important status information for your WLAN
connection, click the FRITZ!WLAN program icon in the notification area of the task bar.
Establishing a WLAN Connection (Windows XP from
Service Pack 2)
To establish a WLAN connection using Microsoft WLAN
Service (“Wireless Zero Configuration Service”) in
Windows XP from Service Pack 2, work through the following steps:
1.
Click the Microsoft WLAN icon in the notification area
of the task bar.
The “Wireless Network Connection” window opens.
All wireless networks found at your location (mostly
WLAN access points) are displayed in a list.
28
Available wireless networks (example of display)
2.
Select the desired WLAN access point and click the
“Connect” button.
The “Wireless Network Connection” window is
opened.
3.
Enter the WLAN key of the WLAN access point in the
“Network key” field.
On the AVM FRITZ!Box family products the network
key is printed on the underside of the device.
4.
Repeat your entry in the “Confirm network key” field
and then click the “Connect” button.
Entering the WLAN key
The WLAN connection is established.
Should difficulties arise in establishing a WLAN connection, see the sections “WLAN Connection Is Not Established” from page 42 and “Errors During Installation” from
page 39.
For information on AVM Stick & Surf, see the section “AVM
Stick & Surf Technology” from page 12.
To display all important status information for your WLAN
connection, click the FRITZ!WLAN program icon in the notification area of the task bar.
29
6
More about WLAN
AVM and WLAN
WLAN (Wireless Local Area Network) is a radio technology that allows
networks and access to the Internet to be provided without cable connections. This allows multiple users to share one wireless Internet connection.
6.1
Standards
The WLAN standards IEEE 802.11a, IEEE 802.11b,
IEEE 802.11g, IEEE 802.11n and IEEE 802.11i were developed by the Institute of Electrical and Electronic Engineers
(IEEE).
The standards IEEE 802.11a, IEEE 802.11b, IEEE 802.11g
and IEEE 802.11n define the transmission rate within a
wireless LAN. The IEEE 802.11i standard is a security standard.
Standards for the Throughput Rate
The FRITZ!WLAN USB Stick N supports the IEEE 802.11n
wireless standard and is downward compatible to
802.11a, b and g networks. The standard used in a given
WLAN depends on the settings of the WLAN access point.
Standard
Frequency Band /
Frequency Bands
Gross Data
Throughput
Net Data Throughput
up to
802.11a
5 GHz
54 Mbit/s
25 Mbit/s
802.11b
2.4 GHz
11 Mbit/s
5 Mbit/s
802.11g
2.4 GHz
54 Mbit/s
25 Mbit/s
802.11n
2.4 / 5 GHz
300 Mbit/s
100 Mbit/s
Data Throughput
The throughputs listed differentiate between gross and
net transmission rates. The net speed describes the transmission rate of the user data. The standards are intended
for different frequency bands.
In order to communicate with each other, the
FRITZ!WLAN USB Stick N and the WLAN access point must
work in the same frequency band.
30
Range
The range within a WLAN is highly dependent on the following three factors:
•
•
•
the WLAN adapter used,
the structural conditions, and
the amount of radio traffic on the same frequency
band. Other wireless networks may be active, but also what are known as analog interferers (for instance
baby monitors, video bridges, DECT telephones,
Bluetooth transmitters for mobile telephones, and
microwave ovens).
IEEE 802.11a
This standard communicates with a maximum of
54 Mbit/s and works exclusively in the seldom used 5GHz range. This means it offers the opportunity to transmit
data relatively free of interference from external influences.
IEEE 802.11b
With a maximum throughput rate of 11 Mbit/s, this is the
oldest standard for radio networks in the 2.4 GHz frequency range (ISM). First-generation WLAN access points, for
example, can use this standard to communicate with the
FRITZ!WLAN USB Stick N.
IEEE 802.11g
This is currently the most common WLAN standard. It communicates with a maximum of 54 Mbit/s gross in the 2.4GHz frequency range (ISM) and guarantees broad compatibility with many WLAN devices.
However, due to heavy use of the 2.4-GHz range, interference is more common than in the less-used 5-GHz range.
IEEE 802.11n
This standard allows for high throughput rates and ranges. The FRITZ!WLAN USB Stick N supports 802.11n in the
2.4-GHz frequency band, or, if desired, also in the 5-GHz
frequency band. Modulation processes and antenna techniques like MIMO (Multiple Input, Multiple Output) use
the entire frequency band available more effectively than
the older standards.
The use of the 802.11n standard—and thus the availability of higher throughput rates—is possible only if the WLAN
connection is secured using the WPA2 security mechanism (AES-CCMP).
31
The Standard for Security
IEEE 802.11i
The WPA2 security mechanism is defined in the
IEEE 802.11i standard. WPA2 is an extension of the familiar security mechanism WPA (Wi-Fi Protected Access).
The main feature of the extension of WPA to WPA2 is the
AES-CCM encryption process.
Mechanism
Encryption
WPA
TKIP (Temporary Key Integrity Protocol)
WPA2
TKIP
AES-CCM
based on the extremely secure AES (Advanced
Encryption Standard) procedure. CCM (Counter
Mode with Cipher Block Chaining Message Authentication Code) defines how the AES procedure is applied to WLAN packets.
The FRITZ!WLAN USB Stick N supports the AES encryption
procedure as part of the WPA2 mechanism, and the TKIP
encryption procedure as part of the WPA mechanism. This
means that the FRITZ!WLAN USB Stick N can be used in
combination with any WLAN access points that also support WPA2 with AES or WPA with TKIP.
6.2
Security
Security is of utmost importance within radio networks.
Radio signals can also be received outside of office or residential spaces and abused for criminal purposes.
Therefore it is important that no unauthorized users can
register in a WLAN to use its Internet access or shared network resources.
The necessary requirements for this, which contribute to
the security of your WLAN and of your computers, are integrated in the FRITZ!WLAN control software.
32
Encryption
The most important security setting is encryption. The
FRITZ!WLAN USB Stick N supports the security mechanisms WEP (Wired Equivalent Privacy), WPA (Wi-Fi Protected Access) and WPA2 as follows:
•
As part of the WEP mechanism a static key is determined to serve for the encryption of the user data.
The key must be registered in the WLAN settings of
the WLAN client and correspond with the WLAN settings of the WLAN access point.
•
The FRITZ!WLAN USB Stick N uses WEP 64/128 with
the setting “Open” or “Open Key”, respectively.
When establishing a WLAN connection using products from other manufacturers, always make sure
that the setting “Open” or “Open Key” is set for registration or authentication in the manufacturer’s software. If necessary, consult the manufacturer’s documentation for more information.
•
If you use a WEP key, make sure that it is the correct
length.
•
WEP
ASCII Characters
Hex. Characters
64
5
10
128
13
26
The WPA and WPA2 mechanisms provide for authentication while the connection is being established.
The user data are encrypted using an automatically
generated key. This key is regenerated at regular intervals.
If the WPA security mechanisms are supported by your
WLAN remote sites, use WPA for your WLAN encryption.
WEP is out of date and data encrypted with WEP can be
deciphered within minutes.
33
6.3
Frequency Range
WLAN uses the frequency range around 2.4 GHz in the ISM
band or, alternatively, the frequency range at 5 GHz.
The frequency range used in your WLAN depends on the
settings of your WLAN access point.
A WLAN in the 2.4-GHz frequency band works in the same
band as Bluetooth, DECT, microwave devices, video bridges and baby monitors. This means that interference may
occur within WLANs operated in the vicinity of such devices. Generally the only adverse effects are to the transmission rate; aborted connections and data losses are rare.
WLAN in the 5-GHz frequency band is subject to less interference, as these radio frequencies are used much less often.
In both frequency ranges, the European regulation authorities have designated certain channels for WLAN. A channel can have a bandwidth of 20 MHz (throughput up to
130 Mbit/s) or 40 MHz (throughput of up to 300 Mbit/s).
Channels located directly next to each other may overlap
and result in mutual interference. For instance, if several
WLANs are operated close to each other in the 2.4-GHz frequency range with a bandwidth of 20 MHz, a distance of
at least five channels should be left empty between each
two channels used. This means that if channel 1 is selected for one WLAN, the channels 6 through 13 can be selected for a second WLAN. This maintains the minimum distance between channels.
Should interference in a WLAN persist, the first step
should be to select a different channel. If your WLAN access point is equipped with an autochannel function, you
can automatically have it search for the WLAN channel in
your frequency range that is subject to the least interference. For more instructions, see the section “WLAN Connection Is Not Established” from page 42.
34
Allocation of the WLAN Channels in the 2.4-GHz Range
Channel Frequency (GHz)
Channel Frequency (GHz)
1
2.412
8
2.447
2
2.417
9
2.452
3
2.422
10
2.457
4
2.427
11
2.462
5
2.432
12
2.467
6
2.437
13
2.472
7
2.442
Allocation of the WLAN Channels in the 5-GHz Range
Channel Frequency (GHz)
Channel Frequency (GHz)
36
5.18
108
5.54
40
5.20
112
5.56
44
5.22
116
5.58
48
5.24
120
5.60
52
5.26
124
5.62
56
5.28
128
5.64
60
5.30
132
5.66
64
5.32
136
5.68
100
5.50
140
5.70
(20 MHz bandwidth only)
104
5.52
35
6.4
WPS (Wi-Fi Protected Setup)
The FRITZ!WLAN USB Stick N supports the standardized
WPS networking procedure (Wi-Fi Protected Setup). With
WPS you can establish a secure WLAN connection between your FRITZ!WLAN USB Stick N and your WLAN access point. All of the necessary WLAN security settings are
transferred in the process.
When establishing a WLAN connection via WPS you can
use either the push-button or the PIN method:
•
For the push-button method (WPS-PBC) your WLAN
access point must be equipped with a hardware or
software switch that is used to enable WPS functionality.
•
For the pin method, you enter the PIN specified by the
FRITZ!WLAN USB Stick N in the WPS data of your
WLAN access point.
WPS can be used only in combination with WLAN access
points that also support WPS. See the documentation of
your WLAN access point to find out whether it supports
WPS and which connection methods can be selected.
Establishing WLAN Connections using WPS
Proceed as follows to establish a WLAN connection using
WPS:
1.
Double-click the program icon in the notification area
of the Windows task bar to open the FRITZ!WLAN user
interface, and then click the “Find” button.
All WLAN devices found are displayed in the “Find
and Select WLAN Devices” window. The WPS icon indicates which devices support WPS.
36
2.
Select from the list the WLAN access point to which a
connection is to be established, and then click the
“Select” button.
3.
If the device you selected supports WPS, next the
“WPS Quick Connection” window will open.
Select the desired connection method here and follow the relevant instructions.
The WPS connection to the selected WLAN access point
will be established automatically.
37
7
Uninstallation
Removing the FRITZ!WLAN USB Stick N
The instructions for removing the FRITZ!WLAN USB Stick N are valid for
all operating systems. The FRITZ!WLAN USB Stick N driver software and
the FRITZ!WLAN control software are removed at the same time.
Proceed as follows:
1.
Insert the FRITZ!WLAN USB Stick N CD.
2.
Run the “setup.exe” file.
For the operation systems Windows Vista 64-bit
Edition and Windows XP 64-bit Edition, the required
“setup.exe” file is located in the “Windows7_Vista_
XP_x64” folder on the CD.
3.
Click “Continue” in the following window.
4.
Select the “Removal” option.
The FRITZ!WLAN USB Stick N will be removed.
5.
Click “Finish” to complete the process of uninstalling
the software.
38
8
Troubleshooting
Help for Errors
This chapter provides assistance if you are having problems with the
WLAN connection, or if you want to change the IP settings on your computer.
8.1
Errors During Installation
If an error message is returned during installation of the
FRITZ!WLAN USB Stick N, this can have various causes.
Check the possible causes and attempt to resolve the error.
Checking the Installation
After installing the FRITZ!WLAN control software and the
FRITZ!WLAN USB Stick N, the FRITZ!WLAN icon does not
appear in the notification area of the Windows task bar.
Possible Cause
The FRITZ!WLAN software or drivers for the
FRITZ!WLAN USB Stick N were not installed correctly or
the device is disabled in the “Device Manager”.
Remedy
First check the “Device Manager” in the “Control Panel”
to see whether the device is listed and disabled. Enable
the device.
If it is not listed, uninstall the FRITZ!WLAN USB Stick N
and repeat the installation as described in the manual.
39
Checking the USB Port
The computer does not detect the FRITZ!WLAN USB
Stick N.
Possible Cause
The FRITZ!WLAN USB Stick N is not inserted correctly into
the USB port or the chip set drivers of your computer are
out of date.
Remedy
Make sure that the FRITZ!WLAN USB Stick N is inserted
firmly into the USB port. Pull the FRITZ!WLAN USB Stick N
out if it is not positioned correctly and insert it into the
USB port again.
Install the latest chip set drivers. See the documentation
for your mainboard to find out which drivers your computer requires. To obtain the latest chip set drivers, visit
the Internet pages of the following manufacturers:
www.intel.com
www.nvidia.com
www.viaarena.com
Uninstalling the WLAN Adapter Software
The AVM FRITZ!WLAN software is installed, but every time
Windows 7/Vista/XP is restarted, the Microsoft WLAN
control is applied, no matter which settings were configured before.
Possible Cause
The FRITZ!WLAN USB Stick N is utilized in the notebook
along with an Intel Pro Wireless Adapter.
Remedy
Remove the Intel Pro Wireless Software (not the driver) to
eliminate the problem.
40
Installing the Latest Service Packs
The FRITZ!WLAN USB Stick N is detected automatically in
the Windows XP operating system. However, the device is
not fully functional.
Possible Cause
The necessary service packs have not been installed.
Remedy
USB 2.0 support was integrated into the operating system for the first time with the Microsoft Service Packs. To
ensure full operation capability, install the current service packs and updates using the Windows Update function. We recommend at least Service Pack 2 for
Windows XP.
For more information on the subject of support for
USB 2.0 in Microsoft Windows XP, see:
USB 2.0 support in Windows XP
Knowledge base article 822603
41
8.2
WLAN Connection Is Not Established
Make sure that the settings in the WLAN access point and
in the FRITZ!WLAN control software agree with the entries
in the following table. Try again to establish a WLAN connection.
For the settings in this table it is presumed that an AVM
WLAN product from the FRITZ!Box family is used with
WPA/WPA2 encryption (mixed mode). In general it is always advisable to secure your WLAN using the most secure mechanism supported by your WLAN remote site.
Setting
Preset Value
SSID(name of the WLAN radio
network)
Name of the WLAN access
point, for example:
FRITZ!Box Fon WLAN 7270
Encryption
WPA or WPA2
Key
The key (ASCII format) is printed on the underside of the device and on the back of the installation CD.
Type of authentication/registra- Pre-shared key
tion
Network mode
Infrastructure
Channel
The channel depends on the
settings of the WLAN access
point.
For more support on problems with WLAN connections,
see the following sections.
42
Checking the Data of the WLAN Connection
Could not register at the WLAN remote site.
Possible Cause
The settings of the WLAN remote site and the entries in
the “WLAN Remote Site” area of the FRITZ!WLAN control
software do not match.
Remedy
Check whether the correct WLAN access point has been
selected from the list of WLAN devices and make sure
that the WLAN key and the name (SSID) of the WLAN remote site have been entered correctly. Pay special attention to capitalization.
For a WLAN product from the AVM FRITZ!Box family, the
default name always begins with “FRITZ!Box”. On AVM
FRITZ!Box products, the WLAN key is printed on the underside of the device and on the installation CD jewel
case.
If you are using a WLAN access point from another manufacturer, please see the documentation of this device.
In a direct connection, the preconfigured name of the adhoc network in the FRITZ!WLAN control software is “ad
hoc”.
Then connect with the WLAN remote site again.
Changing the Position of the WLAN Devices
No WLAN remote sites are found.
Possible Cause
The WLAN remote site has not been turned on or is located too far away from the FRITZ!WLAN USB Stick N.
Remedy
Make sure that the power supply of the WLAN remote site
is secure and that the device is switched on.
Check whether the WLAN remote site is within transmission range of the FRITZ!WLAN USB Stick N. Reduce the
distance and try to establish the connection again.
43
Installing the Patch for WPA2 with Microsoft WLAN
Service
The connection to an access point cannot be established
using the Microsoft WLAN Service (WZC) in Windows XP
with Service Pack 2.
Possible Cause
The required Microsoft patch for WPA2 (IEEE 802.11i)
may not be not installed.
Remedy
Support for WPA2 in Microsoft WLAN service was not
available until a patch for Windows XP with Service
Pack 2. Install the current patch from Microsoft:
http://support.microsoft.com/kb/917021
Alternatively, you can install Service Pack 3 instead.
8.3
Errors During Data Exchange with Other Devices in the Network
Checking the WLAN Access Point
The FRITZ!WLAN USB Stick N and the WLAN access point
cannot exchange any data with each other.
Possible Cause
The WLAN access point is not connected correctly or not
switched on.
Remedy
Check whether the WLAN access point is connected correctly and make sure that the device and the WLAN function are switched on.
44
Allowing Network Access
Two or more computers are networked via
FRITZ!WLAN USB Stick N, but you cannot access files and
connected devices on the remote site.
Possible Cause
The desired resources like folders, drives, printers or
Internet connections are not configured for network sharing.
Remedy
Make sure that those resources are configured for network sharing. Further information is provided in the
Online Help of your operating system.
Checking the Network Data
You computer recognizes the network and the router, but
cannot access the Internet or the network (limited connectivity).
Possible Cause
The WLAN key is wrong or the IP address was not assigned by Windows automatically (note: the process can
take up to three minutes).
Remedy
Check the WLAN key entry. On AVM FRITZ!Box products,
the WLAN key is printed on the underside of the device
and on the installation CD jewel case. If you are using a
WLAN access point from another manufacturer, please
see the documentation of this device. Make sure that the
automatic assignment of IP addresses is enabled in your
operating system. For details, see the section “Checking
the IP Settings” from page 47.
45
Checking the Data of the Ad-hoc Connection
The FRITZ!WLAN USB Stick N and a further WLAN adapter
are connected directly via WLAN, but cannot exchange
any data with each other.
Possible Cause
The IP address was not assigned by Windows automatically (note: the process can take up to three minutes), or
the network key, workgroup or ad-hoc network names do
not match.
Remedy
Make sure that the ad-hoc network name of your connection and the network key match, and that automatic assignment of IP addresses is enabled in your operating
system. The connected computers must be in the same
working group (see also: “Encryption” from page 33 and
“Checking the IP Settings” from page 47).
Switching the WLAN Channel
An undefined malfunction occurs.
Possible Cause
Radio traffic is subjected to interference by strong irradiation.
Remedy
Switch the WLAN channel setting on the access point.
Find a better location for the WLAN devices to avoid potential interference from baby monitors, video bridges,
microwaves, cordless DECT telephones or Bluetooth
devices.
46
Avoiding WLAN Channels with DFS
The FRITZ!WLAN USB Stick N loses the WLAN connection
in the 5-GHz frequency band for no apparent reason.
Possible Cause
In the 5-GHz band the access point is programmed to
change the channel whenever a radar source transmits
on the same channel (DFS: Dynamic Frequency Selection).
Remedy
A forced channel change can be avoided by selecting a
channel on the access point that does not use DFS
(channels 36, 40, 44, 48).
8.4
Checking the IP Settings
A WLAN access point, for instance, a FRITZ!Box WLAN, has
its own DHCP server, which assigns IP addresses to the
connected computers. For this the computers must be
configured to obtain an IP address automatically from the
DHCP server of the access point. The steps for checking
and adjusting this option differ among the operating systems. See the relevant section for your operating system.
Obtaining an IP Address Automatically in Windows 7
Proceed as follows in Windows 7:
1.
Click the “Start” button in the task bar and select the
“Control Panel / Network and Internet”.
2.
Under “Network and Sharing Center”, click “View network status and tasks”.
3.
From the left column, select the “Change adapter settings” command.
4.
Click the “Wireless Network Connection” icon with
the right mouse button and select “Properties”.
5.
Under “This connection uses the following items”,
select the “Internet Protocol Version 4 (TCP/IPv4)”
entry and click the “Properties” button.
47
6.
On the “General” tab, enable the options “Obtain an
IP address automatically” and “Obtain DNS server
address automatically”.
Properties of the Internet protocol (TCP/IP)
7.
Confirm your selection by clicking “OK”.
If necessary, repeat steps 5 through 7 for the “Internet Protocol Version 6 (TCP/IPv6)” as well.
The computer now receives an IP address from the WLAN
access point.
For WLAN products of the AVM FRITZ!Box family, automatic
IP address assignment (DHCP) is enabled in the factory
settings.
48
Obtaining an IP Address Automatically in Windows Vista
Proceed as follows in Windows Vista:
1.
Click the “Start” button in the task bar and select
“Control Panel / Network and Internet / View Network
Status and Tasks”.
2.
From the “Tasks”, select “Manage network connections”.
3.
Click the wireless network connection icon with the
right mouse button and select “Properties”.
4.
Under “This connection uses the following items”,
select the “Internet Protocol Version 4 (TCP/IPv4)”
entry and click the “Properties” button.
5.
On the “General” tab, enable the options “Obtain an
IP address automatically” and “Obtain DNS server
address automatically”.
Properties of the Internet protocol (TCP/IP)
49
6.
Confirm your selection by clicking “OK”.
If necessary, repeat steps 4 through 6 for the “Internet Protocol Version 6 (TCP/IPv6)” as well.
The computer now receives an IP address from the WLAN
access point.
For WLAN products of the AVM FRITZ!Box family, automatic
IP address assignment (DHCP) is enabled in the factory
settings. Obtaining an IP Address Automatically in
Windows XP
Obtaining an IP Address Automatically in Windows XP
Proceed as follows in Windows XP:
1.
Go to “start / Control Panel / Network and Internet
Connections / Network Connections” and doubleclick the “Wireless Network Connection” of the
FRITZ!WLAN USB Stick N.
2.
Click the “Properties” button.
3.
Select “Internet Protocol (TCP/IP)” in the list of items
used in this network connection and click the “Properties” button.
4.
On the “General” tab, enable the options “Obtain an
IP address automatically” and “Obtain DNS server
address automatically”.
50
Properties of the Internet protocol (TCP/IP)
5.
Confirm your selection by clicking “OK”.
The computer now receives an IP address from the WLAN
access point.
For WLAN products of the AVM FRITZ!Box family, automatic
IP address assignment (DHCP) is enabled in the factory
settings.
51
9
Customer Service Guide
Help on All Important Service Topics
AVM provides numerous sources of information to assist you should
any questions or problems arise. Here you will find the important information you need, in the form of manuals, updates and support.
MS Service Pack
In many cases problems which arise during operation can
be resolved by installing the current Microsoft Service
Pack for your operating system.
The current service packs can be obtained free of charge
from Microsoft at the address:
www.microsoft.com
9.1
Product Documentation
To take advantage of all commands and features of your
FRITZ!WLAN USB Stick N, also consult the following information resources:
FRITZ!WLAN Help
In the FRITZ!WLAN user interface you can open the detailed Online Help by selecting the “Help” button, clicking
the Help icon
or pressing “F1”.
Readme
The Readme file contains current information which was
not yet available at the time the manual was completed.
The Readme file is included on the FRITZ!WLAN USB
Stick N CD.
Manual
The manual of the FRITZ!WLAN USB Stick N is included in
PDF format in the “Info” folder on the FRITZ!WLAN USB
Stick N CD.
You can install the Adobe reader to view PDF documents
from the “Software” folder of the FRITZ!WLAN USB Stick N
CD.
52
9.2
Information in the Internet
On its web site AVM presents comprehensive information
on all AVM products as well as new product announcements and new product versions.
Frequently Asked Questions (FAQs)
We would like to make our products as easy to use as possible. If you still have problems, sometimes a little tip is
all you need to resolve them. That is why we present you
with a selection of frequently asked questions.
The FAQs can be viewed at the following address:
www.avm.de/en/service/FAQs
Updates
AVM provides software updates for the FRITZ!WLAN USB
Stick N and the software applications for free downloading over the Internet.
To download updates from the Internet, go to:
www.avm.de/en/download
FTP
The AVM FTP server can also be used to download current
driver software. Click the “FTP Server” link in the download area, or enter the following address:
ftp.avm.de
9.3
Support from the AVM Service Team
Should problems with your FRITZ!WLAN USB Stick N arise,
we recommend taking the following steps:
1.
Read the FAQs in the Internet:
www.avm.de/en/service/FAQs
This site contains answers to questions our customers have frequently asked our Support team.
2.
If you do not find the answer you need in the FAQs,
the AVM Service Team will assist you. The support
desk can be reached by e-mail or by fax.
53
Support by E-mail
You can send us an e-mail request at any time using the
Service area of our web site. The Service area can be
reached at:
www.avm.de/en/service/support
Click in the support area on the “Mail Form” link after your
product. Select the operation system you use. Fill out the
form and send it to AVM support by clicking the “Send”
button. Our Support team will respond by e-mail as quickly as possible.
Support by Fax
If necessary, you can reach AVM Support at the fax number:
+49 (0)30 / 39 97 62 66
The following information should be included in your fax
to the Support team:
•
•
Your name and address.
•
Which operating system are you using (e.g.,
Windows Vista or Windows XP)?
•
At what step of the installation or in which application does an error occur or an error message appear?
An e-mail address or fax number at which you can be
reached.
What is the exact wording of the message?
•
Keep the version numbers of the FRITZ!WLAN USB
Stick N driver at hand. Information on the version can
be viewed using the context menu of the FRITZ!WLAN
program icon.
– Click the icon in the notification area of the task
bar and select the menu command “About”.
Once you have put together this information, please fax it
to AVM Support. The Support team will assist you in resolving your problem.
54
Index
A
FRITZ!WLAN icons
“Edit” icon . . . . . . . . . . . . . . . . . . . .23
connection icon . . . . . . . . . . . . . . .23
infrastructure network icon . . . . . . .21
WLAN icon . . . . . . . . . . . . . . . . . . . 22
access point . . . . . . . . . . . . . . . . . . . . . 21
establishing connection . . . . . . . . 22
ad-hoc icon. . . . . . . . . . . . . . . . . . . . . . 21
ad-hoc network . . . . . . . . . . . . . . . . . . 21
creating . . . . . . . . . . . . . . . . . . . . . 22
participating. . . . . . . . . . . . . . . . . . 23
assistance
FAQs . . . . . . . . . . . . . . . . . . . . . . . . 53
frequently asked questions . . . . . . 53
information in the Internet . . . . . . 53
product documentation . . . . . . . . . 52
support . . . . . . . . . . . . . . . . . . . . . . 53
I
icons in FRITZ!WLAN
ad-hoc icon . . . . . . . . . . . . . . . . . . .21
program icon . . . . . . . . . . . . . . . . . .19
infrastructure network . . . . . . . . . . . . . .21
establishing connections . . . . . . . .21
infrastructure network icon . . . . . . . . . .21
installation . . . . . . . . . . . . . . . . . . . . . . 14
errors during installation . . . . . . . 39
in Windows 7. . . . . . . . . . . . . . . . . . 14
in Windows Vista . . . . . . . . . . . . . . .14
in Windows XP. . . . . . . . . . . . . . . . .16
Internet connection
via the computer . . . . . . . . . . . . . . 24
via the WLAN access point . . . . . . 24
IP address
obtaining automatically in Windows XP
C
connection icon . . . . . . . . . . . . . . . . . . 23
control software
FRITZ!WLAN . . . . . . . . . . . . . . . . . . 19
information . . . . . . . . . . . . . . . . . . 25
customer service
guide . . . . . . . . . . . . . . . . . . . . . . . 52
updates . . . . . . . . . . . . . . . . . . . . . 53
50
D
declaration of conformity . . . . . . . . . . . 57
DHCP server . . . . . . . . . . . . . . . . . . . . . 47
direct connection . . . . . . . . . . . . . . . . . 22
disposal of the device . . . . . . . . . . . . . . 6
K
E
light-emitting diodes . . . . . . . . . . . . . . . .9
key . . . . . . . . . . . . . . . . . . . . . . . . . . . . 22
L
encryption . . . . . . . . . . . . . . . . . . . . . . 33
M
Microsoft WLAN Service . . . . . . . . . . . .25
network key . . . . . . . . . . . . . . . 26, 27
Microsoft WLAN service
Microsoft WLAN icon . . . . . . . . 25, 27
F
FRITZ!WLAN. . . . . . . . . . . . . . . . . . . . . . 19
connection status . . . . . . . . . . . . . 20
context menus . . . . . . . . . . . . . . . . 20
establishing WLAN connections . . 21
help . . . . . . . . . . . . . . . . . . . . . . . . 52
network key . . . . . . . . . . . . . . . . . . 22
program icon . . . . . . . . . . . . . . . . . 19
user interface . . . . . . . . . . . . . . . . . 19
55
N
W
network
error during data exchange . . . . . . 44
network key . . . . . . . . . . . . . . . . . 26, 27
networks
available. . . . . . . . . . . . . . . . . .25, 27
wireless . . . . . . . . . . . . . . . . . .25, 27
WEP key . . . . . . . . . . . . . . . . . . . . . . . . .33
WEP security mechanism . . . . . . . . . . .33
Wi-Fi Protected Setup . . . . . . . . . . . . . 36
Windows 7, installing in . . . . . . . . . . . .14
Windows Vista, installing in . . . . . . . . . 14
Windows XP, installing in . . . . . . . . . . .16
wireless networks . . . . . . . . . . . . . . . . 29
WLAN
access point . . . . . . . . . . . . . . . . . .21
ad-hoc network . . . . . . . . . . . . . . . .21
connecting via an access point . . 22
connecting with FRITZ!WLAN. . . . . .21
connecting with Microsoft WLAN
Service . . . . . . . . . . . . . . . . . . . . .25
connection between WLAN adapters22
direct connection . . . . . . . . . . . . . 22
encryption . . . . . . . . . . . . . . . . . . . .33
frequency range . . . . . . . . . . . . . . .34
icon in the task bar . . . . . . . . . . . . 22
infrastructure network . . . . . . . . . .21
more information . . . . . . . . . . . . . 30
network key . . . . . . . . . . . 22, 26, 27
remote site . . . . . . . . . . . . . . . . . . .21
security . . . . . . . . . . . . . . . . . . . . . .32
standards . . . . . . . . . . . . . . . . . . . 30
taking over security settings . . . . . .12
transmission channels . . . . . . . . . .34
troubleshooting . . . . . . . . . . . . . . 42
types of WLAN connections . . . . . .21
using Stick & Surf for connections .12
Wi-Fi Protected Setup . . . . . . . . . . 36
WPS . . . . . . . . . . . . . . . . . . . . . . . . 36
WLAN devices
searching for . . . . . . . . . . . . . . . . . 22
WPA security mechanisms . . . . . . . . . .33
WPS . . . . . . . . . . . . . . . . . . . . . . . . . . . 36
O
obtaining an IP address automatically
in Windows Vista . . . . . . . . . . . . . . 49
in Windows XP . . . . . . . . . . . . . . . . 50
Windows 7 . . . . . . . . . . . . . . . . . . . 47
operation requirements . . . . . . . . . . . . . 8
P
package contents . . . . . . . . . . . . . . . . . . 8
program icon FRITZ!WLAN . . . . . . . . . . 19
R
recycling of the device . . . . . . . . . . . . . . 6
remote site
establishing a connection . . . . . . . 22
requirements for operation . . . . . . . . . . 8
S
safety instructions . . . . . . . . . . . . . . . . . 6
security in wireless networks . . . . . . . . 32
settings
IP (Internet protocol) . . . . . . . . . . . 47
Stick & Surf. . . . . . . . . . . . . . . 12, 18, 21
support . . . . . . . . . . . . . . . . . . . . . . . . . 53
T
taking over security settings of a FRITZ!Box
12
technical specifications . . . . . . . . . . . . 10
troubleshooting . . . . . . . . . . . . . . . . . . 39
assistance . . . . . . . . . . . . . . . . . . . 52
diagnostics. . . . . . . . . . . . . . . . . . . 39
U
uninstallation . . . . . . . . . . . . . . . . . . . . 38
56
Declaration of CE Conformity
The manufacturer
AVM GmbH
Address
Alt-Moabit 95
D-10559 Berlin
herewith declares that the product
Type
WLAN-Controller
Product
FRITZ!WLAN USB Stick N
complies with the following directives:
•
1999/5/EC
R&TTE Directive: Radio Equipment and Telecommunications Terminal Equipment
•
2004/108/EC
EMC Directive: Electromagnetic Compatibility
The following norms were consulted to assess conformity:
•
•
•
•
•
EN 55024/9.98 + A1/10.01 + A2/01.03
EN 301 489-1 V 1.8.1 (2008)
EN 301 489-17 V 1.3.2 (2008)
EN 300 328 V 1.6.1 (11/2004)
EN 301 893 V 1.4.1 (07/2007)
The CE symbol confirms that this product conforms with the above mentioned norms and regulations.
Berlin, 2009-05-19
Peter Faxel, Technical Director
Indication of Countries
This product may be operated in the countries of the European Union and in Switzerland, Norway
and Iceland. Certain restrictions of user rights or licensing requirements apply in France and Italy.
57