1
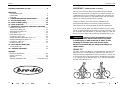
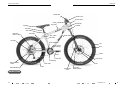
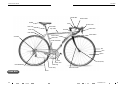
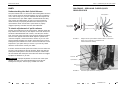
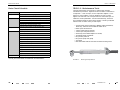
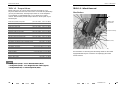
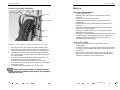
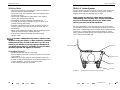
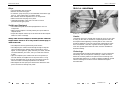
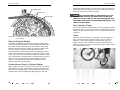
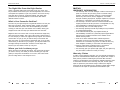
Introduction
Congratulations!
Congratulations on the purchase of your new Brodie Bike! Your
choice puts you among the exclusive group that demands the most
advanced technology and superior craftsmanship available in the
bike industry.
This manual will assist you in setting up and maintaining your
bicycle. Please read through it to familiarize yourself with your Brodie
Bike. We recommend inspecting your bicycle frequently. Remember,
proper maintenance and adjustment will greatly enhance safety,
performance and riding enjoyment.
Read this entire manual carefully.
Reading this manual before your first ride will enable you to
maximize all the benefits and features of your Brodie bike. It was
written to help you gain the ultimate in performance, comfort,
enjoyment and safety when riding your new Brodie. For the most
current manual visit www.brodiebikes.com
brodiebikes.com
Contents
Read Before You Ride
Important: Read before you ride . . . . . . . . . . . . . . . .3
IMPORTANT - READ BEFORE YOU RIDE
Bike Types:
We urge you to read this entire manual before riding your Brodie
bicycle. It is important that your bike fits you properly and that you
understand how to use and maintain it. Before each ride check your
bike over to ensure that it is in safe working order. Ask your Brodie
dealer if you have any questions about your bike.
Full Suspension Bike . . . . . . . . . . . . . . . . . . . . . . . . . . .4
Hardtail Bike . . . . . . . . . . . . . . . . . . . . . . . . . . . . . . . .6
Road Bike . . . . . . . . . . . . . . . . . . . . . . . . . . . . . . . . . .8
I - Understanding the Hub Quick Release . . . . . . . . .10
II - Pre-ride safety Check . . . . . . . . . . . . . . . . . . . .12
III - Rules for Safe Cycling . . . . . . . . . . . . . . . . . . .14
IV - Rules of the Trail . . . . . . . . . . . . . . . . . . . . . . .16
V - Maintenance: Inspection, Lubrication, Adjustment
Maintenance (TECH 1.1) . . . . . . . . . . .
Torque Values (TECH 1.2) . . . . . . . . . . .
Wheel Removal (TECH 1.3) . . . . . . . . .
Tires (TECH 1.4) . . . . . . . . . . . . . . . . .
Brake System (TECH 1.5) . . . . . . . . . . .
Inspection I (TECH 1.6) . . . . . . . . . . . .
Specific Derailleur Adjustment (TECH 1.7)
Derailleur Maintenance (TECH 1.8) . . . .
Inspection II (TECH 1.9) . . . . . . . . . . . .
Drivetrain (TECH 2.0) . . . . . . . . . . . . . .
.
.
.
.
.
.
.
.
.
.
.
.
.
.
.
.
.
.
.
.
.
.
.
.
.
.
.
.
.
.
.
.
.
.
.
.
.
.
.
.
.
.
.
.
.
.
.
.
.
.
.
.
.
.
.
.
.
.
.
.
.
.
.
.
.
.
.
.
.
.
.
.
.
.
.
.
.
.
.
.
.
.
.
.
.
.
.
.
.
.
.
.
.
.
.
.
.
.
.
.
.
.
.
.
.
.
.
.
.
.
.21
.22
.23
.25
.27
.28
.30
.31
.34
.37
VI - Bruce Spicer’s Riding Tips
General Riding Tips . . . . . . . . . . . . . . . . . . . . . . . . . . .40
VII - Warranty Information . . . . . . . . . . . . . . . . . . . . . .43
Appendix
Records of maintenance . .
Record of purchase . . . . .
Warranty . . . . . . . . . . . .
Warranty Registration Card
. . . . . . . . . . . . . . . . . . . . . .46
. . . . . . . . . . . . . . . . . . . . . .47
. . . . . . . . . . . . . . . . . . . . . .48
. . . . . . . . . . . .inside back cover
Under the warranty, your bicycle must be assembled by an
authorized Brodie dealer and it must be properly maintained.
Take your bicycle to your Brodie dealer for periodic maintenance.
If you have any doubt about your ability to perform any of the safety
checks or repairs described in this manual, consult your dealer. If you
are not familiar with ANY feature on your bike, practice in a safe, flat
area that is free of traffic until you become comfortable with its use.
!!WARNING!! Failure to inspect and maintain a bicycle
properly, or failure to ride in a safe manner, may result
in serious injury or death to the rider or others, as well
as damage or excessive wear to the bicycle. Brodie
Bicycles recommends that you always avoid riding in an
unsafe manner.
FRAME FIT
For safety, comfort and efficiency, it is important that your bike is the
right size for you. Your Brodie bicycle dealer will work with you to
make the necessary adjustments to ensure your bike is a good fit. For
a correct frame fit the rider must be able to straddle the bicycle with
1”-2” clearance, for off road bikes allow 1”-2” clearance while lifting
the front end of the bike 4”-6”.
1”-2”
1”-2”
Road Bike
2
Off Road Bike
brodiebikes.com
4” lift
3
Brodie Owners Manual
Full Suspension Bikes
Handle Bar
Brake Lever
Brake Cable
Stem
Head Tube
Top Tube
Saddle
Seat Post
Seat Collar
Seat Tube
Rear Disc
Brake Caliper
Seat Stay
Down Tube
Rear Shock
Cassette
Tire
Rim
Linkage
Plate
Spoke
Pedal
Crank Arm
Rear Derailleur
Cable
Rear Derailleur
Full Suspension Bike
4
Chainring
Front Derailleur
Chain Stay
Chain
Hub (front)
Rotor
Suspension
Forks
Front Disc
Brake Caliper
brodiebikes.com
5
Brodie Owners Manual
Hardtail Bike
Handle Bar
Brake Lever
Brake Cable
Stem
Head Tube
Top Tube
Saddle
Headset
Seat Post
Seat Collar
Rear Disc
Brake Caliper
Seat Stay
F. Der. Cable
Down Tube
Seat Tube
Cassette
Front Derailleur
Tire
Bash Guard
(Rock Ring)
Rim
Spoke
Pedal
Crank Arm
Hub (front)
Chainring
Rear Derailleur
Cable
Chain Stay
Rotor
Chain
Rear Derailleur
Suspension
Forks
Front Disc
Brake Caliper
Hardtail Bike
6
brodiebikes.com
7
Brodie Owners Manual
Road Bike
Handle Bar
Brake Cable
Saddle
Stem
Brake Lever
Seat Collar
Seat Post
Top Tube
Seat Stay
Head Tube
Headset
Rear Brake
Front Brake
Down Tube
Cassette
Seat Tube
Front Derailleur
Tire
Rim
Spoke
Pedal
Hub (front)
Crank Arm
Chainring
Rear Derailleur
Chain Stay
Road Bike
8
Unicrown Forks
Chain
brodiebikes.com
9
Brodie Owners Manual
PART I
PART I - Understanding the Hub Quick Release
DIAGRAMS - OPEN AND CLOSED QUICK
RELEASE LEVER
Understanding the Hub Quick Release
The quick release lever is a cam-action device that tightens when the
lever is swung around its pivot 180 degrees. Do not try to tighten it
as if it were a wing-nut. If you are unfamiliar with the usage of hub
quick releases have your dealer explain and demonstrate how they
work. Always be certain before you get on your bicycle that the
wheels are firmly and properly attached to the frame by the hub
quick releases. Never assume that a quick release is properly
engaged, especially if the bike has been left unattended.
closed position
turn to adjust
clamping force
To check adjustment of quick release:
Flip the quick release lever to the open position. With the wheel axle
fully seated in the fork slots (or rear dropout slot for rear wheel) and
the wheel centered between fork or frame, close the quick release
lever. If the lever closes too easily, open the quick release and adjust
the nut on the opposite side of the wheel (adjust in quarter turns,
clockwise to tighten, counter-clockwise to loosen). If you can close
the lever without wrapping your fingers around the frame or fork for
leverage the quick release is too loose. The lever should leave a clear
impression in your palm when you close it. If you have any doubt
about the correct tension consult your dealer.
If the tire contacts the brake pads once inserted, check to make sure
the axle is fully inserted into the fork dropouts. Never ride with the
brake pads touching the tire. Ensure the closed quick release lever
will not interfere with other parts of the bike and cannot be snagged
by objects or obstacles as you ride.
!!WARNING!! Improper adjustment or incorrect use of hub quick
releases can result in the wheel disengaging from the bicycle.
Damage to the bicycle, serious injury, or death can result.
open position
FIGURE 2 -
Diagram of hub quick release. Note that this is a cam-action
device, not a wing-nut or nut-and-bolt unit.
Follow instructions carefully.
Front Fork
Quick Release
Hub
FIGURE 3 -
10
Front hub quick release in closed position.
brodiebikes.com
11
Brodie Owners Manual
PART II
PRE-RIDE SAFETY CHECK
!!WARNlNG!! Failure to perform safety checks before every
ride and to take corrective action when necessary may result
in serious injury or death to the rider and others, as well as
damage or excessive wear to the bicycle.
CAUTION If you find or suspect a problem, refer to the
maintenance section of this manual. If the necessary repairs
are not covered by the manual take your bicycle to your
Brodie dealer. It is not safe to ride your bike if it is not
functioning at 100% efficiency. If any part gets damaged or
seems to malfunction during a ride, check and adjust it
immediately, or take it to your dealer. The manufacturer is
not responsible for injury or damages that result from faulty
assembly or improper maintenance.
PART II - Pre-Ride Safety Check
CAUTION In addition to pre-ride safety checks, regular
maintenance of your Brodie bicycle is required to keep it
operating at peak performance. Bicycle maintenance
courses may also assist in your ability to maximize the life
span of your bike and its components.
PRE FLIGHT CHECKLIST
PART
PROBLEM
SOLUTION
Hubs
Binding, Grinding, Axle play
See dealer
Rims
Untrue, Flat Spot, Loose
See dealer
Spokes, Scoring
Tires
Incorrect pressure
Air pump with gauge
Seated incorrectly
See dealer
Worn tread or side wall,
New tire purchase
abrasions, foreign objects
Parts Inspection
1.
2.
3.
4.
5.
6.
Clean any dirt or debris from your bicycle.
Inspect the frame and fork for cracks, deep scratches, dents,
bulges or discolouration.
If your Brodie bicycle has front suspension or full suspension,
consult the accompanying manuals for more information on
these components.
Ensure that your wheels are properly secured. If you are
unfamiliar with the proper use of the wheel's quick release
mechanism read the "Hub Quick Release" portion of the manual
for more information.
Make sure nuts, bolts and hardware are tightened correctly.
Check your brakes to make sure that you have adequate braking
power every time you get on your bike.
CAUTION A damaged frame can fail suddenly and result in
injury. If you are in any doubt about the condition of your
frame take it to your Brodie dealer for inspection. If you
crash your bike, be sure to inspect it thoroughly to identify
any problems. Any damaged or suspect parts should always
be replaced as soon as possible.
12
Grinding, looseness or
Adjustment or
roughness
replacement.
Pedals
Loose cleat or strap assembly
Tighten to spec
Reflectors
Broken, Loose
Replace, tighten to spec
V-Brakes
Wearing tire wall, Uneven wear
See dealer
Disc Brakes
Bent rotors, Leaking hydraulics
See dealer
Cables
Frayed, Kinks, Stretch
Replace cable
Derailleurs
Misalignment
See dealer
Handlebar/Stem
Bends, Cracks
Replace bar
Looseness
Tighten to spec
Headset
Binding, Looseness
See dealer
Crank Assembly
Binding, Looseness, Grinding,
See dealer
Clipless Pedals
Loose bolts or crank arms
Chain/Rings/Cogs
Wear, Damaged/broken teeth
See dealer and replace
or links, Rust
Seat Post/Saddle
Improper positioning
See dealer
Nuts/Bolts/Pivots
Loose
Tighten to torque specs
Frame
Check for damage
See dealer
brodiebikes.com
13
Brodie Owners Manual
PART III
RULES FOR SAFE CYCLING
1.
2.
3.
4.
Always wear a properly fitted ANSI or Snell approved helmet.
See your local dealer for proper fitting.
Make sure your shoes can be removed quickly from pedals with
toe-clips.
Eye protection and padded cycling gloves may protect you in the
event of a crash and can make your ride more comfortable.
Know how to use the shifters and brakes on your bike. See
dealer for instructions.
PART III - Rules For Safe Cycling
7.
8.
9.
Make sure you understand the rules of the road where you
live and obey them. Contact your local Ministry of Transport
office for further details.
BRODIE RODIE HINTS
1.
2.
3.
4.
5.
6.
14
Obey all traffic signals.
ALWAYS use hand signals for left and right turns and when you
slow or stop.
Ride with the flow of traffic, not against it.
If two or more road users reach an intersection simultaneously,
the road user on the right has the right of way. However, never
assume that a car will yield right of way. Never assume that
pedestrians or drivers have seen you or will yield right of way.
Cyclists are entitled to full use of the road and should take up
enough space to ensure their safety. However, to avoid impeding
and annoying faster road users stay in the outermost lane or use
bike lanes and designated bike routes if available.
Many drivers are not aware of the rights and concerns of
cyclists. Never challenge a vehicle. Try to maintain a positive
image for cyclists by acknowledging the consideration of
courteous drivers and avoiding confrontations with inconsiderate
road users.
10.
11.
12.
13.
14.
Be alert for cars pulling out into traffic, turning into your path or
stopping. When riding past parked cars watch for doors opening
or pedestrians stepping out from between cars. Periodically look
behind you to be aware of following traffic and always shoulder
check before initiating a lane change or turn.
Cross railroad tracks and bridge expansion joints at right angles
to avoid getting your wheel stuck in the gap. Be extra careful on
steel bridge decks and similar surfaces as they can be very
slippery for two-wheeled vehicles. If necessary, walk your
bike over.
Ride single file when riding with other cyclists and always call
out or signal with a bell or horn when overtaking other cyclists.
Never hold on to moving vehicles, stunt-ride, or race in traffic.
Never carry other riders, packages, or any items that obstruct
your vision or present the possibility of getting caught in your
wheels or drivetrain.
Wear high visibility clothing both during the day and night. Use
an appropriate lighting system for night riding.
In wet conditions lower your speed and brake sooner than you
would on dry roads. Other wet weather riding hazards to look
out for include manhole covers, storm drains, wet leaves and
painted lines on the roadway.
Riding after dark without reflectors and/or lights is extremely
dangerous. If you plan to ride at night install a cycling specific
headlight so you can see and be seen from the front, and a red
tail light to assist vehicles in stopping and avoiding you.
Bright clothing with reflective tape will also aid others in
seeing you in low light conditions. Have your Brodie dealer
replace any damaged or broken reflectors to ensure your low
light riding safety.
brodiebikes.com
15
Brodie Owners Manual
PART IV
RULES OF THE TRAIL,
lnternational Mountain Bicycle Association (IMBA)
Ride on open trails only. Respect trail and road closures; obtain
permits and authorization as required. If you're not sure about
access, ask. In areas where some riding is allowed, certain trails
may be closed because of environmental concerns or conflicts with
other users.
PART IV - Rules of the Trail
ON THE TRAIL TOOLS
When riding your Brodie bike off-road, you must carry a minimum of
important tools and equipment with you at all times. If anyone fails
to carry necessary tools and equipment, they may put themselves in
an undesirable position often resulting in injury or death.
The following list may assist you on your off-road mountain bike
adventures. Note: the following items are used in addition to the
proper clothing and protective cycling gear.
Don't Forget your...
Leave no trace. Do not ride where you will leave evidence of your
passing, for example, in mud where your tires leave marks. Skid
marks can cause erosion. Stay on the trail; do not create new ones.
Pack out what you pack in. Control your bicycle. Inattention for even
a second can cause disaster. Be alert to conditions; anticipate
potential problems.
Always yield trail. Call out a friendly greeting or use a bell to make
your approach known. Be very careful not to startle other users.
Show your respect for others when passing, by slowing to a walk or
stopping. Approach corners or blind spots as if other users are just
around them.
•
•
•
•
•
•
•
•
first aid kit.
tire and tube patch kit with spare tube and tire levers.
pump with gauge and necessary valve adapters.
various sizes of allen keys (2mm through 8mm), phillips driver.
Extra cable.
Chain tool and additional chain pins.
WATER via bottles or hydration pack.
See your dealer for any of these and/or additional items.
Never spook animals. Startling or disturbing wild animals or livestock
can be dangerous for you, others, and the animals. Give animals
plenty of room and time to adjust to you. In passing horseback
riders, use special care; follow their directions. Leave gates as you
found them, or as they are marked.
Plan ahead. Know your own abilities and the area in which you
will ride; be prepared and self-sufficient. Keep your bicycle in
excellent repair, and carry tools and supplies for changes in weather
or other conditions. Your cycling trip should be satisfying for you, and
not a burden or an offence to others. Keep trails open by setting a
good example.
16
brodiebikes.com
17
Brodie Owners Manual
PART V
MAINTENANCE
Inspection, Lubrication, Adjustment
!!WARNING!! Improper adjustment or servicing may result in
damage to your bicycle or serious injury or death to the rider.
Ongoing maintenance of your bicycle keeps it running in good
condition, extends the life span of parts and components, and
decreases the likelihood of riding an unsafe bike. Periodic checks of
your bicycle and regular maintenance are an integral part of keeping
your bike running in good order.
Repairs and maintenance of your Brodie bicycle may require special
tools and/or knowledge. If you have any doubt about your ability to
perform a repair take your bicycle to your Brodie dealer.
Cleaning your Bicycle
Wash your bike with water and mild soap. Use a soft cloth to dry it.
Never wipe off mud or dirt without water as the dirt will act as an
abrasive. Do not use pressurized water as it can force dirt and water
into bearings causing contamination and reducing bearing life span.
Do not submerge bearings. After cleaning, lubricate the chain, pivots
and cables.
Inspection
Always give your bike a thorough inspection as you wash it. Inspect
the frame and all components for damage. Touch up any chipped
paint once bike is clean and dry and use a good quality automotive
wax on painted areas of the bike to make the finish last longer.
PART V - Maintenance
Maintenance Schedule
After an initial break-in period some parts of your bicycle will require
an initial adjustment to ensure optimum performance. Ask your
dealer when you should bring your bike back for any needed
adjustments. If you ride your bicycle in rain, snow, or severe off-road
conditions, it will need more frequent maintenance.
Frame and Fork
Inspect your frame and fork for damage such as dents, cracks,
bulges, and deep scratches. If your Brodie bicycle has a front
suspension fork consult the accompanying user manual for more
information. If you find or suspect damage to your frame or fork take
your bicycle to your Brodie dealer for inspection. Do not ride your
bike until the problem has been corrected.
!! WARNlNG !! A bicycle and its components are subject to
wear and stress. If a component's life expectancy is exceeded
the component can fail without warning, causing serious
injury or death to the rider. Cracks, bulges, deep scratches,
and discolouration are signs of stress-caused fatigue. A part
exhibiting such characteristics is at the end of its life cycle
and should be replaced immediately. If you have any doubt
about a part on your bike take it to your Brodie dealer.
A damaged frame or fork can fail suddenly, with the
possibility of serious injury or death to the rider. Be aware
that all metals fatigue.
Storage
Avoid leaving your bicycle outdoors. Rain and snow causes corrosion
and the sun fades paint and cracks rubber and plastic.
18
brodiebikes.com
19
Brodie Owners Manual
PART V - Maintenance
Parts Check Schedule
Every ride
Check nuts and bolts.
Every week
Check tire pressure with gauge.
Every month
Wash and dry bicycle, inspecting closely for damage.
Lubricate chain
Lubricate brake lever pivots.
Lubricate brake pivots.
TECH 1.1 - Maintenance Tools
The tools listed below are necessary to perform this manual's
maintenance procedures. Tightness of nuts and bolts is measured in
inch/pounds - a unit of torque, or force required to tighten a nut or
bolt to its correct setting. It can be dangerous to over or undertighten nuts and bolts. Use a torque wrench to ensure that you are
within the correct parameters. You will need Allen keys, wrenches
and screwdriver heads to fit the torque wrench. Consult your Brodie
dealer to find out which sizes you will require.
Lubricate front and rear derailleur pivots.
Lubricate control cables at cable housing stops.
Every 3 months
Check torque values of nuts and bolts.
Re-grease seatpost
Every 6 months
Take bicycle to dealer for overhaul.
Re-tension and true wheels.
Grease and adjust brake cables.
Replace brake pads.
Grease and adjust derailleur cables.
Re-grease hub bearings.
• Torque wrench with inch/pound or Newton-meter graduations;
Allen keys, wrenches and screwdriver heads to fit
• Metric open-end wrenches
• 14mm socket wrench (Venturi)
• 15mm open-end pedal wrench
• Allen keys (sizes needed depend on model)
• #2 Phillips-head screwdriver
• Bicycle tube patch kit
• Bicycle tire pump and gauge
• Tire levers
• Bike stand that holds at least the rear wheel off the ground
Re-grease brake arch pivots.
Re-grease handlebar stem.
Re-grease headset bearings.
Re-grease crank bearings.
Re-grease crank arm spindle taper.
Replace chain.
Every year
Re-grease pedal bearings
Consult your Brodie dealer for additional recommendations
20
FIGURE 4 -
Beam type torque wrench.
brodiebikes.com
21
Brodie Owners Manual
TECH 1.2 - Torque Values
Before every ride, do a quick check of the nuts and bolts on your
bicycle to make sure none have come loose. You should also periodically
go over your whole bike, checking torque values. It can be dangerous
to over-tighten or under-tighten bolts, so you should use a torque
wrench. The list below provides torque values for various parts of your
Brodie bicycle.
Brake lever [MTB] clamp bolts
(25 to 40 in/lbs.; 2.8 to 4.5 N/m)
Brake lever [Road] clamp bolts
(50 to 70 in/lbs.; 5.5 to 8.0 N/m)
Brake lever pivot bolts
(25 to 35 in/lbs.; 2.8 to 4.0 N/m)
Brake arch pivot bolts
(30 to 50 in/lbs.; 2.8 to 5.5 N/m)
Brake pad nuts
(70 to 80 in/lbs.; 5.5 to 9.0 N/m)
Brake cable anchor bolts
(50 to 70 in/lbs.; 5.5 to 8.0 N/m)
Derailleur cable anchor bolts
(35 to 50 in/lbs.; 4.0 to 5.5 N/m)
Front derailleur clamp bolt
(20 to 35 in/lbs.; 2.3 to 4.0 N/m)
Rear derailleur fixing bolt
(60 to 75 in/lbs.; 6.8 to 8.5 N/m)
Shimano shift lever clamp bolts
(25 to 40 in/lbs.; 2.8 to 4.5 N/m)
Grip Shift shifter clamp bolts
(25 to 40 in/lbs.; 2.8 to 4.5 N/m)
Shimano shift lever pivot fixing bolts
(22 to 30 in/lbs.; 2.5 to 5.5 N/m)
Handlebar stem/steerer bolts, AheadSet stems
(80 in/lbs.; 9.0 N/m)
AheadSet draw bolt
(22 in/lbs.; 2.5 N/m)
Split cable hanger bolt [AheadSet]
(25 to 40 in/lbs.; 2.8 to 4.5 N/m)
Handlebar clamp bolt
(80 to 100 in/lbs;9 to 11 N/m)
Bar end bolts
(50 to 70 in/lbs.; 5.5 to 8.0 N/m)
Crank fixing bolts
(200 to 240 in/lbs.; 23 to 27 N/m)
Chainring bolts
(70 to 90 in/lbs.; 8 to 10 N/m)
Pedals
(310 in/lbs.; 35 N/m)
Toeclip screws
(25 to 30 in/lbs.; 2.8 to 3.4 N/m)
Step-in shoe cleats
(44 in/lbs.; 5.0 N/m)
Saddle fixing bolt
(140 to 175 in/lbs.; 16 to 20 N/m)
PART V - Maintenance
TECH 1.3 - Wheel Removal
Disc Brakes
Fork
Brake Cable
(Hydraulic)
Caliper Assembly
Disc (Rotor)
FIGURE 5 -
Picture of Disc Brake with labeled parts (side view)
For information on removing and remounting wheels on disc brake
equipped Brodie bicycles consult the accompanying disc brake
owner's manual.
Note:
1 inch/pound (in-lb)= 0.113 Newton/meters (N/m)
1 inch/pound (in-lb)= 1.13 kilograms/cubic meter (kg/cm)
1 inch/pound(in-lb)= 0.083 foot/pounds (ft/lb)
22
brodiebikes.com
23
Brodie Owners Manual
PART V - Maintenance
Linear style brake (V-brake)
TECH 1.4
Tire tube Replacement
Elbow Guide
Brake Cable
Cable Anchor Bolt
Brake Arm
Pivot Bolt
• remove wheel from bike.
• deflate the tube, remove tire and tube from the rim using
tire levers.
• inspect tire for cuts, damage or debris.
• check the rim to make sure that the rim strip covers the
spoke heads.
• Re-install the tire in the orientation/direction marked on the
sidewall.
• Insert tube (avoid pinching/twisting) into tire while aligning
the valve stem with valve hole.
• Reseat the tire bead inside the rim. Do NOT pinch the tube
between the tire and the rim.
• Inflate the tire to approximately half pressure and check to make
sure that the tire is seating properly on the rim. With the tire
properly seated inflate the tire to the proper pressure and
reinstall the wheel on the bicycle.
How to Fix a Flat
FIGURE 6 -
1.
2.
3.
4.
5.
6.
Picture of linear style brake with labeled parts (rear view)
Push the two brake arms together and slide the brake cable
elbow guide up and away from the brake arm to release the V
brakes and provide the necessary clearance to remove the tire.
Disengage the hub quick release lever, loosen the adjustment
nut on the opposite side of the wheel's axle and slide the wheel
out of the dropouts.
If you are removing the back wheel make sure the chain is on
the largest front chain ring and smallest rear cog.
Push the rear derailleur back and lift the rear of the bike.
The wheel should slide out of the rear dropouts and can then be
freed from the chain.
To remount wheel, repeat steps 1-5 in reverse order.
• With the tube removed from the tire check the tire for
foreign objects.
• To find the puncture(s) in the tube, inflate the tube and immerse
it in water. Look for bubbles coming from the tube where the air
is escaping.
• Dry the tire and follow the instructions that come with your
patching kit to repair the hole. With the hole repaired reinstall
the tube as described in the preceding section.
NOTE: Always make sure the wheel is completely inserted
into the dropouts and that the brake pads do not rub against
either the rim or tire.
24
brodiebikes.com
25
Brodie Owners Manual
PART V - Maintenance
Shifting Hints
TECH 1.5 - Brake System
• On the front chainrings, the largest gear is the most difficult to
pedal but offers the highest gear ratio.
• On the rear cogset, the largest gear offers the lowest gear ratio
and the most torque.
• The best gear combination for steep uphills is the smallest
"granny" gear and the largest rear cog.
• On downhills use the big chainring and smallest cog.
• In general, find the right combination of gears to allow you to
maintain a steady pedal stroke.
• Avoid gear combinations such as small ring/small cog and big
ring/big cog which puts undue stress and excessive wear on
the drivetrain.
• Always pedal forward while shifting, reducing pedalling pressure
slightly to avoid jamming or straining the chain.
• If you hear any rubbing or grinding noise after shifting,
see your dealer.
NOTE: Drivetrain misalignment may result in a broken chain,
derailleur moving into spokes, or chain derailment, potentially
causing serious injury or death to the rider. If you are at all
unsure of your abilities to properly adjust the derailleurs on
your Brodie bicycle take it to your dealer to have your bike's
drivetrain inspected and adjusted as necessary.
Test your brakes every time you get on your bike. They are the most
critical piece of equipment on your bike. If they are not working
properly do not ride your bike until they are fixed.
Brake systems are difficult to adjust without a thorough
understanding of the way they work. For this reason Brodie
Bicycles recommends that you have your Brodie dealer
perform your brake set-up and adjustment.
For larger adjustments, loosen the cable anchor bolt on the brake
arm and adjust the amount of cable between the brake lever and the
brake arms. A longer length will increase the distance between brake
pad and rim, a shorter length will decrease the distance. Always
make sure that full braking power can be applied without the brake
lever touching the handlebar grip.
Brake Cable
Elbow Guide
A Headset Loose??
• Straddle the bike and apply the front brake.
• Rock the bike back and forth checking for looseness or knocking
in the headset.
• Lightly bounce the front wheel to check for rattles in the forks.
• To check for tight headset bearings lift the front of the bike and
turn the handlebars. The wheel should swing easily.
• If ANY problem persists see your dealer.
Cable Anchor Bolt
Brake Arm
Pivot Bolt
FIGURE 7 -
26
Illustration of linear type V-brake assembly
brodiebikes.com
27
Brodie Owners Manual
PART V - Maintenance
Brake pad position.
Derailleur System and Shifting
Proper position, and in good condition. When the brakes are applied,
the pads must be centered on the rim. (See Figure 7)
NOTE: Brake pads wear down with use.
To fine-adjust brake cable length, loosen the locknut of the brake
lever's adjustment barrel (see Figure 8), screw the barrel in (to loosen
cable) or out (to tighten cable).
• The derailleur system consists of the components that allow
you to shift gears: The front and rear derailleur, shifters, and
shift cables.
• The left shifter operates the front derailleur
• The right shifter operates the rear derailleur.
• Each shift should automatically position the derailleur chain
guide so that it does not rub the chain.
• The chain should not fall off the inner or outer chainring or cog;
if it rubs or falls off, the derailleur needs adjustment.
Front Derailleur Position lnspection
Reach Adjuster
Brake Lever Adjustment Barrel
FlGURE 8 -
Lever. On some brake levers, the reach adjuster is on the
rear side of the lever and is adjusted with a 2mm allen key
or flathead screwdriver.
TECH 1.6 - Inspection I
Cables
• Look for kinks, broken strands, and frayed ends before each ride.
• Check cable housings for bent or pinched ends and
excessive wear.
• If you find a problem with brake cables fix or replace the
problem part before riding your bike.
• Make sure that end caps cover all exposed cable ends to
prevent fraying.
• Once a month, lubricate the cables where they enter the
cable housings.
• Twice a year have the cables inspected, greased, and adjusted
by your Brodie dealer.
28
• The height and angle of the front derailleur are important to
its performance.
• The outer chain guide should be parallel to the large chainring
when above it.
• The lower edge of the outer chain guide should be positioned
1mm to 3mm above the large chainring teeth when it is directly
above them. (See Figure 9)
Rear Derailleur Position lnspection
• To check alignment of rear derailleur, stand to the rear of the
bicycle and make sure that the small cog, the two derailleur
pulleys, and the chain are all in line (see Figure 10).
• If they are not in line, the rear derailleur needs adjustment
Derailleur Cables Inspection
• Inspect derailleur cables for wear before each ride.
• Look for kinks, broken strands, frayed ends or damaged
cable housings.
• Cable housing ends (ferrules) should be properly seated in
their stops.
• Always have end caps on exposed cable ends.
• Front and rear derailleur cable anchor bolts should be tightened
to 35-50 inch/pounds.
brodiebikes.com
29
Brodie Owners Manual
PART V - Maintenance
For instructions pertaining to the use of the shifting system
on your Brodie bike, please refer to the respective system
instructions and manual. See your dealer for details.
Adjusting Screw
Cable Anchor
1-3 mm
Chain Guide
FIGURE 9 -
Front derailleur position. Lower edge of outer chain guide
should be 1mm to 3mm above the top of the large chainring.
Always wipe any excess oil/lubrication after application.
Excess lube will attract dirt, which will contribute to the
degeneration of your bike and its parts.
TECH 1.7 - Specific Derailleur Adjustment
If you are at all unsure of your abilities to properly adjust the
derailleurs on your Brodie bicycle take it to your dealer or an
experienced mechanic to have your bike's drivetrain
inspected and adjusted as necessary.
30
TECH 1.8 - Tech Tips II - Derailleur Maintenance
Front Derailleur low gear limit
Do this adjustment when the front derailleur will not shift
properly to the small chainring (granny gear).
• Shift the chain onto the small ring and large rear cog.
• Loosen the cable anchor bolt and remove all tension.
• Turn the low gear adjustment screw (see figure 10) until the
chain is approximately 1.25mm from the inner chain guide.
• For Shimano shifters, push the left index lever (shift return lever)
at least twice to make sure it is in its lowest setting.
• (For twist shifters, rotate the left shifter all the way forward.)
• Screw the shifter's adjusting barrel in (clockwise) to within one
turn of its limit.
• Pull the front shift cable taut and tighten the clamp bolt to
35-40 inch/pounds.
Do this adjustment when the front derailleur will not shift
properly to the large chainring.
• Shift the chain to the smallest rear cog.
• Turn the high gear adjustment screw (the outer screw) of the
front derailleur counterclockwise so it will be out of the way of
the front derailleur's motion in the following step.
• Shift the chain onto the large chainring.
• Use the left shifter to position the front derailleur so that
the chain clears the outer chain guide by 1mm.
• Retighten the high-gear adjustment screw until it
meets resistance.
Rear derailleur high gear limit
Do this adjustment when the rear derailleur will not shift
properly to the smallest rear cog.
• Shift the chain to the small rear cog and large chainring.
• Loosen the cable clamp bolt on the rear derailleur and free
the cable.
• Stand to the rear of the bicycle and make sure that the outer
side of the small cog, the two derailleur pulleys, and the chain
are all in line as shown in Figure 10.
• If they are not, turn the rear derailleur's high-gear adjustment
screw (marked "H") until they are aligned.
brodiebikes.com
31
Brodie Owners Manual
For Shimano shifters.
• Push the right index lever (shift return lever) at least eight or
nine times (depending on gearing) to make sure it is in its
lowest setting. For twist shifters, rotate the right shifter all the
way forward.
• Screw the rear derailleur shifter's adjustment barrel in
(clockwise) to within two turns of its inner limit, and the rear
derailleur's adjustment barrel to within one turn of its inner limit.
• Pull the rear shift cable taut, insert the cable into the clamp bolt
groove on the rear derailleur, and tighten the clamp bolt to
35-50 inch/ pounds
Rear derailleur low gear limit
Do this adjustment when the rear derailleur shifts beyond
or short of the largest cog.
• Shift the chain to the smallest rear cog.
• Turn the rear derailleur's low-gear adjustment screw (marked "L"
counterclockwise so it will be out of the way of the rear
derailleur's motion in the following step.
• Carefully shift the chain onto the large rear cog.
• Do not over shift or the chain may wedge itself between the
large cog and the spokes.
• Stand to the rear of the bicycle and make sure that the large
cog, the two derailleur pulleys, and the chain are all in line
(see Figure 10).
• If they are not in line, turn the rear derailleur's adjustment barrel
until they are aligned.
• Re-tighten the low-gear adjustment screw until it
meets resistance.
Checking derailleur adjustment
To check the adjustment of the derailleur system.
• Shift through various gear combinations making sure the chain
does not rub on the front derailleur.
• Also ensure that the chain will not fall off of the front chainrings
either to the inside or outside and check to make sure the
derailleur and big chainring do not rub.
32
PART V - Maintenance
Other Derailleur Maintenance
Lubricate the front and rear derailleur pivots each month. Keep the
front derailleur clamp bolt tightened to 20-35 inch/pounds and the
rear derailleur fixing bolt tightened to 60-75 inch/pounds. Keep the
shift lever clamp bolts (or Grip Shift shifter clamp bolts) tightened to
25-40 inch/pounds, and the shift lever pivot fixing bolts tightened to
22-30 inch/pounds.
Minor adjustments will be needed over time to maintain accuracy
and ease of shifting. You can make fine adjustments by turning
adjustment barrels. The front and rear derailleur system has an
adjustment barrel on the shifter. The rear derailleur on Shimano
systems have adjustment barrels on the shifter and rear derailleur
(adjustment can be done from either barrel). These adjustment
barrels are to be used for minor tuning of your drivetrain ONLY.
For quality drivetrain set-up, see your dealer.
Top Gear
Low Gear
Guide Pulley
Top Adjustment
Screw (H)
Guide Pulley
Low Adjustment
Screw (L)
FIGURE 10 - Rear derailleur alignment. The outer side of the small cog, the
two pulleys and the chain should all be in line. Adjust indexing
while chain is on second smallest cog.
brodiebikes.com
33
Brodie Owners Manual
TECH 1.9 - Inspection II
Handlebar Stem/Headset lnspection
• Inspect stem for damage.
• If you find or suspect damage have it inspected by your dealer
before riding.
• Check stem tightness before every ride by holding the wheel
stationary between your knees and trying to turn the handlebars.
If they move independently, reposition them and tighten the
pinch bolts on the headset.
• To adjust handlebar position add or remove spacers below
the stem.
• The stem cannot be raised.
• If you wish to lower the stem see your dealer.
PART V - Maintenance
Handlebar Stem/Handlebar
• Inspect handlebar for damage.
• If you find or suspect damage, have it inspected by your dealer.
Do not ride your bicycle until the problem is fixed.
• Make sure the stem's handlebar clamp bolt is tightened to
80-100 inch/pounds. An under-tightened or over tightened bolt
is dangerous.
• Also make sure the handlebar end plugs are in place.
• The handlebar angle can be adjusted by loosening the handlebar
clamp bolt, positioning the handlebar as desired and
re-tightening the bolt.
Handlebar Clamp Bolt
Aheadset Adjustments
• The AheadSet bearings are adjusted by first loosening the two
handlebar stem/steerer bolts and the top clamp of double clamp
forks on the steerer tube and stanchions.
• The stem cannot be adjusted if the stem and brake hanger bolts
are at all tight.
• Before adjusting the headset, make sure you have loosened all
three bolts. Failure to do so may result in a cracked stem cap.
• Also, over tightening the headset can destroy it. Tighten the
AheadSet draw bolt to 22 inch/pounds. Re-tighten the
stem/steerer bolts to 80 inch/pounds.
• Re-tighten the hanger bolt to 25~0 inch/pounds.
• Make sure the stem is properly aligned with the front wheel.
• Have your AheadSet headset greased twice a year by your
Brodie dealer.
Aheadset Draw Bolt
Stem/Steerer
Bolts
FIGURE 11 - AheadSet Stem/Headset System.
!!WARNING!! It is very important that the headset bearings
be neither loose nor tight. Riding a bicycle with an
improperly adjusted headset may result in loss of control,
causing serious injury or death to the rider or damage to
the bicycle.
34
brodiebikes.com
35
Brodie Owners Manual
Grips
PART V - Maintenance
TECH 2.0 - DRIVETRAIN
• Loose handlebar grips are unsafe.
• Remove and clean loose grips.
• To remount, spray hair spray on the handlebar and slide the grip
back on. If this method fails use rubber cement.
• Bar end bolts should be tightened to 50-70 inch/pounds.
• Make sure the bar end plugs are in place.
• Unplugged handlebar or bar ends can result in serious
puncture-wound type injuries.
Saddle and Seatpost
• The saddle fixing bolt should be kept tightened to 140-175
inch/pounds.
• Make sure the seatpost is securely held by the quick release or
seatpost binder.
• Inspect the seatpost and the top of the frame where the seatpost
enters for cracks or damage.
Always make sure the seatpost is inserted past the maximum
height marker. Failure to do so may result in serious injury or
death to the rider.
• The seatpost should be greased every three months.
• The seatpost quick release should be tight enough to keep the
seat and seatpost from rotating during normal riding, and no
tighter. To check tightness, grasp seat with your hands, hold the
rear wheel between your knees, and try to rotate the seat side
to side.
• Open the seatpost's quick-release lever to its mid position (in
line with skewer) and tighten the nut by hand until it is snug.
• Do not over-tighten the nut as this puts unnecessary stress on
frame and makes seat-height adjustment more difficult.
• Never tighten the seat post quick release lever without the seat
post in the frame as damage may result.
36
FlGURE 12 - Side view of drive train
Cranks
Crank bolts need to be checked after the first ten hours of 100 miles
of riding. As the crank is mounted on a tapered spindle it will seat
and require further tightening. The fixing bolt on each crank arm
should be tightened to 200-240 inch/pounds. Whenever the crank
arms are removed, a thin film of grease should be applied to the
crank arm spindle tapers before the crank arms are reinstalled to
eliminate creaking.
Chainrings
The chainring bolts should be kept tightened to 70-90 inch/pounds.
Periodically clean and inspect the chainrings. If teeth are bent or
broken the chainring needs to be replaced. Some chainrings have
truncated teeth (Figure 13) to assist in shifting. Familiarize yourself
with the chainrings to be able to discern between damaged or
truncated teeth.
brodiebikes.com
37
Brodie Owners Manual
PART V - Maintenance
pedal before riding in traffic or off-road. Until "clicking in" becomes a
reflex action there is the danger of swerving or falling when trying to
engage or remove the shoe from the pedal.
Truncated Teeth
Pickup Pins
Pickup Teeth
Caution Ask your Brodie dealer to demonstrate how to use
clipless pedals and have your dealer make sure that your
pedals are set up so that you can easily disengage the cleat.
The pedal's release tension should be adjusted properly. See
dealer for further details.
Rear Cassette (Cogs)
Use a small screwdriver or toothbrush to clean out debris and grease
between the cogs. A cog with worn, bent, or broken teeth should be
replaced. As with the front chainrings some cogs are truncated to aid
in shifting.
FIGURE 13 - Chainrings with truncated teeth, pickup pins, and pickup teeth
to aid shifting.
Step-ln (Clipless) Pedals
The pedal's four bindings should be loose enough to release when
necessary and tight enough not to release prematurely. Pedals must
have equal amounts of tension and be free of debris. Pedal spring
tension is adjusted with a 3mm Allen key. Tension increases when
the screw is turned clockwise and decreases when turned
counterclockwise. The indicator near the screw displays the spring
tension. The spring tension changes in 3 steps with one turn of the
screw. The screw can be turned 9 times. When it is turned in all the
way in the direction increasing tension, it suddenly becomes hard to
turn. Do not turn beyond that point. When turning in the other
direction, stop turning when the end of the adjustment screw
becomes even with the spring plate.
Chain
Clean the chain and inspect it for tight links, wear and damage to
pins. If you find damage, replace the chain. As a chain wears, it
lengthens. If your chain is skipping or shifting poorly have your
dealer check your chain for excessive stretch. Lubricate the chain
before it is dry. Remove excess oil when lubricating to keep the chain
from retaining dirt or sand.
A Note About Step-ln (Clipless) Pedals
Step-in pedals are used in conjunction with shoes that have special
cleats fitted to the soles. Ask your Brodie dealer to recommend the
best shoes for your riding style. If you are unfamiliar with the use of
clipless pedals, practice engaging and disengaging the cleat and
38
brodiebikes.com
39
Brodie Owners Manual
PART VI
BRUCE SPICER'S RIDING TIPS
PART VI - Bruce Spicer’s Riding Tips
The Front Brake is Your Friend
Don't believe people who tell you to ignore the front brake because it
will flip you over the bars. Use a smooth, steady squeeze on the
brake lever and you will soon learn to brake hard without flipping or
skidding. You'll have more control over your stopping ability, and the
trails will thank you.
Synthetics -- Even Better Than The Real Thing
Cotton is a great natural fibre, but it sucks for riding in.
A polypropylene jersey made of modern synthetics will do wonders
for your riding comfort by wicking sweat away from your body. As
you get more into riding, shoes and shorts designed for cycling will
make a huge difference in performance and comfort. You'll be dryer
and warmer and beat the bronchitis bug faster than I figured out how
to spell it!
Ride the bike, don't let it ride you
Suspension developments are taking away the need to use "Body
English" more and more. But, to really ride a bike well, you still need
to 'help' it over even the smallest obstacles as well as into dips and
holes in the trail. Your hands control the front wheel, your feet
control the rear.
Bruce’s Bio
Bruce is our Product Manager. He has spent the better part of the
eighties and nineties as a member of the Canadian National Road
Team (8yrs) and a pro-level Mountain biker (8yrs). With an
unprecedented 13 Canadian National Championship, Bruce has
experienced more pleasure and pain in the saddle than most of us
mere mortals could ever comprehend.
Boy Scouts Are Cool. Be Prepared
How long will you be riding? How badly could the weather
deteriorate? Will you be standing around later in cold, wet gear?
Pumps, spares, a change of clothes can make a world of difference
to your ride, and make you a hero to those who didn't put the
thought in beforehand. Splitting the responsibilities on longer epics
makes sense. ie: one rider brings a chain break, another brings a
spare derailleur, etc. Everybody should bring spare tubes though!
Consider Weight to Strength.
The trend in the past has been towards ultra-light frames & parts.
When hardcore riding tests the limits of rider and machine, durability
& bombproof strength become just as important. The market has
become more sensible to strength and less obsessed by purely
weight. Don't sacrifice reliability and safety with parts and
accessories that can't take the abuse you'll want to dish out.
40
brodiebikes.com
41
Brodie Owners Manual
The Right Bike From the Right Dealer
Select a reputable dealer that will be able to fill your needs. Your
bicycle retailer should assist you to find the right bike, the correct fit
and explain the operation of your new purchase. Check out the way
they treat other customers, especially newbies. Ask about afterpurchase tune-ups and maintenance. Avoid stores that deliver
attitude instead of service.
What's Your Favourite Position?
The mass of your upper body has a significant influence on how your
bike rolls over terrain. When climbing steeps, spread your weight
over both wheels and move it fore and aft depending on traction.
Usually you will have your rear forward on the saddle, driving your
weight into the rear tire. Keep your elbows bent and chest low.
Beginners will inch over the side of a drop-off with their weight way
off the back of the saddle. This is fine if the runout is gradual, but if
it's more abrupt you need more aggressive body english. Get centered
over the bike. As you go over you will be heavy on the hands and
light on the feet. As you transition at the bottom pull up on the bars
and be heavy on the feet. As you progress, you will just wheelie over
the edge, landing rear wheel first. Practise on small drops first,
because you can't afford to mess up a big one!
Where you look is where you go
When choosing a line through the terrain, look up the trail at where
you want to end up, not where you don't! Following your eyes will
guide you away from the obstacles. As a novice, this was the best
piece of riding advice I ever had given to me.
42
PART VII - Warranty Information
PART VII
WARRANTY INFORMATION
• This warranty does not cover damages or failure of the bicycle or
parts as a result of: bicycle racing; stunt or acrobatic riding,
jumping, and similar activities; usage as a power-propelled
vehicle; any other misuse, abuse, negligence, or accident;
improper assembly, improper fit, improper adjustment, improper
maintenance, or alterations; and normal wear and tear.
• This warranty is issued to and for the exclusive benefit of the
original purchaser of the bicycle and is not assignable or in any
way transferable to subsequent purchasers or users.
• This warranty does not cover bodily injuries.
• This warranty expressly excludes any liability for any incidental
or consequential damages.
• To the extent allowed by law, any implied warranty of
merchantability or fitness for a particular purpose applicable to
these bicycles is limited in duration to the duration of the
written warranty herein.
• There are no other warranties which extend beyond the
description on the face of this written warranty, and these
warrantors do not authorize any person to create for them any
other obligation or liability in connection with these bicycles.
• Repair or replacement of defective parts or accessories
constitutes the sole remedy under this warranty.
• This warranty gives you specific legal rights, and your rights may
vary from state to state and country to country.
Warranty Claims
To make a claim under this warranty, you must present the defective
part to an authorized Brodie dealer with your original sales receipt or
other proof of purchase containing the purchase date and serial
number. If the distributor and manufacturer determine that this claim
is valid under the terms of this warranty, they will, at their option,
repair or replace the part without charge. However, the original
purchaser will be responsible for any shipping or dealer labor charges
incurred from the repair or replacement of the defective part.
brodiebikes.com
43
12
13
14
15
16
17
18
19
20
21
22
23
24
25
26
27
28
29
30
31
32
33
34
35
36
37.8 34.6 32.0 29.7 27.7 26.0 24.4 23.1 21.8 20.8 19.8 18.9 18.0 17.3 16.6 16.0 15.4 14.8 14.3 13.8 13.4 13.0 12.6 12.2 11.8 11.5
41
42
43
44
45
46
47
48
49
50
51
52
53
54
55
56
96.9 88.8 82.0 76.1 71.0 66.6 62.7 59.2 56.1 53.3 50.7 48.4 46.3 44.4 42.6 41.0 39.4 38.0 36.7 35.5 34.3 33.3 32.3 31.3 30.4 29.6
40.1 36.8 34.0 31.5 29.4 27.6 26.0 24.5 23.2 22.1 21.0 20.0 19.2 18.4 17.6 17.0 16.3 15.7 15.2 14.7 14.2 13.8 13.3 13.0 12.6 12.2
42.5 39.0 36.0 33.4 31.2 29.2 27.5 26.0 24.6 23.4 22.2 21.2 20.3 19.5 18.7 18.0 17.3 16.7 16.1 15.6 15.0 14.6 14.1 13.7 13.3 13.0
44.9 41.1 38.0 35.2 32.9 30.8 29.0 27.4 26.0 24.7 23.5 22.4 21.4 20.5 19.7 19.0 18.2 17.6 17.0 16.4 15.9 15.4 14.9 14.5 14.1 13.7
47.2 43.3 40.0 37.1 34.6 32.5 30.5 28.8 27.3 26.0 24.7 23.6 22.6 21.6 20.8 20.0 19.2 18.5 17.9 17.3 16.7 16.2 15.7 15.2 14.8 14.4
Brodie Owners Manual
44
11
16
17
18
19
20
21
22
23
24
25
26
27
28
29
30
31
32
33
34
35
36
37
38
39
40
49.6 45.5 42.0 39.0 36.4 34.1 32.1 30.3 28.7 27.3 26.0 24.8 23.7 22.7 21.8 21.0 20.2 19.5 18.8 18.2 17.6 17.0 16.5 16.0 15.6 15.1
52.0 47.6 44.0 40.8 38.1 35.7 33.6 31.7 30.1 28.6 27.2 26.0 24.8 23.8 22.8 22.0 21.1 20.4 19.7 19.0 18.4 17.8 17.3 16.8 16.3 15.8
54.3 49.8 46.0 42.7 39.8 37.3 35.1 33.2 31.4 29.9 28.4 27.1 26.0 24.9 23.9 23.0 22.1 21.3 20.6 19.9 19.2 18.6 18.1 17.5 17.0 16.6
56.7 52.0 48.0 44.5 41.6 39.0 36.7 34.6 32.8 31.2 29.7 28.3 27.1 26.0 24.9 24.0 23.1 22.2 21.5 20.8 20.1 19.5 18.9 18.3 17.8 17.3
59.0 54.1 50.0 46.4 43.3 40.6 38.2 36.1 34.2 32.5 30.9 29.5 28.2 27.0 26.0 25.0 24.0 23.2 22.4 21.6 20.9 20.3 19.6 19.1 18.5 18.0
61.4 56.3 52.0 48.2 45.0 42.2 39.7 37.5 35.5 33.8 32.1 30.7 29.3 28.1 27.0 26.0 25.0 24.1 23.3 22.5 21.8 21.1 20.4 19.8 19.3 18.7
63.8 58.5 54.0 50.1 46.8 43.8 41.2 39.0 36.9 35.1 33.4 31.9 30.5 29.2 28.0 27.0 26.0 25.0 24.2 23.4 22.6 21.9 21.2 20.6 20.0 19.5
66.1 60.6 56.0 52.0 48.5 45.5 42.8 40.4 38.3 36.4 34.6 33.0 31.6 30.3 29.1 28.0 26.9 26.0 25.1 24.2 23.4 22.7 22.0 21.4 20.8 20.2
68.5 62.8 58.0 53.8 50.2 47.1 44.3 41.8 39.6 37.7 35.9 34.2 32.7 31.4 30.1 29.0 27.9 26.9 26.0 25.1 24.3 23.5 22.8 22.1 21.5 20.9
70.9 65.0 60.0 55.7 52.0 48.7 45.8 43.3 41.0 39.0 37.1 35.4 33.9 32.5 31.2 30.0 28.8 27.8 26.8 26.0 25.1 24.3 23.6 22.9 22.2 21.6
73.2 67.1 62.0 57.5 53.7 50.3 47.4 44.7 42.4 40.3 38.3 36.6 35.0 33.5 32.2 31.0 29.8 28.7 27.7 26.8 26.0 25.1 24.4 23.7 23.0 22.3
75.6 69.3 64.0 59.4 55.4 52.0 48.9 46.2 43.7 41.6 39.6 37.8 36.1 34.6 33.2 32.0 30.8 29.7 28.6 27.7 26.8 26.0 25.2 24.4 23.7 23.1
78.0 71.5 66.0 61.2 57.2 53.6 50.4 47.6 45.1 42.9 40.8 39.0 37.3 35.7 34.3 33.0 31.7 30.6 29.5 28.6 27.6 26.8 26.0 25.2 24.5 23.8
80.3 73.6 68.0 63.1 58.9 55.2 52.0 49.1 46.5 44.2 42.0 40.1 38.4 36.8 35.3 34.0 32.7 31.5 30.4 29.4 28.5 27.6 26.7 26.0 25.2 24.5
82.7 75.8 70.0 65.0 60.6 56.8 53.5 50.5 47.8 45.5 43.3 41.3 39.5 37.9 36.4 35.0 33.7 32.5 31.3 30.3 29.3 28.4 27.5 26.7 26.0 25.2
85.0 78.0 72.0 66.8 62.4 58.5 55.0 52.0 49.2 46.8 44.5 42.5 40.6 39.0 37.4 36.0 34.6 33.4 32.2 31.2 30.1 29.2 28.3 27.5 26.7 26.0
87.4 80.1 74.0 68.7 64.1 60.1 56.5 53.4 50.6 48.1 45.8 43.7 41.8 40.0 38.4 37.0 35.6 34.3 33.1 32.0 31.0 30.0 29.1 28.2 27.4 26.7
89.8 82.3 76.0 70.5 65.8 61.7 58.1 54.8 52.0 49.4 47.0 44.9 42.9 41.1 39.5 38.0 36.5 35.2 34.0 32.9 31.8 30.8 29.9 29.0 28.2 27.4
92.1 84.5 78.0 72.4 67.6 63.3 59.6 56.3 53.3 50.7 48.2 46.0 44.0 42.2 40.5 39.0 37.5 36.2 34.9 33.8 32.7 31.6 30.7 29.8 28.9 28.1
94.5 86.6 80.0 74.2 69.3 65.0 61.1 57.7 54.7 52.0 49.5 47.2 45.2 43.3 41.6 40.0 38.5 37.1 35.8 34.6 33.5 32.5 31.5 30.5 29.7 28.8
11
12
13
14
15
16
17
18
19
20
21
22
23
24
25
26
27
28
29
30
31
32
33
34
35
36
99.2 91.0 84.0 78.0 72.8 68.2 64.2 60.6 57.4 54.6 52.0 49.6 47.4 45.5 43.6 42.0 40.4 39.0 37.6 36.4 35.2 34.1 33.0 32.1 31.2 30.3
101.6 93.1 86.0 79.8 74.5 69.8 65.7 62.1 58.8 55.9 53.2 50.8 48.6 46.5 44.7 43.0 41.4 39.9 38.5 37.2 36.0 34.9 33.8 32.8 31.9 31.0
104.0 95.3 88.0 81.7 76.2 71.5 67.2 63.5 60.2 57.2 54.4 52.0 49.7 47.6 45.7 44.0 42.3 40.8 39.4 38.1 36.9 35.7 34.6 33.6 32.6 31.7
106.3 97.5 90.0 83.5 78.0 73.1 68.8 65.0 61.5 58.5 55.7 53.1 50.8 48.7 46.8 45.0 43.3 41.7 40.3 39.0 37.7 36.5 35.4 34.4 33.4 32.5
108.7 99.6 92.0 85.4 79.7 74.7 70.3 66.4 62.9 59.8 56.9 54.3 52.0 49.8 47.8 46.0 44.2 42.7 41.2 39.8 38.5 37.3 36.2 35.1 34.1 33.2
111.0 101.8 94.0 87.2 81.4 76.3 71.8 67.8 64.3 61.1 58.1 55.5 53.1 50.9 48.8 47.0 45.2 43.6 42.1 40.7 39.4 38.1 37.0 35.9 34.9 33.9
113.4 104.0 96.0 89.1 83.2 78.0 73.4 69.3 65.6 62.4 59.4 56.7 54.2 52.0 49.9 48.0 46.2 44.5 43.0 41.6 40.2 39.0 37.8 36.7 35.6 34.6
115.8 106.1 98.0 91.0 84.9 79.6 74.9 70.7 67.0 63.7 60.6 57.9 55.3 53.0 50.9 49.0 47.1 45.5 43.9 42.4 41.0 39.8 38.6 37.4 36.4 35.3
118.1 108.3 100.0 92.8 86.6 81.2 76.4 72.2 68.4 65.0 61.9 59.0 56.5 54.1 52.0 50.0 48.1 46.4 44.8 43.3 41.9 40.6 39.3 38.2 37.1 36.1
120.5 110.5 102.0 94.7 88.4 82.8 78.0 73.6 69.7 66.3 63.1 60.2 57.6 55.2 53.0 51.0 49.1 47.3 45.7 44.2 42.7 41.4 40.1 39.0 37.8 36.8
122.9 112.6 104.0 96.5 90.1 84.5 79.5 75.1 71.1 67.6 64.3 61.4 58.7 56.3 54.0 52.0 50.0 48.2 46.6 45.0 43.6 42.2 40.9 39.7 38.6 37.5
125.2 114.8 106.0 98.4 91.8 86.1 81.0 76.5 72.5 68.9 65.6 62.6 59.9 57.4 55.1 53.0 51.0 49.2 47.5 45.9 44.4 43.0 41.7 40.5 39.3 38.2
127.6 117.0 108.0 100.2 93.6 87.7 82.5 78.0 73.8 70.2 66.8 63.8 61.0 58.5 56.1 54.0 52.0 50.1 48.4 46.8 45.2 43.8 42.5 41.2 40.1 39.0
130.0 119.1 110.0 102.1 95.3 89.3 84.1 79.4 75.2 71.5 68.0 65.0 62.1 59.5 57.2 55.0 52.9 51.0 49.3 47.6 46.1 44.6 43.3 42.0 40.8 39.7
132.3 121.3 112.0 104.0 97.0 91.0 85.6 80.8 76.6 72.8 69.3 66.1 63.3 60.6 58.2 56.0 53.9 52.0 50.2 48.5 46.9 45.5 44.1 42.8 41.6 40.4
brodiebikes.com
(26 x 46)/32 = 38.13 inches of gear.
Gear 'inches' refers back to the high wheeler or Penny Farthing of
the 1880's. This historic bike had a tiny rear wheel and a huge
front wheel. The pedals were attached to the big wheel, and there
were no chains or gears. Depending on the rider’s strength the
bigger the fromt wheel, the faster the bike would go. The smaller
the wheel, the easier the bike would go uphill.
Gear Ratio Chart
Using the table at RIGHT (below) you can calculate your own
gearing ratios. Multiplying the wheel diameter by the number of
teeth in the chain wheel and divide that result by the number of
teeth in the free hub cog. For example, if you have a 26” wheel,
a 46-tooth chainwheel and a 32-tooth freehub cog,
your gear would be:
45
Brodie Owners Manual
Purchase Details
Record of maintenance
Record of purchase
Enter each repair here.
date:
* Brodie Model
* Serial #
* Date of Purchase
* Dealer
* Address
* City
* State/Prov.
)
* Dealer Phone # (
* Attach Receipt Here:
Color
Size
* Zip/Postal Code
For the most current manual visit www.brodiebikes.com
* Required for warranty purposes
46
brodiebikes.com
47
Warranty Card
Brodie Owners Manual
Brodie Bicycle Warranty
Brodie warranty will cover defects in material and workmanship of the frame from the date of purchase to the
registered original owner with a copy of the original, dated receipt. Different materials and different categories of
bikes have their own specific warranty details, as outlined below.
* Name
* Address
* City
* State/Prov.
* Home Phone #
Female
* Zip/Postal Code
(
)
Is the Purchaser the Primary User?
* See the Brodie Spec. Chart for your particular model if you’re not sure.
Respective manufacturers cover the components on your bicycle. Brake Pads, Cables, Tires, Tubes, Grips and Drive
Train are considered wear and tear items, and are not covered by warranty.
An authorized Brodie dealer must assemble bicycles. Warranty claims must be handled through an authorized
Brodie dealer. To qualify for warranty, the Brodie warranty registration card must be filled out and submitted within
30 days of purchase. Online registration is also available at www.brodiebikes.com.
Brodie Frames
Brodie’s frames have a warranty against manufacturers defects, and defects in material. You must install a fork
that is within the range of travel length, which is used as original equipment for each model. It is required that
you use a DH style headset when installing long travel forks on frames.
What Will Void Your Warranty
Installing a fork with longer travel than was originally specified for that bike. If it was purchased as a frame only,
the maximum acceptable fork length is the same as what the corresponding bike model was spec’d with, as
outlined in the Specification Chart.
Performing any modification to the frame, i.e. drilling, filling and cutting. Allowing a tire to rub against a frame,
wearing a groove into a tube. Allowing ‘chain suck’ to cut into and damage a chainstay.
Crashing into things. We cannot be responsible for your riding errors or indiscretions! If you break your bike it’s
your problem, not warranty. When you ride in extreme terrain, BMX parks, urban staircases, etc. or attempt to
duplicate the stunts seen in videos, you risk personal injury to yourself, and your bike. The warranty on your bike
does not cover missed landings, ghost rides, and aborted wheelie drops, suddenly appearing trees, or just crashing
in general – even while ‘just riding along’.
48
Age:
0-17
* Brodie Model
* Serial #
* Date of Purchase
* Dealer
* Address
* City
* State/Prov.
* Dealer Phone #
18-24
25-34
Yes
35-49
Color
Size
No
50-64
65+
* Zip/Postal Code
(
)
* Required for warranty purposes
Reason for Choosing a Brodie Bike? Choose all applicable
Brodie Reputation
Frame Design and Quality
Components
Style
Price
Dealer Service
Purpose for Buying a Brodie Bike? Choose all applicable
Off Road Riding
DH
Recreational Riding
Commuting
Touring
Racing/Competition
Form of Excercise
Freeriding
What Other Brands Did You Consider Buying? Choose all applicable
Trek
Giant
Norco
Kona
Specialized
Rocky Mountain
Other (specify)
What is Your Household Income? Choose only one
$15,000 or less
$15,001-$30,000
$30,001-$50,000
$50,001-$75,000
$75,001 +
Cromoly Steel Frames
5 year limited warranty to the registered original owner. Maximum fork travel length permitted is 85mm.
Aluminum Hardtail XC Frames
5 year limited warranty to the registered original owner. Maximum fork travel length permitted is 105mm.
Scandium Frames
2 year limited warranty to the registered original owner. Maximum fork travel length permitted is 105mm.
Aluminum Freeride Hardtails
2 year limited warranty to the registered original owner. Maximum fork travel length permitted is 130mm.
Full Suspension
2 year limited warranty to the registered original owner. Maximum fork travel length permitted is 130mm.
Full Suspension Freeride
1 year limited warranty to the registered original owner. Maximum fork travel length permitted is 150mm.
DH/Freeride
1year limited warranty to the registered original owner. No maximum fork travel length. Recommended fork travel
length is 175-205mm (7” to 8”)
Male
Or register online at www.brodiebikes.com
From:
Place
Stamp
Here
Brodie
280 SW Marine Drive
Vancouver BC
Canada V5X 2R5