1
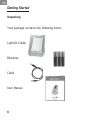
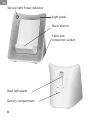
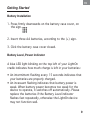
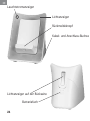
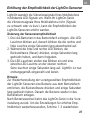
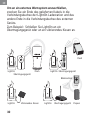
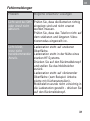
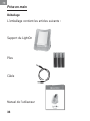
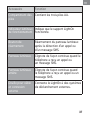
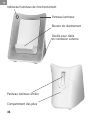
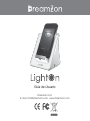
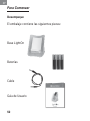
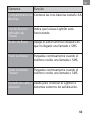
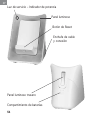
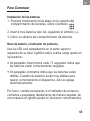
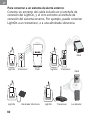
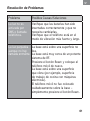
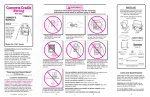
User Manual Dreamzon Ltd. E-mail: [email protected] www.dreamzon.com EN Copyright© 2010 DreamZon Ltd. All rights reserved. Other product and company names mentioned herein may be trademarks or trade names of their respective owners. To the maximum extent permitted by applicable law, under no circumstances shall DreamZon or any of its licensors be responsible for personal injury or any incidental, special, indirect or consequential damages, howsoever caused. The third-party applications provided with your device may have been created and may be owned by persons or entities not affiliated with or related to DreamZon. DreamZon does not own the copyrights or intellectual property rights to the third-party applications. As such, DreamZon does not take any responsibility for end-user support, functionality of the applications, or the information in the applications or these materials. DreamZon does not provide any warranty for the thirdparty applications. By using the applications you acknowledge that the applications are provided as is without warranty of any kind, express or implied, to the maximum extent permitted by applicable law. Contact DreamZon at [email protected], or visit us at www.dreamzon.com 2 EN Safety Precautions and Important Notices • Do not try to connect cradle to electrical source! The LightOn product is operated by batteries and should not be connected to external DC power in any case. • Do not use cradle on surface that vibrates (dryer,washing machine, etc...). LightOn should only be placed on flat non-vibrating surfaces, for example: table, shelf, countertop etc. • Do not use near water – cradle is not waterproof. Keep the LightOn unit away from any heat source as it may damage the unit. 3 EN About LightOn LightOn is a unique decorative solution providing light notification for incoming SMS, Voice or Video calls, thus alerting its users that someone is trying to reach them. When a mobile phone is placed in the LightOn cradle, all incoming SMS messages or phone calls trigger a brightly flashing blue LED light. This light continues to flash until the device is reset, notifying users on the missed call. The LightOn cradle's back-rest is designed to facilitate the use of sign language via mobile video phones. The angle of the cradle enables you to place your phone in the cradle and then comfortably sign with both hands. LightOn allows simple connectivity to popular external signaling systems. Important Note: Please check with your local Reseller the exact LightOn model, which supports your existing signaling system. 4 EN Table of Contents Safety Precautions and Important Notices 3 About LightOn 4 Getting Started / Unpacking 6 Device Layout 7 Battery Installation 9 Battery Level, Power Indicator 9 Using the LightOn Cradle 10 Preparing a Mobile Phone for Use 10 Light Panels 10 Increasing the LightOn Sensors Sensitivity 11 Battery Level Indicator 12 Resetting Light Indicator 12 Operating Environment 13 External Alerting and Triggering Systems 14 Troubleshooting 15 5 EN Getting Started Unpacking Your package contains the following items: LightOn Cradle Batteries Cable User Manual 6 EN Element Function Battery compartment Holds the three AA batteries. Service light Power Indicator Indicates that LightOn cradle is working. Reset button Resets the light panel after a call or SMS has come in. Light panel Flashes repeatedly when the phone receives a call or SMS. Back light panel Flashes repeatedly when the phone receives a call or SMS. Cable and connection socket Connects LightOn to external triggering systems. 7 EN Service light Power Indicator Light panel Reset button Cable and connection socket Back light panel Battery compartment 8 EN Getting Started Battery Installation 1. Press firmly downwards on the battery case cover, on the sign. 2. Insert three AA batteries, according to the (+) sign. 3. Click the battery case cover closed. Battery Level, Power Indicator A blue LED light blinking on the top left of your LightOn cradle indicates how much charge is left in your batteries: • An intermittent flashing every 15 seconds indicates that your batteries are properly charged. • An incessant flashing indicates that battery power is weak. When battery power becomes too weak for the device to operate, it switches off automatically. Please replace the batteries if the Battery Level indicator flashes fast repeatedly, otherwise the LightOn device may not function well. 9 EN Using the LightOn Cradle Preparing a Mobile Phone for Use To use the LightOn cradle: 1. Place the mobile phone on vibrate mode. If a phone has multiple vibration modes, select the mode that uses the strongest and longest vibration time. 2. Gently place phone in cradle. Note: If the phone is not placed gently, the movement may register as a vibration, causing the phone to light up. If this happens, press the Reset button. Light Panels When the mobile phone on the LightOn cradle receives an SMS or phone call, a blue LED light begins flashing brightly in the front and back panels. For the first two minutes after a call comes in, the light flashes rapidly. After two minutes, the frequency of the flashing decreases, conserving battery power, until it totally disappears. 10 EN Increasing the Sensitivity of LightOn Sensors The LightOn device works by converting the vibration signals of your cell phone into a flashing LED light. If your LightOn device is not able to recognize your cell phone’s vibration signals (because the vibration is weak or short), it is possible to increase the sensitivity of LightOn’s sensors. How to Modify Sensor Sensitivity? 1.Insert three AA batteries into the battery compartment. All the LED lights flash brightly, followed by the intermittent flashing of the left and right lights. 2.While the left and right LED lights are flashing, press the Reset button. 3.The LED lights will stop flashing and a single LED light will be lit on the upper right side of the cradle for a few seconds. LightOn is now properly calibrated and ready to be used. Note: If you want to restore the default sensitivity settings of LightOn’s sensors, remove one of the batteries from the battery compartment, hold the Reset button down for a few seconds and then replace the battery in its compartment. Note: After changing the batteries, the LightOn device will return to its default sensitivity settings. If you want to restore the hi-sensitivity setting, repeat steps 1-3 above. 11 EN Battery Level Indicator The LED service light, on the upper left corner of the cradle, flashes every 15 seconds to indicate that the device is working. When battery power is low, this light flashes constantly, alerting you of the need to replace your batteries. Resetting Light Indicator After receiving a call or SMS, you should reset the light indicator so that you know if a new call or SMS comes in. To reset the light indicator • Click the Reset button in the front of the device. The device is now reset. 12 EN Operating Environment The LightOn phone cradle should be placed on a level, non-vibrating surface. Since LightOn technology is based on vibration sensors, the cradle’s operation is designed to have minimum disturbances of radio frequency signals or other mobile phones in the vicinity. External Alerting and Triggering Systems LightOn can connect to external triggering and wireless signaling systems, thus enabling better communications and improving day to day quality of life. LightOn supports today connectivity to market leading wireless signaling systems. 13 EN To connect to an external alerting system: Connect one end of the provided cable into the LightOn cradle’s connection socket, and the other end into the external system device connection socket. For example, connect LightOn to a transmitter, or a vibrating pillow. Flash LightOn Transmitter Flash LightOn Transmitter Flash Or LightOn 14 Vibrating Pillow LightOn Transmitter Pager EN Troubleshooting Problem Possible Causes/Solutions Light is not activated by SMS or phone call. Check that the batteries are inserted properly and that they do not need to be changed. Light flashes even though no incoming call. Cradle placed on uneven surface. Check that the phone is on the longest & strongest vibrating mode. Cradle is placed very close to strong RF system. Push the reset button & place the Mobile phone again Cradle placed on vibrating surface (for example, countertop with kitchen tools). Mobile phone was not placed gently in cradle – simply press the Reset button. 15 EN Problem Possible Causes/Solutions Top left LED is constantly flashing. Replace batteries. I’ve connected the LightOn device to a wireless signaling system, but it doesn’t trigger it. Make sure that you’ve purchased the correct LightOn model . Please contact your reseller. 16 Bedienungsanleitung Dreamzon Ltd. E-mail: [email protected] www.dreamzon.com DE Copyright© 2010 DreamZon Ltd. Alle Rechte vorbehalten. Alle hier erwähnten anderen Produkte und Firmennamen sind die Markenzeichen oder Handelsbezeichnungen ihrer jeweiligen Eigentümer. Die Fa. DreamZon oder alle ihre Lizenzgeber haften unter keinen Umständen für Personenschaden oder jede anfallenden, besonderen, indirekten oder mittelbaren Schäden, wie auch immer verursacht, im gesetzlich zulässigen Umfang. Die Fremdapplikationen, die mit Ihrem Gerät geliefert werden, können von Personen oder Unternehmen, die nicht mit DreamZon verbunden sind oder ihr angehören, hergestellt worden sein und ihnen gehören. DreamZon gehören weder die Urheberrechte noch geistigen Eigentumsrechte der Fremdapplikationen. Somit übernimmt DreamZon keinerlei Verantwortung für den Support des Endnutzers, Funktionsfähigkeit der Anwendungen oder für die Informationen in den Anwendungen dieser Materialien. DreamZon gewährt keinerlei Garantie für Fremdapplikationen. Indem Sie die Applikationen benutzen, nehmen Sie zur Kenntnis, dass die Applikationen ohne Mängelgewähr und ohne jegliche Garantie geliefert werden, ausdrücklich oder stillschweigend im gesetzlich zulässigen Umfang. Für nähere Informationen kontaktieren Sie bitte DreamZon unter [email protected] oder besuchen Sie unsere Webseite: www.dreamzon.com 18 DE Sicherheitsvorkehrungen und wichtige Hinweise • Ladestation nicht an elektrische Quelle anschließen! Das LightOn Produkt ist batteriebetrieben und sollte auf keinen Fall an einen externen Gleichstromanschluss gekoppelt werden. • Ladestation darf nicht auf vibrierenden Oberflächen (Trockner, Waschmaschine, usw.) benutzt werden. LightOn sollte nur auf flache, nicht vibrierende Oberflächen gestellt werden, z.B. Tische, Regale, Arbeitsplatten, usw. • Nicht in der Nähe von Wasser benutzen– Ladestation ist nicht wasserdicht! Ladestation von Hitzequellen fernhalten, da diese das Gerät beschädigen können. Über LightOn LightOn ist eine einzigartige dekorative Lösung, die hereinkommende SMS, konventionelle oder Video-Anrufe über Licht ankündigen. So werden Benutzer darauf aufmerksam gemacht, dass versucht wird, sie zu erreichen. Wenn ein Mobilfunkgerät in die LightOn Ladestation gestellt wird, lösen alle hereinkommende SMS-Nachrichten oder Telefonanrufe das Blinken eines blauen LED-Lichts aus. Dieses Licht blinkt solange, bis das Gerät zurückgesetzt wird und so den Benutzer über den unbeantworteten Anruf informiert. 19 DE Das Rückenteil der LightOn Ladestation wurde so entworfen, dass es Zeichensprache über mobile VideoTelefone vereinfacht. Der Winkel der Ladestation ermöglicht es, das Telefongerät in die Ladestation zu stellen und so bequem beide Hände für die Gebärdensprache zu nutzen. LightOn ermöglicht einfachen Anschluss an beliebte externe Signal-Systeme. Wichtige Anmerkung: Bitte besprechen Sie das genaue LightOn Modell mit Ihrem Vertreiber, um zu prüfen, welches Signalsystem es unterstützt. 20 DE Inhalt Sicherheitsvorkehrungen und wichtige Hinweise 19 Inbetriebnahme 22 Auspacken 22 Layout des Geräts 23 Einlegen der Batterie 25 Batteriezustand oder Stromanzeiger 25 Benutzung der LightOn Ladestation 26 Das Mobiltelefon zur Nutzung vorbereiten 26 Lichtanzeiger 26 Erhöhung der Empfindlichkeit der LightOn-Sensoren 27 Batteriezustandsanzeiger 28 Um den Meldelichtanzeiger zurücksetzen 28 Benutzerumfeld 29 Um an ein externes Warn system anzuschuließen 30 Fehlermeldungen 31 21 DE Inbetriebnahme Auspacken Das Produkt beinhaltet folgende Teile: LightOn Ladestation Batterien Kabel Bedienungsanleitung 22 DE Teile Funktion Batteriefach Fasst drei AA Batterien. Leuchtstromanzeiger Zeigt an, dass die LightOn Ladestation in Betrieb ist. Rückmeldeknopf Setzt den Lichtanzeiger nach hereinkommenden Anrufen oder SMS zurück. Lichtanzeiger Blinkt wiederholt, wenn das Telefongerät einen Anruf oder eine SMS erhält. Blinkt wiederholt, wenn das Lichtanzeiger auf der Telefongerät einen Anruf oder eine Rückseite des Geräts SMS erhält. Kabel - und Anschluss-Buchse Verbindet LightOn mit externen Auslösersystemen. 23 DE Leuchtstromanzeiger Lichtanzeiger Rückmeldeknopf Kabel- und Anschluss-Buchse Lichtanzeiger auf der Rückseite Batteriefach 24 DE Inbetriebnahme Einlegen der Batterien 1. Drücken Sie die Batterieabdeckung auf der Markierung fest nach unten: 2. Legen Sie drei AA Batterie-stromversorgung ein, wie in der (+) Markierung zu sehen. 3. Drücken Sie die Batterieabdeckung zu. Batteriezustand oder Stromanzeiger Ein blinkendes blaues LED-Licht auf der oberen linken Seite Ihrer LightOn Ladestation zeigt den Ladungszustand Ihrer Batterien an: • Alle 15 Sekunden zeigt ein Blinklicht an, dass Ihre Batterien korrekt aufgeladen sind. • Ständiges Blinklicht zeigt an, dass die Batteriestromversorgung schwach ist. Wenn die Batteriestromversorgung zu schwach zur Benutzung des Geräts wird, schaltet es sich automatisch ab. Bitte ersetzen Sie die Batterien, wenn der Anzeiger des Batteriezustands wiederholt und schnell blinkt. Ansonsten könnte die Funktion des LightOn Geräts beeinträchtigt werden. 25 DE Benutzung der LightOn Ladestation Das Mobiltelefon zur Nutzung vorbereiten Benutzung der LightOn Ladestation: 1. StellenSie das Mobiltelefon auf Vibrationsmodus. Wenn ein Telefon über mehrere Vibrationsmodi verfügt, wählen Sie den stärksten und längsten Vibrationsmodus 2. Stellen Sie das Telefon vorsichtig in die Ladestation. Bitte beachten Wenn das Telefon nicht richtig platziert wird, könnte die Bewegung als Vibrationsmodus wahrgenommen werden, was dazu führen könnte, dass der Lichtanzeiger angeht. Wenn dies passieren sollte, drücken Sie bitte den Rückmeldeknopf. Lichtanzeiger Wenn das Mobiltelefon auf der LightOn Ladestation eine SMS oder einen Anruf erhält, fängt ein blaues LED-Licht an, an den vorderen und hinteren Lichtanzeigern zu blinken. Während der ersten beiden Minuten des hereinkommenden Anrufs blinkt das Licht wiederholt schnell. Nach zwei Minuten nimmt die Blinkhäufigkeit ab und spart somit Batteriestrom, bis das Blinken ganz aufhört. 26 DE Erhöhung der Empfindlichkeit der LightOn-Sensoren LightOn wandelt die Vibrationssignale Ihres Mobiltelefons in blinkende LED-Signale um. Wenn Ihr LightOn-Gerät die Vibrationssignale Ihres Mobiltelefons nicht (Signale zu schwach oder zu kurz), kann die Empfindlichkeit der LightOn-Sensoren erhöht werden. Änderung der Sensorenempfindlichkeit 1.Drei AA-Batterien in das Batteriefach einlegen. Alle LED- Leuchten blinken auf, danach blinken die die rechte und linke Leuchte einige Sekunden lang abwechselnd auf. 2.Während die linke und rechte LED blinken, die Rückstelltaste (Reset) drücken, einige Sekunden lang gedrückt halten, und dann freigeben. 3.Die LED-Leuchten stellen das Blinken ein und eine einzelne LED-Leuchte an der oberen rechten Seite leuchtet einige Sekunden lang auf. LightOn ist nun ordnungsgemäß eingestellt und bereit. Hinweis: Zur Wiederherstellung der voreingestellten Empfindlichkeit der LightOn-Sensoren eine Batterie aus dem Batteriefach entfernen, die Rückstelltaste drücken und einige Sekunden lang gedrückt halten. Danach die Batterie wieder in das Batteriefach einlegen. Nach Batteriewechsel kehrt das LightOn-Gerät in die Voreinstellung zurück. Um die Einstellungen für erhöhte Empfindlichkeit wiederherzustellen, Schritte 1-3 wiederholen. 27 DE Batteriezustandsanzeiger Das LED-Licht an der oberen linken Ecke der Ladestation blinkt alle 15 Sekunden, um anzuzeigen, dass das Gerät funktioniert. Wenn der Batteriestrom niedrig ist, blinkt dieses Licht kontinuierlich und macht Sie darauf aufmerksam, dass Sie die Batterien wechseln müssen. Meldelichtanzeiger zurücksetzen Nach Erhalt eines Anrufs oder einer SMS sollten Sie den Meldelichtanzeiger zurücksetzen, so dass Sie wissen, wann ein neuer Anruf oder eine neue SMS hereinkommt. Um den Meldelichtanzeiger zurückzusetzen, drücken Sie auf den Rückmeldeknopf vorne auf dem Gerät. Das Gerät ist nun zurückgesetzt. 28 DE Benutzerumfeld Die LightOn Ladestation sollte auf eine flache, nicht vibrierende Oberfläche gestellt werden. Da die LightOn Technologie auf vibrierenden Sensoren basiert, ist der Betrieb der Ladestation so entworfen, dass die Ladestation minimalen Störungen der Radiofrequenzsignale oder anderer Mobiltelefone in der Umgebung ausgesetzt ist. Externe Warn- und Auslösersysteme LightOn kann an externe Warn-und kabellose Signalsysteme angeschlossen werden, so dass bessere Kommunikation und Lebensqualität im Alltag ermöglicht werden. LightOn unterstützt die heutige Vernetzung an marktführende kabellose Signalsysteme. 29 DE Um an ein externes Warnsystem anzuschließen, stecken Sie ein Ende des gelieferten Kabels in die Verbindungsbuchse der LightOn Ladestation und das andere Ende in die Verbindungsbuchse des externen Geräts. Zum Beispiel: Schließen Sie LightOn an ein Übertragungsgerät oder an ein vibrierendes Kissen an. Flash LightOn Übertragungsgerät Flash LightOn Übertragungsgerät Blinkzeichen oder LightOn 30 Vibrierendes Kissen LightOn Übertragungsgerät Piepser DE Fehlermeldungen Problem Mögliche Ursachen/ Lösungen Licht wird bei SMS oder Anruf nicht aktiviert. Prüfen Sie, dass die Batterien richtig eingelegt sind und nicht ersetzt werden müssen. Prüfen Sie, dass das Telefon nicht auf dem stärksten und längsten Vibrationsmodus eingestellt ist. Licht blinkt, trotz nicht hereinkommender Anrufe. Ladestation steht auf unebener Oberfläche. Ladestation steht in der Nähe eines starken HF-Systems. Drücken Sie auf den Rückmeldeknopf und stellen Sie das Mobiltelefon zurück. Ladestation steht auf vibrierender Oberfläche (zum Beispiel: Arbeitsplatte mit Küchenutensilien). Mobiltelefon wurde nicht vorsichtig in die Ladestation gestellt – drücken Sie auf den Rückmeldeknopf. 31 DE Problem Mögliche Ursachen/ Lösungen LED oben links blinkt ununterbrochen. Ersetzen Sie die Batterien. Ich habe das LightOn Gerät an ein kabelloses Signalsystem angeschlosen, aber der Auslöserimpuls funktioniert nicht. Versichern Sie sich davon, dass Sie das richtige LightOn Modell erworben haben. Bitten wenden Sie sich an den Vertreiber. 30 Manuel de l’utilisateur Dreamzon Ltd. E-mail: [email protected] www.dreamzon.com FR Fr Copyright© 2010 DreamZon Ltd. Tous droits réservés. Il se peut que d’autres noms de produits et de sociétés, mentionnés dans la présente, soient des marques de commerce ou des appellations commerciales de leurs propriétaires respectifs. Dans la mesure la plus extrême permise par les lois applicables, DreamZon, ni aucun de ses concédants de licence, ne pourront, en aucune circonstance, être tenus responsables pour des dommages corporels ou des dommages accessoires, particuliers, indirects ou immatériels de quelque nature que ce soit, quelle qu’en soit la cause. Il se peut que les applications de tierce partie fournies avec votre appareil aient été créées et appartiennent à des personnes ou des entités non affiliées et sans relation avec DreamZon. DreamZon ne possède pas de droits d’auteur ou des droits de propriété intellectuelle sur les applications de tierce partie. De ce fait, DreamZon ne prend aucune responsabilité concernant le support de l’utilisateur final, la fonctionnalité de ces applications ou les informations contenues dans ces applications ou ces supports. DreamZon ne donne aucune garantie pour les applications de tierce partie. Par le fait même d’utiliser ces applications, vous reconnaissez qu’elles sont fournies telle quelles, sans garantie de quelque sorte que ce soit, expresse ou implicite, dans la mesure la plus extrême permise par les lois applicables. 32 FR Fr Veuillez contacter DreamZon à: [email protected], ou visitez notre site à: www.dreamzon.com Précautions de sécurité et avertissements importants • Ne pas tenter de connecter le support à une source électrique! Le LightOn fonctionne à l’aide de piles et il ne doit être connecté à une source de courant continu externe en aucun cas. • Ne pas utiliser le support sur une surface soumise à des vibrations (machine à sécher, machine à laver, etc.). Le LightOn ne doit être posé que sur des surfaces planes, sans vibrations, comme par exemple une table, une étagère, un comptoir, etc. • Ne pas utiliser le support à proximité de l’eau – le support n’est pas étanche. • Garder le LightOn à l’écart de toute source de chaleur : cela risque d’endommager l’appareil. A propos du LightOn LightOn est une solution décorative, unique en son genre, qui procure une notification lumineuse de l’arrivée d’un message SMS ou d’appels vocaux ou vidéos, alertant ainsi ses utilisateurs que quelqu’un essaie de les contacter. Lorsqu’un téléphone portable est placé sur le support du LightOn, tout nouveau message SMS ou appel téléphonique provoque le clignotement de la lumière bleue brillante 33 FR d’un LED. Cette lumière continuera à clignoter jusqu’au réarmement de l’appareil, informant les utilisateurs d’un appel manqué. Le support du LightOn est conçu de manière à faciliter l’utilisation du langage des signes avec un visiophone mobile. L’angle du support vous permet de placer votre appareil sur le support et de converser alors confortablement par signes avec les deux mains. LightOn permet de connecter de manière simple les systèmes populaires de signalisation externe. 34 FR Table des matieres Précautions de sécurité et avertissements importants 33 Prise en main 36 Déballage 36 Description de l’appareil 37 Installation des piles 39 Indicateur du niveau des piles et de fonctionnement 39 Utilisation du support du LightOn 40 Préparation d’un téléphone portable pour l’utilisation 40 Panneaux lumineux 40 Augmentation de la sensibilité des capteurs LightOn 41 Indicateur du niveau des piles 42 Réarmement de l’indicateur lumineux 42 Pour réarmer l’indicateur lumineux 42 Systems d’alerte et de déclanchement externes 43 Résolution de problèmes 45 35 FR Prise en main Déballage L’emballage contient les articles suivants : Support du LightOn Piles Câble Manuel de l’utilisateur 36 FR Accessoire Fonction Compartiment des piles Contient les trois piles AA. Indicateur lumineux Indique que le support LightOn de fonctionnement fonctionne. Bouton de réarmement Réarmement du panneau lumineux après la détection d’un appel ou d’un message SMS. Panneau lumineux Clignote de façon continue quand le téléphone a reçu un appel ou un message SMS. Panneau lumineux arrière Clignote de façon continue quand le téléphone a reçu un appel ou un message SMS. Douille pour câble et connexion externe Connecte le LightOn à des systèmes de déclanchement externes. 37 FR Indicateur lumineux de fonctionnement Panneau lumineux Bouton de réarmement Douille pour câble et connexion externe Panneau lumineux arrière Compartiment des piles 38 FR Prise en main Installation des piles 1. Appuyer sur le couvercle du compartiment des piles, au-dessus du signe : 2. Insérer trois piles AA, en observant la direction du signe (+). 3. Refermer le couvercle du compartiment des piles jusqu’au déclic. Indicateur du niveau des piles et de fonctionnement Un indicateur à LED bleu, clignotant au coint supérieur gauche de votre support du LightOn, indique le niveau de charge restant dans vos piles • Un clignotement intermittent toutes les 15 secondes indique que le chargement de vos piles est approprié. • Un clignotement continu indique le chargement des piles est faible. Quand la puissance des piles devient trop faible pour que le système fonctionne correctement, il s’éteint automatiquement. Veuillez remplacer les piles si l’indicateur du niveau des piles clignote rapidement d’une manière continue, sinon votre LightOn risque de ne pas fonctionner correctement. 39 FR Utilisation du support du LightOn Préparation d’un téléphone portable pour l’utilisation Pour utiliser le support du LightOn : 1. Actionner le téléphone portable dans le mode vibrant. Si le téléphone possède plusieurs modes de vibration, sélectionner le mode qui, quand un message SMS ou un appel vocal / vidéo est reçu, produit les vibrations les plus fortes et de durée la plus longue. 2. Placer doucement le téléphone sur le support. Note: Si le téléphone n’est pas posé doucement, le mouvement risque d’être enregistré comme une vibration, causant le LightOn de se déclencher. Si cela se produit, appuyer sur le bouton de réarmement. Panneaux lumineux Quand le téléphone portable posé sur le support du LightOn reçoit un message SMS ou un appel téléphonique, un indicateur à LED bleu brillant commence à clignoter dans les panneaux avant et arrière du support. Pendant les deux premières minutes après l’arrivée de l’appel, la lumière clignote rapidement. Apres deux minutes, la fréquence du clignotement diminue, afin de conserver la puissance des piles, jusqu’à ce que le clignotement disparaisse complètement. 40 FR Augmentation de la sensibilité des capteurs LightOn Le dispositif Lighton convertit les signaux de vibration de votre téléphone cellulaire en une lumière clignotante. Si votre LightOn ne peut identifier les vibrations de votre téléphone portable (parce que la vibration est trop faible ou trop courte), il est possible d'augmenter la sensibilité des capteurs du LightOn. Comment faire pour modifier la sensibilité du capteur ? 1.Insérez trois piles AA dans le compartiment à piles. Tous les voyants doivent clignoter puis les voyants de gauche et de droite doivent clignoter par intermittence. 2.Pendant que les deux voyants clignotent, appuyez sur le bouton Reset. 3.Les LED s'arrêteront de clignoter, un seul voyant s’allumera pendant quelques secondes à l’angle supérieur droit du socle. Lighton est maintenant correctement étalonné et prêt à être utilisé. Note: Si vous souhaitez restaurer les paramètres de sensibilité par défaut des capteurs LightOn, enlevez l'une des piles du compartiment à piles, maintenez le bouton Reset enfoncé pendant quelques secondes et puis remettez la pile en place. Note: Après tout changement de piles, l'appareil LightOn reviendra à ses paramètres de sensibilité par défaut. Pour une sensibilité plus accrue, répétez les étapes 1-3 ci-dessus. 41 FR Indicateur du niveau des piles L’indicateur à LED, situé au coin supérieur gauche du support, clignote toutes les 15 secondes pour indiquer que l’appareil fonctionne. Quand la charge de la pile est faible, cet indicateur clignote constamment, vous alertant de la nécessité de remplacer les piles. Réarmement de l’indicateur de message ou d’appel Après avoir reçu un appel ou un message SMS, vous devez réarmer l’indicateur lumineux, pour qu’il puisse vous informer de l’arrivée d’un nouvel appel ou message SMS. Pour réarmer l’indicateur lumineux • Appuyer sur le bouton de réarmement sur la face avant du support. Le système est maintenant réarmé. 42 FR Environnement de fonctionnement Le support de téléphone LightOn doit être posé sur une surface horizontale, sans vibrations. Etant donné que la technologie du LightOn est fondée sur des détecteurs de vibrations, le support est conçu pour fonctionner avec un niveau minimum de perturbations dues à des signaux de fréquences radio ou d’autres téléphones portables se trouvant à proximité. Systems d’alerte et de déclanchement externes Il est possible de connecter le LightOn à des systèmes de déclanchement et de signalisation radio externes, pour perfectionner les communications et améliorer la qualité de la vie quotidienne. Le support du LightOn peut aujourd’hui être connecté aux principaux systèmes de signalisation radio existant sur le marché. Note importante: veuillez vérifier auprès de votre revendeur local quel modèle exact de LightOn fonctionne avec votre système de signalisation existant. 43 FR Pour connecter le LightOn à un système d’alerte externe : Brancher une extrémité du câble fourni dans la douille de connexion du support du LightOn, et l’autre extrémité dans la douille de connexion de l’appareil du système externe. Vous pouvez, par exemple, connecter le LightOn à un émetteur ou à un oreiller vibrant. Clignotement LightOn Emetteur Clignotement LightOn Emetteur Clignotement ou LightOn 44 Oreiller vibrant LightOn Emetteur Téléavertisseur FR Résolution de problèmes Problème Causes possibles / Solutions La lumière n’est pas activée par un message SMS ou un appel téléphonique Vérifiez que les piles ont été insérées correctement et qu’elles n’ont pas besoin d’être remplacées. Vérifier que le téléphone est actionné suivant le mode de vibrations le plus long et le plus fort. La lumière clignote Le support est placé sur une surface même lorsqu’aucun qui n’est pas plane. appel n’est reçu. Le support est placé très près d’un système radio. Appuyer sur le bouton de réarmement et poser de nouveau le téléphone portable sur le support. Le support est placé sur une surface soumise à des vibrations (par exemple: un plan de travail avec des appareils ménagers). Le téléphone portable n’a pas été posé doucement sur le support. 45 FR Problème Causes possibles / Solutions L’indicateur en haut a gauche clignote constamment. Remplacer les piles. Assurez-vous que vous avez acheté J’ai connecté le LightOn à le model correct de LightOn. Veuillez vous adresser à votre revendeur. un système de signalisation radio, mais celui-ci ne le déclenche pas. 46 Guía de Usuario Dreamzon Ltd. E-mail: [email protected] www.dreamzon.com SP Copyright© 2010 DreamZon Ltd. Todos los derechos reservados. Otros productos y nombres de empresas mencionados aquí pueden ser marcas registradas o marcas comerciales de sus respectivos dueños. Bajo ninguna circunstancia será DreamZon o cualquiera de sus licenciados responsable por una lesión personal o algún daño incidental, especial, indirecto o consecuente, causado de manera cualquiera. Las aplicaciones creadas por terceros suministradas con vuestro dispositivo pueden haber sido creadas por y ser propiedad de personas o entidades no afiliadas o relacionadas con DreamZon. DreamZon no es propietaria de los derechos de autor o propiedad intelectual de las aplicaciones creadas por terceros. Como tal, DreamZon no asume ninguna responsabilidad por soporte del usuario final, funcionalidad de las aplicaciones, o la información en las aplicaciones o ésos materiales. DreamZon no garantiza las aplicaciones de terceras personas. Al usar las aplicaciones usted indica que está de acuerdo que las aplicaciones, son suministradas tal como son, sin garantía de ningún tipo, declarada o implícita, al extenso máximo permitido por la ley aplicable. Contacte a DreamZon en [email protected], o visítenos en www.dreamzon.com 48 SP Precauciones de Seguridad y Notas Importantes • ¡No trate de conectar la base a una fuente eléctrica! El producto LightOn es operado por baterías y nunca debe ser conectado a una fuente de corriente directa externa. • No use la base en una superficie que vibra (lavadora, secadora, etc.) LightOn sólo debe ser colocado sobre una superficie plana y que no vibre, por ejemplo – una mesa, repisa, etc. • No lo use cerca de líquidos – la base no es impermeable. Mantenga el LightOn lejos de cualquier fuente de calor ya que podría dañar la unidad. 49 SP Sobre el LightOn LightOn es una solución única y decorativa que provee notificación de luces al recibir mensajes SMS, llamadas de voz o videollamadas, alertando así al usuario que alguien lo está buscando. Cuando un teléfono móvil es colocado en la base LightOn, todos los mensajes SMS entrantes o llamadas disparan una fuerte luz LED azul parpadeante. Ésta luz continua parpadeando hasta que el dispositivo es reiniciado, notificando así al usuario de la llamada perdida. El respaldo de la base del LightOn ha sido diseñado para facilitar el uso de lengua de señas a través de video teléfonos móviles. El ángulo de la base le permite poner el teléfono sobre ella y luego cómodamente usar ambas manos para señalar. LightOn permite conexión simple a los más populares sistemas de señalización externos. 50 SP Tabla de Contenido Precauciones de Seguridad y Notas Importantes 49 Para Comenzar 52 Desempaque 52 Partes del dispositivo 53 Instalación de las baterías 55 Nivel de batería, o Indicador de fuerza 55 Usando la Base LightOn 56 Preparando un teléfono móvil a ser usado 56 Paneles luminosos 56 Aumento del nivel de sensibilidad del aparato LightOn 57 Indicador de nivel de baterías 58 Reiniciar el indicador luminoso 58 Entorno de Operación 59 Sistemas de Alerta y Accionamiento Externos 60 Resolución de Problemas 61 51 SP Para Comenzar Desempaque El embalaje contiene las siguientes piezas: Base LightOn Baterías Cable Guía de Usuario 52 SP Elemento Función Compartimiento de Contiene las tres baterías tamaño AA. Baterías Luz de Servicio Indicador de Fuerza Indica que la base LightOn está funcionando. Botón de Reset Apaga el panel luminoso después de que ha llegado una llamada o SMS. Panel Luminoso Parpadea continuamente cuando el teléfono recibe una llamada o SMS. Panel Luminoso Trasero Parpadea continuamente cuando el teléfono recibe una llamada o SMS. Enchufe de cable y Usado para conectar el LightOn a conexión sistemas externos de señalización. 53 SP Luz de servicio – Indicador de potencia Panel luminoso Botón de Reset Enchufe de cable y conexión Panel luminoso trasero Compartimiento de baterías 54 SP Para Comenzar Instalación de las baterías 1. Presione firmemente hacia abajo en la cubierta del compartimiento de baterías, sobre el símbolo. 2.Inserte tres baterías tipo AA, siguiendo el símbolo (+). 3.Cierre la cubierta del compartimiento de baterías. Nivel de batería, o Indicador de potencia Una luz LED azul parpadeando en la parte superior izquierda de su base LightOn indica cuánta carga queda en las baterías: • Un parpadeo intermitente cada 15 segundos indica que las baterías están correctamente cargadas. • Un parpadeo constante indica que las baterías están débiles. Cuando las baterías están muy débiles para operar correctamente el dispositivo, éste se apaga automáticamente. Por favor, cambie las baterías si el indicador de potencia comienza a parpadear rápidamente de manera seguida, de otra manera el LightOn puede no funcionar correctamente. 55 SP Usando la Base LightOn Preparando un teléfono móvil para ser usado Para usar la base LightOn: 1.Ponga el teléfono móvil en modo de vibración. Si su teléfono tiene múltiples modos de vibración, seleccione el modo que usa la vibración más fuerte y larga. 2.Cuidadosamente ponga el teléfono en la base. Nota: Si no se coloca el teléfono cuidadosamente, el movimiento puede ser interpretado como una vibración, lo que causaría que la base se encienda. Si esto sucede, presione el botón Reset. Paneles luminosos Cuando el teléfono celular sobre la base LightOn recibe un mensaje SMS o una llamada, una luz LED azul comienza a parpadear intensamente en los paneles frontal y posterior. Por los primeros dos minutos después de que entre una llamada, la luz parpadea rápidamente. Después de dos minutos, la frecuencia del parpadeo disminuye paulatinamente, para conservar las baterías, hasta que para totalmente. 56 SP Aumento del nivel de sensibilidad del aparato LightOn LightOn funciona mediante la conversión de las señales de vibración de su teléfono móvil en un indicador LED que centellea. Si su aparato LightOn no puede reconocer la vibración de su teléfono móvil (en caso de vibración suave y/o demasiado corta), puede aumentar el nivel de sensibilidad de los sensores de LightOn. Cómo se cambia el nivel de sensibilidad de los sensores? 1. Introduzca tres baterías AA en el compartimiento de baterías. Todos los indicadores LED de LightOn centellean intensamente, e inmediatamente después los indicadores de la izquierda y de la derecha centellean intermitentemente. 2. Mientras los dos indicadores LED centellean, presione el botón RESET durante unos segundos y luego deje de presionar. 3. Los indicadores LED dejan de centellar y un indicador LED único en la parte derecha superior se enciende continuamente durante algunos segundos. El aparato LightOn está calibrado y listo para ser usado. Notas: • Si desea restablecer el nivel de sensibilidad normal de los sensores de LightOn, extraiga una de las baterías del compartimiento de baterías, presione el botón RESET durante algunos segundos y devuelva la bacteria a su lugar. 57 SP • Cuando se reemplazan las baterías, el aparato LightOn comienza a funcionar automáticamente al nivel de sensibilidad normal predeterminado. Si desea restablecer la configuración de alta sensibilidad, repita los pasos 1-3 de arriba. Indicador de nivel de baterías La luz de servicio, en la esquina superior izquierda de la base, parpadea cada 15 segundos para indicar que la unidad está funcionando. Cuando las baterías están débiles, esta luz parpadea constantemente, para alertar que hay que cambiar las baterías. Reiniciar el indicador luminoso Después de recibir una llamada o SMS, debe reiniciar el indicador luminoso para poder saber si llega una nueva llamada o mensaje. Para reiniciar el indicador luminoso • Presione el botón Reset en el frente de la unidad. El dispositivo ha sido reiniciado. 58 SP Entorno de Operación La base LightOn debe ser colocada sobre en una superficie nivelada, sin vibración. Ya que la tecnología LightOn está basada en sensores de vibración, la operación de la base está diseñada a ser mínimamente afectada por señales de radio frecuencia u otros teléfonos móviles en la vecindad. Sistemas de Alerta y Accionamiento Externos LightOn puede ser conectado a sistemas externos de accionamiento y a sistemas de señalización inalámbrica, lo que permite mejores comunicaciones y calidad de vida. LightOn soporta una conexión a los más populares sistemas de señalización inalámbricos. 59 SP Para conectar a un sistema de alerta externo: Conecte un extremo del cable incluido en el enchufe de conexión del LightOn, y el otro extremo al enchufe de conexión del sistema externo. Por ejemplo, puede conectar LightOn a un transmisor, o a una almohada vibratoria. Flash LightOn Transmisor Flash LightOn Transmisor Flash O LightOn 60 Almohada Vibratoria LightOn Transmisor Localizador SP Resolución de Problemas Problema Posibles Causas/Soluciones La luz no es activada por SMS o llamada telefónica. Verifique que las baterías han sido insertadas correctamente y que no necesita cambiarlas. Verifique que el teléfono está en el modo de vibración más fuerte y largo. La luz parpadea La base está sobre una superficie no lisa. aunque no hay llamada entrante. La base está muy cerca de un potente sistema de RF. Presione el botón Reset y coloque el teléfono móvil de nuevo. La base está sobre una superficie que vibra (por ejemplo, superficie de trabajo de cocina con máquinas eléctricas). El teléfono móvil no fue colocado cuidadosamente sobre la base – simplemente presione el botón Reset. 61 SP Problema Posibles Causas/Soluciones El LED superior Cambie las baterías. izquierdo parpadea constantemente. Conecté el LightOn a un sistema de señalización inalámbrico, pero no lo acciona. 62 Asegúrese que compró el modelo correcto de LightOn. Por favor póngase en contacto con su distribuidor. Heb HE הבעיה סיבה אפשרית /פיתרון נא התקשר לספק אצלו רכשת את המכשיר וודא חיברתי את המכשיר איתו שרכשת את מכשיר ה"לייט-און" מהדגם למערכת חיצונית ואין קשר בינהם .המתאים. 13 Heb HE איתור תקלות ופיתרונן הבעיה סיבה אפשרית /פיתרון אין הפעלת אור בעת כניסת שיחה או .SMS בדוק שהסוללות מוכנסות נכון ושהן טעונות. בדוק שהטלפון מכוון לעוצמת רטט מקסימאלית והארוכה ביותר. אין אור גם לאחר בדיקת סוללות וכיוון הטלפון. תאורת השרות מהבהבת בקביעות. 12 עריסת המכשיר מונחת על משטח לא מתאים. עריסת המכשיר מונחת על משטח בסמוך למשדר רדיו הגורם לשיבושים. לחץ על לחצן האיתחול ומקם מחדש את הטלפון בעריסת ה"לייט-און". עריסת ה"לייט-און" מונחת על משטח רגיש לרעידות כגון דלפק במטבח שעליו מכשירים הרועדים בעת הפעלתם (מיקסר). הטלפון הנייד לא הונח נכון בעריסה ,הנח כנדרש ולחץ על לחצן האיתחול (איפוס). החלף סוללות. HE סכימת חיבור למכשירים חיצוניים חבר את הכבל המצורף לאריזה באופן הבא :בצד אחד לעריסת מכשיר ה"לייט-און" ובצדו השני לשקע במכשיר החיצוני לדוגמא :משדר או כרית רטט. קישוריות לשיטות הפעלה והתראה חיצוניות באפשרות מכשיר ה"לייט-און" להתחבר למערכות התראה חיצוניות ומערכות איתות אלחוטיות ידועות בשוק ובכך הוא מאפשר תיקשורת טובה יותר ושיפור איכות החיים היומיומית. הערה חשובה :יש לבדוק עם המפיץ המקומי ,כי רכשת את המודל המתאים למערכת ההתראה שברשותך. היבהוב היבהוב משדר LightOn היבהוב משדר LightOn או איתורית משדר LightOn כרית רטט LightOn 11 HE הגדלת מידת הרגישות של מכשיר ה ”לייט-און” מכשיר ה”-לייט-און” פועל על פי זיהוי רטט הטלפון הנייד שברשותך. במידה ומכשיר ה”-לייט-און” שרכשת ,אינו מזהה את רטט הטלפון הנייד שברשותך( ,במקרים של רטט חלש ו/או קצר מידי) ,יש באפשרותך לשנות את מידת הרגישות של מכשיר ה”-לייט-און” . כיצד יש לשנות את עוצמת הרגישות? .1הכנס 3סוללות AAלבית הסוללות .מכשיר ה”-לייט-און” יבצע הבהוב מלא של כל הנוריות ( )LEDומייד לאחר מכן יהבהבו 2נוריות( ימין ושמאל) לסירוגין למשך מספר שניות. .2במהלך הבהוב 2הנוריות ( ,)LEDלחץ לחיצה קצרה על לחצן הRESET- ושחרר. .3הנוריות ( )LEDיפסיקו להבהב ונורית ( )LEDבודדת תידלק בצד ימין עליון למשך מספר שניות ברציפות .מכשיר ה”-לייט-און” מכויל ומוכן כעת לשימוש. שים לב -במידה וברצונך לחזור למידת הרגישות הרגילה ,יש להוציא את אחת הסוללות מבית הסוללות ,ללחוץ על לחצן ה RESET-למשך מספר שניות ולאחר מכן להחזיר את הסוללה למקומה. בעת החלפת סוללות ,יחזור מכשיר ה”-לייט-און” לפעול באופן אוטומטי במצב רגישות רגיל .במידה וברצונך להגדיר שוב מצב רגישות גבוה -יש לחזור על הפעולות 3-1לעיל. 10 HE פנל התאורה כאשר הטלפון המונח בעריסת המכשיר מקבל SMSאו שיחה ,הנוריות הכחולות בחזית ובגב המכשיר מתחילות להבהב .בשתי הדקות הראשונות ההיבהוב מהיר ,אח"כ יורדת בהדרגה מהירות ההיבהוב (כדי לשמור על הסוללה) עד שנפסקת כליל. חיווי לתקינות המכשיר והסוללות (אינדיקטור) נורית ,Stand-byהינה נורית (לד) הממוקמת בצידה השמאלי העליון של עריסת המכשיר .הנורית מהבהבת מדי 15שניות בכדי להראות שהמכשיר תקין ופועל. כאשר הסוללות נחלשות ,מהבהבת הנורית בקביעות ומתריעה שיש להחליפן. איתחול המכשיר לאחר קבלת SMSאו שיחת טלפון יש לאתחל את המכשיר כדי לאפשר מחדש התרעה על כניסת שיחה SMS/חדשה. אופן האיתחול (איפוס) האיתחול מתבצע ע"י לחיצה על לחצן האיתחול שבחזית העריסה. סביבת ההפעלה של המכשיר יש למקם את עריסת מכשיר ה"לייט-און" על גבי מישטח אופקי יציב אשר אינו חשוף לרעידות כלל. טכנולוגיית המכשיר מבוססת על חיישני הרעדה .עריסת המכשיר כמעט ואינה מושפעת מאותות תדרי רדיו ו/או אותות של טלפונים ניידים הנמצאים בסביבה. 9 HE הפעלה ראשונית של המכשיר התקנת הסוללות .1לחץ כלפי מטה על מכסה תא הסוללות שבגב המכשיר (הציור על המכסה): .2הכנס לתא הסוללות שלוש סוללות מסוג AA .3סגור את מכסה תא הסוללות. מד עוצמת הסוללות בצידו השמאלי העליון של המכשיר ממוקמת נורית (לד) היא מציגה את מידת הטעינה. • הבהוב אחת ל 15שניות -הסוללות טעונות כנדרש. • הבהוב רציף ובלתי פוסק -הסוללות חלשות. כשהסוללות ,חלשות יש להחליפן ,אחרת תפקוד המכשיר עלול להשתבש. הכנת המכשיר והטלפון הנייד לשימוש בכדי להשתמש במכשיר LightOnיש לבצע פעולות אלה: .1העבר את מכשיר הטלפון הנייד למצב רטט. במידה וקיימות למכשיר מספר אפשרויות רטט ,העבר למצב הרטט החזק והארוך ביותר. .2הנח בעדינות את מכשיר הטלפון בתוך העריסה. הערה :במידה והמכשיר לא מונח בעדינות על גבי העריסה ,המכשיר עלול לגרום להבהוב .במידה והדבר קורה ,יש ללחוץ על כפתור האיתחול (איפוס). 8 HE מד עוצמת סוללות (לד) פנל תאורה קדמי לחצן איתחול שקע כניסת כבל תקשורת נורית פנל תאורה אחורי (לד) תא הסוללות (בטריות) 7 HE חלק המכשיר תפקיד תא הסוללות (בטריות) בו ממוקמות 3סוללות .AA נורת שירות מד עצמת סוללות אינדיקציה לכך שהמכשיר עובד והסוללות טעונות. לחצן האיתחול RESETמאתחל את המכשיר אחרי כניסת שיחה או .SMS פנל תאורה מהבהב ברציפות בכניסת שיחה או .SMS פנל תאורה אחורי מהבהב ברציפות בכניסת שיחה או .SMS כבל ושקע תיקשורת מחבר את מכשיר ה"לייט-און" למערכת חיצונית. 6 HE תכולת האריזה אריזת המכשיר כוללת את החלקים הבאים : עריסת המכשיר סוללות (בטריות) כבל מדריך למשתמש 5 HE תוכן ענינים אמצעי זהירות חשובים 3 אודות מכשיר ה ""LightOn 3 תכולת האריזה 5 חלקי המכשיר ותפקידיהם 6 סכימת המכשיר 7 הפעלה ראשונית 8 מד עצמת סוללה 8 הכנת המכשיר והטלפון הנייד לשימוש 8 פנל התאורה ,איתחול המכשיר 9 סביבת ההפעלה 9 הגדלת מידת הרגישות של מכשיר ה ”לייט-און” 10 קישוריות למכשירים חיצוניים 11 סכימת חיבור למכשירים חיצוניים 11 איתור תקלות ותיקונן 12 4 HE אמצעי זהירות חשובים • המכשיר פועל על סוללות בלבד .בשום מקרה אין לחברו למקור חשמל חיצוני ( .) DC power • אין להניח את עריסת המכשיר על משטח רוטט (מכונת כביסה וכו'). המכשיר יונח על משטח יציב לדוגמא :שולחן ,מדף ,דלפק וכו'. • אין להשתמש במכשיר בקרבת מים ,המכשיר אינו עמיד בפני מים. • אין להשתמש במכשיר בקרבת חום ,הדבר עלול לגרום לנזק במכשיר. אודות מכשיר ( LightOn -לייט-און) לייט-און הינו מוצר מעוצב ויחיד במינו הבא לתת פתרון ייחודי באמצעות תאורה על כניסת ,SMSשיחת שמע או שיחת וידאו. כאשר טלפון נייד מונח על עריסת המכשיר :שיחות טלפון ו SMSנכנסות, יגרמו להפעלת אור כחול מהבהב במכשיר. האור ימשיך להבהב כל הזמן עד לאיתחול (איפוס) המכשיר ע"י המשתמש. עריסת המכשיר בנויה בזוית נוחה המאפשרת הנחת הטלפון בתוכה ושימוש בשפת הסימנים בשתי הידיים. המכשיר מאפשר בנקל קישוריות למכשירים נוספים. 3 HE זכויות יוצרים © 2010שייכות לדרימזון בע"מ .כל הזכויות שמורות. שמות המוצרים והחברות הנזכרים בזאת עשויים להוות סמלים מסחריים או שמות מסחריים עבור בעליהם .במידה המרבית המותרת לפי חוק. דרימזון בע"מ או מי מזכייניה לא יישאו בנסיבות כלשהן באחריות לפציעה או לנזק מקרי ,מיוחד ,עקיף או תוצאתי ,שייגרם בכל אופן שהוא. יישומי צד ג' אשר הגיעו עם המכשיר ,נוצרו ו/או שייכים בחלקם לגורמים אשר אינם משוייכים או קשורים לדרימזון בע"מ. לדרימזון בע"מ אין בעלות על זכויות היוצרים או על הקניין הרוחני של יישומי צד ג' .על כן היא אינה נושאת באחריות על התמיכה למשתמש הקצה ,על הפונקציונליות של היישומים ,או על המידע ביישומים או בחומרים אלה. דרימזון בע"מ אינה מעניקה אחריות כלשהו על יישומי צד ג' .על ידי השימוש ביישומים ,הינך מכיר בעובדה כי היישומים ניתנים כפי שהם וללא אחריות מכל סוג שהוא ,מפורשת או משתמעת ,במידה המרבית המותרת על פי חוק. ניתן ליצור קשר עם עם דרימזון בע"מ באתר שלנו: www.dreamzon.com או במייל לכתובתינו [email protected] : 2 מדריך למשתמש Dreamzon Ltd. E-mail: [email protected] www.dreamzon.com