1
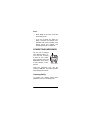
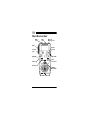
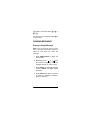
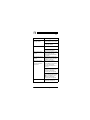
Please read before using this equipment.
Owner’s Manual
DR-83 90-Minute Digital
Recorder
ˆ Contents
Features ............................................... 5
Preparation .......................................... 7
Installing Batteries ............................ 7
Setting the Clock .............................. 8
Connecting Earphones ..................... 9
Listening Safely ............................ 9
Traffic Safety ............................... 10
Connecting an External
Microphone .................................... 11
Attaching the Wrist Strap ............... 11
A Quick Look at the Recorder .......... 12
Operation ........................................... 13
Locking the Recorder’s Controls .... 13
Types of Folders ............................. 13
Selecting a Folder .......................... 14
Recording ....................................... 14
Recording Messages in
Folder A or B ............................. 14
Schedule Recording ................... 16
Using Voice-Activated
Recording ................................... 16
Playing Back Messages ................. 17
Using Fast Playback ................... 18
Using Schedule Playback ........... 18
Fast-Forwarding/Rewinding ........... 19
Using Forward Skip/Reverse
© 2001 RadioShack Corporation. All Rights Reserved.
RadioShack and RadioShack.com are trademarks used
by RadioShack Corporation.
2
Skip ................................................
Moving a Message Between
Folders A and B ............................
Erasing Messages .........................
Erasing a Single Message .........
Erasing All Messages in
a Folder ......................................
Erasing Messages in Folder S .......
Erasing All Messages for a
Selected Date ............................
Erasing All Messages in
Folder S .....................................
Resetting the Recorder ..................
Special Features ...............................
Checking the Remaining Recording
Time ...............................................
Using Power Save .........................
Setting the Options ........................
Setting the Recording Mode ......
Setting Microphone Sensitivity ...
Setting Voice Activation .............
Message Alarm Playback ..........
Schedule Alarm Playback ..........
Turning the Key Tone
On/Off .........................................
Resetting the Time .....................
Troubleshooting ................................
Care ....................................................
Specifications ...................................
20
20
21
21
22
22
22
23
23
25
25
25
25
26
27
28
28
30
31
32
33
34
35
3
THE FCC WANTS YOU TO
KNOW
This device complies with Part 15 of the
FCC Rules. Operation is subject to the following two conditions: (1) this device may
not cause harmful interference, and (2)
this device must accept any interference
received, including interference that may
cause undesired operation.
This equipment complies with the limits for
a Class B digital device as specified in
Part 15 of FCC Rules. These limits provide reasonable protection against radio
and TV interference in a residential area.
However, your equipment might cause TV
or radio interference even when it is operating properly. To eliminate interference,
you can try one or more of the following
corrective measures:
• reorient or relocate the receiving
antenna
• increase the distance between the
equipment and the radio or TV
• use outlets on different electrical circuits for the equipment and the radio
or TV
Consult your local RadioShack store if the
problem still exists.
4
ˆ Features
Your RadioShack 90-Minute Digital Recorder is ideal for quick note-taking. Its
light weight and ultra-small size makes it
easy to slip into a pocket, briefcase, or
purse. You can use it at school, at business conferences, for dictation in the office, or anywhere on the go. You can start
recording manually or set the recorder so
sound activates recording. The recorder
provides an hour and a half of recording
time, allowing you to record and store detailed comments.
Your recorder includes these features:
Flash Memory — digital recording means
no tapes to load or break.
Three Message Folders — let you save
up to 100 messages in each folder so you
can organize your messages more effectively.
Voice Activation — the recorder’s Variable Control Voice Actuator (VCVA) lets
the recorder start recording when it picks
up sound and stop a few seconds after the
sound stops.
Features
5
Liquid Crystal Display — clearly displays mode, recording, and playback
information.
External Microphone Jack — lets you
use an external microphone, so you can
extend your recording range.
Earphone Jack — lets you use an optional earphone to listen to messages
privately.
Message Alarm Playback — the
recorder sounds an alarm at a set time
and date and plays back a selected
message.
Schedule Alarm Playback — the
recorder sounds an alarm at a set time
and plays back schedule messages for a
set date.
Built-In Microphone and Speaker — let
you record and play back notes anywhere.
6
Features
ˆ Preparation
INSTALLING BATTERIES
Your recorder requires two AAA batteries
(not supplied) for power. For the best performance and longest life, we recommend
RadioShack alkaline batteries.
Cautions:
• Use only fresh batteries of the required size and recommended type.
• Do not mix old and new batteries, different types of batteries (standard, alkaline, or rechargeable), or rechargeable batteries of different capacities.
Follow these steps to install batteries.
1. Slide HOLD in the direction of the
arrow.
2. Push down on the battery compartment cover and slide it off in the
direction of the arrow.
3. Place the batteries in the compartment as indicated by the polarity sym-
Preparation
7
bols (+ and –) marked outside the
compartment.
4. Replace the cover. The time appears,
and the hour digits flash. See “Setting
the Clock” below to set the time.
When
appears, the sound becomes
weak or distorted, or the recorder stops
operating properly, replace the batteries.
Warning: Dispose of old batteries
promptly and properly. Do not burn or
bury them.
Caution: If you do not plan to use the
recorder for a week or longer, remove the
batteries. Batteries can leak chemicals
that can destroy electronic parts.
SETTING THE CLOCK
To reset the clock, see “Resetting the
Time” on Page 32.
1. Repeatedly press (or hold down) –
or +
to set the hour, then press
MENU/FOLDER to store the setting.
2. Repeat Step 1 to set the minute, year,
month, and day. After you set the
date, END and HOLD appear briefly,
then the recorder turns off.
8
Preparation
Notes:
• Press STOP at any time to exit the
time-setting mode.
• If you do not press any button for
about 3 minutes, the recorder automatically exits the time-setting mode
without saving your settings. See
“Resetting the Time” on Page 32.
CONNECTING EARPHONES
You can use an optional
mono earphone with a 1/8inch (3.5-mm) mini-plug
to listen to your recordings in private. Your local
RadioShack store carries
a wide selection of earphones.
Insert the earphone’s plug into the
recorder’s EAR jack. The built-in speaker
automatically disconnects.
Listening Safely
To protect your hearing, follow these
guidelines when you use earphones.
Preparation
9
• Set the volume to the lowest setting
before you begin listening. After you
begin listening, adjust the volume to a
comfortable level.
• Do not listen at extremely high volume levels. Extended high-volume
listening can lead to permanent hearing loss.
• Once you set the volume, do not
increase it. Over time, your ears
adapt to the volume level, so a volume level that does not cause discomfort might still damage your
hearing.
Traffic Safety
• Do not wear earphones while operating a motor vehicle or riding a bicycle.
This can create a traffic hazard and
could be illegal in some areas.
• Even though some earphones let you
hear some outside sounds when listening at normal volume levels, they
still can present a traffic hazard.
10
Preparation
CONNECTING AN
EXTERNAL MICROPHONE
You can use an optional
microphone with a 1/8-inch
(3.5-mm) plug to extend
the recording range. Your
local RadioShack store
carries a wide selection of
microphones.
Record
Indicator
Insert the microphone’s plug into the
recorder’s MIC jack. The built-in microphone automatically disconnects.
ATTACHING THE WRIST
STRAP
Thread the strap’s small
loop through the holes on
the bottom of the recorder.
Slip the larger end of the
strap through the smaller
loop. Pull the larger loop to
tighten it.
Preparation
11
ˆ A Quick Look at
the Recorder
EAR
Jack
MIC
Jack
Built-In
Microphone
REC
PLAY
Pocket
Clip
ERASE
HOLD
STOP
VOLUME
FastForward
Rewind
MENU/
FOLDER
12
A Quick Look at the Recorder
ˆ Operation
LOCKING THE RECORDER’S
CONTROLS
You can lock the recorder’s controls so
you do not accidentally change any settings. To lock the recorder’s controls, slide
HOLD in the direction of the arrow. The
time flashes twice.
To conserve battery power, the display
disappears when you lock the recorder’s
controls while the recorder is stopped.
To unlock the recorder’s controls, slide
HOLD in the opposite direction of the ar-
row.
TYPES OF FOLDERS
The recorder has three folders: A , B , and
S . Folders A and B are convenient for
recording ordinary messages. Each folder can store up to 100 messages.
Folder S is convenient for schedule management. The S folder can store up to 15
messages on a given date and 100
messages in the whole folder. You can
use this folder to conveniently check your
Operation
13
schedule for a selected date. By using the
schedule alarm playback feature, this folder can automatically play back your
messages (see “Schedule Alarm Playback” on Page 30).
When you store 100 messages in a folder
or when you store 15 messages for a specific date in folder S . FULL and the
message number flash. You cannot
record more messages until you erase
some messages.
SELECTING A FOLDER
Repeatedly press MENU/FOLDER until the
desired folder ( A , B , or S ) appears.
RECORDING
Recording Messages in Folder
A or B
1. Repeatedly press MENU/FOLDER to
select the desired folder. As you
press MENU/FOLDER, A , B , or S
alternately appear.
2. Select either folder
A
or
B.
Note:
The
recorder’s
default
recording setting is the LP mode
14
Operation
(about 90 minutes of recording). To
select a different recording mode, see
“Setting the Recording Mode” on
Page 26.
3. Press REC. The record indicator
lights and recording begins. The display shows the current folder name,
the current message number, the
recording mode, and the elapsed
recording time.
4. To temporarily stop recording, press
REC. PAUSE and the record indicator
flash. To resume recording, press
REC again.
Note: Recording stops if you press
STOP while the recorder is paused or
leave the recorder set to pause for 10
minutes.
5. Press STOP to stop recording.
When the remaining recording time falls
below 5 minutes, the remaining recording
time appears.
When the remaining recording time falls
below 1 minute, the record indicator flashes. You cannot record additional
messages if FULL appears when you
press REC. To continue recording, erase
Operation
15
unneeded messages (see “Erasing Messages” on Page 21).
Schedule Recording
1. Repeatedly press MENU/FOLDER to
select folder S .
2. Repeatedly press (or hold down) –
or +
to select the desired date.
3. Press REC. The record indicator
lights and recording begins.
4. Press STOP to stop recording.
Using Voice-Activated
Recording
1. Repeatedly press MENU/FOLDER to
select the desired folder.
2. Turn on voice
“Setting
Voice
Page 28.)
activation. (See
Activation”
on
3. Press REC.
When the recorder detects a voice input, it
automatically starts recording and the
record indicator lights. When the voice input stops, the recorder automatically
16
Operation
stops recording within 1 second and enters standby mode.
During the standby mode, VCVA and the
record indicator flash.
PLAYING BACK MESSAGES
1. Repeatedly press MENU/FOLDER to
select the folder which contains the
message you want to play back.
2. Repeatedly press (or hold down) –
or +
until the message number
you want to play back appears.
3. Press PLAY to start playback.
4. Adjust the volume to the desired listening level.
5. To temporarily stop playback, press
PLAY. PAUSE flashes. To resume
playback, press PLAY again.
Note: Playback stops if you press
STOP while the recorder is paused or
leave the recorder set to pause for 10
minutes.
6. The recorder automatically stops at
the end of each message. To stop
playback sooner, press STOP.
Operation
17
Using Fast Playback
To start fast playback (30% faster than
normal playback speed), hold down PLAY
for more than 1 second while the recorder
is either stopped, paused, or in playback.
F-PLAY briefly appears.
Press PLAY again to start playback at the
normal speed.
If you press STOP during fast playback or
the recorder reaches the end of a
message, the recorder stops.
Using Schedule Playback
1. Repeatedly press MENU/FOLDER to
select the S folder.
2. To select the date for the schedule
you want to check, repeatedly press
or +
while the
(or hold down) –
recorder is stopped.
To find the date where the next
message is recorded, hold down –
or +
while the recorder is stopped.
The recorder starts searching and
stops at the next recorded message,
by date. If there are no further
18
Operation
messages, the recorder scrolls
through the calendar year by month.
3. Press PLAY. The recorder plays back
all messages in succession for the
selected date.
4. Press STOP to stop playback.
Note: You cannot skip forward or reverse
in folder S while the recorder is stopped.
You can skip forward or reverse only while
the recorder is paused or in playback.
FAST-FORWARDING/
REWINDING
To fast-forward through a message, hold
for more than 1 second while
down +
the recorder is paused or in playback.
To rewind through a message, hold down
–
for more than 1 second while the
recorder is paused or in playback.
The recorder continues fast-forwarding or
rewinding as long as you hold down either
button.
When the recorder reaches the end of
(while fast-forwarding) or the beginning of
(while rewinding) a message, the recorder
pauses (for about 1/2 a second). Then the
Operation
19
recorder starts fast-forwarding or rewinding the next or previous message. When
the recorder reaches the first or last
message, it automatically stops.
USING FORWARD SKIP/
REVERSE SKIP
To skip backward to a message (while the
recorder is stopped, paused, in playback
or fast playback), repeatedly press (or
hold down while the recorder is stopped) –
until the desired message number appears.
To skip forward to a message (while the
recorder is stopped, paused, in playback
or fast playback), repeatedly press (or
hold down while the recorder is stopped)
+
until the desired message number
appears. Release the button to stop skipping. When the recorder reaches the first
or last message, it automatically stops.
MOVING A MESSAGE
BETWEEN FOLDERS
A AND B
While playing back (or pausing) a
message in folder A or B , hold down
MENU/FOLDER for more than 1 second.
This moves the current message to the
20
Operation
last position in the other folder ( A to
B to A ).
B,
or
You cannot move messages in folder
another folder.
S
to
ERASING MESSAGES
Erasing a Single Message
Note: If you do not press a key for more
than 4 seconds, the recorder returns to
stand by and does not erase the
message.
1. Press MENU/FOLDER to select the
desired folder.
2. Repeatedly press –
or +
while
the recorder is stopped to select the
message number you want to erase.
3. Press ERASE. The selected message
number, ERASE, and YES appear
alternately.
4. Press ERASE again within 4 seconds
to delete the message. Otherwise,
press any other key.
Operation
21
Erasing All Messages in a
Folder
Note: If you do not press a key for more
than 4 seconds, the recorder returns to
stand by and does not erase messages.
1. Press MENU/FOLDER to select either
folder A or B that you want to erase.
2. While the recorder is stopped, hold
down ERASE for more than 2 seconds. ALL flashes, and ERASE and
YES alternately appear.
3. Press ERASE again within 4 seconds
to delete all messages in a folder.
ERASE flashes. Otherwise, press any
other key.
ERASING MESSAGES IN
FOLDER S
Erasing All Messages for a
Selected Date
Note: If you do not press a key for more
than 4 seconds, the recorder returns to
stand by and does not erase messages.
1. Press MENU/FOLDER to select the
folder.
22
Operation
S
2. Select the desired date, then hold
down ERASE for more than 2 seconds. ALL flashes, and the date and
YES flash alternately.
3. Press ERASE within 4 seconds again
to erase all of the messages for the
selected date. Otherwise, press any
other key.
Erasing All Messages in
Folder S
1. Press MENU/FOLDER to select the
folder.
S
2. Hold down ERASE for more than 4
seconds. ALL flashes, and ERASE
and YES alternately flash.
3. Press ERASE within 4 seconds again
to erase all messages in folder S .
Otherwise, press any other key.
RESETTING THE RECORDER
If the recorder stops operating properly,
follow these steps to reset it.
Important: Resetting the recorder clears
all information, including the date and
time, as well as other settings. Reset the
Operation
23
recorder only when you are sure the
recorder is not working properly.
Note: If you do not press a key for more
than 4 seconds, the recorder returns to
stand by and does not reset itself.
1. Hold down STOP, then hold down
ERASE for more than 2 seconds.
CLEAR appears.
2. Release both buttons. CLEAR and
YES appear alternately.
3. Press ERASE again within 4 seconds
to reset the recorder and erase all
saved information. Otherwise, press
any other key.
24
Operation
ˆ Special Features
CHECKING THE REMAINING
RECORDING TIME
Repeatedly press MENU/FOLDER until the
desired folder appears.
Hold down STOP while the recorder is
stopped. The remaining recording time,
remaining battery power, and total number of messages in the folder appear as
long as you hold down STOP.
USING POWER SAVE
When 60 minutes have elapsed while the
recorder is stopped, all display segments
go out and the recorder enters the power
save mode.
To exit the power save mode, press any
button.
SETTING THE OPTIONS
Hold down MENU/FOLDER for more than 1
second while the recorder is stopped to
enter the options mode. Repeatedly press
–
or +
to cycle through the options
Special Features
25
menu (MOdE, MIC, VCVA, ALARM,
ALARM, bEEP, and TIME).
S
To exit the options mode, press STOP.
END briefly appears.
If you do not press any button for about 3
minutes during the options mode, the
recorder automatically exits the options
mode.
Setting the Recording Mode
1. In the options mode, repeatedly press
–
or +
until MOdE flashes.
2. Press MENU/FOLDER to start the
recording mode setting. Either SP or
LP flashes.
or +
3. Press –
mode flashes.
until the desired
• SP — standard playback mode
has approximately 33 minutes of
recording time.
• LP — long playback mode has
approximately 90 minutes of
recording time.
4. Press MENU/FOLDER while the
desired mode flashes to complete its
26
Special Features
setting if you want to remain in the
options mode. Or press STOP while
the desired mode flashes to complete
its setting and exit the options mode.
Setting Microphone Sensitivity
1. In the options mode, repeatedly press
–
or +
until MIC flashes.
2. Press MENU/FOLDER to start the
microphone sensitivity setting. Either
HI or LO flashes.
3. Press –
or +
mode flashes.
so the desired
• HI — high sensitivity mode is recommended for normal use.
• LO — use low sensitivity mode
when there is a lot of background
noise.
Note: When the microphone sensitivity is set to HI, the noise may
increase depending on the recording
conditions.
4. Press MENU/FOLDER while the
desired mode flashes to complete its
setting if you want to remain in the
options mode. Or press STOP while
Special Features
27
the desired mode flashes to complete
its setting and exit the options mode.
Setting Voice Activation
When you use this feature, recording begins when the recorder picks up sound
and stops when the sound stops.
1. In the options mode, repeatedly press
–
or +
until VCVA flashes.
2. Press MENU/FOLDER to enter the
voice activation-setting mode. Either
OFF or On flashes.
or +
so On flashes to
3. Press –
turn on voice activation (or OFF
flashes to turn off the voice activation).
4. Press MENU/FOLDER to complete the
setting .
5. Press STOP to exit the options mode.
Message Alarm Playback
You can set the recorder so it sounds an
alarm at a specified time then play back a
message set for that time. You can set up
to 20 alarm messages.
28
Special Features
1. Select a message you want to play
before you enter the options mode.
2. In the options mode, repeatedly press
or +
until
(or hold down) –
ALARM flashes.
3. Press MENU/FOLDER to enter the
alarm setting mode. The month digits
flash.
4. Repeatedly press (or hold down) –
or +
to set the month and press
MENU/FOLDER.
5. Repeat Step 4 to set the desired date
and time for alarm playback.
6. When you have finished alarm setting, press STOP.
7. At the set time and on the set date,
the recorder sounds short beep tones
and the record indicator flashes.
Press any button. The recorder plays
back the selected message.
When playback finishes, the recorder
clears the alarm setting for that message.
Special Features
29
Notes:
• You cannot set alarm messages if
you have already set 20 messages or
if you select message number 0.
• The beep tones stop automatically if
no button is pressed for 5 minutes
after the beeping starts. The
message is not played back.
• The message alarm playback operates even if the recorder is locked.
To cancel a set alarm message, select the
desired folder, then select the set alarm
message number. Repeat Steps 2–5,
then press MENU/FOLDER. When ON/
OFF appears, press –
or +
to select
OFF. Then press STOP.
Schedule Alarm Playback
You can set the recorder so it sounds an
alarm at the specified time then play back
the day’s messages every day.
1. In the options mode, repeatedly press
or +
until S
(or hold down) –
ALARM flashes.
30
Special Features
2. Press MENU/FOLDER to enter the
alarm setting mode. Either OFF or On
flashes.
3. Press –
or +
to select On.
4. Press MENU/FOLDER. The hour digits
flash.
or +
to set
5. Repeatedly press –
the hour and press MENU/FOLDER.
6. Repeat Step 5 to set the minutes.
7. To complete the folder schedule
alarm setting, press STOP.
8. At the set alarm time each day, the
recorder beeps. Press any button to
play back all of the messages
recorded for the current date.
Note: The schedule alarm playback operates even if the recorder is locked.
Turning the Key Tone On/Off
1. In the options mode, repeatedly press
(or hold down) –
or +
until
bEEP flashes.
2. Press MENU/FOLDER. On or OFF
flashes.
Special Features
31
3. Press –
or +
so OFF flashes to
turn off the key tone or On flashes to
turn on the key tone.
4. Press STOP to finish the setting and
exit the options mode.
Resetting the Time
1. In the options mode, repeatedly press
–
or +
until TIME flashes.
2. Press MENU/FOLDER. The time display appears and hour digits flash.
or +
to set
3. Repeatedly press –
the hour, then press MENU/FOLDER.
4. Repeat Step 3 to set the minute, year,
month, and date. After you set the
date, press STOP.
32
Special Features
ˆ Troubleshooting
Problem
Suggestion
Nothing happens after
pressing a button.
Make sure HOLD is set in the
opposite direction from the arrow.
Make sure that fresh batteries
are correctly installed.
There is no sound.
Make sure the volume is turned
up.
Make sure an earphone is not
connected to the recorder.
The recording level is
too low.
Make sure the microphone sensitivity is properly set. (See
“Setting Microphone Sensitivity”
on Page 27.)
The playback speed is
too fast.
Make sure the unit is not set to
fast playback. (See “Using Fast
Playback” on Page 18.)
The recorder will not
record. FULL appears
when there should be
ample space.
Make sure the number of
recorded messages in the
selected folder has not reached
100. (See “Checking the
Remaining Recording Time” on
Page 25.)
Make sure there is enough
remaining recording time. (See
“Checking the Remaining
Recording Time” on Page 25.)
Make sure the number of messages of the same date in folder
S has not reached 15. (See
“Checking the Remaining
Recording Time” on Page 25.)
Operation is not normal.
Reset the unit. (See “Resetting
the Recorder” on Page 23.)
Troubleshooting
33
ˆ Care
To enjoy your RadioShack 90-Minute Digital Recorder for a long time:
• Keep the recorder dry. If it gets wet,
wipe it dry immediately.
• Use and store the recorder only in
normal temperature environments.
• Handle the recorder gently and carefully. Do not drop it.
• Keep the recorder away from dust
and dirt.
• Wipe the recorder with a damp cloth
occasionally to keep it looking new.
Modifying or tampering with the recorder’s
internal components can cause a malfunction and might invalidate its warranty
and void your FCC authorization to operate it. If your recorder is not performing as
it should, take it to your local RadioShack
store for assistance.
34
Care
ˆ Specifications
Recording Medium ....... Built-in Flash Memory
Recording Time:
SP Mode ................. Approximately 33 min.
LP Mode ................. Approximately 90 min.
Speaker ................................. 28 mm diameter
dynamic internal speaker
Maximum Power ................................. 120 mW
Earphone Jack ..................... 3.5 mm diameter
Impedance ............................................. 8Ω
Microphone Jack .................. 3.5 mm diameter
Impedance ................... Approximately 2 kΩ
Power Requirement ........... Two AAA Batteries
Battery Life ............................. About 40 Hours
with alkaline batteries,
continuous recording
Dimensions (HWD) ..... 410/16 × 114/16 × 10/16 in
(115 × 48.2 × 15 mm)
Weight (including batteries) ................... 2.4 oz
(68 g)
Specifications are typical; individual units might
vary. Specifications are subject to change and
improvement without notice.
Specifications
35
Limited Ninety-Day Warranty
This product is warranted by RadioShack against manufacturing defects
in material and workmanship under normal use for ninety (90) days from
the date of purchase from RadioShack company-owned stores and authorized RadioShack franchisees and dealers. EXCEPT AS PROVIDED
HEREIN, RadioShack MAKES NO EXPRESS WARRANTIES AND ANY
IMPLIED WARRANTIES, INCLUDING THOSE OF MERCHANTABILITY
AND FITNESS FOR A PARTICULAR PURPOSE, ARE LIMITED IN DURATION TO THE DURATION OF THE WRITTEN LIMITED WARRANTIES CONTAINED HEREIN. EXCEPT AS PROVIDED HEREIN,
RadioShack SHALL HAVE NO LIABILITY OR RESPONSIBILITY TO
CUSTOMER OR ANY OTHER PERSON OR ENTITY WITH RESPECT
TO ANY LIABILITY, LOSS OR DAMAGE CAUSED DIRECTLY OR INDIRECTLY BY USE OR PERFORMANCE OF THE PRODUCT OR ARISING OUT OF ANY BREACH OF THIS WARRANTY, INCLUDING, BUT
NOT LIMITED TO, ANY DAMAGES RESULTING FROM INCONVENIENCE, LOSS OF TIME, DATA, PROPERTY, REVENUE, OR PROFIT
OR ANY INDIRECT, SPECIAL, INCIDENTAL, OR CONSEQUENTIAL
DAMAGES, EVEN IF RadioShack HAS BEEN ADVISED OF THE POSSIBILITY OF SUCH DAMAGES.
Some states do not allow limitations on how long an implied warranty
lasts or the exclusion or limitation of incidental or consequential damages, so the above limitations or exclusions may not apply to you.
In the event of a product defect during the warranty period, take the
product and the RadioShack sales receipt as proof of purchase date to
any RadioShack store. RadioShack will, at its option, unless otherwise
provided by law: (a) correct the defect by product repair without charge
for parts and labor; (b) replace the product with one of the same or similar design; or (c) refund the purchase price. All replaced parts and products, and products on which a refund is made, become the property of
RadioShack. New or reconditioned parts and products may be used in
the performance of warranty service. Repaired or replaced parts and
products are warranted for the remainder of the original warranty period.
You will be charged for repair or replacement of the product made after
the expiration of the warranty period.
This warranty does not cover: (a) damage or failure caused by or attributable to acts of God, abuse, accident, misuse, improper or abnormal
usage, failure to follow instructions, improper installation or maintenance, alteration, lightning or other incidence of excess voltage or current; (b) any repairs other than those provided by a RadioShack
Authorized Service Facility; (c) consumables such as fuses or batteries;
(d) cosmetic damage; (e) transportation, shipping or insurance costs; or
(f) costs of product removal, installation, set-up service adjustment or reinstallation.
This warranty gives you specific legal rights, and you may also have
other rights which vary from state to state.
RadioShack Customer Relations, 200 Taylor Street,
6th Floor, Fort Worth, TX 76102
We Service What We Sell
05A01
14-1193 A
12/99
E2-2730-02
Printed in Hong Kong