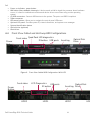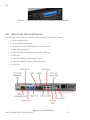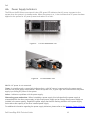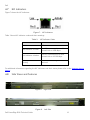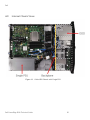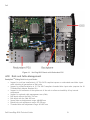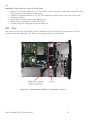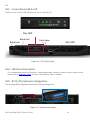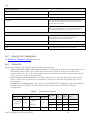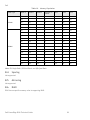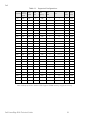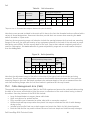
1
PowerEdge R310 Technical Guide The PowerEdge R310 is an enterprise-class server with the right balance of performance and value. Dell This document is for informational purposes only. Dell reserves the right to make changes without further notice to any products herein. The content provided is as is and without express or implied warranties of any kind. Dell, the DELL logo, PowerEdge, , OpenManage, and ReadyRails are trademarks of Dell, Inc. Citrix and XenServer are registered trademarks of Citrix Systems, Inc. and/or one or more of its subsidiaries, and may be registered in the United States Patent and Trademark Office and in other countries. Intel, Xeon, Celeron, and Pentium are registered trademarks and MMX, Celeron, and Core are trademarks of Intel Corporation in the U.S. and other countries. HP and COMPAQ are trademarks of Hewlett-Packard Company. Broadcom and NetXtreme are registered trademarks of Broadcom Corporation and/or its affiliates in the United States, certain other countries and/or the EU. CommVault Galaxy and Simpana are registered trademarks of CommVault Systems, Inc. InfiniBand is a registered trademark and service mark of the InfiniBand Trade Association. Matrox is a registered trademark of Matrox Electronic Systems Ltd. Microsoft, Windows, Windows Server, SQL Server, and BitLocker, and Hyper-V are either registered trademarks or trademarks of Microsoft Corporation in the United States and/or other countries. Mellanox and ConnectX are registered trademarks of Mellanox Technologies, Inc. Red Hat is a registered trademark of Red Hat, Inc. in the United States and other countries. Linux is a registered trademark of Linus Torvalds. Nuvoton is a registered trademark of Nuvoton Technology Corporation. Symantec and Backup Exec are trademarks owned by Symantec Corporation or its affiliates in the U.S. and other countries. QLogic is a registered trademark of QLogic Corporation. Vizioncore is a trademark of Vizioncore Inc. in the United States of America and other countries. VMware and vSphere are registered trademarks and ESX and ESXi are trademarks of VMware, Inc. in the United States and/or other jurisdictions. Other trademarks and trade names may be used in this document to refer to either the entities claiming the marks and names or their products. Dell disclaims proprietary interest in the marks and names of others. ©Copyright 2012 Dell Inc. All rights reserved. Reproduction or translation of any part of this work beyond that permitted by U.S. copyright laws without the written permission of Dell Inc. is unlawful and strictly forbidden. December 2012 | Version 4.0 Dell PowerEdge R310 Technical Guide 1 Dell Table of Contents 1 Product Description............................................................................................ 7 1.1 Overview .................................................................................................... 7 1.1.1 Business Value ...................................................................................... 7 1.1.2 Easy to Manage ..................................................................................... 7 1.1.3 Easy to Set Up ...................................................................................... 7 1.2 Product Comparison ....................................................................................... 8 New Technologies ............................................................................................ 11 2.1 Overview .................................................................................................. 11 2.2 Detailed Information .................................................................................... 11 3 System Overview ............................................................................................. 12 4 Mechanical .................................................................................................... 15 4.1 Chassis Description....................................................................................... 15 4.2 Dimensions and Weight .................................................................................. 15 4.3 Front Panel View and Features ........................................................................ 15 4.4 Front View Cabled and Hot-Swap HDD Configurations .............................................. 16 4.5 Back Panel View and Features ......................................................................... 17 4.6 Power Supply Indicators ................................................................................. 18 4.7 NIC Indicators ............................................................................................. 19 4.8 Side Views and Features ................................................................................ 19 4.9 Internal Chassis Views ................................................................................... 20 4.10 Rails and Cable Management ........................................................................... 21 4.11 Fans ........................................................................................................ 22 4.12 Cabling ..................................................................................................... 23 4.13 Control Panel LED & LCD ................................................................................ 24 4.14 LED Status Description .................................................................................. 24 4.15 R310 LCD (Optional) Configuration .................................................................... 24 5 Security ........................................................................................................ 26 5.1.1 Cover Latch ....................................................................................... 26 2 5.1.2 Bezel ............................................................................................... 26 5.1.3 Hard Drive ......................................................................................... 26 5.1.4 Trusted Platform Module (TPM) ................................................................ 26 5.1.5 Power Off Security ............................................................................... 26 5.1.6 Intrusion Alert .................................................................................... 26 5.1.7 Secure Mode ...................................................................................... 26 5.2 Battery..................................................................................................... 27 5.3 Field Replaceable Units (FRU).......................................................................... 27 5.4 User Accessible Jumpers, Sockets, and Connectors ................................................. 27 6 Power, Thermal, Acoustic .................................................................................. 28 6.1 Power Supplies ........................................................................................... 28 6.1.1 Power Supply Specifications .................................................................... 28 6.1.2 Power Supply Connectors ....................................................................... 28 6.2 Environmental Specifications........................................................................... 29 Dell PowerEdge R310 Technical Guide 2 Dell 6.3 Energy Star Compliance ................................................................................. 30 6.4 Acoustics .................................................................................................. 30 7 Processors ..................................................................................................... 32 7.1 Overview .................................................................................................. 32 7.2 Supported Processors .................................................................................... 33 7.3 Processor Configurations ................................................................................ 33 8 Memory ........................................................................................................ 35 8.1 Overview .................................................................................................. 35 8.1.1 UDIMM .............................................................................................. 35 8.1.2 RDIMM .............................................................................................. 36 8.2 Slots/Risers ............................................................................................... 37 8.3 Speed ...................................................................................................... 37 8.4 Sparing ..................................................................................................... 38 8.5 Mirroring ................................................................................................... 38 8.6 RAID ........................................................................................................ 38 9 Chipset ........................................................................................................ 40 9.1 Overview .................................................................................................. 40 9.2 Direct Media Interface (DMI) ........................................................................... 40 9.3 PCI Express Interface .................................................................................... 40 9.4 SATA Interface ............................................................................................ 40 9.5 AHCI ........................................................................................................ 40 9.6 Intel Rapid Storage Technology ........................................................................ 40 9.7 PCI Interface .............................................................................................. 41 9.8 Low Pin Count Interface (LPC) ......................................................................... 41 9.9 Serial Peripheral Interface (SPI) ....................................................................... 41 9.10 Compatibility Module (MDA Controller, Timer/Counters, Interrupt Controller) ................ 41 9.11 Advanced Programmable Interrupt Controller (APIC) ............................................... 41 9.12 Universal Serial Bus (USB) Controllers ................................................................ 41 9.13 Real-Time Clock (RTC) .................................................................................. 42 9.14 General Purpose Inputs and Outputs (GPIO) ......................................................... 42 9.15 Enhanced Power Management.......................................................................... 42 9.16 Manageability ............................................................................................. 42 9.17 System Management Bus (SMBus 2.0) ................................................................. 43 9.18 Intel Anti-Theft Technology ............................................................................ 43 9.19 Intel Virtualization Technology for Directed I/O .................................................... 43 9.20 JTAG Boundary-Scan ..................................................................................... 43 10 BIOS ............................................................................................................ 44 10.1 Overview .................................................................................................. 44 10.2 Supported ACPI States ................................................................................... 44 10.3 Power Management Modes .............................................................................. 45 10.3.1 Dell Active Power Controller ................................................................... 45 11 10.3.2 Power-Saving BIOS Setting (OS Control) ...................................................... 45 10.3.3 Maximum Performance .......................................................................... 45 Embedded NICs/LAN on Motherboard (LOM) ............................................................. 11.1 Overview .................................................................................................. 11.2 Multiple Speed Support.................................................................................. 11.3 PCI Express Compliance ................................................................................. 11.4 Diagnostics ................................................................................................ Dell PowerEdge R310 Technical Guide 3 48 48 48 48 48 Dell 11.5 Power Management ...................................................................................... 48 11.6 Setting Power Management Options ................................................................... 48 11.7 Broadcom Advanced Control Suite 3 .................................................................. 49 11.8 Teaming ................................................................................................... 49 11.9 VLAN ....................................................................................................... 51 11.10 Preboot Environment .................................................................................... 52 11.11 iSCSI Boot ................................................................................................. 52 11.12 Diagnostic Tests .......................................................................................... 53 11.13 Flow Control .............................................................................................. 53 11.14 Network Controller Sideband Interface (NC-SI)...................................................... 53 11.15 IPv4 and IPv6 Checksum Offload ....................................................................... 53 11.16 IPv4 and IPv6 Large Send Offload ...................................................................... 54 11.17 Jumbo MTU................................................................................................ 54 11.18 LSO and Jumbo Frames.................................................................................. 54 11.19 Wake-Up Capabilities .................................................................................... 54 11.20 WOL Settings .............................................................................................. 54 11.21 Virtualization Functionality ............................................................................ 54 11.22 Usage of Multiple Queues ............................................................................... 55 11.23 LOM Performance ........................................................................................ 55 12 I/O Slots ....................................................................................................... 57 12.1 Overview .................................................................................................. 57 12.2 Quantities and Priorities ................................................................................ 57 12.3 Boot Order ................................................................................................ 58 12.4 External Controller Cards ............................................................................... 58 12.5 PCI Card Dimensions ..................................................................................... 58 13 Storage ........................................................................................................ 59 13.1 Overview .................................................................................................. 59 13.2 Drives ...................................................................................................... 60 13.3 RAID Configurations ...................................................................................... 60 13.4 LED Indicators ............................................................................................ 61 13.5 Optical Drives ............................................................................................. 61 13.6 Tape Drives ............................................................................................... 62 14 Video and Audio .............................................................................................. 63 14.1 Video ....................................................................................................... 63 14.2 Audio ....................................................................................................... 63 15 Rack Information ............................................................................................. 64 15.1 Overview .................................................................................................. 64 15.2 Rails ........................................................................................................ 64 15.3 Cable Management Arm (CMA) ......................................................................... 66 15.4 Rack View ................................................................................................. 67 16 Operating Systems ........................................................................................... 68 17 Solutions....................................................................................................... 69 17.1 Virtualization ............................................................................................. 69 17.2 Database .................................................................................................. 69 18 Systems Management ........................................................................................ 70 18.1 Overview .................................................................................................. 70 18.2 Server Management ...................................................................................... 70 18.3 Embedded Server Management ........................................................................ 71 18.4 Lifecycle Controller and Unified Server Configurator .............................................. 71 18.5 iDRAC6 Express ........................................................................................... 71 Dell PowerEdge R310 Technical Guide 4 Dell 18.6 iDRAC6 Enterprise ........................................................................................ 72 Peripherals .................................................................................................... 74 19.1 USB peripherals........................................................................................... 74 19.2 External Storage.......................................................................................... 74 20 Packaging Options ........................................................................................... 76 19 Tables Table 1. Table 2. Table 3. Table 4. Table 5. Table 6. Table 7. Table 8. Table 9. Table 10. Table 11. Table 12. Table 13. Table 14. Table 15. Table 16. Table 17. Table 18. Table 19. Table 20. Table 21. Table 22. Table 23. Table 24. Table 25. Table 26. Table 27. Table 28. Comparison Table ..................................................................................... 8 Product Features Summary ........................................................................ 12 NIC Indicator Codes ................................................................................. 19 Environmental Requirements ...................................................................... 29 Acoustical Information ............................................................................. 30 Supported Processors ............................................................................... 33 DIMMs Supported .................................................................................... 35 UDIMM Support ...................................................................................... 36 RDIMM Support....................................................................................... 36 Memory Population ................................................................................. 38 Supported Configurations .......................................................................... 39 Supported ACPI States .............................................................................. 45 Power Management Features on the R310....................................................... 46 Current Power Profiles ............................................................................. 47 Smart Load Balancing............................................................................... 50 Teaming Types and Detail ......................................................................... 50 Broadcom Teaming Software Component ....................................................... 51 LOM Performance ................................................................................... 56 PCIe Slot Specification ............................................................................. 57 I/O Slots Quantities and Priorities ................................................................ 57 External Controller Cards .......................................................................... 58 Add-in Card Sizes .................................................................................... 58 RAID Configurations ................................................................................. 60 Rail Information ..................................................................................... 66 Unified Server Configurator Features and Description......................................... 71 Features List for BMC, iDRAC6, and vFlash ...................................................... 72 External Storage ..................................................................................... 74 R310 Volatility ....................................................................................... 78 Dell PowerEdge R310 Technical Guide 5 Dell Figures Figure 1. Figure 2. Figure 3. Figure 4. Figure 5. Figure 6. Figure 7. Figure 8. Figure 9. Figure 10. Figure 11. Figure 12. Figure 13. Figure 14. Figure 15. Figure 16. Figure 17. Figure 18. Figure 19. Figure 20. Figure 21. Figure 22. Figure 23. Figure 24. Figure 25. Figure 26. Figure 27. Figure 28. Figure 29. Figure 30. Figure 31. Figure 32. Chassis Dimensions .................................................................................. 15 Front View Cabled HDD Configuration—With LED .............................................. 16 Front View Hot-swap HDD Configuration with LCD Panel ..................................... 17 Back Panel View ..................................................................................... 17 For Non-Redundant PSU ............................................................................ 18 For Redundant PSU.................................................................................. 18 NIC Indicators ........................................................................................ 19 Right Side ............................................................................................ 19 Left Side .............................................................................................. 19 Cable HDD Chassis with Single PSU ............................................................ 20 Hot Plug HDD Chassis with Redundant PSU ................................................... 21 Non-Redundant PSU Fan Configuration (3 Fans) ............................................. 22 Redundant PSU Fan Configuration (5 Fans) ................................................... 23 LED Control Panel ................................................................................ 24 System Control Panel ............................................................................ 24 Intrusion Detection Switch ...................................................................... 26 Battery ............................................................................................. 27 PERC Battery ...................................................................................... 27 Power Input Connectors ......................................................................... 29 Processor Location ............................................................................... 34 BCM5716C LOM’s Multiple Queues in Virtual Environment ................................. 55 Broadcom LOM .................................................................................... 56 Cabled Hard Drive Chassis ...................................................................... 59 Hot-Swap Hard Drive Chassis ................................................................... 59 Backplane with Hot-Swap Option .............................................................. 59 Hard Drives ........................................................................................ 60 R310 Sliding Rails with Optional CMA ......................................................... 64 1U Threaded Rack Adapter Brackets Kit ...................................................... 65 R310 Static Rails.................................................................................. 65 Rail Adjustability ................................................................................. 66 R310 Mounted in the A3 Sliding Rails with the CMA ......................................... 67 R310 Mounted in the A4 Static Rails in 2-post Center Mount Configuration ............. 67 Dell PowerEdge R310 Technical Guide 6 Dell 1 Product Description 1.1 Overview The Dell™ PowerEdge™ R310 is a high-performance, 1-socket 1U rack server with flexible computing power, business scalability, simplified management, data protection, and security options. Dell PowerEdge 11th generation servers are designed to meet customer needs by combining customerinspired design with excellent reliability, security, and commonality. The PowerEdge R310 embodies the Dell 11G design principles with the same system design commonality, reliability, energy efficiency and simplified systems management features true to the entire portfolio. The result is a compact, efficient server that helps customers of all sizes lower IT-related costs, reduce complexity, and free up resources. The Dell PowerEdge R310 provides the flexible computing power, business scalability, simplified management, data protection, and security options to make it an ideal choice for small to midsize businesses, remote offices, and enterprises. The Dell PowerEdge R310 offers: • • • 1.1.1 Business Value: The performance, security options, and availability scale to meet a variety of business needs. Simplified Management: With optional Dell Lifecycle Controller and optional full OpenManage™ suite designed for improved diagnostics and reduced operational costs. Flexible Technology: Energy-efficient, compact server for ease of deployment. Business Value The PowerEdge R310 rack server offers the right balance of performance, enterprise-class options, and business value to meet the needs of small to midsized businesses, branch offices and enterprises alike with: • • • 1.1.2 Price for performance that includes options for full redundancy in power supplies and hot-swap hard drives. Processor options and memory configurations that are balanced to run typical business applications such as Microsoft® Windows® Small Business Server, Business Center Essentials, SQL Server® Workgroup/Standard, Active Directory®, and SharePoint® as well as Oracle® 11g Standard, VMware®, and file/print. Multiple RAID options and up to four 2.5 or 3.5 inch hard drives to help keep your data safe. Easy to Manage The PowerEdge R310 lets you devote more focus to running your business. The optional advanced embedded management engine, Lifecycle Controller, automates common management tasks and enables zero-media, low-touch deployment that is efficient, secure, and user-friendly. Dell Lifecycle Controller simplifies administrator tasks by performing a complete set of provisioning functions such as system deployment, system updates, hardware configuration and diagnostics from a single intuitive interface called Unified Server Configurator in a pre-OS environment. This eliminates the need to use and maintain multiple pieces of disparate CD/DVD media. With Dell Lifecycle Controller server deployment automation, the R310 can be up and running fast. Also part of the Dell OpenManage portfolio is the Dell Management Console, which is included with every Dell server and provides IT administrators with a consolidated console view of their IT infrastructure. 1.1.3 Easy to Set Up The PowerEdge R310 features a compact chassis that allows flexibility for rack-oriented deployments. The optional advanced systems management capabilities of Dell Lifecycle Controller along with an interactive Dell PowerEdge R310 Technical Guide 7 Dell LCD help simplify server set-up and maintenance. It is an ideal rack for small businesses and larger offices needing manageability. The PowerEdge R310 is an enterprise-class server with the right balance of performance and value. 1.2 Product Comparison Table 1. Comparison Table Feature/Spec R310 R300 (Predecessor) R410 (Next level up) Socket Single, LGA1156 Single, LGA771 Double, LGA1366 Processor Quad-Core Intel® Xeon® processors 3400 series Intel® Core™ i3-540 Intel® Core™ i3-530 Intel® Pentium® G6950 Intel® Celeron® G1101 Quad-Core Intel® Xeon® Processor 5000 series Dual and Quad-Core Intel® Xeon® Processor 3000 series Intel® Core 2 Duo® processor Intel® Celeron® processor 2S Intel® Xeon® processor 5500 series Data Rate DMI @2.5 GT/s (for 4 lanes, bandwidth 2GB/s) DMI: CPU to PCH 1333MHz (bandwidth 10.4 GB/s) FSB: CPU to north bridge QPI @ 6.4 GT/s (for 20 lanes, bandwidth 25.6 GB/s) QPI: CPU to IOH # Processors 1 1 1 to 2 ® ® # Cores Intel Xeon : Quad DT proc: Dual Dual or Quad Dual or Quad L2/L3 Cache Intel® Xeon®: 8MB DT proc: 4, 3 or 2M Intel® Intel® Intel® L2 Intel® L2 4MB or 8MB Celeron®: 512 MB L2 Core™ 2 Duo: 2MB L2 Xeon® 3000 Series: 6MB Xeon® 5000 Series: 6MB Chipset Intel® 3420 Intel® 3400 Intel® 5520 DIMMs DDR3 6 R-DIMMs or 4 U-DIMMs DDR II 6 R-DIMMs 4+4 DDR3 Unbuffered w/ECC or Registered w/ECC 1333/1066/800MHz DIMM Speed 1333/1066MT/s 667MT/s 1333/1066/800MT/s Minimum/Maximum RAM 1GB/32GB 512MB/24GB 1GB/64GB HD Bays 4 x 3.5” Optional hot-swap Or 2.5” SAS/ SSD via hotswap chassis 2 x 3.5” Cabled or hot-swap hard drive bays 4x 3.5” Optional hot-swap Support 2.5" HDDs via hot-swap tray HD Types SATA/SAS/SSD SATA/SAS Default SATA. Optional SAS and SSD via add-in controller External Drive Bay(s) 1 for slim ODD 1 for slim ODD 1 for slim ODD Dell PowerEdge R310 Technical Guide 8 Dell Feature/Spec R310 R300 (Predecessor) R410 (Next level up) Internal HD Controller Intel® 3420 ICH9R Chipset-based SATA NON-RAID: SAS 5/E LSI2032 (For TBU) NON-RAID: SAS 5/E LSI 2032 (For TBU only) SAS 6/E PERC S100 (Embedded SW RAID) Optional HD Controller NON-RAID: SAS 5/E (Field Support Only – No Factory Install) LSI2032 (For TBU) 6Gb/s SAS HBA RAID: PERC6/E (Field Support Only) SAS 5/E (Field Support Only) SAS 6/iR PERC S300 H200 H700 H800 RAID: SAS 5/E SAS 6/iR PERC 6/i PERC 6/E RAID: SAS 6/iR PERC 6/i PERC 6/E Availability ECC Memory, Hot-swap HDD; Redundant PSU; Quad-pack LED diagnostic/LCD with Hotswap HDD chassis, TPM ECC memory, Add-in RAID, tool-less chassis, Hot-plug HDD, Redundant PSU, TPM/CTPM Hot-swap HDD; Redundant PSU; Quad-pack LED diagnostic/LCD with Hot-swap HDD chassis; Memory mirroring Server Management BMC, IPMI 2.0 compliant; Full Open Manage suite Optional; iDRAC6 Express, iDRAC6 Enterprise, vFlash Full OpenManage™ suite Optional DRAC5 BMC, IPMI 2.0 compliant; Full Open Manage suite Optional; iDRAC6 Express, iDRAC6 Enterprise, vFlash I/O Slots Riser 1: PCIe x16 (x8 routing), Full Height/ Half Length, Gen 2 Riser 1: Two PCIe x8 One PCIe x16 (True x16, Gen2); full height, half length Riser 2: PCIe x8 (x8 routing), Full Height/Half Length, Gen 2 Riser 2: One PCI-X 64/133 and one PCIe x8 (embedded): PCIe x8 (x4 routing) RAID PERC S100: RAID 0, 1, 5, 10 (SATA only) PERC S300: RAID 5, 10 (SATA & SAS) SAS 6i/R: RAID 0, 1 (SATA & SAS) PERC H200: RAID 0, 1, 10 (SATA, SAS & SSD) PERC H700: RAID 0, 1, 5, 6, 10 (SATA, SAS & SSD) PERC H800: RAID 0, 1, 5, 6, Dell PowerEdge R310 Technical Guide 0,1, 5, 6, 10 See optional Storage Controller 9 Dell Feature/Spec R310 R300 (Predecessor) R410 (Next level up) 10 (SATA, SAS & SSD) NIC/LOM 2x GbE LOM 2x GbE LOM 2x GbE LOM Optional: various NIC available USB 2 rear/2 front/2 internal 2 rear/2 front/1 internal 2 front/2 rear/2 internal Power Supplies Non-Redundant, 350W (80+ Bronze) Single power supply (400W) Optional redundant power supplies (400W each) Non-Redundant, 480W (80+ SILVER) Optional Redundant, 500W (80+ GOLD) Auto Ranging (100V~240V) Optional Redundant, 400W (80+ Silver) Auto Ranging (100V~240V) Fan Non-redundant, non-hotswappable Non-redundant, non-hotswappable Non-redundant, non-hotswappable Chassis Rack Rack Rack Dimension (HxWxD) 42.4 x 434.0 x 610 (mm) ( w/o bezel) 1.67 x 17.10 x 24.00 (in) 42.35 x 426.3 x 660.4 (mm) (w/o bezel) 1.67 x 16.78 x 26 (in) 43.0 x 434.0 x 627.1 (mm) (w/o ear, w/o bezel) 1.69 x 17.09 x 24.69 (in) Weight Max: 33.02 lbs (15Kg) Max: 29.66 lbs (13.45Kg) Max: 62.61lbs (28.4Kg) Dell PowerEdge R310 Technical Guide 10 Dell 2 Key Technologies 2.1 • • • • • • • • 2.2 Overview New Intel 1 Socket platform: Intel Xeon processor 3400 series with Intel 3420 chipset SSD advantage (support SSD drives) Self-Encrypting Drives (SED) Software RAID PERC S100 & PERC S300 6Gb/s SAS HBA PERC7 support including: PERC H200, H700, H800 Next generation Dell embedded server management o iDRAC express with Lifecycle Controller and Unified Server Configurator o Optional iDRAC enterprise—Optional vFlash DDR3 memory technology which replaces fully buffered DIMMs in the new Intel architecture (Native DDR3 memory capability improves memory access speed, lowers latency and allows more memory capacity (up to 6 DIMMs per 1 socket platform).) Detailed Information Platform Features: • Highly integrated single-processor solution Processors: • • • • • • Intel Xeon processor 3400 series with Intel 3420 chipset Socket: LGA1156 Intel® Turbo Boost Technology for dynamic frequency scaling Intel® Hyper-Threading technology for 8-thread processing with quad core performance 8MB of Intel® Smart Cache (Xeon) Integrated memory controller (IMC) o DDR 3 1066/1333 UDIMM, 1066/1333 RDIMM (Xeon only) o Support 2 channels DDR3 o Up to 2 UDIMMs or 3 RDIMMs per channel o 16GB UDIMMs and 32GB max with RDIMMs o Up to 4 UDIMMs, up to 1333 MHz o Up to 6 RDIMMs, up to 1333 MHz (6 DIMMs at 800 MHz) Software RAID: Dell Software RAID is a chipset RAID enhanced version developed based on Intel chipset 3420. PERC S100 is purely a firmware/driver upgrade from Intel chipset. PERC S300, in addition to chipset firmware/driver upgrade, has a controller on the add-in PCIe adapter card. PERC S100 and S300 support Microsoft® operating systems only (no Linux® OS or virtualization solutions). Dell PowerEdge R310 Technical Guide 11 Dell 3 System Overview R310 is a 1S rack product designed to deliver value with flexible options allowing performance and redundancy for small businesses and scaling to the enterprise. The R310 is an ideal for small business and enterprise customers and offers features such as: • • • • • • Feature configurability Server management option with iDRAC features to help simplify your IT Security features with TPM, internal USB and IPv6 Competitive storage expandability and $/GB with 4 x 3.5” HDD, both cabled and hot swap Serviceability and diagnostics with optional interactive LCD Compact chassis depth of 24” (61 cm) to address space constraints including closets, shallow racks, mobile server enclosures, wall server enclosures, A/V racks and legacy server racks Table 2. Product Features Summary Feature Technical Specifications Form Factor 1-Socket 1U Rack Processors Quad-core Intel® Xeon® processors 3400 series Dual-core Intel® Core™ i3 processor 500 series Intel® Pentium® G6950 Dual-core Intel® Celeron® G1101 Processor Sockets 1 Cache 2MB, 3MB, 4MB and 8MB Chipset Intel® 3420 Chipset Memory1 Up to 48GB (6 DIMM slots) 1GB/2GB/4GB/8GB 1066 & 1333MHz I/O Slots 2 PCIe G2 slots: Slot 1: PCIe x16 (x8 routing), Full Height/Half Length Slot 2: PCIe x8 (x8 routing), Full Height /Half Length RAID Controller Internal Controllers: 6Gb/s SAS HBA PERC H200 (6Gb/s) PERC H700 (6Gb/s) with 512MB battery-backed cache; 512MB, 1GB Non-Volatile battery-backed cache SAS 6/iR PERC S100 (software based) PERC S300 (software based) Drive Bays Cabled or hot-swap options available: 4 hard drive chassis: 3.5” SAS and SATA or 2.5” SAS and SSD drives Maximum Internal Storage Up to 12TB Dell PowerEdge R310 Technical Guide 12 Dell Feature Technical Specifications Hard Drives1 3.5” cabled SATA (7.2K RPM): 160GB, 250GB, 500GB, 1TB, 2TB, 4TB 3.5” cabled Near Line SAS (7.2K RPM): 500GB, 1TB, 2TB, 4TB 3.5” hot-plug SAS (15K RPM): 146GB, 300GB, 450GB, 600GB, (10K RPM) 600GB 3.5” hot-plug SAS (10K RPM) 600GB 3.5” 6Gps SAS (7.2K): 2TB 2.5” hot-plug SAS (10K RPM): 146GB, 300GB 2.5” hot-plug SSD 50GB, 100GB Communications Intel® Gigabit ET Quad Port Server Adapter Intel Gigabit ET Dual Port Server Adapter Broadcom® NetExtreme™ II 5709 Dual-Port Gb Ethernet TOE Server Adapter Broadcom NetExtreme II 5709 Dual-Port Gb Ethernet TOE/iSCSI Offload Server Adapter Intel PRO/1000 PT Server Adapter Brocade® CNA Dual-port adapter Optional Add-In HBAs: Brocade FC4 and 8 GB HBAs Power Supply One non-redundant 350W power supply Two hot-pluggable redundant 400W hot-plug power supplies Availability Hot-plug hard drives, hot-plug redundant power supplies, DDR3 ECC memory, and quad-pack LED or an interactive LCD display screen Video Matrox® G200eW with 8MB Remote Management Optional iDRAC Express, iDRAC 6 Enterprise Systems Management Full OpenManage™ Support: BMC, IPMI2.0 compliant Lifecycle Controller enabled via optional: iDRAC6 Express, iDRAC6 Enterprise and vFlash Rack Support ReadyRails™ sliding rails with optional cable management arm for 4post racks (optional adapter brackets required for threaded hole racks); ReadyRails™ static rails for 2-post and 4-post racks Operating Systems Microsoft® Windows Server® 2012 Microsoft Windows Server 2012 Essentials Microsoft Windows® Essential Business Server 2008 Microsoft Windows Server 2008 SP2, x86/x64 (x64 includes Hyper-V®) Microsoft Windows Server 2008 R2, x64 (includes Hyper-V v2) Microsoft Windows HPC Server 2008 Novell® SUSE® Linux Enterprise Server Red Hat® Enterprise Linux® Dell PowerEdge R310 Technical Guide 13 Dell Feature Technical Specifications Solaris™ 10 05/10 (update 10) x86-64 Virtualization OS Options: Citrix® XenServer® Microsoft Hyper-V through Microsoft Windows Server 2008 VMware® vSphere® including ESX™ and ESXi™ Red Hat Enterprise Virtualization® For more information on the specific versions and additions, visit Dell.com/OSsupport. Featured Database Applications Microsoft® SQL Server® solutions (see Dell.com/SQL) Oracle® database solutions (see Dell.com/Oracle) 1 GB means 1 billion bytes and TB equals 1 trillion bytes; actual capacity varies with preloaded material and operating environment and will be less. Dell PowerEdge R310 Technical Guide 14 Dell 4 Mechanical 4.1 Chassis Description The R310 is a 1U /1 Socket rack mount chassis. The updated design includes a new LCD (Optional), bezel and hard-drive carriers. Additional changes include tool-less rack latches, a pull out tray for customer labels, supports persistent storage with internal USB and SD card slot and updated power supplies. 4.2 Dimensions and Weight Chassis Dimensions Xa Xb (Width) 482.4 434 mm (17.09 inch) Y (Height) 42.4 mm (1.69 inch) Figure 1. Za w/ bezel 35.0 Za w/o bezel 21.0 Zb (Depth) Zc 612.6 mm (24.12 inch) 641.9 Chassis Dimensions Weight: 15.0 Kg (33.02 lb) (maximum configuration) 4.3 Front Panel View and Features Front I/O panel access including USB and VGA interfaces. The following components are located on the front: • System Identification panel (Information tag): A slide-out panel for system identification labels including the Express Service tag, embedded NIC MAC address and iDRAC6 Enterprise card MAC address. Space has been provided for an additional label Dell PowerEdge R310 Technical Guide 15 Dell • • • • • • • • • 4.4 Power on indicator, power button NMI button (Non-maskable interrupt): A device sends an NMI to signal the processor about hardware errors; it is used to troubleshoot software and device driver errors when using certain operating system (2) USB connectors: Connects USB devices to the system. The ports are USB2.0 compliant Video connector LED menu buttons: Allows you to navigate the control panel LED menu Optional LCD panel: Provides system ID, status information, and system error messages System identification button Optical drive (optional) Hard drives Front View Cabled and Hot-Swap HDD Configurations Power Button Front video Quad Pack LED diagnostics ID button USB ports HDD0 Figure 2. Front video HDD1 Asset tag HDD2 Optical Disk Drive HDD3 Front View Cabled HDD Configuration—With LED LCD Diagnostics Power Button HDD0 Dell PowerEdge R310 Technical Guide USB ports ID button HDD1 Optical Disk Asset tag Drive HDD2 16 HDD Dell Figure 3. 4.5 Front View Hot-swap HDD Configuration with LCD Panel Back Panel View and Features The following components are located on the rear panel of the R610 enclosure: • (1) 15-pin VGA connector • (1) 9-pin serial port connector • (2) Integrated 10/100/1000 Ethernet RJ-45 connectors • (1) Rear system ID button • (1) Active ID Cable Management Arm external LED jack • (2) USB ports • (1) (Optional) iDRAC6 Enterprise RJ-45 port • (1) (Optional) iDRAC6 Express vFlash media slot • (2) PCIe slots Figure 4. Dell PowerEdge R310 Technical Guide Back Panel View 17 Dell 4.6 Power Supply Indicators The PSUs on the R310 have one status bi-color LED: green LED indicates that AC power is present to the system when the system is in standby mode. When the system is on, it also indicates that DC power has been applied to the system for AC power present and amber for a fault. Figure 5. Figure 6. For Non-Redundant PSU For Redundant PSU Not lit—AC power is not connected. Green—In standby mode, a green light indicates that a valid AC source is connected to the power supply and that the power supply is operational. When the system is on, a green light also indicates that the power supply is providing DC power to the system. Amber—Indicates a problem with the power supply. Alternating green and amber—When hot-adding a power supply, this indicates that the power supply is mismatched with the other power supply (a high output power supply and an Energy Smart power supply are installed in the same system). Replace the power supply that has the flashing indicator with a power supply that matches the capacity of the other installed power supply. For additional information regarding the power supply indicators, please refer to the Hardware Owner’s Manual. Dell PowerEdge R310 Technical Guide 18 Dell 4.7 NIC Indicators Figure 7 shows the NIC indicators. NIC Indicators Figure 7. Table 3 shows NIC indicator codes and their meanings. Table 3. NIC Indicator Codes Indicator Indicator Code No Link Off Link Indicator is Green The NIC is connected to a valid network link at 1000 Mbps. Link Indicator is Amber The NIC is connected to a valid network link at 10/100 Mbps. Activity Indicator is blinking Network data is being sent or received For additional information regarding the NIC indicators and their status please refer to the Hardware Owner’s Manual. 4.8 Side Views and Features Dell PowerEdge R310 Technical Guide Figure 8. Right Side Figure 9. Left Side 19 Dell 4.9 Internal Chassis Views Figure 10. Cable HDD Chassis with Single PSU Dell PowerEdge R310 Technical Guide 20 Dell Figure 11. Hot Plug HDD Chassis with Redundant PSU 4.10 Rails and Cable Management ReadyRailsTM Sliding Rails for 4-post Racks: • • • • • • • • • Support for tool-less installation in 19” EIA-310-E compliant square or unthreaded round hole 4-post racks including all generations of Dell racks Support for tooled installation in 19” EIA-310-E compliant threaded hole 4-post racks (requires the 1U Threaded Rack Adapter Brackets Kit) Support for full extension of the system out of the rack to allow serviceability of key internal components Support for optional cable management arm (CMA) Rail depth without the CMA: 714 mm Rail depth with the CMA: 835 mm Square-hole rack adjustment range: 686-883 mm Round-hole rack adjustment range: 672-876 mm Threaded-hole rack adjustment range: 651-897 mm Dell PowerEdge R310 Technical Guide 21 Dell ReadyRailsTM Static Rails for 4-post & 2-post Racks: • • • • • • 4.11 Support for tool-less installation in 19” EIA-310-E compliant square or unthreaded round hole 4-post racks including all generations of Dell racks Support for tooled installation in 19” EIA-310-E compliant threaded hole 4-post and 2-post racks Rail depth: 622 mm Square-hole rack adjustment range: 608-879 mm Round-hole rack adjustment range: 594-872 mm Threaded-hole rack adjustment range: 604-890 mm Fans There are up to five fans in the chassis when a redundant PSU is configured with the system or three if configured with non-redundant PSU. Refer to the figures below for further detail. Figure 12. Non-Redundant PSU Fan Configuration (3 Fans) Dell PowerEdge R310 Technical Guide 22 Dell Figure 13. Redundant PSU Fan Configuration (5 Fans) Additional details regarding the fans for the R310 include: • • • • The Embedded Server Management logic in the system will control and monitor the speed of the fans. A fan failure or over-temperature in the system will result in a notification from iDRAC6. The R310 power supply units do not have any integrated fans; they are cooled by the system fan in front of them. The system requires a PSU blank (metal cover) in place of the empty power supply slot. System fan speed is pulse-width modulated. Fans are non-redundant and not hot-swappable. 4.12 Cabling All cables are clearly marked with Dell part numbers. Dell PowerEdge R310 Technical Guide 23 Dell 4.13 Control Panel LED & LCD The R310 comes with an LED Configuration and an optional LCD. Slim ODD Bezel lock Front video Slim ODD Bezel lock Cable HDD config comes with Quad Figure 14. LED Control Panel 4.14 LED Status Description For a complete description of indicators, causes and possible courses of action to take to resolve errors, please refer to Diagnostic Lights section in the Hardware Owner’s Manual. 4.15 R310 LCD (Optional) Configuration The hot-swap HDD configuration comes with LCD panel diagnostics. Front Figure 15. System Control Panel Dell PowerEdge R310 Technical Guide 24 Dell The system control panel is located on the front of the system chassis to provide user access to buttons, display, and I/O interfaces. Features of the system control panel include: • • • • • • ACPI-compliant power button with an integrated green power LED (controlled by iDRAC6) 128x20 pixel LCD panel with controls o Two navigation buttons o One select button o One system ID button Non-Maskable Interrupt (NMI) button (recessed) Ambient temperature sensor Two external USB 2.0 connectors (with an internal USB connector and Internal SD Module) 15-pin VGA connector The LCD panel is a graphics display controlled by iDRAC6. Error codes can be sent to the display by either iDRAC6 or BIOS. The system's LCD panel provides system information and status messages to signify when the system is operating correctly or when the system needs attention. The LCD backlight is blue during normal operating conditions and changes to amber to indicate an error condition. When the system is in standby mode, the LCD backlight is off and can be turned on by pressing the Select button on the LCD panel. The LCD backlight will remain off if the "No Message" option is selected through the iDRAC6, the LCD panel, or other tools. BIOS has the ability to enter a “Secure Mode” through Setup, which locks the Power and NMI buttons. When in this mode, the Power button can still be used to turn on the system, but it cannot be used to turn off power to the system. Dell PowerEdge R310 Technical Guide 25 Dell 5 Security 5.1.1 Cover Latch The R310 comes with a coin lock entry latch on the top cover of the unit and provides security for the entire system. Also, the lock provides for tool-less access to the chassis. For specific information regarding the opening and closing of the system, please refer to the Opening and Closing the System section in the Hardware Owner’s Manual. 5.1.2 Bezel A metal bezel is an available option and is mounted to the chassis front to provide the Dell ID. A lock on the bezel prevents un-authorized access to system peripherals and the control panel. System status (via the LCD) remains viewable with the bezel is installed. For specific instructions regarding the operation of the bezel, see the Front Bezel (Optional) section in the Hardware Owner’s Manual. 5.1.3 Hard Drive Hot-Plug hard drives are only accessible by opening the bezel, thus locking the bezel secures the hard drives. Cabled Hard drives are only accessible by opening the top cover, thus locking the top cover will secure the hard drives. 5.1.4 Trusted Platform Module (TPM) The TPM is used to generate/store keys, protect/authenticate passwords, and create/store digital certificates. TPM can also be used to store the BitLocker keys for hard drive encryption feature in Microsoft® Windows Server® 2008. TPM is enabled through a BIOS option and uses HMAC-SHA1-160 for binding. In China, S-TPM (Socket TPM) is used. 5.1.5 Power Off Security The control panel is designed such that the Power switch cannot be accidentally activated. The lock on the bezel secures the Power button behind the bezel. In addition, there is a setting in the CMOS setup that disables the Power button function. 5.1.6 Intrusion Alert The Chassis Intrusion switch is located at the front panel board. The switch detects when the top cover is opened. USB ports USB ports Figure 16. Intrusion Detection Switch 5.1.7 Secure Mode The R310 BIOS has the ability to enter a secure boot mode via Setup. This mode includes the option to lock out the power and NMI switches on the Control Panel or set up a system password. Dell PowerEdge R310 Technical Guide 26 Dell 5.2 Battery A replaceable coin cell CR2032 3V battery is mounted on the planar to provide backup power for the RealTime Clock and CMOS RAM on the ICH9. Figure 17. Battery A battery holder for the PERC card is located behind HDD1 cage as shown in Figure 18. Battery Holder for PERC Figure 18. PERC Battery 5.3 Field Replaceable Units (FRU) The planar contains a serial EEPROM with FRU information including Dell part number, part revision level, and serial number. The backplane’s SEP and the power supplies’ microcontroller are also used to store FRU data. Parts available for field replacement include: • • • • • • 5.4 CMOS battery Expansion card Front bezel HDD I/O panel Memory • • • • • • ODD Power supply Processor Processor shroud System board System fan User Accessible Jumpers, Sockets, and Connectors Please refer to Jumpers and Connectors section in the Hardware Owner’s Manual. Dell PowerEdge R310 Technical Guide 27 Dell 6 Power, Thermal, Acoustic 6.1 Power Supplies The power supply subsystem consists of one or two AC/DC power supplies (1+1 redundant configuration) connected to the planar through the power distribution board (PDB). The power supply only provides +12V and +12Vaux. There are several voltage regulators in the system to supply different voltage levels needed by different logic devices. 6.1.1 Power Supply Specifications The standard R310 server system includes a single 350W (non-redundant) power supply. There is also an option for a 400W (redundant) power supply. Either power supply configuration will provide power to the R310 planar and the four internal hard drive bays. Power will be soft-switched, allowing power cycling through a switch on the front of the system enclosure, or through software control (that is, server management functions.) The power system is compatible with industry standards such as ACPI and Server 2000. For a redundant power supply configuration, the second power supply provides hot-swappable power redundancy. In redundant mode, the system distributes the power load across both power supplies to maximize efficiency. When a power supply is removed with the system powered on, the full power load is picked up by the remaining power supply. See Power Supplies in the Hardware Owner’s Manual for more information. Power supplies for the R310 do not have a FRU EEPROM. FRU data is stored in the memory of the PSU Microcontroller. Additionally, the PSU Firmware can be updated by the iDRAC over the PMBus. If using only one power supply, the single PSU should be installed in the PS1 bay and a PSU blank (metal cover) will be installed in the PS2 bay. The use of the PS1 bay for the single PSU configuration is for consistency and to ensure proper system cooling. 6.1.2 Power Supply Connectors There are 2 separate power supply connectors on the planar: one connector is an ATX connector (2x12), the other is a 2x2 connector to provide an additional two pins for +12V. (The connector pin definition is not ATX standard and is defined by power rating calculation.) The 2x12 connector provides 3.3V, 5V, 12V (P12VA) and 12V standby (P12V_AUX) to the system. (3.3V standby to system is generated from 12V standby.) The 2x2 connector provides 12V (P12VB) to CPU VRD 12V input. Dell PowerEdge R310 Technical Guide 28 Dell Figure 19. Power Input Connectors 6.2 Environmental Specifications Table 4 details environmental requirements for the R310 for operation and storage. Table 4. Environmental Requirements Temperature Operating 10° to 35°C (50° to 95°F) with a maximum temperature gradation of 10°C per hour (NOTE: For altitudes above 2950 feet, the maximum operating temperature is de-rated 1ºF/550 ft.) Storage –40° to 65°C (–40° to 149°F) with a maximum temperature gradation of 20°C per hour Relative Humidity Operating 8% to 85% (non-condensing) with a maximum humidity gradation of 10% per hour Storage 5% to 95% (non-condensing) Dell PowerEdge R310 Technical Guide 29 Dell Maximum Vibration Operating 0.25 G at 3–200 Hz for 15 min Storage 0.5 G at 3–200 Hz for 15 min Maximum Shock Operating One shock pulse in the positive z axis (one pulse on each side of the system) of 31 G for 2.6 ms in the operational orientation Storage Six consecutively executed shock pulses in the positive and negative x, y, and z axes (one pulse on each side of the system) of 71 G for up to 2 ms Altitude Operating –16 to 3048 m (–50 to 10,000 ft) (NOTE: For altitudes above 2950 feet, the maximum operating temperature is de-rated 1ºF/550 ft. Storage –16 to 10,600 m (–50 to 35,000 ft) Airborne Contaminant Level Class 6.3 G1 or lower as defined by ISA-S71.04-1985 Energy Star Compliance See Energy Star Compliance results on Dell.com. 6.4 Acoustics The acoustical design of the PowerEdge R310 reflects the following: • • • Adherence to Dell’s high sound quality standards. Sound quality is different from sound power level and sound pressure level in that it describes how humans respond to annoyances in sound, like whistles, hums, etc. One of the sound quality metrics in the Dell specification is prominence ratio of a tone, and this is listed in the table below. Noise ramp and descent at bootup. Fan speeds hence noise levels ramp during the boot process in order to add a layer of protection for component cooling in the case that the system were not to boot properly. Noise levels vs. configurations. The noise level of PowerEdge R310 is dependent upon the hardware configuration of the system. The table below shows the noise levels of R310 with different configurations. Table 5. Acoustical Information Configurations @ 23 ± 2 °C CPU 1 x Intel X3430 2.4 GHz CPU 1 x Intel X3470 DIMM PSU 2 x 2GB 1 x 350 W Nonredundant SAS 6i/R 2 x 400 W PERC H700 4 x 4GB Dell PowerEdge R310 Technical Guide RAID Card Operating Mode LWA-UL (Bels) LpA (dBA) PROMINENT TONES Standby 1.5 17 None Idle 5.5 39 None Stress 5.6 39 None Standby 1.8 17 None 30 Dell 2.4 GHz CPU Nonredundant Idle 5.9 43 None Stress 5.9 43 None Definitions Standby: AC Power is connected to Power Supply Units but system is not turned on. Idle: Reference ISO7779 (1999) definition 3.1.7; system is running in its OS but no other specific activity. Stressed Processor: An operating mode per ISO7779 (1999) definition 3.1.6. The software MemBW4 is activated to stress the processors. LwA – UL: The upper limit sound power level (LwA) calculated per section 4.4.2 of ISO 9296 (1988) and measured in accordance to ISO 7779 (1999). LpA: A-Weighted sound pressure level. The system is placed in a rack with its bottom at 75 cm from the floor. The acoustic transducer is at front bystander position, ref ISO7779 (1999) Section 8.6.2. Prominent tone: Criteria of D.5 and D.8 of ECMA-74 9th ed. (2005) are followed to determine if discrete tones are prominent. The system is placed in a rack with its bottom at 75 cm from the floor. The acoustic transducer is at front bystander position, ref ISO7779 (1999) Section 8.6.2. Dell PowerEdge R310 Technical Guide 31 Dell 7 Processors 7.1 Overview The PowerEdge R310 is based on the Intel FCLGA1156 to support Intel® Xeon® 3400 series and Intel® Core™ i3 processors. Features include: • Intel Hyper-Threading technology for 8-thread processing with quad-core performance • 8MB of Intel Smart Cache • Integrated memory controller (IMC) – 2ch DDR3 o Up to 4 U-DIMMs, up to 1333 MHz o Up to 6 R-DIMMs, up to 1333 MHz • Flexible PCI Express Configurations • Socket: LGA1156 Socket Dell PowerEdge R310 Technical Guide 32 Dell 7.2 Supported Processors Table 6. Supported Processors Model Speed Power Cache Cores Threads Turbo Memory Process Intel® Xeon® X3480 3.06GHz 95W 8M 4 8 Yes DDR3 1333 45nm Intel® Xeon® X3470 2.93GHz 95W 8M 4 8 Yes DDR3 1333 45nm Intel® Xeon® X3460 2.80GHz 95W 8M 4 8 Yes DDR3 1333 45nm Intel® Xeon® X3450 2.67GHz 95W 8M 4 8 Yes DDR3 1333 45nm Intel® Xeon® X3440 2.53GHz 95W 8M 4 8 Yes DDR3 1333 45nm Intel® Xeon® X3430 2.40GHz 95W 8M 4 4 Yes DDR3 1333 45nm Intel® Xeon® L3426 1.86GHz 45W 8M 4 8 Yes DDR3 1333 45nm Intel® Xeon® L3406 2.26GHz 30W 4M 2 4 Yes DDR3 1066 (UDIMM only) 32nm Intel® Core™ i3550 3.20GHz 73W 4M 2 4 No DDR3 1333 32nm Intel® Core™ i3540 3.06GHz 73W 4M 2 4 No DDR3 1333 32nm Intel® Core™ i3530 2.93GHz 73W 4M 2 4 No DDR3 1333 32nm Intel® Pentium® G6950 2.80GHz 73W 3M 2 2 No DDR3 1066 32nm Intel® Celeron® G1101 2.26GHz 73W 2M 2 1 No DDR3 1066 32nm 7.3 Processor Configurations The PowerEdge R310 is a single socket 1U rack server that operates in single-processor mode only. The memory controller is embedded in the processor. Dell PowerEdge R310 Technical Guide 33 Dell Figure 20. Processor Location Dell PowerEdge R310 Technical Guide 34 Dell 8 Memory 8.1 Overview The R310 utilizes DDR3 memory providing a high-performance, high-speed memory interface capable of low latency response and high throughput. Features include: • • • • • • • • • • Registered ECC DDR3 SDRAM DIMMs (RDIMM) or unbuffered ECC DDR3 SDRAM DIMMs (UDIMM) Six 72-bit (240-pin) sockets for DIMM memory modules on the R310 planar Support for up to 32 GB of RDIMM memory (with four 8 GB RDIMMs) Support for up to 16 GB of UDIMM memory (with four 4 GB UDIMMs) Support for 1066/1333 MHz single and dual rank DIMMs Support for 1066 MHz quad rank DIMMs Single DIMM configuration only with DIMM in socket A1 Single Bit Error Correction SDDC (Single Device Data Correction: x4 or x8 devices) Support for Advanced ECC mode Restrictions include: • No mixing of RDIMMs and UDIMMs • Non-ECC UDIMMs are not supported on R310 • Mixing ECC and non-ECC UDIMMs anywhere on the platform will prevent the system to boot/function correctly • No support for the following: o LV DIMMS o Quad-rank UDIMM o 256Mb/512Mb technology or x4 and x16 DRAMs on RDIMM o 256Mb technology, x4 DRAM on UDIMM and quad-rank UDIMM The R310 supports a minimum memory of 1GB upgradeable to 32GB of RAM, as shown in Table 7. Table 7. DIMMs Supported Unbuffered Registered DDR3 1333 1GB DIMM, Single Rank DDR3 1066 1GB DIMM, Single Rank DDR3 1066 1GB DIMM, Single Rank DDR3 1333 1GB DIMM, Single Rank DDR3 1066 2GB DIMM, Dual Rank DDR3 1066 2GB DIMM, Dual Rank DDR3 1333 2GB DIMM, Dual Rank DDR3 1333 2GB DIMM, Dual Rank DDR3 1066 4GB DIMM, Dual Rank DDR3 1066 4GB DIMM, Quad Rank DDR3 1333 4GB DIMM, Dual Rank DDR3 1333 4GB DIMM, Dual Rank DDR3 1066 8GB DIMM, Quad Rank 8.1.1 UDIMM Table 8 details UDIMM support for the R310. Dell PowerEdge R310 Technical Guide 35 Dell Table 8. 8.1.2 UDIMM Support System System DIMM DIMM DIMM NUM Capacity Memory Speed TYPE Capacity DIMM Speed Slot NUM Ranks 1 GB 1333 1333 U 1GB 1 1 1R 2 GB 1333 1333 U 1GB 2 1,2 1R 2 GB 1333 1333 U 2GB 1 1 2R 4 GB 1333 1333 U 1GB 4 1,2,3,4 1R 4 GB 1333 1333 U 2GB 2 1,2 2R 4 GB 1333 1333 U 4GB 1 1 2R 8 GB 1333 1333 U 4GB 2 1,2 2R 8 GB 1333 1333 U 2GB 4 1,2,3,4 2R 16 GB 1333 1333 U 4GB 4 1,2,3,4 2R RDIMM Table 9 details RDIMM Support on the R310. Table 9. RDIMM Support System System Memory Capacity Speed DIMM DIMM Speed TYPE DIMM NUM Capacity DIMM Slot NUM Ranks 1 GB 1333 1333 R 1GB 1 1 1R 2 GB 1333 1333 R 1GB 2 1,2 1R 2 GB 1333 1333 R 2GB 1 1 2R 4 GB 1333 1333 R 1GB 4 1,2,3,4 1R 4 GB 1333 1333 R 2GB 2 1,2 2R 4 GB 1066 1066 R 4GB 1 1 4R 6 GB 800 1333 R 1GB 6 1,2,3,4,5,6 1R 8 GB 1066 1066 R 4GB 2 1,2 4R 8 GB 1333 1333 R 2GB 4 1,2,3,4 2R 12GB 800 1333 R 2GB 6 1,2,3,4,5,6 2R 16 GB 800 1066 R 4GB 4 1,2,3,4 4R 16 GB 800 1066 R 4GB 4 1,2,3,4 4R 32 GB 800 1066 R 8GB 4 1,2,3,4 4R 4 GB 1333 1333 R 4GB 1 1 2R 8 GB 1333 1333 R 4GB 2 1,2 2R 16 GB 1333 1333 R 4GB 4 1,2,3,4 2R 24GB 800 1333 R 4GB 4 1,2,3,4,5,6 2R Dell PowerEdge R310 Technical Guide 36 Dell 8.2 Slots/Risers The PowerEdge R310 has 6 DIMM slots for memory and supports: • 1066/1333 UDIMM or RDIMM (Xeon® only; except L3206) • 2 channels/up to 2 UDIMM or 3 RDIMM per channel 8.3 Speed The memory frequency is determined by a variety of inputs: • • • Speed of the DIMMs Speed supported by the CPU Configuration of the DIMMs The memory speed of each channel depends on the memory configuration: • • For single- or dual-rank memory modules: – One memory module per channel supports up to 1333MHz – Two memory modules per channel supports up to 1066MHz For quad-rank memory modules: – One memory module per channel supports up to 1066Mhz – Two memory modules per channel are limited to 800MHz, regardless of memory module speed. If memory modules with different speeds are installed, they will operate at the speed of the slowest installed memory module(s). Table 10 shows the memory populations and the maximum frequency achievable for that configuration. Dell PowerEdge R310 Technical Guide 37 Dell Table 10. DIMM Type UDIMM RDIMM DIMM 0 DIMM 1 Memory Population DIMM 2 Number of DIMMS 800 1066 1333 SR 1 Yes Yes DR 1 Yes Yes SR SR 2 Yes Yes SR DR 2 Yes Yes DR DR 2 Yes Yes SR 1 Yes Yes DR 1 Yes Yes QR 1 Yes No SR SR 2 Yes Yes SR DR 2 Yes Yes DR DR 2 Yes Yes QR SR 2 Yes No No QR DR 2 Yes No No QR QR 2 Yes No No SR SR SR 3 Yes No No SR SR DR 3 Yes No No SR DR DR 3 Yes No No DR DR DR 3 Yes No No Note: SR=Single Rank, DR=Dual Rank, and QR=Quad Rank 8.4 Sparing Not supported. 8.5 Mirroring Not supported. 8.6 RAID R310 has no specific memory rules in supporting RAID. Dell PowerEdge R310 Technical Guide 38 Dell Table 11. System System Capacity Memory DIMM Speed Speed DIMM TYPE Supported Configurations DIMM Capacity NUM DIMM NUM Ranks Slot MEM Tech 1 GB 1333 1333 U 1GB 1 1 1R 1Gb 1 GB 1333 1333 R 1GB 1 1 1R 1Gb 2 GB 1333 1333 U 1GB 2 1,2 1R 1Gb 2 GB 1333 1333 U 2GB 1 1 2R 1Gb 2 GB 1333 1333 R 1GB 2 1,2 1R 1Gb 2 GB 1333 1333 R 2GB 1 1 2R 1Gb 4 GB 1333 1333 U 1GB 4 1,2,3,4 1R 1Gb 4 GB 1333 1333 U 2GB 2 1,2 2R 1Gb 4 GB 1333 1333 U 4GB 1 1 2R 2Gb 4 GB 1333 1333 R 1GB 4 1,2,3,4 1R 1Gb 4 GB 1333 1333 R 2GB 2 1,2 2R 1Gb 4 GB 1066 1066 R 4GB 1 1 4R 1Gb 6 GB 800 1333 R 1GB 6 1,2,3,4,5,6 1R 1Gb 8 GB 1333 1333 U 4GB 2 1,2 2R 2Gb 8 GB 1333 1333 U 2GB 4 1,2,3,4 2R 1Gb 8 GB 1066 1066 R 4GB 2 1,2 4R 1Gb 8 GB 1333 1333 R 2GB 4 1,2,3,4 2R 1Gb 12GB 800 1333 R 2GB 6 1,2,3,4,5,6 2R 1Gb 16 GB 1333 1333 U 4GB 4 1,2,3,4 2R 2Gb 16 GB 800 1066 R 4GB 4 1,2,3,4 4R 1Gb 32 GB 800 1066 R 8GB 4 1,2,3,4 4R 2Gb 4 GB 1333 1333 R 4GB 1 1 2R 2Gb 8 GB 1333 1333 R 4GB 2 1,2 2R 2Gb 16 GB 1333 1333 R 4GB 4 1,2,3,4 2R 2Gb 24 GB 800 1333 R 4GB 6 1,2,3,4,5,6 2R 2Gb Note: Desktop processor & Xeon L3206 support UDIMM memory configurations only. Dell PowerEdge R310 Technical Guide 39 Dell 9 Chipset 9.1 Overview The R310 planar incorporates the Intel 3420 as PCH chipset. The Intel 3420 is a highly integrated I/O controller. The following high-level features are supported by the chipset. 9.2 Direct Media Interface (DMI) Direct Media Interface (DMI) is the chip-to-chip connection between the processor and Intel 3420 chipset. This high-speed interface integrates advanced priority-based servicing allowing for concurrent traffic and true isochronous transfer capabilities. Base functionality is completely software-transparent, permitting current and legacy software to operate normally. 9.3 PCI Express Interface The Intel 3420 provides up to 8 PCI Express Root Ports, supporting the PCI Express Base Specification, Revision 2.0. Each Root Port supports 2.5 GB/s bandwidth in each direction (5 GB/s concurrent). PCI Express Root Ports 1-4 can be statically configured as four x1 Ports or ganged together to form one x4 port. Ports 5 and 6 can only be used as two x1 ports. 9.4 SATA Interface The Intel 3420 has two integrated SATA host controllers that support independent DMA operation on up to six ports and supports data transfer rates of up to 3.0 GB/s (300MB/s). The SATA controller contains two modes of operation – a legacy mode using I/O space, and an AHCI mode using memory space. Software that uses legacy mode will not have AHCI capabilities. The Intel 3420 supports the Serial ATA Specification, Revision 1.0a. The Intel 3420 also supports several optional sections of the Serial ATA II: Extensions to Serial ATA 1.0 Specification, Revision 1.0 (AHCI support is required for some elements). 9.5 AHCI The Intel 3420 provides hardware support for Advanced Host Controller Interface (AHCI), a new programming interface for SATA host controllers. Platforms supporting AHCI may take advantage of performance features such as no master/slave designation for SATA devices—each device is treated as a master—and hardware-assisted native command queuing. AHCI also provides usability enhancements such as Hot-Plug. AHCI requires appropriate software support (e.g., an AHCI driver) and for some features, hardware support in the SATA device or additional platform hardware. 9.6 Intel Rapid Storage Technology The Intel 3420 provides support for Intel® Rapid Storage Technology, providing both AHCI (see above for details on AHCI) and integrated RAID functionality. The industry-leading RAID capability provides highperformance RAID 0, 1, 5, and 10 functionality on up to 6 SATA ports of Intel 3420. Matrix RAID support is provided to allow multiple RAID levels to be combined on a single set of hard drives, such as RAID 0 and RAID 1 on two disks. Other RAID features include hot spare support, SMART alerting, and RAID 0 auto replace. Software components include an Option ROM for pre-boot configuration and boot functionality, a Microsoft Windows compatible driver, and a user interface for configuration and management of the RAID capability of Intel 3420. Dell PowerEdge R310 Technical Guide 40 Dell 9.7 PCI Interface The Intel 3420 PCI interface provides a 33 MHz, Revision 2.3 implementation. The Intel 3420 integrates a PCI arbiter that supports up to four external PCI bus masters in addition to the internal Intel 3420 requests. This allows for combinations of up to four PCI down devices and PCI slots. 9.8 Low Pin Count Interface (LPC) The Intel 3420 implements an LPC Interface as described in the LPC 1.1 Specification. The Low Pin Count (LPC) bridge function of the Intel 3420 resides in PCI Device 31:Function 0. In addition to the LPC bridge interface function, D31:F0 contains other functional units including DMA, interrupt controllers, timers, power management, system management, GPIO, and RTC. 9.9 Serial Peripheral Interface (SPI) The Intel 3420 implements an SPI Interface as an alternative interface for the BIOS flash device. An SPI flash device can be used as a replacement for the FWH, and is required to support Gigabit Ethernet, Intel® Active Management Technology and integrated Intel Quiet System Technology. The Intel 3420 supports up to two SPI flash devices with speed up to 50 MHz utilizing two chip select pins. 9.10 Compatibility Module (MDA Controller, Timer/Counters, Interrupt Controller) The DMA controller incorporates the logic of two 82C37 DMA controllers, with seven independently programmable channels. Channels 0–3 are hardwired to 8-bit, count-by-byte transfers, and channels 5–7 are hardwired to 16-bit, count-by-word transfers. Any two of the seven DMA channels can be programmed to support fast Type-F transfers. Channel 4 is reserved as a generic bus master request. The Intel 3420 supports LPC DMA, which is similar to ISA DMA, through the Intel 3420’s DMA controller. LPC DMA is handled through the use of the LDRQ# lines from peripherals and special encoding on LAD[3:0] from the host. Single, Demand, Verify, and Increment modes are supported on the LPC interface. The timer/counter block contains three counters that are equivalent in function to those found in one 82C54 programmable interval timer. These three counters are combined to provide the system timer function, and speaker tone. The 14.31818 MHz oscillator input provides the clock source for these three counters. The Intel 3420 provides an ISA-Compatible Programmable Interrupt Controller (PIC) that incorporates the functionality of two, 82C59 interrupt controllers. The two interrupt controllers are cascaded so that 14 external and two internal interrupts are possible. In addition, the Intel 3420 supports a serial interrupt scheme. All of the registers in these modules can be read and restored. This is required to save and restore system state after power has been removed and restored to the platform. 9.11 Advanced Programmable Interrupt Controller (APIC) In addition to the standard ISA compatible Programmable Interrupt controller (PIC) described in the previous section, the Intel 3420 incorporates the Advanced Programmable Interrupt Controller (APIC). 9.12 Universal Serial Bus (USB) Controllers The Intel 3420 contains up to two Enhanced Host Controller Interface (EHCI) host controllers that support USB high-speed signaling. High-speed USB 2.0 allows data transfers up to 480 Mb/s. The PCH also contains two Rate Matching Hubs (RMH) that support USB full speed and low-speed signaling. Dell PowerEdge R310 Technical Guide 41 Dell The Intel 3420 supports up to fourteen USB 2.0 ports. All fourteen ports are high-speed, full speed, and lowspeed capable. Real-Time Clock (RTC) 9.13 The Intel 3420 contains a Motorola MC146818A-compatible real-time clock with 256 bytes of battery-backed RAM. The real-time clock performs two key functions: keeping track of the time of day and storing system data, even when the system is powered down. The RTC operates on a 32.768 KHz crystal and a 3 V battery. The RTC also supports two lockable memory ranges. By setting bits in the configuration space, two 8-byte ranges can be locked to read and write accesses. This prevents unauthorized reading of passwords or other system security information. The RTC also supports a date alarm that allows for scheduling a wake up event up to 30 days in advance, rather than just 24 hours in advance. General Purpose Inputs and Outputs (GPIO) 9.14 Various general purpose inputs and outputs are provided for custom system design. The number of inputs and outputs varies depending on Intel 3420 configuration. Enhanced Power Management 9.15 The Intel 3420’s power management functions include enhanced clock control and various low-power (suspend) states (e.g., Suspend-to-RAM and Suspend-to-Disk). A hardware-based thermal management circuit permits software-independent entrance to low-power states. The Intel 3420 contains full support for the Advanced Configuration and Power Interface (ACPI) Specification, Revision 3.0a. Manageability 9.16 In addition to Intel AMT the Intel 3420 integrates several functions designed to manage the system and lower the total cost of ownership (TCO) of the system. These system management functions are designed to report errors, diagnose the system, and recover from system lockups without the aid of an external microcontroller. • • • • • TCO Timer. The Intel 3420’s integrated programmable TCO timer is used to detect system locks. The first expiration of the timer generates an SMI# that the system can use to recover from a software lock. The second expiration of the timer causes a system reset to recover from a hardware lock. Processor Present Indicator. The Intel 3420 looks for the processor to fetch the first instruction after reset. If the processor does not fetch the first instruction, the Intel 3420 will reboot the system. ECC Error Reporting. When detecting an ECC error, the host controller has the ability to send one of several messages to the Intel 3420. The host controller can instruct the Intel 3420 to generate either an SMI#, NMI, SERR#, or TCO interrupt. Function Disable. The Intel 3420 provides the ability to disable the following integrated functions: LAN, USB, LPC, Intel HD Audio, SATA, PCI Express or SMBus. Once disabled, these functions no longer decode I/O, memory, or PCI configuration space. Also, no interrupts or power management events are generated from the disabled functions. Intruder Detect. The Intel 3420 provides an input signal (INTRUDER#) that can be attached to a switch that is activated by the system case being opened. The Intel 3420 can be programmed to generate an SMI# or TCO interrupt due to an active INTRUDER# signal. Dell PowerEdge R310 Technical Guide 42 Dell 9.17 System Management Bus (SMBus 2.0) The Intel 3420 contains an SMBus Host interface that allows the processor to communicate with SMBus slaves. This interface is compatible with most I2C devices. Special I2C commands are implemented. The Intel 3420’s SMBus host controller provides a mechanism for the processor to initiate communications with SMBus peripherals (slaves). Also, the Intel 3420 supports slave functionality, including the Host Notify protocol. Hence, the host controller supports eight command protocols of the SMBus interface (see System Management Bus (SMBus) Specification, Version 2.0): Quick Command, Send Byte, Receive Byte, Write Byte/Word, Read Byte/Word, Process Call, Block Read/Write, and Host Notify. Intel 3420’s SMBus also implements hardware-based Packet Error Checking for data robustness and the Address Resolution Protocol (ARP) to dynamically provide address to all SMBus devices. 9.18 Intel Anti-Theft Technology The Intel 3420 introduces a new hardware-based security technology which encrypts data stored on any SATA compliant HDD in AHCI Mode. This feature gives the end-user the ability to restrict access to HDD data by unknown parties. Intel® Anti-Theft Technology can be used alone or can be combined with software encryption applications to add protection against data theft. Intel® Anti-Theft Technology functionality requires a correctly configured system, including an appropriate processor, Intel Management Engine firmware, and system BIOS support. 9.19 Intel Virtualization Technology for Directed I/O The Intel 3420 provides hardware support for implementation of Intel® Virtualization Technology with Directed I/O (Intel® VT-d). Intel VT-d Technology consists of technology components that support the virtualization of platforms based on Intel® Architecture Processors. Intel VT-d Technology enables multiple operating systems and applications to run in independent partitions. A partition behaves like a virtual machine (VM) and provides isolation and protection across partitions. Each partition is allocated its own subset of host physical memory. 9.20 JTAG Boundary-Scan Intel 3420 adds the industry standard JTAG interface and enables Boundary-Scan in place of the XOR chains used in previous generations of the Intel 3420. Boundary-Scan can be used to ensure device connectivity during the board manufacturing process. The JTAG interface allows system manufacturers to improve efficiency by using industry available tools to test the Intel 3420 on an assembled board. Since JTAG is a serial interface, it eliminates the need to create probe points for every pin in an XOR chain. This eases pin breakout and trace routing and simplifies the interface between the system and a bed-of-nails tester. Dell PowerEdge R310 Technical Guide 43 Dell 10 BIOS 10.1 Overview The R310 BIOS is based on the Dell BIOS core, and supports the following features: • • • • • • • • • • • • • • • • • • • • • • • • • • • • • • • • • • • • • • 10.2 • • • 1S Support System BIOS System Setup Onboard PCI video BIOS support SATA enabled for CDROM and HDD PCI FW3.0 compliant PCI-to-PCI bridge 1.0 compliant Plug and Play BIOS 1.0a compliant MP 1.4 SMBIOS 2.5 USB 1.1 with legacy USB support USB 2.0 support in BIOS during pre-boot Dell Server Assistant 7.0 support System Service support iDRAC supported Error logging through ESM ACPI 2.0 support (S0, OS-S4, S5 states) I2O v1.5 ready Selectable Boot support based on BIOS Boot Specification v1.01 El Torito CD-ROM Boot 1.0 Remote BIOS Update support Remote Configuration Interface (RCI) support Console redirection via COM1 PXE support based on Preboot Execution Environment Specification v2.1 2-byte ID support ePPID support in flash Memory remapping support DDR3 UDIMM and RDIMM memory support UEFI shell Support BMC and iDRAC6 Express support Intel® Virtualization Technology for Directed I/O Intel® I/O Acceleration Technology AC recovery staggering power-up DIMM mismatch checking Support for multiple power profiles Maximum performance OS Control (Demand-Based Switching(DBS)) Active Power Controller Supported ACPI States ACPI compliance: S0, S4, S5 supported NO S1, S2, S3 (STR) support S4 will be supported by OS support only Dell PowerEdge R310 Technical Guide 44 Dell Table 12. 10.3 Supported ACPI States Wake Up Events States Can Wake From RTC S5, OS-S4 Power Button S5, OS-S4 RI# Not supported PME# S5, OS-S4 KB Not supported MOUSE Not supported USB Not supported WOL S5, OS-S4 Power Management Modes 10.3.1 Dell Active Power Controller The Dell Active Power Controller (DAPC) is a Dell proprietary implementation. DAPC is implemented in system BIOS and uses hardware level counters, etc. to determine hardware utilization. The BIOS uses this information to determine when to change the processor’s operating frequency. The DAPC is OS independent. This provides a consistent power management solution regardless of the installed OS. 10.3.2 Power-Saving BIOS Setting (OS Control) Intel processors support Demand-Based Switching (DBS) which enables the processor to dynamically change its operating frequency in response to workload changes. The industry-standard implementation of this power management feature is in the OS. The OS monitors process/thread-level utilization of the processor and uses processor controls to change the processor’s operating frequency. For heavy workloads, the OS will run the processor at higher frequencies for additional performance. Lighter workloads do not need high performance, thus the OS will run the processor at lower frequencies. 10.3.3 Maximum Performance The Maximum Performance Mode disables power management. In this mode, the processor frequency is statically set to the highest supported frequency. The power management features are implemented via two categories: fixed or generic. Fixed features use bits defined in the ACPI specification for specific capabilities. The fixed feature bits give the OS complete control over the power management of a device since the location of the bits is given to the OS in the FACP table. Thus, a driver can directly access bits to control a device’s power management. Generic features have defined enable and status bits, but the functionality is not fully visible to the OS. Dell provides ASL code to handle the details of generic features, allowing the OS to intelligently communicate with systemspecific hardware. The following table summarizes power management features on this system. Dell PowerEdge R310 Technical Guide 45 Dell Table 13. Power Management Features on the R310 Feature Type Enable/Status/ Ctrl bit location Description ACPI mode switch Fixed PCH The OS uses the SCI_EN bit to switch from legacy mode to ACPI mode. Sleep states Fixed PCH Supported states: S0 (Working), S4-OS (‘Hibernation’ in W2K), and S5 (Soft-off). S1 (also called ‘standby’ or ‘suspend’) and S3 are not supported. Power Button Fixed PCH In ACPI mode, OS has control of the power button. In nonACPI mode, SMI handler owns power button events. Real-Time Clock Fixed PCH The OS is able to configure the system to wake on the RTC alarm. Power Mgmt. Timer Fixed PCH 24-bit power management timer is used. Power Mgmt. Event (PME) Generic PCH Each host bus’s PME# signal is routed to a separate generalpurpose event pin in the chipset. When a device signals PME#, the system wakes (if necessary), the OS detects the event, and a Dell-defined ASL routine handles the event. Wake-onLAN is one example of a PME. USB wake Generic N/A This feature is not supported on this system since the S1 state is not supported. DBS N/A Processor MSRs This feature does P state transition under Windows C State Support N/A Processor and PCH registers This feature allows multiple C state supports for Processor. This feature will work under Windows and ACPI OS that understand C states. Power Profile support N/A Processor/IMC and PCH chipset registers. 11G Servers will be the most energy smart servers that Dell will ship. In addition to P,C and T states, BIOS will expose the Power Profiles to the OS. Each Power profile will have a specific settings and it will fine tune processor, MCH, IOH and South Bridge. For detailed explanation on how this feature works, please look at BIOS Power Management specification located in Design Docs under R310 engineering. Here are the current Power profiles that 11G BIOS will expose in BIOS setup. Dell PowerEdge R310 Technical Guide 46 Dell Table 14. Maximum Performance Current Power Profiles DBPM Disabled ( BIOS will set P-State to MAX) Memory frequency = Maximum Performance Fan algorithm = Maximum Performance OS Control Enable OS DBPM Control (BIOS will expose all possible P states to OS) Memory frequency = Maximum Performance Fan algorithm = Minimum Power Active Power Controller Enable Dell System DBPM (BIOS will not make all P states available to OS) Memory frequency = Maximum Performance Fan algorithm = Minimum Power Custom CPU Power and Performance Management: Maximum Performance | Minimum Power | OS DBPM | System DBPM Memory Power and Performance Management: Maximum Performance |1333Mhz |1067Mhz |800Mhz| Minimum Power Fan Algorithm Maximum Performance | Minimum Power Dell PowerEdge R310 Technical Guide 47 Dell 11 Embedded NICs/LAN on Motherboard (LOM) 11.1 Overview Broadcom® 5716C LOMs are the layer 2 networking LOM option on the PowerEdge R310. Dual port 5716C controller-based LOMs on the R310 support multiple functions over a unified fabric to help manage Ethernet, iSCSI and remote management traffic on each port simultaneously. The BCM5716 LOM provides dual 10/100/1000BASE-T Gigabit Ethernet functions, an IEEE802.3-compliant media access controller (MAC), and a UTP copper physical layer transceiver solution for high-performance network applications. 11.2 Multiple Speed Support The BCM5716C LOM includes dual 10/100/1000-Mbps Ethernet MACs with both half-duplex and full-duplex capability and a dual 10/100/1000 copper PHY. Both Ethernet ports are fully compatible with the IEEE 802.3 standard for auto-negotiation of speeds. It supports VLAN tagging, layer 2 priority encoding, link aggregation, and full-duplex flow control 802.3 functions in the MAC. 11.3 PCI Express Compliance BCM5716C LOM supports a x4 PCI Express® v2.0- and v1.1-compliant bus interface. The device provides large on-chip buffer memory to compensate for rate differences between the host and the wire. Additionally, several plug-and-play enhancements have been added to make the device even more user-friendly. 11.4 Diagnostics A link quality indicator can be combined with the link speed LED to give installers an instant visual indication if there are any issues with the wiring plant supporting operation at the desired speed. This includes physical wiring of defects or channel conditions. The Broadcom remote cable management and diagnostics software (Broadcom Advanced Control Suite [BACS]) can be used with the device to provide remote management of the cable and a first level of diagnostics and fault isolation. BCM5716C LOM continually monitors various channel conditions. The wirespeed capability allows the LOM to force auto-negotiation to be automatically limited by the speed that the channel can reliably support rather than the performance of the end equipment. 11.5 Power Management Adapter speed connection when the system is in D0 uninitialized or D3 Cold state for a wake-up signal may be at 100 Mbps, but can return to 1000 Mbit/s when the system is up and running if connected to a 1000 Mbps capable switch. Dell supports Wake on LAN (WOL) on only one LOM port in the system at a time. See Using the System Setup Program and UEFI Boot Manager section of the Hardware Owner’s Manual for more information. 11.6 Setting Power Management Options You can set power management options to allow the operating system to turn off the controller to save power or to allow the controller to wake up the computer. However, if the device is busy (servicing a call, for example), the operating system will not shut down the device. The operating system attempts to shut Dell PowerEdge R310 Technical Guide 48 Dell down every possible device only when the computer attempts to go into hibernation. To have the controller stay on at all times, do not click the Allow the computer to turn off the device to save power check box. See Using the System Setup Program and UEFI Boot Manager section of the Hardware Owner’s Manual for more information. 11.7 Broadcom Advanced Control Suite 3 Broadcom Advanced Control Suite 3 (BACS), a component of the Broadcom teaming software, is an integrated utility that provides useful information about each network adapter that is installed in your system. The BACS 3 utility also enables you to perform detailed tests, diagnostics, and analyses on each adapter, as well as to modify property values and view traffic statistics for each adapter. Microsoft .NET Framework 2.0 includes the runtime and associated files needed to run BACS 3, and must be installed on your system in order for BACS 3 to operate. For optimal performance of BACS 3, Broadcom recommends .NET Framework 2.0 SP1, .NET Framework 3.0 SP1, or .NET Framework 3.5, depending on your operating system. 11.8 Teaming Using the Broadcom teaming software, you can split your network into virtual LANs (VLANs) as well as group multiple network adapters together into teams to provide network load balancing and fault tolerance functionality. For Linux®, customer is requested to use standard Linux teaming software as Broadcom CNIC LOM are fully compliant with it. Broadcom Advanced Server Program (BASP) is the Broadcom teaming software for the Windows family of operating systems. BASP runs within the Broadcom Advanced Control Suite 3 (BACS) utility. BASP provides heterogeneous support for LOM and adapter teaming to include all of the Broadcom BCM5716C controllers Note: The use of any form of teaming (Smart Load Balancing, Generic Trunking, or Link Aggregation) with the iSCSI boot device is not supported; however, teaming can still be configured on other devices in the system BASP supports four types of teams for Layer 2 teaming: • Smart Load Balancing and Failover • Link Aggregation (802.3ad) • Generic Trunking (FEC/GEC)/802.3ad-Draft Static • SLB (Auto-Fallback Disable) Dell PowerEdge R310 Technical Guide 49 Dell Table 15. Smart Load Balancing Operating system Failover/Fallback—All Broadcom Failover/Fallback—Multivendor Protocol IP IPX NetBEUI IP IPX NetBEUI Windows Server® 2003 SP2 Y Y N/S Y N N/S Windows Server® 2008 Y Y N/S Y N N/S Windows Server® 2008 R2 Y Y N/S Y N N/S Operating system Load Balance—All Broadcom Load Balance—Multivendor Protocol IP IPX NetBEUI IP IPX NetBEUI Windows Server® 2003 SP2 Y Y N/S Y N N/S Windows Server® 2008 Y Y N/S Y N N/S Windows Server® 2008 R2 Y Y N/S Y N N/S Legend: Y = yes N = no N/S = not supported Table 16. Teaming Type Teaming Types and Detail Switch-Dependent (Switch must support specific type of team) Load Balancing Failover Smart Load Balancing and Failover (with two to eight load balance team members) SLB (Auto-Fallback Disable) Link Aggregation (802.3ad) Generic Trunking (FEC/GEC)/802.3adDraft Static Dell PowerEdge R310 Technical Guide Link Aggregation Control Protocol Support Required on the Switch 50 Dell Table 17. Software Component Miniport Driver Intermediate Driver Broadcom Teaming Software Component Broadcom Name Network Adapter/Operating System System Architecture Windows File Name Virtual Bus Driver (VBD) BCM5708, BCM5709 32-bit bxvbdx.sys BCM5708, BCM5709 64-bit bxvbda.sys BCM57710, BCM57711 32-bit evbdx.sys BCM57710, BCM57711 64-bit evbda.sys Windows Server® 2003 (NDIS 5.1) 32-bit bxnd51x.sys Windows Server® 2003 (NDIS 5.1) 64-bit bxnd51a.sys Windows Server® 2003 (NDIS 5.2) Driver supports Layer 4 32-bit bxnd52x.sys Windows Server® 2003 (NDIS 5.2) Driver supports Layer 4 64-bit bxnd52a.sys Windows Server® 2008 (NDIS 6.0) 32-bit bxnd60x.sys Windows Server® 2008 (NDIS 6.0) 64-bit bxnd60a.sys Windows Server® 2008 R2 (NDIS 6.0) 64-bit bxnd60a.sys Windows Server® 2003 Broadcom® Base Driver Broadcom® Advanced Server Program (BASP) 32-bit baspxp32.sys ® 64-bit basamd64.sys ® 32-bit, 64-bit basp.sys ® Windows Server 2008 R2 64-bit basp.sys – – bacs.exe Windows Server 2003 Windows Server 2008 Configuration User Interface 11.9 ® Broadcom Advanced Control Suite 3 (BACS) VLAN Virtual LANs (VLANs) allow you to split your physical LAN into logical parts, to create logical segmentation of workgroups, and to enforce security policies for each logical segment. Each defined VLAN behaves as its own separate network with its traffic and broadcasts isolated from the others, increasing bandwidth efficiency within each logical group. Up to 64 VLANs (63 tagged and 1 untagged) can be defined for each Broadcom adapter on your server, depending on the amount of memory available in your system. VLANs can be added to a team to allow multiple VLANs with different VLAN IDs. A virtual adapter is created for each VLAN added. Although VLANs are commonly used to create individual broadcast domains and/or separate IP subnets, it is sometimes useful for a server to have a presence on more than one VLAN simultaneously. Broadcom Dell PowerEdge R310 Technical Guide 51 Dell adapters support multiple VLANs on a per-port or per-team basis, allowing very flexible network configurations. 11.10 Preboot Environment Broadcom 5716C LOM support Preboot Execution Environment (PXE), iSCSI BOOT, and Bootstrap Protocol (BootP). Multi-Boot Agent (MBA) is a software module that allows your network computer to boot with the images provided by remote servers across the network. The Broadcom MBA driver complies with the PXE 2.1 specification and is released with both monolithic and split binary images. This provides flexibility to users in different environments where the motherboard may or may not have built-in base code. The MBA module operates in a client/server environment. A network consists of one or more boot servers that provide boot images to multiple computers through the network. The Broadcom implementation of the MBA module has been tested successfully in the following environments: • • • • • • Red Hat® PXE Server. Broadcom PXE clients are able to remotely boot and use network resources (NFS mount, and so forth) and to perform Linux installations. In the case of a remote boot, the Linux universal driver binds seamlessly with the Broadcom Universal Network Driver Interface (UNDI) and provides a network interface in the Linux remotely-booted client environment. Intel APITEST. The Broadcom PXE driver passes all API compliance test suites. MS-DOS UNDI. The MS-DOS Universal Network Driver Interface (UNDI) seamlessly binds with the Broadcom UNDI to provide a network adapter driver interface specification (NDIS2) interface to the upper layer protocol stack. This allows computers to connect to network resources in an MS-DOS environment. Remote Installation Service (RIS). The Broadcom PXE clients are able to remotely boot to a Windows Server 2003 (SP1 and older) system running RIS to initialize and install Windows Server 2003 and prior operating systems. To extend functionalities beyond basic network connectivity when loading an operating system through RIS, see Using the NetXtreme II Monolithic Driver. Windows Deployment Service (WDS). For Windows Server 2003 SP2, RIS was replaced by WDS, which offers a Broadcom PXE client to install Windows operating systems, including Windows Server 2008 and Windows Server 2008 R2. To extend functionalities beyond basic network connectivity when loading an operating system through WDS, see Using the NetXtreme II Monolithic Driver. Automated Deployment Service (ADS). The Broadcom PXE client can connect to a Windows Server 2003 system and run a deployment agent that allows one to perform some administrative functions, including, but not limited to, deploying a Windows Server 2003 image. To extend functionalities beyond basic network connectivity when loading an operating system through ADS, see Using the NetXtreme II Monolithic Driver. 11.11 iSCSI Boot BCM5716C offers iSCSI boot technology, which allows a diskless boot of OS from an iSCSI target machine remotely located over a standard IP network (LAN or SAN). The benefits are: • Lower hardware purchase cost—no disk, less space • Reduced operating cost—less power/cooling • Greater HW reliability—no disk failures • Simplified management—centralized upgrades • Greater SW integrity/availability—fewer backups • Faster recovery—no need to rebuild servers • Protocol Simplicity—standard storage interface • Greater Security—SAN isolation prevents hacking • Major Operating System support • Appears to the host OS as a local disk Dell PowerEdge R310 Technical Guide 52 Dell • Common interrupt vector as a disk drive iSCSI boot operates in two phases: • • Pre-OS iSCSI boot option ROM will establish a connection to an iSCSI target using statically configured parameters or dynamically. After establishing an iSCSI connection to a remote iSCSI target, the iSCSI boot host software will also install a legacy Int13h style interface to allow the remote iSCSI target to act as if it were a local hard drive. 11.12 Diagnostic Tests The Diagnostic Tests option on the Diagnostics tab lets you check the state of the physical components on a Broadcom network adapter. You can trigger the tests manually, or choose to have BACS 3 continuously perform them. If the test are performed continuously, then the number of passes and fails in the Status field for each test increments every time the tests are performed. For example, if a test is performed four times and there are no fails, the value in the Status field for that test is 4/0. However, if there were 3 passes and 1 fail, the value in the Status field is 3/1. Notes: • You must have administrator privileges to run diagnostic tests. • The network connection is temporarily lost while these tests are running. • This option is available for Broadcom NetXtreme II VBD drivers. • Some tests are not supported on all Broadcom adapters. 11.13 Flow Control Enables or disables the receipt or transmission of PAUSE frames. PAUSE frames allow the network adapter and a switch to control the transmit rate. The side that is receiving the PAUSE frame momentarily stops transmitting. 11.14 Network Controller Sideband Interface (NC-SI) BCM5716C support NC-SI. Industry standard. NC-SI is used to enable a common interface definition between different Management Controller and Network Controller for out-of-band manageability and functionality such as Remote Media (R-Media) and Remote Keyboard-Video-Mouse (R-KVM). This specification addresses not only the electrical and protocol specifications, but also the system-level behaviors for the Network Controller and the Management Controller related to the NC-SI. 11.15 IPv4 and IPv6 Checksum Offload Normally, the checksum function is computed by the protocol stack. When you select one of the Checksum Offload property values (other than None), the checksum can be computed by the network adapter. • Rx Enabled. Enables receive TCP/IP/UDP checksum offload. • Tx Enabled. Enables transmit TCP/IP/UDP checksum offload. • Tx/Rx Enabled (default). Enables transmit and receive TCP/IP/UDP checksum offload. • None. Disables checksum offload. Dell PowerEdge R310 Technical Guide 53 Dell 11.16 IPv4 and IPv6 Large Send Offload Normally, the TCP segmentation is done by the protocol stack. When you enable the Large Send Offload property, the TCP segmentation can be done by the network adapter. The default setting for this property is Enabled. 11.17 Jumbo MTU Enables the network adapter to transmit and receive oversized Ethernet frames that are greater than 1514 bytes, but less than or equal to 9000 bytes in length (9600 bytes for network adapters that operate at 10 Gbps). This property requires the presence of a switch that is able to process jumbo frames. This property is only available for Broadcom NetXtreme II adapters. 11.18 LSO and Jumbo Frames Enables the network adapter to transmit and receive oversized Ethernet frames that are greater than 1514 bytes, but less than 9000 bytes in length. This property requires the presence of a switch that is able to process Jumbo frames. This information is available for some Broadcom® NetXtreme® adapters but is not available for all Broadcom NetXtreme II adapters. 11.19 Wake-Up Capabilities Enables the network adapter to wake up from a low-power mode when it receives a network wakeup frame. Two types of wake-up frames are possible: Magic Packet™ and Wake Up Frame. This property is only available for Broadcom NetXtreme adapters. Both (default). Selects both Magic Packet and Wake Up Frame as wake-up frames. Magic Packet. Selects Magic Packet as the wake-up frame. None. Selects no wake-up frame. Wake Up Frame. Selects Wake Up Frame as the wake-up frame and allows the network adapter to wake the system when an event such as a ping or an Address Resolution Protocol (ARP) request is received. This option works in conjunction with the operating system power mode saving and does not work if the Power Save setting does not enable WOL. 11.20 WOL Settings Sets the speed at which the network adapter connects to the network while the network adapter is in Wake on LAN mode. By default, the WOL Speed property is set to Auto. This property is only available for Broadcom NetXtreme adapters. • 10 Mb. Sets the speed to 10 Mbit/s. This is the network speed when the system is in a standby mode awaiting a wakeup frame. • 100 Mb. Sets the speed to 100 Mbit/s. • Auto (default). Sets the speed for optimum network connection. 11.21 Virtualization Functionality Broadcom has partnered with various VM vendors, including VMware®, to remove some of the virtualization bottlenecks and improve system performance by providing additional features. Broadcom Ethernet network controllers support stateless offloads such as TCP Checksum Offload (CSO), which enables network adapters to compute TCP checksum on transmit and receive, and TCP Large Send Offload (LSO), which allows TCP layer to build a TCP message up to 64 KB long and send it in one call down the stack through IP and the Ethernet device driver, saving the host CPU from having to compute the checksum in a virtual environment. Dell PowerEdge R310 Technical Guide 54 Dell Jumbo frame support in virtual environments also saves CPU utilization due to interrupt reduction and increases throughput by allowing the system to concentrate on the data in the frames, instead of the frames around the data. NetQueue in VMware enables BCM5716C to provide extended performance benefits that meet the demands of bandwidth intensive applications requiring high performance and higher networking throughput in a virtual environment NetQueue support of BCM5716C in VMware removes single queue bottlenecks, and use of stateful offloads such as TCP offload and iSCSI hardware-based acceleration in virtual environments is proven to provide excellent performance on VM. 11.22 Usage of Multiple Queues Current hardware trends of increased processor core density are leading to an increased number of VMs requiring more CPU cycles to route packets to the VMs. For example, it is common today to expect to have quad core processors on each blade. That indicates 2^3 blades * 2^2 threads = 2^5 threads per chassis. By utilizing the hardware queues provided by the network controller, VM vendors have eliminated the single thread limitation in a traditional OS and have optimized the hypervisor for multiple hardware threads. The first attempt to address these problems is to offload these tasks into BCM5716C, where the transport queue manager can transmit packets from multiple queues and can steer the receive packets into multiple queues. By dedicating Tx/Rx queue pair to a VM, the network adapter can provide DMA to and from the VM’s memory, and vSwitch will only process the control plane operation. Figure 21. BCM5716C LOM’s Multiple Queues in Virtual Environment 11.23 LOM Performance BCM5716C LOM has been designed to work in various workload environments and described below. End customers are encouraged to enable Broadcom LOM for following environments. Dell PowerEdge R310 Technical Guide 55 Dell Table 18. LOM Performance Gartner Categorization Workload Payload Size R/W % Ran/Seq% Queue Depth Broadcom LOM Web Infrastructure Webservers, Media Streaming, Video on Demand 4K—512K 95/5 75/25 1-64 Recommended Collaborative Exchange Email 4K 67/33 100/0 1-64 Recommended IT infrastructure File Servers 8K 98/2 0/100 1-64 Recommended Business Processing DBMS (OLTP), ERP, CRM 8k 70/30 100/0 1-64 Recommended Decision Support Webserver Logs, SQL Logs 8K, 64K 0/100 0/100 1-64 Recommended BCM5716C have Interrupt Coalescing feature enabled for end customers who want to tweak the performance for smaller packet sizes. Figure 22. Broadcom LOM Dell PowerEdge R310 Technical Guide 56 Dell 12 I/O Slots 12.1 Overview Table 19. Slot Connector Slot1 X16 Routing lanes Technology Silkscreen X8 PCIe 2.0 (5GT/s) SLOT1 PCIE_G2_x8 Full height Half length X8 PCIe 2.0 (5GT/s) SLOT2 PCIE_G2_x8 Full height Half length Slot2 X8 12.2 Quantities and Priorities Table 20. Category Internal Controllers External Controllers FC HBAs NICs PCIe Slot Specification Height Length I/O Slots Quantities and Priorities Card Priority Description Width Maximum Cards Slot Priority 100 PERC S300 Modular x4 Gen1 1 Slot 3 200 SAS 6/iR Modular x4 Gen1 1 Slot 3 300 PERC H700 Adapter x8 Gen2 1 Slot 2 300 PERC H700 Adapter NV RAM x8 Gen2 1 Slot 2 400 PERC H200 Adapter x8 Gen2 1 Slot 2 500 PERC H800 512MB Adapter x8 Gen2 2 Slot 1, 2 500 PERC H800 512MB Adapter NV RAM x8 Gen2 2 Slot 1, 2 600 6Gbps SAS HBA x8 Gen2 2 Slot 1, 2 800 QLE2562 FC8 Dual Channel HBA x8 Gen1 2 Slot 1, 2 900 LPe12002 FC8 Dual Channel HBA x8 Gen1 2 Slot 1, 2 1000 QLE2560 FC8 Single Channel HBA x8 Gen1 2 Slot 1, 2 1100 LPe12000 FC8 Single Channel HBA x8 Gen1 2 Slot 1, 2 1200 Intel Gigabit ET Quad Port Server Adapter x4 Gen2 2 Slot 1, 2 1300 Intel Gigabit ET Dual Port Server Adapter x4 Gen2 2 Slot 1, 2 1400 Broadcom NetExtreme II 5709 Dual-Port Gb Ethernet TOE Server Adapter x4 Gen1 2 Slot 1, 2 1500 Broadcom NetExtreme II 5709 Dual-Port Gb Ethernet TOE/iSCSI Offload Server Adapter x4 Gen1 2 Slot 1, 2 Dell PowerEdge R310 Technical Guide 57 Dell Category SCSI Controllers Card Priority Description Width Maximum Cards Slot Priority 1600 Intel PRO/1000 PT Server Adapter x1 Gen1 2 Slot 1, 2 1700 LSI2032 PCIe SCSI HBA (Sasquatch) x4 Gen1 2 Slot 1, 2 Rules: * The cards must be installed in the order they are listed (top to bottom) * If multiple adapter part numbers are on one line, install in order shown * The adapter should be installed by Slot Priority in the first available slot (L to R) * Placement of card(s) should be consistent for all orders 12.3 Boot Order System boot order is settable in the BIOS NICs. 12.4 External Controller Cards Table 21. Category External Controller Cards Description Bandwidth Max Quantity Slot Priority PERC H800 NV X8 2 Slot 1, 2 PERC 6/E 256MB x8 2 Slot 1, 2 PERC 6/E 512MB x8 2 Slot 1, 2 6Gbs SAS HBA X8 2 Slot 1, 2 SAS 5/E x8 2 Slot 1, 2 PERC H800 or External Controllers 12.5 PCI Card Dimensions Table 22. Link Width Add-in Card Sizes Height Length x1 Standard-height, half-length card 111.15 mm (4.376 inches) max 167.65 mm (6.600 inches max X1, x4, x8, x16 Standard-height, full-length cards 111.15 mm (4.376 inches) max 312.00 mm (12.283 inches) max Low-profile cards 68.90 mm (2.731 inches) max 167.65 mm (6.600 inches) max Dell PowerEdge R310 Technical Guide 58 Dell 13 Storage 13.1 Overview Figure 23. Cabled Hard Drive Chassis Figure 24. Hot-Swap Hard Drive Chassis R310 supports up to 4 HDDs as can be seen in the diagram above. • 4x 3.5” cabled SATA from motherboard SATA connector Or • 4x 3.5” cabled SAS or SATA via add-on storage controller Or • 4x 3.5” hot-swap SAS or SATA via add-on storage controller Or • 4x 2.5” hot-swap SAS or SATA or SSD via add-on storage controller Note that 2.5” HDD requires hot-swap configuration with the 3.5” hard drive tray and the retention kit. Customer must choose cabled configuration or hot-swap configuration at point of purchase. This is not an upgrade option after point of sale. The R310 backplane that supports the hot-swap hard drive chassis is shown in Figure 25. Intrusion Detection Switch Figure 25. Backplane with Hot-Swap Option Dell PowerEdge R310 Technical Guide 59 Dell 13.2 Drives Figure 26. Hard Drives Form Factor Capacity Speed Type 3.5” 160GB 7.2K SATA 3.5” 250GB 7.2K SATA 3.5” 500GB 7.2K SATA 3.5” 1TB 7.2K SATA 3.5” 2TB 7.2K SATA 3.5” 4TB 7.2K SATA 3.5” 500GB 7.2K NL SAS 6Gb 3.5” 1TB 7.2K NL SAS 6Gb 3.5” 2TB 7.2K NL SAS 6Gb 3.5” 4TB 7.2K NL SAS 6Gb 3.5” 146GB 15K SAS 3Gb 3.5” 300GB 15K SAS 6Gb 3.5” 450GB 15K SAS 6Gb 3.5” 450GB 15K SAS 6Gb/ Self Encrypting Drive (SED) 3.5” 600GB 15K SAS 6Gb 3.5” 600GB 15K SAS 6Gb/ Self Encrypting Drive (SED) 3.5” 600GB 10K SAS 2.5” 146GB 10K SAS Hot-swap only (through hard drive carrier) 2.5” 300GB 10K SAS Hot-swap only (through hard drive carrier) 2.5” 50GB N/A SSD 2.5” 100GB N/A SSD 13.3 Note RAID Configurations Table 23. RAID Configurations Cabled/ Hot Swap Configs Description Min HDD Max HDD Cabled C0A No HDD, Cabled HDD Chassis 0 0 Hot Swap C0B No HDD, Hot Swap HDD Chassis 0 0 Cabled C1 On-board SATA Controller– No RAID 1 4 Cabled C2A Embedded SATA SW RAID –RAID 0 (PERC S100) 2 2 Cabled C2B Embedded SATA SW RAID –RAID 0 (PERC S100) 3 4 Cabled C3 Embedded SATA SW RAID –RAID 1 (PERC S100) 2 2 Cabled C4 Embedded SATA SW RAID—RAID 5 (PERC S100) 3 4 Dell PowerEdge R310 Technical Guide 60 Dell Cabled/ Hot Swap Configs Description Min HDD Max HDD Cabled C5 Embedded SATA SW RAID – RAID 10 (PERC S100) 4 4 Cabled C6 Add-in SAS/SATA RAID card – RAID 5 (PERC S300) 3 4 Cabled C7 Add-in SAS/SATA RAID card – RAID 10 (PERC S300) 4 4 Cabled C8 Add-in SAS/SATA RAID card – No RAID (SAS 6/iR or H200) 1 4 Cabled C9 Add-in SAS/SATA RAID card – RAID 0 (SAS 6/iR, H200, or H700) 2 4 Cabled C10 Add-in SAS/SATA RAID card – RAID 1 (SAS 6/iR, H200, or H700) 2 2 Cabled C11 Add-in SAS/SATA RAID card – RAID 5 (H700) 3 4 Cabled C12 Add-in SAS/SATA RAID card – RAID 6 (H700) 4 4 Cabled C13 Add-in SAS/SATA RAID card, RAID 10 (H200 or H700) 4 4 Hot-Swap C14 Add-in SAS/SATA RAID card, RAID 5 (PERC S300) 3 4 Hot-Swap C15 Add-in SAS/SATA RAID card, RAID 10 (PERC S300) 4 4 Hot-Swap C16 Add-in SAS/SATA RAID card, No RAID (SAS 6/iR or H200) 1 4 Hot-Swap C17 Add-in SAS/SATA RAID card, RAID 0 (SAS 6/iR, H200 or H700) 2 4 Hot-Swap C18 Add-in SAS/SATA RAID card, RAID 1 (SAS 6/iR, H200, H700) 2 2 Hot-Swap C19 Add-in SAS/SATA RAID card, RAID 5 (H700) 3 4 Hot-Swap C20 Add-in SAS/SATA RAID card, RAID 6 (H700) 4 4 Hot-Swap C21 Add-in SAS/SATA RAID card, RAID 10 (H200 or H700) 4 4 Hot-Swap C22 Add-in SAS/SATA RAID card, RAID 1 + RAID 1 (PERC S300) 2+2 2+2 Hot-Swap C23 Add-in SAS/SATA RAID card, RAID 1 + RAID 1 (SAS 6/iR, H200, or H700) 2+2 2+2 Notes: • • • 13.4 Must be all 3.5” HDD or 2.5” HDD. Must be all SAS or all SATA or all SSD. No Mixed HDD allowed in R310. SSD support requires H200 or H700. PERC S100, SAS 6i/R and PERC S300 do not support SSD. LED Indicators Each disk drive carrier has two LED indicators visible from the front of the system. One is a green LED for disk activity and the other is a bicolor (Green/Amber) LED for status information. The activity LED is driven by the disk drive during normal operation. The bicolor LED is controlled by the SEP device on the backplane. Both LEDs are used to indicate certain conditions under direction of a storage controller. 13.5 Optical Drives The R310 supports one SATA interface DVD-ROM or DVD+/-RW. Dell PowerEdge R310 Technical Guide 61 Dell 13.6 Tape Drives The R310 does not support an internal backup device. Only external backup devices are supported. Refer to Section 3 for the supported devices. Dell PowerEdge R310 Technical Guide 62 Dell 14 Video and Audio Video 14.1 Matrox G200eW w/ 8MB memory integrated in Nuvoton® WPCM450 (BMC controller) - 14.2 1280x1024@85Hz for KVM and 1600x1200@60Hz for video out 640x480 (60/72/75/85 Hz; 8/16/32-bit color) 800x600 (60/72/75/85 Hz; 8/16/32-bit color) 1024x768 (60/72/75/85 Hz; 8/16/32-bit color) 1152x864 (75 Hz; 8/16/32-bit color) 1280x1024 (60/75/85 Hz; 8/16-bit color) 1280x1024 (60 Hz, 32-bit color) (note 32 bit color is only supported at 60 Hz for this resolution) Audio Not available. Dell PowerEdge R310 Technical Guide 63 Dell 15 Rack Information 15.1 Overview The ReadyRails™ sliding and static rail systems for the R310 provide tool-less support for 4-post racks with square or unthreaded round mounting holes including all generations of Dell racks. Both support tooled mounting in 4-post threaded racks (an optional adapter brackets kit is required for the sliding rails), with the static rails also providing tooled mounting support for 2-post (Telco) racks for added versatility. The optional cable management arm (CMA) can be mounted on either the left or right side of the sliding rails without the use of tools for fast and easy deployment. NOTE: The R310 is not compatible with any other Dell rails including previous generation rails, but it does use the same sliding rails as the R410 and uses the same static rails as the R310 & R410. 15.2 Rails The rail offerings for the R310 consist of two types: sliding and static. The sliding rails allow the system to be fully extended out of the rack for service and are available with or without the optional cable management arm (CMA). Figure 27. R310 Sliding Rails with Optional CMA Sliding rail kits can be used in a threaded hole rack only if threaded rack adapter brackets are installed. The threaded rack adapter brackets are first mounted to the EIA flanges in the rack, and then the sliding rails are mounted into the brackets. The design of the brackets has been optimized to limit the forward shift of the system in the rack to only 17.3 mm. The adapter brackets kit includes 6 brackets to accommodate different rail lengths, plus 4 sets of custom screws in common thread sizes. A detailed ‘Getting Started Guide’ is included in the kit along with directions for installing the brackets and mounting the rails into the brackets. Dell PowerEdge R310 Technical Guide 64 Dell Depending on the depth of the rack used, it may be necessary to remove the server’s bezel in order to close the door of the rack. A minimum of 58 mm will be needed between the back surface of the door panel and the front face of the EIA flange for the front door to close with the 11G server bezel installed. Figure 28. 1U Threaded Rack Adapter Brackets Kit The static rails support a wider variety of racks than the sliding rails but do not support serviceability in the rack and are thus not compatible with the CMA. Figure 29. R310 Static Rails One key factor in selecting the proper rails is identifying the type of rack in which they will be installed. Both the sliding rails and the static rails support mounting in 19”-wide, EIA-310-E compliant 4-post racks, but only the static rails, as the more generic or “universal” solution, support mounting in 2-post (Telco) racks. Dell PowerEdge R310 Technical Guide 65 Dell Table 24. Rail Identifier Mounting Interface Rail Information Rail Type Rack Types Supported 4-Post 2-Post Square Round Thread Flush Center A3 ReadyRails™ Sliding √ √ √1 X X A4 ReadyRails™/Generic Static √ √ √ √ √ 1 Requires the 1U Threaded Rack Adapter Brackets Kit (Dell PN 8Y19G). Note that screws are not included in the static rail kit due to the fact that threaded racks are offered with a variety of thread designations. Users must therefore provide their own screws when mounting the static rails in threaded or 2-post racks. Other key factors governing proper rail selection include the spacing between the front and rear mounting flanges of the rack, the type and location of any equipment mounted in the back of the rack such as power distribution units (PDUs), and the overall depth of the rack. Due to their reduced complexity and lack of need for CMA support, the static rails offer a greater adjustability range and an overall smaller footprint than the sliding rails. Figure 30. Rail Adjustability Rail Adjustability Range (mm) Rail Identifier Square Round Threaded Rail Depth (mm) Min Max Min Max Min Max without CMA with CMA A3 686 883 672 876 651 897 714 835 A4 608 879 594 872 604 890 622 - Note that the adjustment range of the rails is a function of the type of rack in which they are being mounted. The min-max values listed above represent the allowable distance between the front and rear mounting flanges in the rack. Rail depth represents the minimum depth of the rail as measured from the rack front mounting flanges when the rail rear bracket is positioned all the way forward. 15.3 Cable Management Arm (CMA) The optional cable management arm (CMA) for the R310 organizes and secures the cords and cables exiting the back of the server and unfolds to allow the server to extend out of the rack without having to detach the cables. Some key features of the R310 CMA include: • • • • • • Large U-shaped baskets to support dense cable loads Open vent pattern for optimal airflow Fully reversible (can be mounted on either side) with no conversion required Utilizes hook-and-loop straps rather than plastic tie wraps to eliminate the risk of cable damage during cycling Includes a low profile fixed tray to both support and retain the CMA in its fully closed position Both the CMA and the tray mount without the use of tools via simple and intuitive snap-in designs Dell PowerEdge R310 Technical Guide 66 Dell 15.4 Rack View The R310 sliding rails are a “stab-in” design, meaning that the inner (chassis) rail members must first be attached to the sides of the system prior to inserting them into the middle (intermediate) and outer (cabinet) rail members installed in the rack. The CMA can be mounted to either side of the rails without the use of tools or the need for conversion, but it is recommended that it be mounted on the side opposite the power supplies to allow easier access to the power supplies for service or replacement. Figure 31. R310 Mounted in the A3 Sliding Rails with the CMA The R310 static rails are also a “stab-in” design, but unlike the sliding rails, they do not include middle (intermediate) rail members. After the inner (chassis) rail members have been attached to the sides of the chassis, they are inserted directly into the outer (cabinet) rail members installed in the rack. Figure 32. R310 Mounted in the A4 Static Rails in 2-post Center Mount Configuration Dell PowerEdge R310 Technical Guide 67 Dell 16 Operating Systems See the Operating System Support Matrix for Dell PowerEdge Systems for the most current information on supported operating systems. Dell PowerEdge R310 Technical Guide 68 Dell 17 Solutions 17.1 Virtualization Virtualization OS Options include: • • • • • Citrix® XenServer® Enterprise 5.6 x86-64 Microsoft® Hyper-V® via Microsoft® Windows Server® 2008 VMware® vSphere® including ESX™ and ESXi™ Vizioncore™ vEssentials Novell® PlateSpin® Migrate For more information on the specific versions and additions, visit www.dell.com/OSsupport. 17.2 Database The following database solutions are available on the PowerEdge R310: • • Microsoft® SQL Server® solutions (see www.Dell.com/SQL) Oracle® database solutions (see www.Dell.com/Oracle) Dell PowerEdge R310 Technical Guide 69 Dell 18 Systems Management Overview 18.1 Dell delivers open, flexible, and integrated solutions that help you reduce the complexity of managing disparate IT assets by building comprehensive IT management solutions. Combining Dell PowerEdge Servers with a wide selection of Dell-developed management solutions gives you choice and flexibility, so you can simplify and save in environments of any size. To help you meet your server performance demands, Dell offers Dell OpenManage systems management solutions for: Deployment of one or many servers from a single management console Monitoring of server and storage health and maintenance System update, configuration change, and maintenance Dell offers IT management solutions for organizations of all sizes—priced, sized, and supported right. • • • Server Management 18.2 A Dell Systems Management and Documentation DVD and a Dell Management Console DVD are included with the product. Content includes: • • • • • • • • Dell Systems Build and Update Utility: Dell Systems Build and Update Utility assists in OS install and pre-OS hardware configuration and updates. OpenManage Server Administrator: The OpenManage Server Administrator (OMSA) tool provides a comprehensive, one-to-one systems management solution, designed for system administrators to manage systems locally and remotely on a network. OMSA allows system administrators to focus on managing their entire network by providing comprehensive one-to-one systems management. Management Console: Our legacy IT Assistant console is also included, as well as tools to allow access to our remote management products. These tools are Remote Access Service for iDRAC and the BMC Management Utility. Active Directory Snap-in Utility: The Active Directory Snap-in Utility provides an extension snapin to the Microsoft Active Directory. This allows you to manage Dell specific Active Directory objects. The Dell-specific schema class definitions and their installation are also included on the DVD. Dell Systems Service Diagnostics Tools: Dell Systems Service and Diagnostics tools deliver the latest Dell optimized drivers, utilities, and operating system-based diagnostics that you can use to update your system. eDocs: The section includes PDF files for PowerEdge systems, storage peripheral, and OpenManage software. Dell Management Console DVD: The Dell Management Console is a Web-based systems management software that enables you to discover and inventory devices on your network. It also provides advanced functions, such as health and performance monitoring of networked devices and patch management capabilities for Dell systems. Server Update Utility: In addition to the Systems Management Tools and Documentation and Dell Management Console DVDs, customers have the option to obtain Server Update Utility DVD. This DVD has an inventory tool for managing updates to firmware, BIOS, and drivers for either Linux or Windows operating systems. Dell PowerEdge R310 Technical Guide 70 Dell Embedded Server Management 18.3 The PowerEdge R310 implements circuitry for the next generation of embedded server management. It is Intelligent Platform Management Interface (IPMI) v2.0 compliant. The optional iDRAC (Integrated Dell Remote Access Controller) is responsible for acting as an interface between the host system and its management software and the periphery devices. These periphery devices consist of the PSUs, the storage backplane, integrated SAS HBA or PERC 6/I, and control panel with display. The optional upgrade to iDRAC6 provides features for managing the server remotely or in data center lightsout environments. Advanced iDRAC features require the installation of the optional iDRAC6 Enterprise card. Lifecycle Controller and Unified Server Configurator 18.4 Embedded management is comprised of four key components: Dell Lifecycle Controller Dell Unified Server Configurator iDRAC6 (Integrated Dell Remote Access Controller) vFlash (virtual flash media) Lifecycle Controller powers the embedded management features. It is integrated and tamperproof storage for system-management tools and enablement utilities (firmware, drivers, etc.). • • • • Dell Unified Server Configurator (USC) is a local 1:1 graphical user interface embedded on Lifecycle Controller that aids in local server provisioning in a pre-OS environment. For servers with iDRAC Express, the Lifecycle Controller offers OS install, platform updates, platform configuration, and diagnostics capabilities. For servers without iDRAC6 Express, this utility has limited functionality and offers OS install and diagnostics capabilities only. To access the Unified Server Configurator, press the <F10> key within 10 seconds of the Dell logo’s appearance during the system boot process. Current functionality enabled by the Unified Server Configurator is detailed in Table 25. Table 25. Unified Server Configurator Features and Description Feature Description Faster O/S Installation Drivers and the installation utility are embedded on system Faster System Updates Integration with Dell support automatically directed to latest versions of the Unified Server Configurator, iDRAC, RAID, BIOS, NIC, and Power Supply Update Rollback Ability to recover to previous known good state for all updatable components More Comprehensive Diagnostics Diagnostic utilities are embedded on system Simplified Hardware Configuration Detects RAID controller and allows user to configure virtual disk and choose virtual disk as boot device, eliminating the need to launch a separate utility. Also provides configuration for iDRAC, BIOS, and NIC/LOM. 18.5 iDRAC6 Express The optional iDRAC6 Express is the first tier of iDRAC6 upgrades. In addition to upgrading the system with a Lifecycle Controller, the iDRAC6 Express offers the following key features: Dell PowerEdge R310 Technical Guide 71 Dell Graphical web interface Standard-based interfaces Server Sensor monitoring and fault alerting Secure operation of remote access functions including authentication, authorization, and encryption • Power control and management with the ability to limit server power consumption and remotely control server power states • Advanced troubleshooting capabilities For more information on iDRAC6 Express features see table below. • • • • iDRAC6 Enterprise 18.6 The optional iDRAC6 Enterprise card provides access to advanced iDRAC6 features. The iDRAC6 Enterprise connects directly to the R310 planar and is mounted parallel to the planar with stand-offs. Key features for the iDRAC6 Enterprise include: Scripting capability with Dell’s Racadm command-line Remote video, keyboard, and mouse control with Virtual Console Remote media access with Virtual Media Dedicated network interface Additionally, the iDRAC6 Enterprise can be upgraded by adding the vFlash Media card. This is a 1 GB Dell branded SD card that enables a persistent 256 or 512 MB virtual flash partition. A more detailed feature list for iDRAC6 Enterprise and vFlash is included in the following table. • • • • Table 26. Feature Features List for BMC, iDRAC6, and vFlash BMC iDRAC6 Express iDRAC6 Enterprise vFlash Media Interface and Standards Support Web-based GUI SNMP WSMAN SMASH-CLP IPMI 2.0 Racadm command-line Conductivity Shared/Failover Network Modes IPv4 VLAN Tagging IPv6 Dynamic DNS Dedicated NIC Security and Authentication Role-based Authority Dell PowerEdge R310 Technical Guide 72 Dell Feature BMC iDRAC6 Enterprise vFlash Media Active Directory SSL Encryption Local Users iDRAC6 Express Remote Management and Remediation Remote Firmware Update Server power control Serial-over-LAN (with proxy) Serial-over-LAN (no proxy) Power capping Last crash screen capture Boot capture Serial-over-LAN Virtual media Virtual console Virtual console sharing Virtual flash Monitoring Sensor Monitoring and Alerting Real-time Power Monitoring* Real-time Power Graphing* Historical Power Counters* Logging Features System Event Log RAC Log Trace Log * BMC availability through OpenManage Dell PowerEdge R310 Technical Guide 73 Dell 19 Peripherals 19.1 USB peripherals The R310 supports the following USB-based peripherals: • • • • 19.2 USB Key (Bootable) Keyboard (Note: Only one USB keyboard is supported) Mouse (Note: Only one USB mouse is supported) Optional USB DVD-ROM External Storage Table 27. External Storage Type SAN Support SAS Management SW for xBOD External Storage Product Support Status EMC's AX Arrays (SCSI, FC and iSCSI) Supported—iSCSI Only EMC's CX Arrays Not Supported Equal Logic's PS5XXX Arrays (iSCSI) Supported OMSS X.X for MD1000 Supported OMSS X.X for MD1020 Supported Rossini X.X for MD3000 Supported Rossini for MD3000i Supported PV NAS PV DAS PV SAN Not Supported MD1000 JBOD Supported MD3000 RBOD Supported MD1120 2.5 SAS/SATA JBOD Supported MD1220 2.5 6Gb/s SAS Supported MD1200 2.5” or 3.5” 6Gb/s SAS Supported MD3000i iSCSI RAID array Supported IDM External Tape Backup Tape Backup SW Not Supported RD1000 USB Supported LTO3-060 SCSI Supported LTO3-FH Supported LTO4-120 (Half-Height, Low-Cost, SAS) Supported LTO4-120 (Full Height, SAS) Supported PV114T—2U external TBU Supported PV-124T SAS/SCSI Supported ML6000 SAS/FC/SCSI Supported CommVault Galaxy Supported Symantec Backup Executive including Backup Executive System Recovery Supported Dell PowerEdge R310 Technical Guide 74 Dell External Storage Type SAS xBOD SW Product Support Status Microsoft Data Protection Manager (DPM) Supported OpenManage Storage Manager Supported Dell PowerEdge R310 Technical Guide 75 Dell 20 Packaging Options R310 packaging options include: • • Single pack Multipack Dell PowerEdge R310 Technical Guide 76 Dell Appendix A. Regulatory Certifications The PowerEdge R310 meets the requirements outlined in the EMC, Product Safety and Environmental parts of Dell Compliance Design Standard (Dell P/N: ENG0002520). Regulatory Model: E09S Regulatory Type: E09S001 ENVIRONMENTAL Product Safety, EMC and Environmental Datasheets are available at: http://www.dell.com/content/topics/global.aspx/about_dell/values/regulatory_com pliance/dec_conform?c=us&l=en&s=cor Dell PowerEdge R310 Technical Guide 77 Dell Appendix B. Statement of Volatility The Dell PowerEdge R310 contains both volatile and non-volatile (NV) components. Volatile components lose their data immediately upon removal of power from the component. Non-volatile components continue to retain their data even after the power has been removed from the component. Components chosen as user-definable configuration options (those to the motherboard) are not included in the Statement of Volatility. Configuration option information (pertinent to options such as microprocessors, system memory, remote access controllers, and storage controllers) is available by component separately. The following Non-volatile components are present in the PowerEdge R310 server. Table 28. R310 Volatility Server BIOS SPI Flash Details Size: 32 Mbits Type [e.g., Flash PROM, EEPROM]: Flash Can user programs or operating system write data to it during normal operation? Purpose? [e.g., boot code] No How is data input to this memory? Loading flash memory requires a vendor provided firmware file and loader program which is executed by booting up the system from a floppy or OS based executable containing the firmware file and the loader. System loaded with arbitrary data in firmware memory would not operate. How is this memory write protected? Software write protected Server BMC SPI Flash Details Size: 128 Mbits Type [e.g., Flash PROM, EEPROM]: Flash Can user programs or operating system write data to it during normal operation? Purpose? [e.g., boot code] No How is data input to this memory? Loading flash memory requires a vendor provided firmware file and loader program which is executed by booting up the system from a floppy or OS based executable containing the firmware file and the loader. System loaded with arbitrary data in firmware memory would not operate. How is this memory write protected? Software write protected Dell PowerEdge R310 Technical Guide Boot Code, System Configuration information, EFI environment BMC boot configuration setting 78 Dell CPLD Details Size: 1200 LUTs Type [e.g., Flash PROM, EEPROM]: Internal Flash Can user programs or operating system write data to it during normal operation? Purpose? [e.g., boot code] No System power sequence control. How is data input to this memory? Factory only. Not customer updatable. How is this memory write protected? Software write protected Server CMOS (Complementary Metal-Oxide Semiconductor) Memory Details Size: 512 Bytes Type: [e.g., Flash PROM, EEPROM]: Battery backed NVRAM Can user programs or operating system write data to it during normal operation? Purpose? [e.g., boot code] No How is data input to this memory? F2 Setup Menu during POST How is this memory write protected? N/A How is the memory cleared? Jumper on motherboard can be used to clear to factory default settings Ethernet Controller Configuration Data (planar) Details Size: 4 Mbits Type: [e.g., Flash PROM, EEPROM]: Flash Can user programs or operating system write data to it during normal operation? Purpose? [e.g., boot code] No How is data input to this memory? Loading flash memory requires a vendor provided firmware file and loader program which is executed by booting up the system from a floppy or OS based executable containing the firmware file and the loader. System loaded with arbitrary data in firmware memory would not operate. How is this memory write protected? No explicitly protected but special applications are needed to communicate through the LOMs to reprogram this ROM. Server System Event Log Memory / FRU Details Size: 32 Kbits Type: [e.g., Flash PROM, EEPROM]: SEEPROM Can user programs or operating system write data to it during normal operation? Purpose? [e.g., boot code] No How is data input to this memory? factory and iDRAC embedded OS Dell PowerEdge R310 Technical Guide RTC & Configuration settings LAN on Motherboard configuration and firmware motherboard electronic product identifier 79 Dell How is this memory write protected? writes controlled by iDRAC embedded OS How is the memory cleared? Lifecycle log is clearable only in a factory environment SEL is user clearable Remarks Power Supply FRU Details Size: 256 Bytes Type: [e.g., Flash PROM, EEPROM]: SEEPROM Can user programs or operating system write data to it during normal operation? Purpose? [e.g., boot code] No How is data input to this memory? Programmed by the power supply manufacturer. Trusted Platform Module (TPM) Details Size: 128 Bytes Type: [e.g., Flash PROM, EEPROM]: EEPROM Can user programs or operating system write data to it during normal operation? Purpose? [e.g., boot code] No How is data input to this memory? Loading flash memory requires a vendor provided firmware file and loader program. System loaded with arbitrary data in firmware memory would not operate. How is this memory write protected? Software write protected How is the memory cleared? F2 Setup option Store power supply information Storage of encryption keys Remarks Backplane Firmware and FRU Details Size: 2 Kbits Type: [e.g., Flash PROM, EEPROM]: Flash Can user programs or operating system write data to it during normal operation? Purpose? [e.g., boot code] No How is data input to this memory? Loading flash memory requires a vendor provided firmware file and loader program which is executed by booting up the system from a floppy or OS based executable containing the firmware file and the loader. System loaded with arbitrary data in firmware memory would not operate. How is this memory write protected? Software write protected iDRAC Express Details Size: 1 GBit Type: [e.g., Flash PROM, EEPROM]: SD card Can user programs or operating system write No Dell PowerEdge R310 Technical Guide Backplane Firmware and FRU data storage 80 Dell data to it during normal operation? Purpose? [e.g., boot code] Full USC feature app. Code How is data input to this memory? Factory installed How is this memory write protected? Software write protected iDRAC Enterprise Details Size: 1 GBit Type: [e.g., Flash PROM, EEPROM]: SD card Can user programs or operating system write data to it during normal operation? Purpose? [e.g., boot code] No How is data input to this memory? Factory installed How is this memory write protected? Software write protected Server BMC (Baseboard Management Controller) Firmware Flash Memory Details Size: 384 KB Flash Type: [e.g., Flash PROM, EEPROM]: Flash PROM Can user programs or operating system write data to it during normal operation? Purpose? [e.g., boot code] No How is data input to this memory? Loading flash memory requires a vendor provided firmware file and loader program which is executed by booting up the system from a floppy or OS based executable containing the firmware file and the loader. System loaded with arbitrary data in firmware memory would not operate. How is this memory write protected? Software write protected Virtual KVM app. Code Stores the BMC Firmware To obtain optional component information, please refer to the Dell Statement of Volatility for the individual components. Please direct any questions to your Dell Marketing Representative. Dell PowerEdge R310 Technical Guide 81