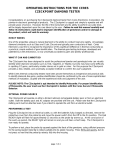
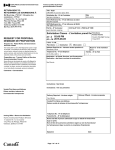
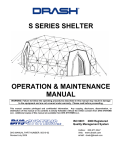
1
REEVES EMS DECONTAMINATION SHELTER XB / S Series OPERATION & MAINTENANCE MANUAL WARNING: Failure to follow the operating procedures described in this manual may result in damage to the equipment and are not covered under warranty. Before proceeding, read this manual. This manual contains privileged and confidential information. Any copying, disclosure, dissemination, or distribution of this manual or its contents is strictly forbidden without written consent from DHS Systems LLC. Additional copies of this manual are available from DHS Systems LLC. TECH MANUAL PART NUMBER: 1006370 Reissue Date: 17 November 11 Hotline: 800-328-5563 Fax: (845)-365-2114 Email: [email protected] Web: www.reevesems.com Operation & Maintenance Revision History Date Revision Description 04/14/06 95302-00 Original Issue. 02/28/11 1006370 Changed TM part number to new TM part number format. Removed Warranty page. Updated contact information. 11/17/11 1006370 Added new Warranty page to TM. Copyright © 2011, DHS Systems, LLC Part Number 1006370 DHS SYSTEMS LLC This document contains information proprietary to DHS SYSTEMS, LLC and is intended solely for use by its customers. No portion of this document may be reproduced for release to a third party without written consent from DHS SYSTEMS, LLC. Operation & Maintenance Warning Summary This Warning Summary explains the use of general safety Note, Caution, and Warning notices present in this Technical Manual that must be understood and applied during the operation and maintenance of this equipment. Failure to observe these precautions could result in serious injury or death to personnel. Equipment Specific Safety Issues General The cautions and warnings point out known conditions that are potentially hazardous. However, no manual can cover every possible situation. If in doubt, contact DHS Systems. Service and repair procedures not covered in this manual should be performed only by authorized DRASH technicians. General Precautions REMEMBER SAFETY FIRST. If unsure of the instructions or proper operating procedures, contact DHS Systems before continuing. This manual emphasizes the safety precautions necessary during the operation and maintenance of the Decontamination Shelter. Each section uses caution and warning messages for both the safety of the operator as well as the durability of the equipment. If any of the cautions or warnings is not readily understood, contact DHS Systems, before proceeding. When an abnormal condition is observed and procedures in the manual do not specifically describe the condition, all operations should be stopped and DHS Systems should be contacted immediately for assistance. DHS SYSTEMS, LLC Contact Information Phone: 800-328-5563 FAX: (845)-365-2114 E-mail: [email protected] Qualified Personnel A qualified person is someone who is familiar with this manual, the operation of the Decontamination Shelter Series, the hazards involved in its operation and maintenance and who has been certified by the DHS SYSTEMS training program. This manual is not intended to be a substitute for proper training. DHS SYSTEMS strongly recommends that all receive training directly from DRASH. Warning Alert Classifications The Warning Alert Classification is an indication of the level of importance of the Warning. The various levels of Alert Types are defined below, from the most important (Danger) to items of lesser importance. Danger: Danger refers to immediate hazards that will result in severe personal injury or death. Warning: Warning refers to a hazard or unsafe method or practice that may result in severe personal injury or death. Caution: Caution refers to a hazard or unsafe method or practice that may result in personal injury or equipment damage. Note: Note refers to an important feature that the operator should be aware of for maximum operating efficiency of the equipment. Part Number 1006370 DHS SYSTEMS LLC This document contains information proprietary to DHS SYSTEMS, LLC and is intended solely for use by its customers. No portion of this document may be reproduced for release to a third party without written consent from DHS SYSTEMS, LLC. Operation & Maintenance THIS PAGE INTENTIONALLY LEFT BLANK Part Number 1006370 DHS SYSTEMS LLC This document contains information proprietary to DHS SYSTEMS, LLC and is intended solely for use by its customers. No portion of this document may be reproduced for release to a third party without written consent from DHS SYSTEMS, LLC. Operation & Maintenance TABLE OF CONTENTS 1. 2. 3. INTRODUCTION ..............................................................................................................................1-1 1.1 Decontamination Shelter Features ..........................................................................1-2 1.2 Decontamination Shelter Components ....................................................................1-2 1.3 XB Shelter Specifications ........................................................................................1-3 1.4 S Shelter Specification ............................................................................................1-4 SETTING UP THE SHELTER ...........................................................................................................2-1 2.1 Deployment Procedure ............................................................................................2-1 2.2 2.3 Shelter Accessories ...............................................................................................2-7 Optional Accessories Available (Purchased Separately)..........................................2-7 STRIKING THE SHELTER ...............................................................................................................3-1 3.1 4. 5. Take Down Procedure .............................................................................................3-1 FIELD MAINTENANCE OF THE SHELTER ...................................................................................... 4-1 4.1 Shelter Repairs ...............................................................................................4-1 4.2 Replacement of Strut Pairs ......................................................................................4-2 DECONTAMINATION SHELTER WARRANTY REGISTRATION FORM........................................... 5-1 Part Number 1006370 DHS SYSTEMS LLC This document contains information proprietary to DHS SYSTEMS, LLC and is intended solely for use by its customers. No portion of this document may be reproduced for release to a third party without written consent from DHS SYSTEMS, LLC. Operation & Maintenance THIS PAGE INTENTIONALLY LEFT BLANK . Part Number 1006370 DHS SYSTEMS LLC This document contains information proprietary to DHS SYSTEMS, LLC and is intended solely for use by its customers. No portion of this document may be reproduced for release to a third party without written consent from DHS SYSTEMS, LLC. Operation & Maintenance 1. INTRODUCTION The Reeves / Drash Rapid Deployable Rigid Shelter is a freestanding, self-supporting structure that does not require any assembly in the field or any special equipment for either erecting or striking. There are no obstructions such as centered poles or locking devices needed to keep the shelter erect. The major component of this shelter is the frame with a pre-attached cover. The frame is manufactured from a material called Titanite which has flex strength of 250% greater than the flex strength of aluminum. The frame consists of an arrangement of various sized Titanite struts that are connected as pairs and articulate at the hubs see (Figure 1-1). These hubs enable the struts to move freely. The unique frame design allows for quick erect and strike. Looped Keepers Keepers and Hubs Shelter Frame Struts Staking Eyes Wind Lines Figure 1-1. Decontamination Shelter Basic Features Part Number 1006370 1-1 DHS SYSTEMS LLC This document contains information proprietary to DHS SYSTEMS, LLC and is intended solely for use by its customers. No portion of this document may be reproduced for release to a third party without written consent from DHS SYSTEMS, LLC. Operation & Maintenance 1.1 Decontamination Shelter Features The exterior cover is a manufactured vinyl coated polyester fabric which has a high resistance to abrasion and ultraviolet rays. The cover is also fire retardant, mildew resistant, and water repellent. The cover is pre-attached to the frame using keepers at the hub points (see Figure 1-1). 1.2 Decontamination Shelter Components The following items are the primary components for the Shelter. All these items are packaged together and kept in the transport bag. See Table 1-1 for Field Repair Kit contents. Figure 1-2. Shelter Components Part Number 1006370 1-2 DHS SYSTEMS LLC This document contains information proprietary to DHS SYSTEMS, LLC and is intended solely for use by its customers. No portion of this document may be reproduced for release to a third party without written consent from DHS SYSTEMS, LLC. Operation & Maintenance 1.3 XB Shelter Specifications The basic XB decontamination shelter has an inside footprint of 14.5 ft by 8 ft (4.4m by 2.4m). This shelter may be lengthened by adding one (or more) quads which extends in 4 ft (1.2m) increments. See Figure 1-3 for various XB decon shelter configurations. 2XB EXTERIOR 8 FT. 2.4 M. LENGTH 3XB 12 FT. 3.7 M. 4XB 16 FT. 4.9 M. 5XB 20 FT. 6.1 M. 6XB 24 FT. 7.3 M. Figure 1-3. XB Shelter Dimensions Part Number 1006370 1-3 DHS SYSTEMS LLC This document contains information proprietary to DHS SYSTEMS, LLC and is intended solely for use by its customers. No portion of this document may be reproduced for release to a third party without written consent from DHS SYSTEMS, LLC. Operation & Maintenance 1.4 S Shelter Specification The basic “S” shelter starts as an individual shelter with a ground footprint of 6.10 ft (1.8m) by 5 ft (1.5 m). For models, S2 through S6, the basic ground footprint is 11.5 ft (3.5 m) by 10 ft. This shelter may be lengthened by adding one (or more) quads which extends in 5 ft (1.5m) increments. See Figure 1-4 for various S shelter configurations. 6.10 ft. 1.8 m 11.5 ft. 3.5 m INDIVIDUAL SHELTER 5 ft. 1.5 m MODEL S2 10 ft. 3m MODEL S3 15 ft. 4.5 m MODEL S4 20 ft. 6.1 m MODEL S5 MODEL S6 25 ft. 7.6 m 30 ft. 9.1 m EXTERIOR DIMENSIONS for “S” Model Figure 1-4. S Shelter Dimensions Part Number 1006370 1-4 DHS SYSTEMS LLC This document contains information proprietary to DHS SYSTEMS, LLC and is intended solely for use by its customers. No portion of this document may be reproduced for release to a third party without written consent from DHS SYSTEMS, LLC. Operation & Maintenance 2. SETTING UP THE SHELTER This manual has been prepared to assist you in understanding the correct procedures for set-up and take-down of the shelter. 2.1 Deployment Procedure The set-up and take-down procedures are the same for either the XB or S shelter. THESE PROCEDURES MUST BE FOLLOWED TO ENSURE PROPER DEPLOYMENT AND TAKE-DOWN OF THE SHELTER. Failure to follow these simple procedures may hinder optimum performance or result in damages to the shelter. 2.1.1 Carrying and Positioning the Shelter CAUTION This step requires (minimum) two to four people to lift and move the shelter package to a cleared area for deployment. From the people designated to deploy the shelter, assign one person as Team Leader. This is important since all movement in set-up and striking procedures require a smooth and uniform effort. 1. Locate a cleared area and ensure there is enough space for set-up. 2. Place containment berm in center of cleared area and unfold. 3. Place the shelter in the center of the containment berm with the shelter standing on end with opening facing up. 4. Open the transport bag; remove the field repair kit, push poles, and shelter. 5. Remove the Shelter cinch straps; place the cinch straps and repair kit back into the transport bag to prevent loss. 2.1.2 Exterior Lifting Hubs & Positioning of People NOTE DO NOT GRAB THE MIDDLE OF THE STRUT 1. To spread the shelter, follow the step that is associated with the model type: a) Individual Shelter: Requires a minimum of two people for set-up and striking. b) XB / S MODELS 2, & 3: (Minimum 4 people) Position one person at each narrow end wall. Center one person on each of the longer sides. c) XB / S MODELS 4, 5, & 6: (4 to 6 people required).Position two people per long wall at each hub point next to the end of the wall. This will help properly distribute the load. Figure 2-1. Positioning of Lifting Personnel 2. Depending on model, locate four outer hubs; these are the hubs with the coated steel wire looped keepers, to determine the long sides of the shelter. The “lifting” hubs and the top part of the struts are the only places from which the shelter should be lifted. Part Number 1006370 2-1 DHS SYSTEMS LLC This document contains information proprietary to DHS SYSTEMS, LLC and is intended solely for use by its customers. No portion of this document may be reproduced for release to a third party without written consent from DHS SYSTEMS LLC. Operation & Maintenance 3. Check that the wind lines are not snagged on any hubs. Snagged wind lines may prevent the shelter from spreading. 4. To spread the shelter, place one person at each corner of the shelter. On larger shelters, it may be necessary to position one person in the center of each side wall; this will help distribute the load. 2.1.3 Position, Lift, & Spread the Shelter NOT E Before any commands or movement of the shelter takes place, the team leader must be certain that all team members are in position to ensure movement is coordinated and synchronized. Damages to the shelter will incur. 1. With both hands, grasp the lifting hubs. The hubs will spread out as the shelter is opened. 2. With a minimum of (4) people, (depending on model) and on the team leaders command, lift the shelter off the ground, take two steps backwards and put the shelter down. If anyone feels any resistance, immediately yell STOP; identify and correct the problem before continuing. Figure 2-2. Lifting & Spreading the Shelter 3. Continue to lift the shelter at the highest point of the strut, step backwards, and spread the shelter. Repeat this process until the shelter reaches its maximum spread. 4. At maximum spread, the shelter will resist any further expansion. 2.1.4 Raise Shelter to Pole Height NOTE Never push on a hub that does not have a red flag 1. Locate the push poles that were removed from the transport bag. 2. Locate the red flag hubs under the frame as shown in Figure 2-3. 3. Position people at the doorways. Place and hold the push pole at the push point hub (red flag). All people should be ready to push up. At this time, the team leader should get a verbal signal from each member that they’re ready. 4. Each person should simultaneously lift the shelter up. As quickly as possible, place one end of the push pole directly underneath the push point hub with the red flag, keeping the push pole straight see Figure 2-4. 5. On the team leaders command, team members lower the shelter down so it is resting on all four push poles. Part Number 1006370 2-2 DHS SYSTEMS LLC This document contains information proprietary to DHS SYSTEMS, LLC and is intended solely for use by its customers. No portion of this document may be reproduced for release to a third party without written consent from DHS SYSTEMS LLC. Operation & Maintenance Figure 2-3. Red Flag Hub Location Figure 2-4. Push Pole Placements Part Number 1006370 2-3 DHS SYSTEMS LLC This document contains information proprietary to DHS SYSTEMS, LLC and is intended solely for use by its customers. No portion of this document may be reproduced for release to a third party without written consent from DHS SYSTEMS LLC. Operation & Maintenance 2.1.5 Final Push to Full Height 1. With smaller models, the shelter is now ready to push to full height. With larger shelters, the four poles must be moved inward towards a second set of four red flags (2), one quad closer to the center of the shelter. People should alternately move inward to this new push point as shown in Figure 2-5. This action will evenly distribute the weight of the shelter (1). 1 2 Figure 2-5. Personnel Positioned for Final Lift 2. People are now in position to push the shelter to full height. 3. Check for obstructions before starting the final push to full height. 4. Prior to the final push, each person should check that the doors are not caught on any hubs or between the struts (see Figure 2-6). Fabric that is snagged will prevent the shelter from easily pushing to full height. Figure 2-6. Inspect Shelter for Obstructions 5. Return to the push pole and prepare to lift the shelter to its full height. NOTE If setting up during high winds, position additional people on the windward side along the length of the shelter. Unravel the wind lines on both short ends and at least two wind lines on the windward side. Have people hold onto the wind lines while shelter is being erected. 6. All together, in a coordinated and evenly effort, everyone should lift the shelter until the side walls come to a vertical position. Part Number 1006370 2-4 DHS SYSTEMS LLC This document contains information proprietary to DHS SYSTEMS, LLC and is intended solely for use by its customers. No portion of this document may be reproduced for release to a third party without written consent from DHS SYSTEMS LLC. Operation & Maintenance CAUTION IF ANY RESISTANCE IS FELT, IMMEDIATELY YELL STOP TO PREVENT POSSIBLE DAMAGE TO THE FRAME OR MATERIAL. 7. Let the shelter rest back on the push poles and clear any obstruction. 8. Slowly lower poles until the sides of the shelter take full weight. 9. The shelter should be positioned properly when fully erect as shown in Figure 2-7. Figure 2-7. Shelter in Erected Position 2.1.6 Secure the Shelter NOTE In high wind conditions, strike the shelter for safety purposes To ensure the stability of the shelter, all ground stakes and wind lines that were supplied for the shelter must be utilized, especially during inclement and changing weather conditions. Use the following list and Figure 2-8 as a guide for properly securing the shelter. Individual Shelter 8 Ground Stakes Model # 2 & 3 12 Ground Stakes Model # 4, 5, & 6 20 Ground Stakes 1. Place ground stakes in all the stake loops around the shelter’s base perimeter to ensure that the shelter is adequately secured. 2. Fully unravel all wind lines and stake them out 4 to 5 feet from shelter. 3. Use the tensioner on the wind lines to keep them taut. 4. During adverse weather conditions, check the wind lines and stakes periodically to ensure they are properly secured. NOTE If shelter is erected on blacktop, concrete, or similar hard surfaces, pre-drill staking holes with a Hilti (or similar) power fastener drill/driver to ensure maximum safety during high wind conditions. Part Number 1006370 2-5 DHS SYSTEMS LLC This document contains information proprietary to DHS SYSTEMS, LLC and is intended solely for use by its customers. No portion of this document may be reproduced for release to a third party without written consent from DHS SYSTEMS LLC. Operation & Maintenance Figure 2-8. Shelter Staking and Tie-down Diagram Part Number 1006370 2-6 DHS SYSTEMS LLC This document contains information proprietary to DHS SYSTEMS, LLC and is intended solely for use by its customers. No portion of this document may be reproduced for release to a third party without written consent from DHS SYSTEMS LLC. Operation & Maintenance 2.2 Shelter Accessories The XB and S Decontamination Shelters come with Lane Curtains and a 2–Line Integrated plumbing package; the Individual Shelter comes with Lane Curtains and a 1-Line Integrated plumbing package. The lane curtains can create two or three lane corridors for decontamination of male / female ambulatory and non-ambulatory patients as shown in Figure 2-9. The 2-line integrated plumbing package as shown in Figure 2-10 consists of eight shower-heads and four hand wands. The 1-line integrated plumbing package (not shown) consists of four shower-heads and two hand wands. Figure 2-9. Two or Three Lane Configuration 2.2.1 Figure 2-10. Internal Plumbing Installing Lane Curtains 1. Locate and attach white lane curtain(s) to the blue divider(s) Velcro strip. 2. Attach bungee cords from the bottom of the white lane curtains to the elevation grids. 2.2.2 Installing Shower-heads and Spray Wands 1. Remove red rubber caps from quick connect fittings either on the 1-line or 2-line integrated plumbing. 2. Attach shower-heads and hand wands to the quick connect fittings. The placement of the shower-heads and hand wands are entirely up to the customer’s preferences. 2.3 Optional Accessories Available (Purchased Separately) Rigid-Wall Containment Berm Water Containment Bladders Water Supply Adapter Kit Elevation Grids Assortment of Interior Lighting Submersible Pump Patient Roller System Part Number 1006370 2-7 DHS SYSTEMS LLC This document contains information proprietary to DHS SYSTEMS, LLC and is intended solely for use by its customers. No portion of this document may be reproduced for release to a third party without written consent from DHS SYSTEMS LLC. Operation & Maintenance THIS PAGE INTENTIONALLY LEFT BLANK Part Number 1006370 2-8 DHS SYSTEMS LLC This document contains information proprietary to DHS SYSTEMS, LLC and is intended solely for use by its customers. No portion of this document may be reproduced for release to a third party without written consent from DHS SYSTEMS LLC. Operation & Maintenance 3. STRIKING THE SHELTER 3.1 Take Down Procedure 3.1.1 Prepare the Shelter 1. Remove all equipment and accessories from inside the shelter; place items far enough out of the way so they don’t interfere with take down of the shelter. 2. Tie back all doorways and secure with attached Velcro straps. 3. Remove all ground stakes. 4. Rewind the wind lines. Unwound wind lines may become tangled when the shelter is packed. Figure 3-1. Tie back doorways 3.1.2 Grasp Exterior Lifting Hubs For striking of shelter, follow the steps that are associated with the model type. a) Individual Shelter: Position two people minimum along each side wall of shelter. b) Model 2 & 3: (Minimum four people). Position team members along each side wall of shelter c) Model 4, 5, & 6: (Minimum six people). Position three team members along side wall at each hub point. Figure 3-2. Positioning of People 1. Position each person at a corner of the shelter so they can slightly lift the exterior cover and easily grasp the exterior lifting hub. 2. The team leader should circle the shelter to verify that each team member is in position and ready to execute on command. Figure 3-3. Exterior Lifting Hubs 3. Collapse side walls of the berm and flip under. 4. Collapse the entrance and exit walls of the berm and flip forward (yellow safety markings will show). 5. Ensure all side walls of the berm are laying flat. Part Number 1006370 3-1 DHS SYSTEMS LLC This document contains information proprietary to DHS SYSTEMS, LLC and is intended solely for use by its customers. No portion of this document may be reproduced for release to a third party without written consent from DHS SYSTEMS LLC. Operation & Maintenance 3.1.3 Lift Up and Out To Strike 1. The team leader will count to three. On the count of three, each person must lift their hub up and take a step backwards in one swift motion. This action will release the frame walls, and be lowered to the ground. 2. To compress the shelter each person will lift the shelter off the ground by the hubs and walks toward the center. 3. Before completely compressing, carefully push the cover between the struts so that all keepers are exposed. Figure 3-4. Hold Shelter by Hubs and Walk Forward CAUTION DO NOT step on the fabric which may gather at your feet 4. Check that all wind lines are free and not tangled within the frame or fabric. If tangled, lift the Shelter and walk out one to two steps, untangle and re-compress the Shelter. 5. Place the wind lines on top of the Shelter. 6. Compress further to compact the bundle. 3.1.4 Securing the Shelter 1. Once the shelter has been compressed, secure one of the cinch straps around the top section of the shelter, approximately 1 ½ ft from the top of the shelter (see Figure 3-5). Figure 3-5. Secure First Cinch Strap 2. With one of two straps secured, place two people, one on each side of the shelter and continue to push shelter together while a third person tightens the second strap approximately 1 ½ ft from the bottom (see Figure 3-6). 3. With two people, continue compressing the shelter while the third person tightens both upper and lower cinch straps. 4. Remove any stored items from the transport bag. 5. Align the carrying straps on the outside of the bag with the side walls. This will allow the instruction panels to fall against the side wall when slipped over the shelter. Figure 3-6. Positioning Both Cinch Straps 6. 7. 8. 9. 10. Place the shelter into transport bag and tighten exterior straps. Push the shelter over with the instruction panel down. Place the push poles and repair kit into the transport bag. Pull the rope to close the end of the transport bag and secure bag with knot. The shelter is now secure and ready for the next deployment. Remember to lift with your legs, and not with your back when moving the transport bag. 11. Clean, refold and stow the containment berm for the next deployment. Part Number 1006370 3-2 DHS SYSTEMS LLC This document contains information proprietary to DHS SYSTEMS, LLC and is intended solely for use by its customers. No portion of this document may be reproduced for release to a third party without written consent from DHS SYSTEMS LLC. Operation & Maintenance 4. FIELD MAINTENANCE OF THE SHELTER Before initiating any repairs, identify the nature of the problem. Most repairs to the shelter can be made with the standard Field Repair Kit included with the shelter. Each kit contains the following components: Table 4-1. Contents of Field Repair Kit 1-Roll Duct Tape Spanner Wrench Mini Hack Saw 1 oz. tube of Adhesive 1-Extra Wind Line Scissors 5-Strut Repair Sleeves 1-Exterior Looped Keeper 2-Interior Looped Keeper 4.1 Shelter Repairs 4.1.1 Repair of Shelter Struts 1-Exterior Keeper 1-Swatch of Fabric 25 ft. Lay-flat Plumbing Hose 5-O’rings for Quick Connects 10-Worm Gear Clamps 10-Clamp Protectors 1-Female Cam 1-Roll Teflon Tape ¼ Nut Driver Fractured struts are repaired as follows: 1. After identifying the fractured strut or struts, assess whether the cover needs to be removed to reach the fracture. If it is necessary to remove the cover, use the spanner wrench and remove only those keepers necessary to peel back the cover to reach the fractured strut or struts. 2. Locate the mini hack saw. 3. Using the mini hack saw, trim off one half inch from each damaged side. 4. Retrieve a repair sleeve. 5. Slide a repair sleeve over the broken strut. Keep the break centered in the repair sleeve. 6. Tape ONLY one end of the repair sleeve with the duct tape. This will allow the other broken end to telescope within the sleeve and maintain its critical length see Figure 4-1. 7. Insert the keeper and turn by hand until snug. 8. Use the spanner wrench to tighten one-quarter turn past hand tight. Do not tighten excessively. 9. All sewn seams should be aligned and fabric reinforced circles around keepers should not be twisted. Figure 4-1. Repairing Shelter Struts Part Number 1006370 4-1 DHS SYSTEMS LLC This document contains information proprietary to DHS SYSTEMS, LLC and is intended solely for use by its customers. No portion of this document may be reproduced for release to a third party without written consent from DHS SYSTEMS, LLC. Operation & Maintenance 4.2 Replacement of Strut Pairs NOTE Replacing one or more strut pair(s), requires the acquisition of an Optional Spare Parts Kit (purchased separately) containing the parts listed on Table 4-2 Table 4-2. Optional Spare Parts Kit (Purchased Separately) Item Kit, Spare Parts Keepers, Interior Looped Keepers, Exterior Looped Keepers, Exterior Hub Set, Interior Hub Set, Exterior Screws Hose Clamp Poly Tee Cap, Red Protective Showerhead Pliers, Crimping O’ring Qty 1 5 5 5 2 2 50 12 4 4 2 1 20 Item Lay Flat Hose Ratchet Screwdriver A-Side Pair/Blue B-Side Pair/Red A-Sub Pair/Green B-Sub Pair/Yellow Spanner Wrench Clamp Protector Adapter, ½” MIP X QC Teflon Tape Gun, Spray with Tip Cam, ½” FPT X Female Socket Qty 50 1 2 4 2 4 1 12 4 1 1 2 Strike the shelter to replace strut pair(s) for repair, as follows: 1. Identify the damaged strut pair for repair. 2. Remove the keepers from the cover by using the spanner wrench (see Figure 4-2, Frame 1). 3. Loosen all screws from the exterior hubs at the damaged strut pair connection using the ratchet screwdriver. Do not remove damaged strut pair from the hubs at this time (see Figure 4-2, Frame 2). 4. Identify the color plug of the damaged strut pair. The color plug may be located on any one of the four strut ends. Select the same color plug strut pair from the spare parts kit (see Figure 4-3). 5. Place the replacement strut pair next to the damaged strut pair to ensure that both color plugs and scissor pins match exactly (see Figure 4-2, Frame 3). 6. Properly position replacement pair; remove ends of damaged strut pair from exterior hubs and insert new strut pair. At this time, tighten all screws on the exterior hubs (see Figure 4-2, Frame 4 & Frame 5). 7. Insert the keeper and tighten by hand until snug. Tighten with the spanner wrench, ¼ turn past hand tight. Do not over-tighten. All seams should be aligned; the fabric circles around the keepers should not be twisted (see Figure 42, Frame 6). 8. Once all damaged struts have been repaired, erect the shelter to its normal position to ensure repair was properly completed. Part Number 1006370 4-2 DHS SYSTEMS LLC This document contains information proprietary to DHS SYSTEMS, LLC and is intended solely for use by its customers. No portion of this document may be reproduced for release to a third party without written consent from DHS SYSTEMS, LLC. Operation & Maintenance Figure 4-2. Replacement of Strut Pairs Part Number 1006370 4-3 DHS SYSTEMS LLC This document contains information proprietary to DHS SYSTEMS, LLC and is intended solely for use by its customers. No portion of this document may be reproduced for release to a third party without written consent from DHS SYSTEMS, LLC. Operation & Maintenance Figure 4-3. XB Strut Pair Identity by Dimensions and Color Pairs Part Number 1006370 4-4 DHS SYSTEMS LLC This document contains information proprietary to DHS SYSTEMS, LLC and is intended solely for use by its customers. No portion of this document may be reproduced for release to a third party without written consent from DHS SYSTEMS, LLC. Operation & Maintenance Figure 4-4. S Strut Pair Identity by Dimensions and Color Pairs Part Number 1006370 4-5 DHS SYSTEMS LLC This document contains information proprietary to DHS SYSTEMS, LLC and is intended solely for use by its customers. No portion of this document may be reproduced for release to a third party without written consent from DHS SYSTEMS, LLC. Operation & Maintenance 4.2.1 Repair of Shelter Cover NOTE If time does not allow for the following repair procedure, this repair can be done on a temporary basis by using duct tape. This repair procedure can be accomplished in any weather condition. 1. Cut enough fabric to cover the tear or hole, with approximately ¼” extra on all sides. 2. Apply a thin layer of adhesive to the reverse side of patch. 3. Apply a thin layer of adhesive to the area around the tear or hole in the shelter to which patch will be applied. 4. Press the patch firmly over the tear or hole. 5. Smooth out any air bubbles from under the patch. 6. The patch will be secure in three hours. 7. Allow the patch to cure for 24 hours. 4.2.2 Shelter Maintenance during Inclement Weather NOTE The shelter should be stricken if it is to be left unattended for an extended period of time when there is a possibility of inclement weather To prevent damage to the shelter due to heavy snow or freezing rain, check the roof periodically for rain puddles or ice/snow accumulation. This can be accomplished by: 1. Shaking the cover from the outside of the Shelter. 2. Using a push pole, gently tap between the frame and cover until the shelter is cleared of the snow or ice accumulation. 3. During adverse weather conditions, routinely check and verify the security of the; a) Wind lines b) Stakes c) Keepers 4. Periodically recheck all screws on the exterior hubs and keepers for looseness. 4.2.3 Cleaning the Shelter & Accessories WARNING DO NOT USE AMONNIA BASE SOLVENTS TO CLEAN THE SHELTER; THEY WILL DISSOLVE THE PROTECTIVE COATING ON THE FABRIC. NOTE A power washer may be used at low pressure setting and warm water. Use caution and good judgment regarding water pressure and temperature. Proper maintenance requires the shelter to be cleaned after each usage. Clean the shelter as follows: 1. Brush off all excess dirt and debris with a soft bristle brush. 2. Using a cloth, sponge, or mop, the shelter can be manually cleaned using a mixture of warm water and Simple Green® or equivalent. 3. Remove grease, oil, or other heavy stains by scrubbing with Simple Green or equivalent. 4. Rinse with clean water. 5. Allow the Shelter to dry completely before repackaging. Part Number 1006370 4-6 DHS SYSTEMS LLC This document contains information proprietary to DHS SYSTEMS, LLC and is intended solely for use by its customers. No portion of this document may be reproduced for release to a third party without written consent from DHS SYSTEMS, LLC. 5. WARRANTY DHS SYSTEMS LLC LIMITED WARRANTY Effective As Of January 1, 2011 DHS Systems LLC provides a limited warranty that all DRASH® (Deployable Rapid Assembly Shelter) products shall be free from defects in materials and workmanship for the period of time shown in the Warranty Schedule below. This warranty shall be for the benefit of the original purchaser and shall inure to the benefit of any additional end users of the product, shall begin on the date of shipment to the original purchaser and extend for the period of time shown in the Warranty Schedule set forth below (but in no event in excess of that time). WARRANTY SCHEDULE DRASH Shelters and Shelter Accessories: 60 Months DRASH UST Trailers and Trailer Accessories: 24 Months DRASH Heaters and Heater Accessories: 24 Months DRASH Power Distribution Unit (PDU): 24 Months The liability of DHS Systems LLC hereunder is limited to the labor and parts required to repair or replace any defective part or other covered defect in material or workmanship. Damage due to excessive wear and tear, improper use or carelessness is not covered under this limited warranty. Any attempt to repair a defect by a party not authorized by DHS Systems LLC may void this warranty. This warranty is contingent upon a) proper operation of the products in accordance with the operating instructions provided and b) proper maintenance and care of the equipment in accordance with the operating instructions provided. Warranty claims must contain a detailed explanation of the defect and be supported by summary extracts of pertinent service and maintenance records, if applicable. DHS Systems LLC shall have the right to examine the alleged defect and may require the claimant at the claimant’s expense, to return the product for such an examination, if practicable. In the event the claim is validated, claimant shall be reimbursed for the cost of shipping the product to DHS Systems LLC. If DHS Systems LLC personnel are required to visit the claimant’s site to validate any claim and such claim is not validated, all expenses for travel and accommodations will be charged to the claimant. Part Number 1006370 5-1 DHS SYSTEMS LLC This document contains information proprietary to DHS SYSTEMS, LLC and is intended solely for use by its customers. No portion of this document may be reproduced for release to a third party without written consent from DHS SYSTEMS, LLC. Any warranty claims must be filed with DHS Systems LLC within 90 days after the alleged defect has first been identified. All claims must be mailed or faxed to the following: DHS SYSTEMS LLC 33 Kings Highway Orangeburg, NY 10962-1802 Attn: Customer Service, Logistics Phone: 845-359-6066 Fax: 845-365-2114 email: [email protected] This warranty is the sole warranty provided for the products listed herein. DHS Systems LLC provides no other express or implied warranty with respect to these products (including but not limited to no implied warranty of merchantability or fitness for a particular purpose). Part Number 1006370 5-2 DHS SYSTEMS LLC This document contains information proprietary to DHS SYSTEMS, LLC and is intended solely for use by its customers. No portion of this document may be reproduced for release to a third party without written consent from DHS SYSTEMS, LLC. 6. DECONTAMINATION SHELTER WARRANTY REGISTRATION FORM The product warranty is included with shipping of your product(s). Additional paper copies of this manual or on a CD-ROM may be purchased for the price of $25.00. Please contact us for further information. DHS SYSTEMS LLC 33 Kings Highway Orangeburg, NY 10962-1802 Attn: Customer Service, Logistics Phone: 845-359-6066 Fax: 845-365-2114 email: [email protected] To validate the Limited Warranty, you must register the equipment with DHS Systems LLC. Please fill in the information below, make a copy and mail to the above address, or fax to (845)-365-2114. If you have multiple units, you may list their Shelter SN # and Heater SN # below. Warranty Registration Date Primary POC Company Name Secondary POC Address City State Zip Code Phone Fax Cell Phone Email SSN # (Shelter Serial Number) HSN # (Heater Serial Number) DRASH use only Part Number 1006370 6-3 DHS SYSTEMS LLC This document contains information proprietary to DHS SYSTEMS, LLC and is intended solely for use by its customers. No portion of this document may be reproduced for release to a third party without written consent from DHS SYSTEMS, LLC. (Fold) Place Stamp Here Return Address: DHS SYSTEMS LLC 33 Kings Highway Orangeburg, New York 10962 RE: Warranty Registration (Fold) Part Number 1006370 6-4 DHS SYSTEMS LLC This document contains information proprietary to DHS SYSTEMS, LLC and is intended solely for use by its customers. No portion of this document may be reproduced for release to a third party without written consent from DHS SYSTEMS, LLC.