1
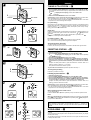
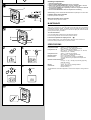
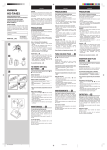
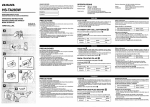
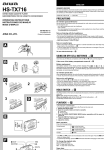
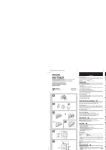
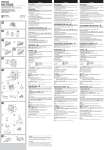
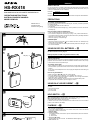
ENGLISH
OWNER’S RECORD
HS-RX418
For your convenience, record the model number and serial number (you will find it in the
cassette holder of your set) in the space provided below. Please refer to them when you
contact your AIWA dealer in case of difficulty.
STEREO RADIO CASSETTE PLAYER
RADIORREPRODUCTOR DE CASSETTE ESTEREOFONICO
Model No.
HS-RX418
Serial No.
OPERATING INSTRUCTIONS
INSTRUCCIONES DE MANEJO
MODE D’EMPLOI
Highlighted letters and numbers in the text of this manual correspond to the illustrations.
PRECAUTIONS
To maintain good performance
8B-HR7-901-01
010301AYO-OX
Printed in Hong Kong
Do not use the unit in places which are extremely hot, cold, dusty or humid. In particular,
do not keep the unit:
• in a high humidity area such as a bathroom
• near a heater
• in an area exposed to direct sunlight (e.g., inside a parked car, where it can become
extremely hot)
Note on listening with the headphones
• Listen at moderate volumes to avoid hearing damage.
• Do not wear the headphones while driving or cycling. It may create a traffic hazard.
• You should use extreme caution or temporarily discontinue use in potentially hazardous
situations, such as walking, jogging, etc.
• Wear them properly; L is left, R is right.
A
Cassette tapes
• Take up any slack in the tape with a pencil or similar tool before use. Slack tape may
break or jam in the mechanism. → A
• 100-minute or longer tapes are extremely thin and easily deformed or damaged. They
are not recommended.
USING ON DRY CELL BATTERIES → B
B
1
Open the battery compartment and insert two size AA (R6) dry cell batteries with
the 0 and 9 marks correctly aligned.
2
R6 (AA) × 2
Battery life (EIAJ 0.2 mW using alkaline batteries LR6)
Playback
Approx. 30 hours
Battery replacement
Replace the batteries with new ones when the OPE/BATT indicator becomes dim during
playback. If the unit remains in use after the OPE/BATT indicator becomes dim, “beep”
is heard several times and operation stops.
To maintain preset data
• When replacing the batteries, the unit will retain the preset station frequencies for
about 5 minutes. To prevent the erasure of the memories, replace the batteries within 5
minutes.
• If non remote control headphones are used, unplug the headphones before taking out
the batteries.
3
Note on dry cell batteries
• Make sure that the 0 and 9 marks are correctly aligned.
• Do not mix different types of batteries, or an old battery with a new one.
• To prevent the risk of electrolyte leakage or explosions, never recharge the batteries,
apply heat to them, or take them apart.
• When not using the batteries, remove them to prevent needless battery wear.
• If liquid leaks from the batteries, wipe thoroughly to remove.
USING ON AC HOUSE CURRENT → C
Contact your nearest Aiwa service personnel and purchase an AC adaptor Aiwa
AC-D302.
Connect the AC adaptor.
1 to DC 3 V jack
2 to a wall outlet
C
HOLD SWITCH → D
AC-D302
DC 3 V
When operating with the main unit, release HOLD on the main unit. → a
When operating with the remote control, release HOLD on the remote control. → b
When not using the unit, set both HOLD to the hold position. → c
Accidentally pressed buttons will not function.
If buttons on the main unit are pressed when the HOLD switch is set to the HOLD
position, “hold” flashes in the display.
PLAYBACK → E
D
• Use only Type I (normal) tapes.
• Connect the supplied headphones to the remote control, then connect the remote
control to the \ jack on the main unit.
1 Release HOLD.
2 Insert a cassette.
Turn OPEN in direction of the arrow to open the cassette holder, and insert a cassette.
a Front side
b Reverse side
3 Press the d button.
Playback starts from the front side. The OPE/BATT indicator lights up.
Playback starts from the front side. The OPE/BATT indicator lights up.
4 Adjust the volume.
HOLD
Basic operation
Press the following buttons.
To fast forward
To rewind
To stop
To change the playback side
the FF button
the REW button
the s button on the main unit
the s RADIO OFF button on the remote conrol
the d button during playback
• If you press the FF or REW button during playback, playback starts automatically when
the end of the tape is reached.
Note
After you press a button, if “beep” is heard several times and then operation does not
start, check to see that the batteries do not wear out.
Super bass
Press the 5 S-BASS button to emphasize the low frequencies.
display. Press the button again to resume the normal sound.
the display.
E
appears in the
disappears from
To repeat a 5-second phrase
1
4
2
3
FF
REW
5 S-BASS
+5 PHRASE
Press the +5 PHRASE button during playback. The tape is rewound to a point
approximately *5 seconds before the point where the button was pressed and playback
resumes automatically.
* The time may vary according to the playback point of the tape when the button is
pressed.
Tape direction memory
The playback side does not change when the tape stops. The next time jl button is
pressed, playback starts on the same side. However, playback starts from the front side
of the tape after:
• The cassette holder is opened.
• The dry cell batteries are removed.
Caution
Do not force the cassette holder to open if the cassette cannot be taken out.
In this case, close the cassette holder once, press the jl button and after a few seconds
press the s button.
When the tape stops completely, open the cassette holder.
2
3
4
NOTE
FOR USE IN THE U.S.A.
This equipment has been tested and found to comply with the limits for a Class B
digital device, pursuant to Part 15 of the FCC Rules. These limits are designed to
provide reasonable protection against harmful interference in a residential installation.
This equipment generates, uses, and can radiate radio frequency energy and, if not
installed and used in accordance with the instructions, may cause harmful interference
to radio communications. However, there is no guarantee that interference will not
occur in a particular installation. If this equipment does cause harmful interference
to radio or television reception, which can be determined by turning the equipment
off and on, the user is encouraged to try to correct the interference by one or more of
the following measures:
– Reorient or relocate the receiving antenna.
– Increase the separation between the equipment and receiver.
– Connect the equipment into an outlet on circuit different from that to which the
receiver is connected.
– Consult the dealer or an experienced radio/TV technician for help.
CAUTION
Modifications or adjustments to this product, which are not expressly approved by
the manufacturer, may void the user’s right or authority to operate this product.
This device complies with Part 15 of the FCC Rules. Operation is subject to the
following two conditions: (1) This device may not cause harmful interference, and (2)
this device must accept any interference received, including interference that may
cause undesired operation.
ENGLISH
F
TUNING IN TO A STATION → F
1
1 Release the HOLD switch.
2 Press the RADIO ON/OFF/BAND button repeatedly to select AM, FM1 or FM2.
FM 1 and FM 2 have the same frequency range and both can be used to tune in to an
FM station.
is displayed in the display, press the KEY MODE button.
If
disappears.
3 Press the UP or DOWN button to tune in to a station.
3
5 S-BASS
KEY MODE
2
After listening, press the RADIO ON/OFF/BAND button repeatedly to turn off the radio.
When operating with the remote control, press the sRADIO OFF button.
• You can turn off the radio by keeping the RADIO ON/OFF/BAND button on the main
unit pressed for 2 seconds during radio reception.
For quick tuning
2
3
3
UP
TUNING
BA
R A DI
ND
FF
O
O N / O F F/
4
REW DOWN
Keep either the UP or DOWN button pressed, then the frequency in the display changes
rapidly. When the button is released, the frequency changes with a slower speed. If a
appears, however, the frequency does not stop. To stop
station is tuned in to,
tuning, press either UP or DOWN button.
Super bass
Press the 5 S-BASS button to emphasize the low frequencies.
appears in the
disappears from
display. Press the button again to resume the normal sound.
the display.
is displayed, press the KEY MODE button repeatedly until
If
disappears. And then press the 5 S-BASS button.
For better reception → G
FM: The headphone cord functions as the antenna. Keep it extended.
AM: Turn the unit to find the position that gives best reception.
About the FM stereo broadcast
G
The FM broadcast is received in stereo.
However, the sound may be heard in monaural when the FM stereo signal is weak.
FM
AM
PRESETTING STATIONS → H
H
A total of 30 stations can be preset, 10 stations for each AM, FM1 and FM2 band.
1 Release the HOLD switch.
2 Press the RADIO ON/OFF/BAND button to select AM, FM1 or FM2.
is displayed in the display, press the KEY MODE button repeatedly
If
disappears.
until
3 Press the UP or DOWN button to tune in to a station.
appears in the display.
4 Press the KEY MODE button repeatedly until
5 Keep one of the numeric (1 – 5) buttons pressed for 2 seconds to select the
preset number. For preset number 6 and above, press and release the +5 button
first.
Example: To select preset number 8, press and release the +5 button. While “5” is
flashing, press the 3 button for 1 – 2 seconds.
Beep sound is heard and the station is preset.
1
To preset two or more stations, repeat the procedure from step 1.
5
To change the presetting
3
Repeat the procedure from step 1.
2
3
3
2,4
Listening to preset stations → I
2
1
2
3
4
FF
UP
ND
BA
R A DI
TUNING
4
O
O N / O F F/
REW DOWN
Release the HOLD switch.
Press the RADIO ON/OFF/BAND button to select AM, FM1 or FM2.
appears in the display.
Press the KEY MODE button repeatedly until
Press and release the numeric (1 – 5) buttons to select the desired preset number.
For preset number 6 and above, press and release the +5 button first.
Example: To select preset number 8, press and release the +5 button. While “5” is
flashing, press and release the 3 button.
After listening, press the RADIO ON/OFF/BAND button repeatedly to turn off the radio.
When operating with the remote control, press the sRADIO OFF button.
• You can turn off the radio by keeping the RADIO ON/OFF/BAND button on the main
unit pressed for 2 seconds during radio reception.
When operating with the remote control
You can skip the step 3.
Press the PRESET ) or ( button repeatedly in step 4 to select the preset number.
Note
While
is displayed, the S-BASS button functions as only 5 button. To emphasize
disappears,
the low frequencies, press the KEY MODE button repeatedly until
then press the S-BASS button.
4
5
Caution
1
When selecting a preset station, DO NOT HOLD the numeric (1 – 5) buttons for
more than a second. Otherwise, currently-tuned station will be preset to that button
instead.
KEY MODE
2
3
FF
UP
TUNING
4
5
+5
WORLD AREAS → J
S-BASS
Radio broadcasts have different frequency ranges and change in different steps in different
countries.
This unit has three world reception areas: USA (North and South America), JP (Japan)
and EU (other areas).
PHRASE
The reception area is factory-set to USA. Select JP to use in Japan and select EU to use
in Europe and other areas.
REW DOWN
+5
in Euro e and other areas.
PHRASE
Selecting a reception area
1 Release the HOLD switch.
2 Press the RADIO ON/OFF/BAND button to turn on the radio.
3 While pressing the KEY MODE button, press the +5 button within 1 second.
The reception area (USA, JP or EU) flashes for about 10 seconds.
4 Press the UP or DOWN button repeatedly to select the reception area while the
reception area is flashing.
5 Press the KEY MODE button while the reception area is flashing.
I
1
After listening, press the RADIO ON/OFF/BAND button repeatedly to turn off the radio.
If flashing stops during operation
4
Repeat the procedure from step 3.
3
When the reception area is changed
The stations that you preset are erased.
2
MAINTENANCE
To clean the head and the tape path
J
After every 10 hours of use, clean the head and the tape path with a commercially
available head cleaning cassette. For details, refer to the operating instructions of the
head cleaning cassette. After cleaning the head and the tape path, wait until cleaned
parts dry before inserting a cassette.
1
To clean the cabinet
Use a soft cloth lightly moistened with a mild detergent solution.
Do not use strong solvents such as alcohol, benzine or thinner.
4
3
If erroneous operation or display occurs → K
3,5
Press the RESET button on the cassette holder with a thin rod to reset the unit.
If the unit is reset, the stations that you preset are erased.
2
2
SPECIFICATIONS
Frequency range:
Reception area USA
3
ND
+5
BA
R A DI
KEY MODE
O
O N/O F
F/
4
5
3
FF
UP
KEY MODE
TUNING
4
REW DOWN
K
RES
ET
PHRASE
AM 530 – 1,710 kHz (10 kHz steps)
FM1, FM2 87.5 – 108.1 MHz (200 kHz steps)
Reception area JP
AM 531 – 1,629 kHz (9 kHz steps)
FM1, FM2 76 – 108 MHz (100 kHz step in 76 – 90 MHz,
50 kHz step in 90 – 108 MHz)
Reception area EU
AM 531 – 1,602 kHz (9 kHz steps)
FM1, FM2 87.5 – 108 MHz (50 kHz steps)
Maximum output:
5 mW + 5 mW (EIAJ 32 ohms)
Power sources:
DC 3 V using two size AA (R6) dry cell batteries
AC house current using the optional AC adaptor Aiwa
AC-D302
Maximum outside dimensions:
81.9 (W) × 111 (H) × 28.8 (D) mm (excluding projecting
parts and controls)
3 1 /4 × 4 3 /8 × 1 3/16 in.
Weight:
Approx. 130 g (4.6 oz.) excluding batteries
Accessories:
Stereo headphones (1)
Remote control (1)
The specifications and external appearance of this unit are subject to change without
notice.