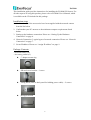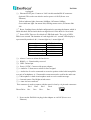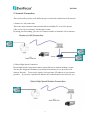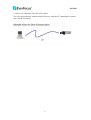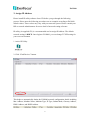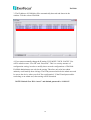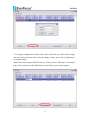
1
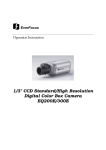
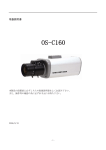
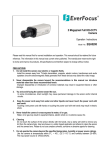
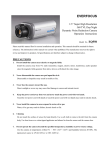
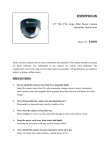
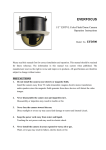
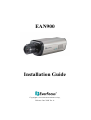
EAN900
Installation Guide
Copyright © EverFocus Electronics Corp,
Release: Jun. 2009 Ver. A
EAN900
This installation guide provides instructions for installing the EAN900 IP Camera. For
all other aspects of using this product, please refer to EAN900 User’s Manual, which
is available on the CD included in this package.
Installation steps
1. Confirm that all of the accessories have been supplied with the network camera
from the list below.
2. Confirm that your PC answers to the minimum computer requirements listed
below.
3. Setting up the hardware connection. Please see “Setting Up the Hardware
Connection” on page 4.
4. Network Connection. 3 typical types of network connection. Please see “Network
Connection” on page 7.
5. Set an IP address. Please see “Assign IP address” on page 9.
Package Contents
- Network camera (x1)
- Accessory packet (x1)
z C adaptor mount ring
z
SD card cover bracket + 1 screw
z
Fixing block (fixes to back panel for holding power cable) + 2 screws
z
Hexagon wrench
2
EAN900
- Power adaptor (x1)
- Printed Installation Guide (x1)
- Software APs including user’s manual CD (x1)
Minimum Computer Requirements
-CPU: PC Pentium IV (2.0 GHz or higher) / AMD Athlon (or higher)
-VGA card: 32 MB min. 16.7 million colours, with DirectX9.0c support
-Memory: 512 MB RAM min., 1 GB HD space or above
Additional HD space depends on required local storage of video files,
100 Mbps network card
-Screen Resolution: 1024 x 768 pixels or higher, 32-bit pixel color resolution
-Operating system: Windows XP, service pack 3 or higher
-Software: DirectX9,0c, Internet Explorer 6.0 or higher
Note: Please connect to Microsoft’s Web Site for downloading.
For example: (This web site may change without notices.)
http://www.microsoft.com/downloads
3
EAN900
1. Setting Up the Hardware Connection
1. Mount a lens to the camera. (Megapixel lens recommended for high image
quality.)
2. Connect the EAN900 Network Camera to a PC with a Cat.5 cable.
○,1
○,2
Feh
Feh
Feh
○,9
○,4
○,5
○,6 ○,7○,8
Feh
Feh
13
○
○,1 SD card: Slot to insert SD card.
○,2 Video output: Loop through connection to the video signal from the Video In
connector. Terminated with a coaxial/BNC connector.
Note: 1. To see the image of video output, user must press Reset button for
about 35 seconds until the image is showed.
2. When switching to network video output, the camera power must be
4
EAN900
re-plugged.
○,3 Ethernet RJ-45 port: Connect to LAN via this standard RJ-45 connector.
Optional: This socket can also be used to power via PoE (Power over
Ethernet)
Yellow indicator light: On means 100Mbps, Off means 10Mbps.
Green indicator light: On means link, flicking means active, Off means link
fail.
○,4 Reset: Loading factory default configuration by pressing the button, which is
inside this hole. Please insert the keen-edged device to the hole for 10 seconds.
○,5 Power LED: There are five kinds of LED flash mode. The cycle of LED
flash is one second. The duration of each single bit is 0.1 second. LED display is
represented by number 0 & 1; 0 means light on, 1 means light off.
System Status
Power ON
Power OFF
SD card formatting
SD card is inserted
Firmware updating
LED Flash mode
1111111111
0000000000
1101100000
0111111111
0101010101
○,6 Alarm: Connect to Alarm In/Out device.
○,7 RS485 (+-): Functionality reserved.
○,8 GND: Ground pin.
○,9 Power 12VDC: Connect with power adaptor.
○,10 Audio In: 3.5mm stereo socket for line-in signal.
○,11 Audio Out: It can be connected to an active speaker with a built-in amplifier
or a pair of headphones. A 3.5mm audio connector must be used for the audio out.
○,12 Microphone: A built-in microphone used to receive audio message.
○,13 Internal sensor: Day/Night switch sensor.
○,14 Auto iris lens connector
This connector is used to connect with the auto iris lens by a 4 pin male connector
Pin 1
Pin 2
Pin 3
Pin 4
3
4
1
2
Direct Drive CntCnt+
Drv+
Drv-
3. Power on the EAN900 via plug in the Adapter or via PoE (Power over
Ethernet).
5
EAN900
1.1 Terminal Connector Schematic Diagram
Terminal connector schematic diagram
6
EAN900
2. Network Connection
This section tells you how to do different types of network connections to IP cameras.
a. Router or LAN connection
This is the most common connection that allows multiples PC to see IP cameras/
video servers in pre-existing LAN through a router.
By doing port forwarding, you can view camera outside of internal LAN on internet.
b. Direct High Speed Connection
Direct High Speed Connection connect camera directly to modem without a router.
You need to assign the IP address you obtain from internet service provider to IP
camera/ Encoder. To access the camera, just type http:// IP address of your internet
provider. If you have a dynamic IP address, this connection does not work for you.
7
EAN900
c. One to one connection from PC to IP camera
You can connect directly without switch. However, only the PC connecting to camera
can view the IP camera.
8
EAN900
3. Assign IP Address
Please install IP utility software from CD before you go through the following
process. Please note the following procedures are an example according to EAN900
default values. These values may vary with your network system. Please consult your
ISP or network administrators for more detail of network setting reference.
IP utility (in supplied CD) is a recommended tool to assign IP address. The default
network setting is DHCP. Once login to EAN900, you can change TCP/IP setting for
your own environment.
1. Active IP Utility.
2. Click “Find Devices” button.
This helps to automatically obtain the EAN900 network configuration details including
Mac Address, Machine Name, Machine Type, IP Type, Subnet Mask, Gateway Address,
DNS1 Address, and DNS2 Address.
9
EAN900
3. The IP address of EAN900 will be automatically detected and shown in the
window. Tick the selected EAN900.
4. If you want to manually change the IP setting, YOU MUST CLICK “LOGIN”. You
will be asked to enter “User ID” and “Password”. This is a security measure of
configuration setting, in order to modify those network configurations of EAN900.
EAN900 administrator can only do the setting. Therefore only who has admin
authority could modify these settings. The ID & password must be the admin user and
be sent to the device when you click "Set configuration". If the ID and password do
not belong to an admin user, then setting will be discarded.
NOTE: Default User ID is “user1” and default password is “11111111”.
10
EAN900
5. To change configurations, double click on the value that you wish to make change
and enter the desired new value. After the change is done, press “Set Configuration”
to confirm setting.
Note: Most router support DHCP. However, when you have difficulty of selecting IP
type, please consult your IP administrator for the IP type your router support.
11
EAN900
6. Click “Connect to selected IP” and the browser will automatically connect to the
EAN900 network page.
7. You will be asked to enter User ID and Password first.
Note: Default user name is “user1” and default password is “11111111”.
8. Now, you will be lead to the live view page of EAN900.
9. Exit: Close IP Utility window to finish your setting.
12
EAN900
EverFocus Electronics Corp.
Head Office:
12F, No.79 Sec. 1 Shin-Tai Wu Road,
Hsi-Chi, Taipei, Taiwan
TEL: 886-2-26982334
FAX: 886-2-26982380
www.everfocus.com.tw
China Office:
Room B-05D-1, KESHI PLAZA, Shangdi
Information Industry Base,Haidian
District, Beijing China
100085
TEL: +86-10-62973336/37/38/39
FAX: +86-10-62971423
www.everfocus.com.cn
USA Office:
1801 Highland Ave. Unit A
Duarte, CA 91010, U.S.A.
TEL: +1-626-844-8888
FAX: +1-626-844-8838
www.everfocus.com
Europe Office:
Albert-Einstein-Strasse 1
D-46446 Emmerich, Germany
TEL: 49-2822-9394-0
FAX: 49-2822-939495
www.everfocus.de
USA N.Y. Office:
415 Oser Avenue Unit S
Hauppauge, NY 11788
Tel: 631-436-5070
FAX: 631-436-5027
www.everfocus.com
Your EverFocus product is designed
and manufactured with high quality
materials and components which can
be recycled and reused.
This symbol means that electrical and
electronic equipment, at their
end-of-life, should be disposed of
separately from your household waste.
Please, dispose of this equipment at
your local community waste
collection/recycling centre.
In the European Union there are
separate collection systems for used
electrical and electronic product.
Please, help us to conserve the
environment we live in!
Japan Office:
1809 WBG Maribu East 18F,
2-6 Nakase.Mihama-ku.
Chiba city 261-7118, Japan
TEL: 81-43-212-8188
FAX: 81-43-297-0081
www.everfocus.co.jp
Ihr EverFocus Produkt wurde entwickelt
und hergestellt mit qualitativ
hochwertigen Materialien und
Komponenten, die recycelt und wieder
verwendet werden können.
Dieses Symbol bedeutet, dass
elektrische und elektronische Geräte am
Ende ihrer Nutzungsdauer vom
Hausmüll getrennt entsorgt werden
sollen.
Bitte entsorgen Sie dieses Gerät bei
Ihrer örtlichen kommunalen
Sammelstelle oder im Recycling Centre.
Helfen Sie uns bitte, die Umwelt zu
erhalten, in der wir leben!
®
EverFocus
P/N: MEANG00500
13