1
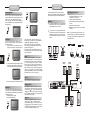
JHT140
DVD Home Theater System
Audiovox Electronics Corporation
150 Marcus Boulevard, Hauppauge, NY 11788
www.Jensen.com
© 2004 Audiovox
Printed in China
Built-in Dolby Digital decoding for maximum home entertainment enjoyment
Unique laser-head over-current protection system doubles service life
Special DVD deck features fully dustproof and anti shock design as well as augmented error
correction and better stability
Fully functional DVD operating system offers many favorite functions and user-friendly
operation
Integrated DVD and built-in 6-channel amplifier
WARRANTY
90 DAY LIMITED WARRANTY
AUDIOVOX ELECTRONICS CORPORATION (the Company) warrants to the original retail purchaser of this product that should this product or any
part thereof, under normal use and conditions, be proven defective in material or workmanship within 90 days from the date of original purchase, such
defect(s) will be repaired or replaced with new or reconditioned product (at the Company’s option) without charge for parts and repair labor.
To obtain repair or replacement within the terms of this Warranty, the product is to be delivered with proof of warranty coverage (e.g. dated bill of sale),
specification of defect(s), transportation prepaid, to an approved warranty station. For the location of the nearest warranty station to you, call toll-free
to our control office:
1-800-252-6123
This Warranty does not extend to the elimination of externally generated static or noise, to correction of antenna problems, to cost incurred for
installation, removal, or reinstallation of the product, or damage to tapes, compact discs, speakers, accessories or electrical systems.
This Warranty does not apply to any product or part thereof which, in the opinion of the Company, has suffered or been damaged through alteration,
improper installation, mishanding, misuse, neglect, accident or by removal or defacement of the factory serial number/bar code label(s). THE EXTENT
OF THE COMPANY’S LIABILITY UNDER THIS WARRANTY IS LIMITED TO THE REPAIR OR REPLACEMENT PROVIDED ABOVE AND, IN NO
EVENT, SHALL THE COMPANY’S LIABILITY EXCEED THE PURCHASE PRICE PAID BY PURCHASER FOR THE PRODUCT.
The Warranty is in lieu of all other express warranties or liabilities. ANY IMPLIED WARRANTIES, INCLUDING ANY IMPLIED WARRANTY OF
MERCHANTABILITY, SHALL BE LIMITED TO THE DURATION OF THIS WRITTEN WARRANTY. ANY ACTION FOR BREACH OF ANY WARRANTY
HEREUNDER INCLUDING ANY IMPLIED WARRANTY OF MERCHANTABILITY MUST BE BROUGHT WITHIN A PERIOD OF 30 DAYS FROM
DATE OF ORIGINAL PURCHASE. IN NO CASE SHALL THE COMPANY BE LIABLE FOR ANY CONSEQUENTIAL OR INCIDENTAL DAMAGES
FOR BREACH OF THIS OR ANY OTHER WARRANTY, EXPRESS OR IMPLIED, WHATSOEVER. No person or representative is authorized to
assume for the Company any liability other than expressed herein in connection with the sale of this product.
Some states do not allow limitations on how long an implied warranty lasts or the exclusion or limitation of incidental or consequential damage so the
above limitations or exclusions may not apply to you. This warranty give you specific legal rights and you may also have other rights which vary from
state to state.
28
U.S.A.: AUDIOVOX ELECTRONIC CORPORATION, HAUPPAUGE, NEW YORK 11788
CANADA: AUDIOVOX CANADA LTD., MISSISSAUGA, ONTARIO
AUSTRALIA: AUDIOVOX PACIFIC PTY LTD., DOYLE AVENUE, UNANDERRA, NEW 2526 • (042) 718-555
NEW ZEALAND: AUDIOVOX PACIFIC PTY LTD., UNIT B, 6 HEADERSON PLACE, PENROSE, AUCKLAND, AUCKLAND • (09) 645-720
PRECAUTIONS
A lightning bolt with an arrowhead symbol within
an equilateral triangle is intended to alert the
user to the presence of uninsulated "dangerous
voltage" within the product's enclosure that may
be of sufficient magnitude to constitute a risk of
electric shock to persons.
The exclamation point within an equilateral
triangle is intended to alert the user to the
presence of important operating and maintenance (servicing) instructions in the literature
accompanying the appliance.
WARNING: TO AVOID THE DANGER OF FIRE
OR ELECTRIC SHOCK, DO NOT EXPOSE THIS
APPLIANCE TO RAIN OR MOISTURE. NEVER
OPEN THE CABINET, AS DANGEROUS HIGH
VOLTAGES ARE CONTAINED INSIDE. ONLY
A QUALIFIED SERVICE TECHNICIAN SHOULD
ATTEMPT TO OPEN THE CABINET.
PROTECT YOURSELF!
Record the model and serial numbers for this
unit while it is easy to see them. These numbers
are located on the back of the unit's cabinet.
Retain this information for future reference.
Model Number
JHT140
Serial No. _________________________
Retain this information for future reference.
WARNING
RISK OF ELECTRICSHOCK
DO NOT OPEN
CAUTION
RISK OF ELECTRIC SHOCK DO NOT OPEN
CAUTION: TO REDUCE THE RISK OF
ELECTRIC SHOCK, DO NOT REMOVE COVER
(OR BACK). THERE IS NO USER SERVICE
ABLE PART INSIDE. REFER SERVICING TO
QUALIFIED SERVICE PERSONNEL.
CAUTION: TO PREVENT ELECTRIC SHOCK,
MATCH WIDE BLADE OF PLUG TO WIDE
SLOT, AND FULLY INSERT INTO ELECTRICAL
SOCKET.
CAUTION: This DVD receiver unit employs
a laser system. To prevent direct exposure to
the laser beam, do not open the enclosure.
Visible laser radiation is present when enclosure is open. DO NOT STARE INTO BEAM.
Additionally, the use of controls or adjustments
or performance of procedures other than those
specified herein may result in hazardous radiation exposure.
To ensure proper use of this product, please
read this owner's manual carefully and retain
for future reference. Should the unit require
maintenance, contact an authorized service
centre.
1
IMPORTANT-SAFETY INFORMATION
2
CAUTION: Is it important that you read and follow all
of the instructions in this booklet and any marked on
the unit itself. Retain this booklet for future reference.
Accessories--- Never place this product on an unstable platform, stand, cart, wall mount, shelf, or
table. The product may fall, causing serious personal
injury to persons and pets, as well as seriously
damaging the product. Use only with a stable platform,
stand, cart, wall mount, shelf, or table that has been
recommended by or sold with the product . Any
mounting of the product should follow the
manufacturer's instructions and use a mounting
accessory recommended by the manufacturer.
This unit, while positioned on some carts, must
be moved with care. Quick stops, excessive force,
and uneven surfaces may cause the product and
cart combination to overturn.
Attachments---Use only approved attachments, as
others may cause hazards.
Cleaning--- Always unplug this unit from the wall
electrical outlet before cleaning. Do not use liquid or
aerosol cleaners; use a damp cloth for cleaning.
Lightning--- For added product protection during
a lightning storm or when it is left unattended and
unused for long periods of time, unplug it from the
wall outlet and/or disconnect the antenna or cable
system. This will prevent damage to the product due
to lightning and power-line surges.
Object and Liquid Entry--- Never push objects of
any kind into this product through openings as they
may touch dangerous voltage points or short-out
parts that could cause a fire or electric shock.
Never spill liquid of any kind on or into the product.
Outdoor Antenna Grounding--- If an outside
antenna or cable system is connected to the product,
be sure the antenna or cable system is grounded so
as to provide protection against voltage surges and
built-up static charges.
Overloading---Do not overload wall outlets, extension cords, or integral convenience receptacles, as
this may result in a fire or electric shock.
Power - Cord Protection - Power supply cords
should be routed so that they are not likely to be
walked on or pinched by items placed upon or against
them, paying particular attention to cords at plugs,
convenience receptacles, and the point where they
exit from the product.
TECHNICAL
SPECIFICATIONS
Power Lines---An outside antenna system should
not be located in the vicinity of overhead power lines
or other electric light or power circuits, or where it
can fall into such power lines or circuits. When
installing an outside antenna system, extreme care
should be taken to keep from touching such power
lines or circuits as contact with them might be fatal.
Power Sources---This product should be operated
only from the type of power source indicated on the
marking label. If you are not sure of the type of power
supply to your home, consult your product dealer or
local power company. For products intended to
operate from battery power or other sources, refer to
the operating instructions. This DVD home theater
operates on AC 120V~60Hz. Do not turn off unit
immediately after turning on; wait at least 10 seconds.
Replacement Parts--- If replacement parts are
required, be sure the service technician has used
approved replacement parts or have the same
characteristics as the original part. Unauthorized
substitutions may result in fire, electric shock, or
other hazards.
Safety Check---Upon completion of any service
or repairs to this product, ask the service technician
to perform safety checks to determine that the
product is in proper operating condition.
Servicing--- Do not attempt to service this product
yourself as opening or removing covers may expose
you to dangerous voltage or other hazards. Refer all
servicing to qualified service personnel.
TV System---This unit is compatible with television
sets featuring either the NTSC or PAL color system.
Ventilation---Slots and openings in the cabinet
are provided for ventilation and to ensure reliable
operation and protection from overheating. These
openings should never be blocked by placing the
product on a bed, sofa, rug, or other similar surface.
This product should not be placed in a built-in installation such as a bookcase or rack unless proper
ventilation is provided. Never place this product near
a heat source, such as heat registers, stoves,
radiators, or any other product that produces heat.
Water and Moisture---Do not use this product near
sources of water and moisture, such as bath tub, wash
bowl, kitchen sink, or wash machine; in a wet, damp
basement; or near a swimming pool or similar
locations. If moisture condensation occurs, remove
any disc, connect the unit's power cord to a wall outlet,
turn the unit on, and leave it on for two to three hours.
By then, the unit will have warmed up and evaporated
any moisture
DVD Player
TV System
Compatible Discs
Resolution Ratio
Video S/N Ratio
Frequency Response
Audio S/N Ratio
Degree of Distortion
D/A Converter
Video Out
S-Video Out
Audio Out
Digital Audio Output
Connections
FM Tuner
Tuning Range
S/N Ratio
Monophonic
Stereo
Selectance
THD
Monophonic
Stereo
Frequency Response
Stereo Resolution
AM Tuner
Tuning Range
S/N Ratio
THD
NTSC/PAL
DVD, CD, MP3,
VCD, CD-R, CD-RW
Greater Than 500 lines
65dB
fs (96KHz/24bit)
4Hz - 44KHz:+/-2dB
95dB
<0.01%
192KHz/24bit
1Vp-p
Y: 1Vp-p(75 )
C: 0.3Vp-p(75 );
+0
2.0V
-1
5.1 Channel,
Optical,Coaxial
YUV,CVBS
S-Video, 2 Channel
Output
Frequency Response:
Main Speakers
Surround Speakers
Center Speaker
Subwoofer
S/N Ratio
Input Sensitivity
Channel Resolution
Remote Control
Transmitter
Signal Range
Power Source
General
Power Supply
Consumed Power
200Hz-20kHz +/- 3dB
200Hz-20kHz +/- 3dB
200Hz-20kHz +/- 3dB
20Hz-200Hz +/- 3dB
> 76dB
350mv, 47k
> 30dB (Normal)
Infrared Ray
Approximately 15'
2 " AAA " Batteries
AC 120V~60Hz
60W
Specifications subject to change without notice.
87.5-108MHz
>46dB
>46dB
>50dB (DIN)
50dB
2%
3%
30Hz-10kHz +/- 1dB
35dB (1kHz)
30dB (100Hz-10kHz)
530-1710KHz
35dB
3%
Amplifier
All speakers tested @ 1kHz single channel driven.
Main Speakers
20W+20W (6 ohms)
Surround Speakers
20W+20W (6 ohms)
Center Speaker
20W (6 ohms)
Subwoofer
40W (8ohms)
27
JPEG FILES
JPEG is the most efficient, widely used compression/
storage format. Even if pictures are compressed 15-20
times, they still have good appearance, are supported
by most software, have small data files and are easy
to use. This machine can read JPEG files from a
picture CD.
Press revelant number key to select picture display.
1. Put in disc correctly, and the machine begins to
search disc information.
2. Press the number key to select picture.
Select to play by menu
1. Put in disc, the machine searches disc information
and the main menu appears. Press the number key
to select picture, and press play to confirm.
2. Press direction key to select picture, then press
the play key.
3. Press direction key to select other pictures.
4. Select the first line file item on the right, then
press the play key to return to the main menu.
26
TROUBLESHOOTING
This handy troubleshooting guide is designed
to provide quick solutions in the event that you
experience technical problems with this DVD
player. If the problem is not listed or if the
provided solution does not correct the problem,
please contact Jensen at the number listed in
the warranty section of this manual.
Problems & Possible Solutions
No power
1. Check to ensure that the power plug is
securely in the wall outlet.
No sound
1. Check the connection between the DVD
player and the TV set, amplifier, or any
other unit it is connected to.
2. Check to ensure the TV and amplifier are
in the correct mode.
No picture
1. Check the connection between the DVD
player and the TV set or any other unit it
is connected to.
2. Check to make sure TV is turned on.
Disc does not play
1. Check to make sure the disc is loaded
correctly (label side u)p on the disc tray.
2. Check that disc is free from dirt, dust,
fingerprints, and smudges.
3. Check to ensure disc is with in the guides
on the tray.
4. Check if the parental lock function is on.
5. Make sure disc is for use in region.
Remote does not work.
1. Check batteries; possibly replace.
2. Check to ensure there isn't any obstacle
between the remote sensor on the unit's
front panel and the remote control.
3. Be sure the remote is aimed at the remote
sensor.
Divided picture
1. Check that the disc is clean and has no
scratches.
2. The unit is controlled by a microcomputer,
which may need to be reset. Turn off the
unit's power, wait several seconds, then
turn it back on.
No color picture
1. Check to see if the S connector is damaged
(bent pin).
MP3 discs don't play
1. Use another software edition to reburn
disc, as the edition used may not be compatible with the player.
"E
2. Use new editions
of software such as Audio
station 4, Easy CD Creator, etc.
3. Make sure MP3 file is not encoded with a
variable bit rate, such as provided by Real
Networks.
TABLE OF CONTENTS
Precautions............................................... 1
System Setup............................................19
Safety Information .................................... .2
Language Setup. .................................................... 19
Table of Contents .......................................3
Video Setup ............................................................21
Audio Setup ........................................................... 22
About Your DVD Player ..............................4
More Audio Setup....................................................23
Best Location..........................................................4
Rating Setup...........................................................24
To Obtain a Clear Picture......................................... 4
MP3 Function.............................................25
Playable Discs........................................................4
Digital Audio Output ................................................4
JPEG Files................................................ 26
Laser-Head Over-Current Protection System ............4
Troubleshooting ........................................ 26
Use of Discs...............................................5
Technical Specifications ............................ 27
Handling.................................................................5
Warranty...............................................................28
Cleaning.................................................................5
Storing...................................................................5
Front and Back Panels . ..............................6
Front Panel.............................................................6
Back Panel.............................................................6
Remote Control..........................................7
Operating the Remote Control.....................8
Connecting Devices...................................9
Speakers..................................................10
Arrangement of Speakers...........................10
Connecting Speakers.................................11
Connecting Antenna...................................12
Connecting Power Supply...........................13
Playing the Radio.......................................14
Basic DVD Operation..................................15
Functions..................................................16
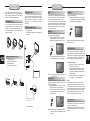
JHT140 – Package Contents
3
ABOUT YOUR
DVD PLAYER
MP3 FUNCTION
The following will help you get the most enjoyment from your DVD receiver system.
BEST LOCATION
The unit should be placed on a firm, flat surface, away from VCRs, stereos, radios, or large
speakers, as the magnetic flux from these devices may cause distortion in the sound and a poor
picture. If placed in a cabinet, be sure there is at least 1" of free space completely around the unit
for proper ventilation.
TO OBTAIN A CLEAR PICTURE
A DVD receiver is a precision device. If the optical pick-up lens and disc drive parts become dirty
or worn down, picture quality will become poor. Store DVD player in a clean, dust free environment.
PLAYABLE DISCS
This DVD receiver system will play the following types of discs: DVD, MP3, CD, VCD, CD-R, and
CD-RW with super-error correction ability. It is also capable of displaying picture CDs and digital
photo albums. It supports eight languages, up to 32 subtitles, and multi-angle viewing. It features
easy setup and operation with on-screen menus. It has full function CPU upgradeable capability.
DIGITAL AUDIO OUTPUT
The unit's coaxial output capability enables you to connect an external six-channel AV amplifier
and processor with built-in Dolby Digital code with just one cord. This enables you to conveniently
enjoy different DVD, CD, and MP3 discs.
MP3 OPERATION
An MP3 disc is an audio compression mode using Level 3 of the international standard MPEG, whereby sound
signal is compressed at a rate of 12:1. An MP3 disc can record music for playing over 600 minutes or recording
over 170 songs, rivaling CDs in sound quality.
To play an MP3 disc:
Files Menu of MP3 Play
When playing an MP3 disc, 2 files menus can be selected by pressing the PROG key: File List and Folder.
1. File List
Select the files to be played by pressing the UP/DOWN arrow key while also pressing the ENTER key, or
use the number keys and the ENTER key to select directly. If the number input is out of the music number,
"CURRENT TRACK NUMBER" will display on screen.
2. Folder
Display the menu first, then press UP/DOWN and LEFT/RIGHT arrows and ENTER key to select the
subdirectory and music.
ANALOG AUDIO OUTPUT
Speaker system plug-and-play convenience through the built-in six-channel power amplifier
eliminates the use of an external power amplifier.
4
LASER-HEAD OVER-CURRENT PROTECTION SYSTEM
To extend the service life of the laser head, the unit includes a unique laser-head over-current
protection system, ensuring a constant laser current.
25
SYSTEM SETUP
USE OF DISCS
Pink Noise Setting
Pink Noise is test tone set to Off and can select test
LEFT, CENTER, RIGHT, RIGHT SURROUND and LEFT
SURROUND channels.
A. From Stop mode, press SETUP.
B. Select More Audio and press ENTER.
C. Select Pink Noise and press ENTER.
D. Select the desired Pink Noise setting and press
ENTER. This function can select test LEFT,
CENTER, RIGHT, RIGHT SURROUND and
LEFT SURROUND channels.
E. Press SETUP to save and exit.
DRC Setting
DRC is Dynamic Range Control.
A. From Stop mode, press SETUP.
B. Select More Audio and press ENTER.
C. Select DRC and press ENTER.
D. Select the desired DRC setting and press ENTER.
Select Off or On state.
E. Press SETUP to save and exit.
24
LPCM 48k DS Setting
A. From Stop mode, press SETUP.
B. Select More Audio and press ENTER.
C. Select LPCM 48k DS and press ENTER.
D. Select the desired LPCM 48k DS setting and press
ENTER.
Select Off is LPCM 48k.
Select On is LPCM 96k.
E. Press SETUP to save and exit.
This page contains valuable information regarding the handling, cleaning, and storage of discs
played in this unit.
Language Video
Audio
Prologic
Subwoofer
Pink Noise
DRC
LPCM 48k DS
On
On
Off
Off
Off
More Aud
Rating
Off
Left
Center
Right
Left Surr
Right Surr
Do not touch the playback side of the disc.
Do not attach paper or tape to discs.
Do not stick or write anything on the surface. Protect against fingerprints.
Always hold a disc by the center and edge portions.
Cleaning
Language Video
Audio
More Aud
Prologic
Subwoofer
Pink Noise
DRC
LPCM 48k DS
On
On
Off
Off
Off
Off
On
Language Video
Audio
More Aud
Prologic
Subwoofer
Pink Noise
DRC
LPCM 48k DS
On
On
Off
Off
Off
Rating
Language
Password
Video
Audio
More Aud
Do not store discs in places subject to direct sunlight or near heat sources.
Do not store discs in places subject to moisture and dust.
Store discs vertically in a case. Stacking or placing objects on discs outside of their cases may
cause warping.
Rating
----
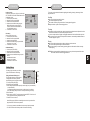
Setting the Password & Rating Level
Rating
8. Adult
The DVD player allows you to block playback
LOAD Factory Reset
of inappropriate content with a passwordprotected rating system (not all discs are rated).
A. From Stop mode, press SETUP.
B. Select Rating and press ENTER.
C. Select Rating and press ENTER repeatedly to set the rating from 1 (most restrictive)
to 8 (least restrictive ).
If a password has already been set, the lock icon will be closed. You will not be
able to select Rating until you SELECT the correct password using the 0-9 keys.
D. Select Password.
E. Use the 0-9 keys to SELECT a 4-digit password and press ENTER. The lock icon will
close to indicate that the rating and password are set.
F. Press SETUP to save and exit.
Not all DVDs are rated. DVDs that are rated higher than the level you select will not
play without SELECTING the correct password.
If you forget your password, select 8888 to clear the memory. Keep this password
out of reach of children as it will always unlock the Parental Control setting.
NOTE: We are not responsible for damage that may occur to any disc that is operated in this unit or
not handled, cleaned or stored as suggested above.
5
Off
On
Rating
Fingerprints and dirt on the disc may cause picture and/or sound deterioration. Wipe the disc from
the center outward with a soft cloth. Always keep the disc clean.
If you can not wipe the dirt off, lightly use a slightly moistened soft cloth and finish with a dry cloth.
Do not use any type of solvent such as paint thinner, benzene, commercially available cleaners or
anti-static spray for vinyl LPs.
Storing
Rating Setup
The Rating Setup menu allows you to block
playback of DVDs based on their ratings.
Handling
1:Kid Safe
2:G
3:PG
4:PG-13
5:PG-R
6:R
7:NC-17
8:Adult
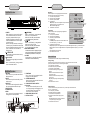
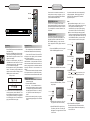
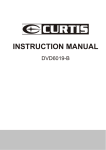
FRONT AND
BACK PANELS
SYSTEM SETUP
MP3 Setting
Front Panel Functions
2
1
3
4
5
6
7
VOLUME
Z300 DVD AMPLIFIER SYSTEM
DVD/CD/CD-R/CD-RW/MP3/HDCD
DOWN
4.
PREV/DOWN
While in the DVD mode, you may press this
button to access the previous track.
While in the tuner mode, press this button to
search downward among radio stations.
5.
NEXT/UP
While in the DVD mode, you may press this
button to access the next track.
While in the tuner mode, press this button to
to search upward among radio stations.
6. INPUT SIGNAL SOURCE
Use this button to select the proper input signal
source.(Note: Selected input will correspond to
the selected input terminal on the rear panel.)
7. VOLUME
Use this button to control the unit's volume. It
controls all six channels simultaneously.
1. POWER
Before plugging the power cord into the AC
outlet, check to make sure all connections
are properly completed. When they are,
carefully the plug power cord into the outlet.
Press the POWER button on the front panel
to power the unit on.
When unit is initially powered on, a brief surge
of electricity may cause interference with other
electronic equipment on the same circuit. If this
occurs, connect the unit to an outlet on a
different circuit.
2.
6
UP
OPEN/CLOSE
Use this button to open and close the disc tray
while in DVD mode.
3.
PLAY /AUTO
Use this button to begin play function while in
DVD mode.
When in the tuner mode, you may press this
button for automatic search.
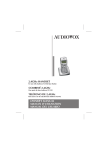
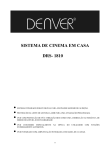
1. ANTENNA
Use to connect the provided indoor FM and
AM loop antennas.
2. AUX IN
Use to connect input for both auxiliary 1 and 2
music sources.
3. AUDIO OUT
Use to connect both the right and left channel
line outputs as well as subwoofer output.
4. VIDEO OUTPUT
5. S-VIDEO OUTPUT
6. REAR
Use to connect the four terminals of the left
and right surround sound speakers.
L
SW
FM
COAXIAL
7. FRONT/MAIN
Use to connect the four terminals of the left
and right front or main speakers.
8. CENTER/SUBWOOFER
Use to connect the four terminals of the center
and subwoofer speakers.
9. COAXIAL DIGITAL AUDIO OUTPUT
10. 120V~60Hz
This unit comes with an AC power cord. Be
sure its prongs are dry before plugging it into
an electrical outlet. Take caution not to
overextend the cord or walk on it.
11. COMPONENT VIDEO OUTPUT
12. OPTICAL OUTPUT
10
1
1
(75 W)
SR
AM ANTENNA
SL
FR
FL
CEN
SW
DVD & AMPLIFIER SYSTEM
L
R
AUX 1
AUX 2
R
2
VIDEO
3
4
Cr
S-VIDEO
OPTICAL
OUTPUT
AUX IN
5
12
Cb
Y
SPEAKERS IMPEDANCE 6W
8W
COMPONENT VIDEO OUT
11
Language
Ac3
MP3/WMA
Others
Video
Audio
Analog Out
5.1 channel
5.1 channel
5.1 channel
More Aud
6
7
8
Rating
Digital Out
PCM
PCM
PCM
PCM
Raw
Off
5.1 channel
2 channel
Off
Others Setting
Language Video Audio More Aud Rating
Follow these steps to set the outgoing analog and digital audio
format of others tracks:
Analog Out
Digital Out
A. From Stop mode, press SETUP.
PCM
PCM
5.1 channel
AC3
B. Select Audio, and press ENTER.
Raw
PCM
5.1 channel
MP3/WMA
C. Select Dolby D, and press ENTER.
Off
PCM
5.1 channel
Others
D. Set Analog out to:
5.1 channel
2 channel
2 Channel (default) to output 2 channel stereo audio from the
Off
stereo audio output; e.g., to a VCR or TV.
E. Set Digital out (from Optical out) to:
PCM (default) to output 2 channel digital audio from the optical/coaxial digital audio outputs; e.g.,to a Minidisc recorder.
Raw to output the raw 2 channel digital bitstream form th optical/coaxial digital audio outputs; e.g., to an external
amplifier.
Off to disable CD others audio output.
F.
Press SETUP to save and exit.
More Audio Setup
23
The More Audio menu includes Prologic and Subwoofer settings.
Prologic Setting
Back Panel Functions
9
Follow these steps to set the outgoing digital audio format of MP3
tracks (Note: The analog format is fixed to 2 channel ):
A.
From Audio mode, press SETUP.
B.
Select Audio mode, press ENTER.
C.
Select MP3, and press ENTER.
D.
Set Digital out to:
PCM (default) to output 2 channel digital from the optical/coaxial
digital audio outputs; e.g.,to a Minidisc recorder.
Off to disable MP3 digital output.
E.
Press SETUP to save and exit.
The DVD player has a built-in Dolby Prologic decoder to provide virtual surround sound for PCM
(stereo) source material from the 5.1 channel analog audio outputs.
A. From Stop mode, press SETUP.
B. Select More Audio, and press ENTER.
Language Video Audio More Aud
C. Select Prologic and press ENTER.
Prologic
On
On
D. Select the desired Prologic setting and press
Subwoofer
On
ENTER:
Off
Pink Noise
Off
Auto stereo audio soundtracks will be output in
DRC
Off
Dolby Prologic mode.
Off
LPCM 48k DS
On all audio soundtracks will be output in Dolby
Prologic mode.
Off (default ) Dolby Prologic decoding will always
be inactive.
E. Press SETUP to save and exit.
Rating
Subwoofer Setting
You must indicate in the menu system whether or not your audio setup includes a Subwoofer
(the 1 in 5.1 sourround sound).
A. From Stop mode, press SETUP.
B. Select More Audio and press ENTER.
Language Video Audio More Aud
C. Select Subwoofer and press ENTER.
D. Select the desired Subwoofer setting and press
Prologic
On
ENTER.
On
On
Subwoofer
Off
Pink Noise
On (default) indicates that you are using a Subwoofer
Off
Off
DRC
for LFE (low frequency effects) signals.
Off
LPCM 48k DS
E. Press SETUP to save and exit.
Rating
REMOTE
CONTROLLER
SYSTEM SETUP
Select [Video Output], and press ENTER or
to display
Language
Video
Audio
More Aud
Rating
the [Video Out] submenu:
A . Press ENTER to confirm
TV Shape
B. Press SETUP to exit the Setup Menu
TV System
Note: The Composite video and
S-video output is always available.
Video Output
MUTE
OPEN/CLOSE
4:3 PS
NTSC
S-video
S-Video
TUNER
DVD
AUX1
AUX2
YUV
[S-Video] -Select if you connected the DVD player
to your TV using the composite Video output.
[YUV] -Select if you connected the DVD player to your TV using the YUV output.
[Y Pb Pr] - Select if you connected the DVD player to your TV using progressive scan.
N/P
Press
SUBTITLE LANGUAGE ANGLE
to change your selection
Audio Setup
The Audio menu allows you to set the analog and digital audio outputs to correspond with the external components you have
connected to the player. For example, if you connected the player to a TV using the Stereo Audio jacks, you should set Dolby
Digital and others settings to 2 channel to enjoy downmixed stereo audio.
You can set the audio format for each of the following sources: Dolby Digital, MP3, CD and Others.
DVD playback must be stopped in order to adjust the Audio setup.
22
AC-3 Setting
Follow these steps to set the analog and digital audio formats of
outgoing Dolby Digital 5.1 soundtracks:
Language Video Audio More Aud Rating
A. From Stop mode, press SETUP.
B. Select Audio and press ENTER.
C. Select Dolby D and press ENTER.
Analog Out
Digital Out
PCM
D. Set Analog out to:
AC3
5.1 channel
PCM
Raw
Off
6 Channel (default) to output Dolby Digital 5.1 channel
MP3/WMA
5.1 channel
PCM
Others
audio from the 5.1 channel analog audio outputs; e.g.,
5.1 channel
PCM
to a 5.1 channel amplifier.
5.1 channel
2 Channel to output downmixed 2 channel stereo from
2 channel
Off
the stereo audio outputs; e.g., to a VCR or TV.
E. Set Digital out to:
PCM (default) to output 2 channel digital from the optical/coaxial digital audio outputs; e.g., to a Minidisc recorder.
RAW to output the raw 5.1 channel digital bitstream form the optical/coaxial digital audio outputs; e.g., to an
external amplifier with a Dolby Digital decoder.
Off to disable Dolby Digital decoder.
F.
Press SETUP to save and exit.
PCM stands for Pulse Code Modulation, and is the standard 2-channel stereo format used for audio CDs.
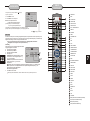
+10
1
OPEN/CLOSE
2
MUTE
3
DVD SELECTOR
4
AM/FM TUNER
5
AUX1 SELECTOR
6
AUX2 SELECTOR
7
N/P TV MODE SELECTOR
8
SUBTITLE
9
LANGUAGE
10
ANGLE
11
12
0-9 NUMBER KEYS
+10
13
TIME
TIME
PROG CH LEVEL
TITLE
DISPLAY
SLOW
VOLUME
MENU
PRE/TUN
FM MODE
14
TITLE
15
PROG PROGRAM
16
CHANNEL SELECTOR
17
VOLUME INCREASE
18
VOLUME DECREASE
ENTER
19
SCREEN DISPLAY
REPEAT
20
SLOW MOTION
ZOOM RESUME
21
MENU
22
FM STEREO / MONO MODE
23
PRESET/TUNING
SETUP
PROLOGIC
STEP
STOP
PAUSE
MEMO
AUTO
PLAY
DOWN
A-B
UP
24
SCROLL UP
25
SCROLL RIGHT
26
SCROLL DOWN
27
SCROLL LEFT
28
ENTER
29
SETUP
30
REPEAT
31
PRO LOGIC
32
STEP
33
ZOOM
34
RESUME PLAY
35
STOP
36
PAUSE
37
PLAY
38
A-B REPEAT
39
DOWN (search down for radio stations/ previous track)
40
UP (search up for radio stations/next track)
41 MEMO (memory/rewind skip)
42
AUTO (automatic search/forward skip)
7
OPERATING THE
REMOTE CONTROL
Battery Installation
1. Push down and out on the battery Compartment cover to remove it.
2. Insert the two " AAA " batteries into the battery
compartment of the remote control, making
sure the + and - signs on the batteries and
inside the battery compartment match up.
3. Replace the battery compartment cover.
8
Notes:
Do not mix batteries from different manufacturers, nor old ones with new.
If the remote control will not be used for an
extended period of time, remove the
batteries to prevent damage-causing
corrosion.
Remove dead batteries immediately to
prevent damage-causing corrosion.
If battery leakage occurs, wipe the battery
liquid from the battery compartment, then
replace both batteries.
Always replace both batteries at the same
time, using new, fully charged batteries.
Life expectancy of batteries may vary
depending on amount of use.
Using the Remote Control
Point the remote control at the remote sensor
on the DVD receiver. When the signal is
received from the remote control, the unit will
function accordingly. The remote will operate to
approximately 16' from the remote sensor at an
angle of around 30 degrees each direction.
SYSTEM SETUP
Notes:
Do not direct the remote sensor toward
any light source, such as direct sunlight or
a strong fluorescent light, as it may cause
the unit to not operate correctly.
When other remote controls are used
nearby or when the remote is used near
equipment using infrared rays, interference
may occur.
Placing an object on the remote control
may cause it to inadvertently depress a
button, changing a function and shortening
battery life.
Do not glaze the front of the DVD receiver
with colored glass, as it may cause
interference with normal operation of the
controller.
Make sure there is no barrier between the
remote control and remote sensor, as it
could prevent the unit from receiving the
signal.
Do not spill water or put wet items on the
remote control.
Never disassemble remote control.
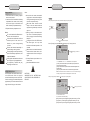
Video Setup
Select [Video] in the Setup Menu, and press ENTER to display the [Video] sub menu :
Language
Press
to
select the menu
item
Video
Audio
More Aud
TV Shape
4:3 PS
TV System
NTSC
Video Output
S-Video
A . Press ENTER or
B. Press
Rating
to set
to return to the Setup Menu
Select [TV shape], and press ENTER or
Language
Video
to display the [TV shape] submenu:
Audio
More Aud
Rating
TV Shape
4:3 PS
4:3 PS
TV System
NTSC
4:3 LB
Video Output
S-Video
16:9
A . Press ENTER to confirm
Press
to change your selection
B. Press SETUP to exit the Setup Menu
[4:3 PS] -Pan and scan refers to pictures where part of pictures is cut
off so it fills the whole screen.
[4:3LB] -Letter Box refers to pictures where black bands appear at the
top and bottom.
[16:9] -The picture fills the screen of a wide-screen (16:9) television.
Note: Not all DVDs offer movies in Full Screen format. If not, the disc will override your
BATTERIES
INCORRECT USE OF BATTERIES MAY
CAUSE THEM TO LEAK, CORRODE OR
EXPLODE.
TV Display setting and the movie will be displayed in Letterbox format.
Select [TV system] and press ENTER or
Language
Video
to display the [TV system] sub menu :
Audio
More Aud
Rating
TV Shape
4:3 PS
TV System
NTSC
NTSC
Video Output
S-Video
PAL
Press
to change your selection
AUTO
A . Press ENTER to confirm
B. Press SETUP to exit the Setup Menu.
[NTSC] -Select if you are using NTSC signal system to match your TV set.
[PAL] -Select if you are using PAL signal system to match your TV set.
[AUTO]- Select if you are using AUTO signal system to match your TV set.
21
CONNECTING
DEVICES
SYSTEM SETUP
Language Setup
Select [Subtitle], and press ENTER or
Language
Video
Audio
to display the [Subtitle] submenu:
More Aud
OSD Menu
English
Subtitle
English
English
Audio
English
DVD Menu
English
German
French
Spanish
Auto
Off
Active
Subwoofer
(optional)
Rating
Press
to change your selection
Cassette Deck
Note: Subtitle languages vary by disc.
Power
A. Press ENTER to confirm
FM
Antenna
VCR
B. Press SETUP to exit the Setup Menu
Select [Audio], and press ENTER or
Language
Video
OSD Menu
Audio
AM
Antenna
to display the [Audio] submenu:
More Aud
Rating
English
L
SW
FM
COAXIAL
(75 W)
SR
AM ANTENNA
SL
FR
FL
CEN
SW
DVD & AMPLIFIER SYSTEM
L
English
Audio
English English
DVD Menu
English German
French
Spanish
R
AUX 1
AUX 2
AUX IN
VIDEO
Cr
S-VIDEO
OPTICAL
OUTPUT
Cb
Y
SPEAKERS IMPEDANCE 6W
8W
COMPONENT VIDEO OUT
to change your selection
Note: Audio languages vary by disc.
9
S-Video
Press
R
Video
20
Subtitle
A. Press ENTER to confirm
B. Press SETUP to exit the Setup Menu
Select [DVD Menu], and press ENTER or
Language
Video
Audio
More Aud
Subtitle
English
Audio
English
DVD Menu
English English
German
French
Spanish
to display the [DVD Menu] submenu:
Component
Video Output
Rating
A. Press ENTER to confirm
B. Press SETUP to exit the Setup Menu
Television
Press
to change your selection
Note: Menu languages vary by disc.
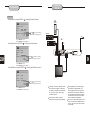
Connection terminals for this DVD receiver
are found on the rear panel. Carefully read
and follow the manufacturers' instructions
for any video or audio device being
connected to this unit.
Do not connect the power until all other
connections have been properly completed.
The red terminal ("R") is for connecting the
right channel. The white terminal ("L") is
ior connecting the left channel. The yellow
terminal is for video connection. Make sure
all connections are securely made. Improper
connections may cause noise, poor performance or damage to the equipment.
Do not tie the AV cord with any other cords,
such as the power cord or speaker wires, as
doing so may result in poor picture and/or
sound quality.
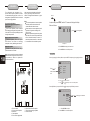
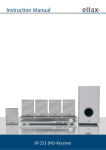
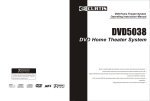
ARRANGEMENT
OF SPEAKERS
SPEAKERS
Ideal surround sound speaker configuration
may vary according to room size and wall
material. The figure below illustrates a typical
arrangement.
The configuration and arrangement of a
surround sound system's speakers is critical.
For maximum listening enjoyment, refer to the
Arrangement of Speakers section in this manual
prior to connecting speakers.
Hints:
Front or main speakers and central speaker
should be placed at the same level and
oriented toward the listener's ears.
3D surround sound or rear speakers should
be placed 3' higher than the height of the
listener's ears.
Subwoofer speaker may be placed anywhere
within the room, as its location produces little
effect on a listener's sensation to sound. To
obtain the optimum bass effect, a subwoofer
r is recommended in home theater systems.
Surround Sound Speakers
Front or main right and left speakers;
center speaker
These three speakers provide extensive
sound imaging and augment the dynamic effect
of the audio. A movie's principal dialogue comes
through these speakers.
Rear or surround sound speakers
These two speakers provide 3-D dynamic
sound effects, and create an enveloping
atmosphere, as they add background sounds.
.
Subwoofer speaker
Provides rich and powerful bass, adding a
powerful dimension of realism.
10
SYSTEM SETUP
SETUP
In stop mode, press SETUP, and the TV screen will display the Setup
Menu as follows:
Language
Audio
More Aud
Rating
Press
A. Press ENTER to display each submenu
B. Press SETUP to exit the Setup Menu
Language Setup
Select [Language] in the Setup Menu, and press ENTER to display the [Language] submenu:
Language
1
4
5
2
Press
to
select the menu
item
Video
Audio
OSD Menu
English
Subtitle
English
Audio
English
DVD Menu
English
A . Press ENTER or
More Aud
Rating
to set
B. Press
to go back one menu
C. Press
OR
Select [OSD Menu], and press ENTER or
8
Language
Video
Audio
English
repeatedly to return to the Setup Menu
to display the [OSD Menu] submenu :
More Aud
Rating
OSD Menu
Subtitle
Press
Audio
DVD Menu
6
1.TV set or screen
2. Front or main left speaker
3. Subwoofer
4. Center speaker
5. Front or main right speaker
to change items
Setup Menu
Note: Audio recorded for the center speaker and
subwoofer will be assigned to the front and 3-D
rear speakers to obtain the optimum 3-D
surround sound effect.
3
Video
7
6. 3-D surround sound left speaker
7. 3-D surround sound right speaker
8. Viewer's location
A . Press ENTER to confirm.
B. Press SETUP to exit the Setup Menu.
to change your selection
19
CONNECTING
SPEAKERS
FUNCTIONS
MENU: MENU/PBC
With the PBC function on, choosing a song on a
CD can only be done from the main menu.
With the PBC function off, song selections can be
made by using the corresponding number
keys. The menu content of the disc will appear
when the MENU button is pressed while a DVD
disc is playing.
REPEAT
REPEAT ALL
REPEAT
REPEAT OFF
MENU
AUDIO
SUBTITLES
PLAY
This well-designed DVD receiver provides
optimum sound quality when the speakers used
are within the range of their rated impedance.
Connecting Speaker Cables
1.Peel off approximately 1/ 2" of cable
insulation (see #1 below).
2.Tighten the wire end (#2 below)
3.Open cable terminal by pressing back on
the tab.
4.Insert wire end into terminal.
5.Release tab; make sure wire is in terminal
securely.
Important
The minimum impedance of the five speaker
terminals is 4 ohms; for the subwoofer, the
minimum impedance is 8 ohms.
If you want to use only one speaker or listen
to monophonic music, do not parallel connect
individual speakers to the left and right
channel terminals. See the figure on the left
below.
A-B Repeat
The A-B repeat function allows you to
re-show sections between two specific points
(A and B) on a disc.
1. Press the A-B button while the disc is
playing to set point A, the beginning spot.
REPEAT A
A-B
18
2. Press the A-B button again while the disc
is playing to set point B, the ending spot.
The section between A and B will replay.
REPEAT AB
3. Press the A-B button a third time to cancel.
Note: To prevent damage to the circuit, care
should be taken to prevent short circuiting from
occurring at the positive and negative poles of
the speaker cord.
The repeat mode changes each time the
REPEAT key is pressed (i.e., from title repeat to
chapter repeat, all repeat , to repeat off.)
When playing a CD or MP3, press the REPEAT
button to get the following display: Repeat Single,
Repeat All and Repeat Off.
When playing a DVD, press REPEAT button to get
the following player mode: Repeat Chapter, Repeat
Title and Repeat Off.
1
2
3
Zoom
A picture may be enlarged up to four times
during either playback or slow motion through
the unit's zoom function. Press the ZOOM key
once and it enlarges the image 2x; press a
second time, and the image enlarges 3x. A
third pressing enlarges the image 4x. A forth,
fifth and sixth pressing enlarges the image 1/2x,
1/3x and 1/4x, respectively . To return to normal
playback, press ZOOM a seventh time. Enlargement
takes place in the center of the picture.
i
4
11
Surround
Speaker
Surround
Speaker
Center
Channel
Speaker
Vol set
When a DVD disc is played, press this key
and the Volume key to adjust channel level.
L
SW
FM
COAXIAL
(75 W)
SR
AM ANTENNA
SL
FR
FL
CEN
SW
DVD & AMPLIFIER SYSTEM
Repeat Play
This DVD receiver allows repeated playback
of specific titles, chapters/tracks, or segments.
It even allows switching between two items that
are being repeated.
1. Select the item to repeat.
2. Press the REPEAT key.
REPEAT
REPEAT SINGLE
Volume and Mute
The volume on this DVD receiver is easily
controlled with the remote control by pressing
either the VOL key to raise the volume or the
VOL key to lower it. By pressing the MUTE
key, no audio will be heard. To rein state the audio,
press the MUTE key again.
Program
Allows you to program specific tracks in a
desired order of play. Press PROG, and the
program menu appears on the screen. Set up
program play using the number keys, then press
the ENTER key to program play. To exit program
mode, press the PROG button again.
5
L
R
AUX 1
AUX 2
AUX IN
R
VIDEO
OUTPUT
Cr
S-VIDEO
OPTICAL
Cb
Y
SPEAKERS IMPEDANCE 6W
8W
COMPONENT VIDEO OUT
Main
Speaker
Main
Speaker
Subwoofer
CONNECTING
ANTENNA
FUNCTIONS
Radio signals may be difficult to receive in
some buildings and under certain conditions.
The provided antennas will help in their reception.
They are intended for indoor use only.
AM Loop Antenna
The placement of the AM loop antenna should
be in a direction that provides the clearest
reception. Keep as far as possible from DVD
receiver, TV set, and speaker and power cords.
If reception remains poor, an outdoor antenna
may be necessary.
FM Indoor Antenna
The FM antenna should be fully extended
and in a direction that provides the clearest
signal. Secure the antenna ends in a location
where distortion is a minimum. If reception
remains poor, an outdoor antenna may be
necessary.
To connect the FM antenna:
1.Open cable terminal by pressing back on tab
2.Insert wire end
3.Release tab; make sure wire is in terminal
securely
N/P
This DVD receiver supports video output of
various systems, including auto, NTSC, and PAL.
The picture will blink and become colorless
when the wrong system is selected. If this
occurs, press the N/P key on the remote control,
then select the correct system (NTSC for North
America, PAL for Europe). For more information
on output format, refer to the TV set's manufacturer's instructions.
Subtitles
The unit has the capability to display subtitles
in any of 32 different languages.
1. Press the SUBTITLE key. The subtitle
menu will appear. Select the desired
language by pressing the SUBTITLE key.
Language
The unit has the capability to show movies in
one of eight languages.
1. Press the LANGUAGE key. The language
menu will appear. Select desired language
by pressing the LANGUAGE key.
LANGUAGE
AUDIO 1/8 AC-3 2CH ENGLISH
Note: The disc being played must be multi-language encoded.
SUBTITLE 02/08 ENGLISH
SUBTITLE
12
To connect the AM loop antenna:
1.Hold down handle
2.Insert wire end into hole
3.Release handle
Position for best reception
2. To remove the subtitles from view, press
the SUBTITLE key until they disappear.
AM
SUBTITLE OFF
FM
1
2
3
Outdoor AM antenna
Coaxial cable(75 ohm)
FM
Note: The disc being played must be multisubtitle encoded.
Camera Angle
The ability to change the camera angle allows the
viewer to play director and watch a movie from
different perspectives.
1. Press the ANGLE key on the remote control.
With each press, the angle changes.
2. The key may be pressed only when the
flashing angle icon appears in the unit's
display panel.
ANGLE
LOCATING A TITLE
DVD discs are normally divided into titles,
which are then sub-divided into chapters. A
specific title can be easily found with this unit.
Specific titles can be found using either the title
menu function, if the DVD disc contains a title
menu, or through its unique title number.
Title Menu Function
1. Press the TITLE key. The title menu will
appear on the TV screen.
2. Press the appropriate scroll key to select
desired title. A title may also be located
by pressing its assigned number with the
number buttons.
3. Press the ENTER key to start playback
from chapter 1 of the selected title.
Note:
Some discs do not respond to this function. If
different instructions appear on the TV screen,
follow those instructions.The Instructions given
here describe the basic procedure. Procedures
may vary depending on the content of the DVD
disc. When playing a VCD2.0 disc, the TITLE
key can be used to return to the menu.
1/4
Coaxial cable (75 ohm)
Outdoor FM antenna
Note: Camera angles may be changed only on
discs with multi-angle capability encoded
into them.
Pro Logic selector
When playing a DVD/VCD disc, first press STOP,
then pressthe Pro Logic key to select Pro Logic
ON or OFF channel output.
When playing CDs and in tuner mode, press the
Pro Logic key to select stereo or 5.1 channel
output.
17
BASIC DVD
OPERATION
AUTO
2X
CONNECTING
POWER SUPPLY
FUNCTIONS
Screen Display
While a disc is playing, the status of various
functions may be checked, such as the tile, track
number, and several time categories.
POWER
1. Press the DISPLAY key once and the title
appears along with the chapter and how much
time has played.
2X
DISPLAY
MEMO
00:04:08
00:40:52
VOLUME
Z300 DVD AMPLIFIER SYSTEM
DVD/CD/CD-R/CD-RW/MP3/HDCD
DOWN
To activate either function, simply press the
key or key on the remote control. The
speed changes each time the key is pressed.
To resume normal playback, when press the
PLAY key.
16
Memory Playback
This unit allows the viewer to stop playback,
then later continue playback from that exact disc
location. Press the STOP key to halt playback.
The unit then will memorize the location where
playback was stopped. To resume watching,
press the RESUME or PLAY key and the unit will
resume playback from the exact location where
playback was stopped. (Exclude Mp3 DISC)
When you play DVD discs, press MENU or
TITLE key return menu and title, the unit then
will memorize the location, To resume watching
press the RESUME key and the unit will resume
playback from the exact location.
UP
2. Press the DISPLAY key again and the
remaining time for that particular title appears
while soundtrack is CD/VCD format.
VCD 2.0
Track 1/15
Before plugging the power cord into the AC outlet, check to make sure all of the connections
have been properly completed. When they have been, carefully plug power cord into outlet.
Press the POWER button on the front panel to power on the unit. The display panel will light up.
3. Press the DISPLAY key again and the total
elapsed time for that particular chapter appears.
while soundtrack is DVD format.
DVD
Title
1/10
Audio
1/3
Subtitle
1/1
17
When the unit is initially powered on, a brief surge of electricity may cause interference with other
electronic equipment on the same circuit. If this occurs, connect the unit to an outlet on a different
circuit.
00:01:32
01:44:34
Chapter 2/4 Angle 1/1
6CH
BASIC OPERATION
RESUME
RESUME
4. Press the DISPLAY key again and the
display turns off.
Slow Motion
This DVD receiver has the ability to play
discs in slow motion in either forward or reverse
direction. Each time the SLOW key is pressed,
the speed will slow from forward slow speed1/ 2,
to 1/ 4, to 1/ 8, to 1/ 16 to reverse slow speed 1/ 2,
to 1/ 4, to 1/ 8, to 1/ 16, to normal speed. To
resume normal playback, press the PLAY key.
SLOW
Selecting Sound Source
1. Press any function button (DVD, AM/FM,
AUX1, AUX2) to select desired sound source.
The appropriate symbol appears in the display.
2. When the AM/FM tuner button is pressed,
the last station listened to will play.
Note: The desired program source will not play
unless it and the selected signal button coincide
with the active program source signal input.
Volume Control
The volume may be adjusted by either turning
the large volume knob on the front panel or
using the appropriate volume button on the
remote control.
Mute
Pressing the MUTE button temporarily mutes
every speaker. To resume audio, press MUTE
again.
13
BASIC DVD
OPERATION
PLAYING THE RADIO
MUTE
OPEN/CLOSE
TUNER
DVD
N/P
AUX1
AUX2
SUBTITLE LANGUAGE ANGLE
+10
DISPLAY
SLOW
VOLUME
MENU
PRE/TUN
FM MODE
ENTER
SETUP
DOWN
Positioning
14
REPEAT
VOLUME
DVD/CD/CD-R/CD-RW/MP3/HDCD
PROLOGIC
STEP
ZOOM RESUME
STOP
PAUSE
PLAY
A-B
MEMO
AUTO
DOWN
UP
UP
Automatic Tuning
1.Press TUNER button to select desired wave
band (AM or FM).
2.Press UP or DOWN button to find a station.
The frequency will change with each press.
When a station's signal is received, it will
appear in the display.
3.To lock on to a station quickly, hold the UP
or DOWN button for two seconds. The unit
will start automatic tuning. When a station
is found, automatic tuning stops.
4.To add a station to memory, press the MEMO
button. The memory storage number will
blink for four seconds in the display. Press
MEMO again to store the station.
Once it has read the disc, the unit automatically
will begin playback. When playing a DVD, the
DVD title or menu will appear. CD tracks are
played in sequence.
To play a DVD video disc:
Turn on the TV, and select the A/V mode. If
the set features an SCART connection, be sure
the SCART mode is selected from the TV menu.
Turn on amplifier, if connected. Select AC-3 or
DVD mode.
Note:
It is possible to damage a disc if it is not
placed correctly on the guides in the disc tray.
This may also cause the DVD player to
malfunction. Do not force or place anything
other than" a 5 DVD or CD onto the disc tray.
Never move the DVD player during playback ,
as this may cause damage to the disc as well as
the player. To open and close the disc tray, only
use the OPEN/CLOSE key found on bot the
remote control and on the unit's front panel.
TIME
PROG CH LEVEL
TITLE
Z300 DVD AMPLIFIER SYSTEM
Once the unit is connected to a television set
and any other accessory equipment, you are
ready to enjoy the excitement of DVD videos or
your favorite CDs and MP3 files.
This unit will store up to 50 individual AM or
50 individual FM radio stations in its memory.
1.Press the AUTO button. The word AUTO
will appear in the display and the automatic
tuning mode is activated.
2.Stations will be stored in ascending order
until 50 stations of that particular wave band
have been saved. When a station is stored, the
memory storage number, as well as the station's
frequency, will flash for four seconds in the
display.
3.When the total number of stations reaches
50, in a particular wave's (AM or FM) memory,
no further station in that wave band will be saved.
To play an audio disc:
Turn on the audio system, and choose the
input source connected to the DVD player. Set
the SPDIF OUTPUT to SPDIF OFF from the
SETUP MENU display if you don't have the
proper equipment for Dolby Digital surround
sound.
1. Press the POWER key on the front panel.
DISC LOADING appears on screen.
LOADING
PLAY
PLAY
REMOTE CONTROL
FRONT PANEL
Press PAUSE key:
PAUSE
PAUSE
REMOTE CONTROL
FRONT PANEL
If there is no disc, NO DISC shown on screen:
No Disc
5. PREV/NEXT playback
Press
or
to play the previous or next
track. To resume normal playback, press PLAY.
Memory number
Wave band
Station frequency
5. To reduce noise when an FM-stereo program
has been received, press the FM button. The
word STEREO will disappear from the display.
The program is now heard in monographic
form, reducing the noise. To resume stereo
play, press the FM button again.
To Play Preset Stations
1.Press the TUNER button to select the
desired wave band.
2.Press the PRE/TUN button.
3.Press any of the numbere buttons to
select the desired station's memory number.
For example, to play the station at memory
#5, simply press the 5 button; for memory
#17, press the 1 button followed by the 7
button.
4.Stations in the memory function may also
be accessed by pressing the UP or DOWN
button.
Press PREV key:
DOWN
2. Press the OPEN/CLOSE key. The disc
tray will open.
OPEN
PREV
REMOTE CONTROL
Press NEXT key:
FRONT PANEL
NEXT
OPEN/CLOSE
REMOTE CONTROL
3. Place the disc on the disc tray. Be sure
the play side is face down on the tray.
4. Press OPEN/CLOSE to close the tray.
The disc tray will close. The disc type
will appear in the upper eft-hand corner
of the screen.
UP
REMOTE CONTROL
6.Fast Forward/Reverse Playback
The unit features both fast forward and fast
reverse playback. Either mode will speed up
2x,4x,8x,16x,32x.
15