1
READ ALL
INSTRUCTIONS
AND SAFETY
INFORMATION
Installation Instructions
Part One
PLACEMENT: UL approved for vertical installation only.
CONTROL OF HEATER: ON-OFF control built into product.
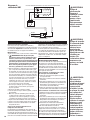
IMPORTANT!
It is extremely
important you
verify the
electrical supply
wires are the
same voltage as
the heater (i.e. 120
volt heater to 120
volt power supply
and 240 volt heater
to 240 volt power
supply). If
replacing an
existing heater,
check the labels
of the old heater
and replace using
the same voltage.
Hooking a 240 volt
heater to a 120 volt
power supply will
drastically reduce
the heater's
output. Hooking a
120 volt heater to a
240 volt power
supply will
destroy the heater.
Connecting your
heater to an
incompatible
power supply will
void the warranty.
How do I install for new construction?
STEP 1
How do I install in an existing wall?
STEP 1
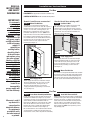
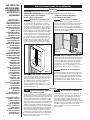
Mount The Wall Can
The wall can is designed to fit between two
standard 16 inches on-center studs. UL requires a
minimum clearance of 6 inches adjacent vertical
surfaces such as walls, shelving, drapes, etc.
Manufacturer recommends 12 inches from finished floor and adjacent surfaces. (Note: Front
edge of wall can must be flush with finished wall.
If installing on unfinished wall; face of wall can
must extend from face of stud to allow for thickness
of sheetrock.) Secure the wall can to the studs
with two screws or nails, right or left hand
mounting (See Figure 1).
Cut Hole In Wall
Cut a hole 10¼ inches wide by 16¾ inches high
next to wall stud. UL requires a minimum
clearance of 6 inches adjacent vertical surfaces,
such as walls, shelving, drapes, etc. Manufacturer
recommends 12 inches from finished floor and
adjacent surfaces (See Figure 2).
WALL CAN
SCREW
Figure 2
STEP 2
GROUND
WIRE
GROUND
SCREW
SCREW
SUPPLY
STEP 3
Mount The Wall Can
The wall can is designed to fit between two standard
16 inches on-center studs. Note: Front edge of wall
can must be flush with finished wall (See Figure 2).
Secure the wall can to the studs with two screws
or nails, right or left hand mounting (See Figure 1).
Figure 1
STEP 2
Route Supply Wires
Route supply wire from circuit breaker through
opening in bottom of wall can and secure with
strain relief connector, leaving 6 inches to 10
inches wire lead for later use. Connect supply
ground wire to grounding screw in wall can
(See Figure 1).
Route Supply Wires
Route supply wire from circuit breaker through
opening in bottom of wall can and secure with
strain relief connector, leaving 6 inches to
10 inches wire lead for later use. Connect
supply ground wire to grounding screw in wall
can (See Figure 1).
Part Two
STEP 1
2
Warranty is void if
any material is
sprayed on the
element or blower.
Use paintmask
provided if walls
are to be textured
or painted.
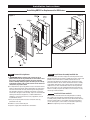
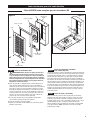
Insert Heater Assembly Into Wall Can
Install spring clips on wall can edge, two at the top
and two at the bottom (See Figure 3). Lay heater
assembly on its front surface and position so rocker
switch will be installed at bottom of wall can
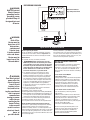
(See Figure 4). Make the connection of the supply
wires to the lead wires from the rocker switch.
Position the heater assembly to fit adapter plate
to the surface of the wall can (See Figure 3).
Be sure all lead wires are inside the wall can before
securing heater assembly. (Use the four #10 32 x ½
inch machine screws; two at top and two at bottom.)
STEP 2
Install Grill Frame and Grill
Remove protective film from frame and grill before
installing. Place grill frame outside top and bottom
flanges of the heater assembly. Place grill over
frame and secure with the four finishing washers
and four #10 x 1½ inch Phillips oval head sheet
metal screws (See Figure 3). Start all four screws
before tightening (Note: Over tightening screws
may damage grill).